By the end of this post, I promise you will have the following questions answered about ConvertBox & FunnelKit Automations:
Here are some answers you’ll get from today’s article:
- Can you connect ConvertBox with FunnelKit Automations? (yes you can)
- How do you integrate the two systems? (it’s very easy)
- How deep is the FunnelKit Automations / ConvertBox integration? (I’ll share some powerful ways to use the two together)
With everything WordPress, there is more than one way to do each thing, so after some testing myself, I will share with you what I think is the best way you can set up ConvertBox with FunnelKit Automations for your website.
There were a few things I set up myself and then realized I could have been set up in a much better way, so I will give you the details to save you time.
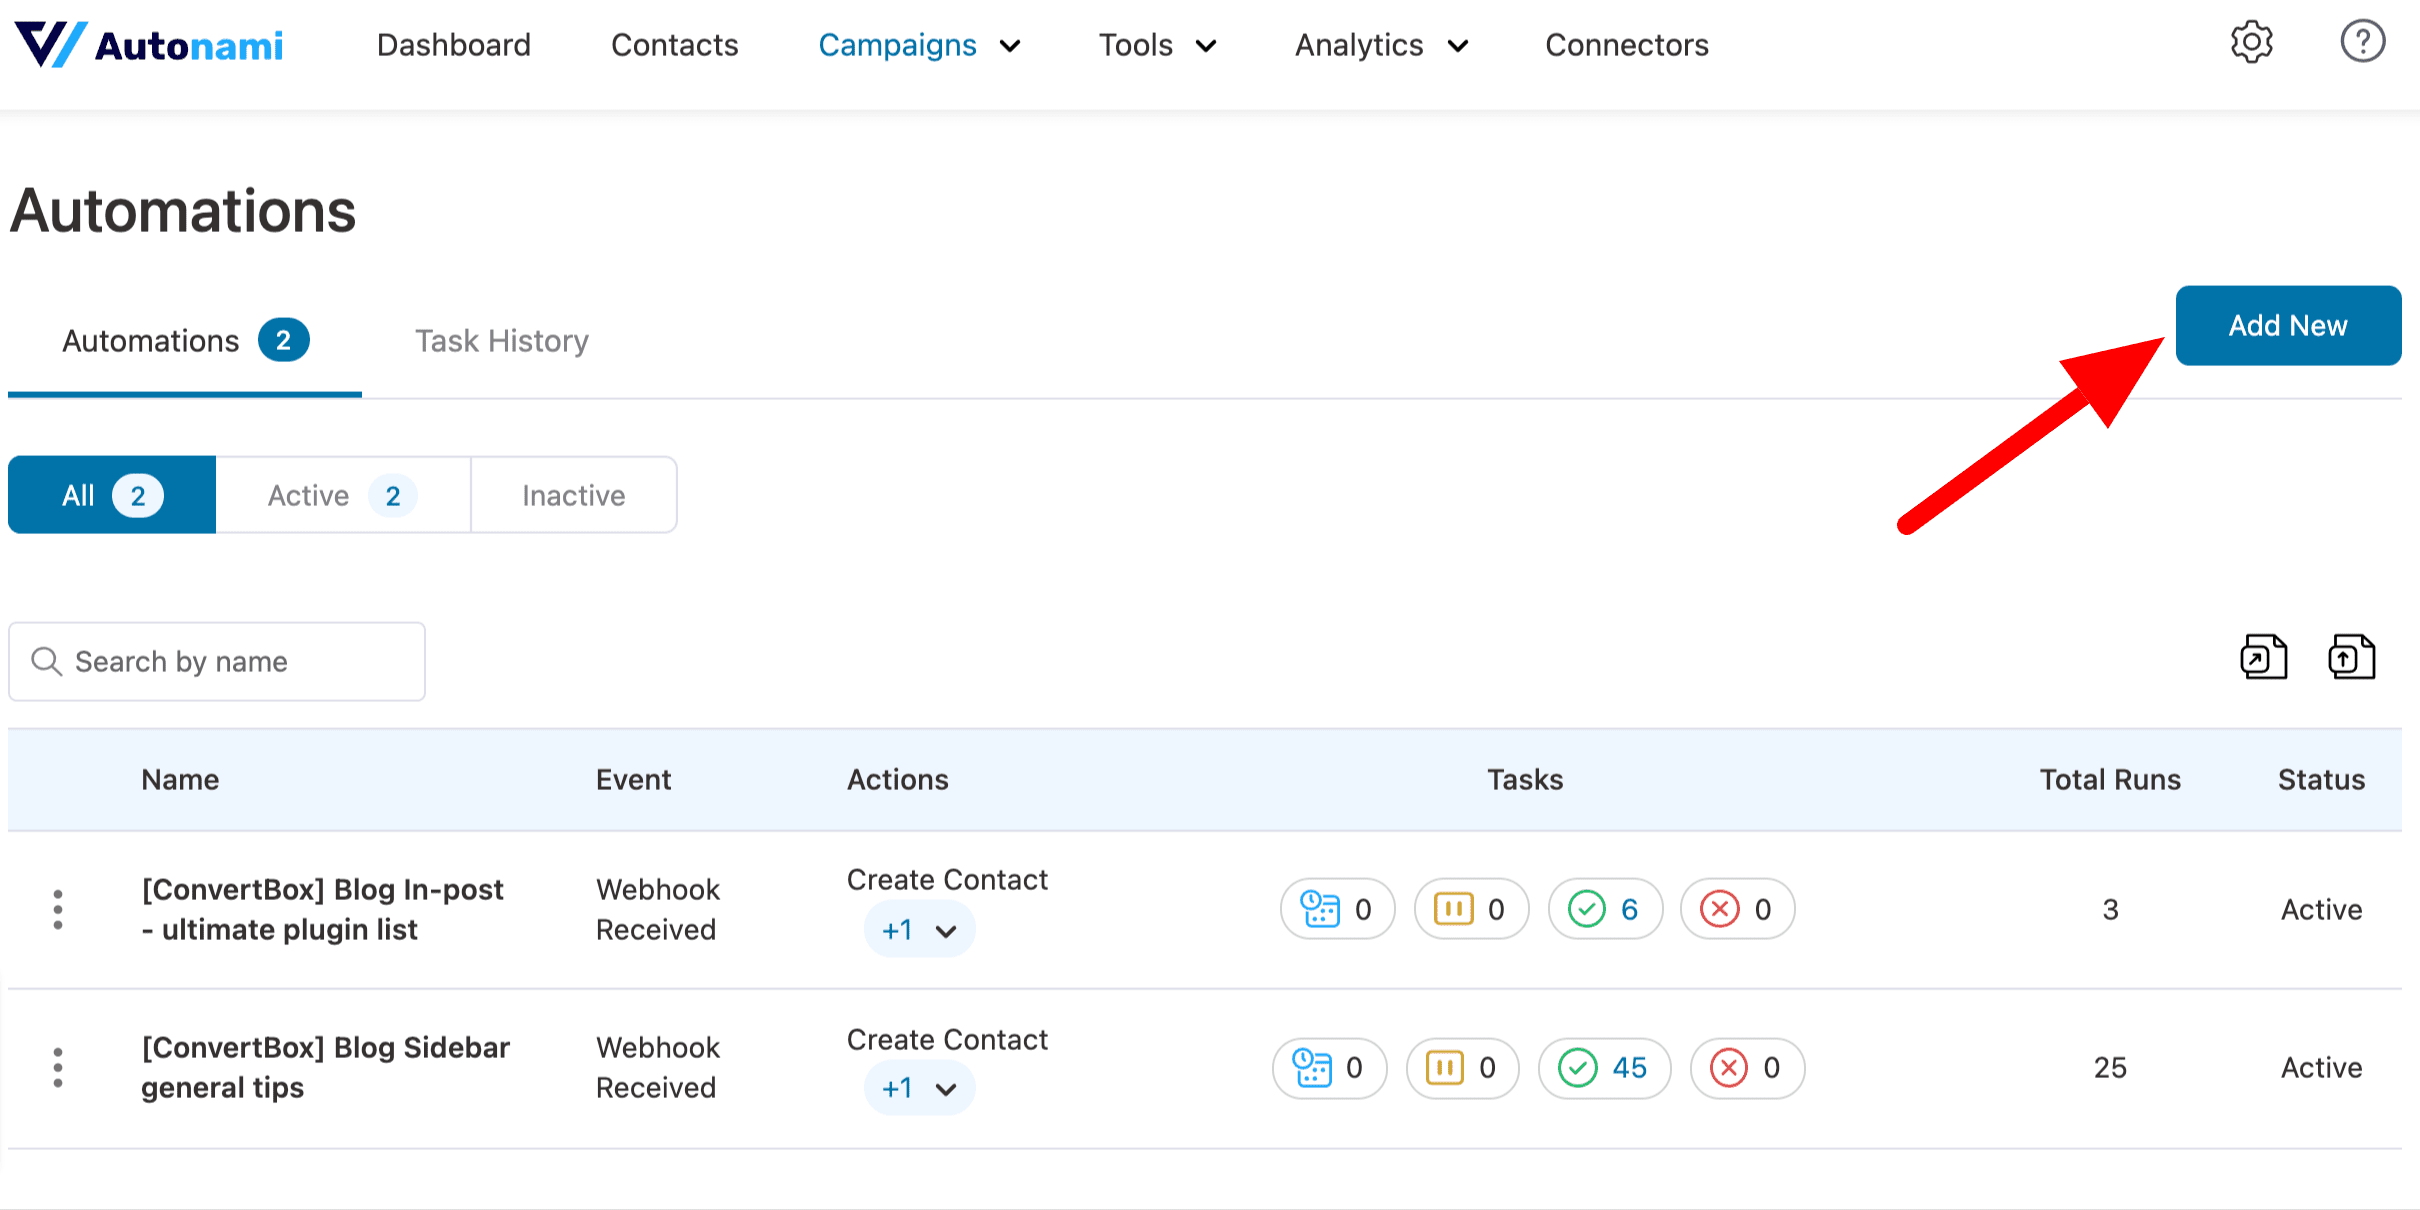
Create an Automation and get our Webhook URL
Our first goal for this integration is to have the people who complete your opt-in form be added as a contact in your FunnelKit Automations.
To do this, we will use Webhooks.
If you don’t know what Webhooks are, don’t stress – if you follow this tutorial, you’ll set up what you need.
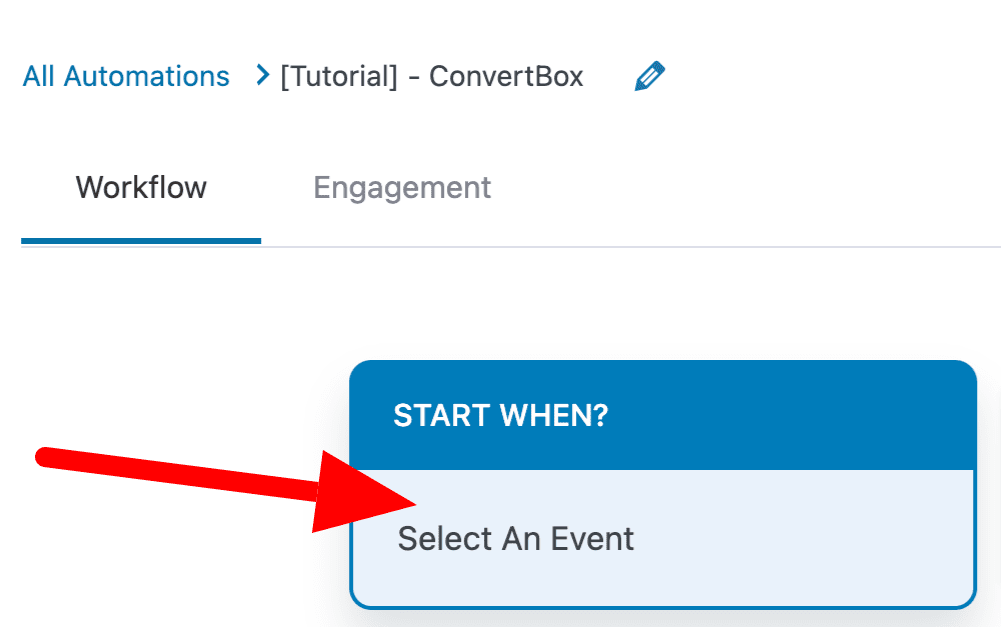
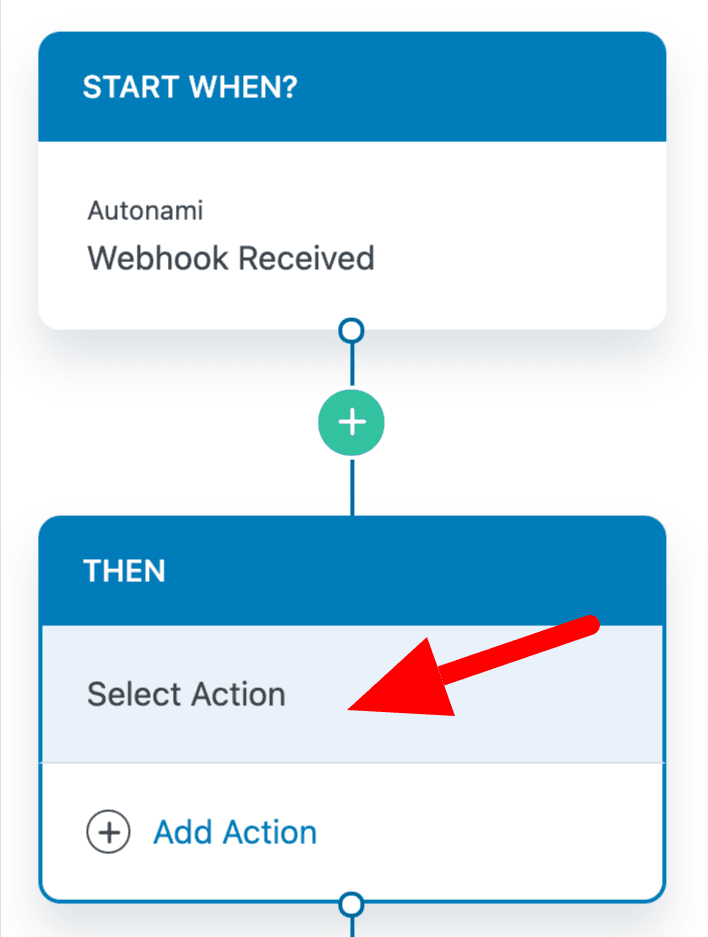
First, go to FunnelKit Automations and create a new Automation.
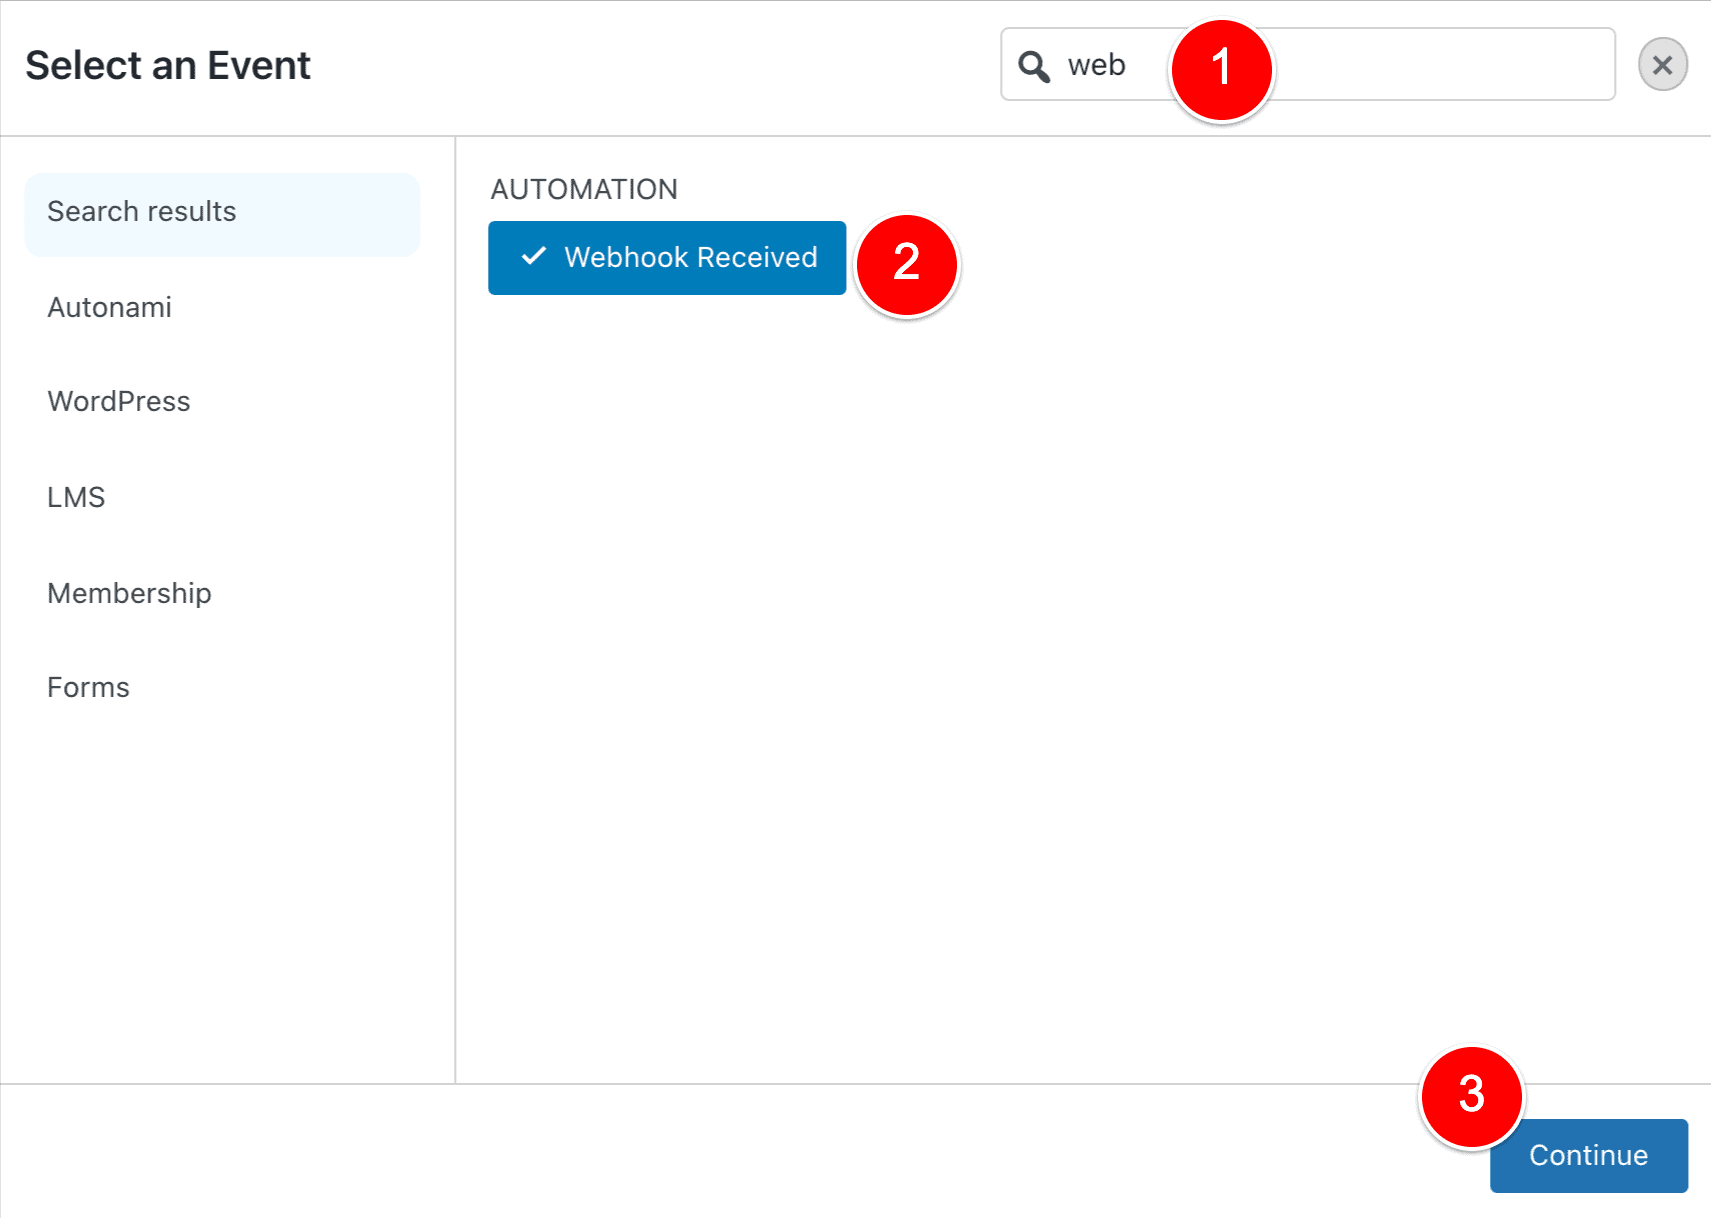
Next, click to Select An Event.
and then search for Webhook Received (1), click it (2) and then Continue (3).
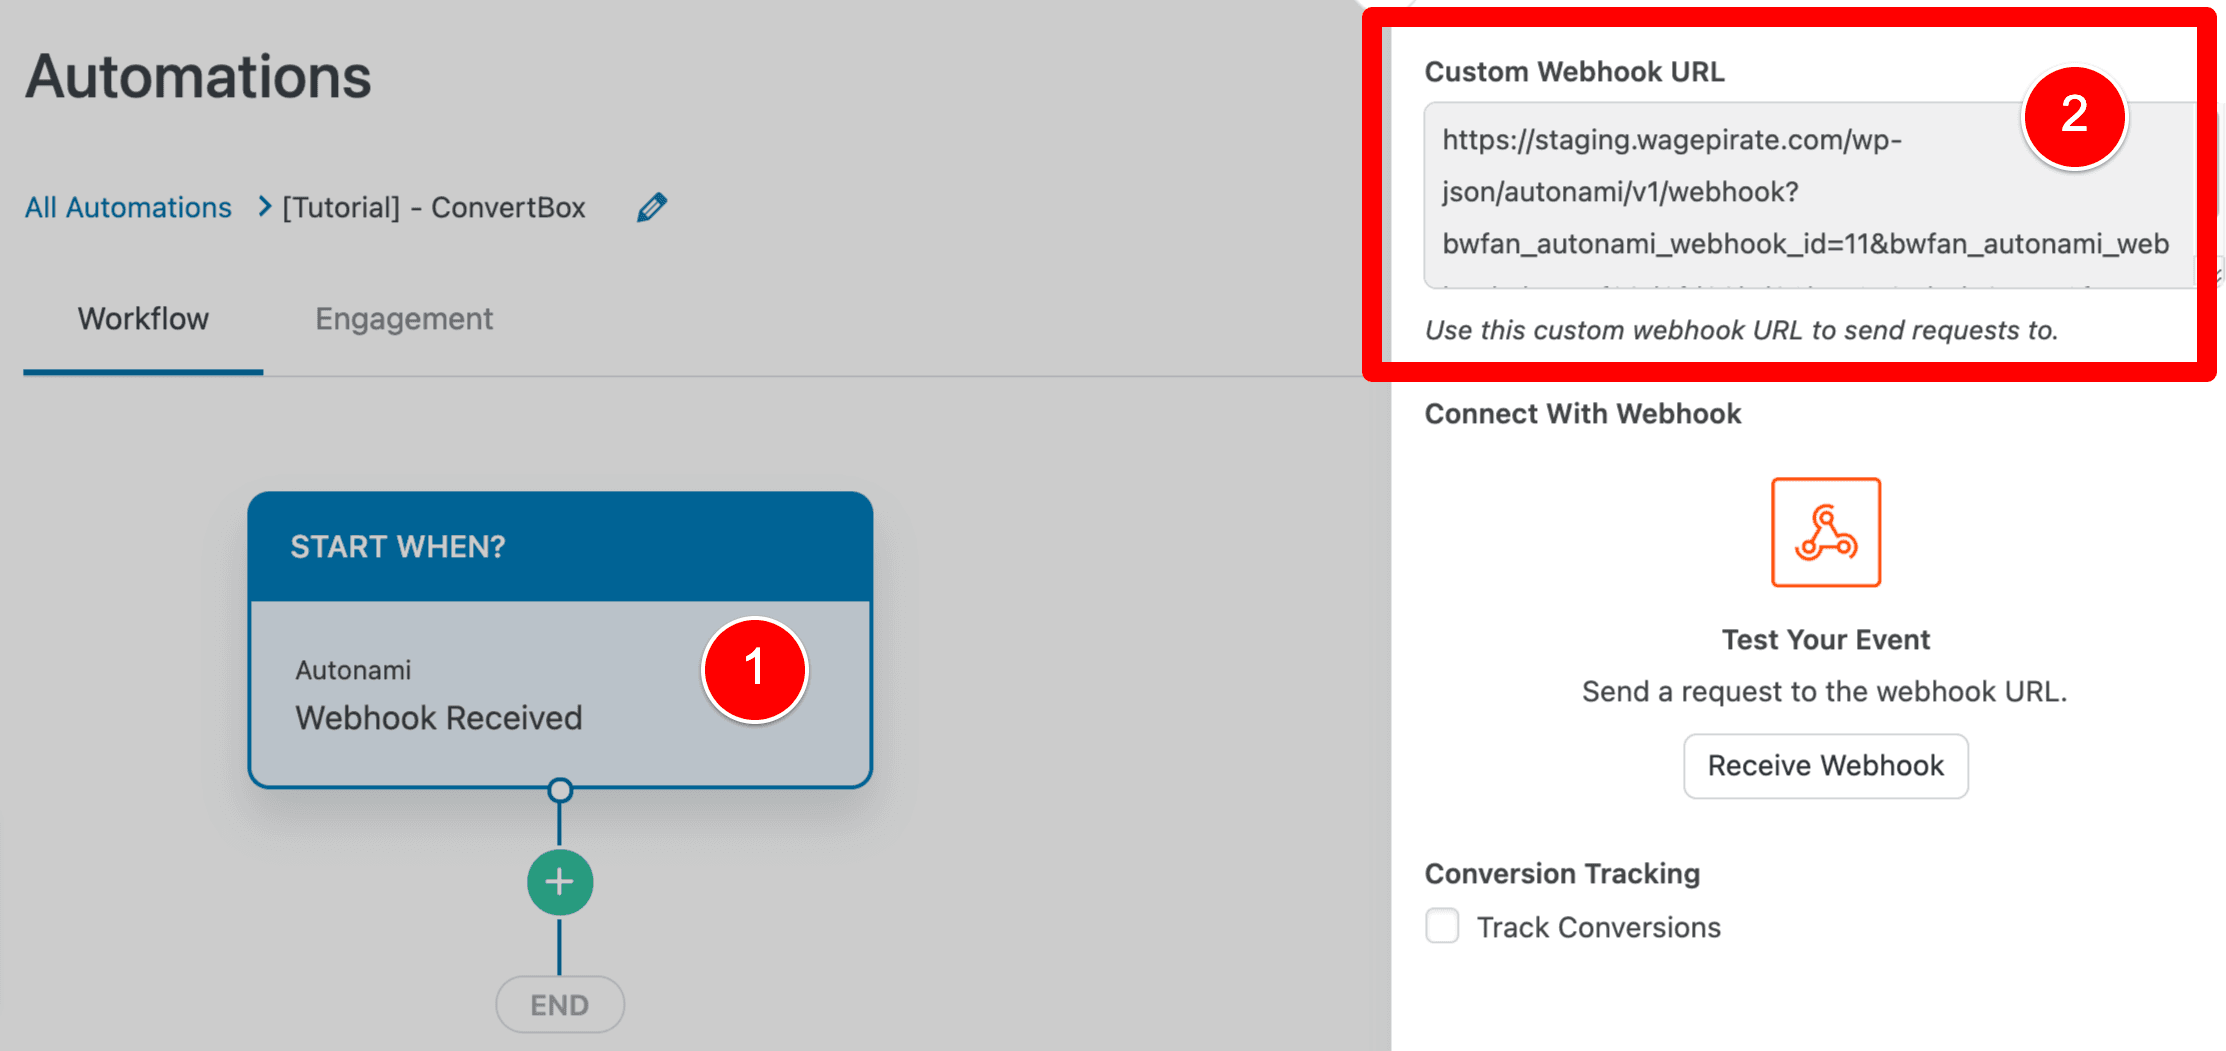
Once you’ve done that, click on the Webhook Received event (1) and you will find your Webhook URL (2), as shown below.
So think of it link this:
In this Automation, FunnelKit Automations is now waiting for data to be sent to this URL.
Once data is received at this URL, FunnelKit Automations will then trigger this Automation to start.
[bricks_template id=”72291″]Configure ConvertBox to send data to our webhook URL
So now that we have this URL that FunnelKit Automations wants data sent to, let’s go ahead and get ConvertBox sending data.
Copy your webhook URL as you’ll be pasting this into ConvertBox very soon.

Log into your ConvertBox account and go to the opt-in form that you want to integrate with FunnelKit Automations.
Next, click on the ConvertBox form element (1) and then click to edit that form’s settings (2), as shown below.
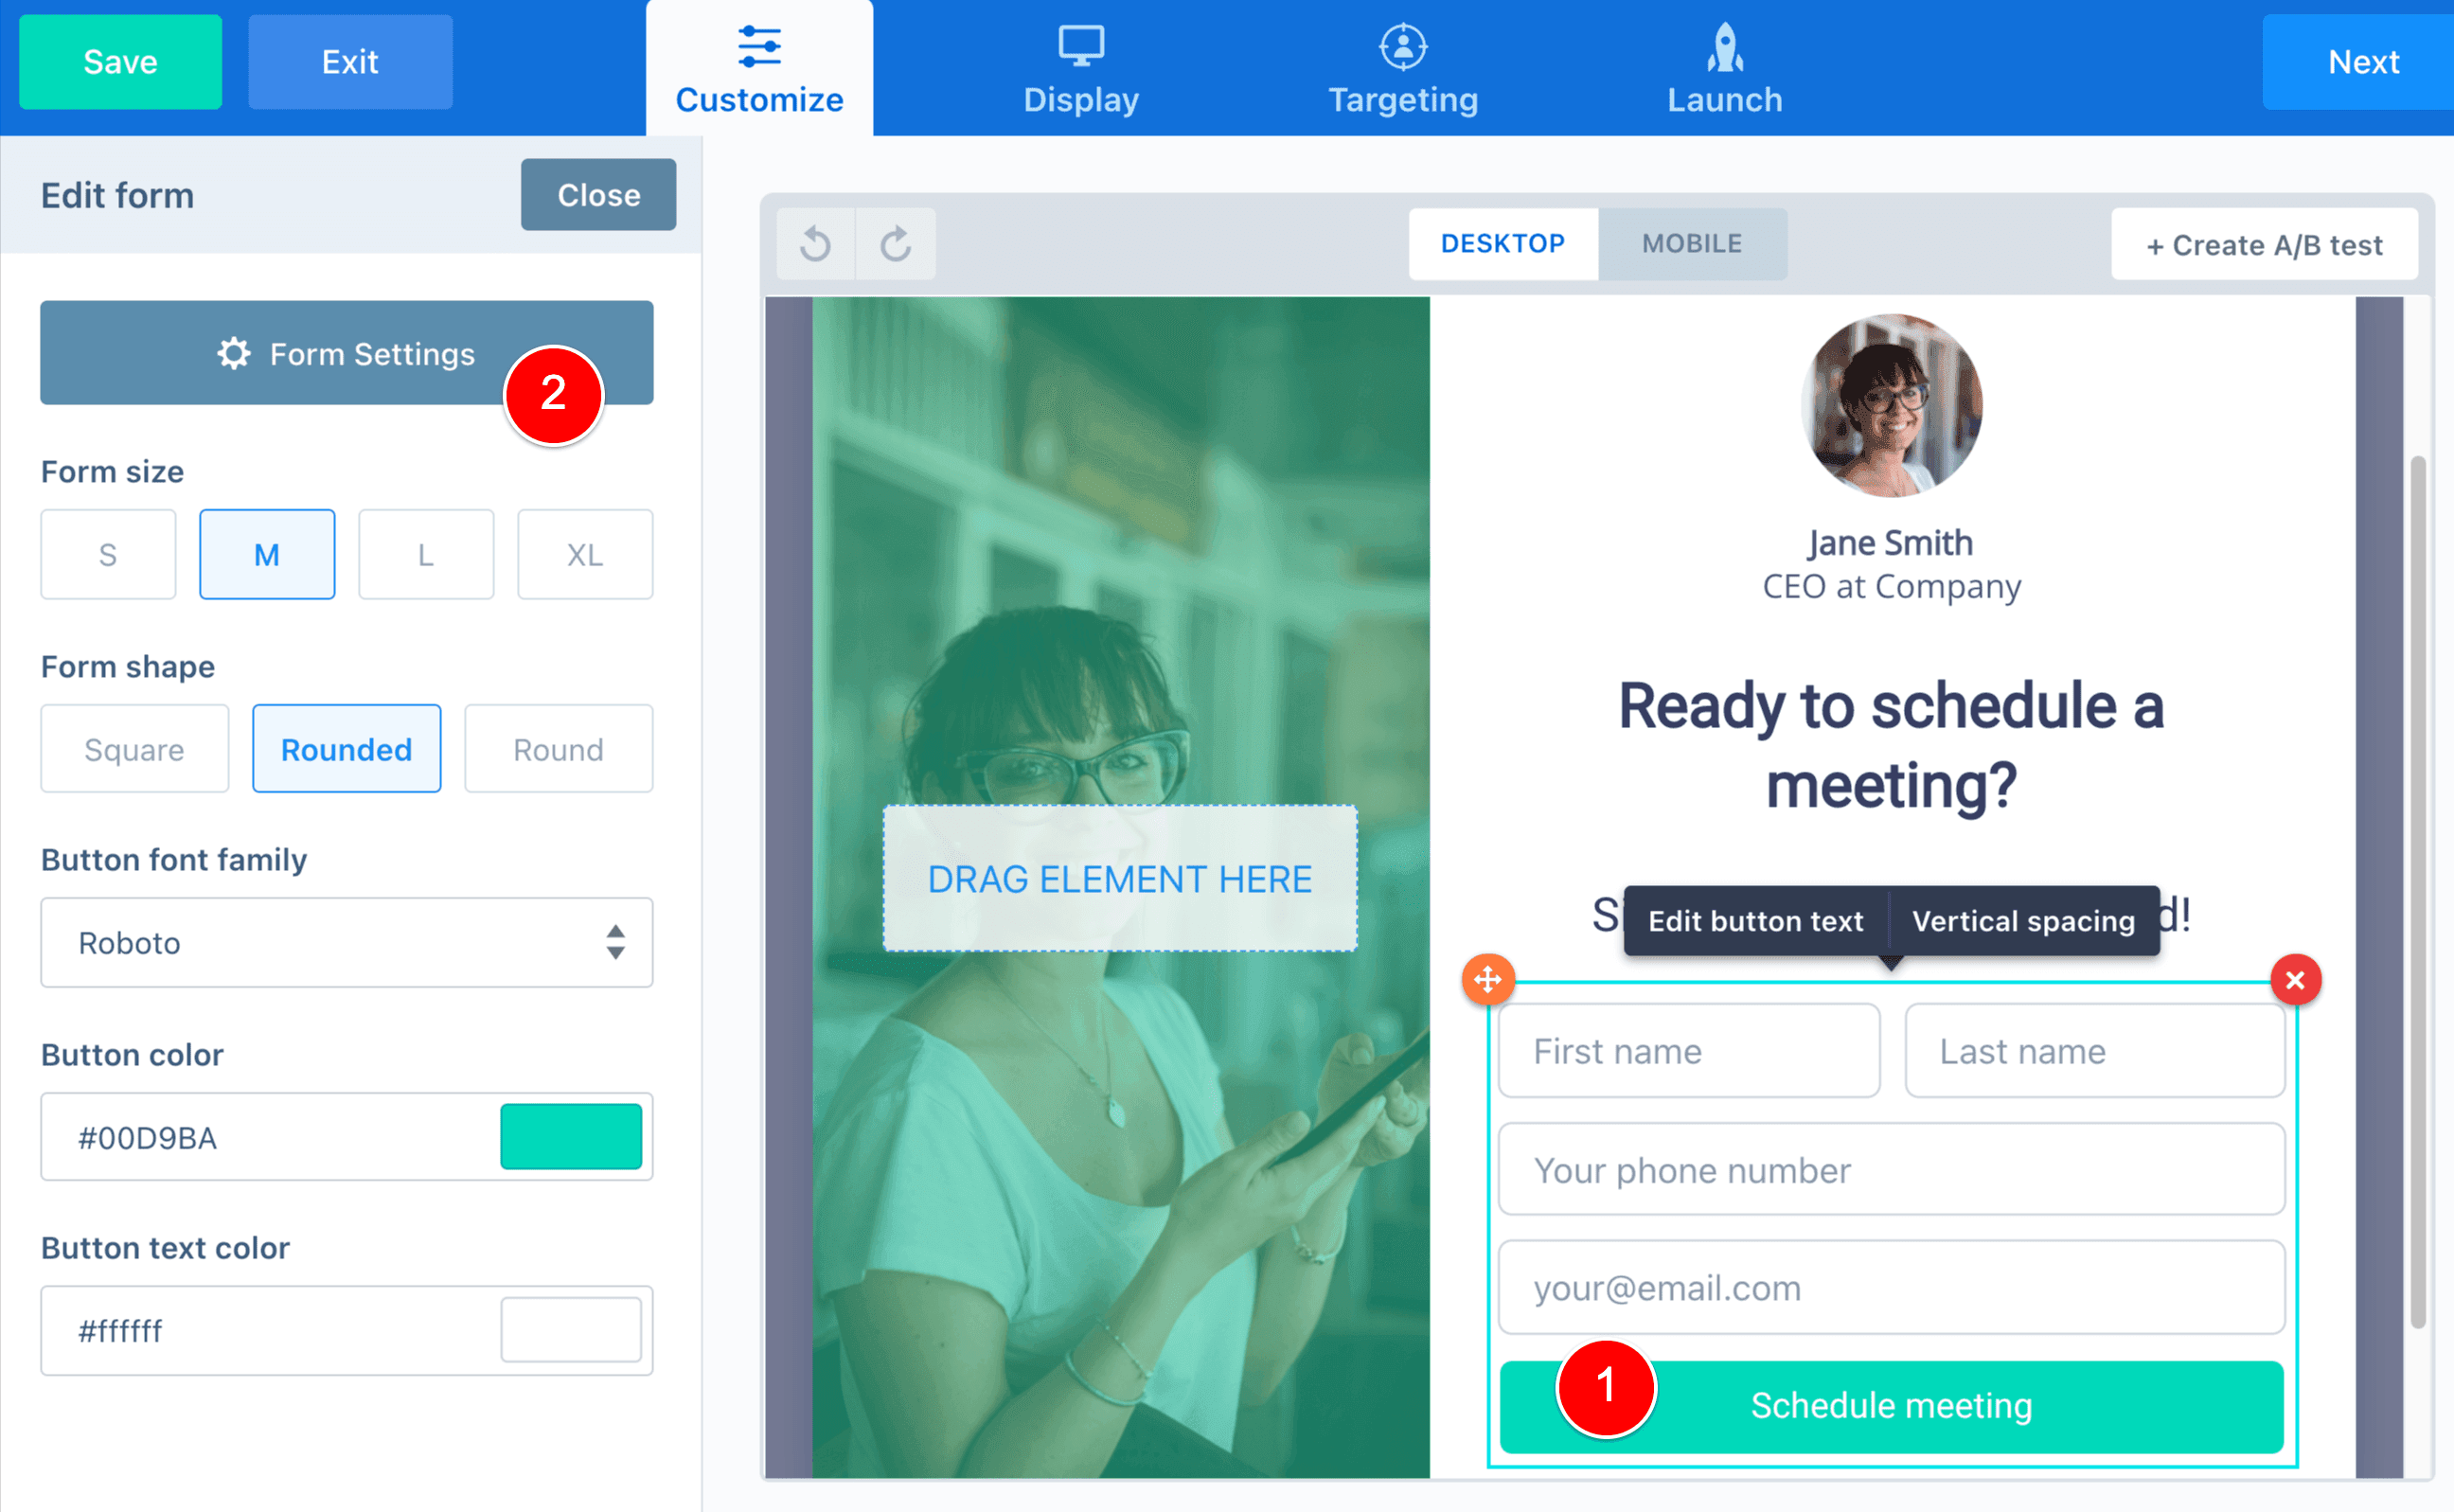
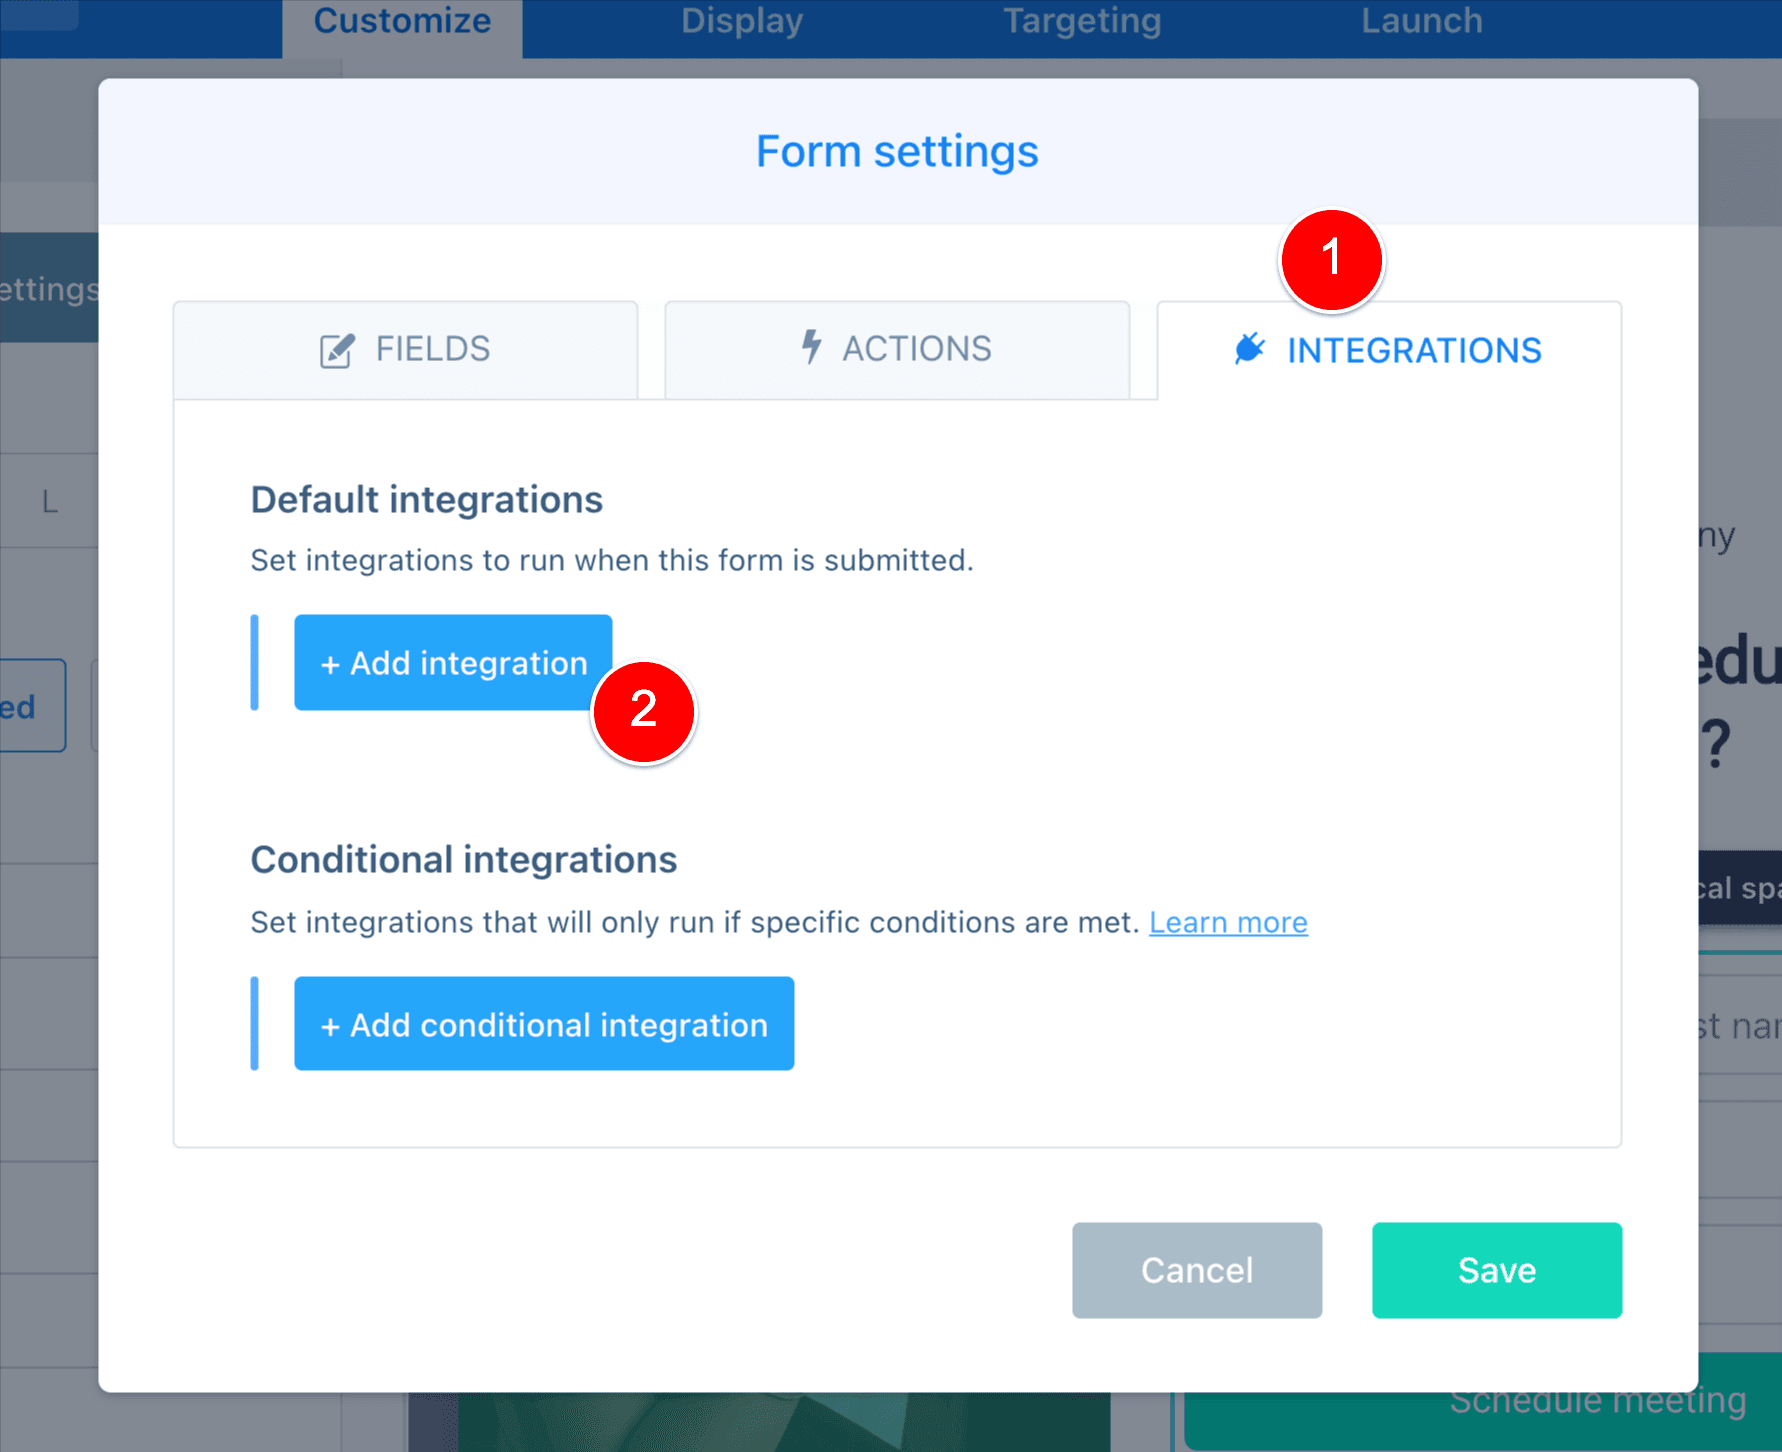
Click on Integrations and then + Add integration.
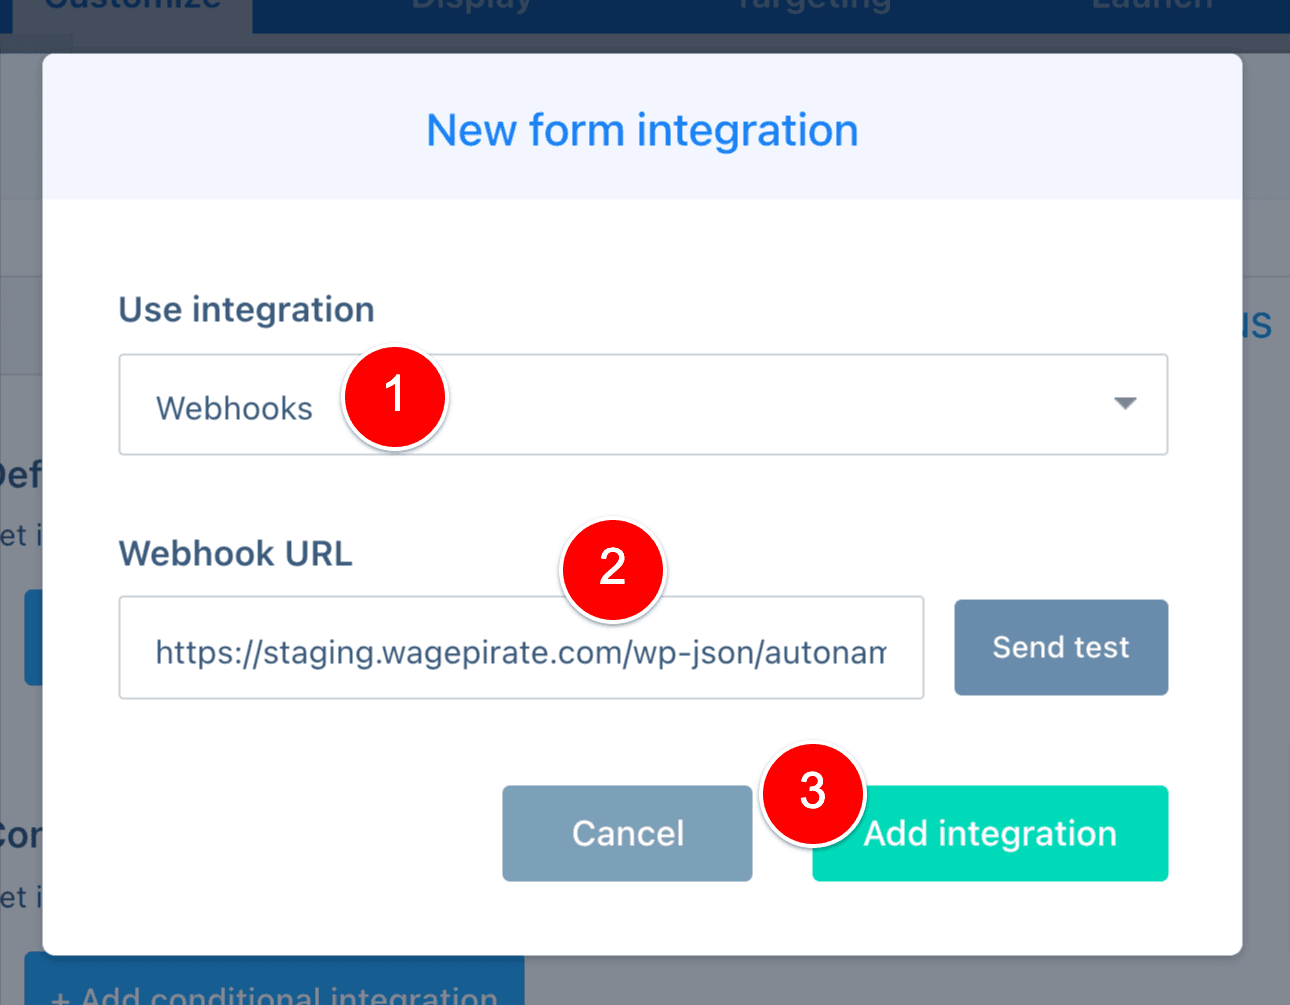
Select Webhooks from the dropdown (1) and then paste in the Webhook URL that you copied from your FunnelKit Automations Automation (2). Lastly, click Add integration (3).
Publish your ConvertBox if you haven’t done so already and add it to your website.
Test your webhook is working
I like to test my webhook is working at this point. Once I know it’s working, then I continue building my Automation using this data (as I’ll show you further on in this tutorial).
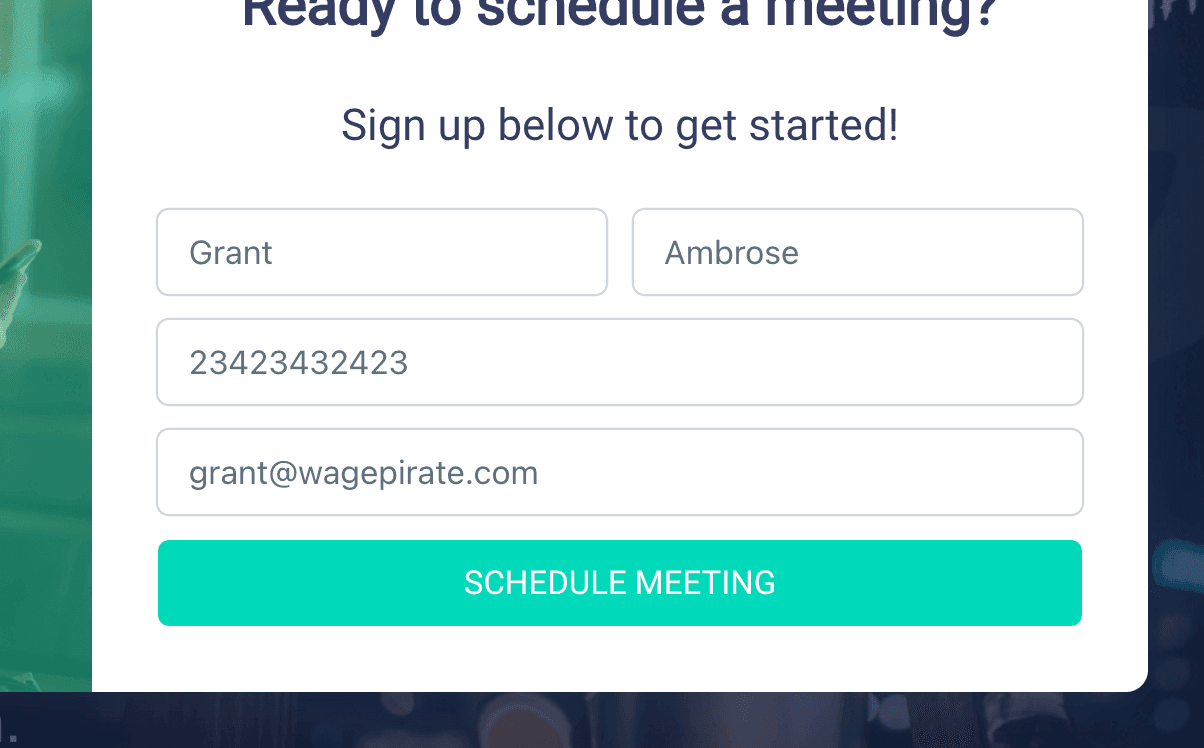
Go to your website and enter your details into your ConvertBox opt-in form and submit the form.
Go back to FunnelKit Automations, click into the Receive Webhook trigger and then click the Receive Webhook button.
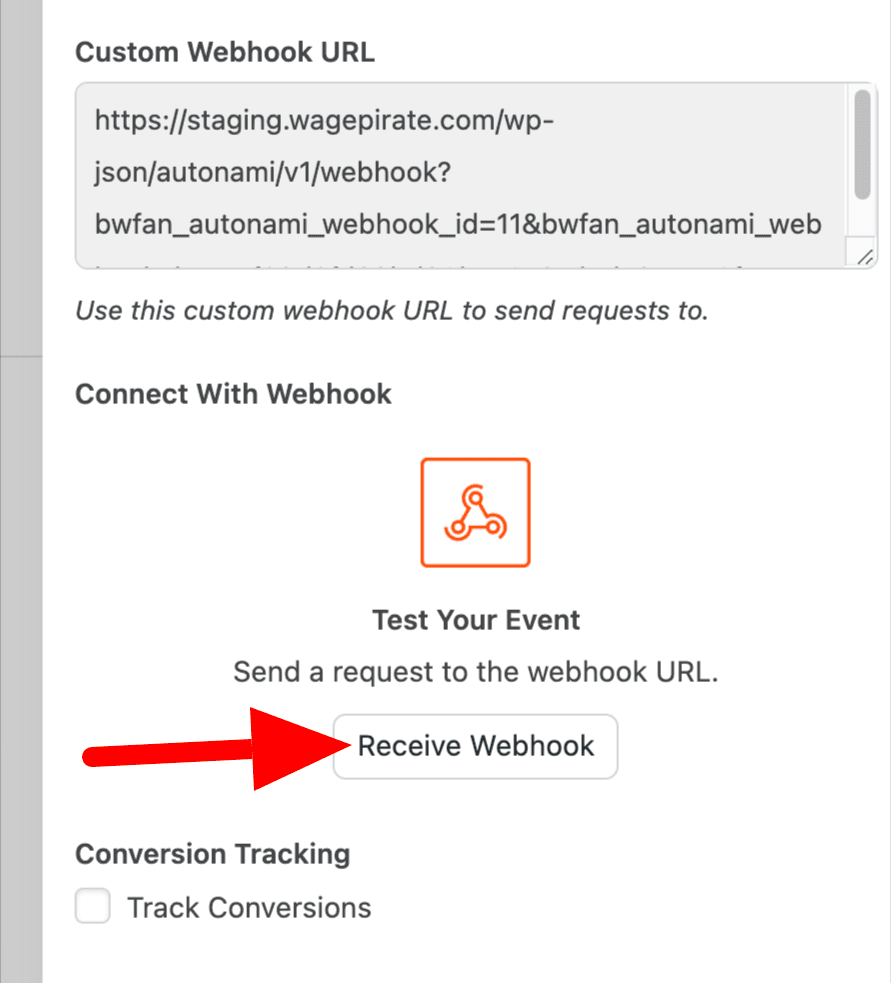
And you should see your data come into FunnelKit Automations.
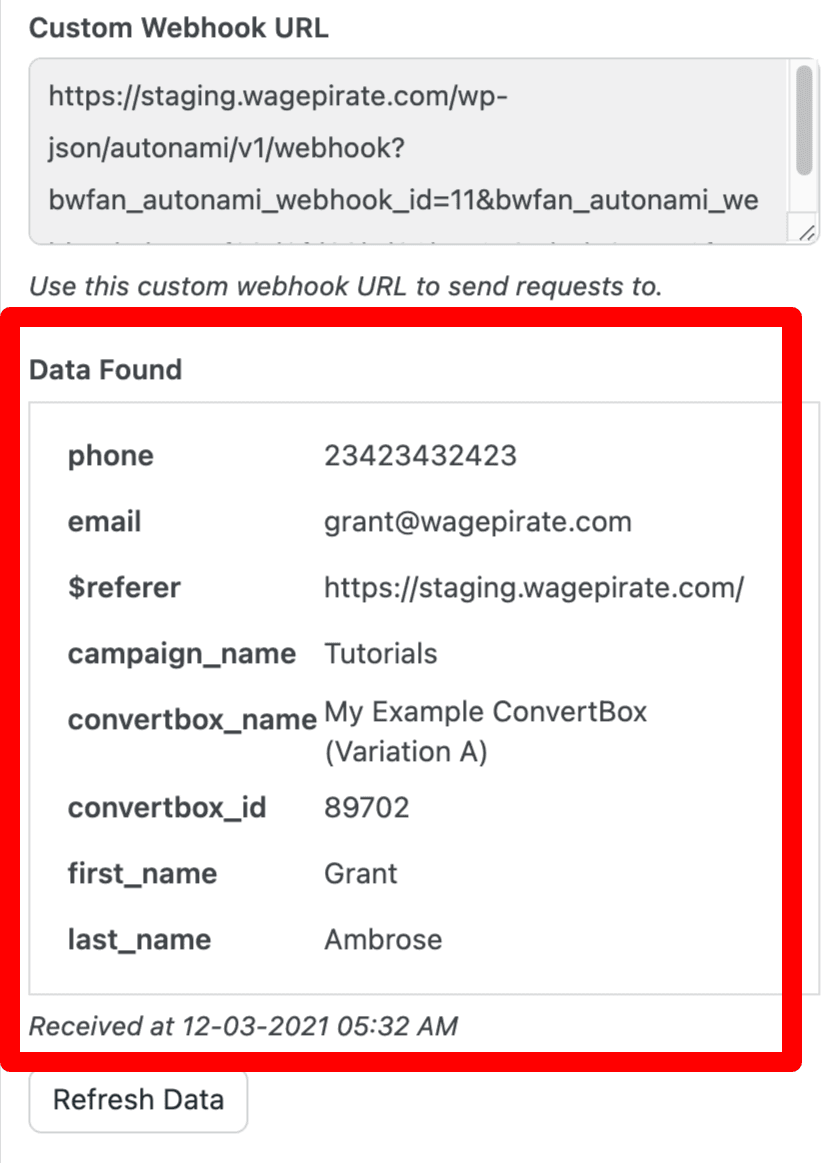
If you see your data displaying like my image above, you’re set to go!
Create a new contact in FunnelKit Automations
At this stage: your visitor can fill out your ConvertBox form and the data will be sent to FunnelKit Automations. BUT the data is not saved in FunnelKit Automations. That’s what we will do in this step, using our Automation.
In your Automation, under the Webhook Received trigger event, you need to map the email field from your ConvertBox form to the Select Email Field option you see below in FunnelKit Automations.
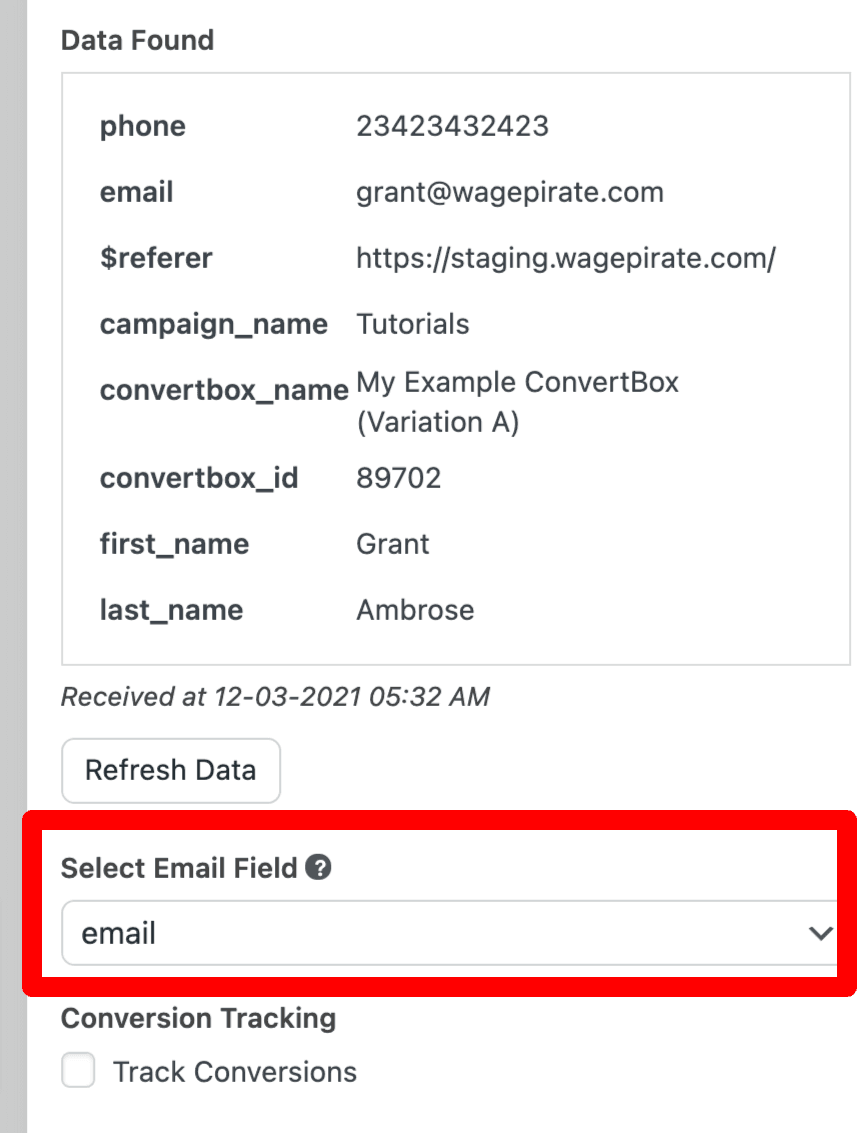
By doing this step above, you’re telling FunnelKit Automations what field in your ConvertBox form is your user’s email address. FunnelKit Automations will use this field now as it goes through the steps in your Automation.
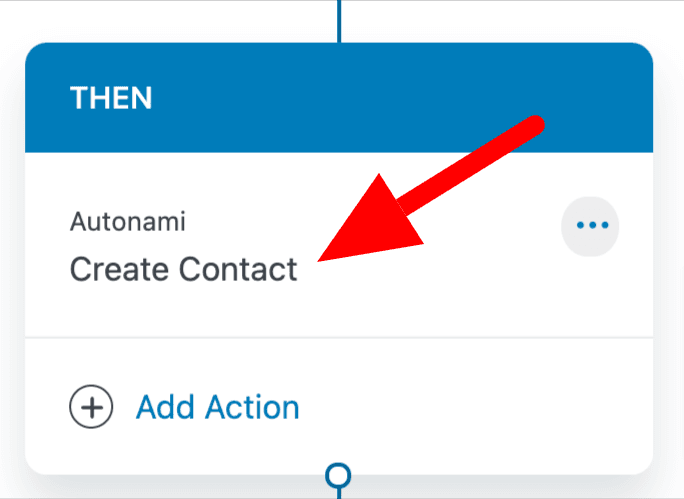
Now that you’ve done the step above, add a Create Contact action to your Automation.
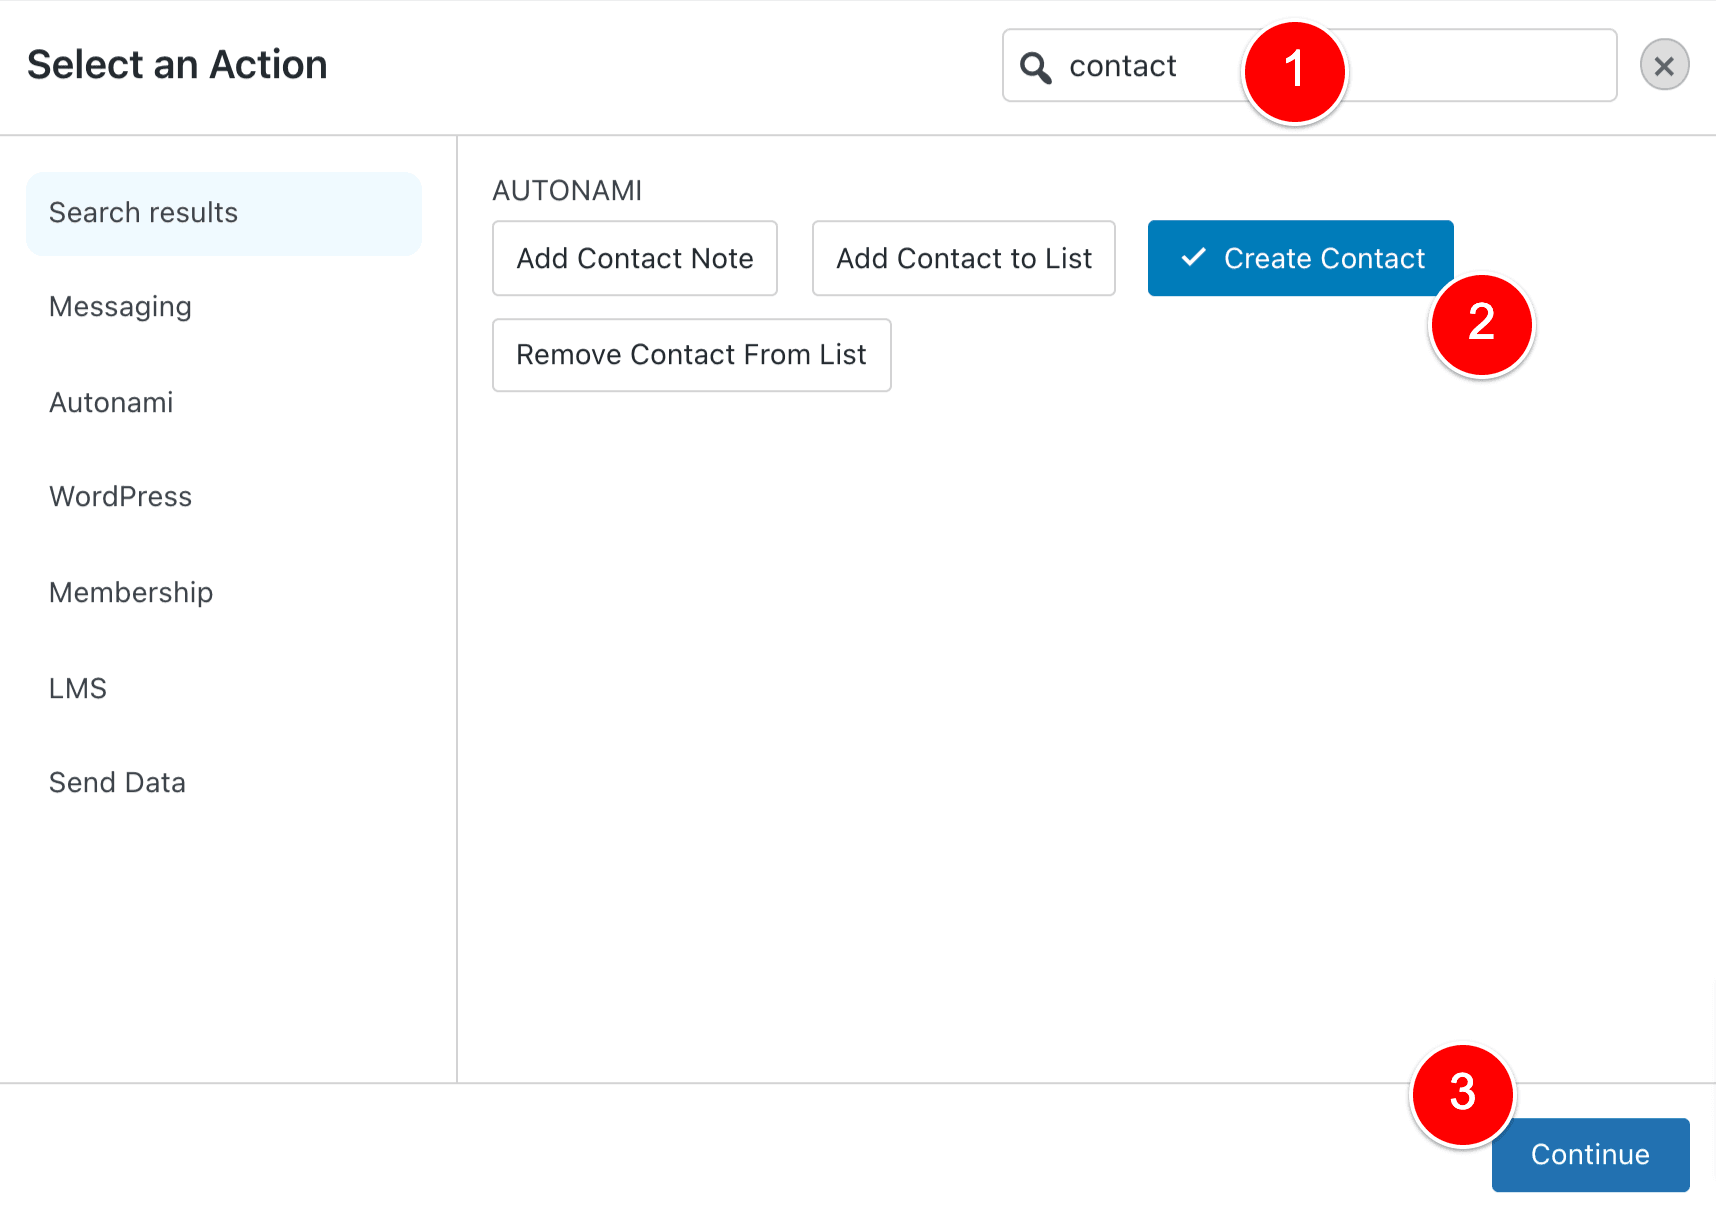
Then click on the Create Contact action.
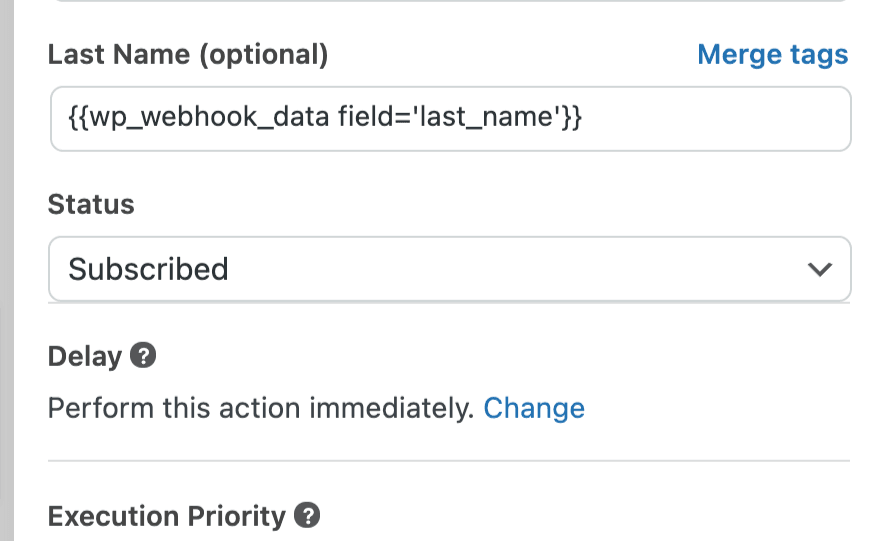
And now you need to map each of these FunnelKit Automations contact fields to the webhook data that ConvertBox sent to our Automation.
To do this, click on Merge Tags.
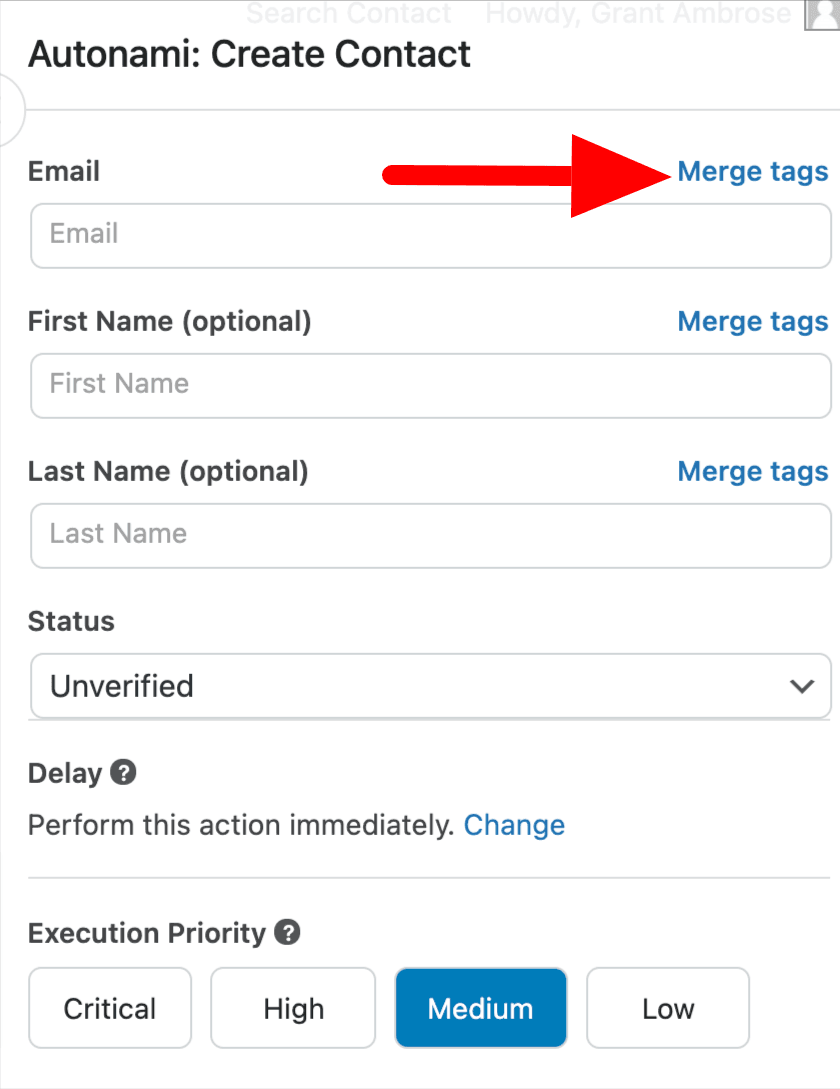
Under Webhook Data click Select.
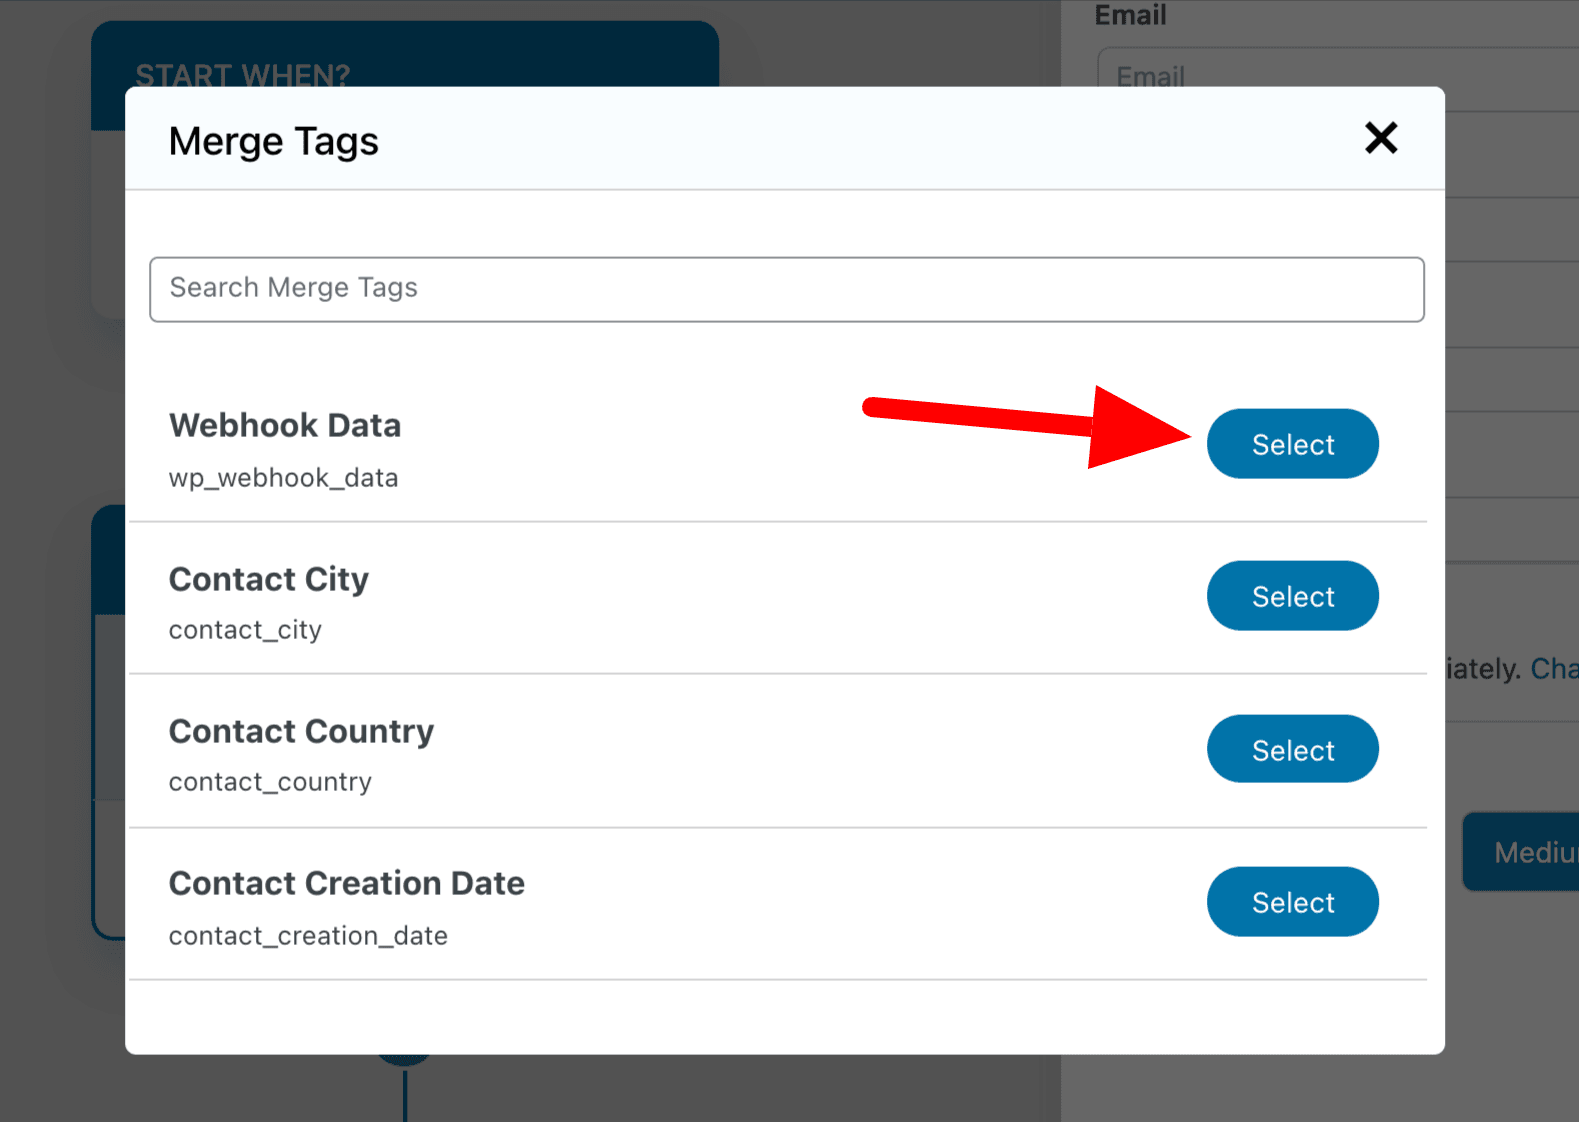
In the dropdown, select email (1) and then click Copy To Clipboard.
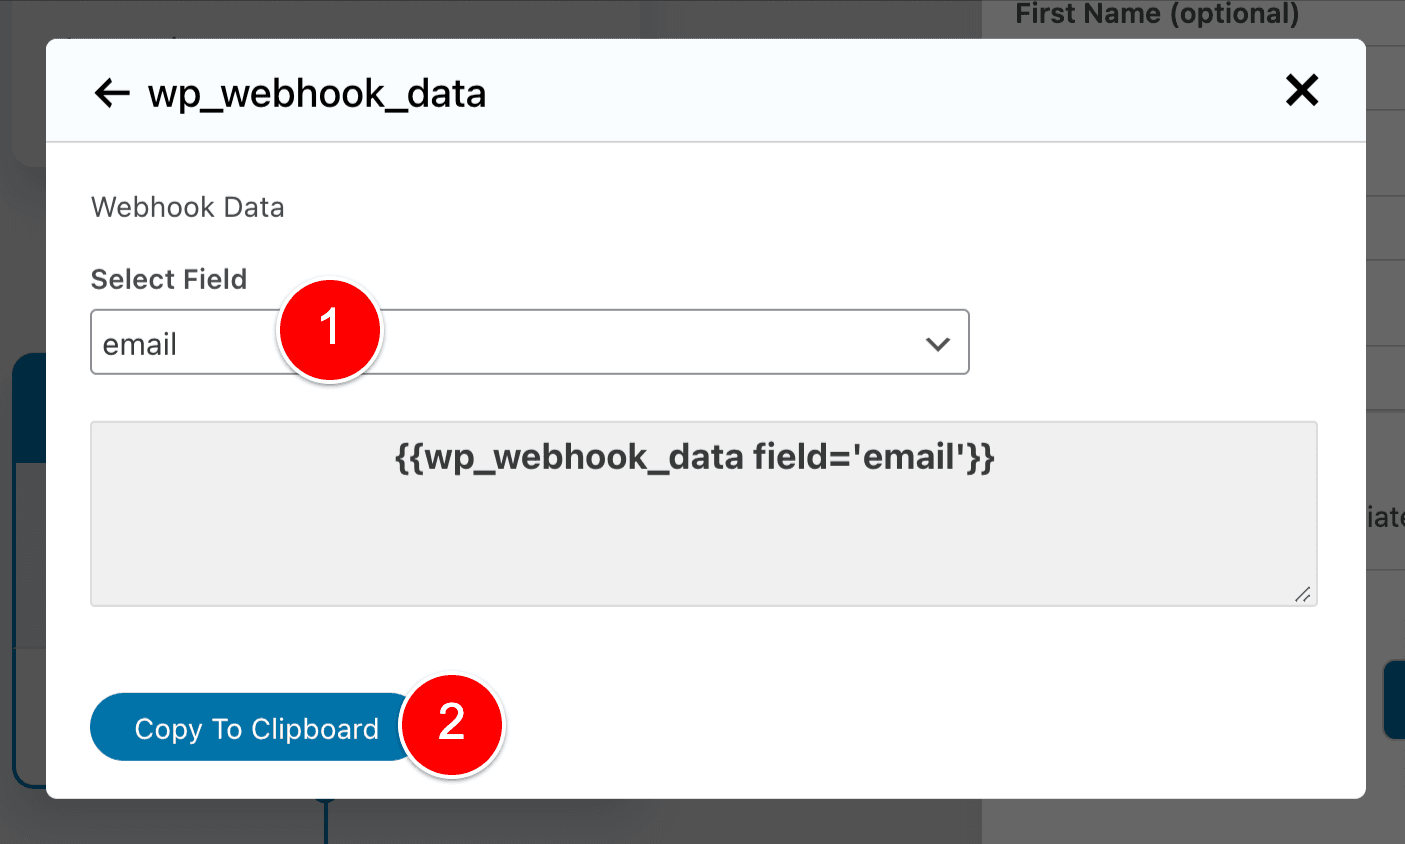
Then paste it into the email field, like below.
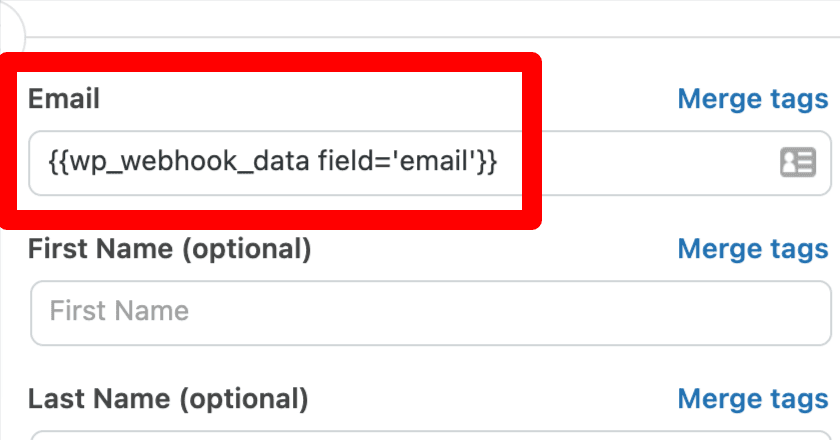
By doing the above, we have mapped the data from our email field in our ConvertBox to the email field that FunnelKit Automations will use when it creates a contact.
So now, just do the same and map the rest of the fields.
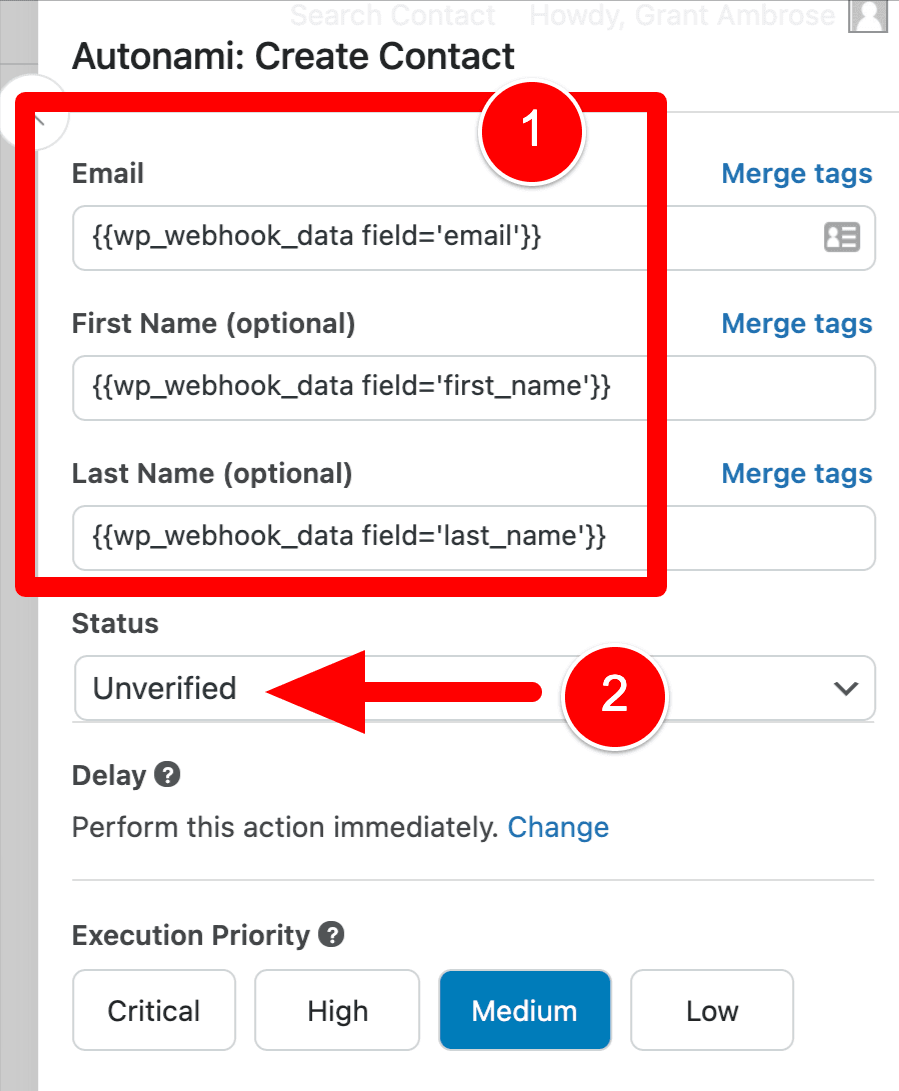
NOTE: if your ConvertBox only collects people’s email addresses, you would just map the email field and leave the others blank – hence why the others say “optional”. FunnelKit Automations just needs an email address to be able to create a contact.
Now, if you’re wondering why I selected Unverified at (2) above, I’ll explain why I recommend you do this in the next part of this tutorial.
Unverified vs Subscribed
When you create a contact in FunnelKit Automations, you have to set their subscriber Status and you either want to set Status as Subscribed or Unverified. What you choose here will depend on whether or not you wish to use a double opt-in method or single opt-in method in FunnelKit Automations.
You probably already know this, but just quickly:
- Single opt-in: Your contact is immediately added to your mailing list for you to email.
- Double opt-in: Your contact is set to Unverified status and you send them an email with a link. When the contact clicks this link in your email, you change their status from Unverified to Subscribed. If they never click this link, they will stay in Unverified status and you will not email them.
For WagePirate.com, I decided to use a double opt-in method. This helps me weed out any fake email addresses that are entered into my website so that way I know I am emailing real people.
If you are happy to use single opt-in, then for this Create Contact action, just set Status to Subscribed.
But just be warned – if you have a ConvertBox form that people have to fill in to get your eBook / hidden download / lead magnet – people will put fake emails into here just to get your download, and with the single opt-in, you’ll be emailing these fake email addresses in the future (which will hurt your email open rates if you don’t clean your email list).
If you are not keen on using single opt-in, I can help!
Set up a double opt-in for new Contacts in FunnelKit Automations
I wrote an article that shows you exactly how you can create a double opt-in using FunnelKit Automations.
RELATED: Click here to see how to set up a double opt-in with FunnelKit Automations.
How deep is the ConvertBox / FunnelKit Automations integration?
The integration between ConvertBox and FunnelKit Automations has provided me with everything I’ve needed so far. There has not been anything I haven’t been able to set up at the time of writing this article.
Here is everything I currently have set up, including how it works, why I set it up and the logic between the two systems:
- General opt-in to my FunnelKit Automations Mailing List
When a ConvertBox form is completed, add that user as a Contact in FunnelKit Automations and send them an email with a Link Trigger. Once they click this Link Trigger, they are then opted-in to my mailing list and will receive my broadcast emails when I send promotional emails from FunnelKit Automations. - Opt-in to get my Lead Magnet and add these people to my FunnelKit Automations mailing list in the process
I have any lead magnets on my website (Lead Magnet – something a user fills out a ConvertBox form to get access to, like an eBook / private article etc). When someone fills out my opt-in form from ConvertBox on my website, I add them as a contact and send them an email with a Link Trigger. Once the user clicks this Link Trigger, I set their status to Subscribed and the URL the Link Trigger is set to go it is the URL that has the Lead Magnet they want to get.
Important for you to know
While writing the above section, I noticed that it is very simple and you may feel that the ConvertBox / FunnelKit Automations integration isn’t very deep. But that is not the case.
The thing is – FunnelKit Automations being inside your WordPress install just cuts out a lot of the different things you’re probably used to setting up and that’s a good thing! That’s why we’re all using FunnelKit Automations instead of other CRMs like ActiveCampaign.
Here is an example I think is important to understand below.
You are linking a ConvertBox form to a specific Automation in FunnelKit Automations
This removes the need to worry about tagging and complex setups.
As I showed you in this tutorial on this page, when you create a new Automation you are triggering the Automation with the Webhook Received trigger by using the Webhook URL.
You can set up many ConvertBox forms to go to this same Webhook URL if you want or you can keep each form going to its own Automation. It’s really up to you.
But the main thing is, you are linking each ConvertBox form to Automations in FunnelKit Automations based on that webhook URL.
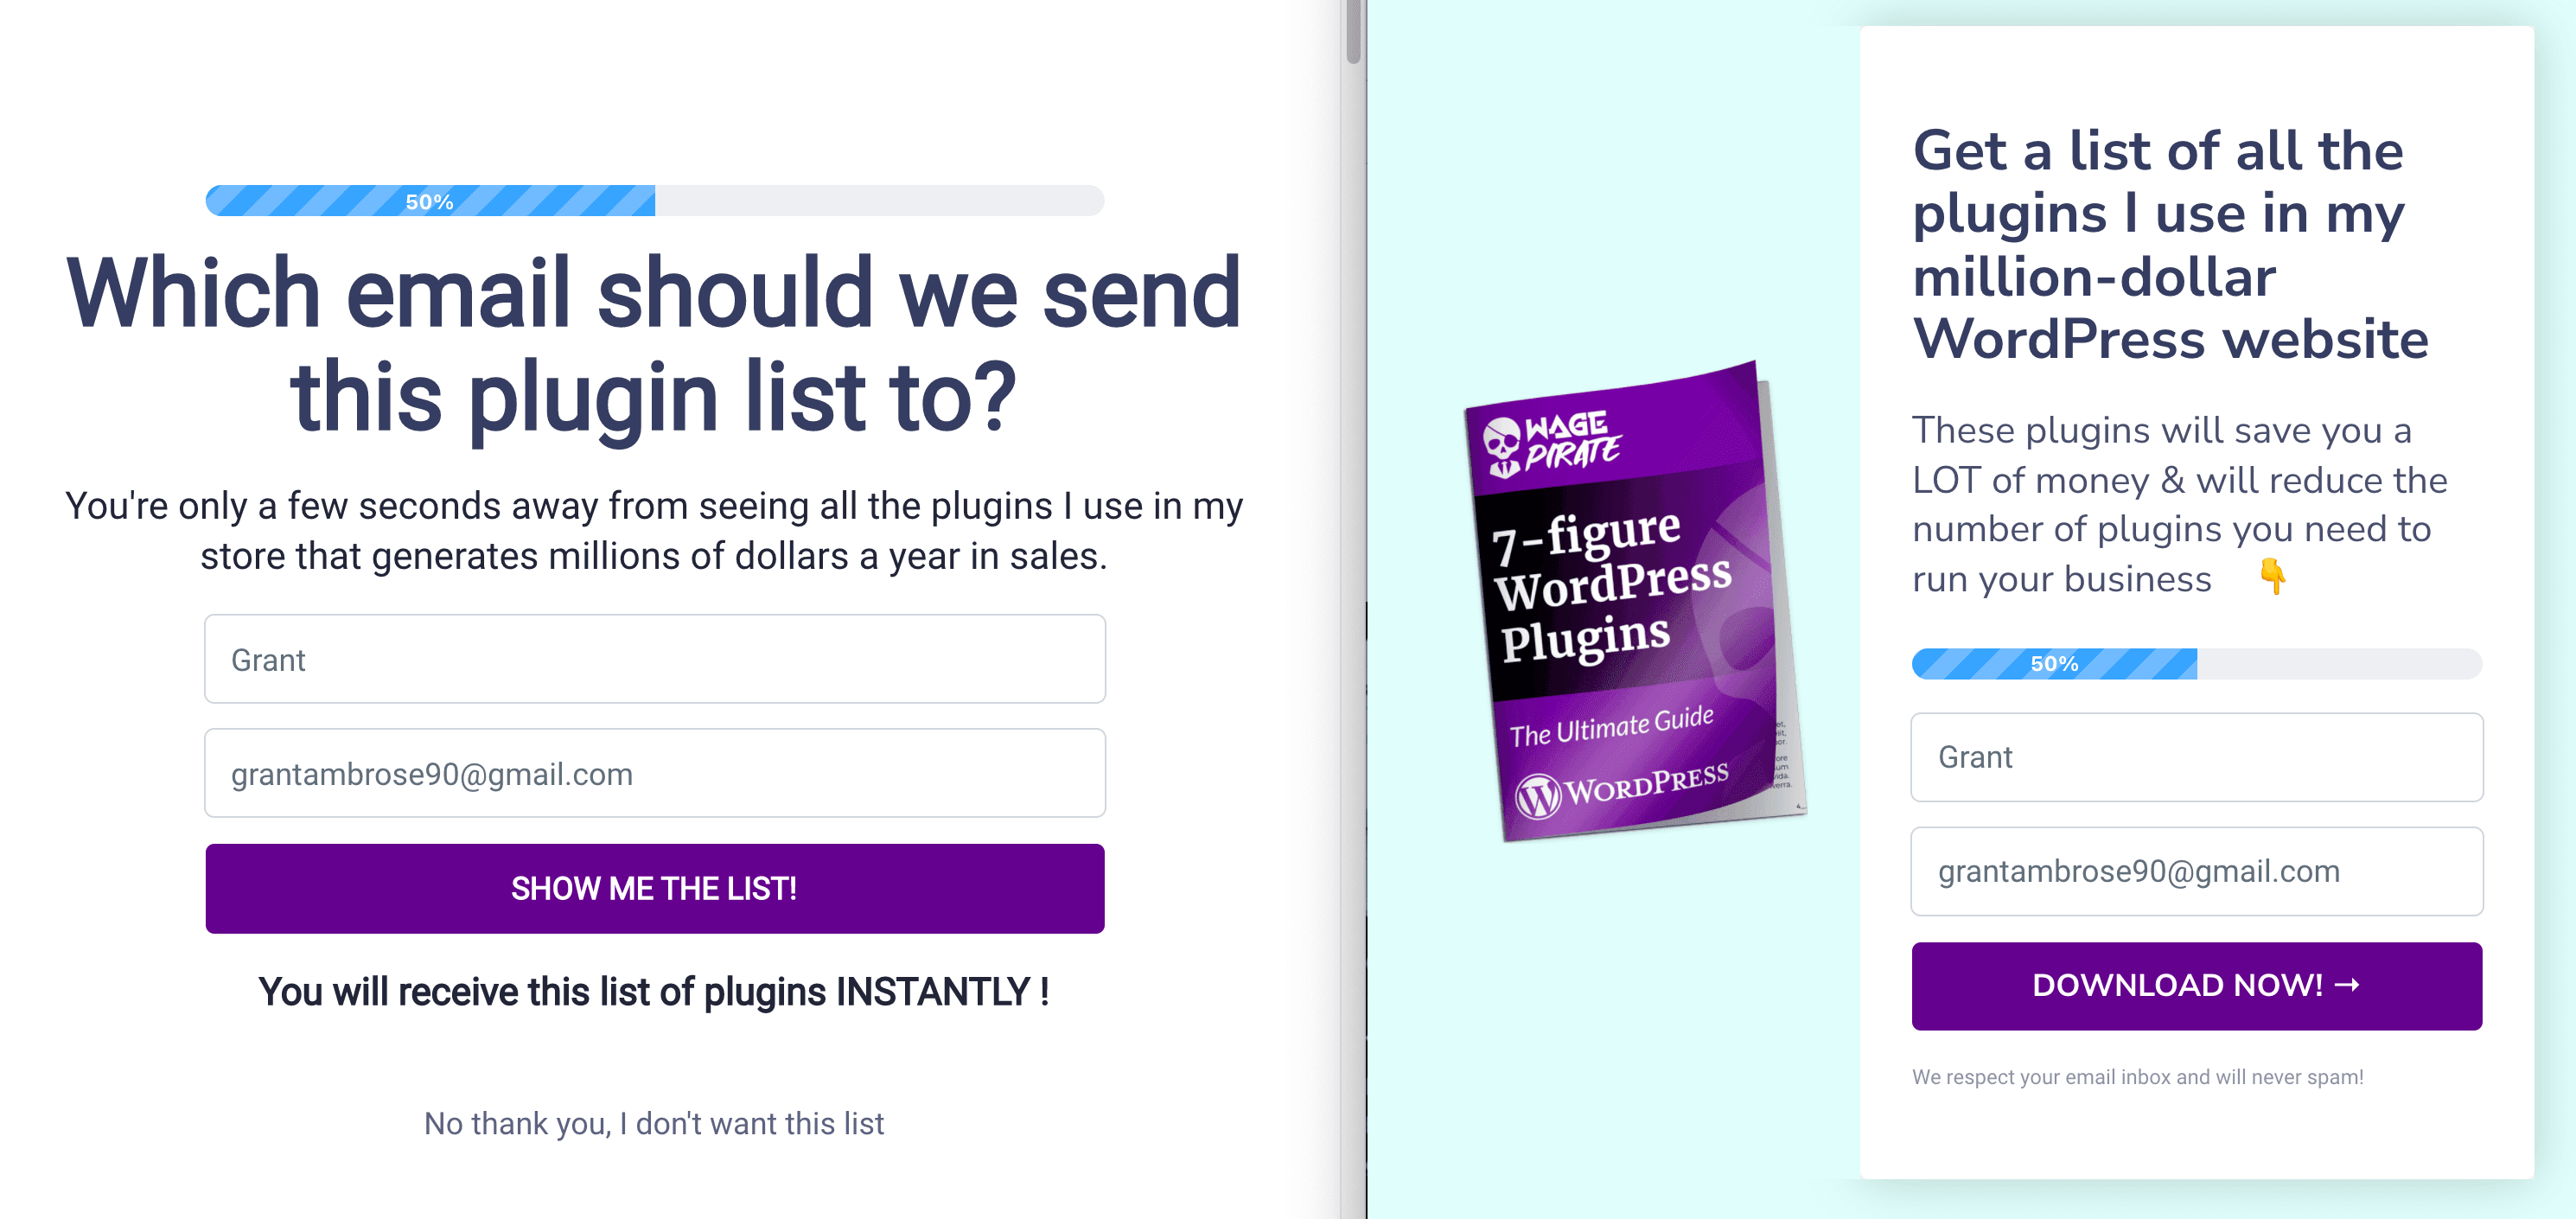
For example, let’s say you have 3 forms on your website and they are all asking your user the same thing: To put in their email address so they can receive your marketing tips and tricks.
Below is an example of this on my website WagePirate.com that you’re currently on.
The form on the left shows when you click a button on my homepage and the form on the right shows in the content of each of my articles.
Both of these forms trigger the same Automation in FunnelKit Automations, even though they are different ConvertBox forms showing on different parts of my website.
Once the data is sent from ConvertBox into FunnelKit Automations, FunnelKit Automations handles all the complex stuff like segmenting, adding tags, subscribing users and everything else.
That’s the easiest way I find for me to think about all of this.
ConvertBox is merely just to get the data into FunnelKit Automations.
Once the data is in FunnelKit Automations, you set up whatever you want to do from there.
And as I said above, so far there hasn’t been a case where I couldn’t get ConvertBox to get the right data into FunnelKit Automations.