The aim of this post is to show you the fastest way to set up Landing Pages using Beaver Builder, while also creating them in a way that enables you to easily manage them as the number of Landing Pages you have grows.
Let me flesh out the Table of Contents with a bit more info…
Here are the steps we’ll take in this tutorial to create and manage our Landing Pages:
- Create a new Custom Post Type called Landing Pages
This is very important to do (in my opinion). It allows us to easily separate our Landing Pages from regular pages and has many other benefits we’ll discuss in this tutorial. - Add default settings to this Post Type
I will show you how to set your new Landing Page post type to not have a header or footer by default (which is what you want) AND I’ll also show you how to force the layout to be full-width. - Quickly build the Landing Page
You’ve got Beaver Builder already I’m assuming, so I’m not going to show you how to drag a module onto the page 😉 But I’ll give you a few tips and keep this part short. - Add an Opt-in Form to our Landing Page to collect Leads
I’ll show you where to find my favourite Landing Page templates for Beaver Builder and how to quickly import them. - We’ll use Conditional Logic in Beaver Builder to show a Thank You page after the user completes the Opt-in Form (I wish I knew this sooner!)
Once people complete the opt-in form, we’ll reload the page and hide our Landing Page content and only show our Thank You page content, all done using the Conditional Logic feature available in Beaver Builder. By doing this, we can have our Landing Page and Thank You page in the 1 Beaver Builder page instead of creating 2 pages (1 page for the Landing Page and 1 Page for the Thank you page). This means that as your library of Landing Pages grow, it is much easier to keep track of what’s going on in your WordPress admin area. - BONUS! I’ll show you how I run my entire CRM from within WordPress to automate everything that happens after someone Opts-in to my Landing Page (NEW!)
Recently, I managed to cancel my ActiveCampaign subscription and now I do all my email marketing and automation from WITHIN WordPress using my new favourite plugin (I’ll show you how this all works in this tutorial, too!).
Create a new Custom Post Type for Landing Pages
To create a new Custom Post Type, we’ll go ahead and install the Custom Post Types UI plugin from the WordPress repository.
I find this plugin super useful but hey, I get it – if you’re used to registering post types using PHP, that’s fine too.
For this tutorial, we’ll use this plugin because I find it very reliable and I like that I can register both Post Types and Taxonomies very fast using a UI.
You just install this plugin like any other WordPress plugin, by going to Plugins > Add New.
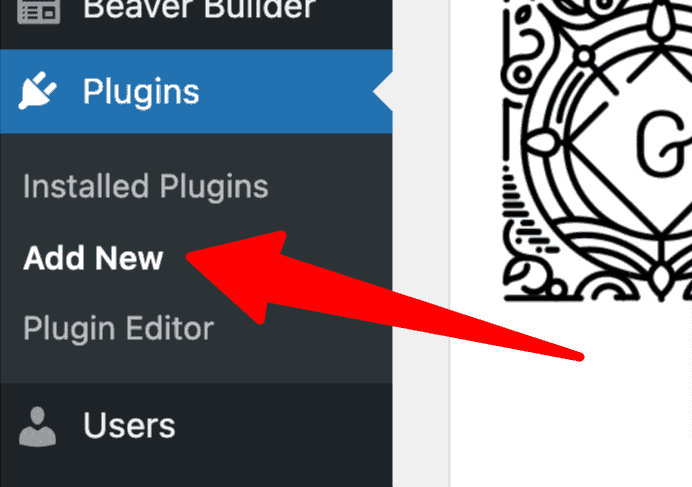
Then search for Custom Post Types UI (1) and then install and Activate it (2).
I already have the plugin installed, so that’s why it says Update Now – but you get the idea.
Now, let’s register our new post type for Landing Pages.
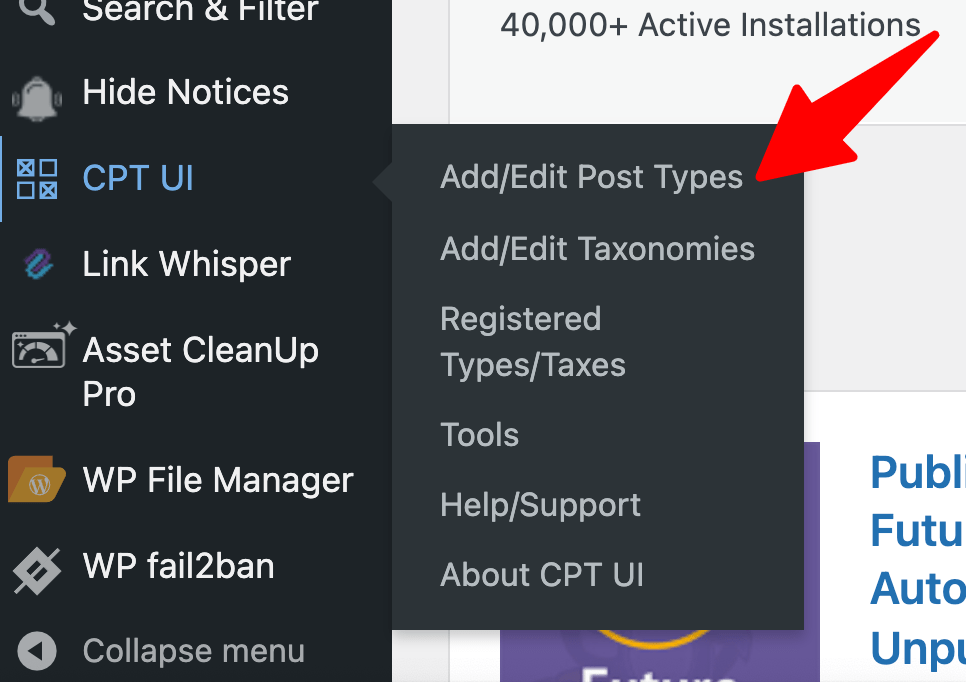
In your WordPress Admin Menu on the side, go to CPT UI > Add/Edit Post Types.
All you have to do is set these three settings below…
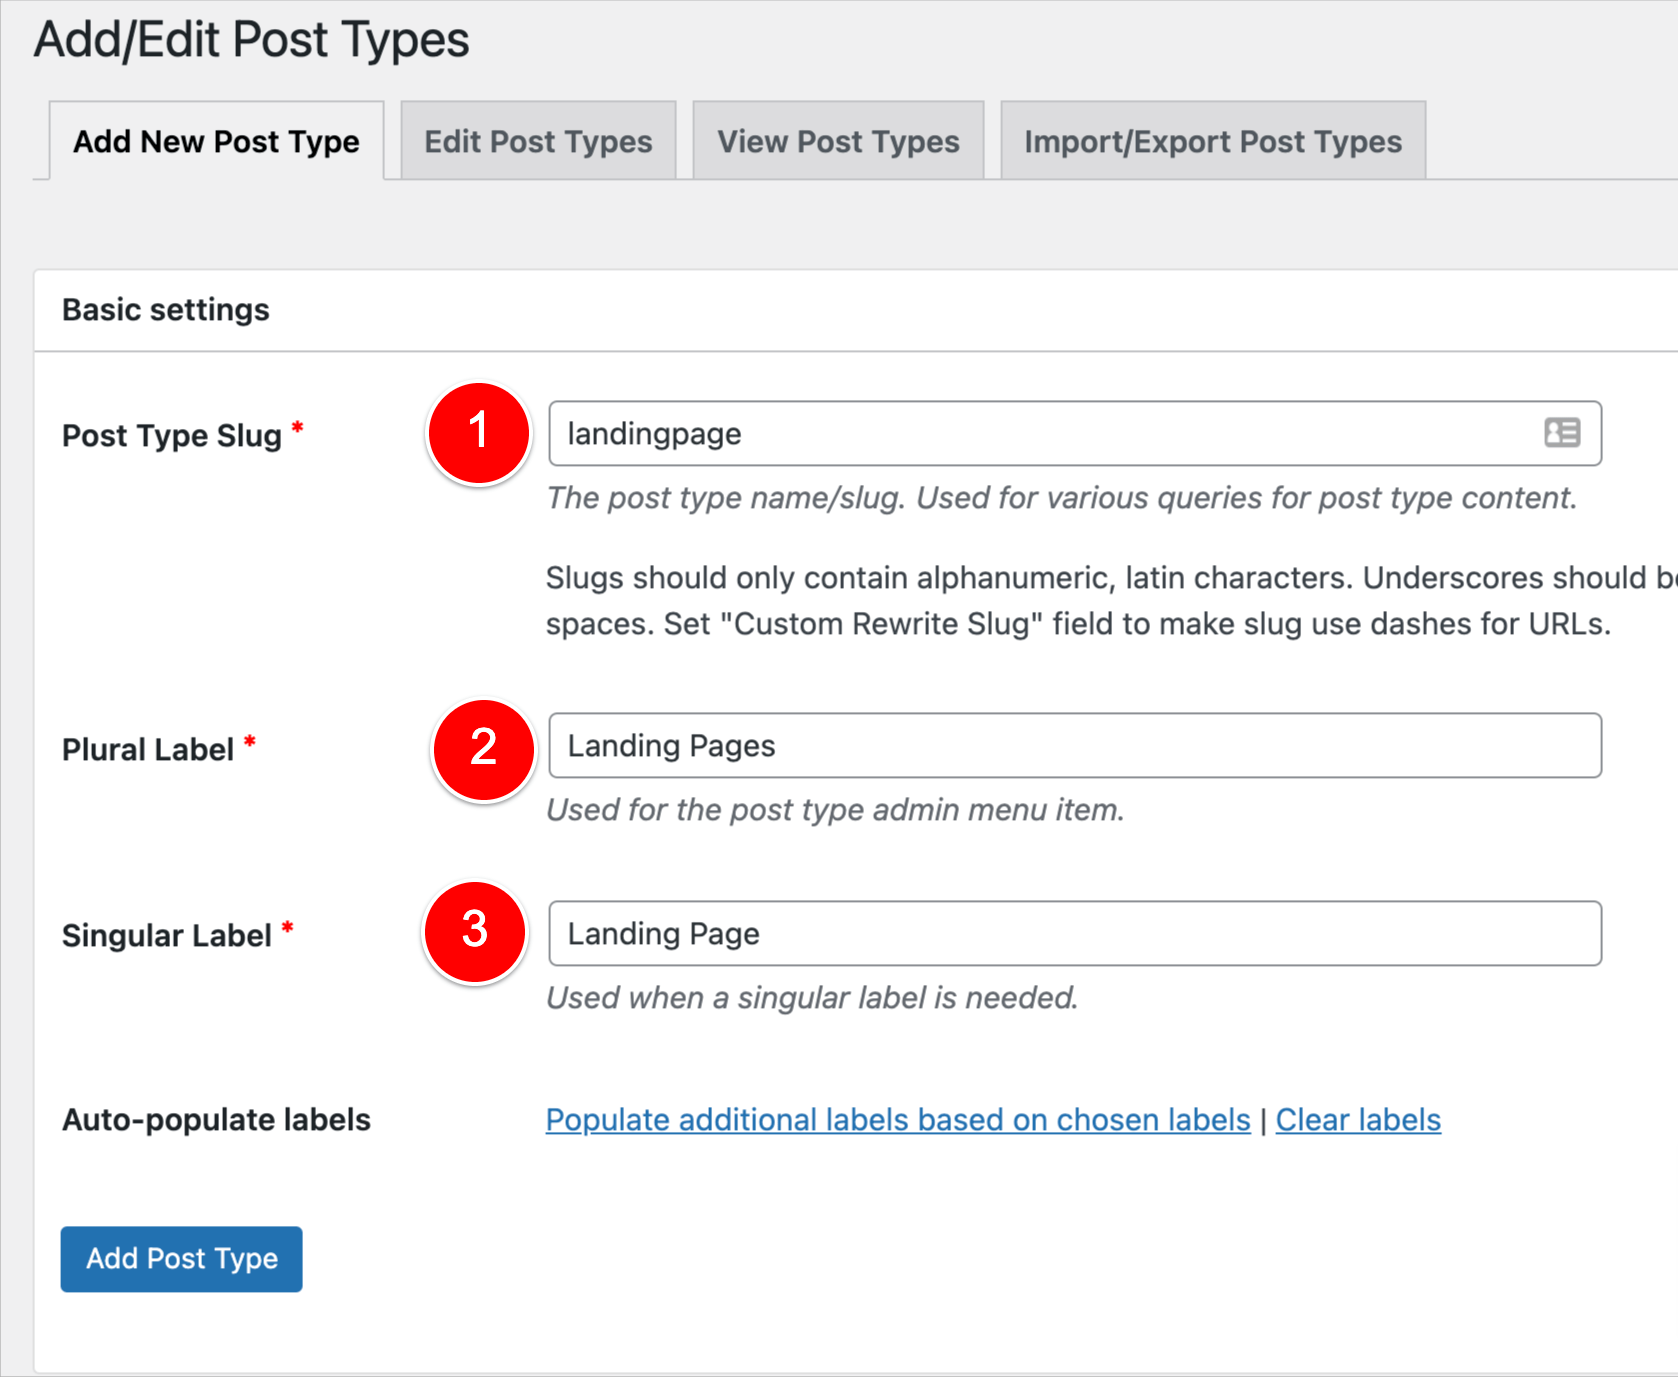
The only other setting I’d recommend changing is the Icon, because hey – it’s fun!
I chose this one, but you can choose any of them.
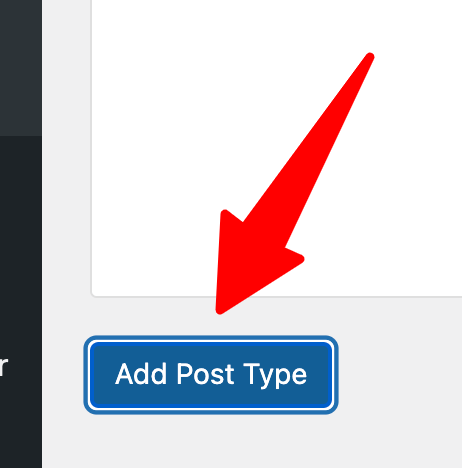
Then scroll down and click Add Post Type.
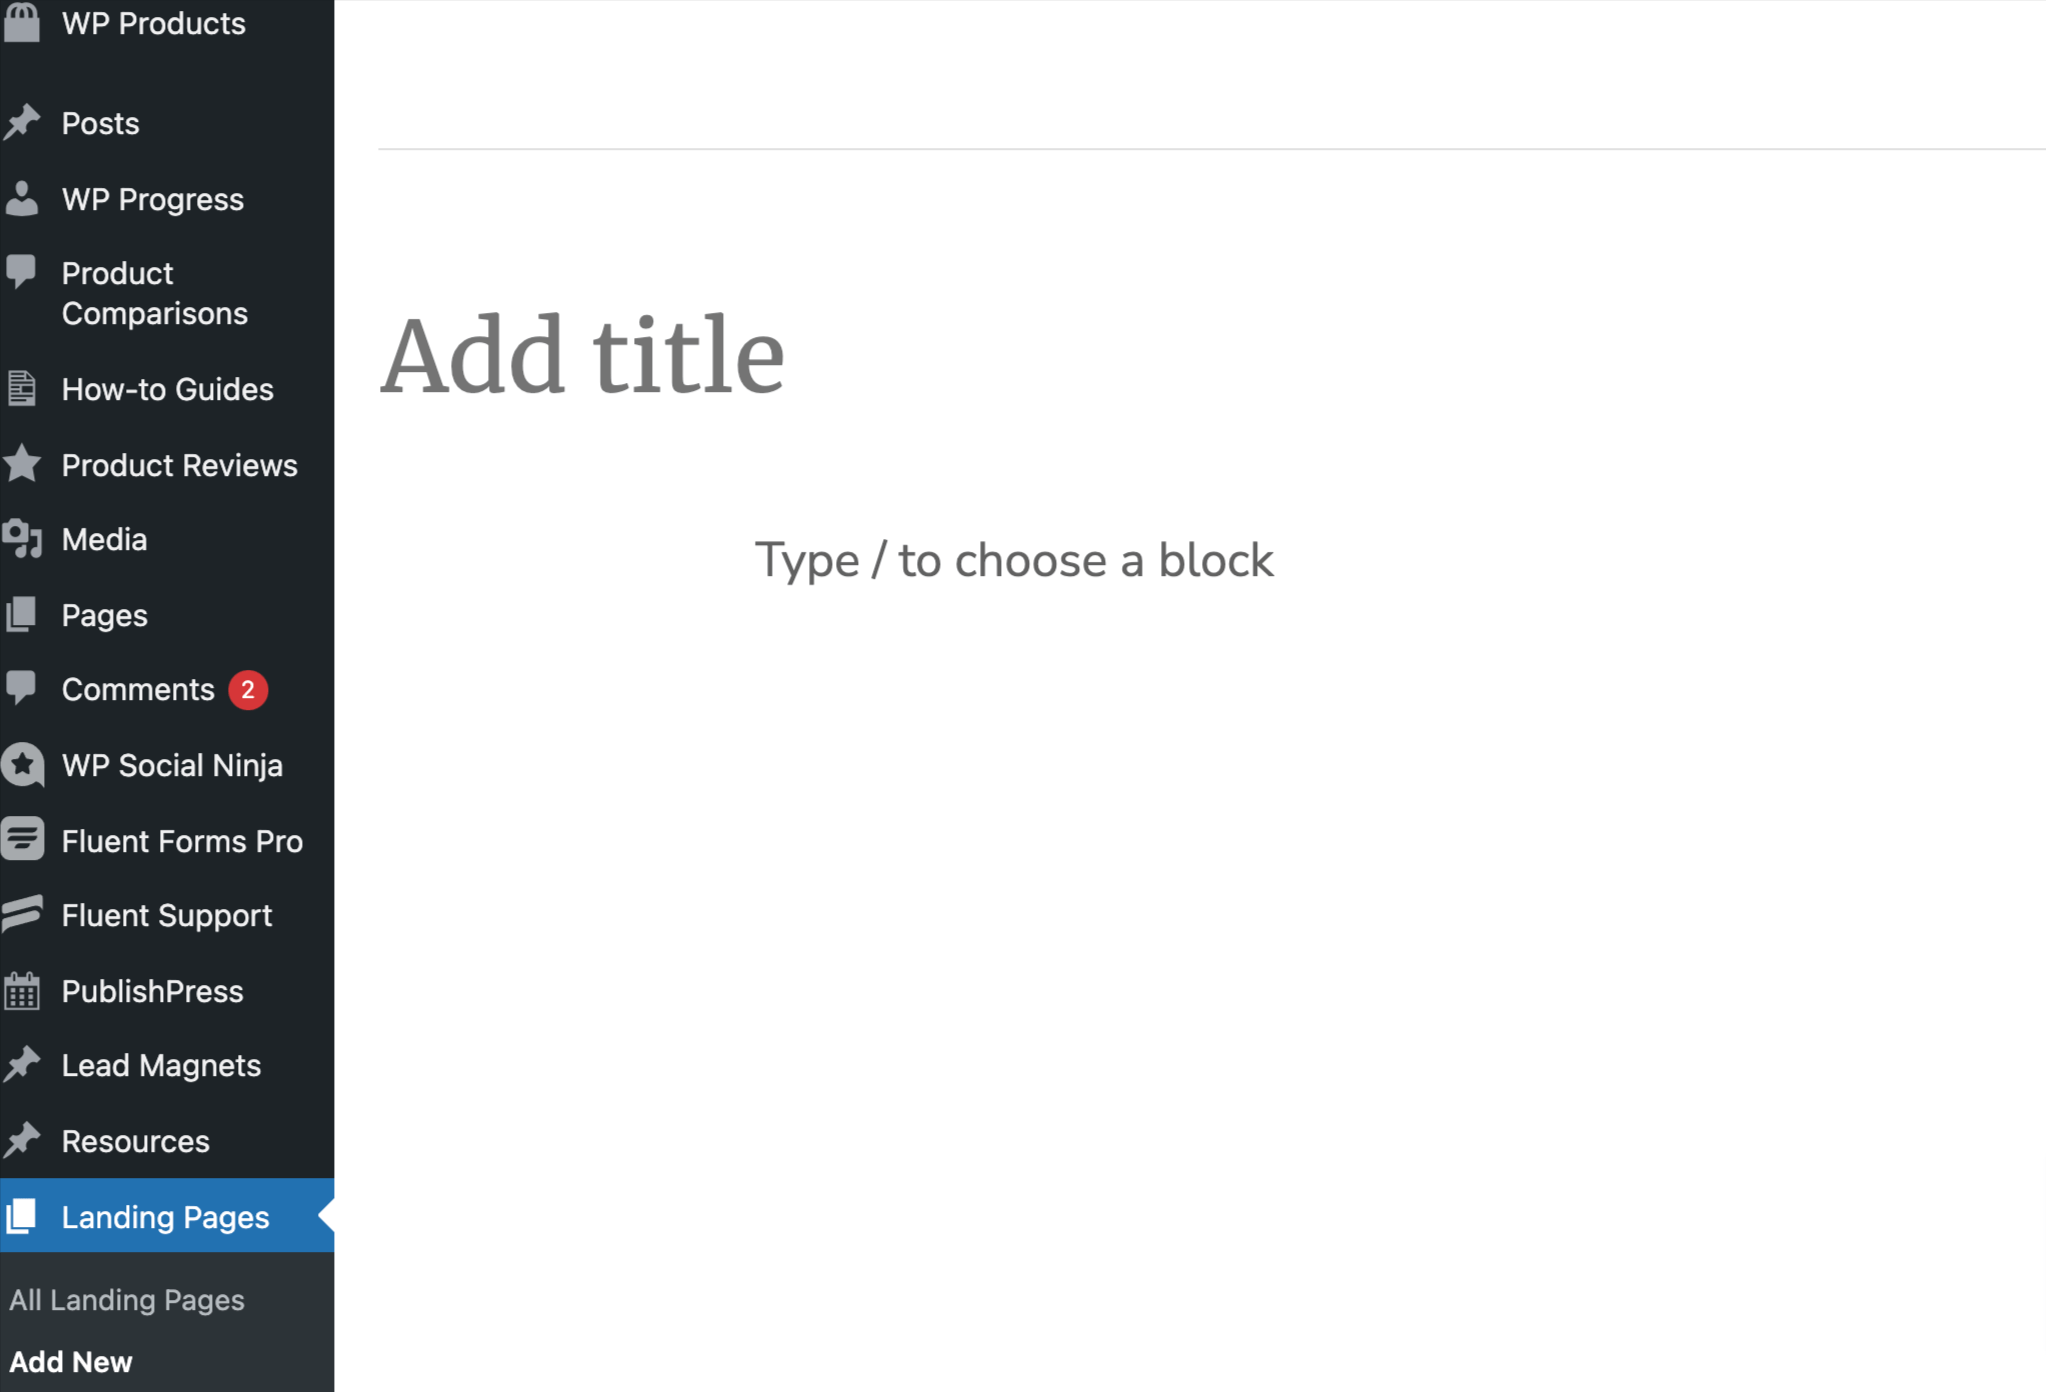
Now you’ll see your new Landing Page post type in the Admin Menu, as shown below.
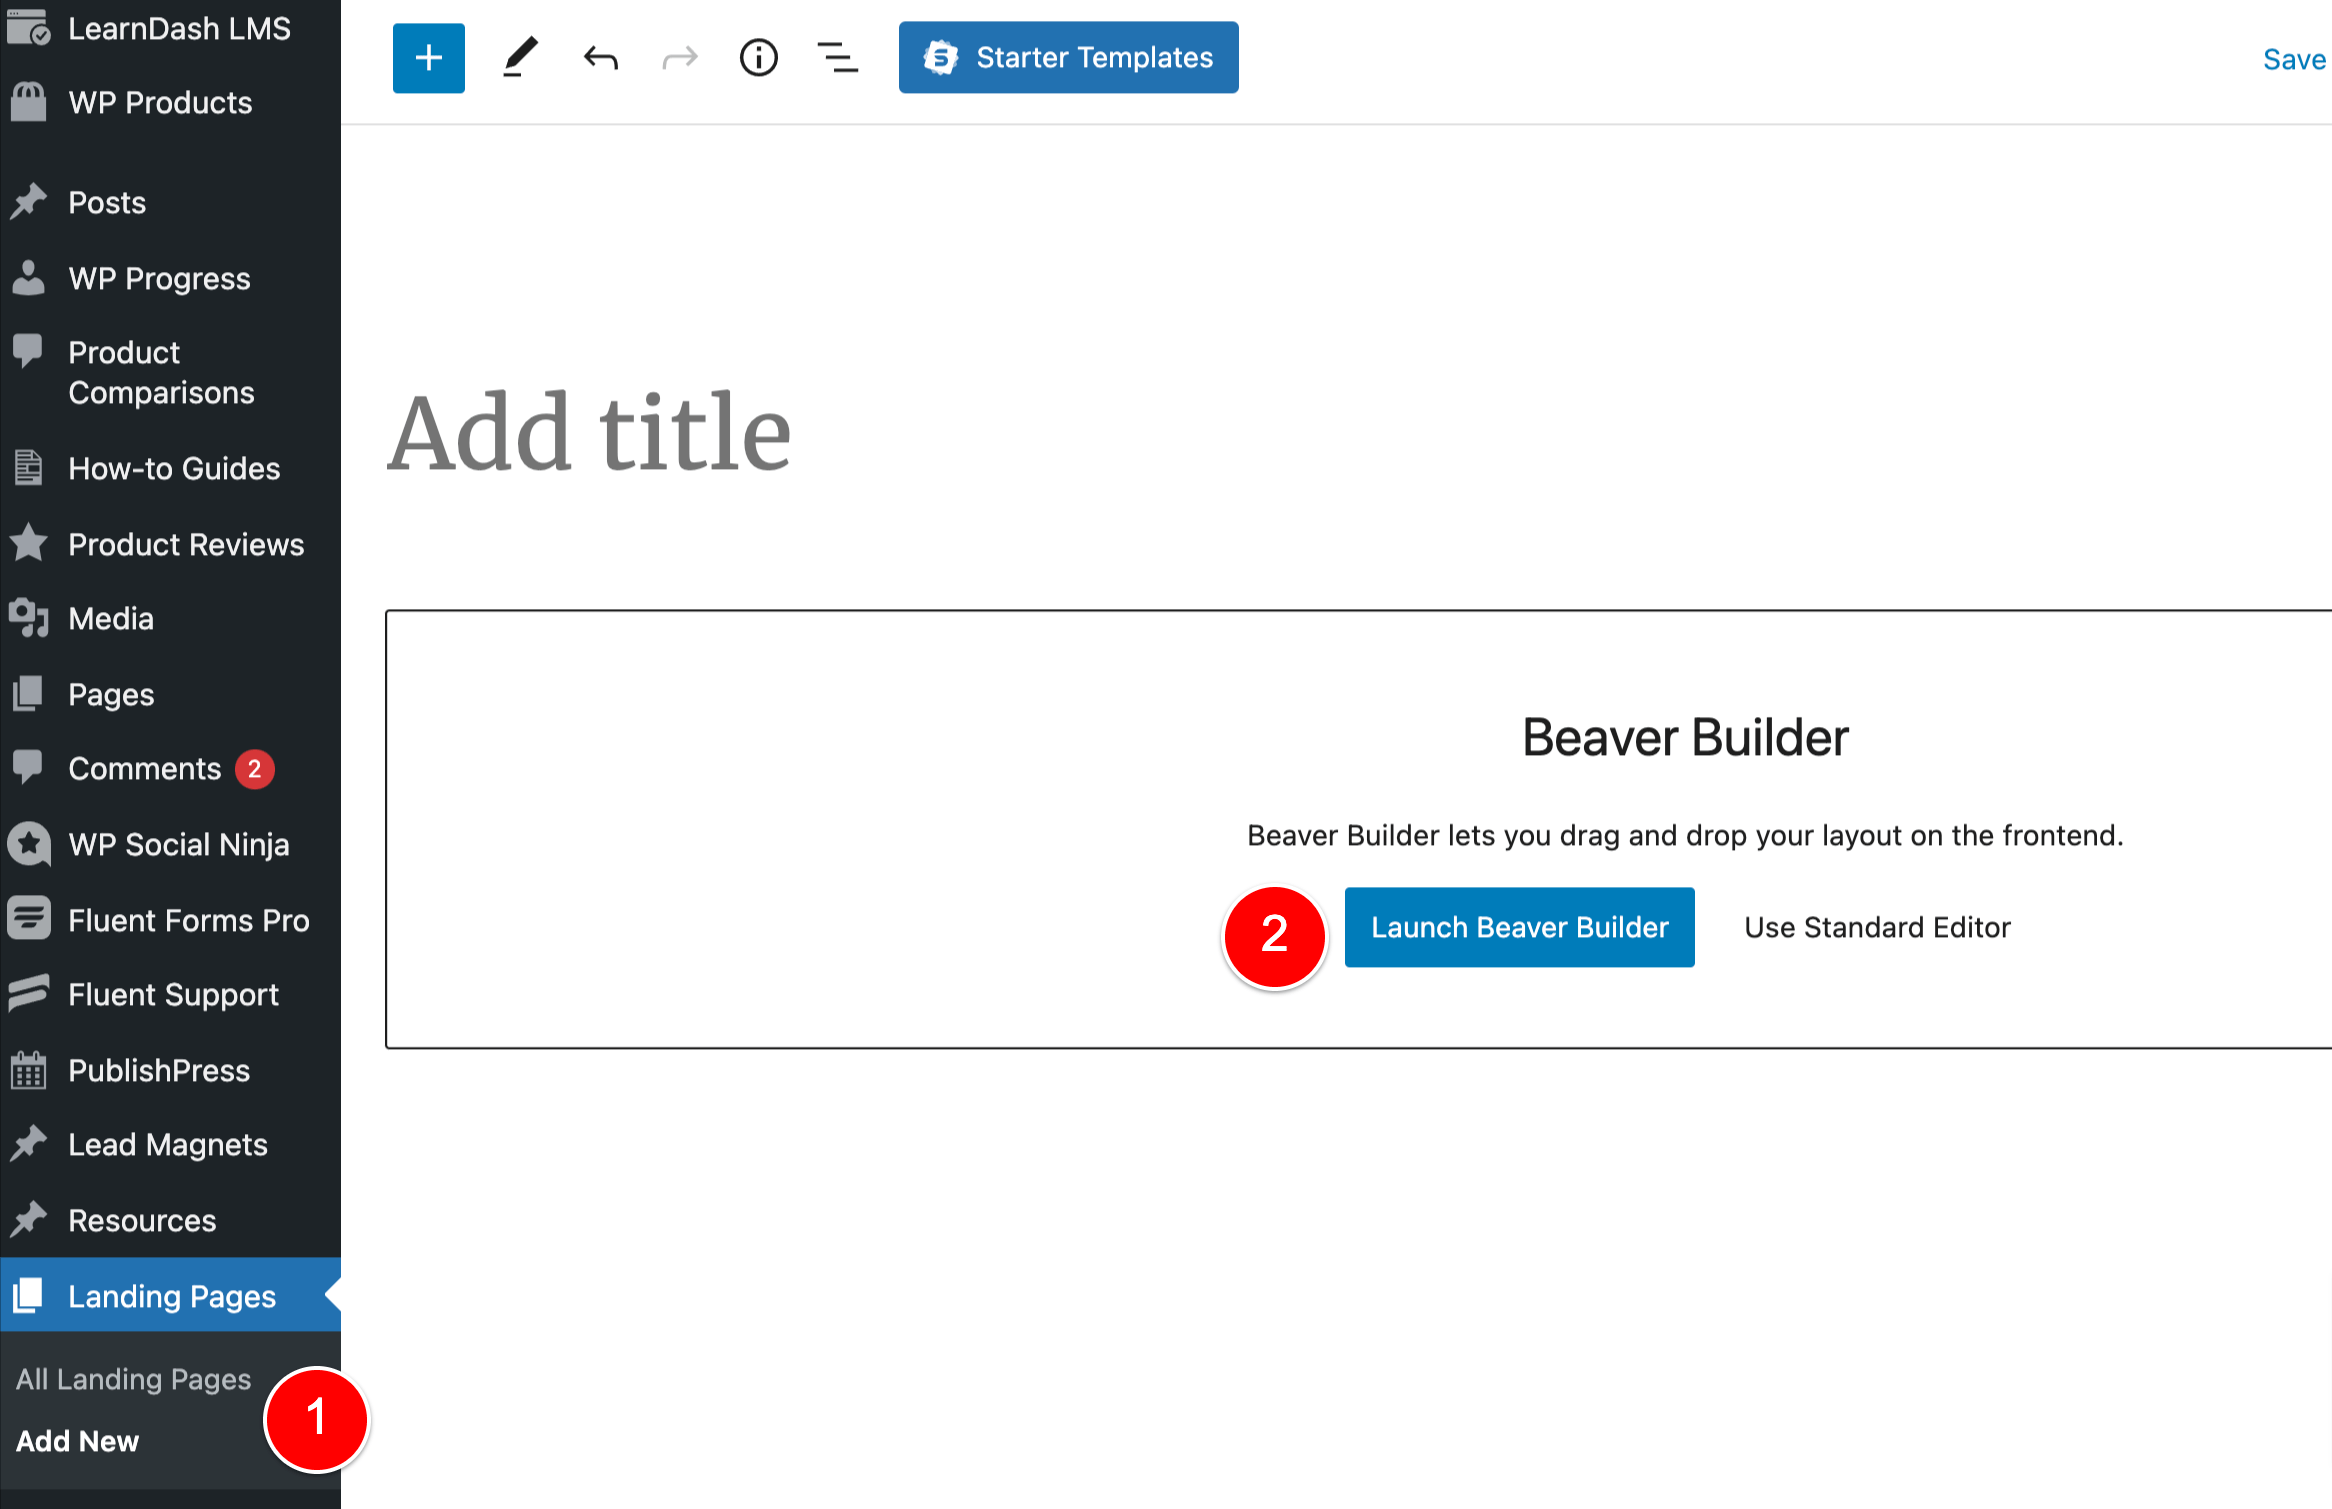
And to add a new Landing Page, you’ll just go to Landing Pages > Add New.
But if you try doing this now and click Landing Pages > Add New, you won’t be given the option to build it using Beaver Builder; only Gutenberg is available for editing, as shown below.
We need to tell Beaver Builder that we want to use it for this post type to build the content.
We’ll cover this in the next step
Enable Beaver Builder to work on our new Landing Page post type
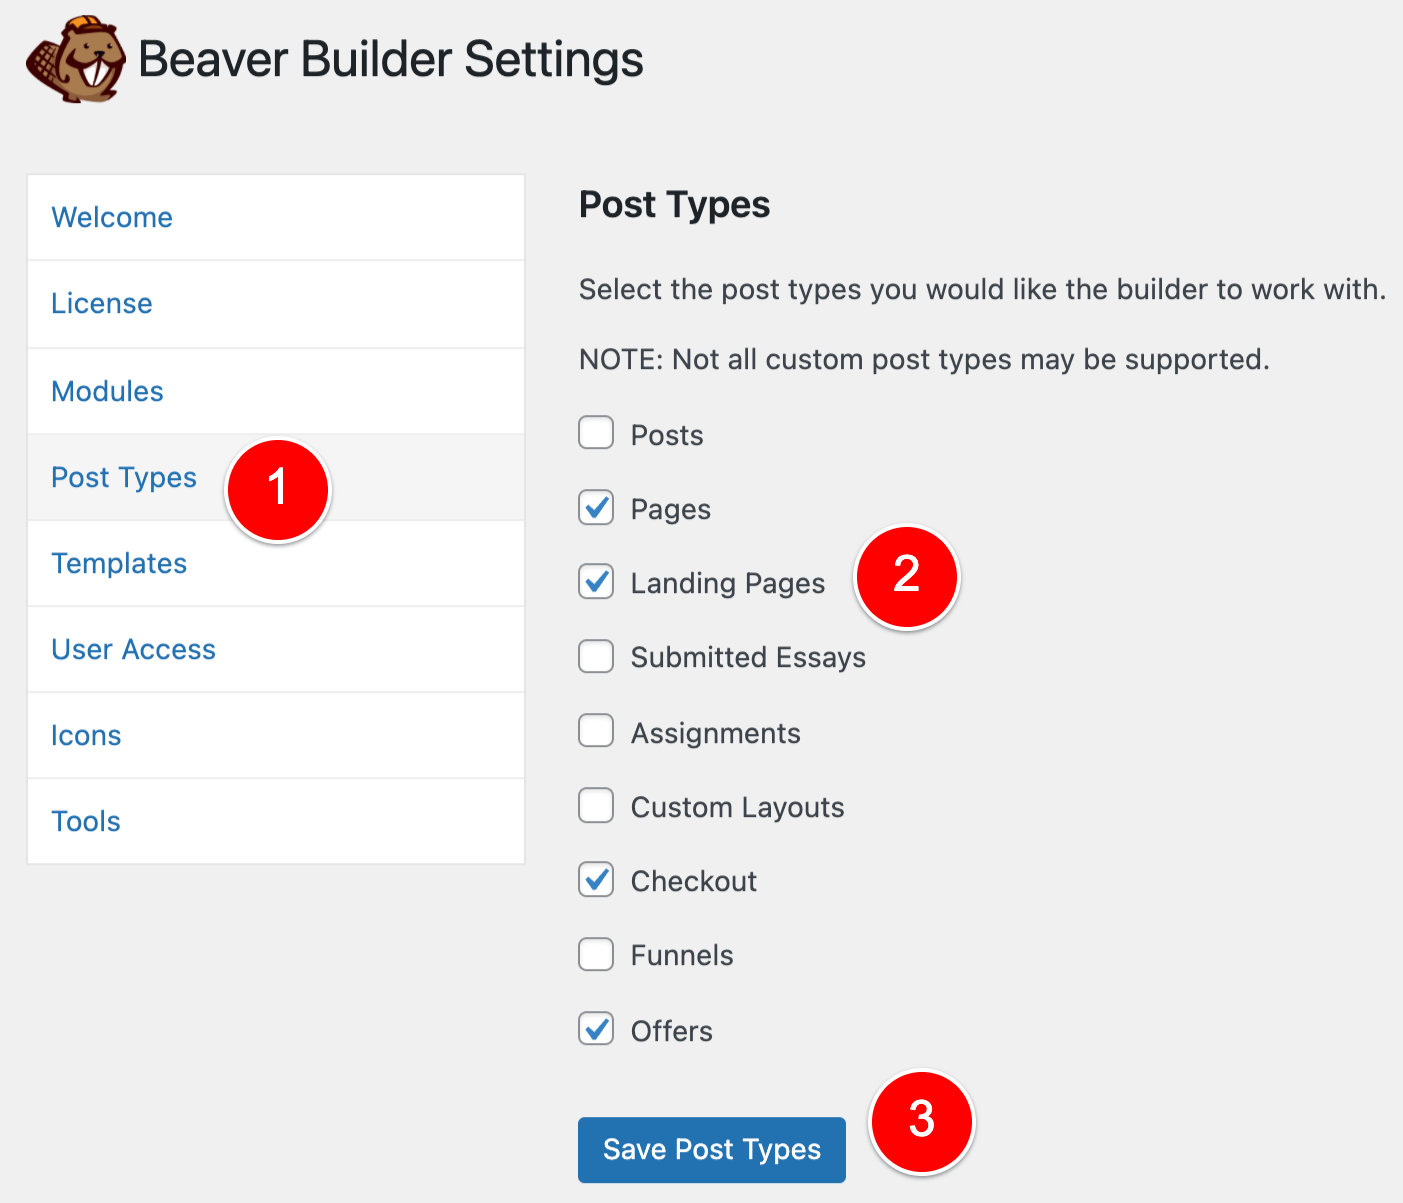
You can customize what post types you want to edit using the Beaver Builder page builder.
To do this, go to Settings > Beaver Builder.
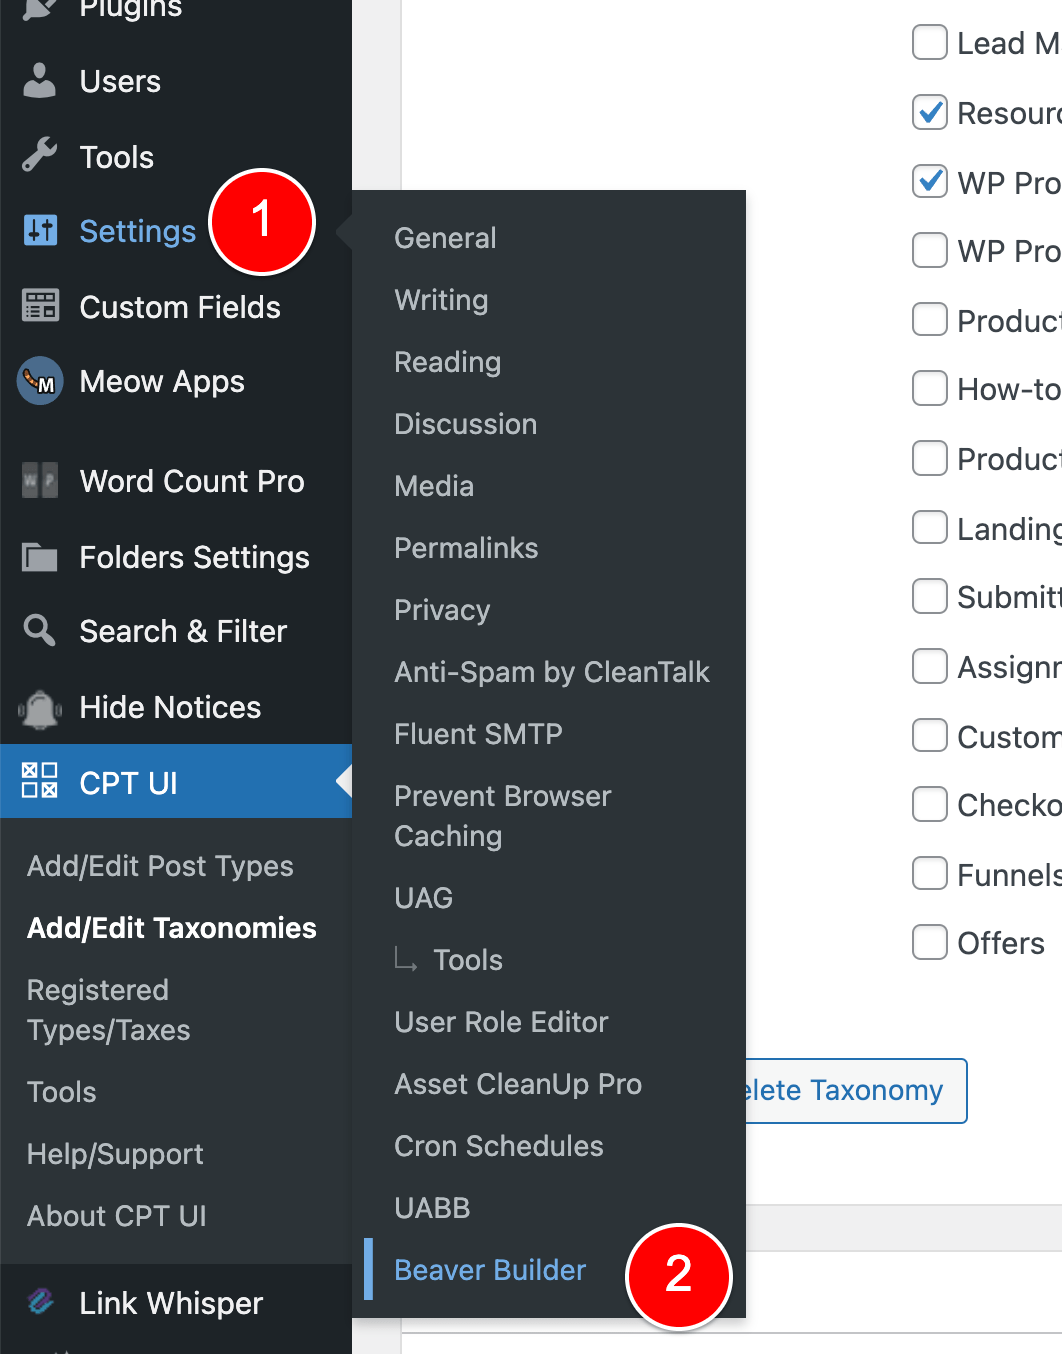
Then Post Types, select Landing Pages and click Save Post Types.
Now if you go to Landing Pages > Add New, you’ll see that you have the option to design the content using Beaver Builder.
But we’re still not there just yet.
Go to Landing Pages > Add New and create and edit a new Landing Page using Beaver Builder.
Save this Landing Page as we will use it in the next section to test a few things as we add a bit of PHP code.
At this stage, you might see something like the below:
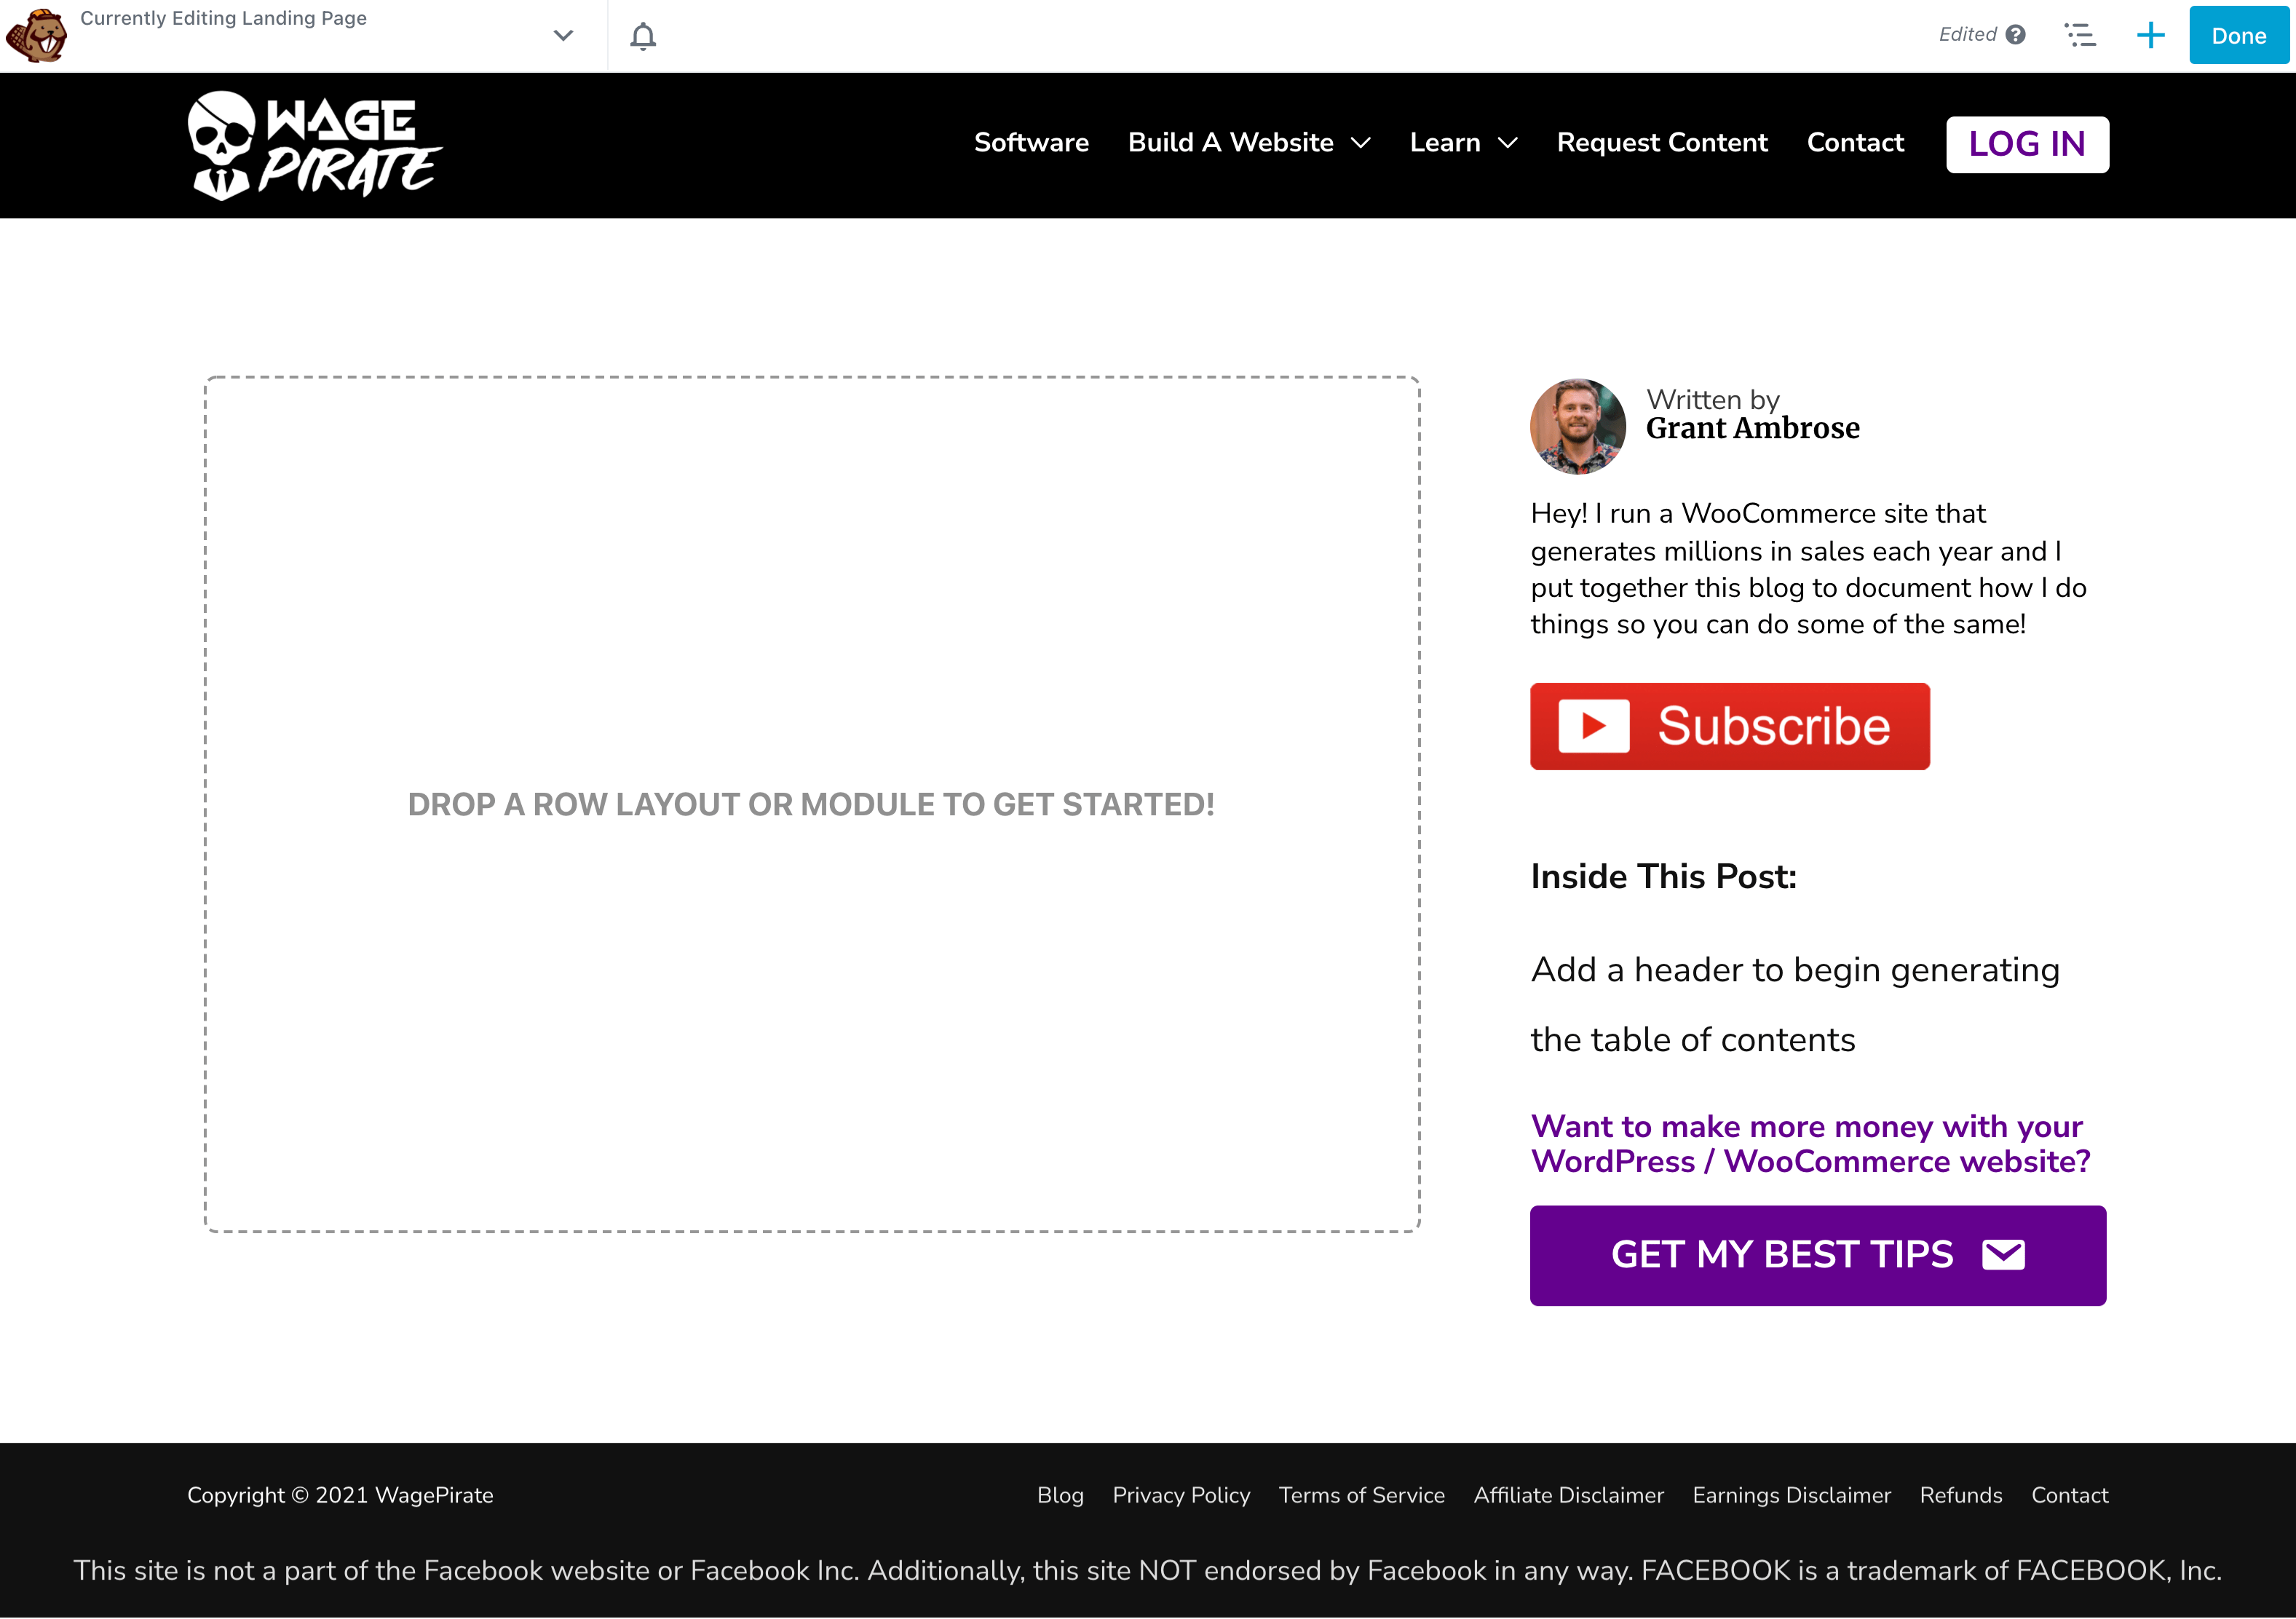
The grey dashed box is the area that Beaver Builder can design within.
We want to do a few things here:
- We want to remove the Header and Footer
It’s very rare that you’d ever want to add your Header and Footer to your Landing Pages because they distract your user from taking the action you want them to do (submit your Opt-in Form or click to go to checkout and buy your product). For that reason, we’ll remove the header and footer for our Landing Page post type - We need to remove the sidebar and force a full-width layout
We want to build our entire page with Beaver Builder, so we’re going to remove the sidebar and then stretch the content area to be 100% width so that Beaver Builder can design the whole page.
Unfortunately, how you remove your Header and Footer on Post Types, as well as how you remove your sidebar and stretch your content 100% is going to depend on the WordPress Theme you’re using.
For this tutorial, I’ll show you how to do these things with the Astra WordPress Theme, which is the WordPress theme I use and recommend.
Removing the Header and Footer in the Astra theme
To remove the Header and Footer on all posts created in our new Landing Page post type, edit your Child Theme’s functions.php file and add the below code.
add_action( 'wp', 'astra_remove_header_footer' );
function astra_remove_header_footer() {
	global $post;
	$global_post_type = get_query_var('post_type');
	$post_types_to_include = array('landingpage');
	if( in_array($global_post_type, $post_types_to_include) ){
		remove_action( 'astra_header', 'astra_header_markup' );
    		remove_action( 'astra_footer', 'astra_footer_markup' );
    		remove_action( 'astra_footer_after', 'ga_do_astra_footer_after' );
    		add_filter( 'astra_single_post_navigation_enabled', '__return_false' );
    	}
}
Code language: PHP (php)
NOTE: If you need to disable the header and footer on multiple Post Types, you just change the following line to be something like below:
Change this line:
<meta charset="utf-8">$post_types_to_include = array('landingpage');
Code language: PHP (php)
To something like this
<meta charset="utf-8">$post_types_to_include = array('landingpage', 'lead_magnets');
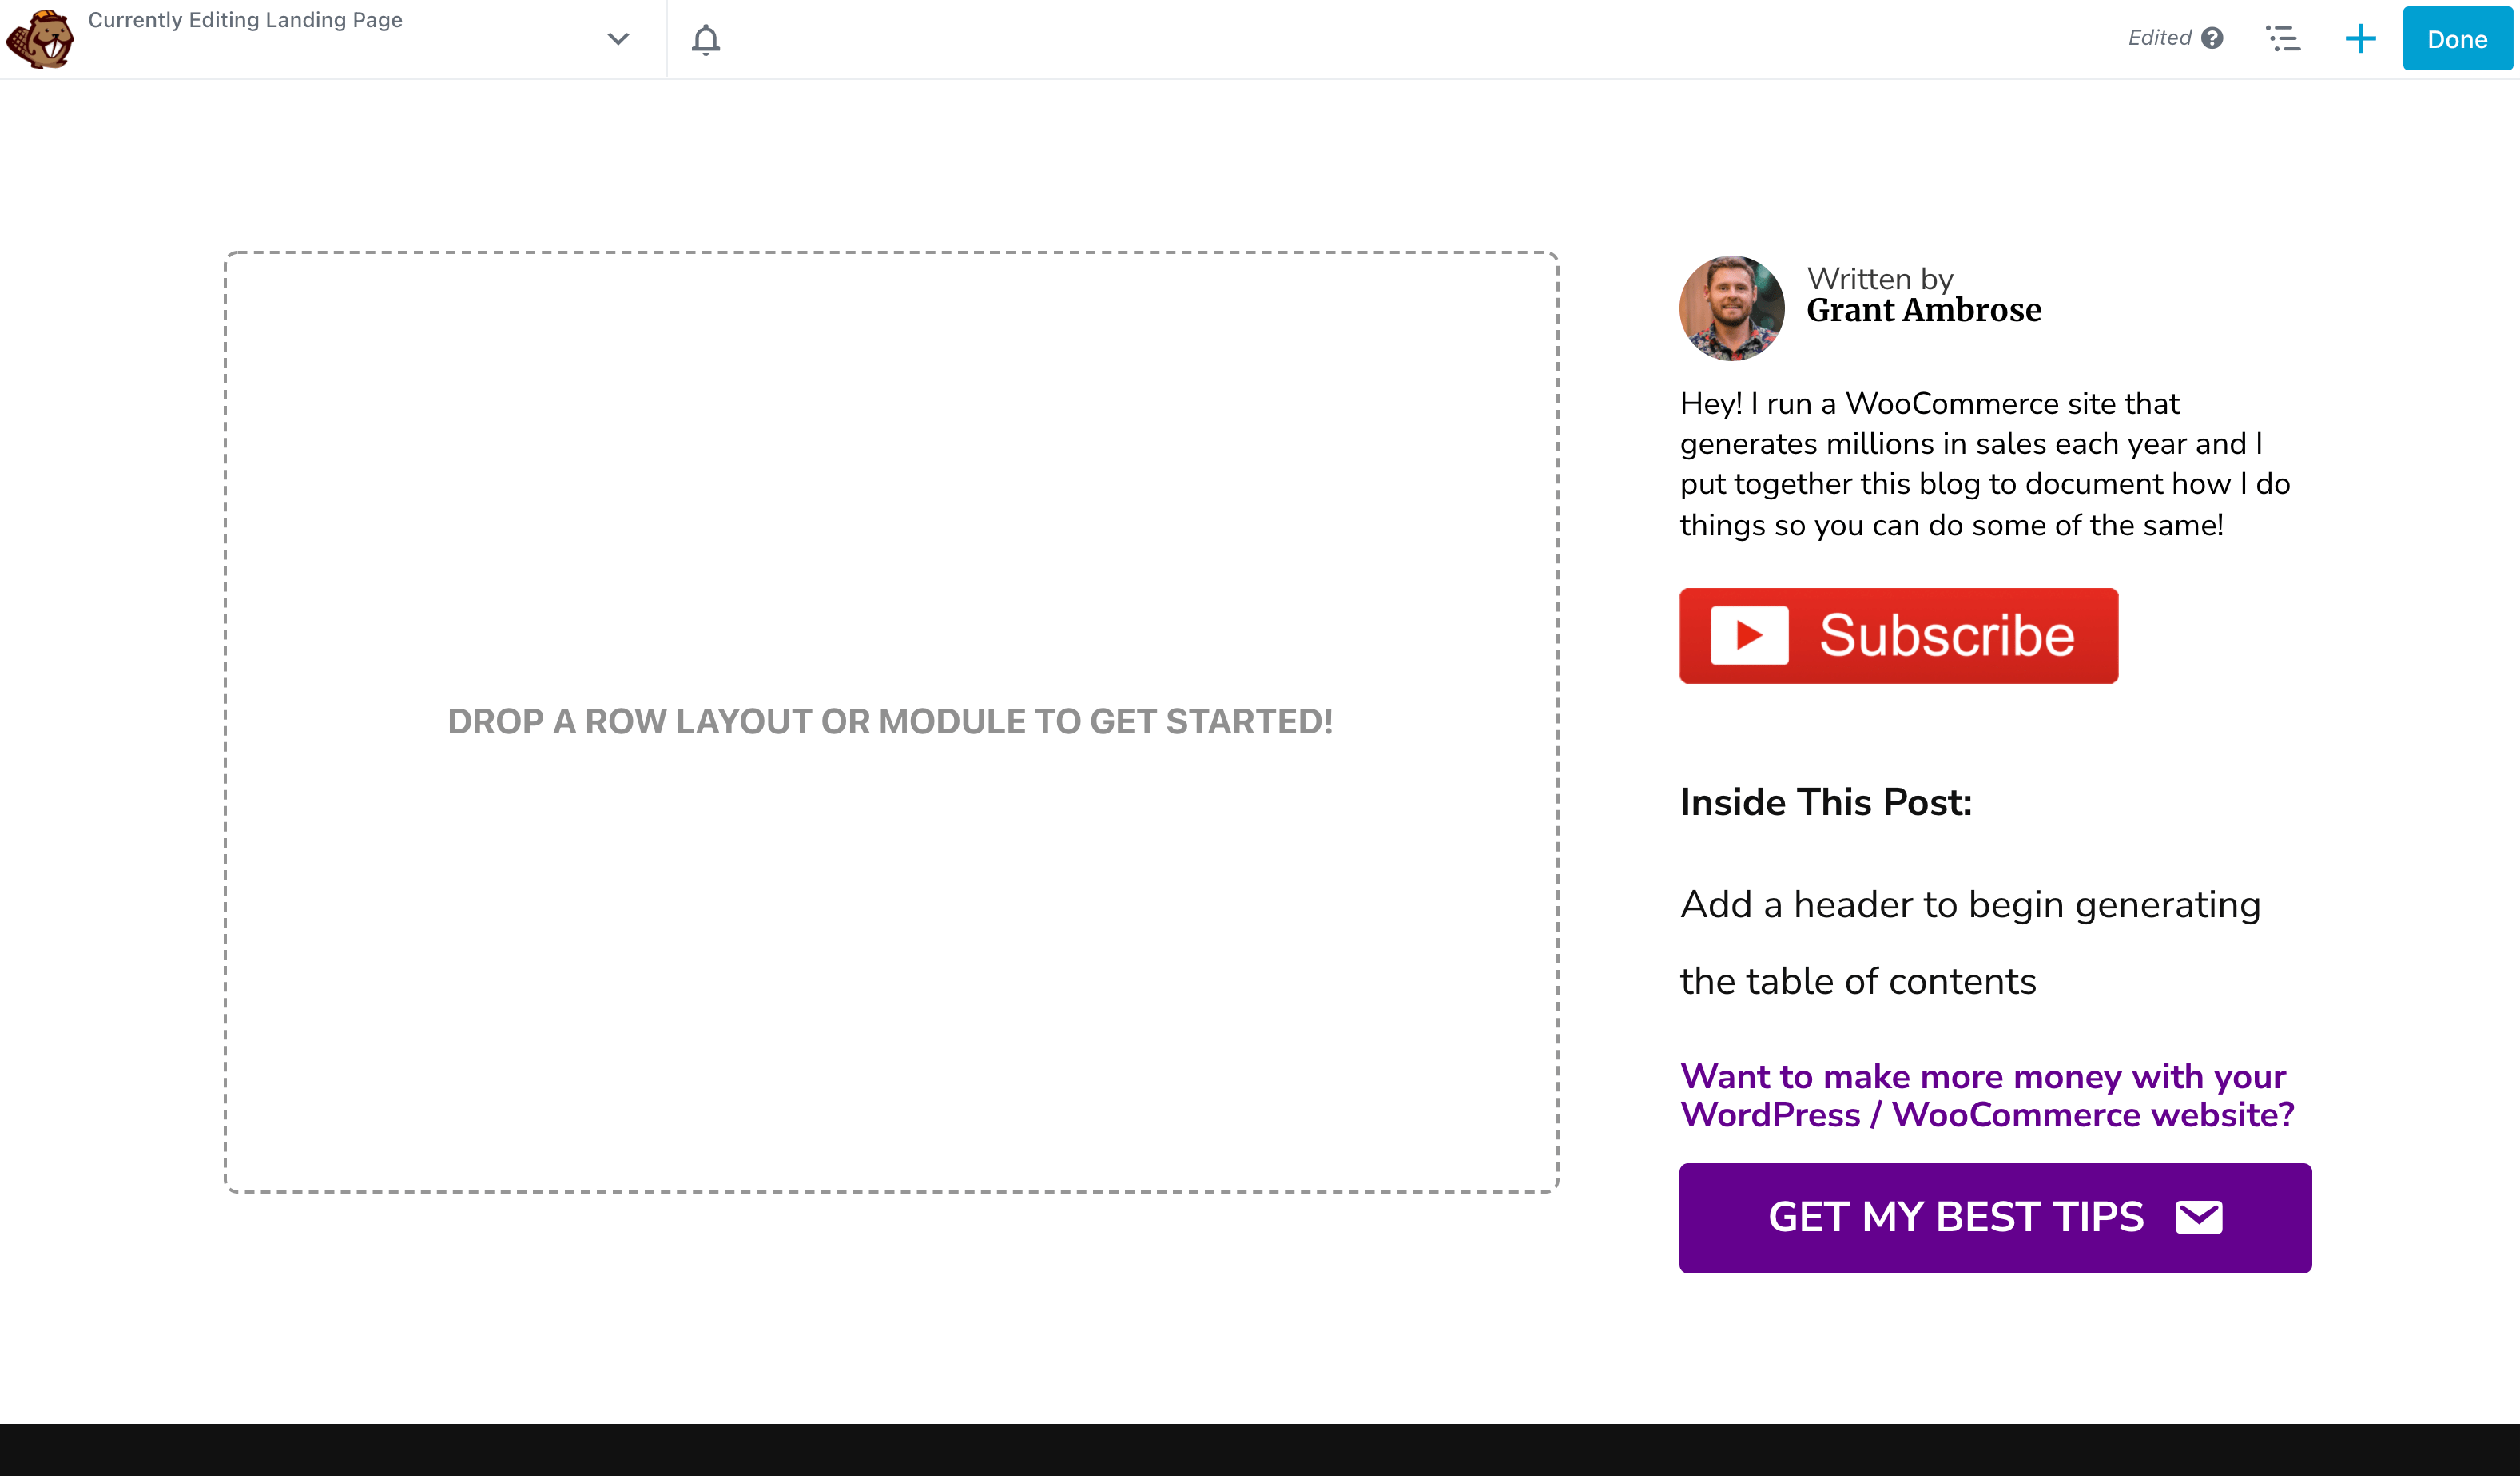
Code language: PHP (php)Save your functions.php file with this new code and then refresh your test Landing Page to ensure that the code worked and our Header and Footer is disabled.
This is what I see now – it worked!
Next, add this PHP code to your functions.php file to remove the sidebar in the Astra Theme.
add_filter('astra_page_layout', 'do_my_astra_page_layout');
function do_my_astra_page_layout($sidebar){
	if(is_singular('landingpage')){
		$sidebar = 'no-sidebar';
	}
	return $sidebar;
}
Code language: PHP (php)
And lastly, add this code below to force your content width to be 100%.
add_filter( 'astra_get_content_layout', 'my_content_layout');
function my_content_layout($layout){
	if(is_singular('landingpage')){
		$layout = 'page-builder';
	}
	return $layout;
}
Code language: PHP (php)
Save your functions.php file with these changes and then go back and edit your test Landing Page.
You should now see no header or footer, no sidebar and your area that you can design with Beaver Builder should be the entire page and 100% of the width.
This is shown below.

If you have the Astra Theme – that should be been quite easy to follow.
For other themes – I’m really sorry I couldn’t be more specific for you, but your theme should operate under the same logic we used here for Astra.
The best thing to do is reach out to your theme developer and ask them for the code to achieve what we have just done here.
Seriously – that’s the hard stuff all set up.
Let’s get into designing our Landing Pages.
Design your Landing Page
Just like a normal page, drag-and-drop in your modules to build your Landing Page.
As I said at the start of this How-to Guide, I won’t humour you by teaching you how to build your page using Beaver Builder, as I’m thinking you already own it if you’re reading this article.
Here are a few tips I find very helpful when I’m building my Landing Pages / Sales Pages for my Sales I build using FunnelKit…
Design your pages at a narrower width to overcome “writer’s block”
I find that sometimes designing a Landing Page that is very wide becomes overwhelming because of all the space I need to fill.
Sort of like a writer who can’t get started because they’re staring at a blank page.
What I find helps me overcome this, is make the content area that I am designing narrower – around 960px.
Sometimes I’ll do this to start so the space to fill with my design isn’t so large and then after I’ve completed half the page, I’ll reset the area to be wider again – see what works for you.
To make the Content Area narrower, edit a Row and its settings as shown below.
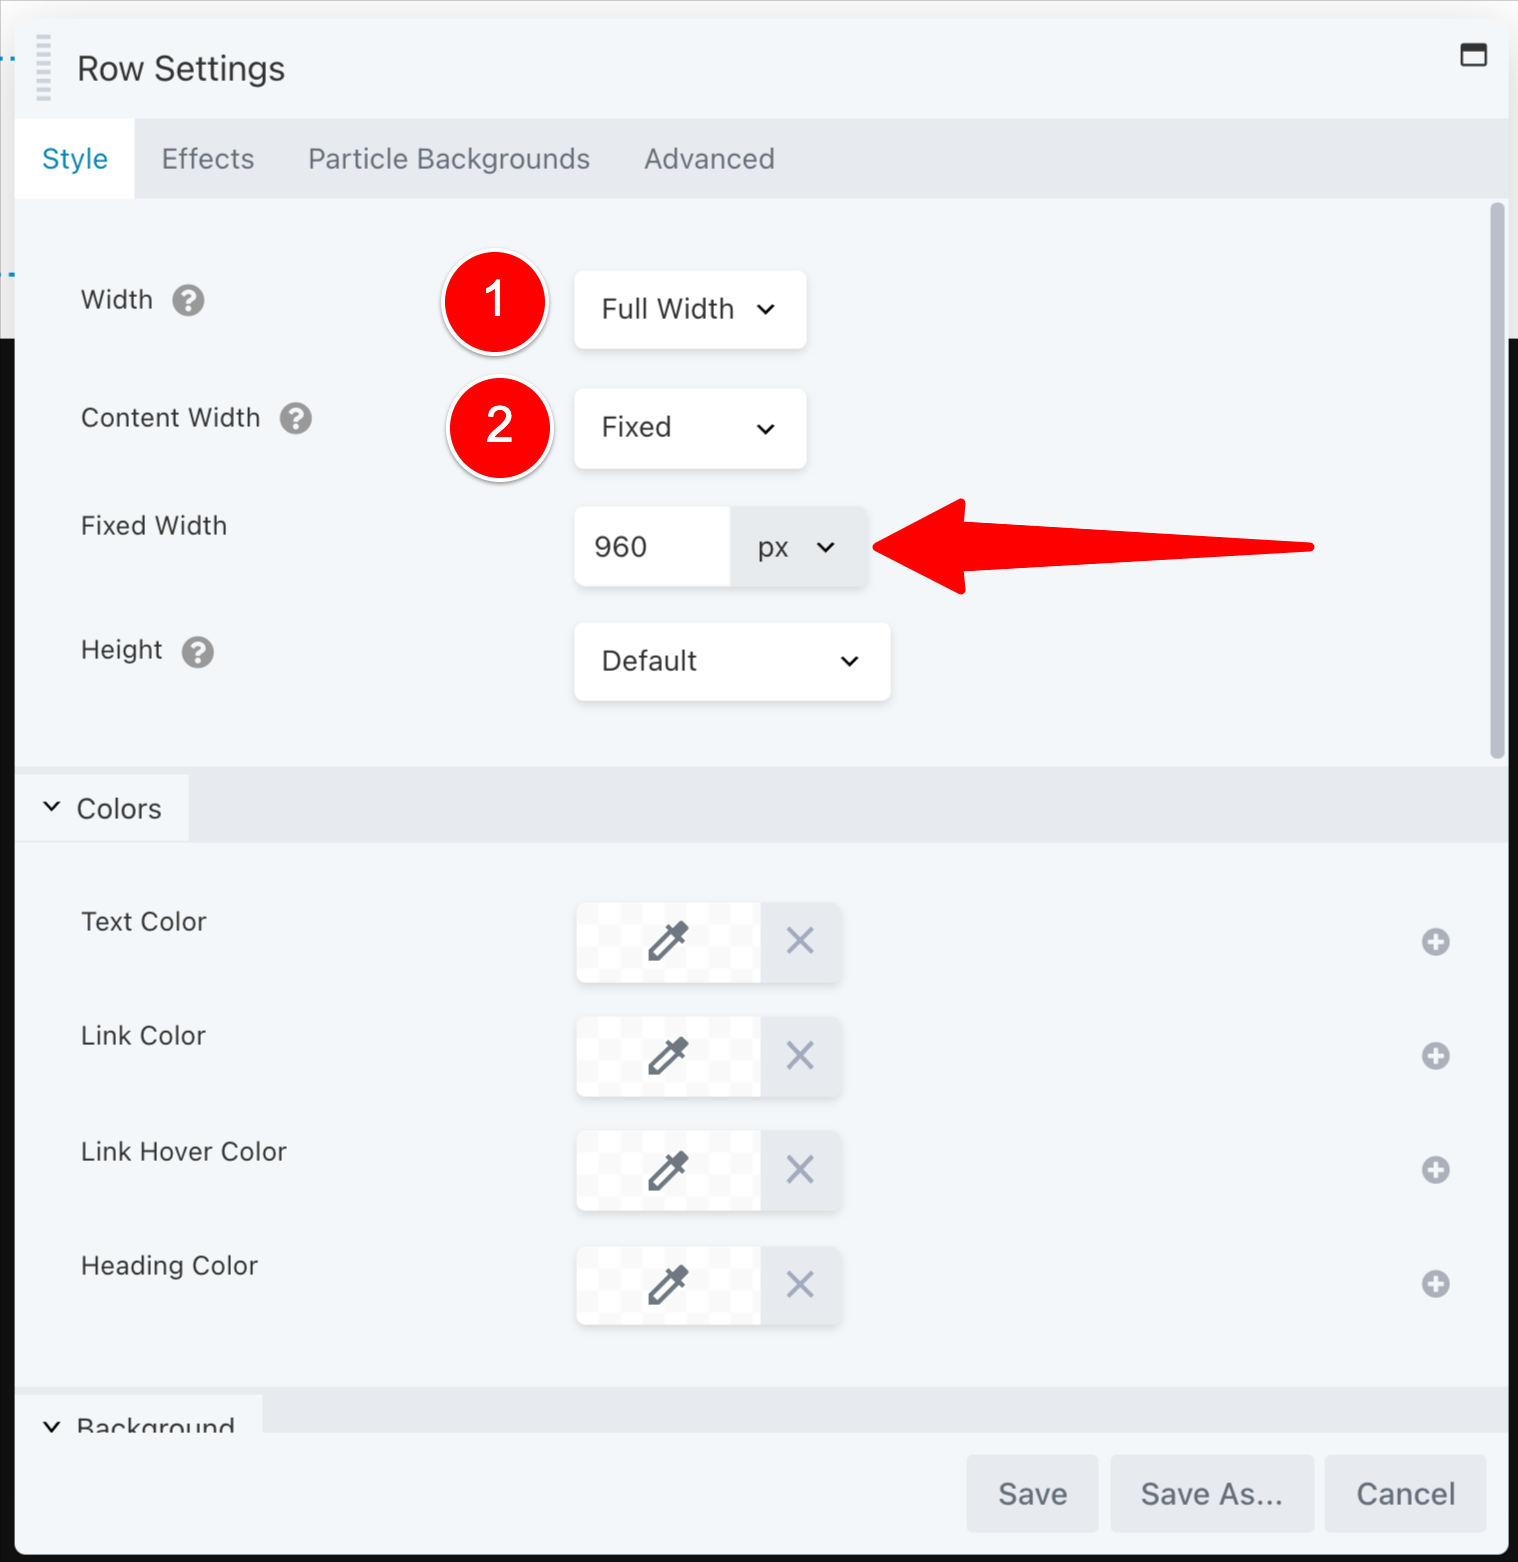
But the downside is you need to do that for every row you add to your Landing Page.
And if you later do decide (after a bit of designing) that you’re comfortable making the page width wider again, you have to go in and edit every row on your page.
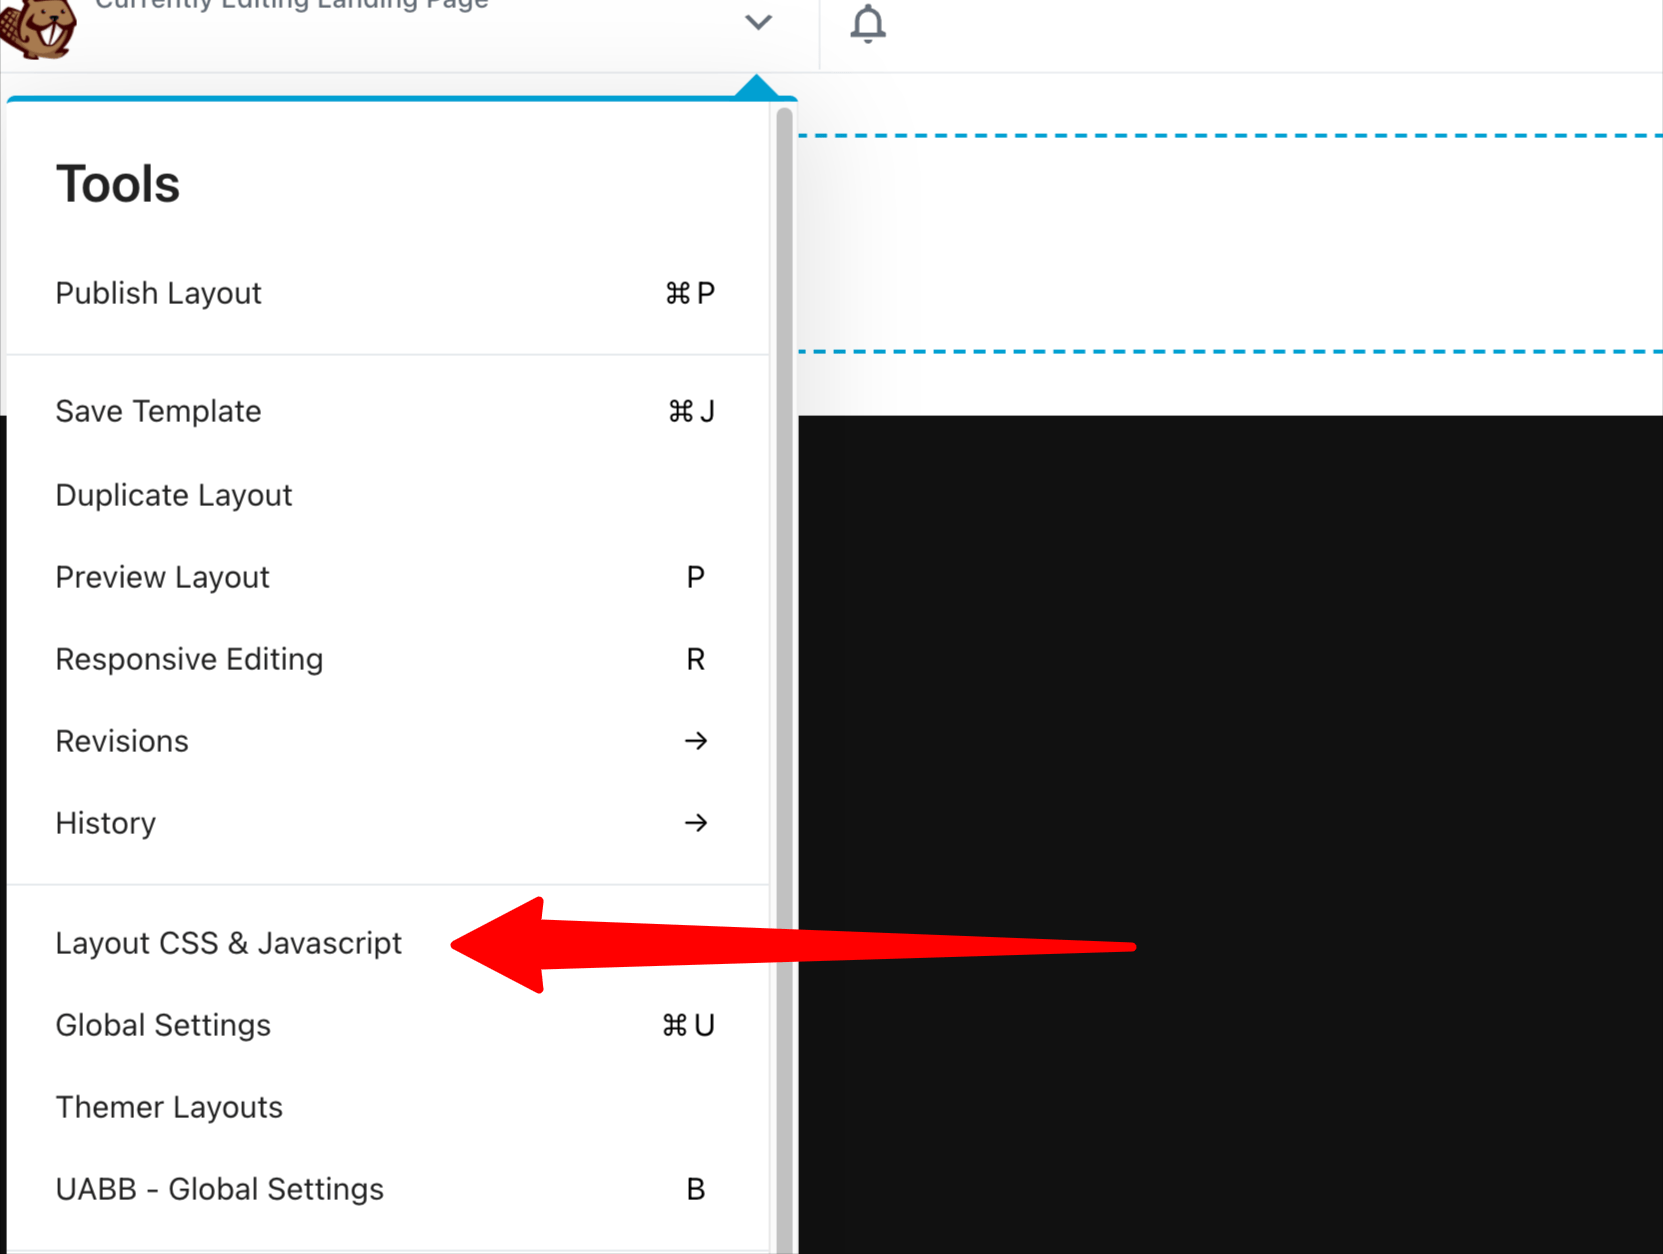
An easier way I find is to go to go to Layout CSS & Javascript…
Then add this CSS (1) and click Save (2).
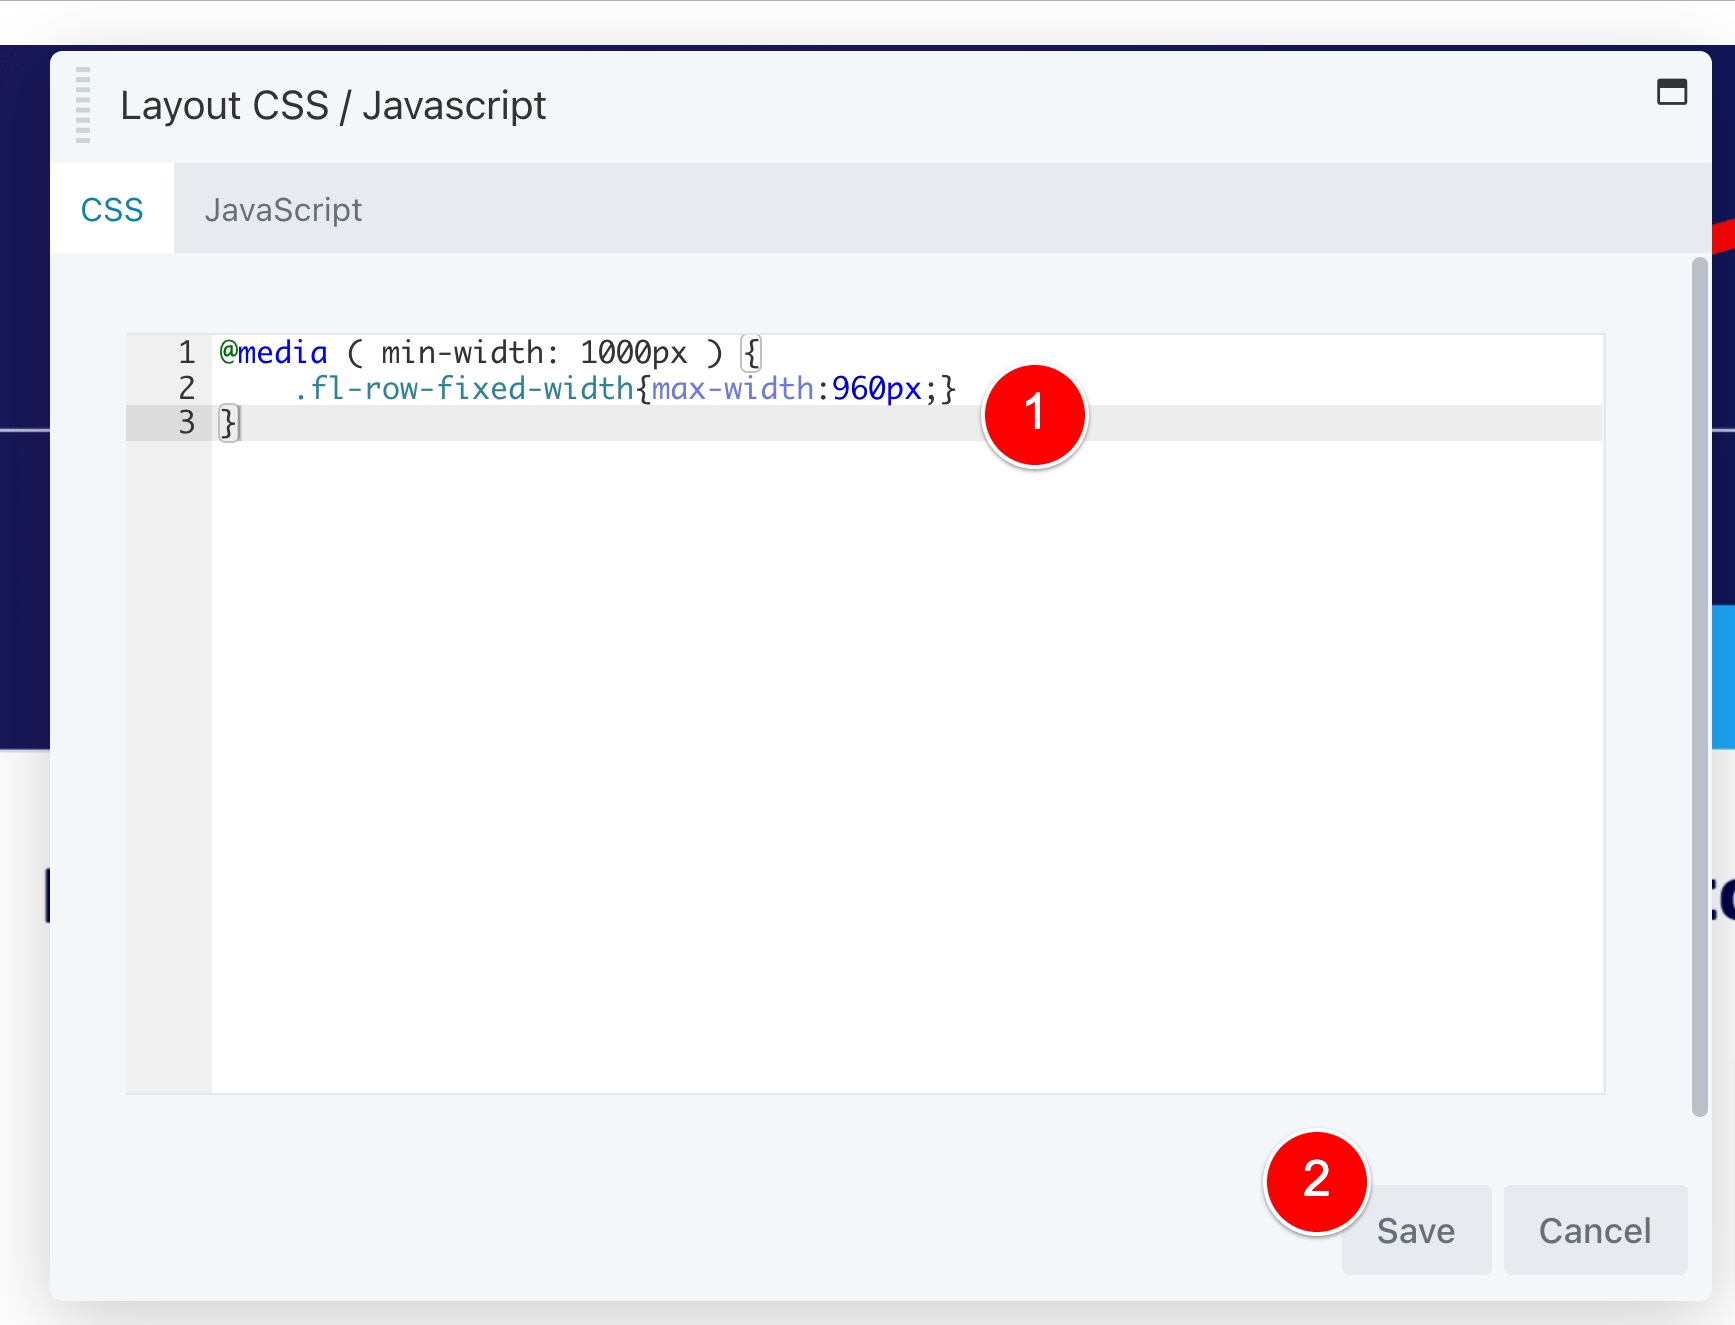
@media ( min-width: 1000px ) {
    .fl-row-fixed-width{max-width:960px;}
}
Code language: PHP (php)
So now you can just comment out / remove this CSS code if you do decide to make your layout wider and all rows on the page will update their width instantly.
Don’t start with Templates
I have tried and tried so many times to use Templates with the thought that doing so would save me time, but using Templates seems to extend the design process for me.
And I don’t say that light-heartedly.
There is a plugin called Ultimate Addons for Beaver Builder plugin (UABB).
If you click the link above and go to their website, you’ll see that UABB gives you extra Beaver Builder modules you can use to build your pages with, along with Page Templates.

I have paid for this plugin and I highly recommend it if you’re using Beaver Builder because it unlocks a lot of potential with the extra modules it brings into your Beaver Builder website.
But the Page Templates – I just can’t make them work.
I choose a template, import it into my website and I feel like I spend more time adjusting things to how I want them than I would just building the page from scratch.
The reason we buy, use and love Beaver Builder is because of how fast it allows us to build websites.
So that’s why I just do the following…
Find a Landing Page that you like and build it from scratch
The easiest method to build high-quality Landing Pages in Beaver Builder is to draw inspiration and build from the ground up.
Here is an example of how I used this in my business.
For my Ecommerce brand, before I switched over to building sales funnels with WordPress using FunnelKit, I was using ClickFunnels for our Sales Funnels.
I found this template that ClickFunnels had in their library and I really liked it (this isn’t the entire design, this is just the above-fold section, as an example).

So when I recently had to design a Landing Page using Beaver Builder, I was searching online for inspiration and I remembered that I liked a few templates that ClickFunnels had.
I logged in there, found this design and then I recreated a similar one using Beaver Builder.
I had this fully designed in under an hour.
I strongly feel that you’ll build better pages faster by using inspiration and starting from scratch VS importing a Page Template and trying to tweak it to your liking.
At this stage, you’re pretty well set up to use Beaver Builder to build Landing Pages and this is where I sat comfortably for a while.
But as I really started to scale up my businesses and create a lot of Landing Pages and Lead Magnets, I started to find that I needed a better way to organise everything I was doing.
In these new few sections, I am going to cover a few more advanced topics that I have learnt along the way in regards to organising my Landing Pages in WordPress.
If you are running a decent-sized business that is producing (or anticipating building) a lot of Landing Pages, you’ll want to keep on reading before it’s too late.
Organise your Landing Pages into Folders
I use a plugin called Folders by Premio which allows me to organise any Post Type’s posts into folders.
On my Demo website, this is what my Landing Pages’s post type looks like.
On my main website, I group my Landing Pages by Campaign but you can choose to organise it however you want.
In the plugin’s settings, you just enable the Folders plugin to show for the Landing Page post type…
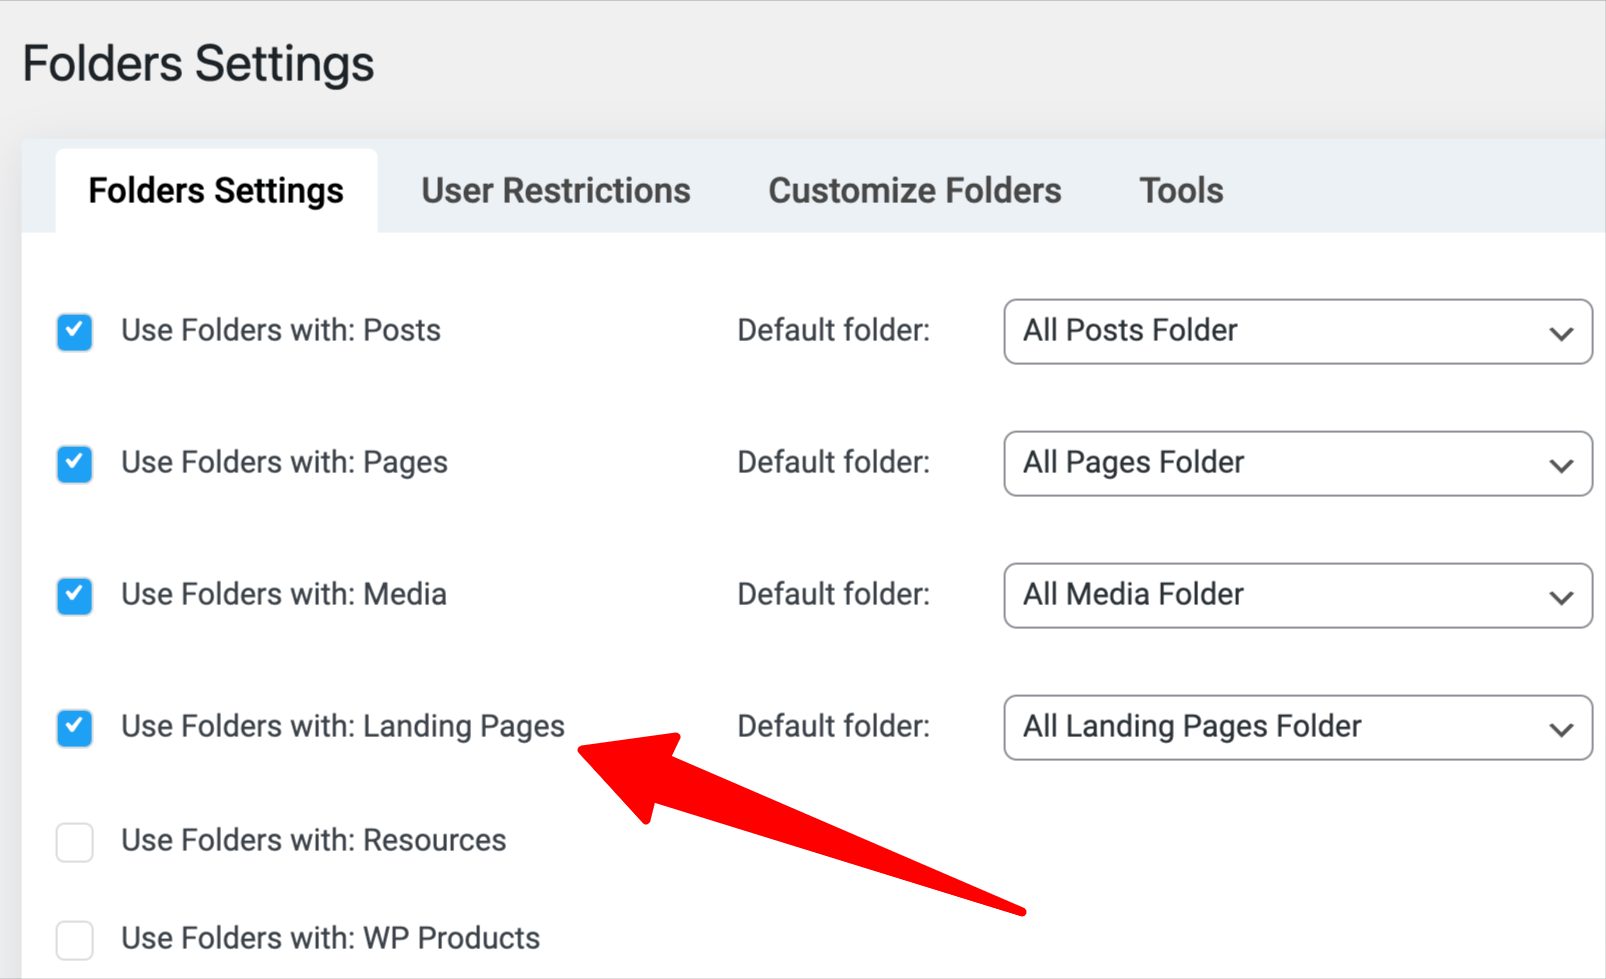
And then you’re good to go.
Side note – I actually got this plugin to manage my Media Library and it works really well for that, too!
Use Conditional Logic to reduce the number of Landing Pages you need
One of my favourite features about Beaver Builder is the Conditional Logic you can apply to each thing on the page to show / hide it based on rules.
You can leverage this feature in Beaver Builder to reduce the number of pages you need to create for your Landing Pages…
Which makes managing your Landing Pages even easier with Beaver Builder!
To do this, I create everything to do with my Landing Page in one design.
We all love examples, so let’s get into one…
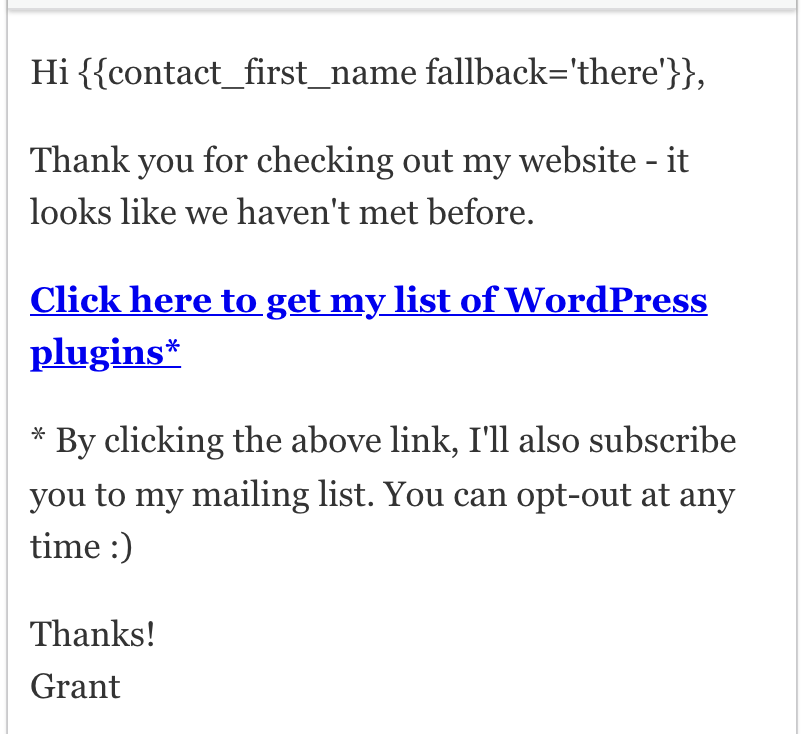
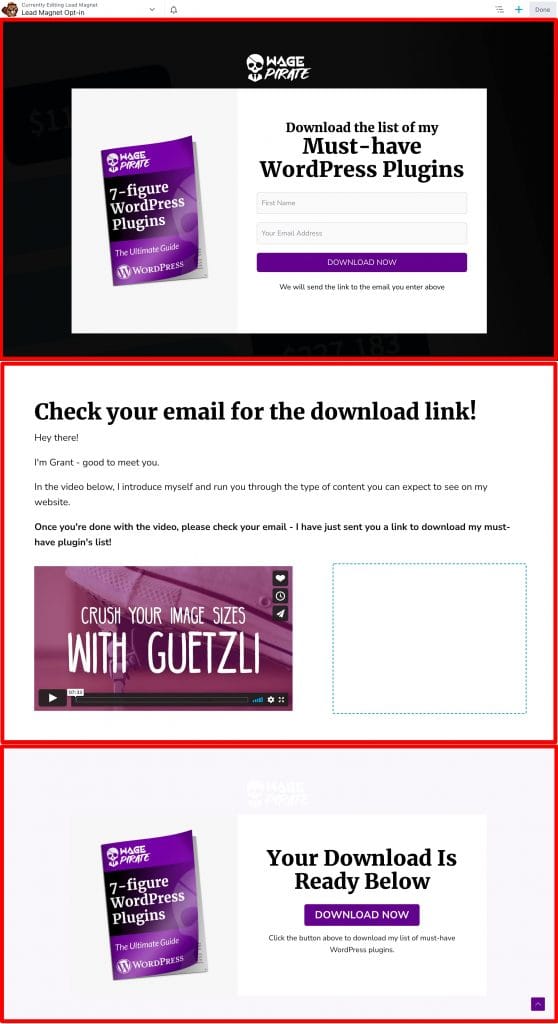
Let’s say I have this Opt-in Form on my Landing Page where people can complete the form to download a list of my favourite WordPress plugins.
This is what that would look like below.

A user puts their details into the form, clicks the submit button and then I show them a Thank You page that contains a message that lets the user know their form submission has been successful.
When I do this in my business, I actually make people double opt-in to my Mailing List.
So when the user submits this form, I send them an email that looks like this:
So now we have 3 pages for this 1 Landing Page
- The Landing Page that people can put in their email address to Opt-in and get my plugin list
- The Thank You Page that lets the user know their form has been submitted successfully. On this page, I also let them know to go and check their email for the download link.
- The Download Page itself. This is the page that I redirect the user to once they click the link in the email. This is the page that contains the direct link to download the plugin list
Now, we could do something like this with our Landing Pages where each page is its own page.
But that would get VERY messy as the number of Landing Pages you have increased over time.
The way around all of this is to use Conditional Logic, as shown below.
By adding Conditional Logic rules using Beaver Builder to each row on our Landing Page, we can build every single page needed for a Landing Page in the one Beaver Builder page.
How to set up Conditional Logic in Beaver Builder
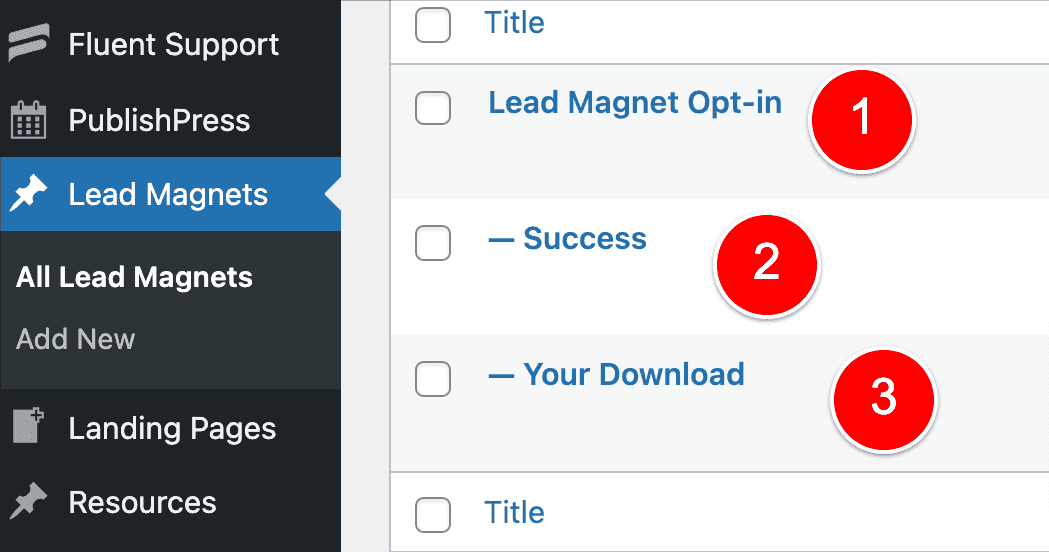
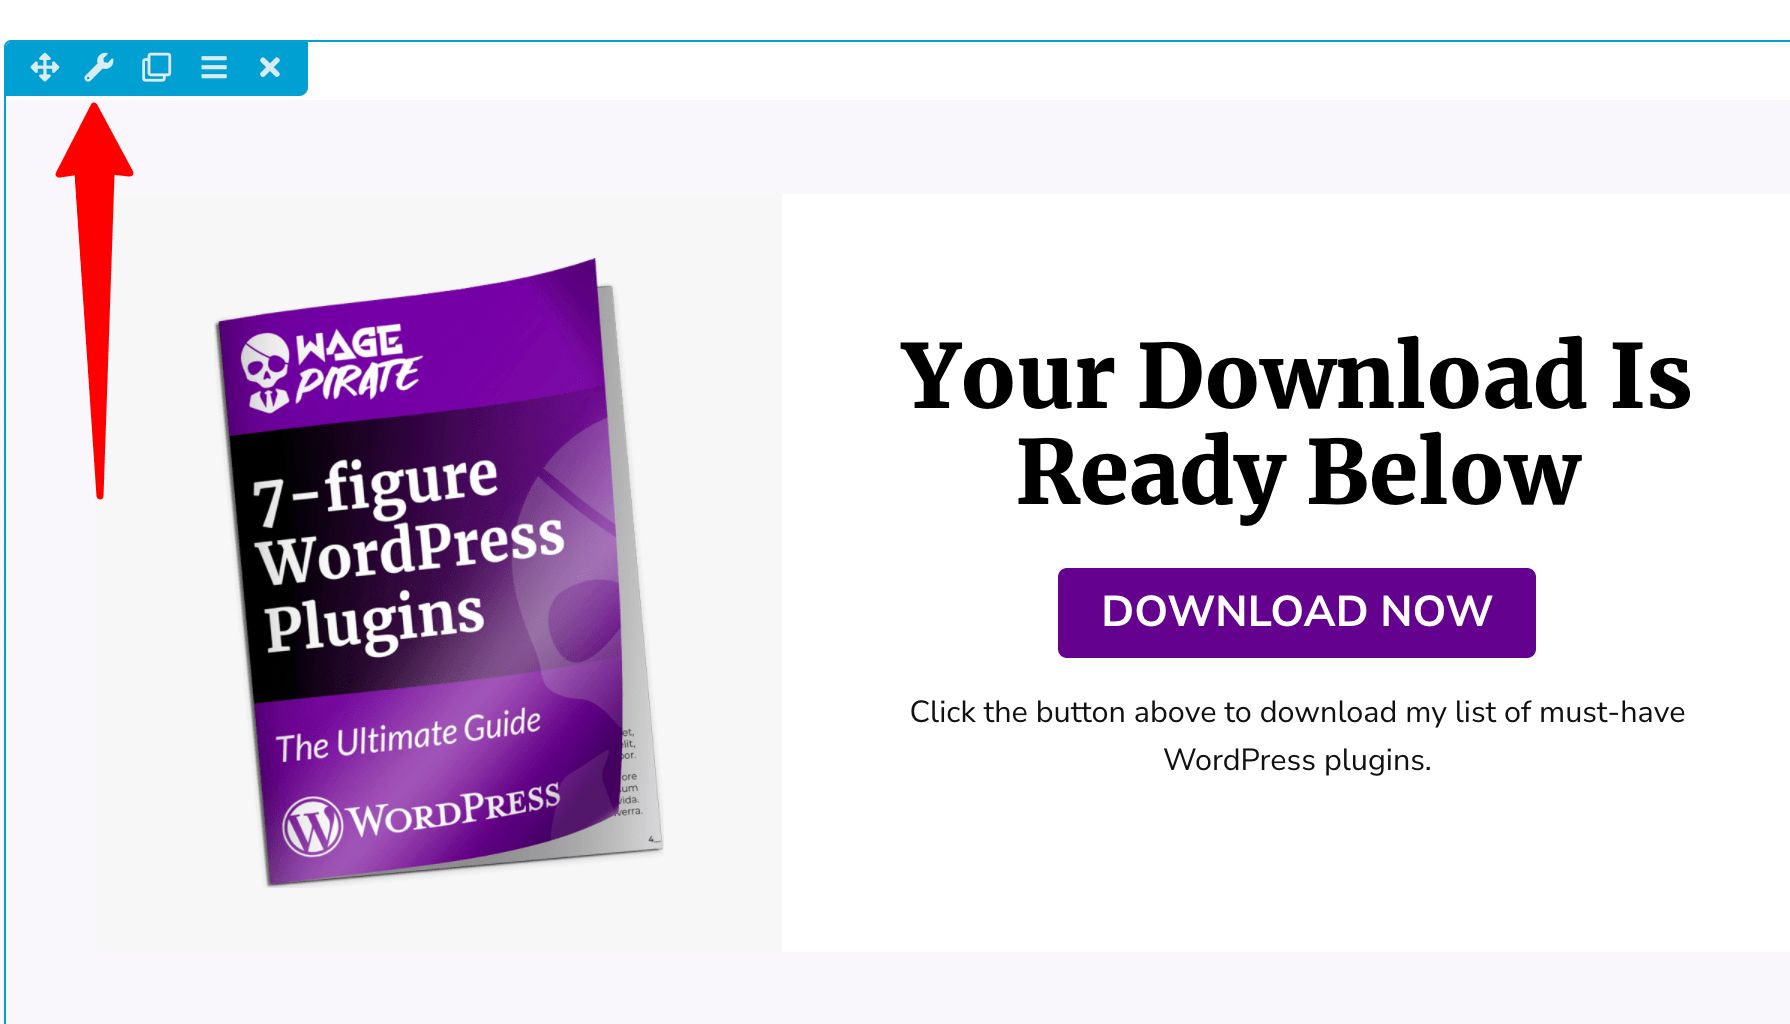
So this is what my Landing Page looks like when I’m editing it with Beaver Builder.
As you can see, there are 3 rows on the page.
And each row has Conditional Logic rules added to it.
To do that, you go to the Row Settings for a particular row, like so:
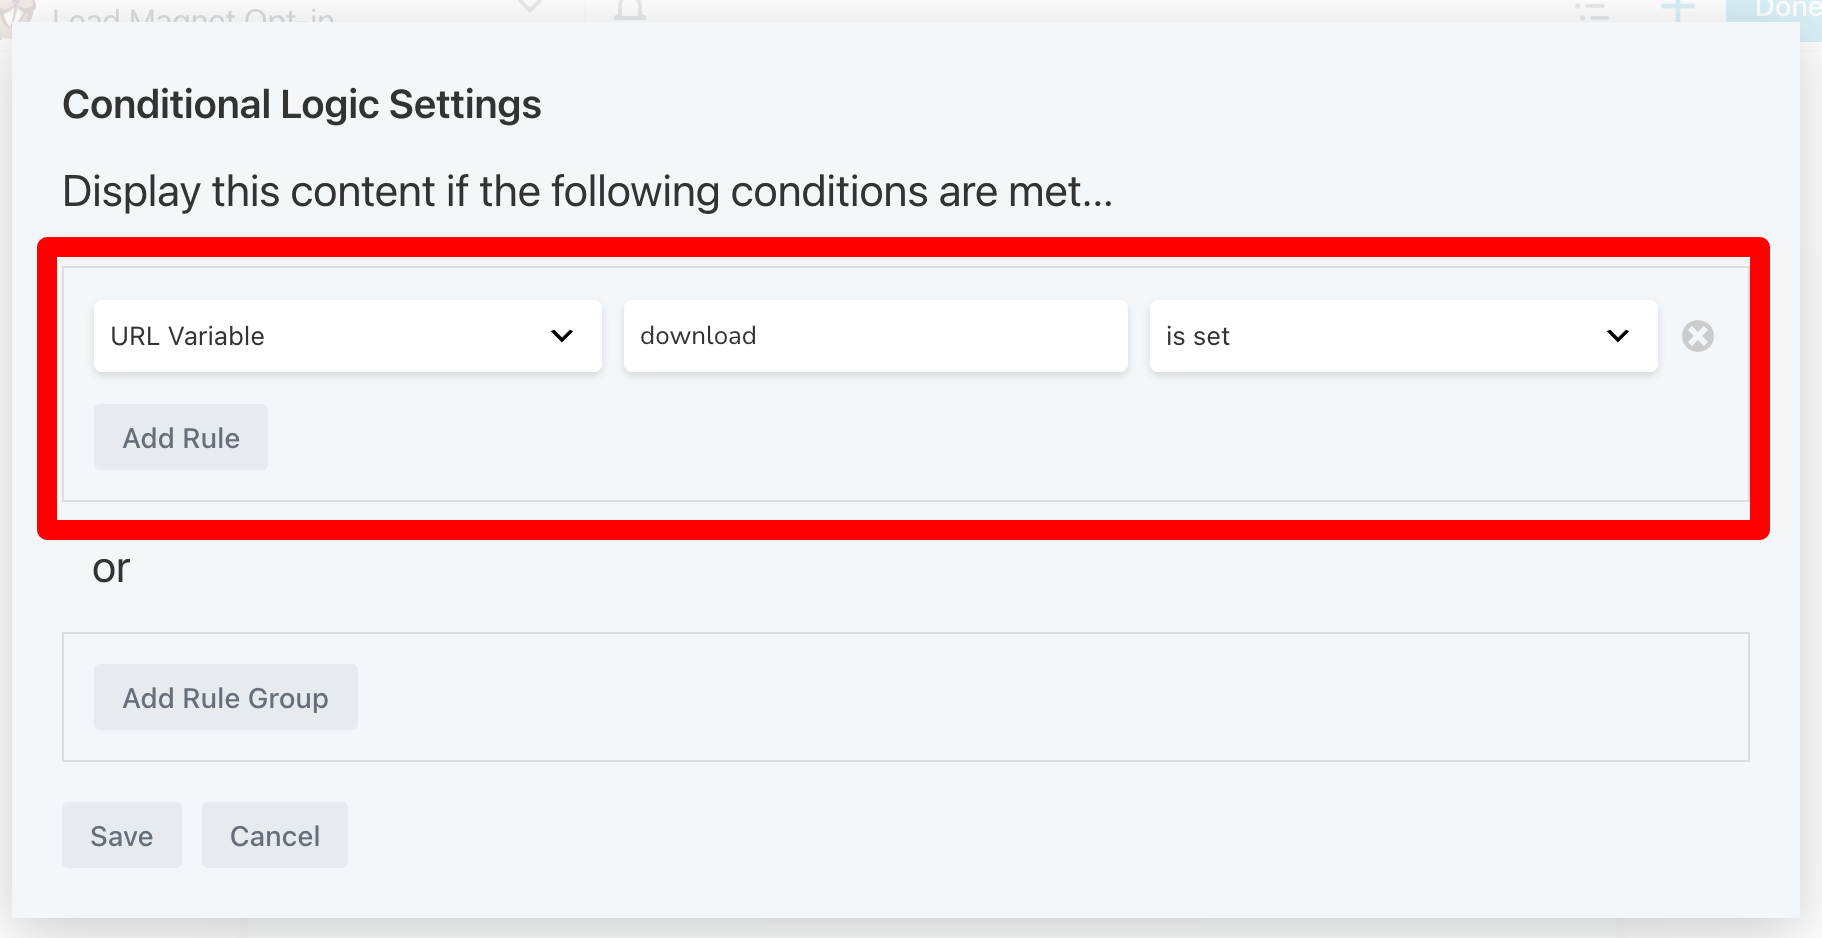
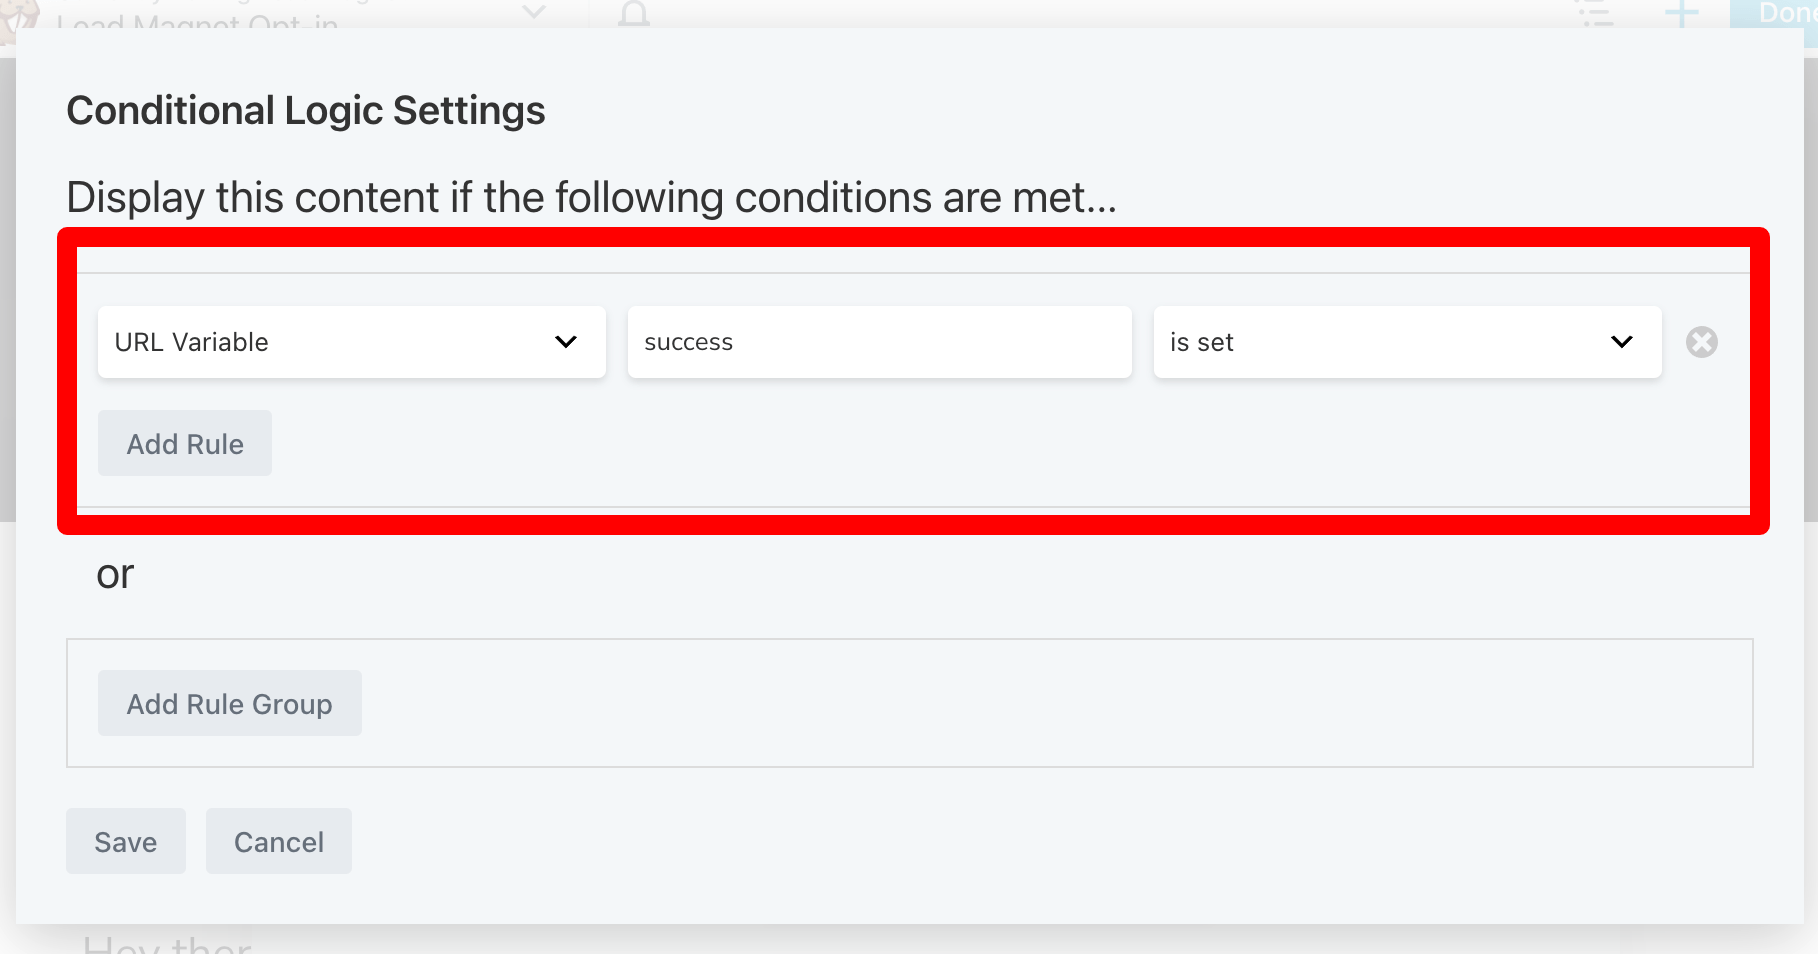
And then set Display to Conditional Logic in the dropdown and then click the button that says Open Conditional Logic Settings.
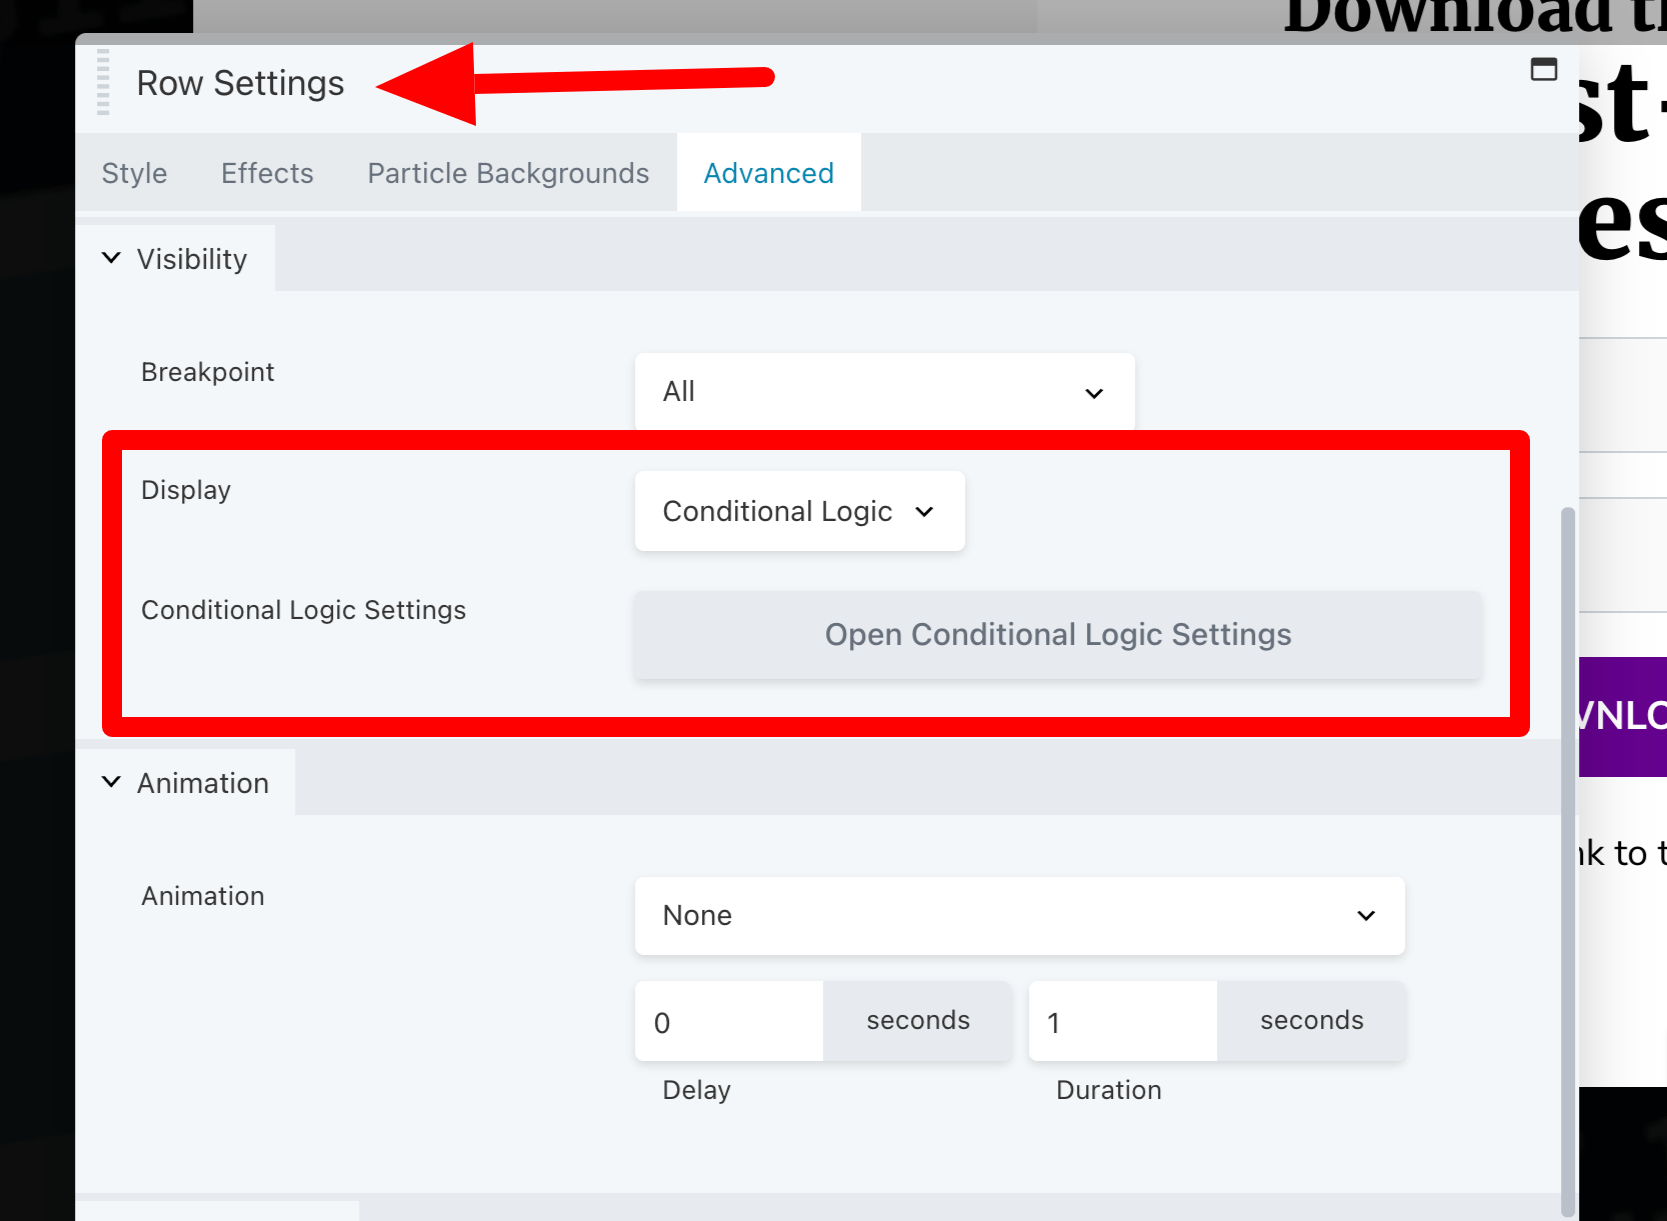
This is where you define the rules for which this row you’re editing will show or hide.
This is good! In case you were wondering, Conditional Logic in Beaver Builder doesn’t just use CSS to display:none; the elements. It actually uses PHP and to output or not output the module completely. That keeps your code nice and clean using this feature.
Here are the settings that I have applied for each of the 3 rows in my above example.
Row 1 (Landing Page that has the Opt-in Form).
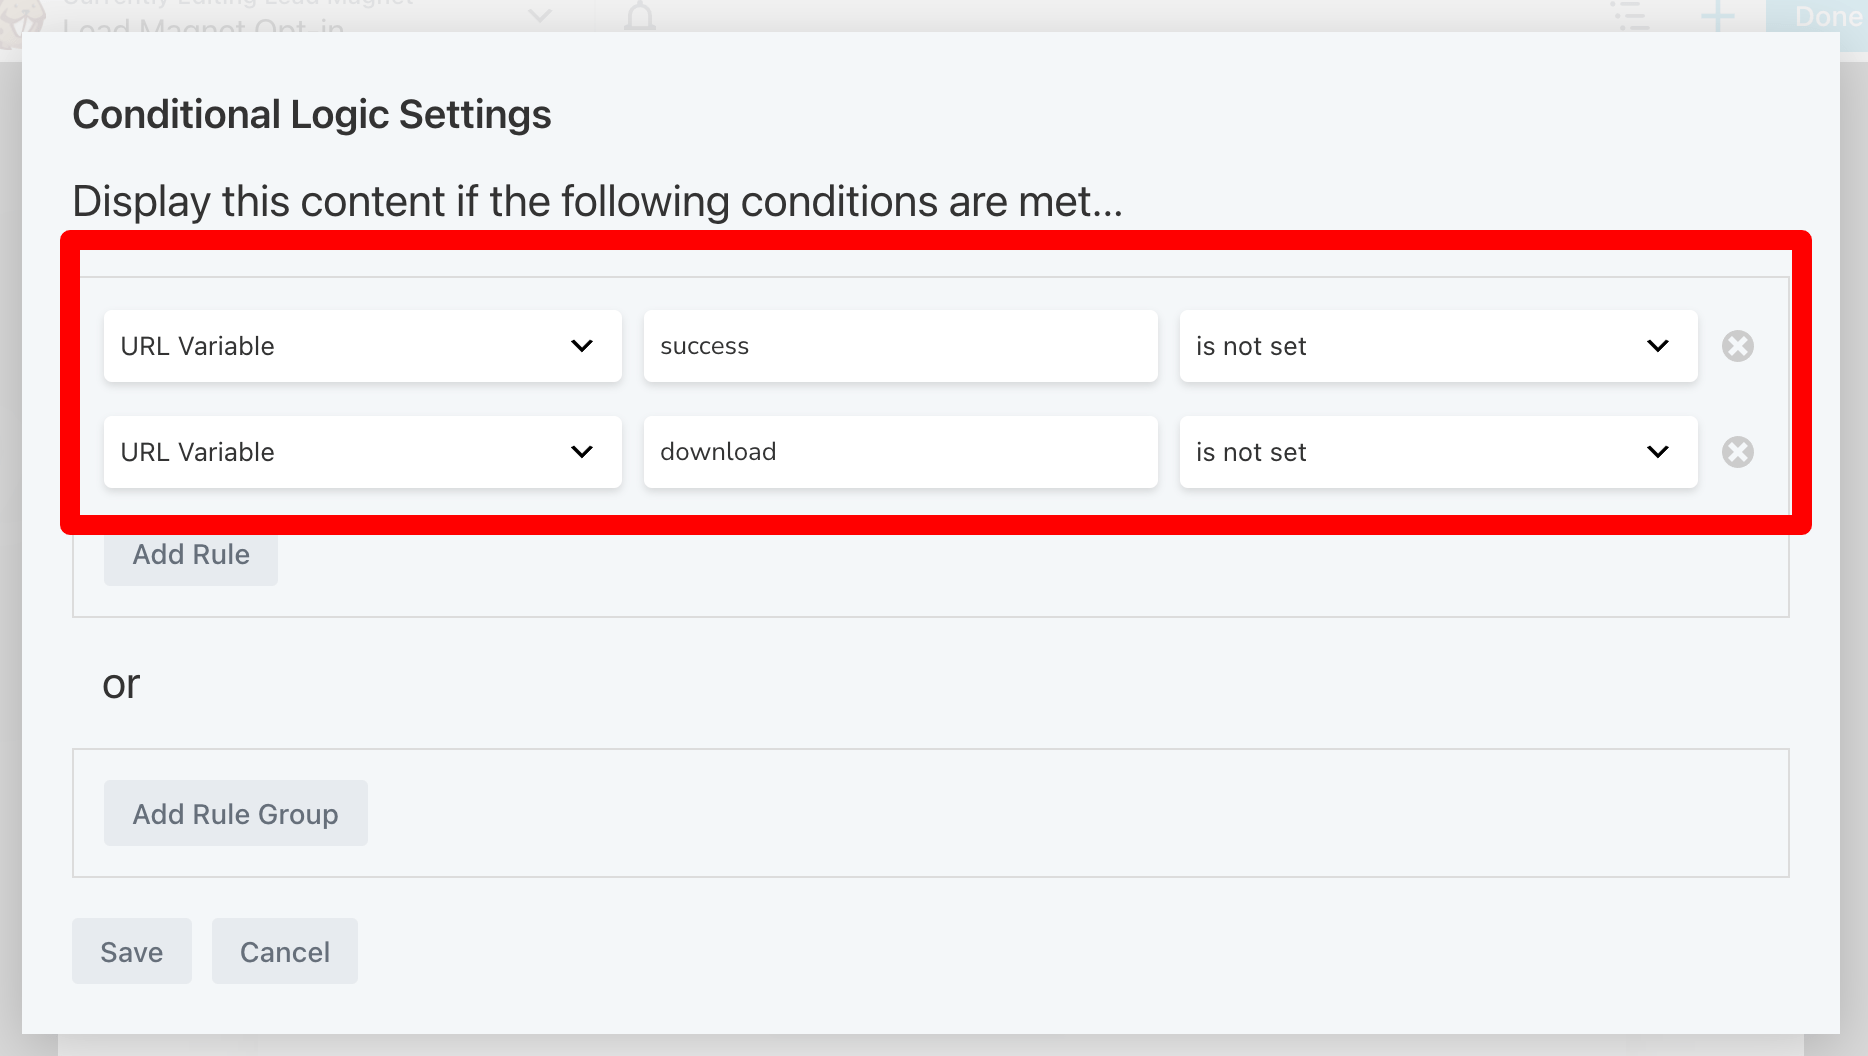
Row 2: Thank You page.
Row 3: The Download Page.
Putting the rules together, the user lands on the Landing Page with the Opt-in Form.
My Optin-form is a form I’ve built with my favourite forms plugin FluentForms.
In FluentForms, I can set a URL that my form will redirect to once my user completes it, which is shown below.
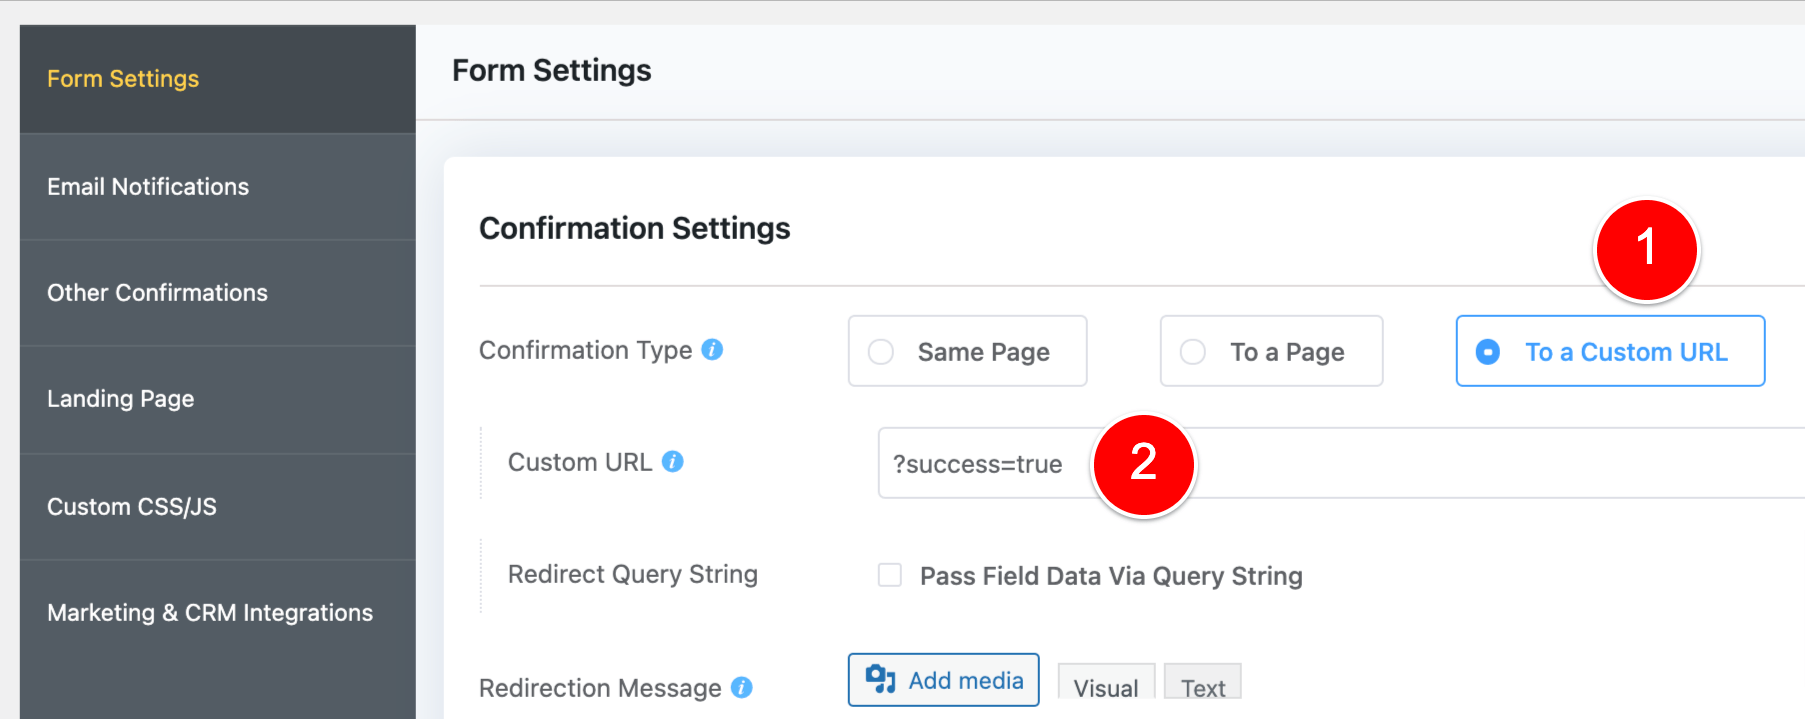
Notice how I have defined my form to go to the URL ?success=true.
What I am doing here is telling FluentForms that I want it to refresh the current page the user is on and add ?success=true to the URL.
By doing this, the page reloads and then all other rows HIDE and our Thank you row SHOWS because the success variable IS SET (i.e. we set it to true, that’s what ?success=true is doing).
And lastly, when someone completes this opt-in form, I send them an email with a link they can click to download the Lead Magnet.
This link sends them back to this same URL they completed the Opt-in form on, but the URL has ?download=true on the end of it.
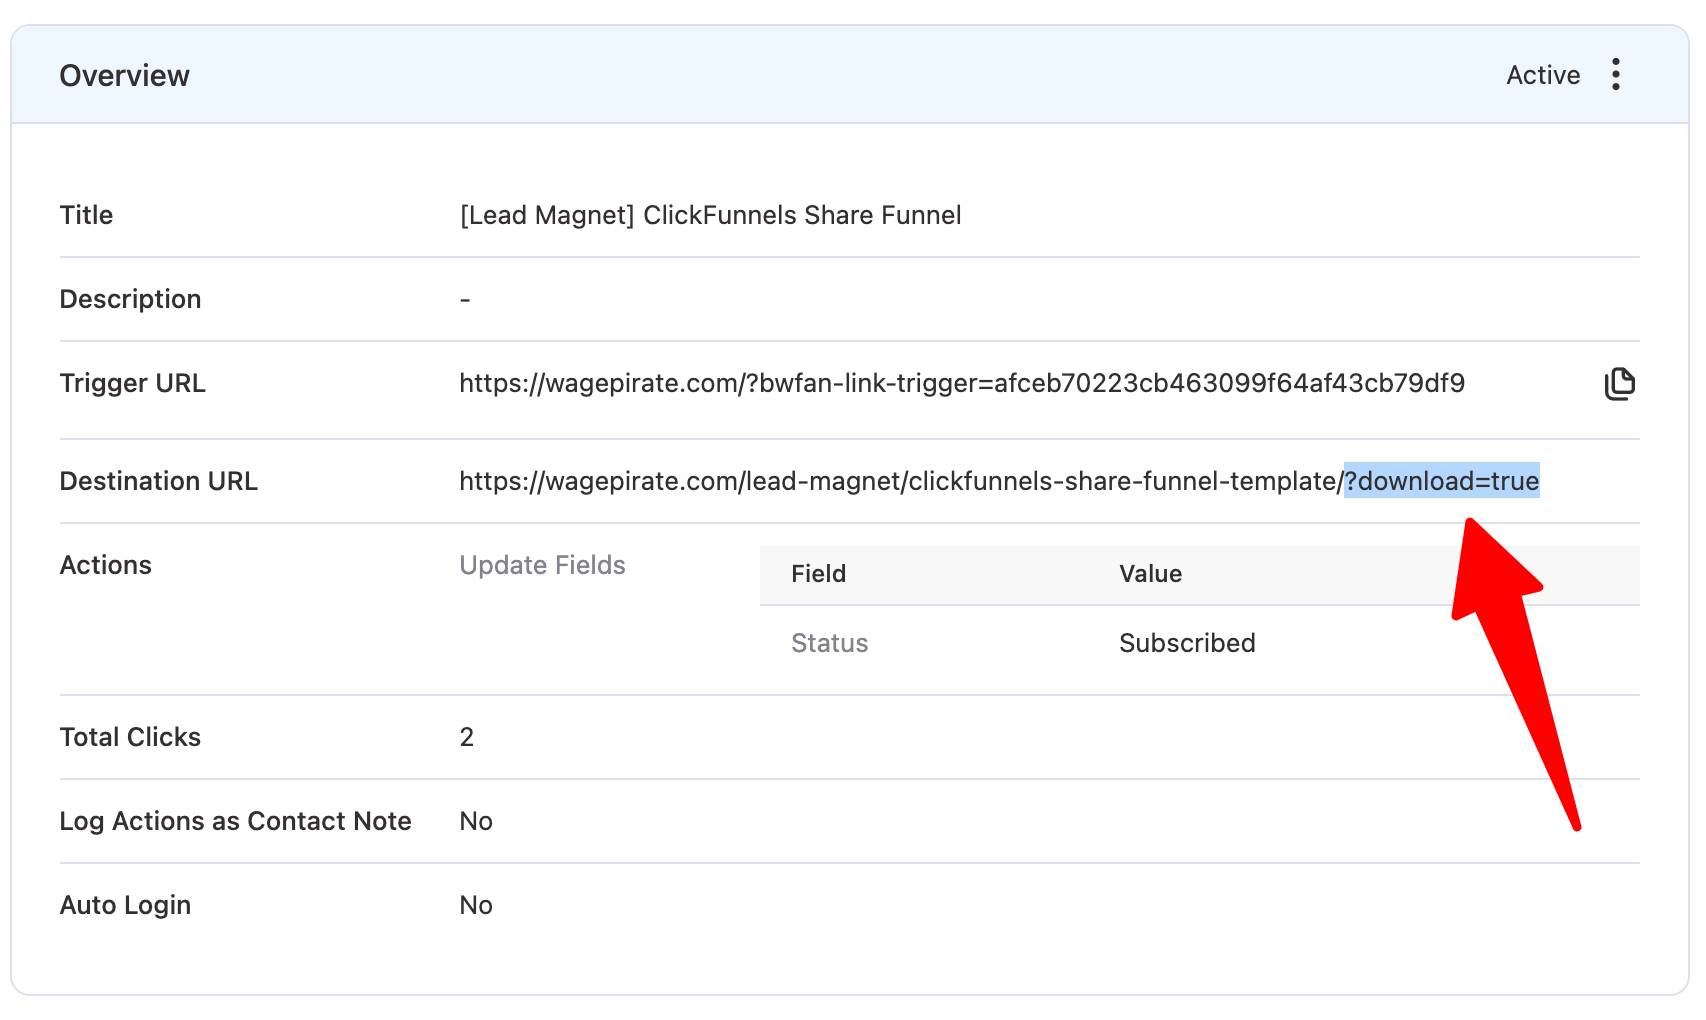
Which causes all other rows to HIDE and our download row to SHOW.
This system works EXTREMELY well and keeps all my Landing Pages and Lead Magnets very easy to manage and it should help you do the same – it’s a proven system.
Now, you might be wondering what WordPress plugin I am using the send the email with the link to my users after they complete my Opt-in Form.
Well, leads me into the final part of all of this creating Landing Pages with Beaver Builder, which is the backend.
The one thing that’s missing from this Beaver Builder Landing Page Tutorial
This article taught you how to set up and manage your Landing Pages in WordPress using Beaver Builder and it should be a massive help for you and your business (I know it has been for mine).
But what I haven’t covered here is what happens after your user completes your Opt-in form.
I was using ActiveCampaign for the longest time, paying $100 per month just to have my contacts in there so I could email them.
Recently, I tried out a new WordPress plugin and it’s fast becoming my favourite plugin of all time.
This plugin saves me A LOT of money each month as I can cancel a lot of SaaS apps (like ActiveCampaign) and…
The best thing?
Everything happens within my WordPress install.
I don’t need to sync contacts from my opt-in form into a third-party CRM and then do complex tagging.
I don’t need to use Zapier to run Automations.
This plugin completely replaced A LOT of the software and tools I was using in WordPress.
The plugin is called FunnelKit Automations…
And I’ll demonstrate how powerful this plugin is by showing you some of the ways I use FunnelKit Automations to run my Blog and Ecommerce website.
Here are the links below…
Let me know in the comments below if you have any specific tips on creating Landing Pages with Beaver Builder.
I’d love to hear if you’re doing something different.