I STRUGGLED more than I should have with the new Conditional Logic feature introduced in Bricks version 1.5 and this article will show you EXACTLY how to use this new feature in the EASIEST way possible.
I’ll also be showing you all the mistakes I made myself setting this up (so you don’t make them too!).
This is an example of how you use this new PHP Filter introduced in Bricks 1.5 that allows us to do Conditional Logic…
…and here is some code taken from my live website where I am using this new PHP Filter to output a Section in Bricks above the footer ONLY under specific conditions like on certain post types and archives.
In this post today, I’ll be showing you everything I think you need to know to be able to go out and use this to build the Bricks website you need for your business.
The NEW PHP Filter released in Bricks 1.5
I want to stress this now so you aren’t losing your hair…
Bricks 1.5 has now introduced the ability for us to use conditional logic for outputting the elements of our Bricks Builder pages.
NOTE: This means you cannot use this new PHP Filter unless you are using Bricks version 1.5 or greater.
It’s not yet at the level of being able to use a UI to set your conditions, but that is planned and on the Bricks Roadmap.
For now, Bricks 1.5 has added a new PHP filter that we can use and this tutorial today will run you through how to use it.
STRUCTURE: How this tutorial is structured
Just quickly – here’s how I’ve laid out this tutorial to give you everything you need to know in an easy-to-follow manner.
The structure will be:
- We will use a REAL-LIFE example of my live website wagepirate.com
- I had set up some conditional logic using some custom PHP that got around the fact that Bricks didn’t have any native Conditional Logic features. I’ll first show you how I have this set up currently on my website
- Then, we will convert my website from using the old method to using the new PHP Filter made available in Bricks 1.5
- Doing it this way, you’ll see the old vs new approach and a real-world use-case, which I always love providing for you.
So firstly, the old method i.e. how I currently have set up condtional logic in my website.
VIDEO: The Video Tutorial
Here is the video version of this blog post BUT I would recommending watching this video and reading this blog post as I cover a few different things in each.
OLD METHOD: How I set up Conditional Logic prior to Bricks 1.5
Here is how I currently have conditional logic in Bricks Builder.
Example: I have an Optin section that appears in the Footer of my website
At the time of writing this article, I have this row just above the Footer on my website where people can Optin to get my WP Toolkit for [year].

How I set up this Optin Row
I set up this Optin row as follows…
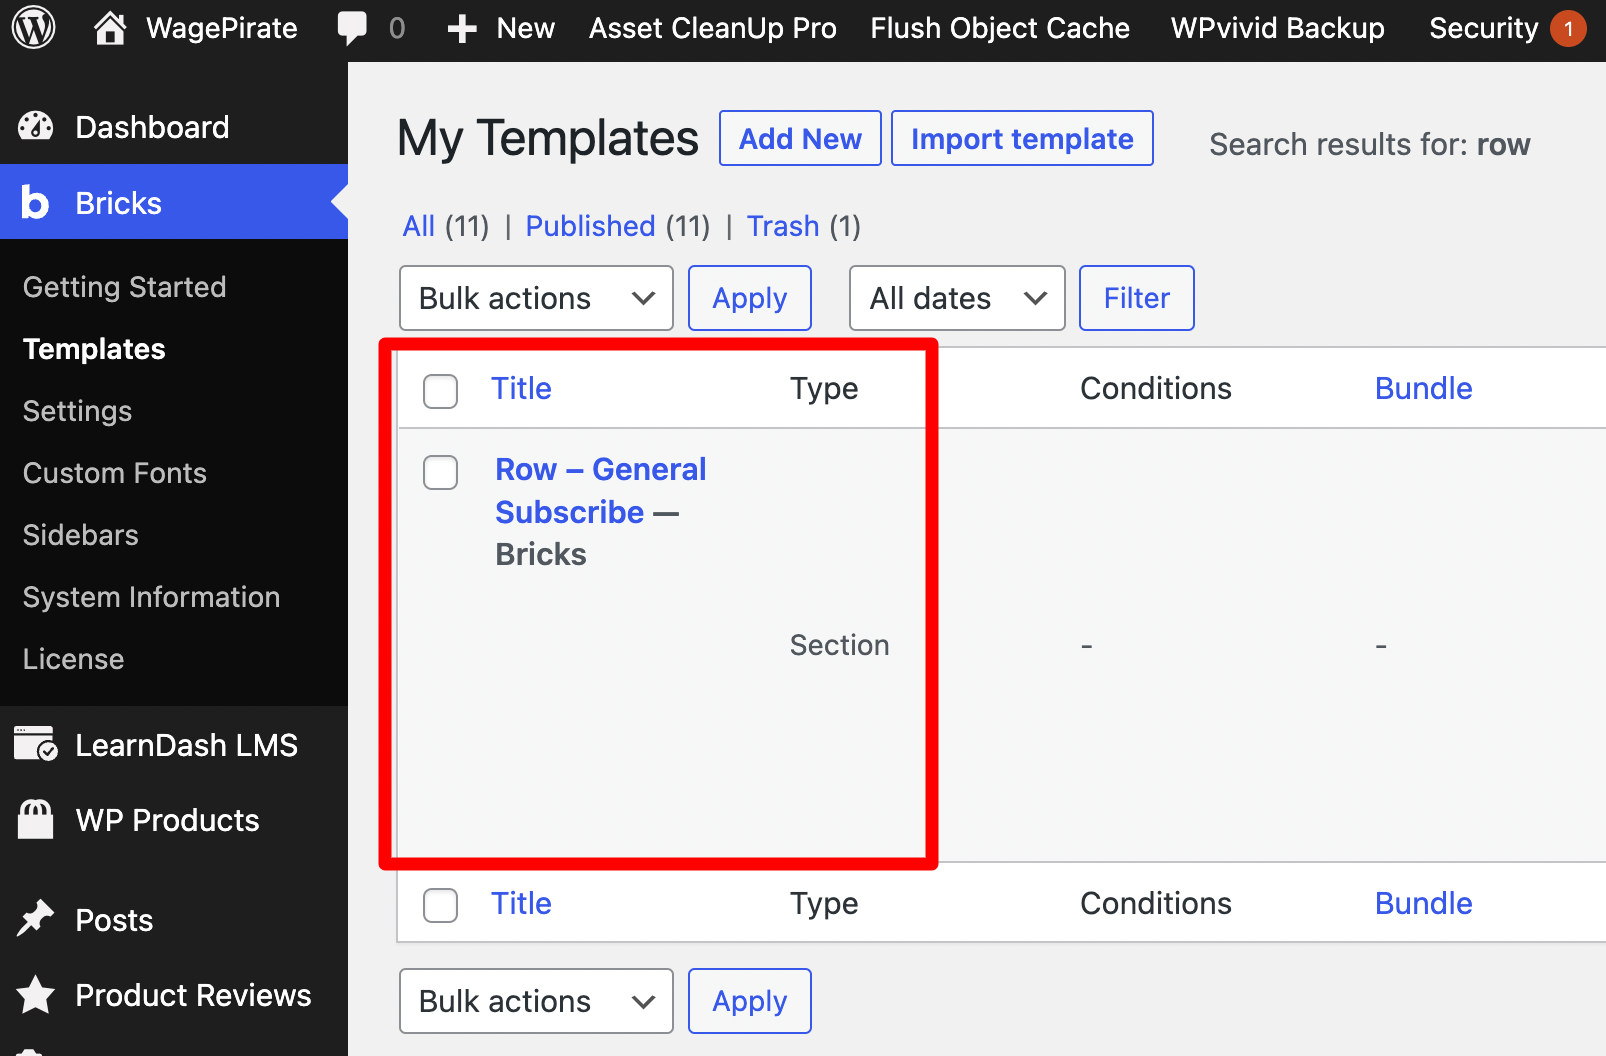
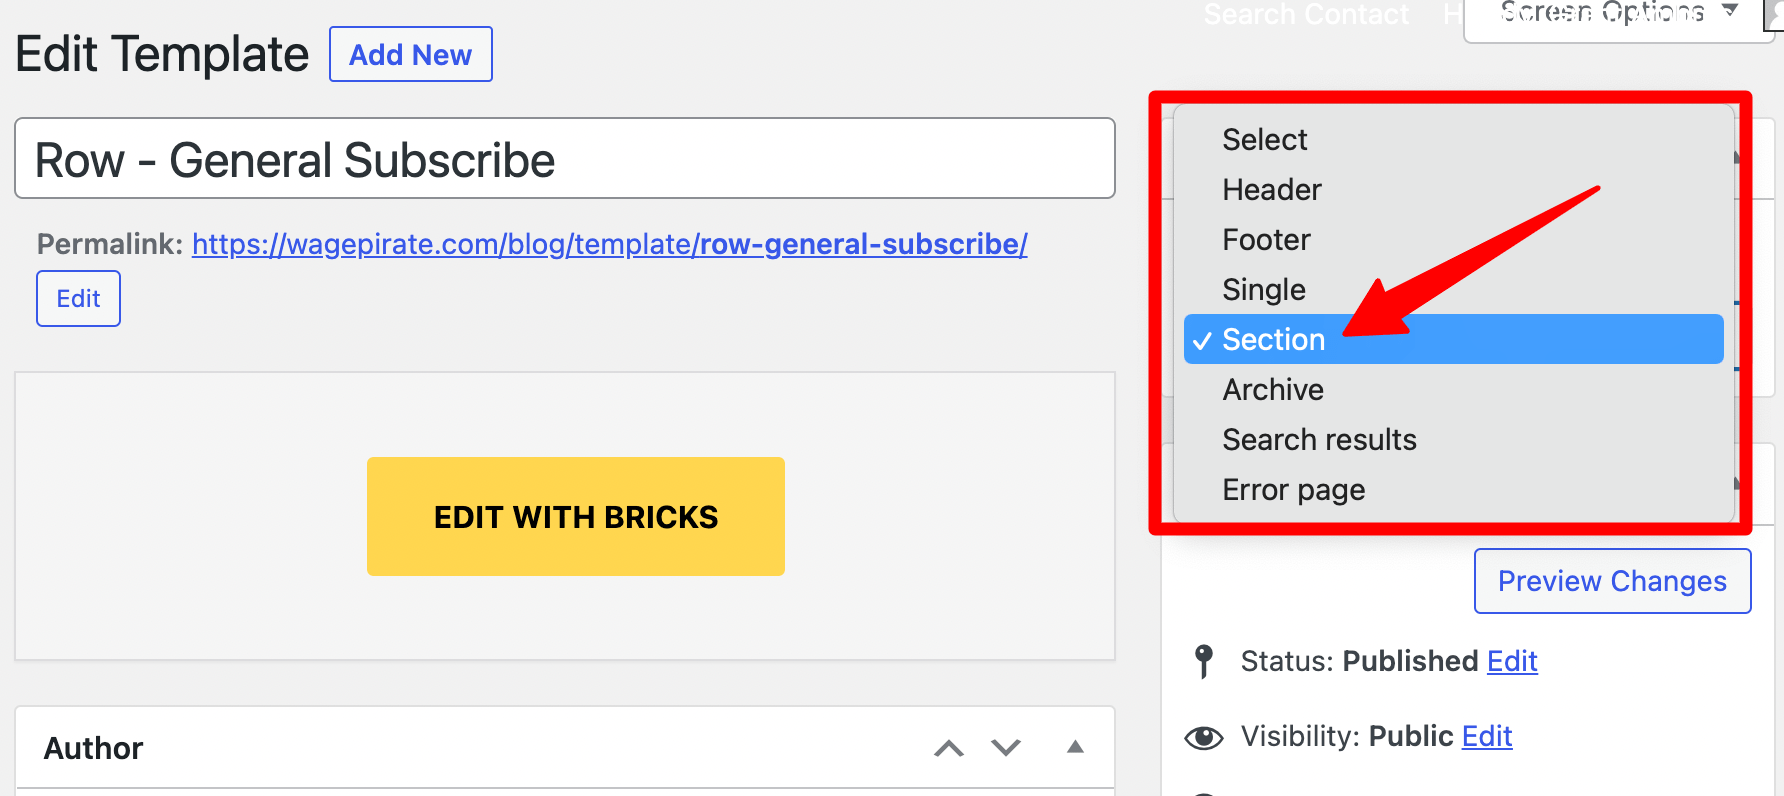
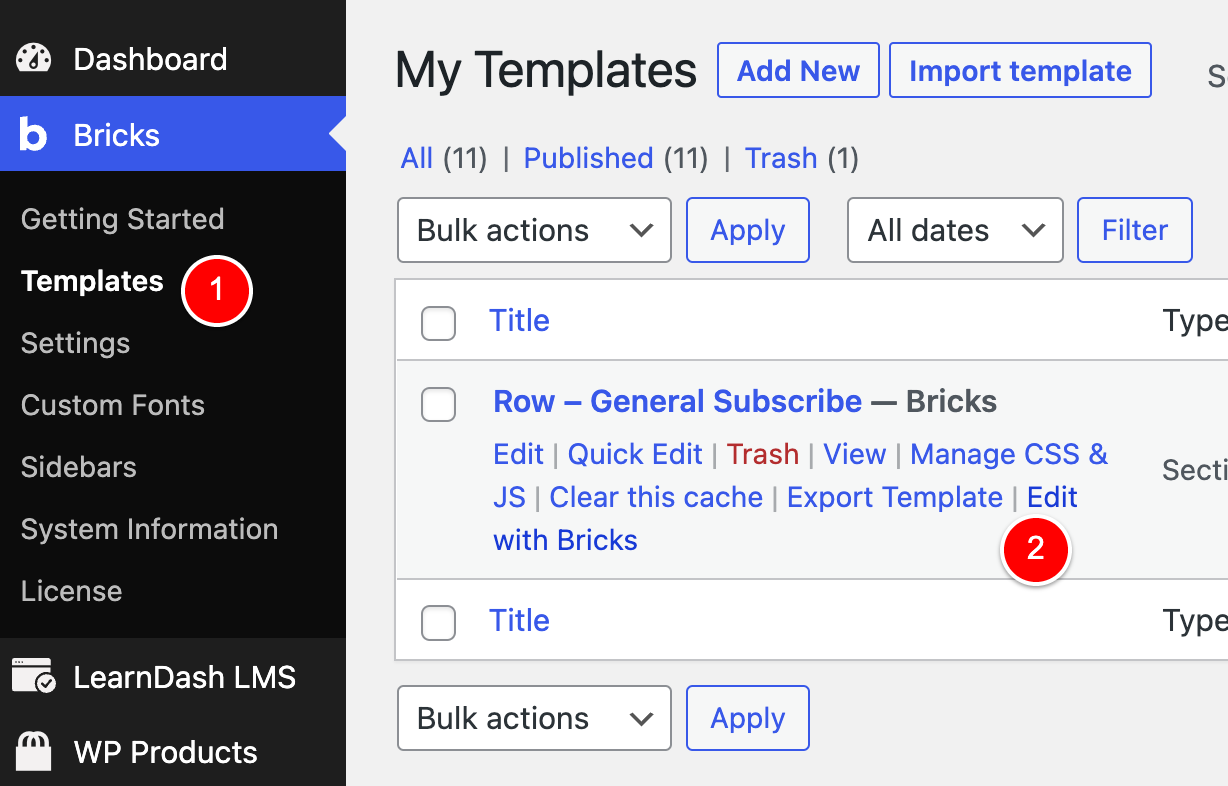
When I built my website initially, I went to Bricks > Templates and created a new Template called Row – General Subscribe.
As you can see from the above image, I created this template as the Template Type: Section.
The Conditional Logic I needed to set up
The thing about this row is that I don’t want it to appear on EVERY page on my website.
For example, there are some Custom Post Types that I need to exclude this row from showing on:
- Optin Pages
- Sales Pages
- Checkout Pages
- Upsell pages built with FunnelKit
To give you a specific example…
Below is an Optin page I use where people can Optin to get my WordPress Toolkit for [year] (i.e. my favourite plugins and how I use them in my businesses).

Obviously, I don’t want to output my Wp Toolkit Bricks Template at the bottom of this optin page because then I would have two forms on the same page asking the user to do the same thing.
So that’s what we will be doing – only showing this Bricks Template for the WP Toolkit IF specific conditions are met (i.e. not optin pages etc).
Here’s how I currently have it set up prior to upgrading to Bricks 1.5…
Using the Bricks Builder Template Shortcode
Now, as you may or may not know, in Bricks Builder – each template you create gets its own shortcode that you can use to output that template wherever you want.
So for this Optin row, I have the below shortcode to output its contents.
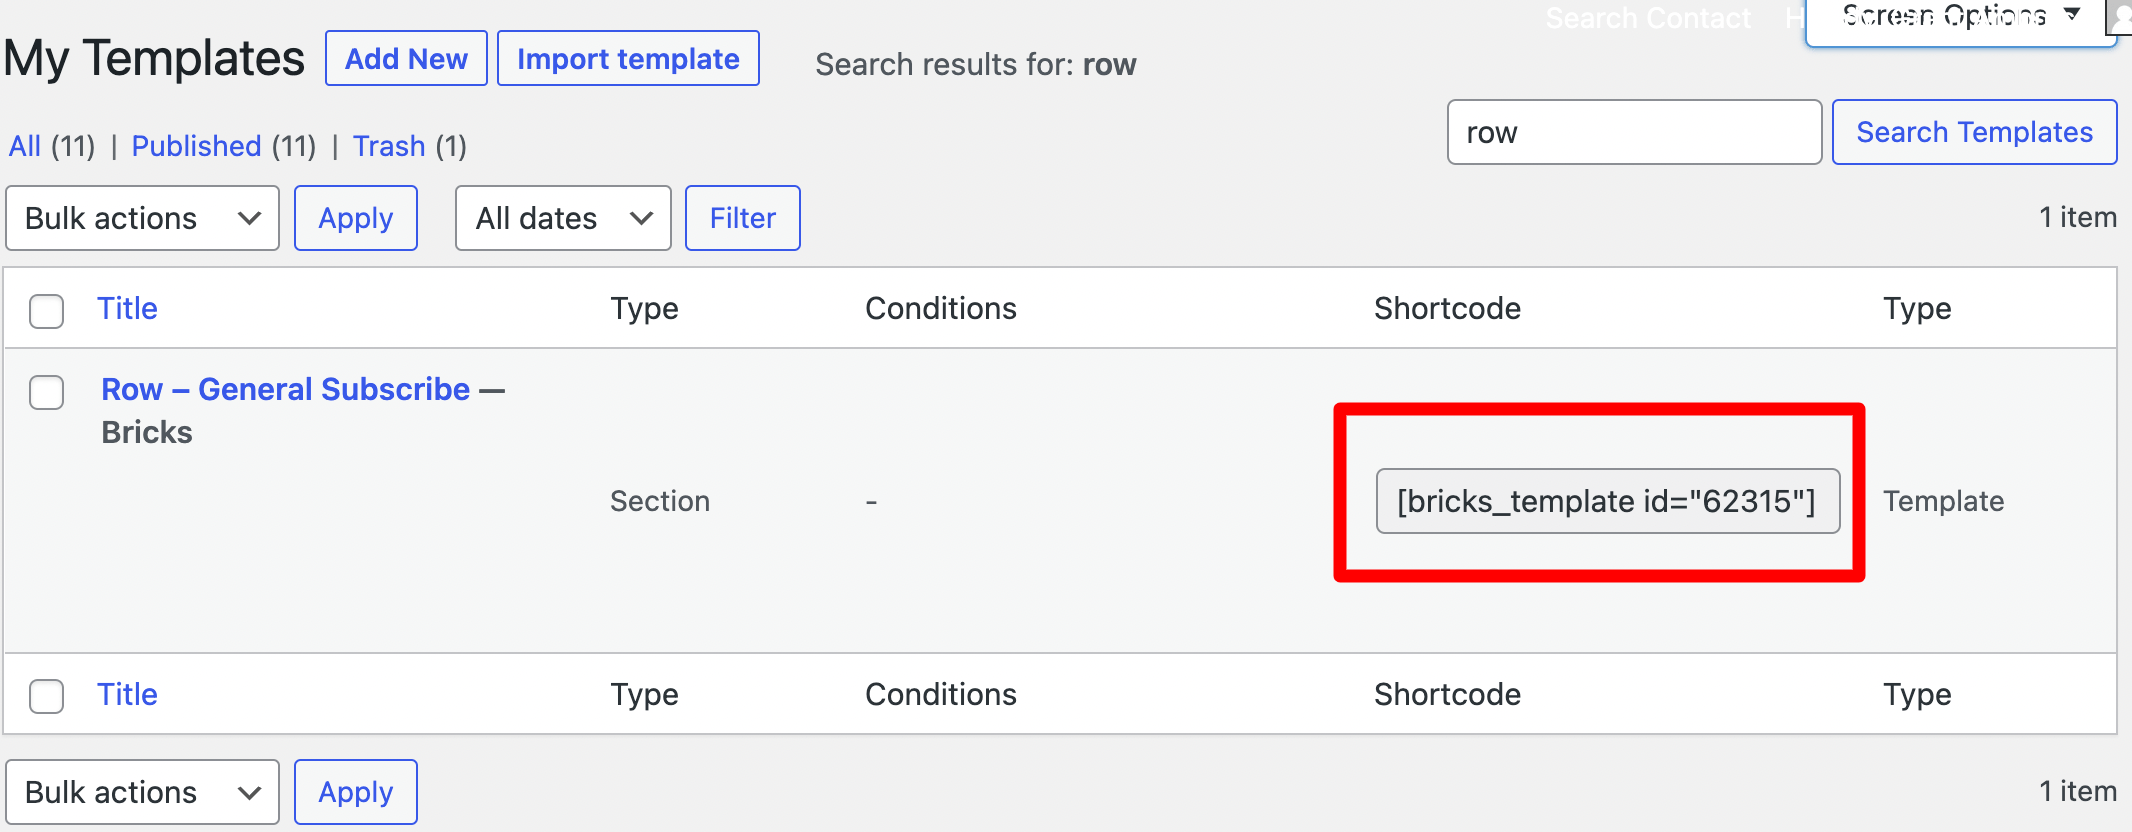
So all I had to do was copy this shortcode and then go to Bricks > Templates and edit my Footer template with Bricks.
Then I added a Code element just above my Footer (1) and inside it, I added some PHP conditionals (2) and echo my shortcode for the Optin Row template at (3) if the conditions are met.
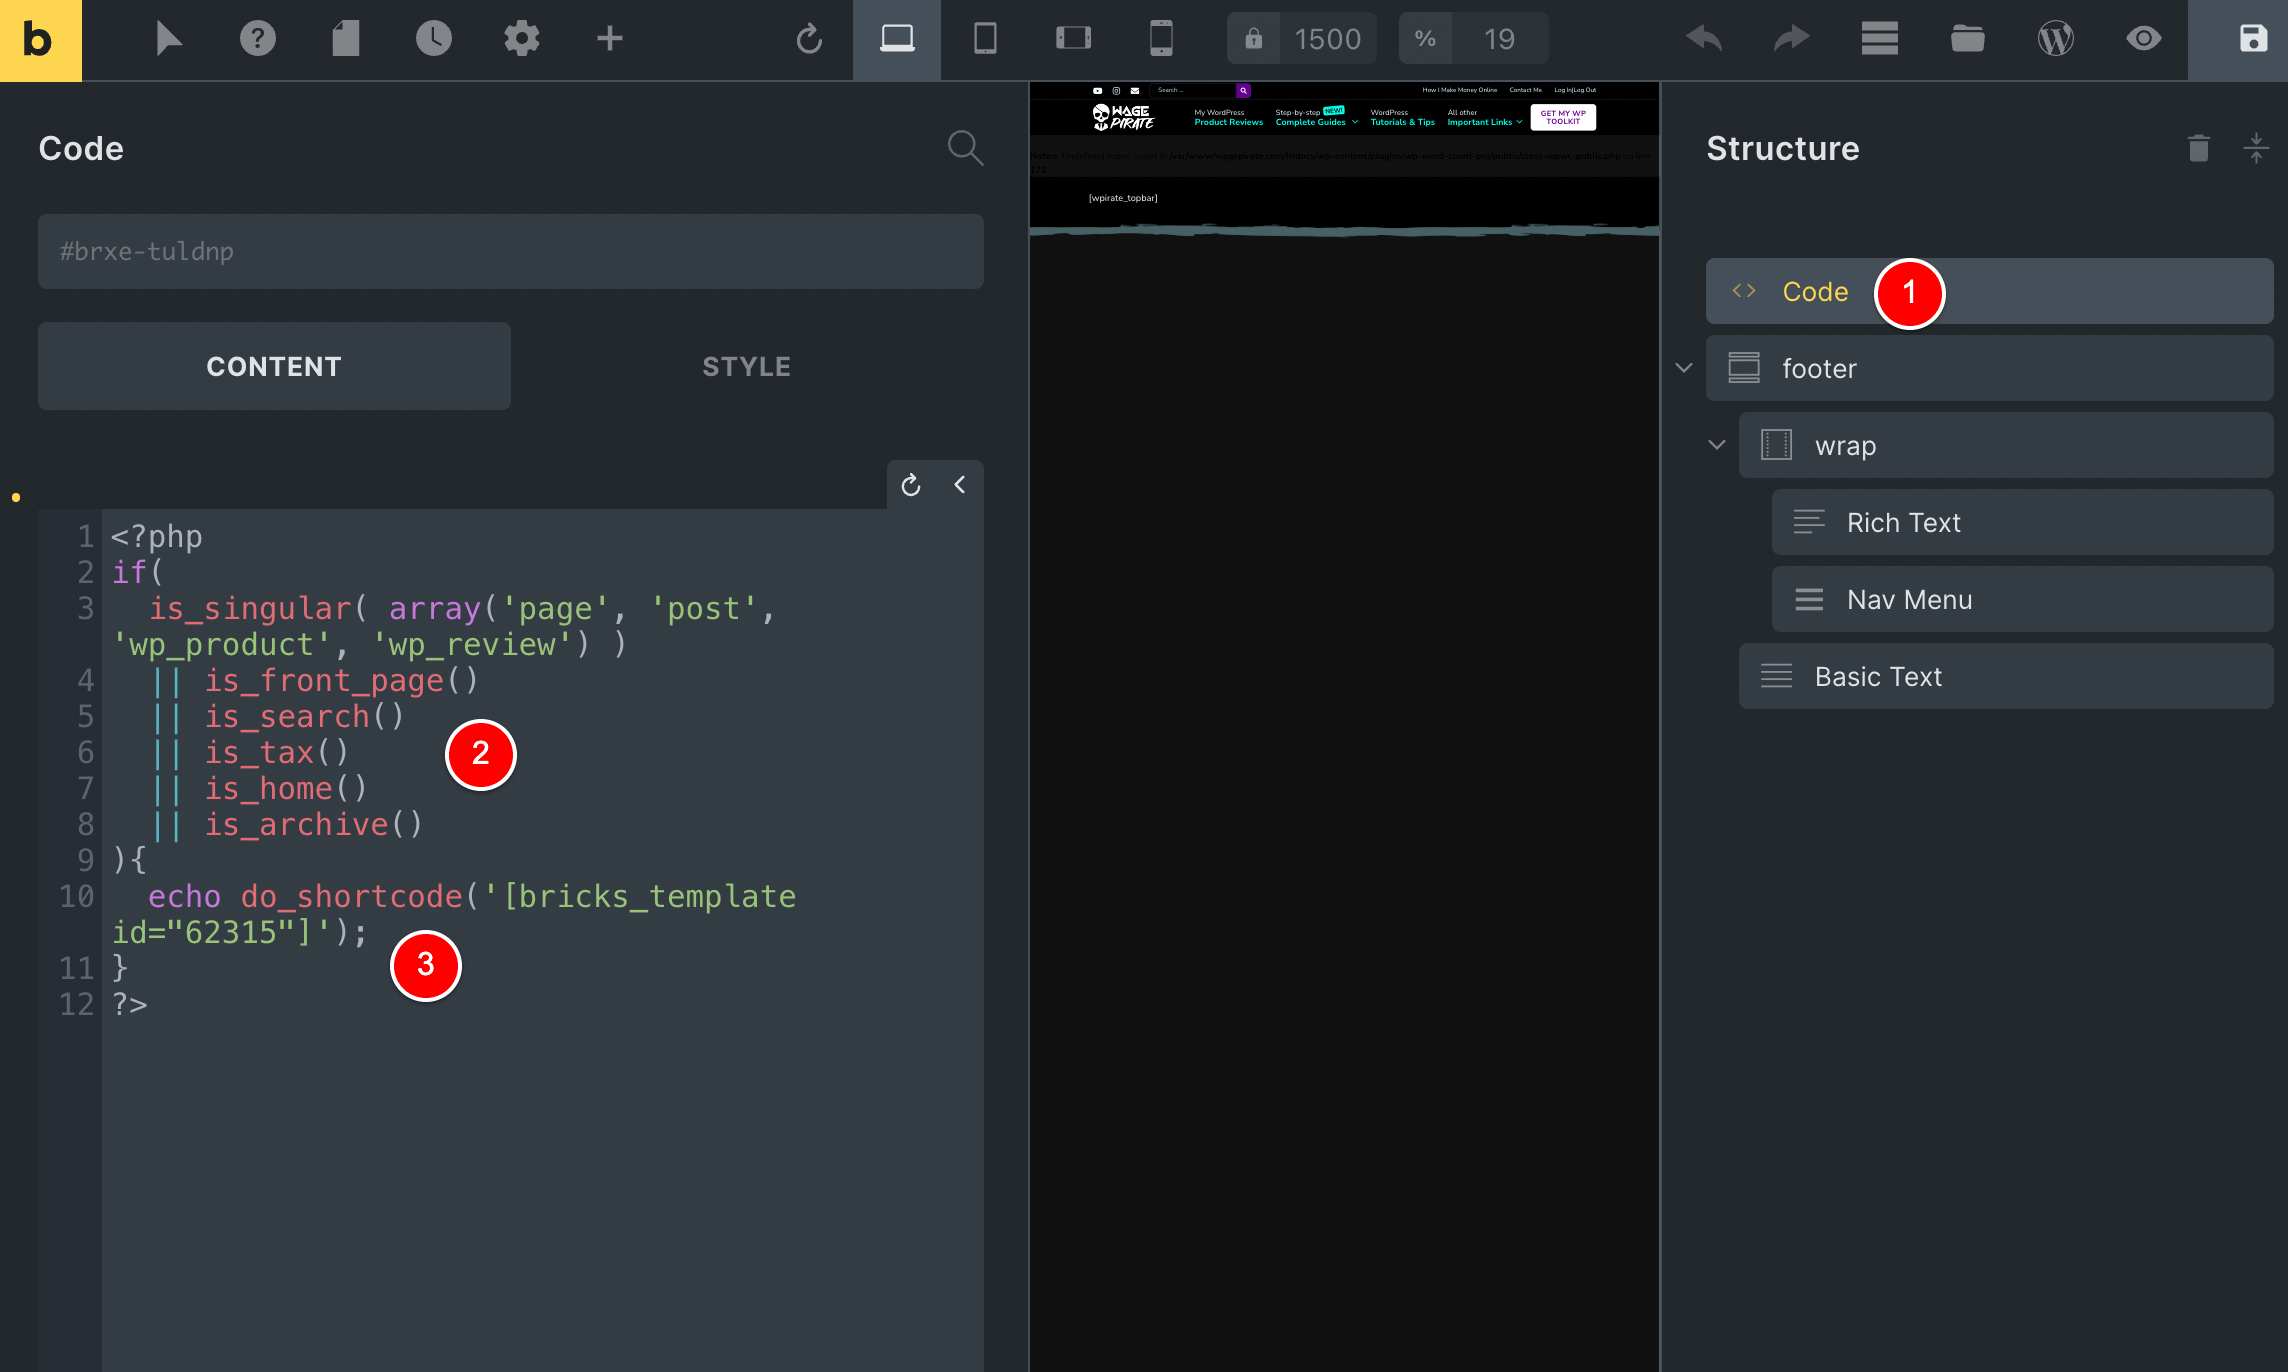
Here is that code below, in case the above image is hard to see:
<?php
if(
  is_singular( array('page', 'post', 'wp_product', 'wp_review') )
  || is_front_page()
  || is_search()
  || is_tax()
  || is_home()
  || is_archive()
){
	echo do_shortcode('[bricks_template id="62315"]');
}
?>Code language: HTML, XML (xml)
As you can see, I am only showing my WP Toolkit Optin Row template from Bricks Builder if the post type matches a specific set of post types and a few other conditions like if it’s the home page, search page etc.
And that’s it – that’s how I set up the Conditional Logic feature in Bricks Builder prior to version 1.5.
NOTE: This OLD METHOD is still perfectly fine to use!
Now, to be honest – the setup above works perfect and I don’t really need to go ahead and change it to the new PHP Filter in Bricks 1.5…
BUT! …
I thought I’d go ahead and update it to using the new Conditional Logic PHP feature so I could get more familiar with Bricks and have a bit of fun in the process.
DELETE our OLD METHOD code
At this point, I’ll delete the old Code Element that was here above our footer…
And I’ll confirm that now we have no Optin row outputting before our footer on the frontend.

All looks good, so let’s get to recreating this using the new PHP filter.
NEW METHOD: The new PHP Filter for Conditional Logic in Bricks 1.5
Remember – this method will ONLY work for Bricks Builder version 1.5 or above.
WPCodeBox: The best plugin for adding your custom Snippets
For this tutorial, I will be adding my custom WordPress code using a plugin called WPCodeBox.
I’d definitely recommend learning more about this plugin because I literally had never heard of it until a couple of months ago and now I use it every time I need to add PHP / JS / CSS to my website.
BUT!
Don’t worry – where I use WPCodeBox you can just add the code into your Theme’s (or Child Theme’s) functions.php file as you normally would.
Add our Optin Template to the Footer Template
Due to Bricks not having Conditional Logic prior to 1.5 (and as you now know) I created the separate template in Bricks for the WP Toolkit optin row and then added that row into the Footer template using the Shortcode and code element.
For the new Method, let’s go ahead and directly add this row into the Footer Template and then we’ll use the PHP Filter to conditionally output the row.
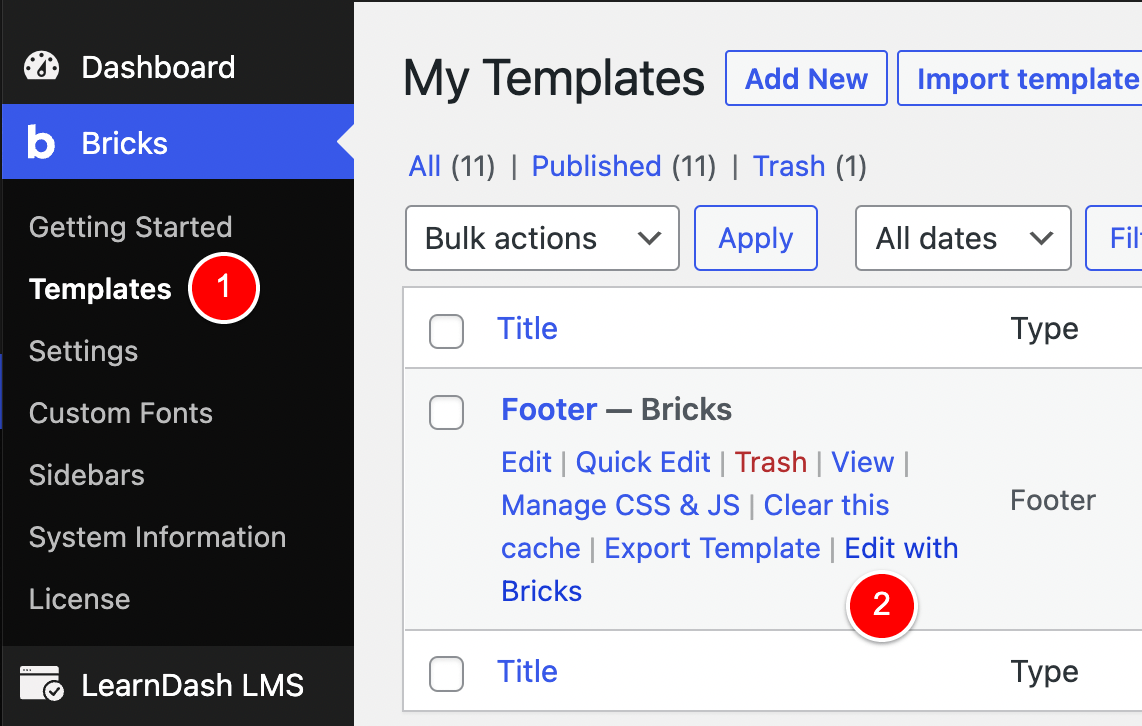
To do this, I will go to Bricks > Templates (1), find this Template that has the WP Toolkit Optin row and then I’ll click Edit with Bricks (2)…
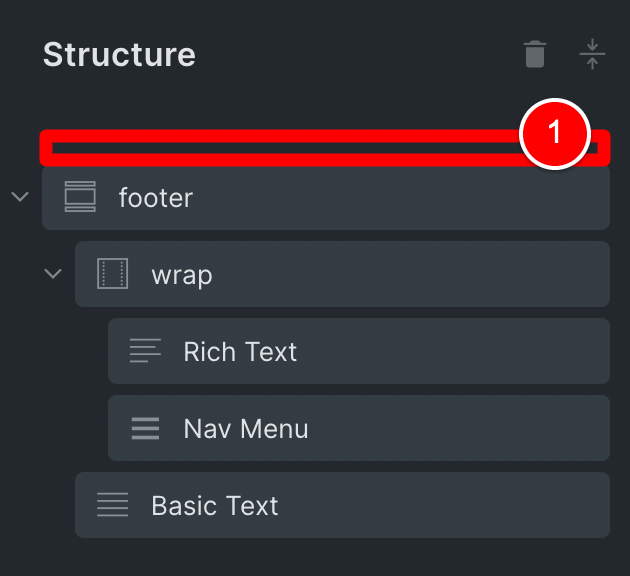
Then, I’ll just right-click on the Section and Copy it from this template (1)…

and I’ll paste it into my Footer template at (1) which is just above my Footer section at (2).
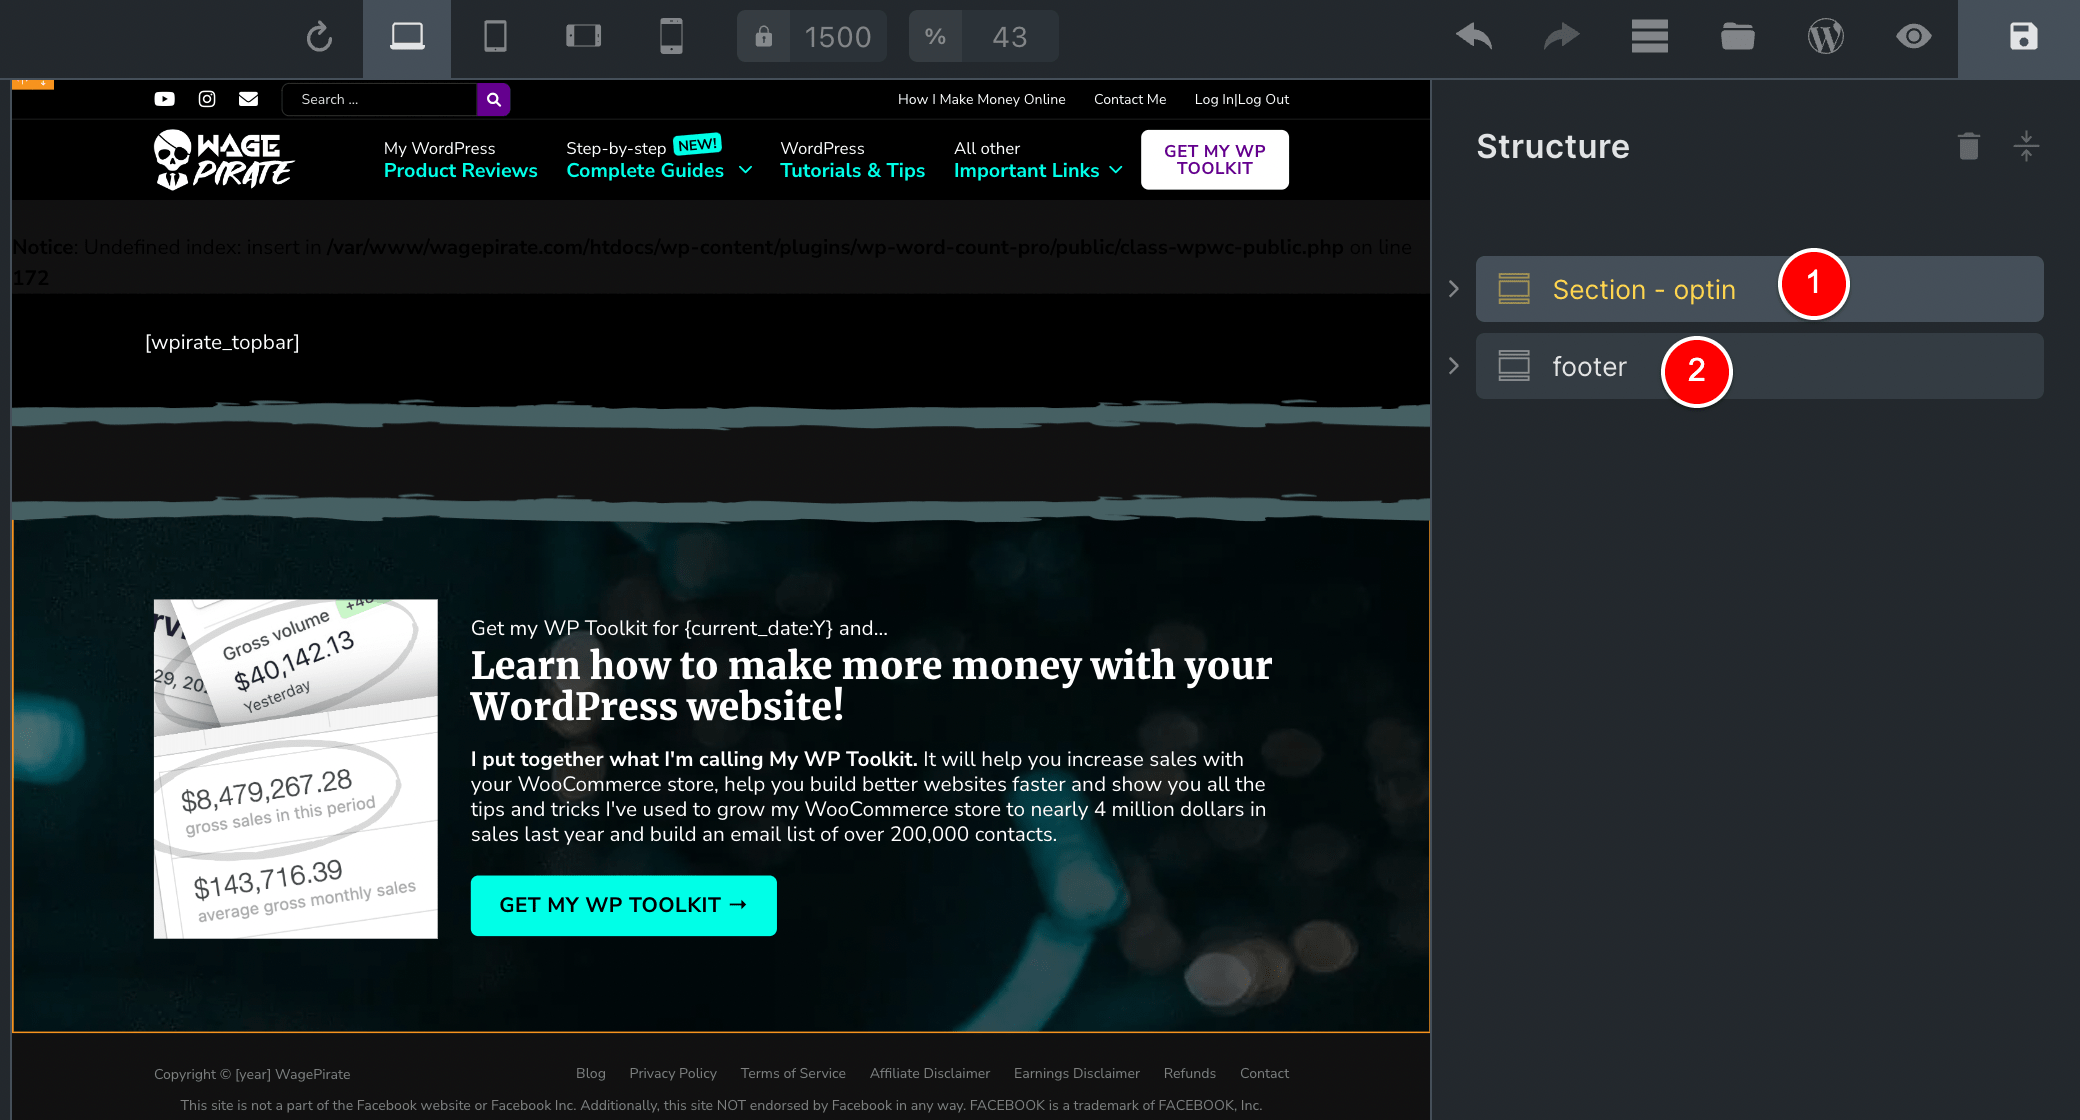
By doing this, our Optin Row is now output above our footer…
BUT!…
it is going to show on EVERY page on our website.
This is where the new PHP Filter in Bricks 1.5 comes to save the day.
Create a custom PHP Filter function
Go to WPCodeBox in the WP Admin menu…
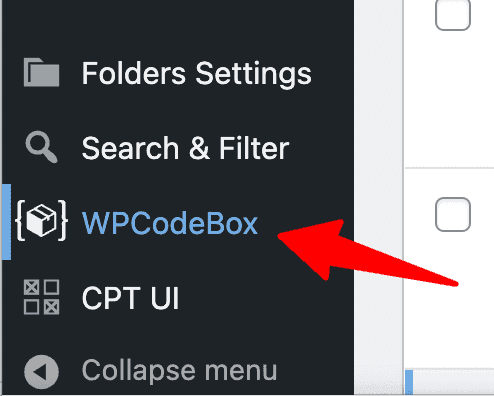
And create a new PHP Snippet as shown below from steps (1) to (4).
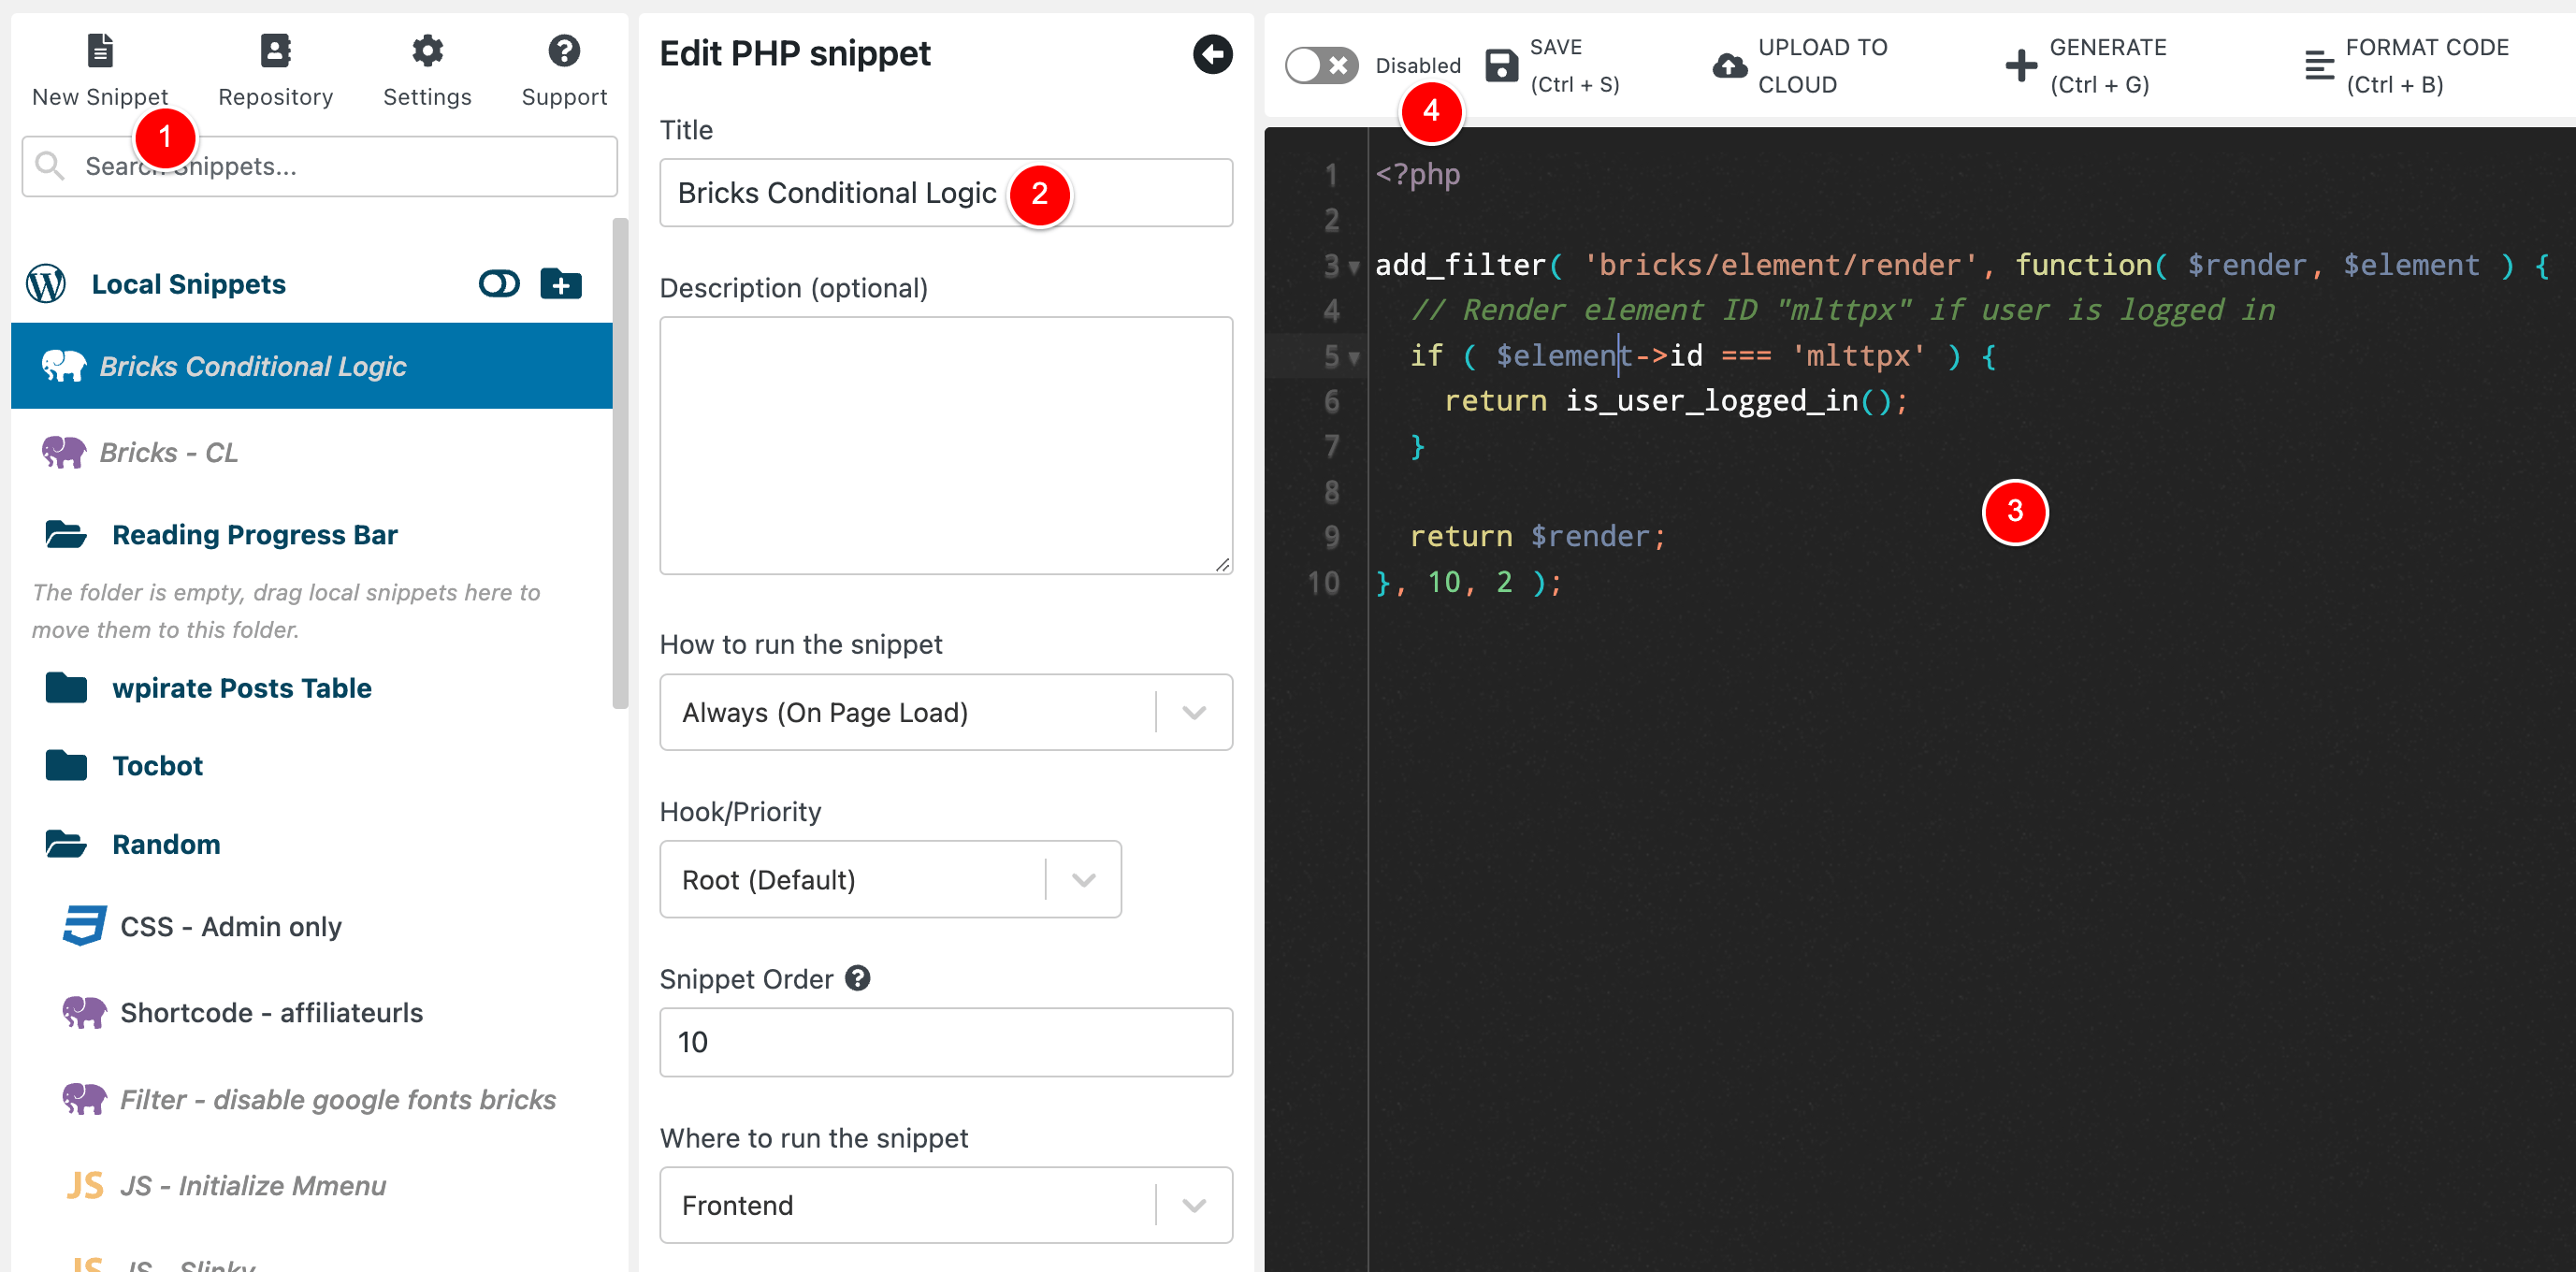
Note that I have left this code disabled at (4) because we need to update it before we put it live.
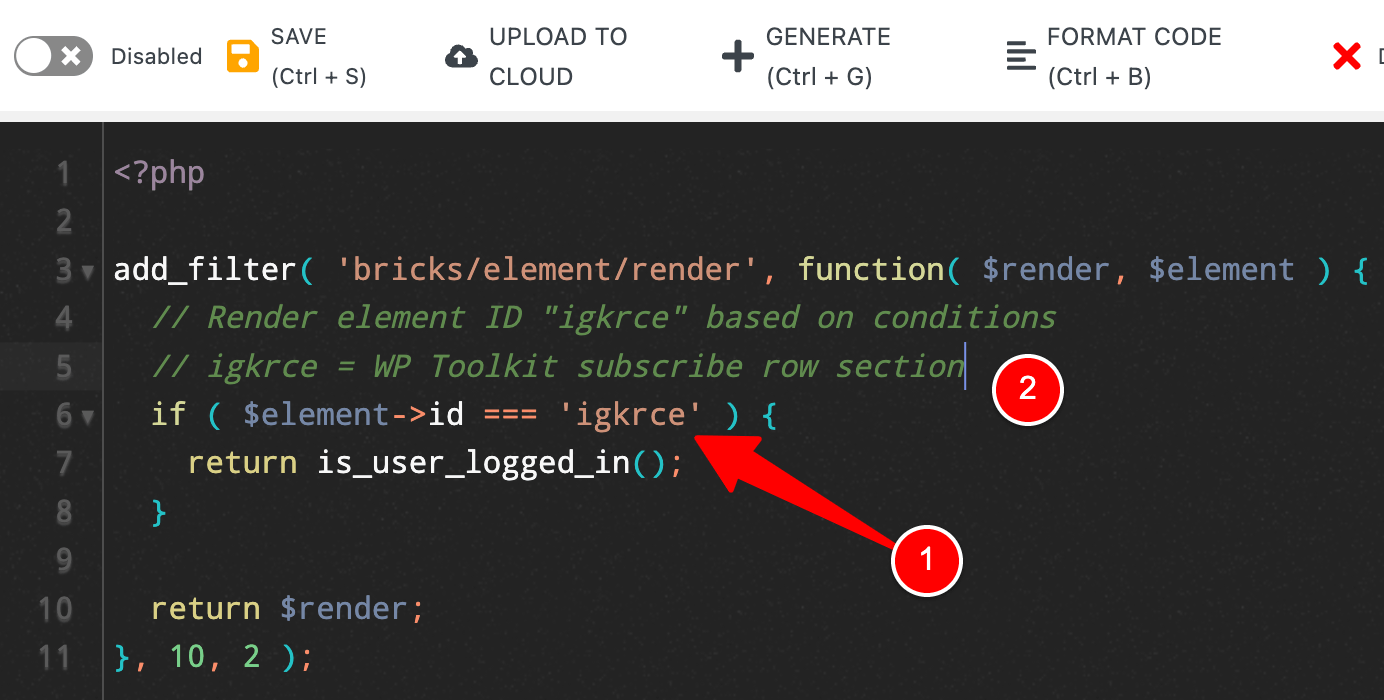
Also – the code I put at (3) is shown below…
<?php

add_filter( 'bricks/element/render', function( $render, $element ) {
  // Render element ID "mlttpx" if user is logged in
  if ( $element->id === 'mlttpx' ) {
    return is_user_logged_in();
  }

  return $render;
}, 10, 2 );Code language: HTML, XML (xml)
NOTE: This is actually a bit of example code that the Bricks team provide us in their knowledge base for this new PHP filter.
What the Bricks example code above is doing logically, is only outputting the element in bricks with the id of mlttpx if the user is logged into WordPress.
Using this as a base, I will customize this code to do what I need for this WP Toolkit optin row and then we can move to some other examples you might need for your own website.
Element ID: Getting the ID of the Element we wish to apply Conditional Logic to
Getting the ID of our Optin Section is very easy (but you can easily make a mistake here)…
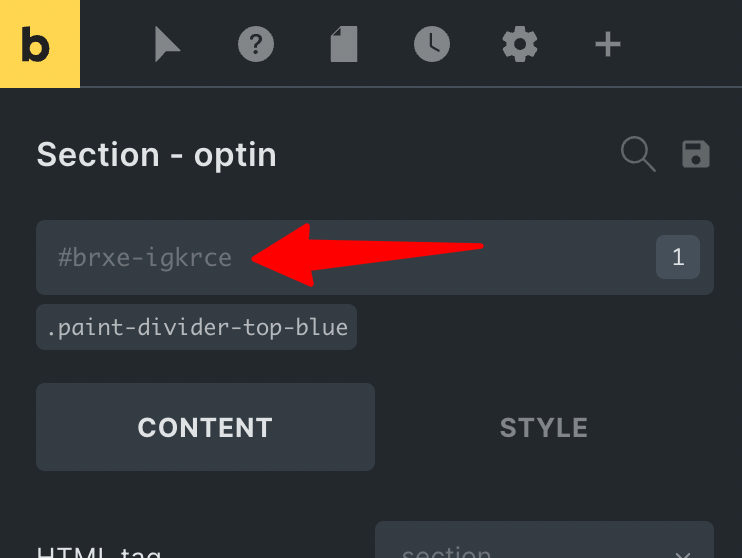
In the Bricks editor, click on the Element you wish to apply conditional logic to (1) and then note its ID on the left at (2).
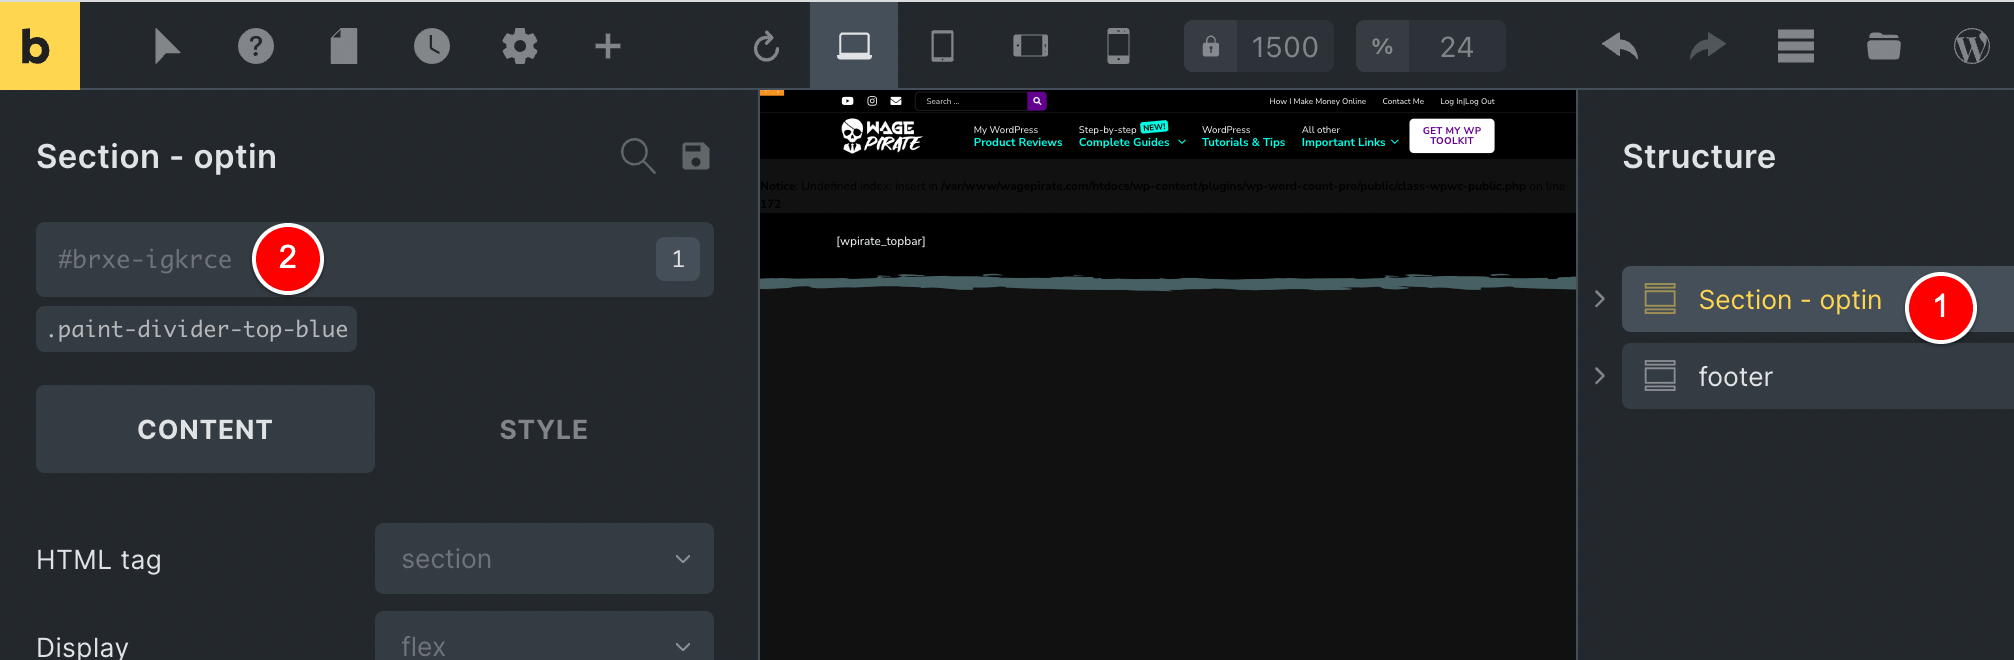
In the example above, I click on the Optin section and I can see that its ID at (2) is
#brxe-igkrceCode language: CSS (css)Now, back in WPCodeBox, I will update the PHP code to target the Bricks Element with the Bricks ID igkrce (1) and I will also add some notes at (2) that help me remember what ID is which element in Bricks when I come back to this code in the future.
Conditionals: Adding PHP Conditions to Elements in Bricks
Now that our code is targeting the Element we want to target (based on the ID), all that’s left to do here is add our PHP Conditionals like you normally would in any other WordPress function.
For this personal use case, I only want to output this WP Toolkit Optin section with ID igkrce on specific post types, my blog post, the search page, taxonomies, my home page and archive pages.
So I add the WordPress PHP conditionals at (1) below and if these conditions are met, I return false which means Bricks should NOT output this element (i.e. do not render the element).
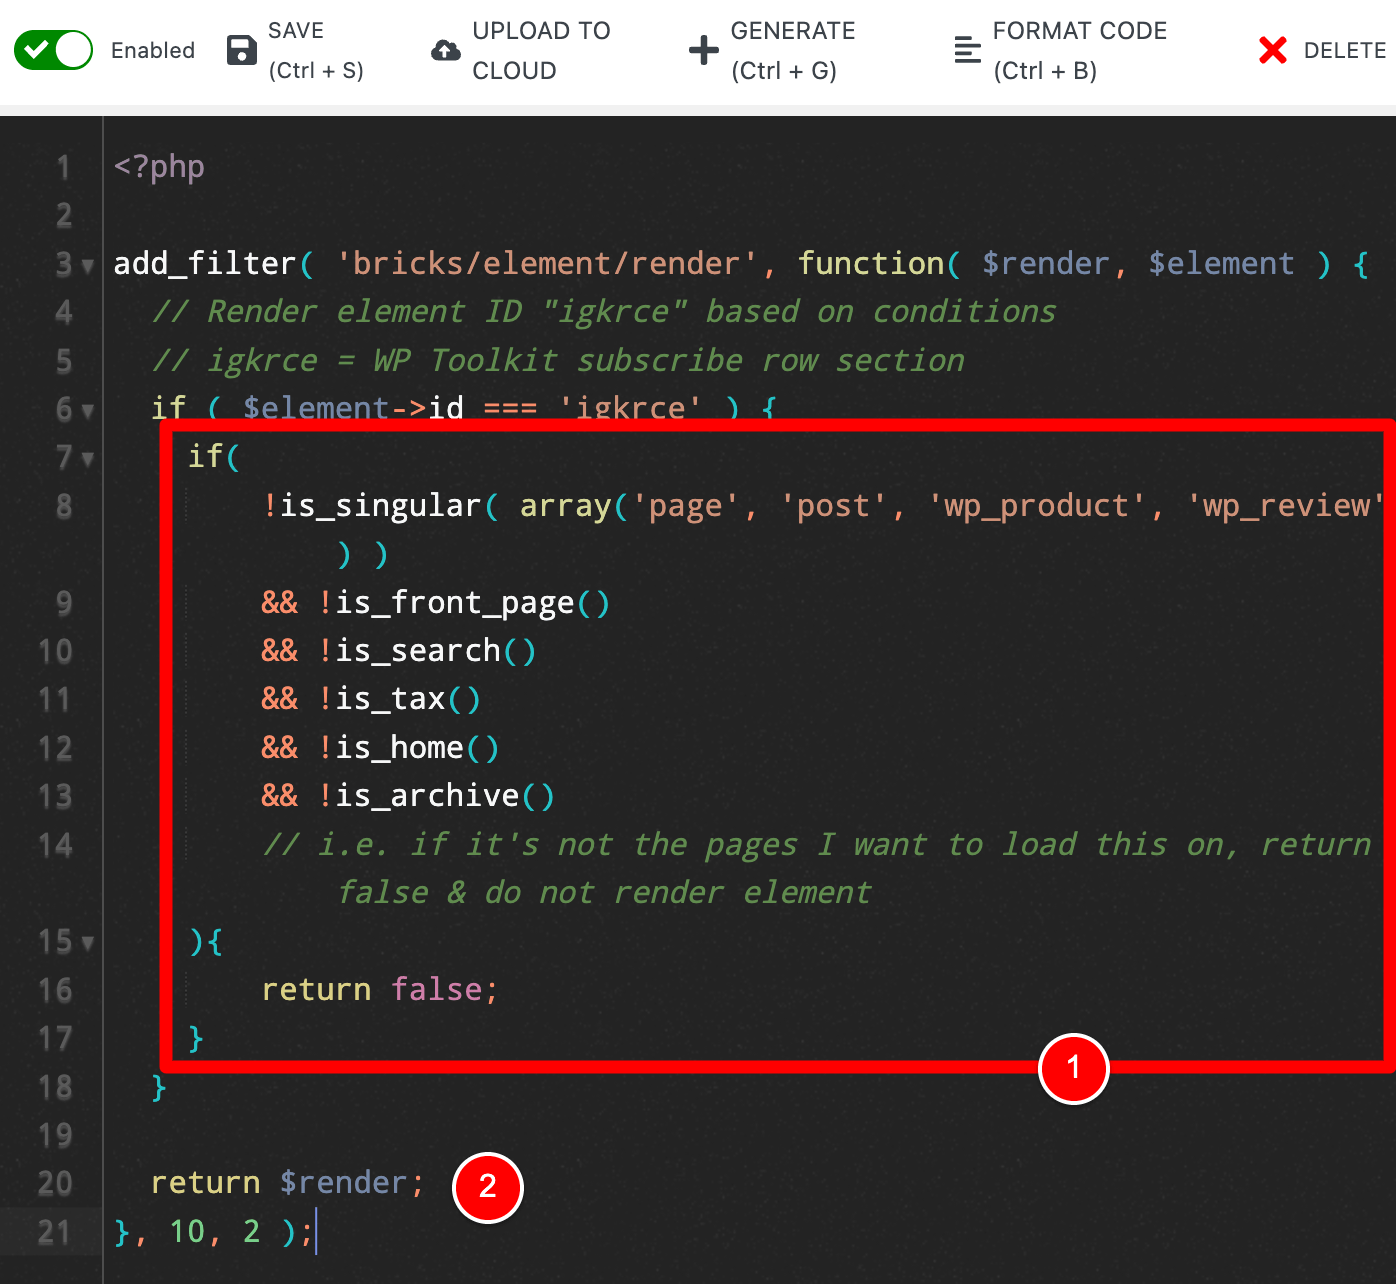
If these conditions are NOT met, then I return true.
NOTE: If that is a bit confusing, don’t worry – it was a bit confusing for a rookie like me too, but I’ll explain it in more detail in the next section.
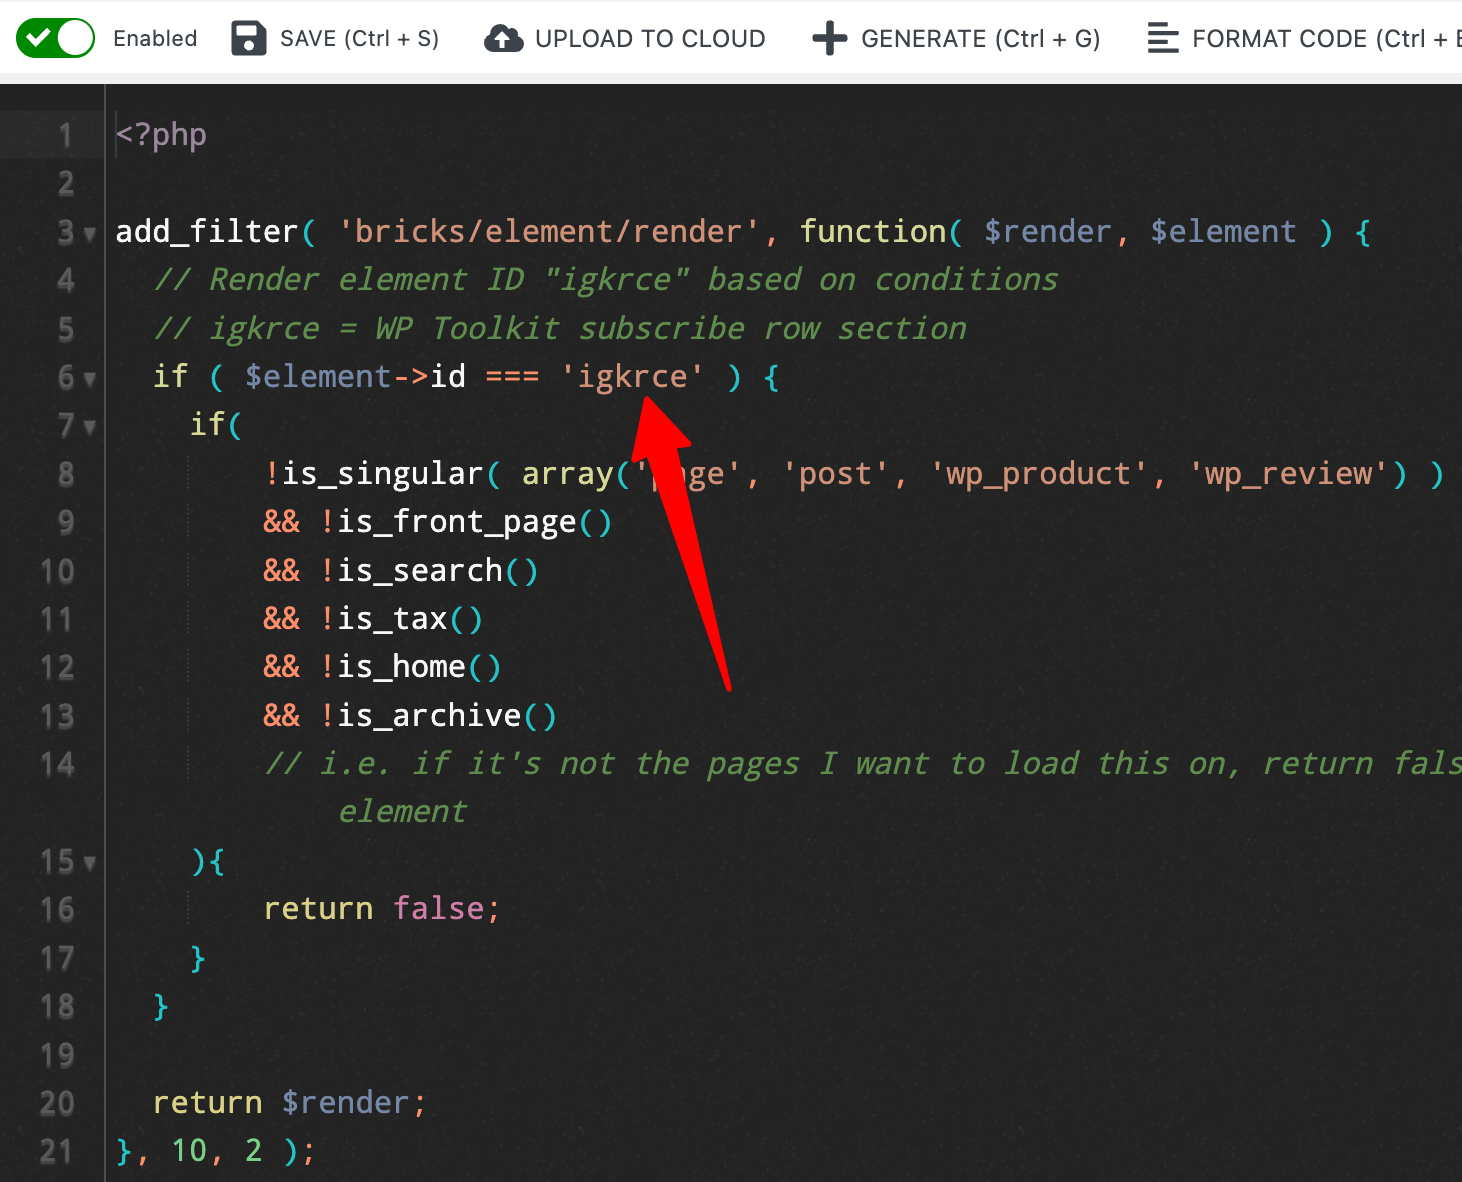
Here is the above code for easier reading…
<?php
add_filter( 'bricks/element/render', function( $render, $element ) {
// Render element ID "igkrce" based on conditions
// igkrce = WP Toolkit subscribe row section
if ( $element->id === 'igkrce' ) {
if(
!is_singular( array('page', 'post', 'wp_product', 'wp_review') )
&& !is_front_page()
&& !is_search()
&& !is_tax()
&& !is_home()
&& !is_archive()
// i.e. if it's not the pages I want to load this on, return false & do not render element
){
return false;
}
}
return $render;
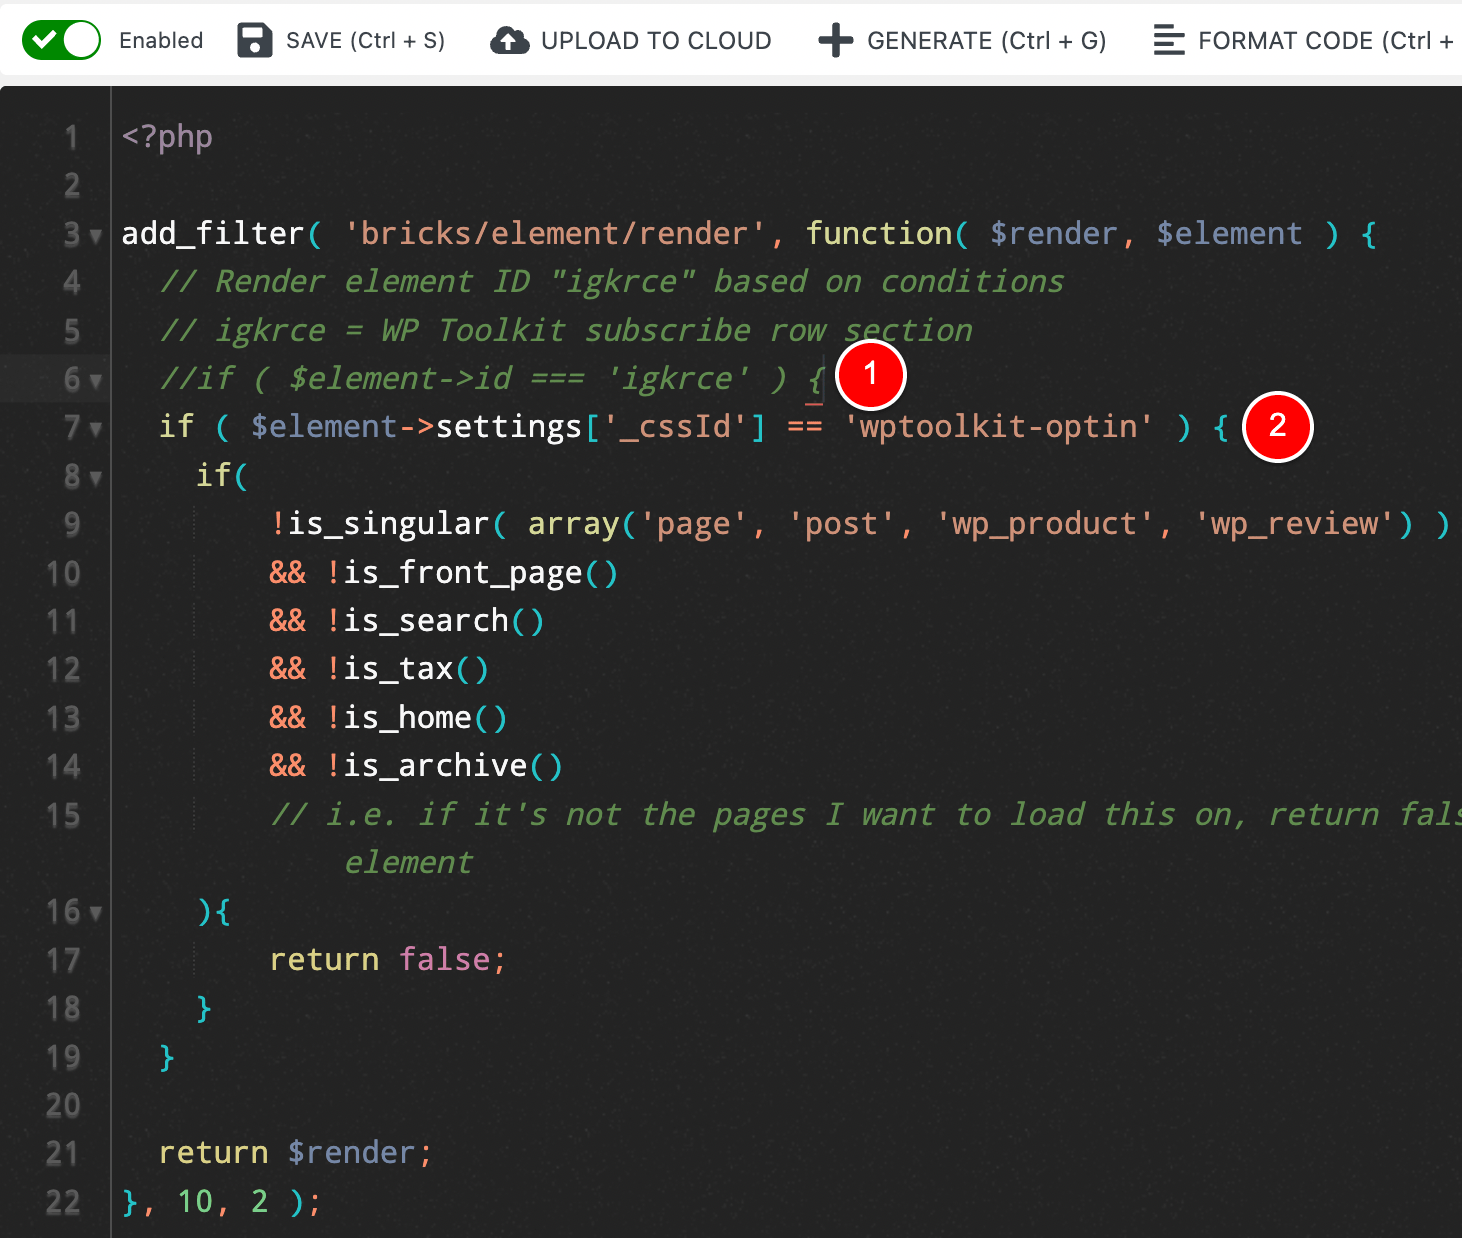
}, 10, 2 );Code language: PHP (php)Now, the above does meet my needs but below is a different way to think of this function (and to me is easier for my brain to wrap it’s synapses..??) around.. (I’ll see myself out)…
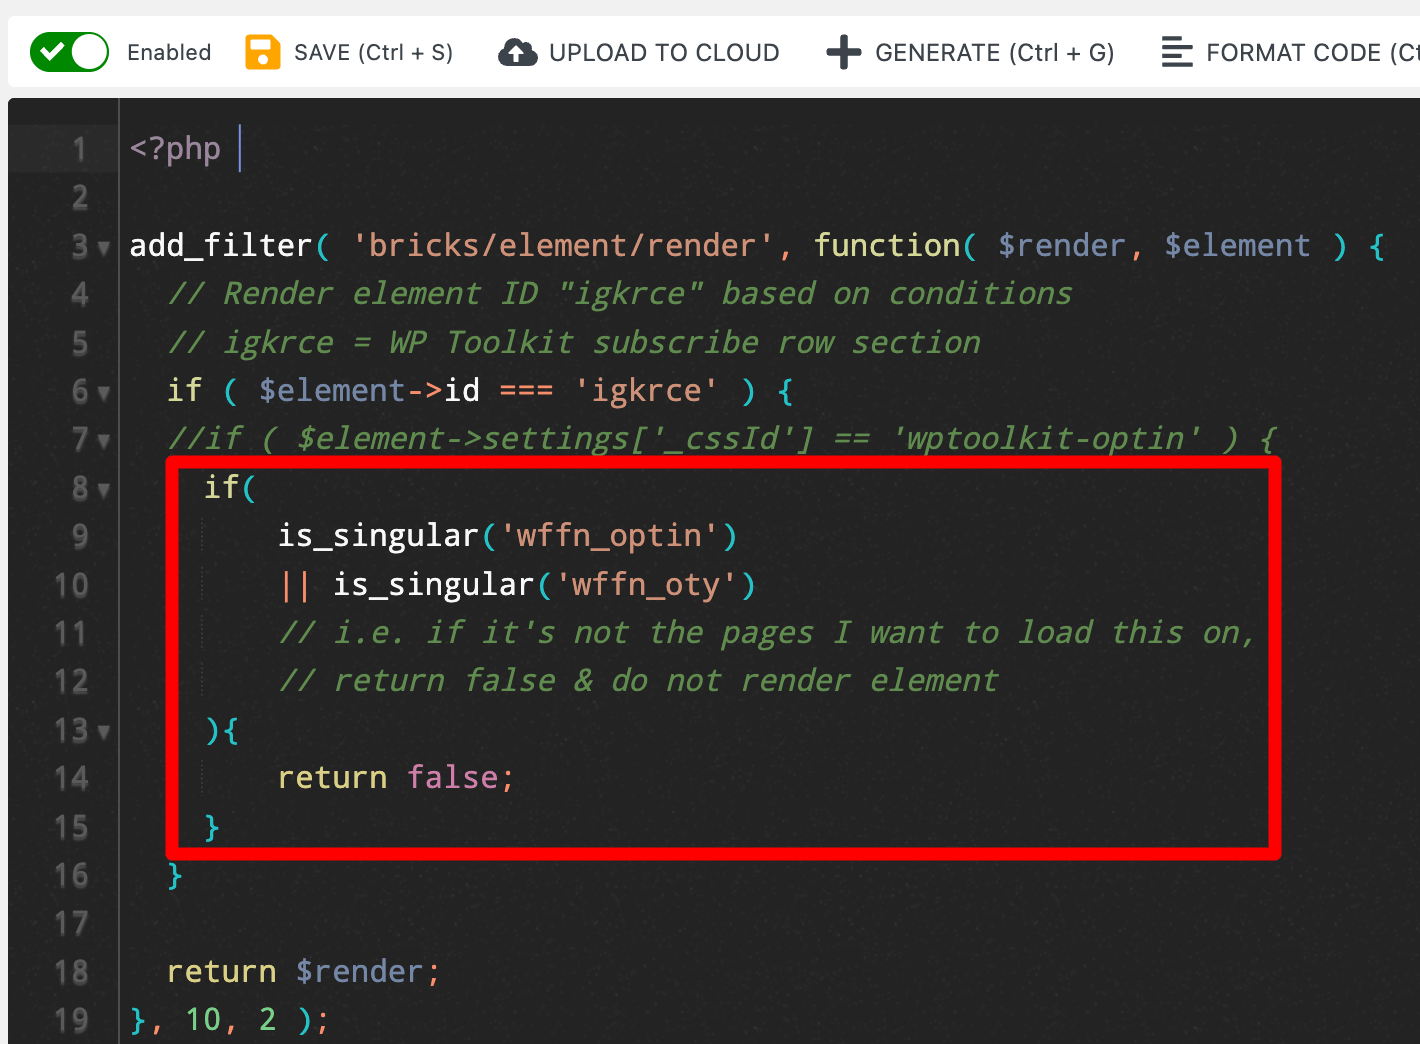
The reason that this code is easier for me to understand is that (in the part in the red box) I am adding the conditions I want to return false (i.e. NOT output the element), otherwise it returns true and shows the element.
If I were you, I would take the approach like the above and just define all the conditions under which you want to hide an element and then return false – I find this makes it much easier to come back to the code later on and understand what it’s doing.
Here is that code below…
<?php

add_filter( 'bricks/element/render', function( $render, $element ) {
  // Render element ID "igkrce" based on conditions
  // igkrce = WP Toolkit subscribe row section
  if ( $element->id === 'igkrce' ) {
  //if ( $element->settings['_cssId'] == 'wptoolkit-optin' ) {
    if(
        is_singular('wffn_optin')
        || is_singular('wffn_oty')
        // i.e. if it's not the pages I want to load this on,
        // return false & do not render element
    ){
        return false;
    }
  }

  return $render;
}, 10, 2 );Code language: PHP (php)
The Final Result: We’re done!
From using the code above, we’ve now achieved what we set out to do for this example.
Our section correctly outputs on our Home Page and the other pages we need it to…

And it doesn’t render / output on other pages like my Optin Pages etc…

But there is so much more I want to cover with this new PHP Filter that will help you understand how exactly it works and how to best use it in your website…
TIPS! Further understanding of this new PHP Filter
After playing around with this new PHP filter, here are some of the mistakes I made (and how to fix them) and other tips that will help you use this new Conditional Logic feature in Bricks 1.5.
All this PHP Filter wants is a true or false
Let’s take the below code example from the Bricks docs…
add_filter( 'bricks/element/render', function( $render, $element ) {
  // Render element ID "mlttpx" if user is logged in
  if ( $element->id === 'mlttpx' ) {
    return is_user_logged_in();
  }

  return $render;
}, 10, 2 );Code language: PHP (php)
The code checks if the Element ID is mlttpx, and if it is, it then does the following:
return is_user_logged_in();
This WordPress core function is_user_logged_in() by nature returns true if the user is logged in, or false if the user is logged out.
Another (less sexy) way to write this would be as follows but it will give you a better idea of what I mean…
<?php

add_filter( 'bricks/element/render', function( $render, $element ) {
  // Render element ID "mlttpx" if user is logged in
  if ( $element->id === 'mlttpx' ) {
      if( is_user_logged_in() ){
          // user is logged in, show element
          $render = true;
      }
      else{
          // user is logged out, do not show element
          $render = false;
      }
  }
  return $render;
}, 10, 2 );Code language: HTML, XML (xml)
TRUE is set by default
Let’s take the above PHP code and slightly adjust it to the following:
<?php

add_filter( 'bricks/element/render', function( $render, $element ) {
  // Render element ID "mlttpx" if user is logged in
  if ( $element->id === 'mlttpx' ) {
      if( !is_user_logged_in() ){
          // user is not logged, do not show element
          $render = false;
      }
  }
  return $render;
}, 10, 2 );Code language: HTML, XML (xml)
Now our code is ONLY setting the $render variable to false if the user is logged out.
But see how we never have to set $render = true anywhere?
That’s because, by default, Bricks WANTS to render / show all the elements and you are using this PHP Filter to specify when NOT to output elements.
And this leads me to my next point…
You are trying to find reasons NOT to render the Element
What I am finding is easiest to do when approaching using this conditional logic feature in Bricks is to do the following…
TIP! Write this function with the mindset of trying to set $render to false where you want to hide your elements, otherwise, just let it return true with that last line return $render. I.e. Don’t try to set $render to true as it’s true by default, try to set it to false, otherwise just return as normal for output.
By default, Bricks WANTS to output all the elements that you add to your page in the Bricks editor.
So what you’re doing with this PHP Filter is setting up a few conditionals and if they are met / not met, you are returning FALSE to Bricks which by you’re saying “don’t render this element on the frontend”.
We can see this clearer if we break down the below code from the Bricks docs.
add_filter( 'bricks/element/render', function( $render, $element ) {
  // Conditional display logic goes here:
  // $render = true to render the element
  // $render = false to skip the element render

  return $render;
}, 10, 2 );Code language: PHP (php)
At the end of this function, you can see that $render is returned and without writing any code here, $render = true by default i.e. show all elements.
That’s why in my example I used in this tutorial of showing my Optin section on specific parts of my website I did the following checks to return $render as false…
But I never had to specify it as true.
So write your code for try set to false, otherwise, leave it as the default true and the element will show.
The ID and _cssId are DIFFERENT
In the Bricks Docs, they provide this example function with the following explanation….
“The following example will show a specific element based on the HTML ID on a single post page with a specific category.”…
add_filter( 'bricks/element/render', function( $render, $element ) {
  // Check if this is a single post page
  if ( ! is_single() ) {
    return $render;
  }

  // Get the element custom HTML ID
  $html_id = isset( $element->settings['_cssId'] ) ? $element->settings['_cssId'] : false;

  // Check if the element has the HTML ID "project-award"
  if ( $html_id && $html_id === 'project-award' ) {
    return has_category('projects');
  }

  return $render;
}, 10, 2 );
Code language: PHP (php)
What I want to focus on here is that says $element->settings[‘_cssId’].
Previously in this tutorial, we used the following code where we got the ID from (2) below…
and then we used the 6 letter ID of this section igkrce in our code like below.
<?php

add_filter( 'bricks/element/render', function( $render, $element ) {
  // Render element ID "mlttpx" if user is logged in
  if ( $element->id === 'mlttpx' ) {
    // code here
  }

  return $render;
}, 10, 2 );
Code language: HTML, XML (xml)
It took me a bit of trial and error here to understand what the difference between the following two IDs was and I want to save you the headache:
- $element->id
- $element->settings[‘_cssId’]
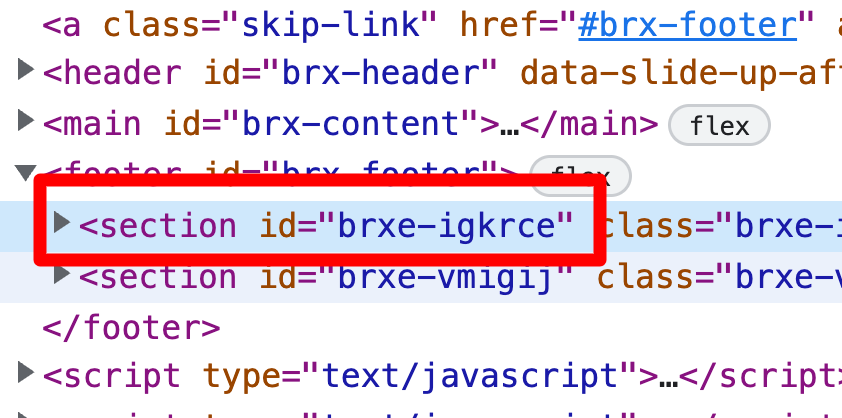
In Bricks Builder, each Element by default gets its own 6-letter ID that you can see up here at (1) and it is prefixed ALWAYS with brxe-.
This forms the ID of the HTML Element, as we can see if we view the source code.
However, in regards to this new PHP Filter, I want to point two things out…
Firstly – as you now know, when you are writing your PHP code with this filter, you don’t add the brxe- part (you only use the 6-letter ID).
You can see that in my final code here that I used in the first part of this tutorial…
Now, the second thing I want to point out here is that when you go click on an Element in Bricks and then click this pencil icon…
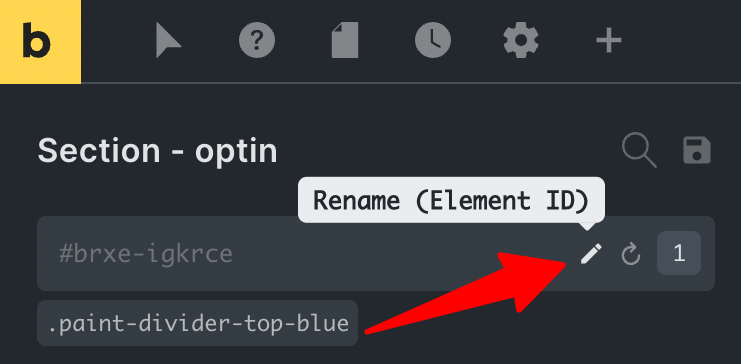
And then write your own ID as I have done below…
You most likely DO NOT use $element->id to target this element…
To target this element you will probably want to use $element->settings[‘_cssId’].
I have updated my code below to show you how this would work by commenting out the old cold at (1) and then adding this new code at (2) where we use our updated $element->settings[‘_cssId’]…
After investigating a bit, here is why you could make this change.
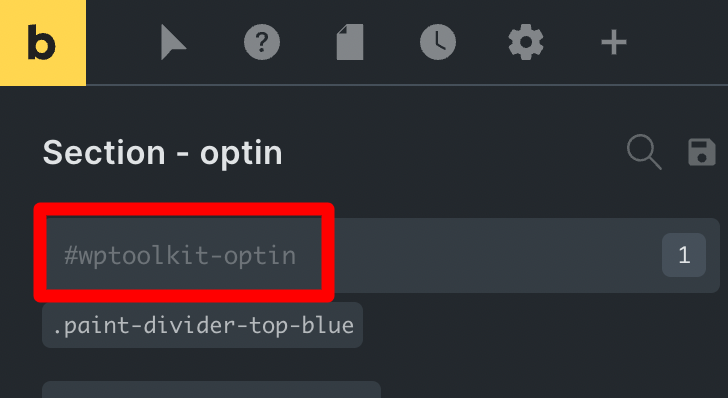
When you set a custom ID for your element like we did here…
It automatically updates the field under STYLE > CSS ID…
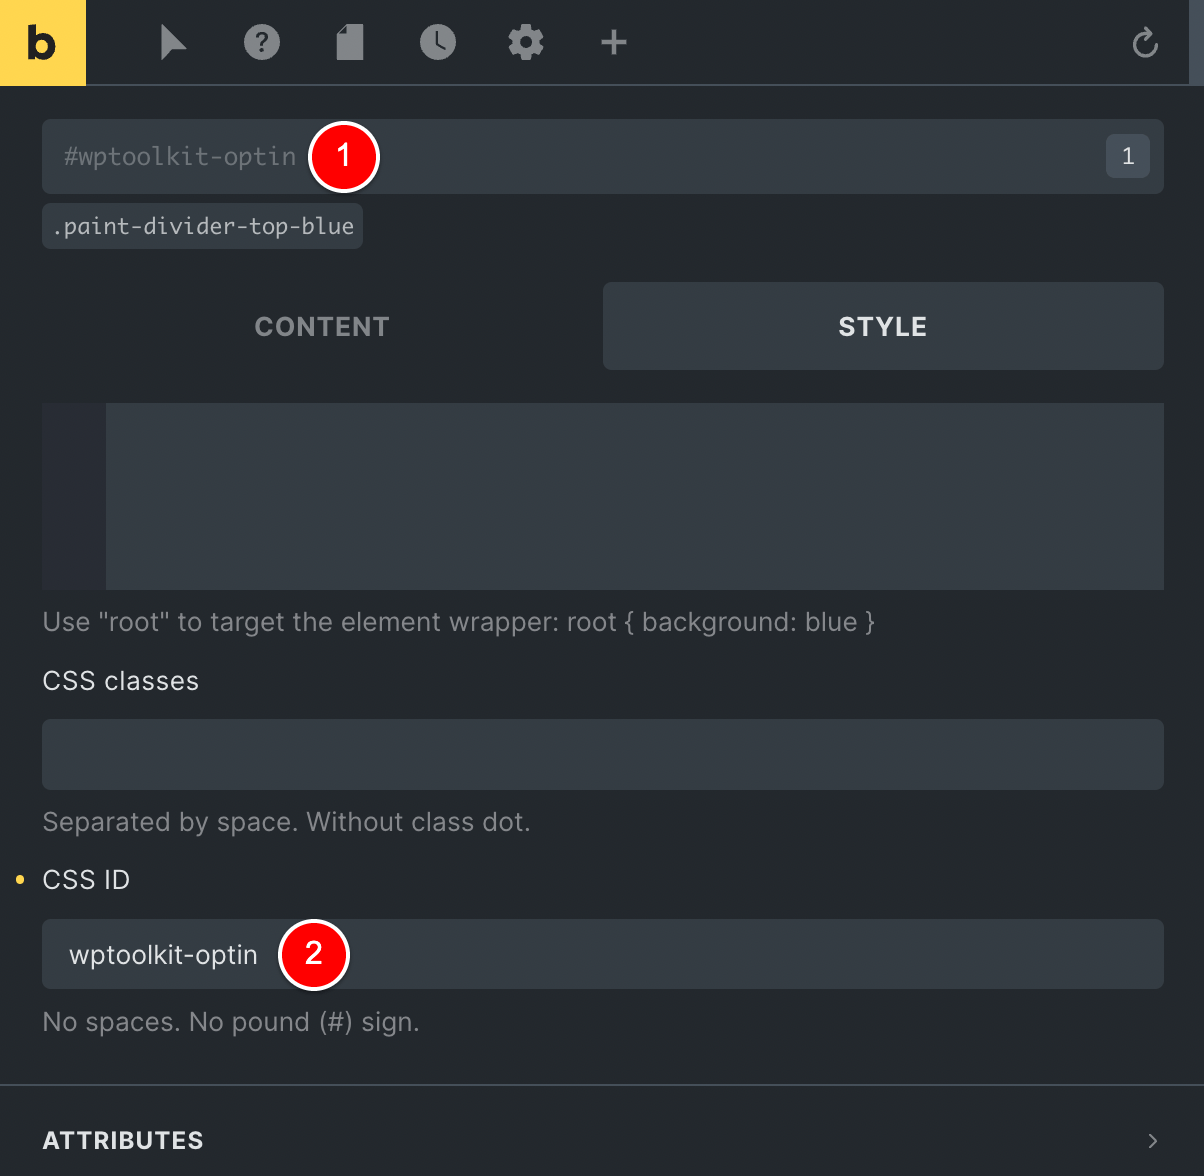
Hence why you can use this updated targeting method for an Element’s ID.
Now…
You might have noticed that here I used the words you may and you can etc to describe your ability to use $element->settings['_cssId'] VS $element->id.
The reason I use these words is because you can still use the $element->id method EVEN if you set your own custom ID on the element.
If we check the source code after adding our own custom ID wptoolkit-optin to the section, you can see that it updated the HTML ID BUT we also still have the bricks ID available to us via the CSS Class (as shown by the arrow below)…

I tested adding this custom ID wptoolkit-optin to the section and then using the below code…
if ( $element->id === 'igkrce' )Code language: PHP (php)…and it still works!
So it’s up to you which one you want to use but hopefully, that saves you a little bit of headache.
Leave a Reply