This article will show you how to set a Bricks Builder Template for a post or page using PHP.
The way we’ll do it is by utilizing the bricks/screen_conditions/scores PHP Filter.
You’ll notice that the last word on the end of that filter is “scores”.
Bricks has a built-in template scoring system and it uses these scores to know which Template should be used to render the current URL trying to be accessed on your website. Using this PHP Filter, we are able to hook in and set our own scores for templates – and in doing so – we can control what Template is used to render content in our website.
To give you an idea of how this works, here is the final PHP Code we’ll write today:
// Bricks scoring for template selection
add_filter('bricks/screen_conditions/scores', function ($scores, $condition, $post_id, $preview_type) {
    // pqyncm is the ID of the condition
    // for the "Single - Page Builder" bricks template
    // c_bricks_template_based_on_score_select = ACF dropdown field ID
    $acf_bricks_template = get_field('c_bricks_template_based_on_score_select');
    if(!isset($acf_bricks_template)){
        return $scores;
    }
    // if the code gets here, there is a setting in the ACF dropdown
    // so we will apply our custom Scoring Logic
    if ($condition['id'] === 'pqyncm' && $acf_bricks_template == 'page-builder') {
        $scores[] = 9;
    }
    return $scores;
}, 10, 4);Code language: PHP (php)
And don’t worry if that code doesn’t make sense…
Today, we start from scratch and I run you through each line of this code, what it does and how you can customize it to achieve whatever you need to do on your website.
Most Bricks Builder users will use this on their website
Now, you might be wondering… is this article relevant to me and do I need to do something like this?
Let me show you an example of where I am currently using the above PHP Filter on my website.
To do this, we will recap something I had to set up on my website recently with Bricks and go through it step-by-step.
In doing so, you’ll see where I got stuck with the default Bricks Templating system…
and then how this PHP Filter helped me solve it.
I think this is going to be a great article to follow along with because I feel like most Bricks websites need to do this (let me know in the comments below!).
So let’s kick things off and revisit the first thing I was doing on my website before I got stuck and needed to use this PHP Filter…
and that was creating my Home Page.
Creating my Homepage
To build my Home Page, I did what you’d expect.
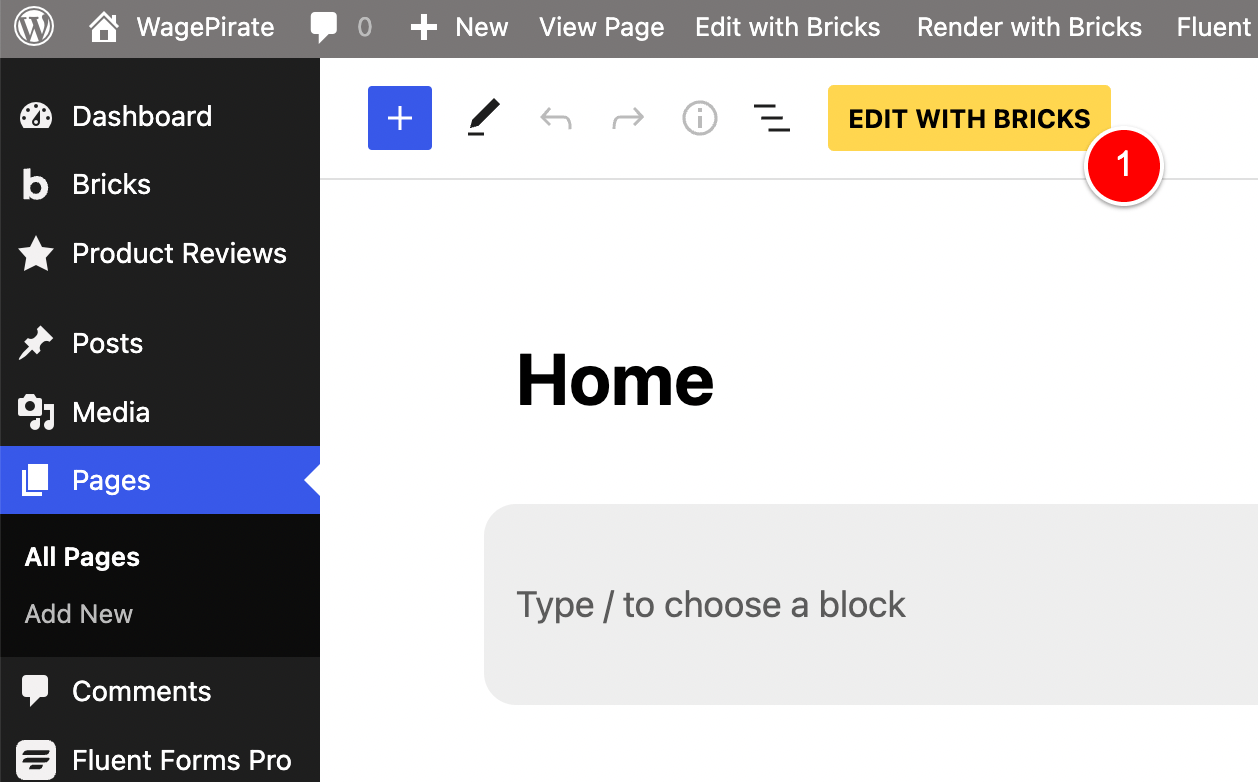
I went to Pages > Add New.
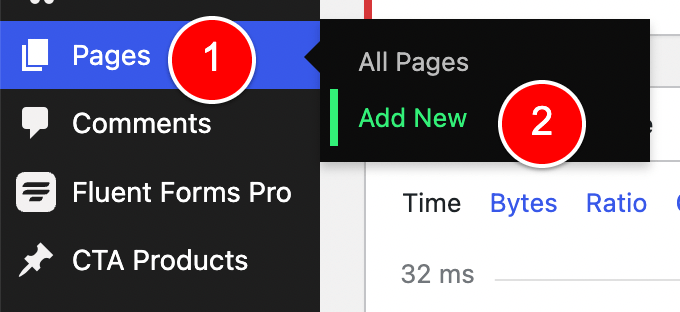
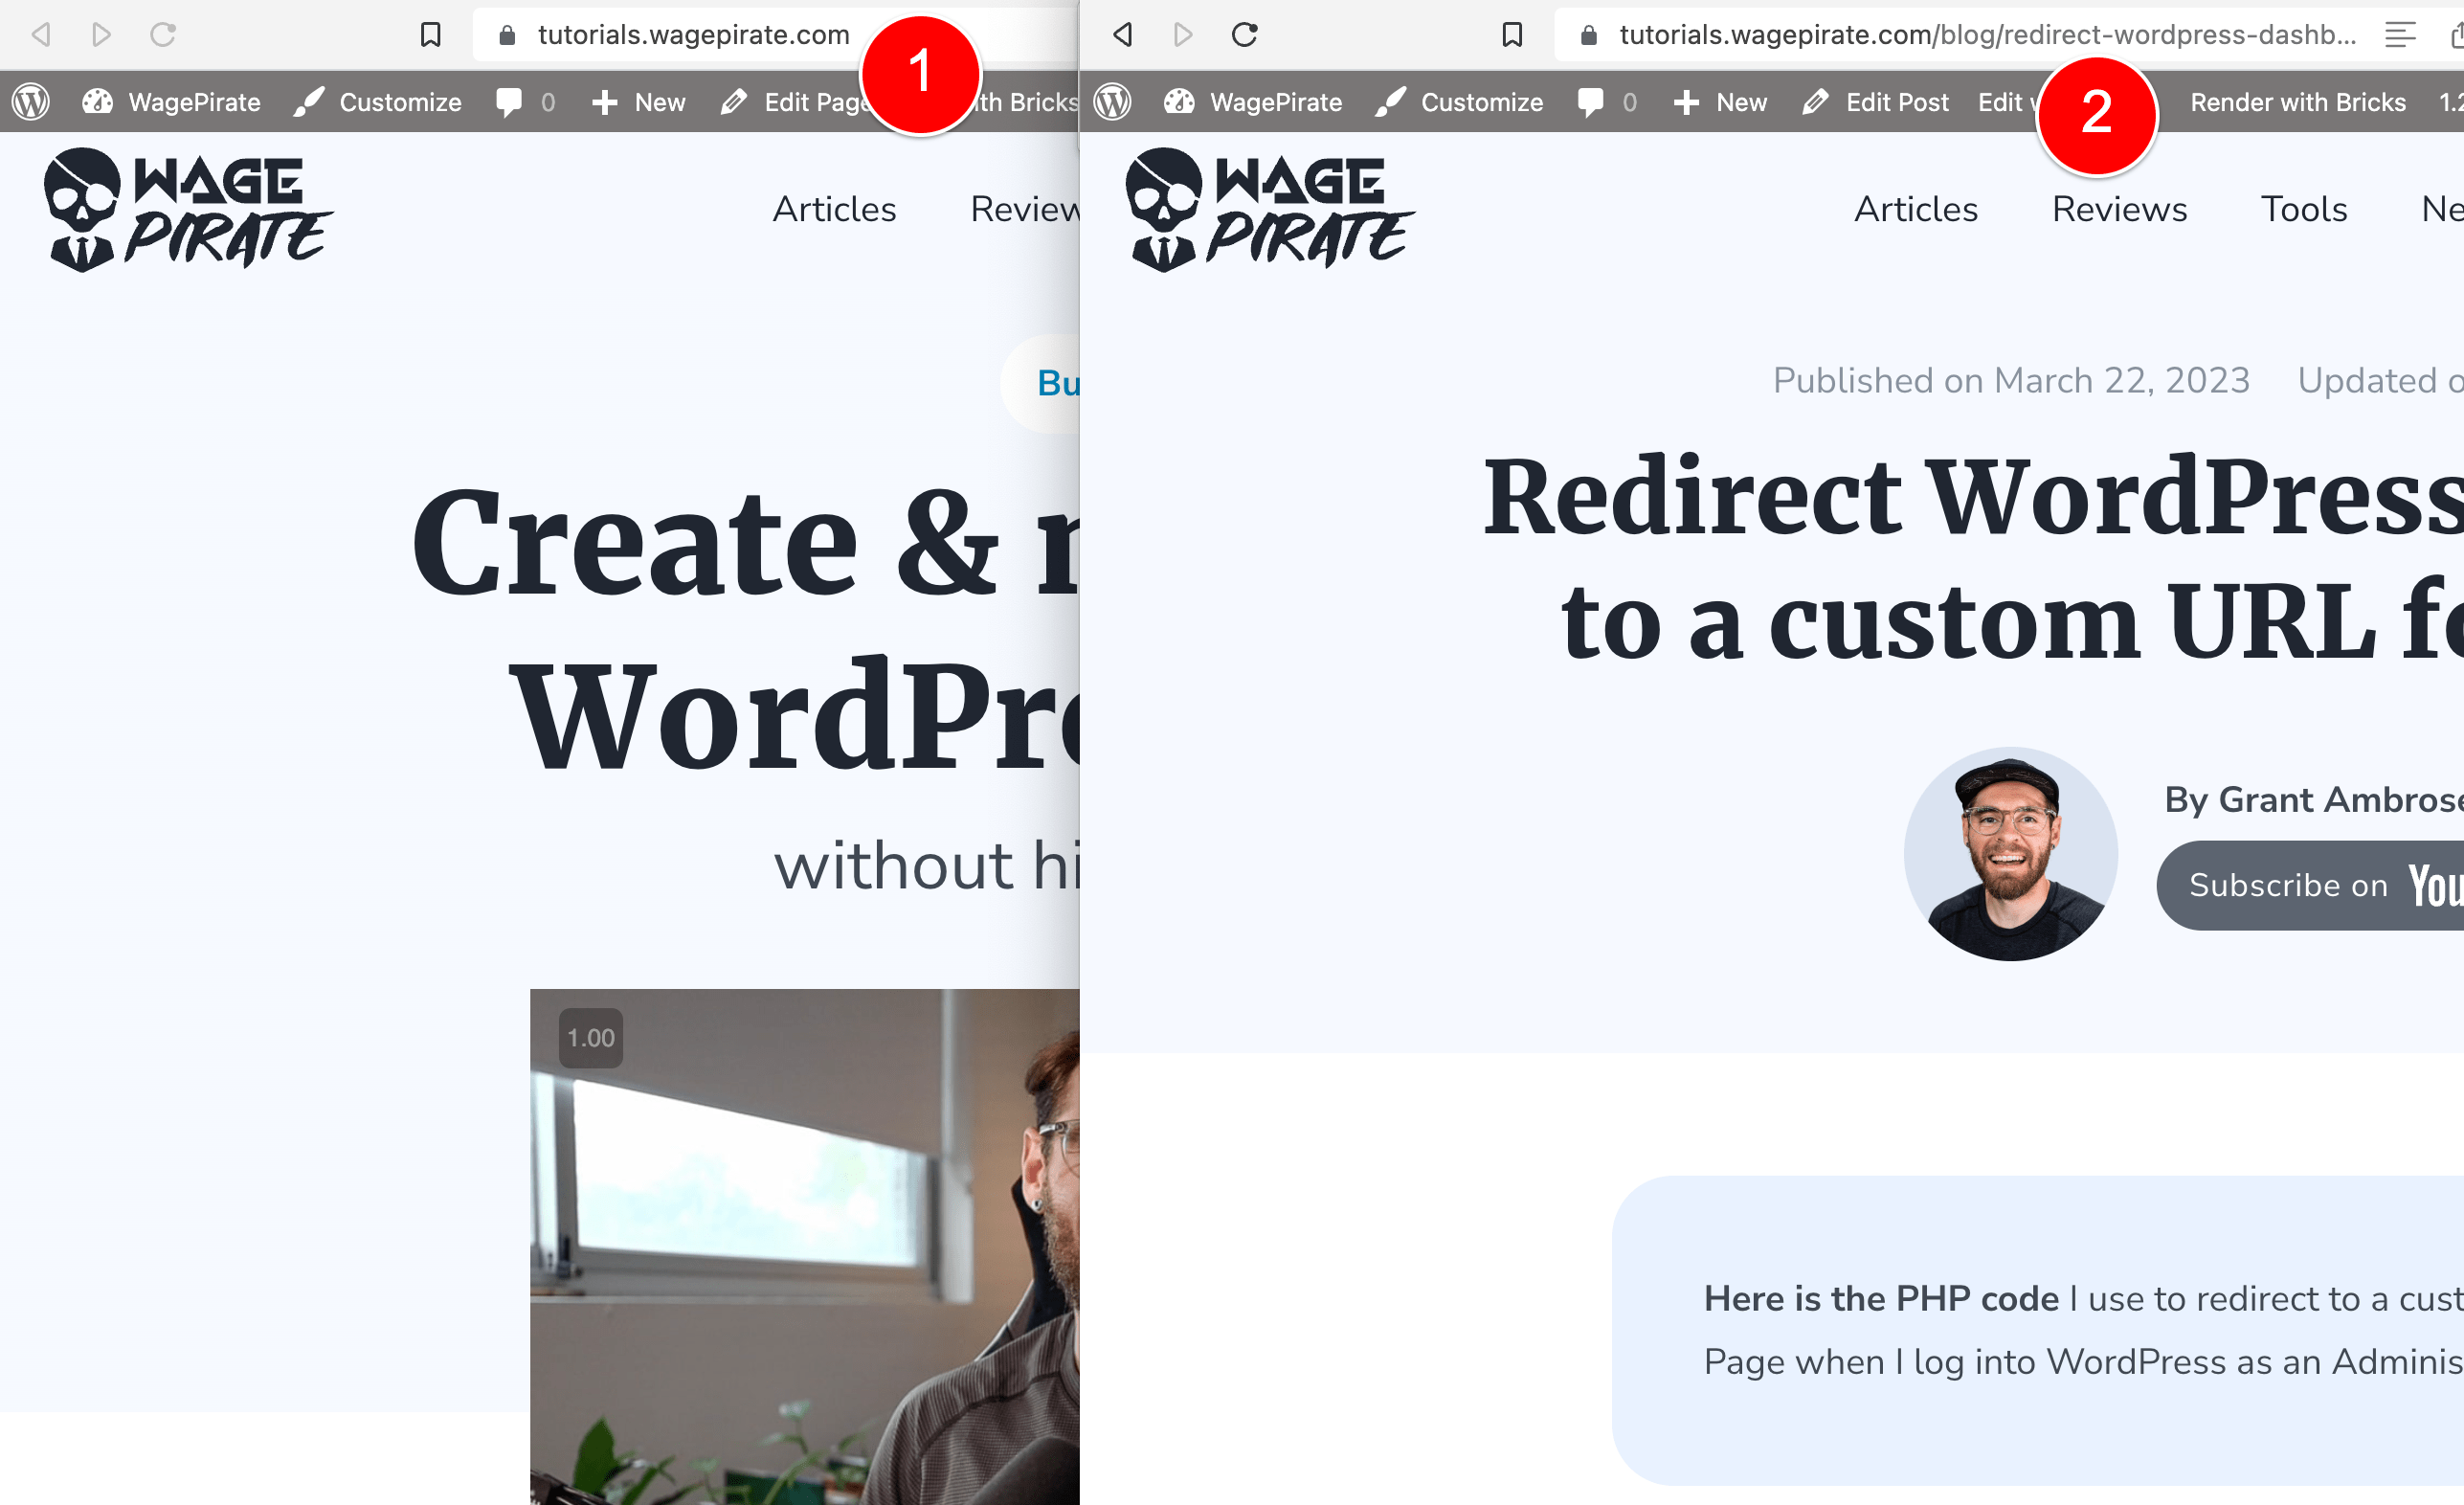
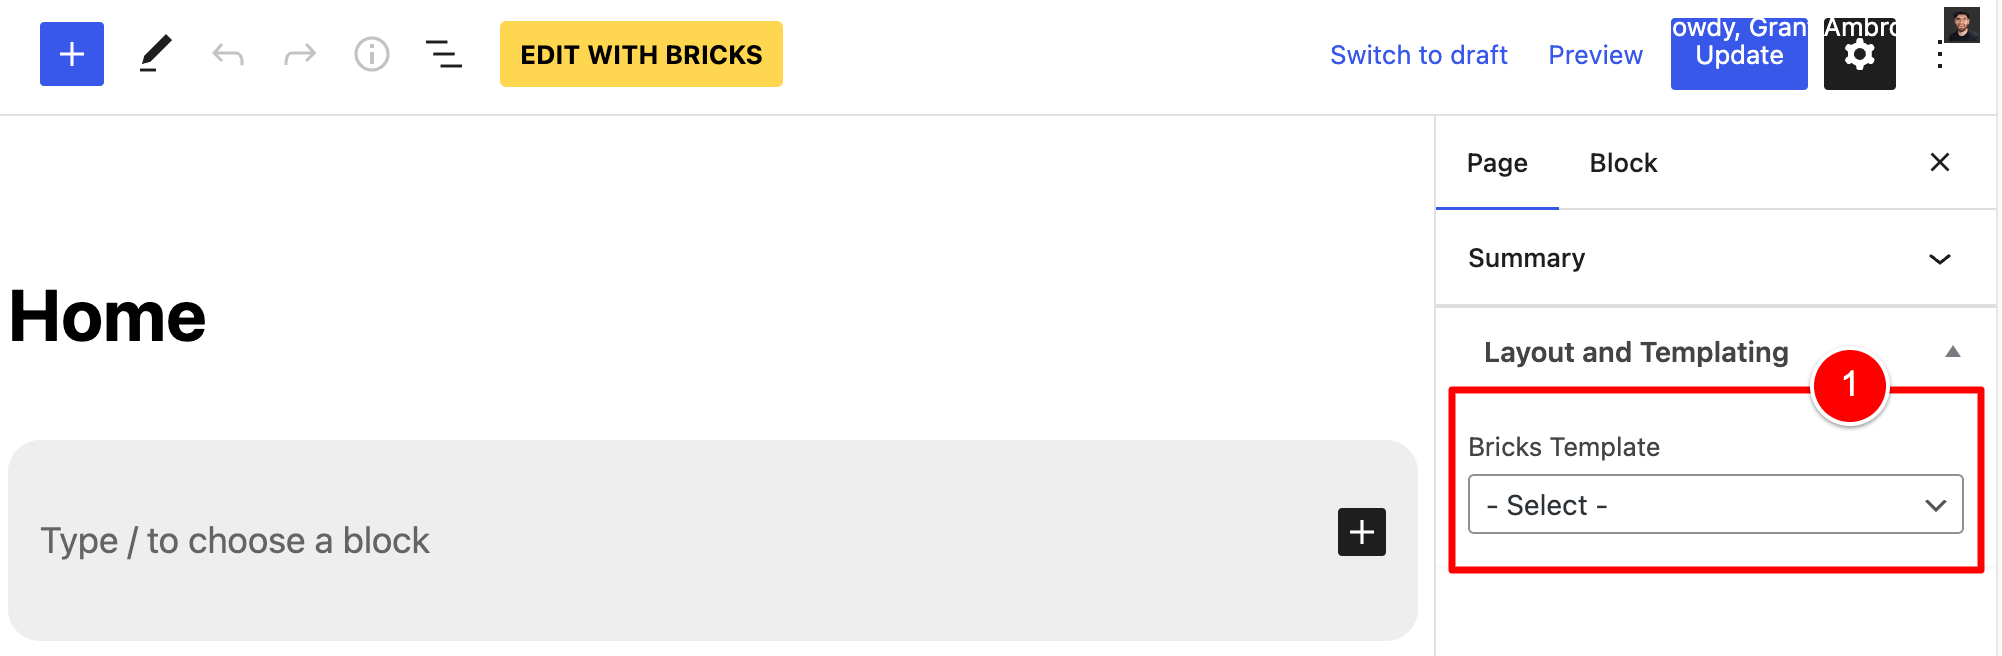
I created a Page named Home and then clicked Edit with Bricks (1).
I then went ahead and designed the page.
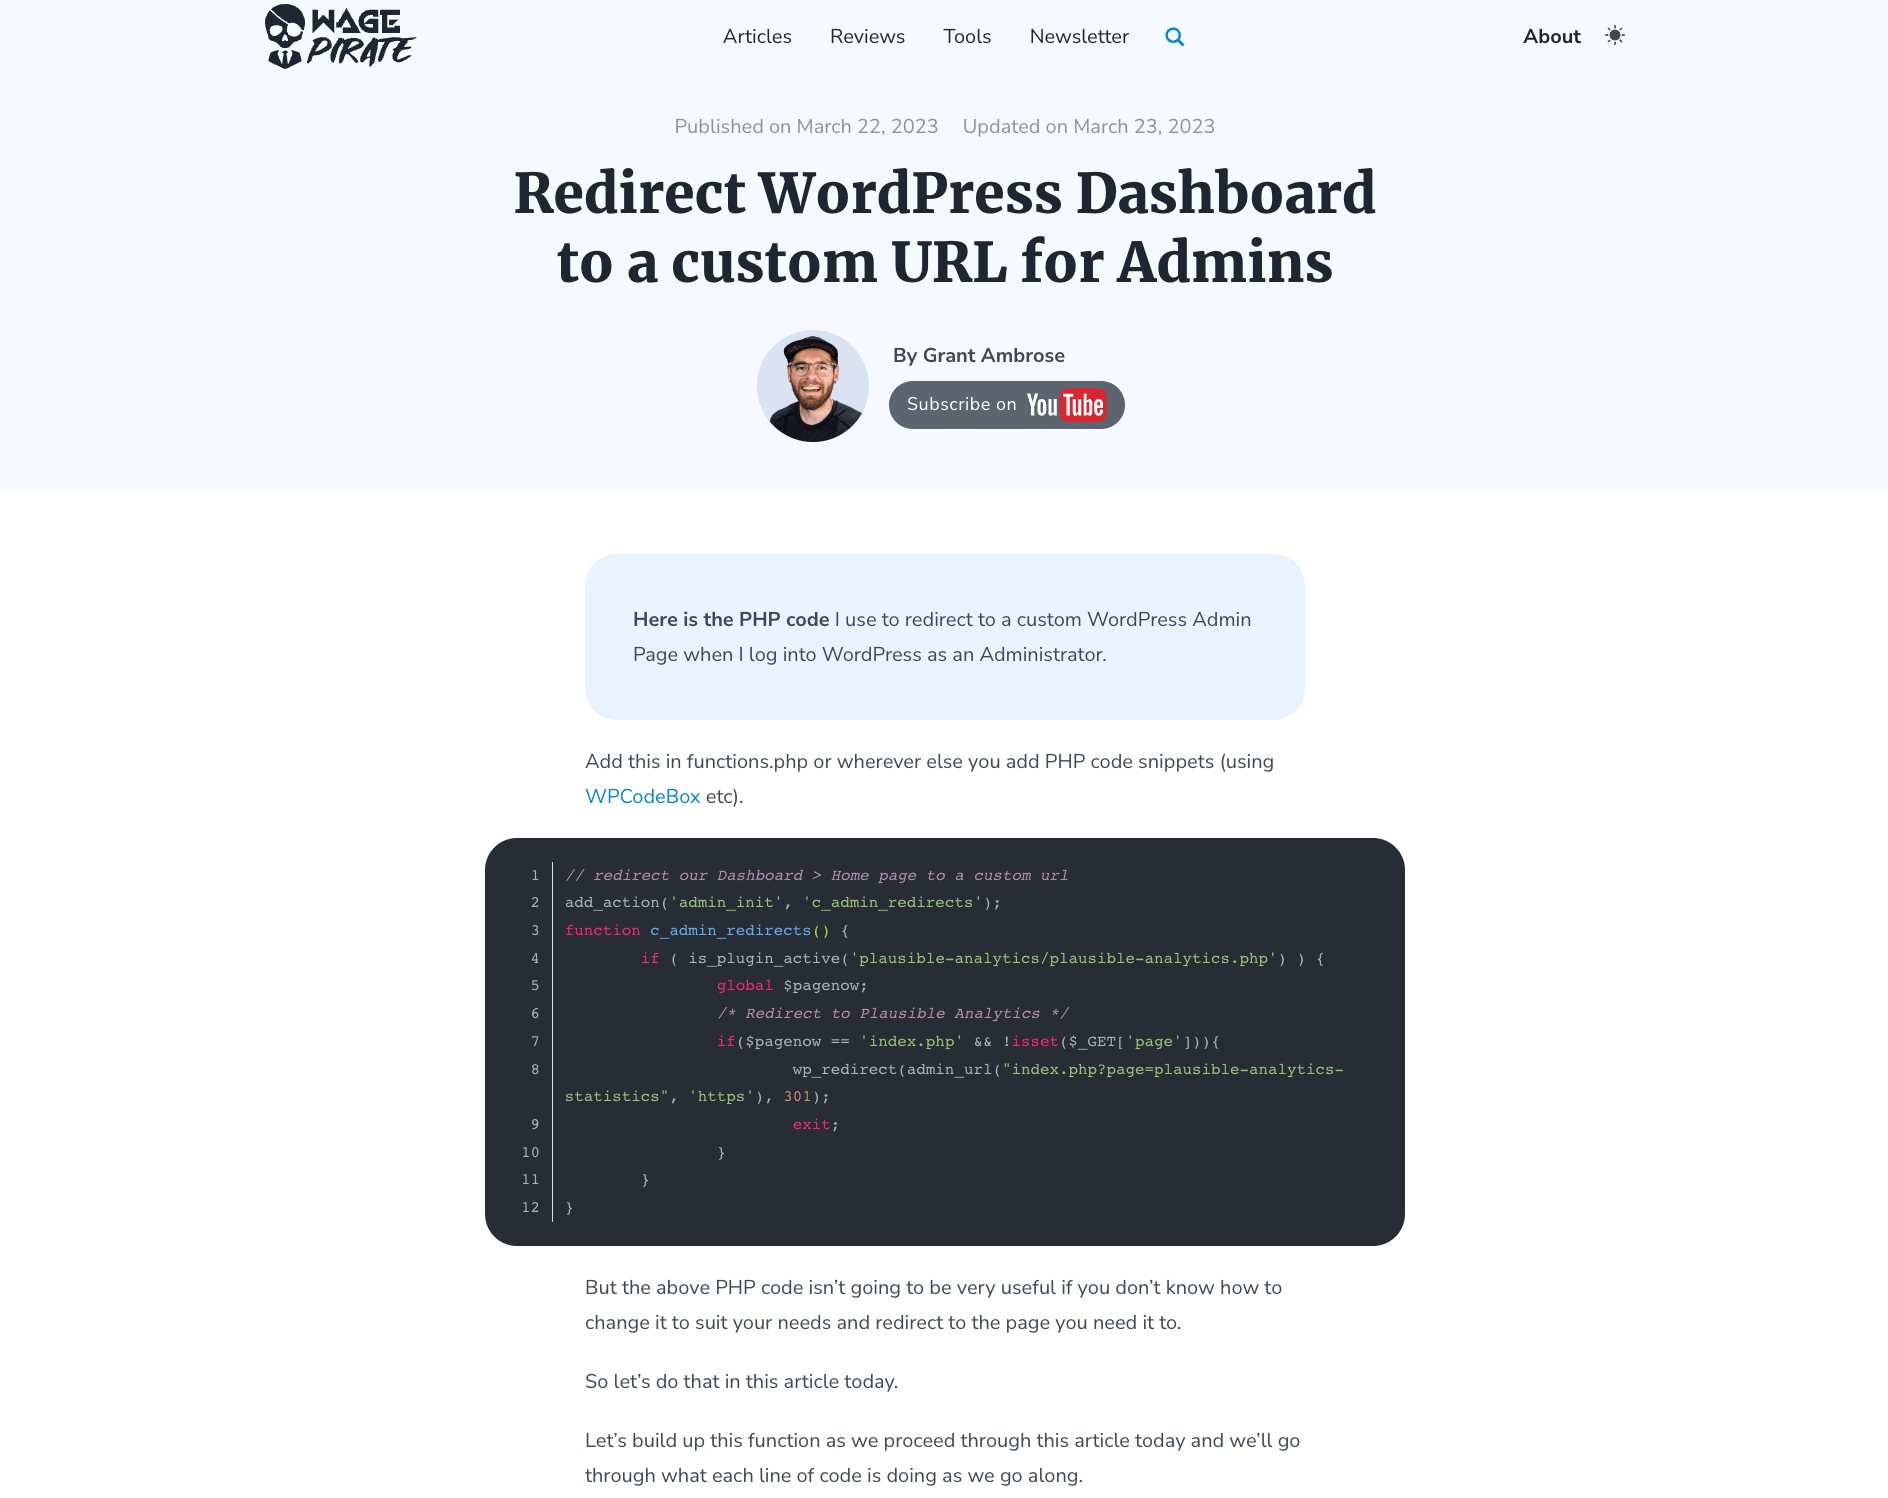
Here is what the top hero section of my Home page looks like in the Bricks builder.
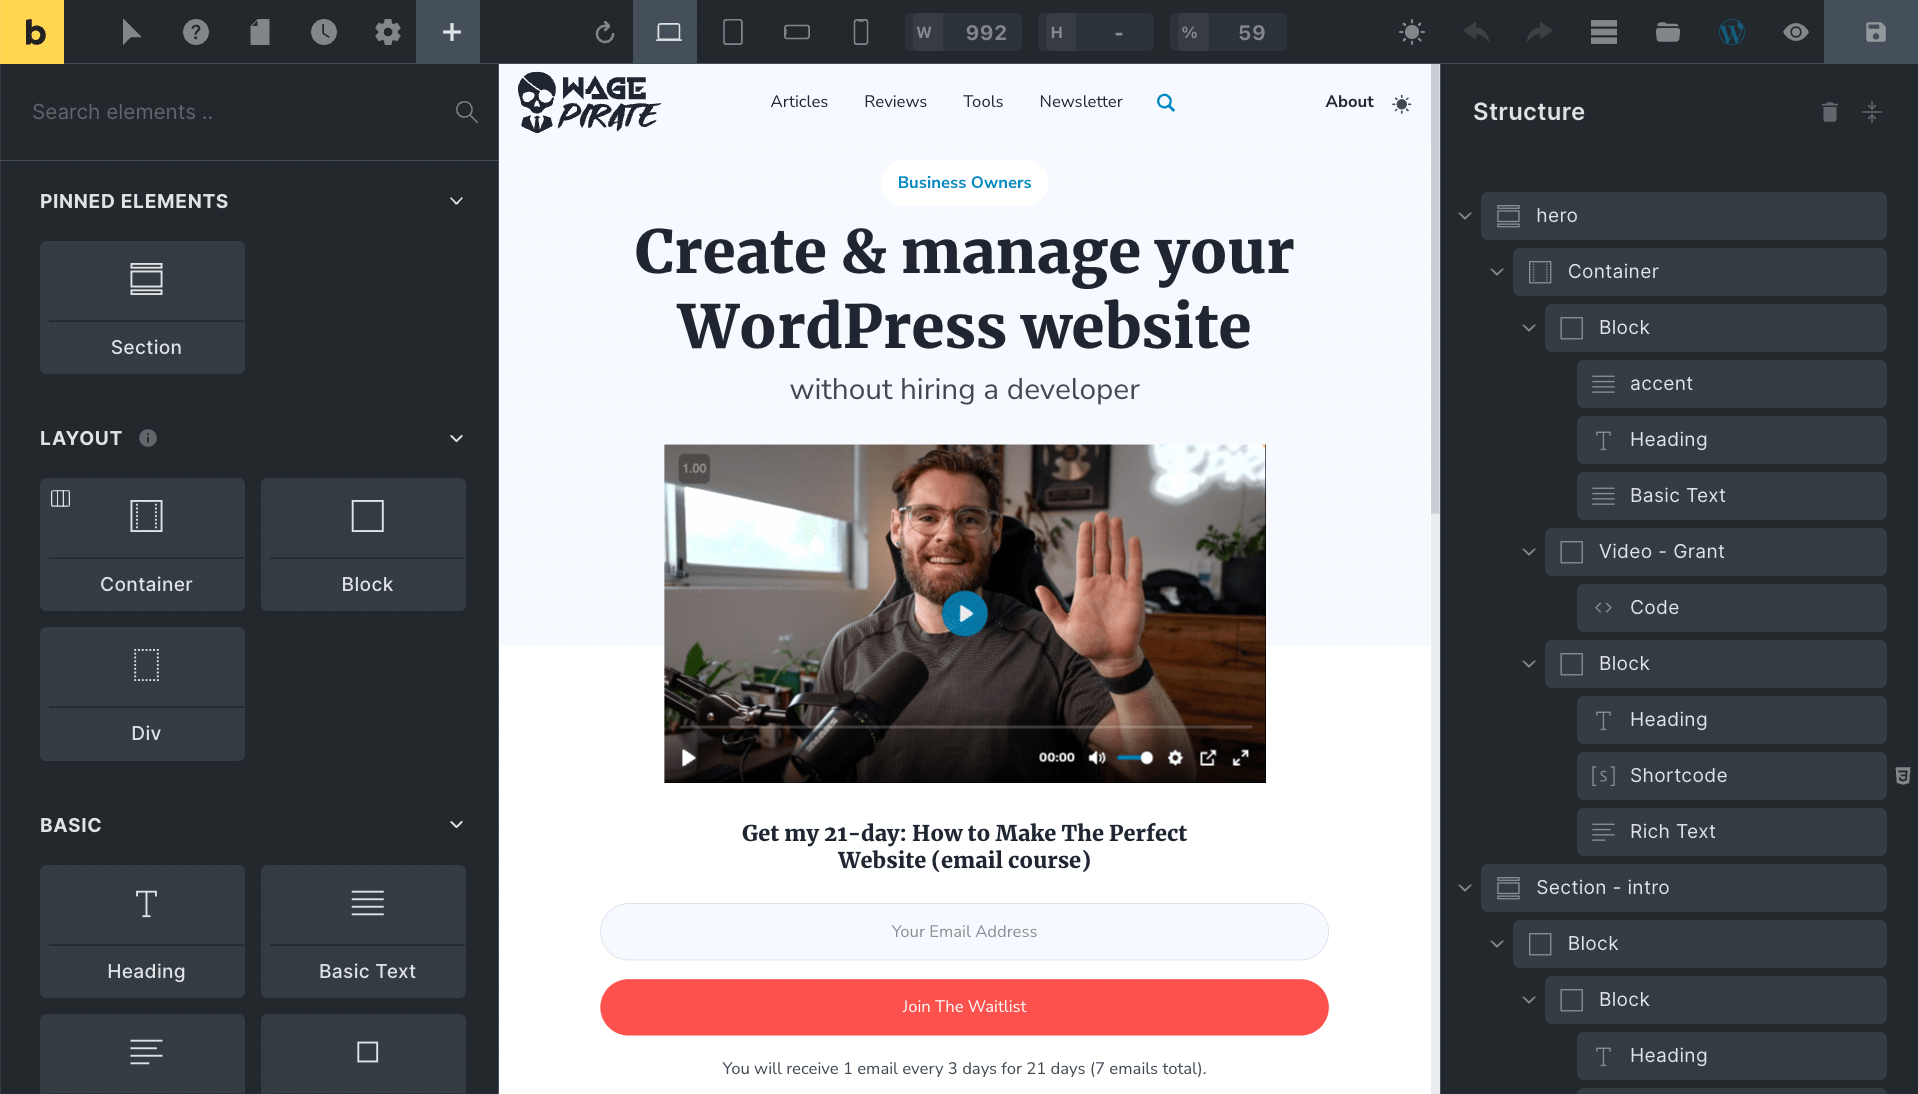
No surprises here, but it’s the next part that gets interesting…
Creating my default Single Posts template
Once I had designed my Homepage, I moved on to creating my Single Posts template.
i.e. the template that would be used when Bricks tries to render my Blog Posts, Product Reviews (this is a Custom Post Type on my website), my Optin Pages built with the FunnelKit plugin, etc.
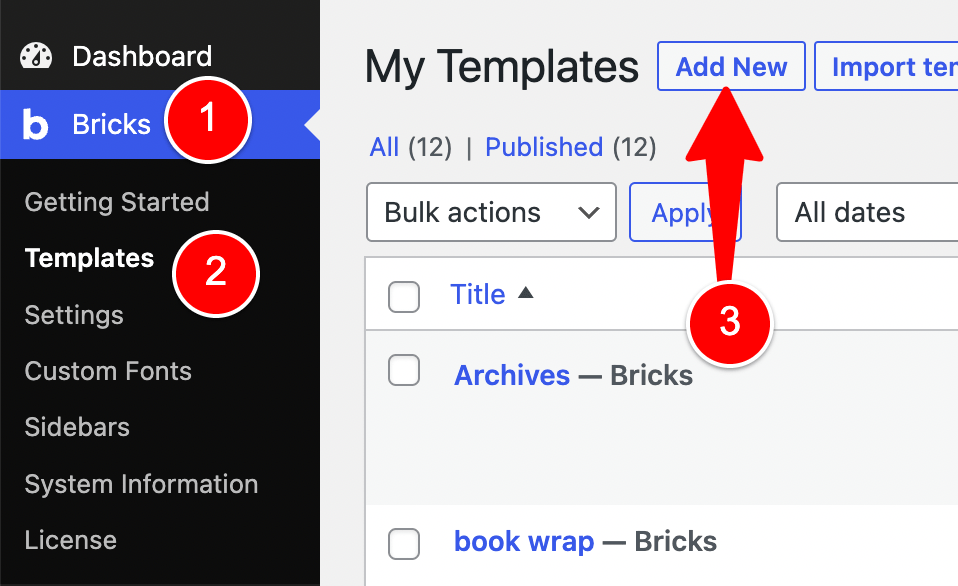
I went to Bricks (1) > Templates (2) and clicked Add New (3).
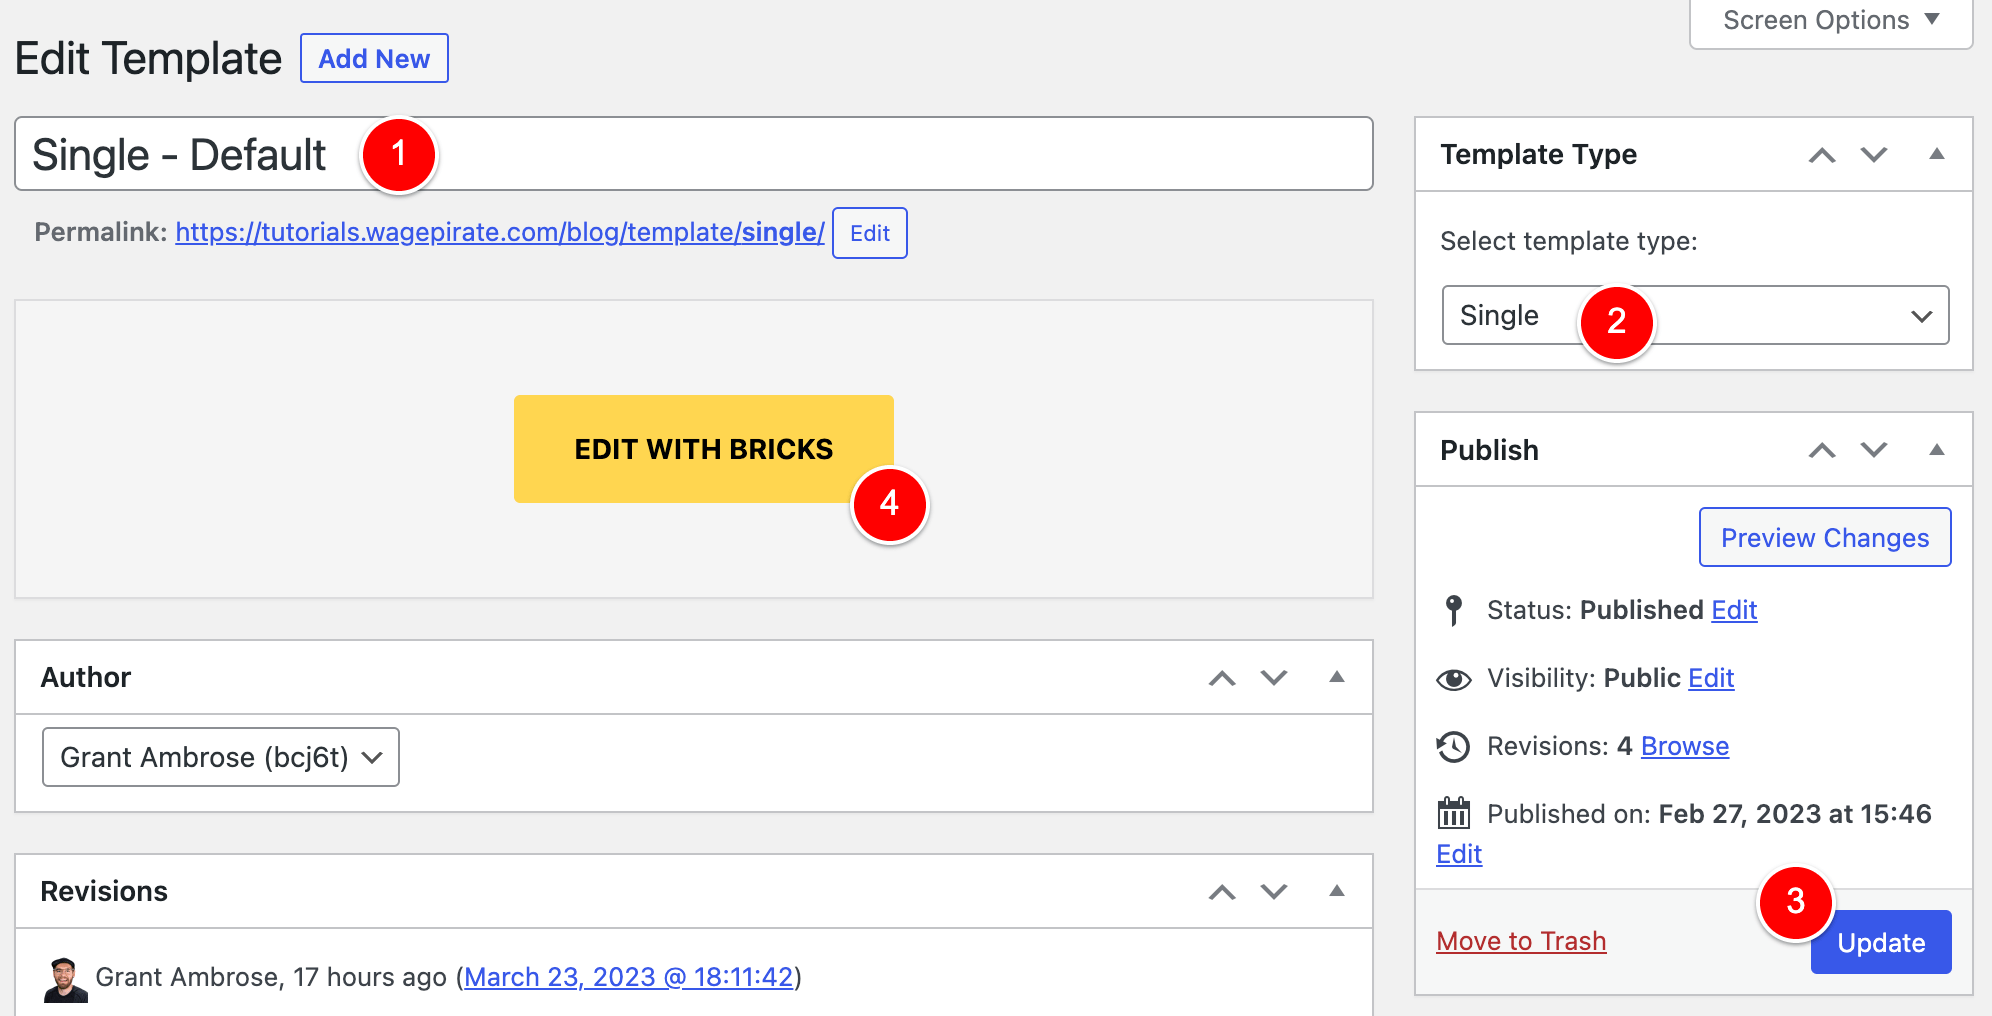
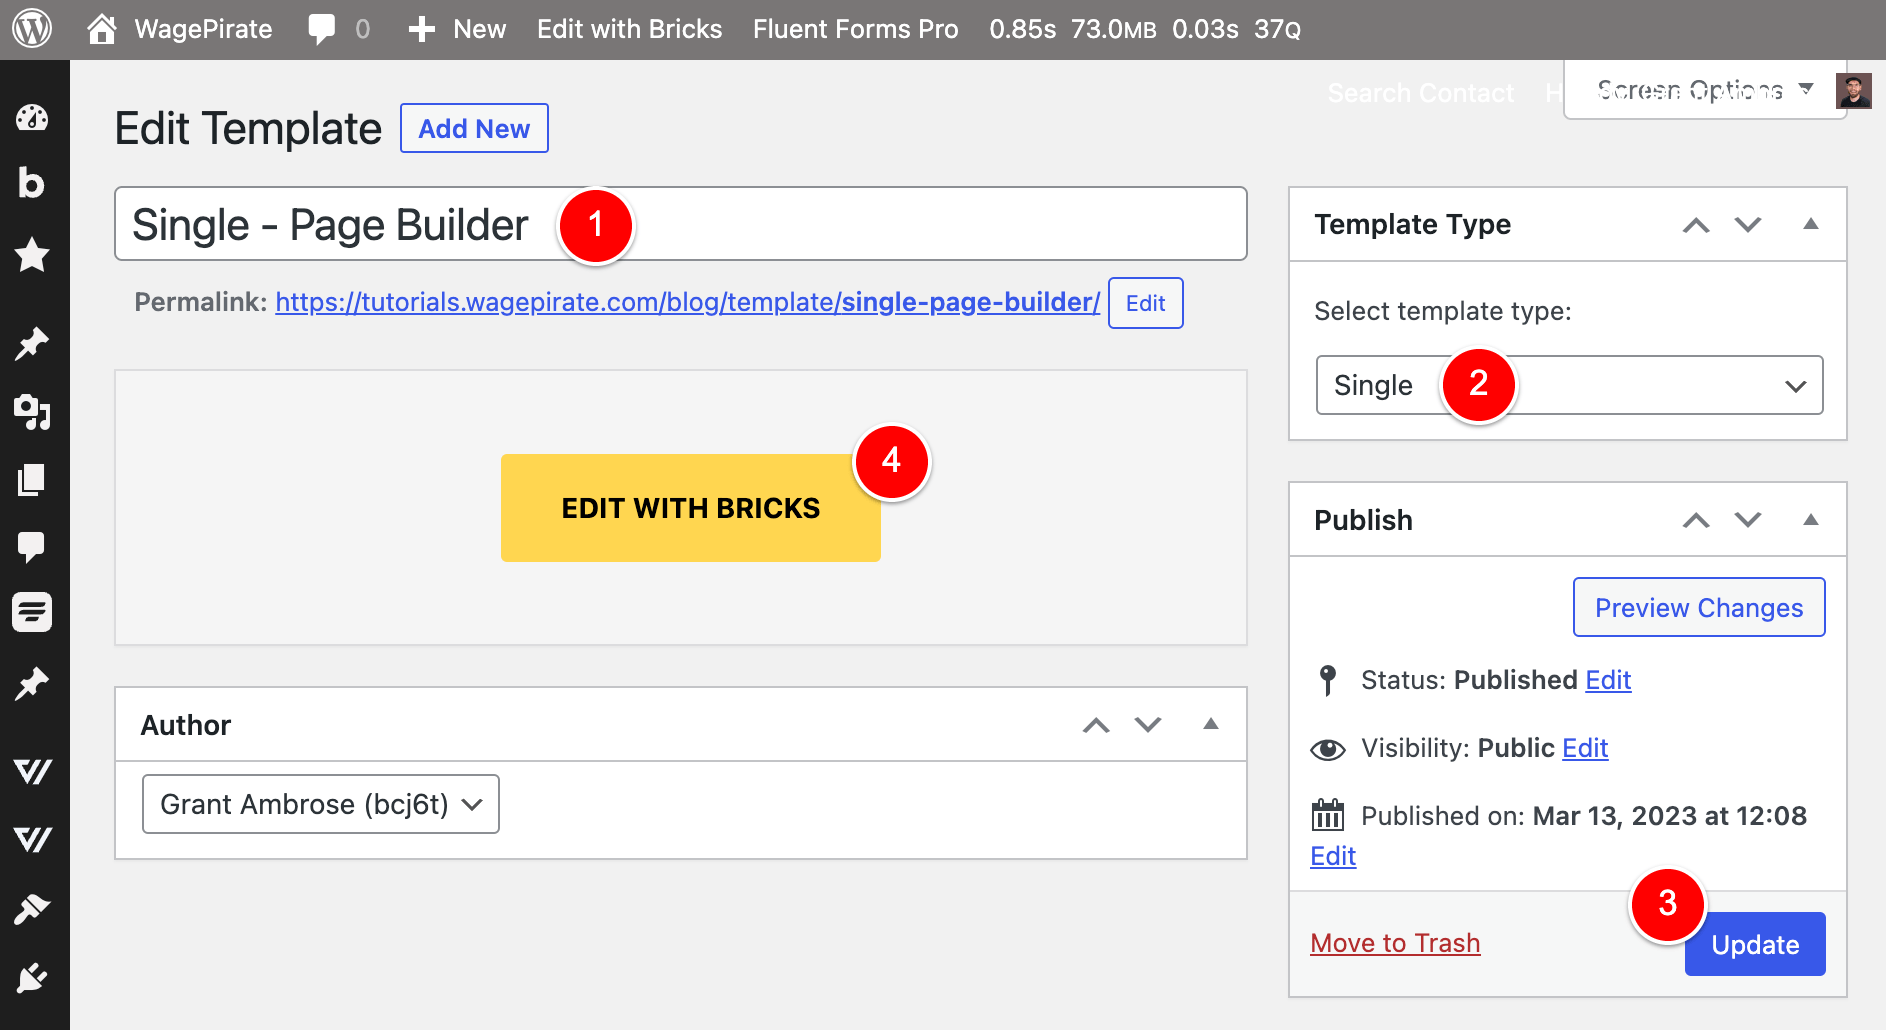
I named the template Single – Default (1), made its type Single (2), clicked to Publish it (3) and then clicked Edit With Bricks to begin designing the template (4).
The final design I created is below.
And if we jump in and edit the template with Bricks, you will see that I have a Post Content element added to the template (1) with its Data source set to WordPress (2) and it outputs that content at (3).
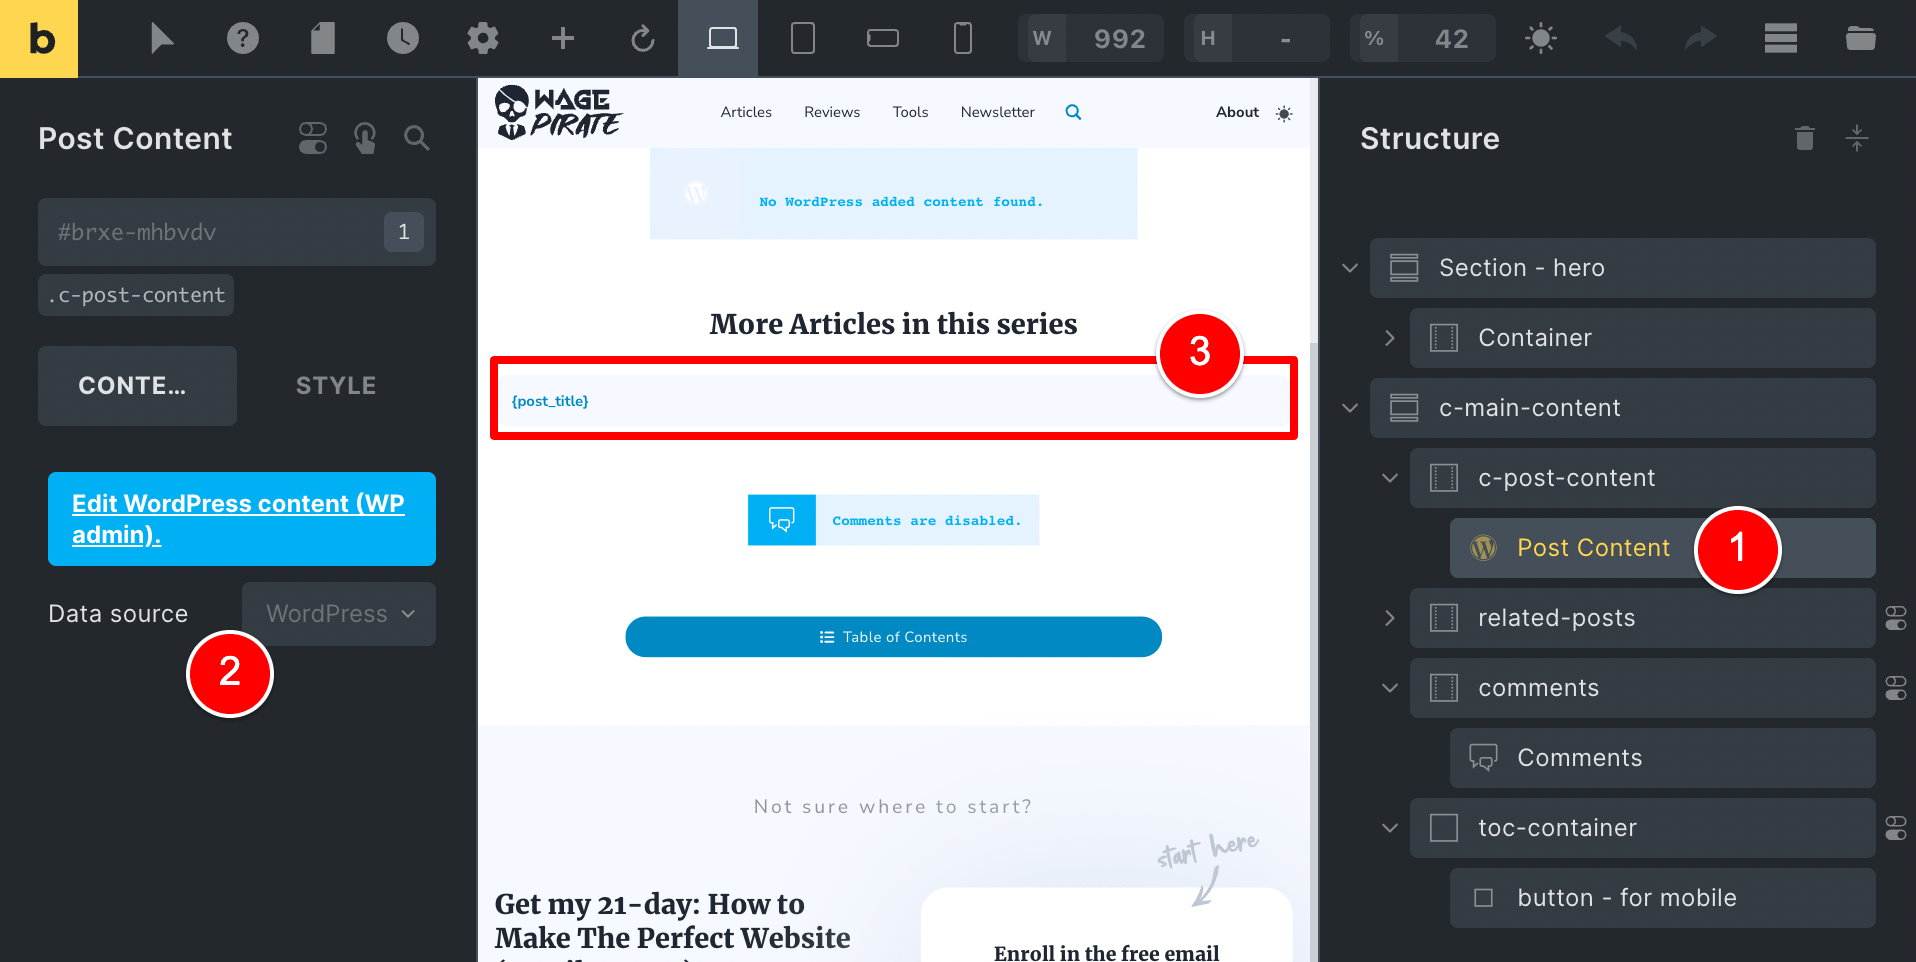
In case you haven’t worked with the Data source: WordPress part before, it just means that it outputs whatever I write in Gutenberg for that post / page into that area in the Template.
… and for most of the content on my website – this is EXACTLY what I want.
I don’t want to need to think of how to fill the page with pretty images, columns and stuff like that.
For my website, I want to sit down, explain things well and focus more on what I am saying than how the page looks.
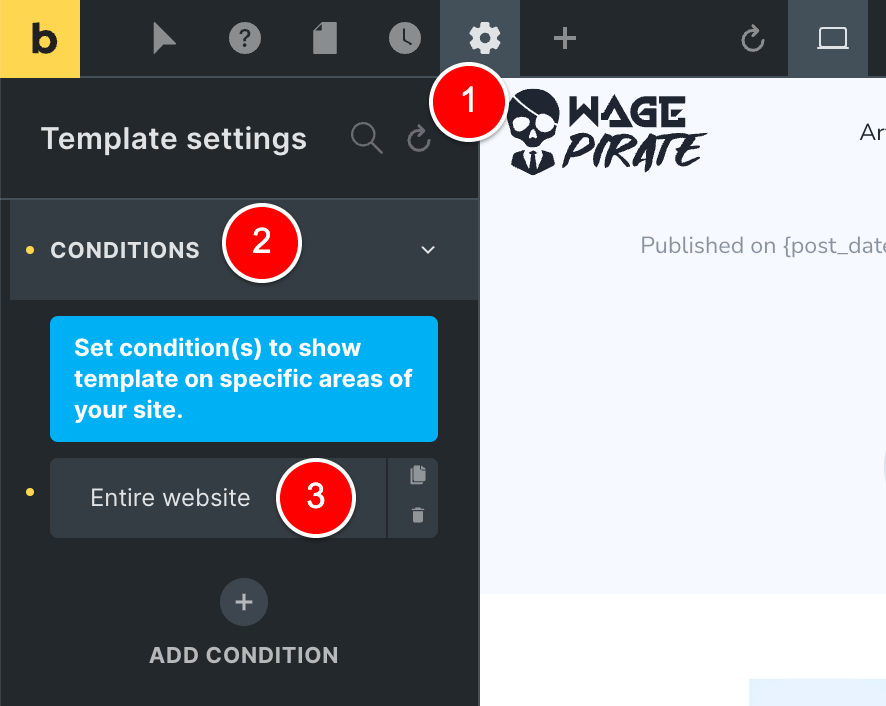
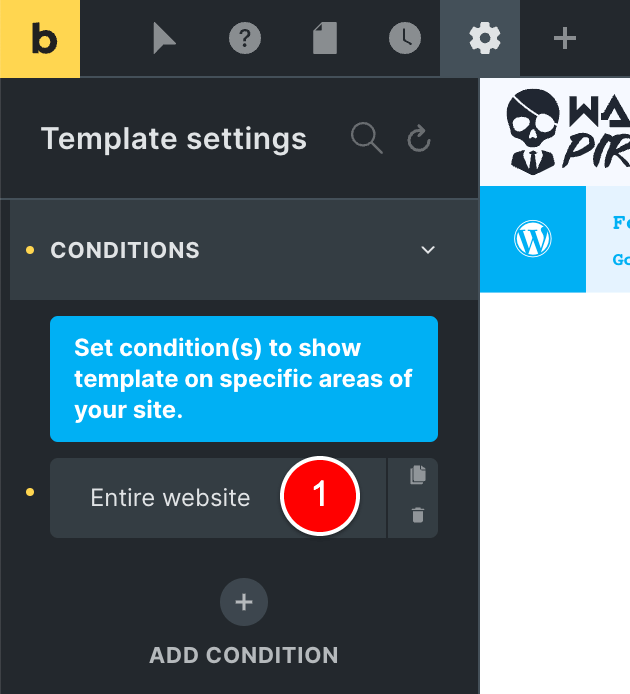
Then, because I wanted this to be the default template that applied to ALL the content on my website, I went to Settings (1) > Conditions (2) and applied this template to my Entire Website (3).
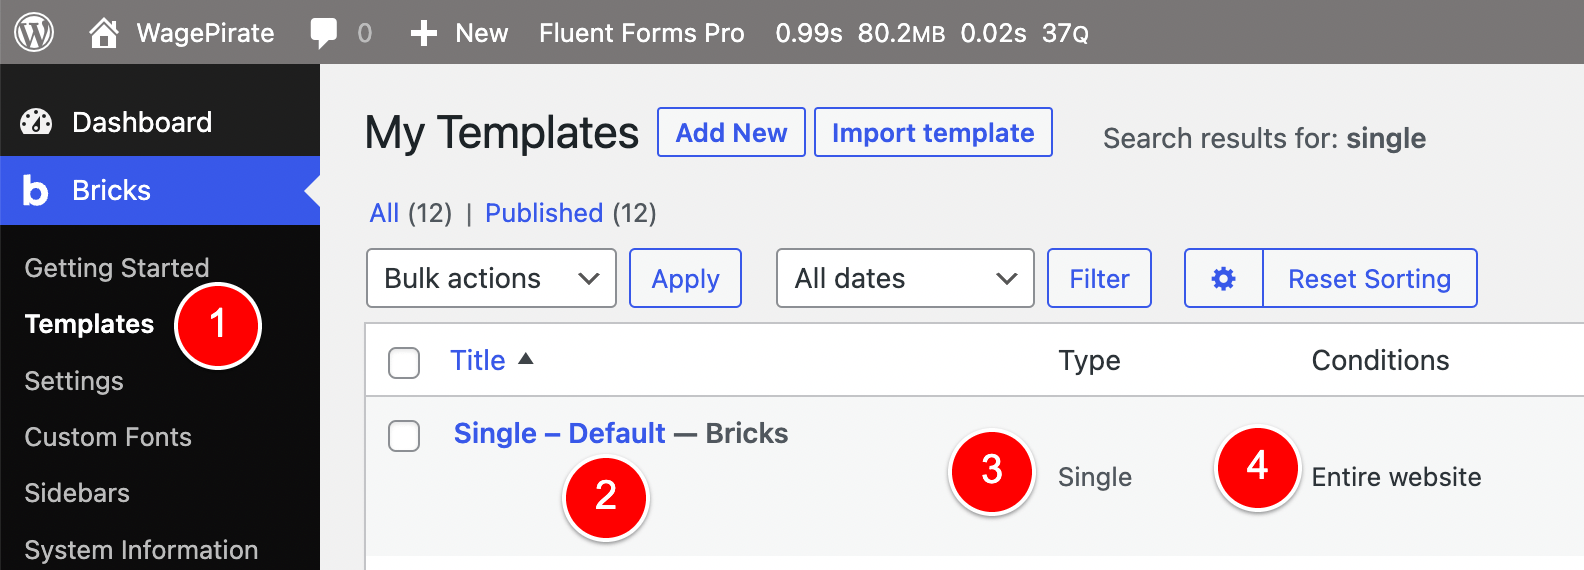
Going back to my WordPress Dashboard and then to Bricks > Templates (1) – I can see a summary of what this template is doing on my website at (2)(3)(4).
The Problem & what I had to solve
With all that done, I thought cool – two things off my list
- My Home Page was complete
- My default Single Posts template was completed and applied to all Pages / Pages / Custom Post Types on my website.
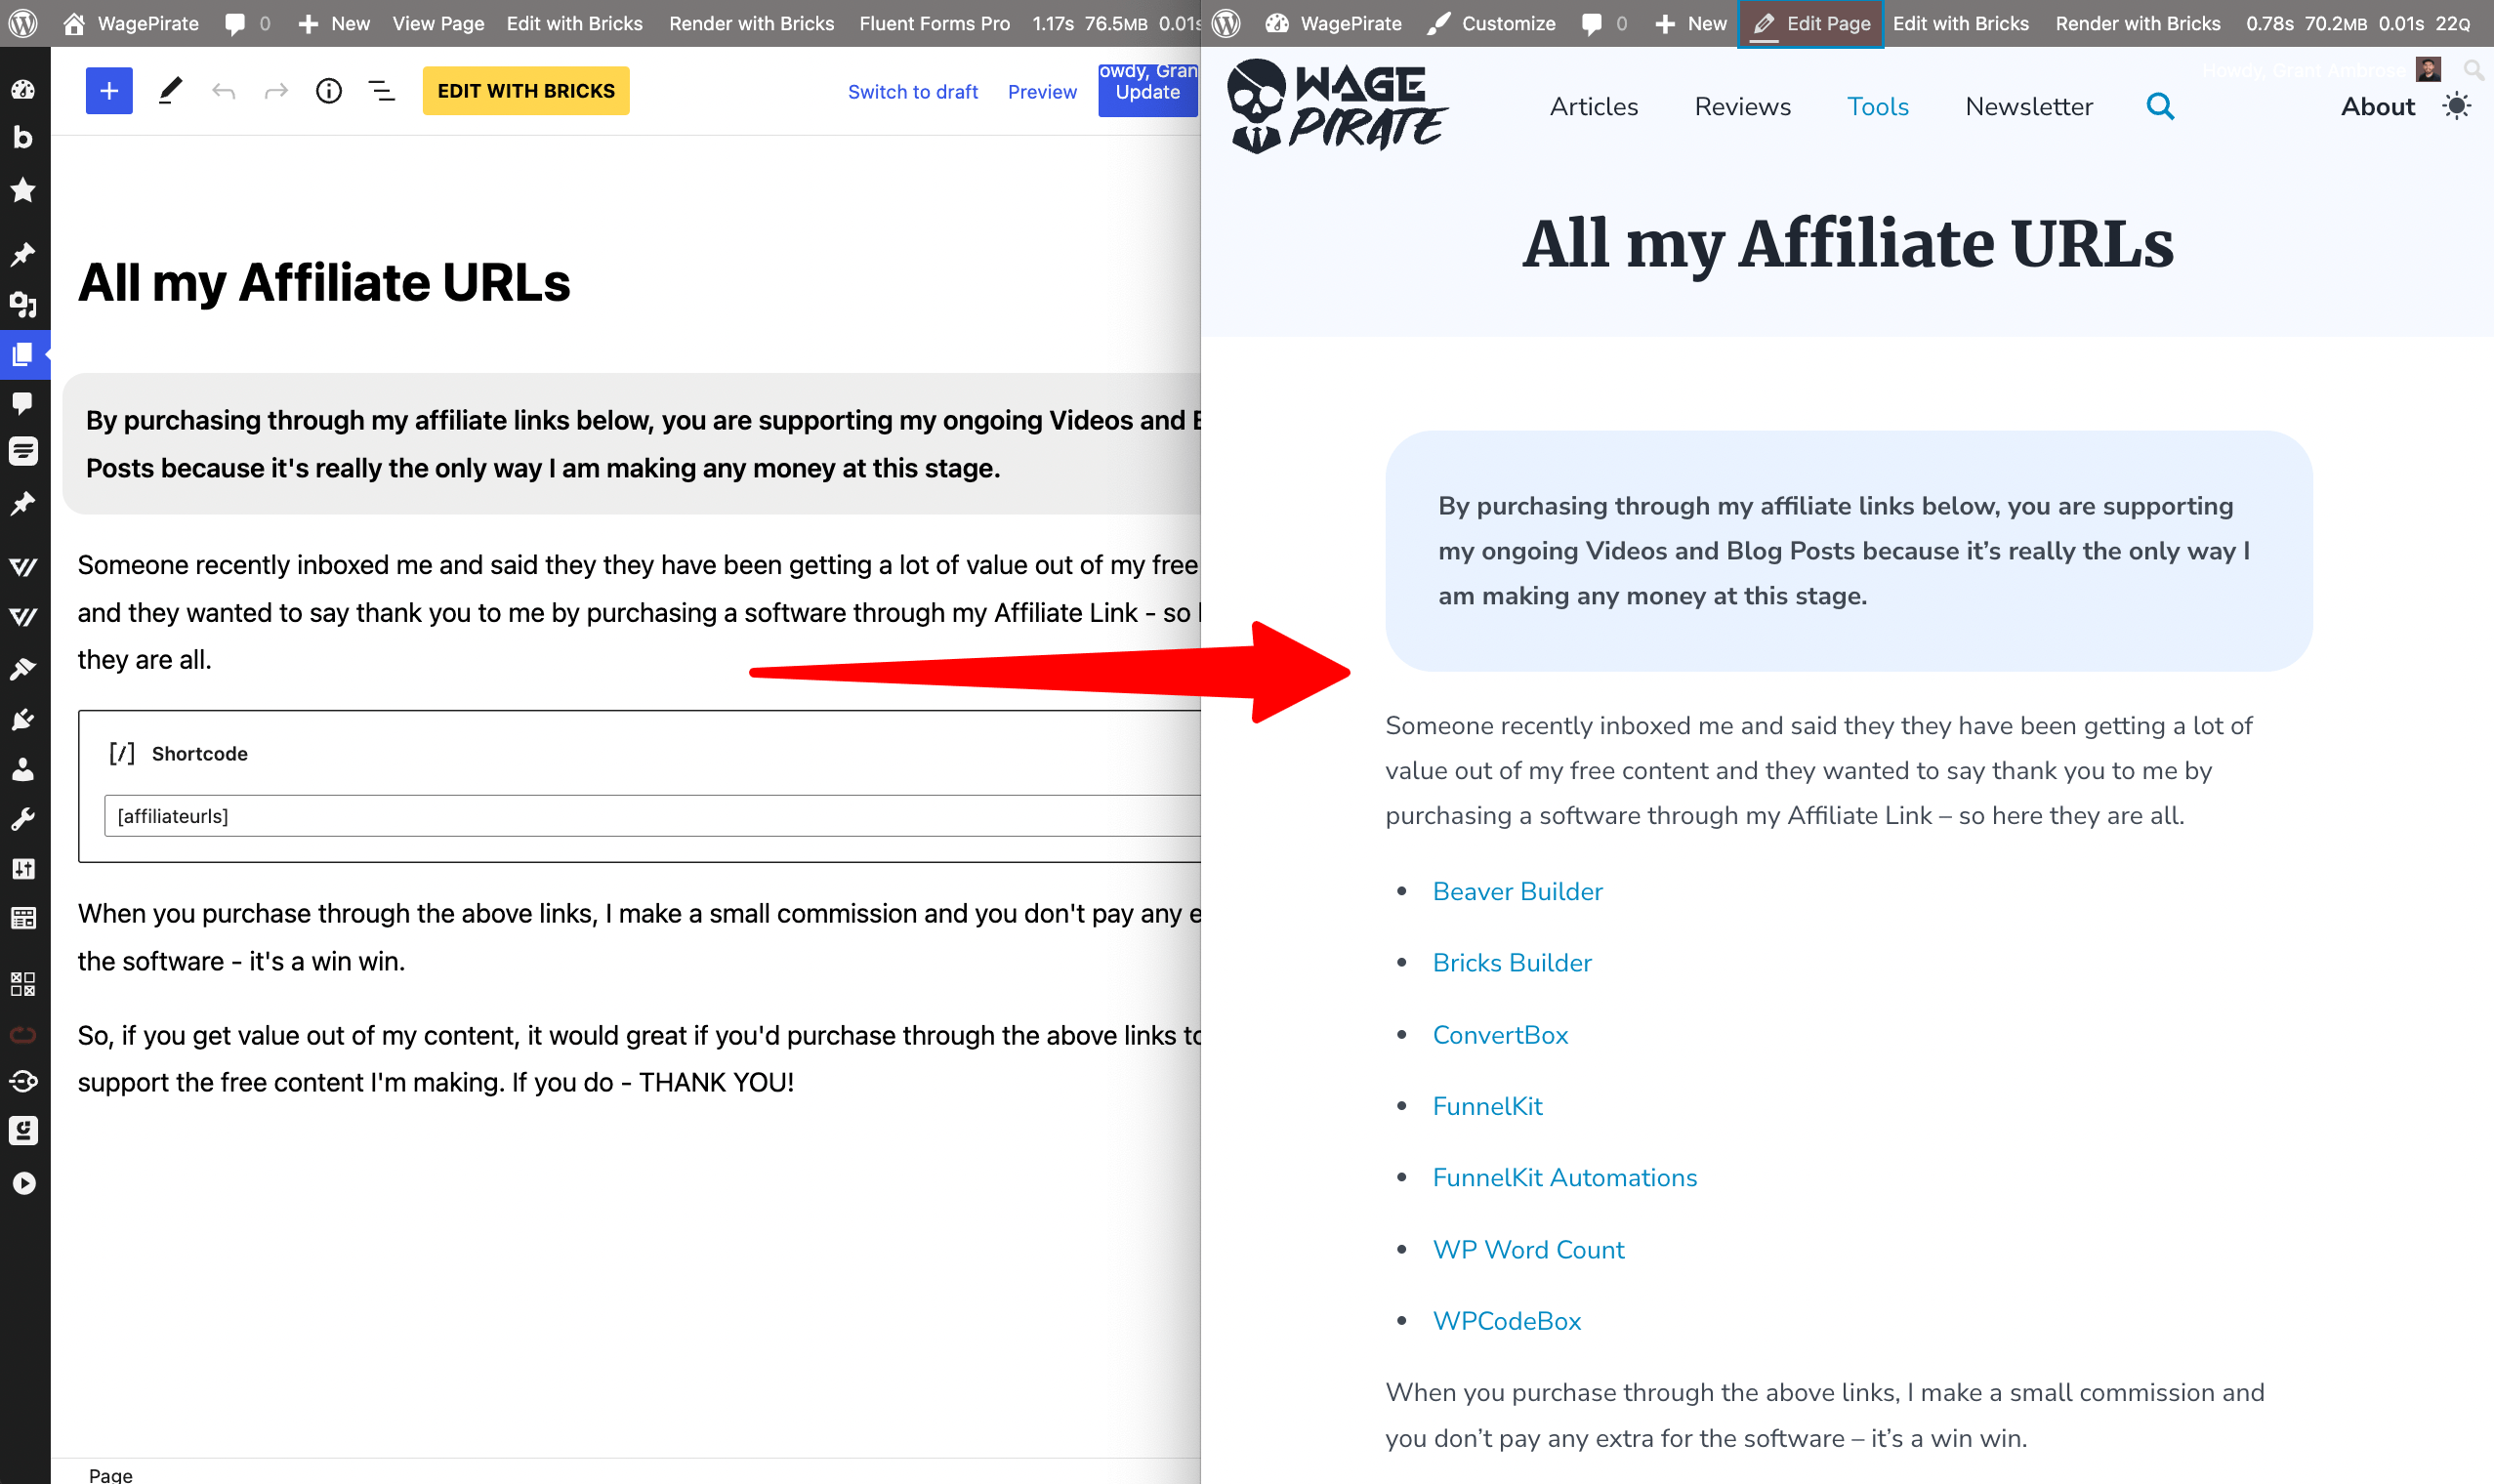
But then I went back to my Home Page and saw this…
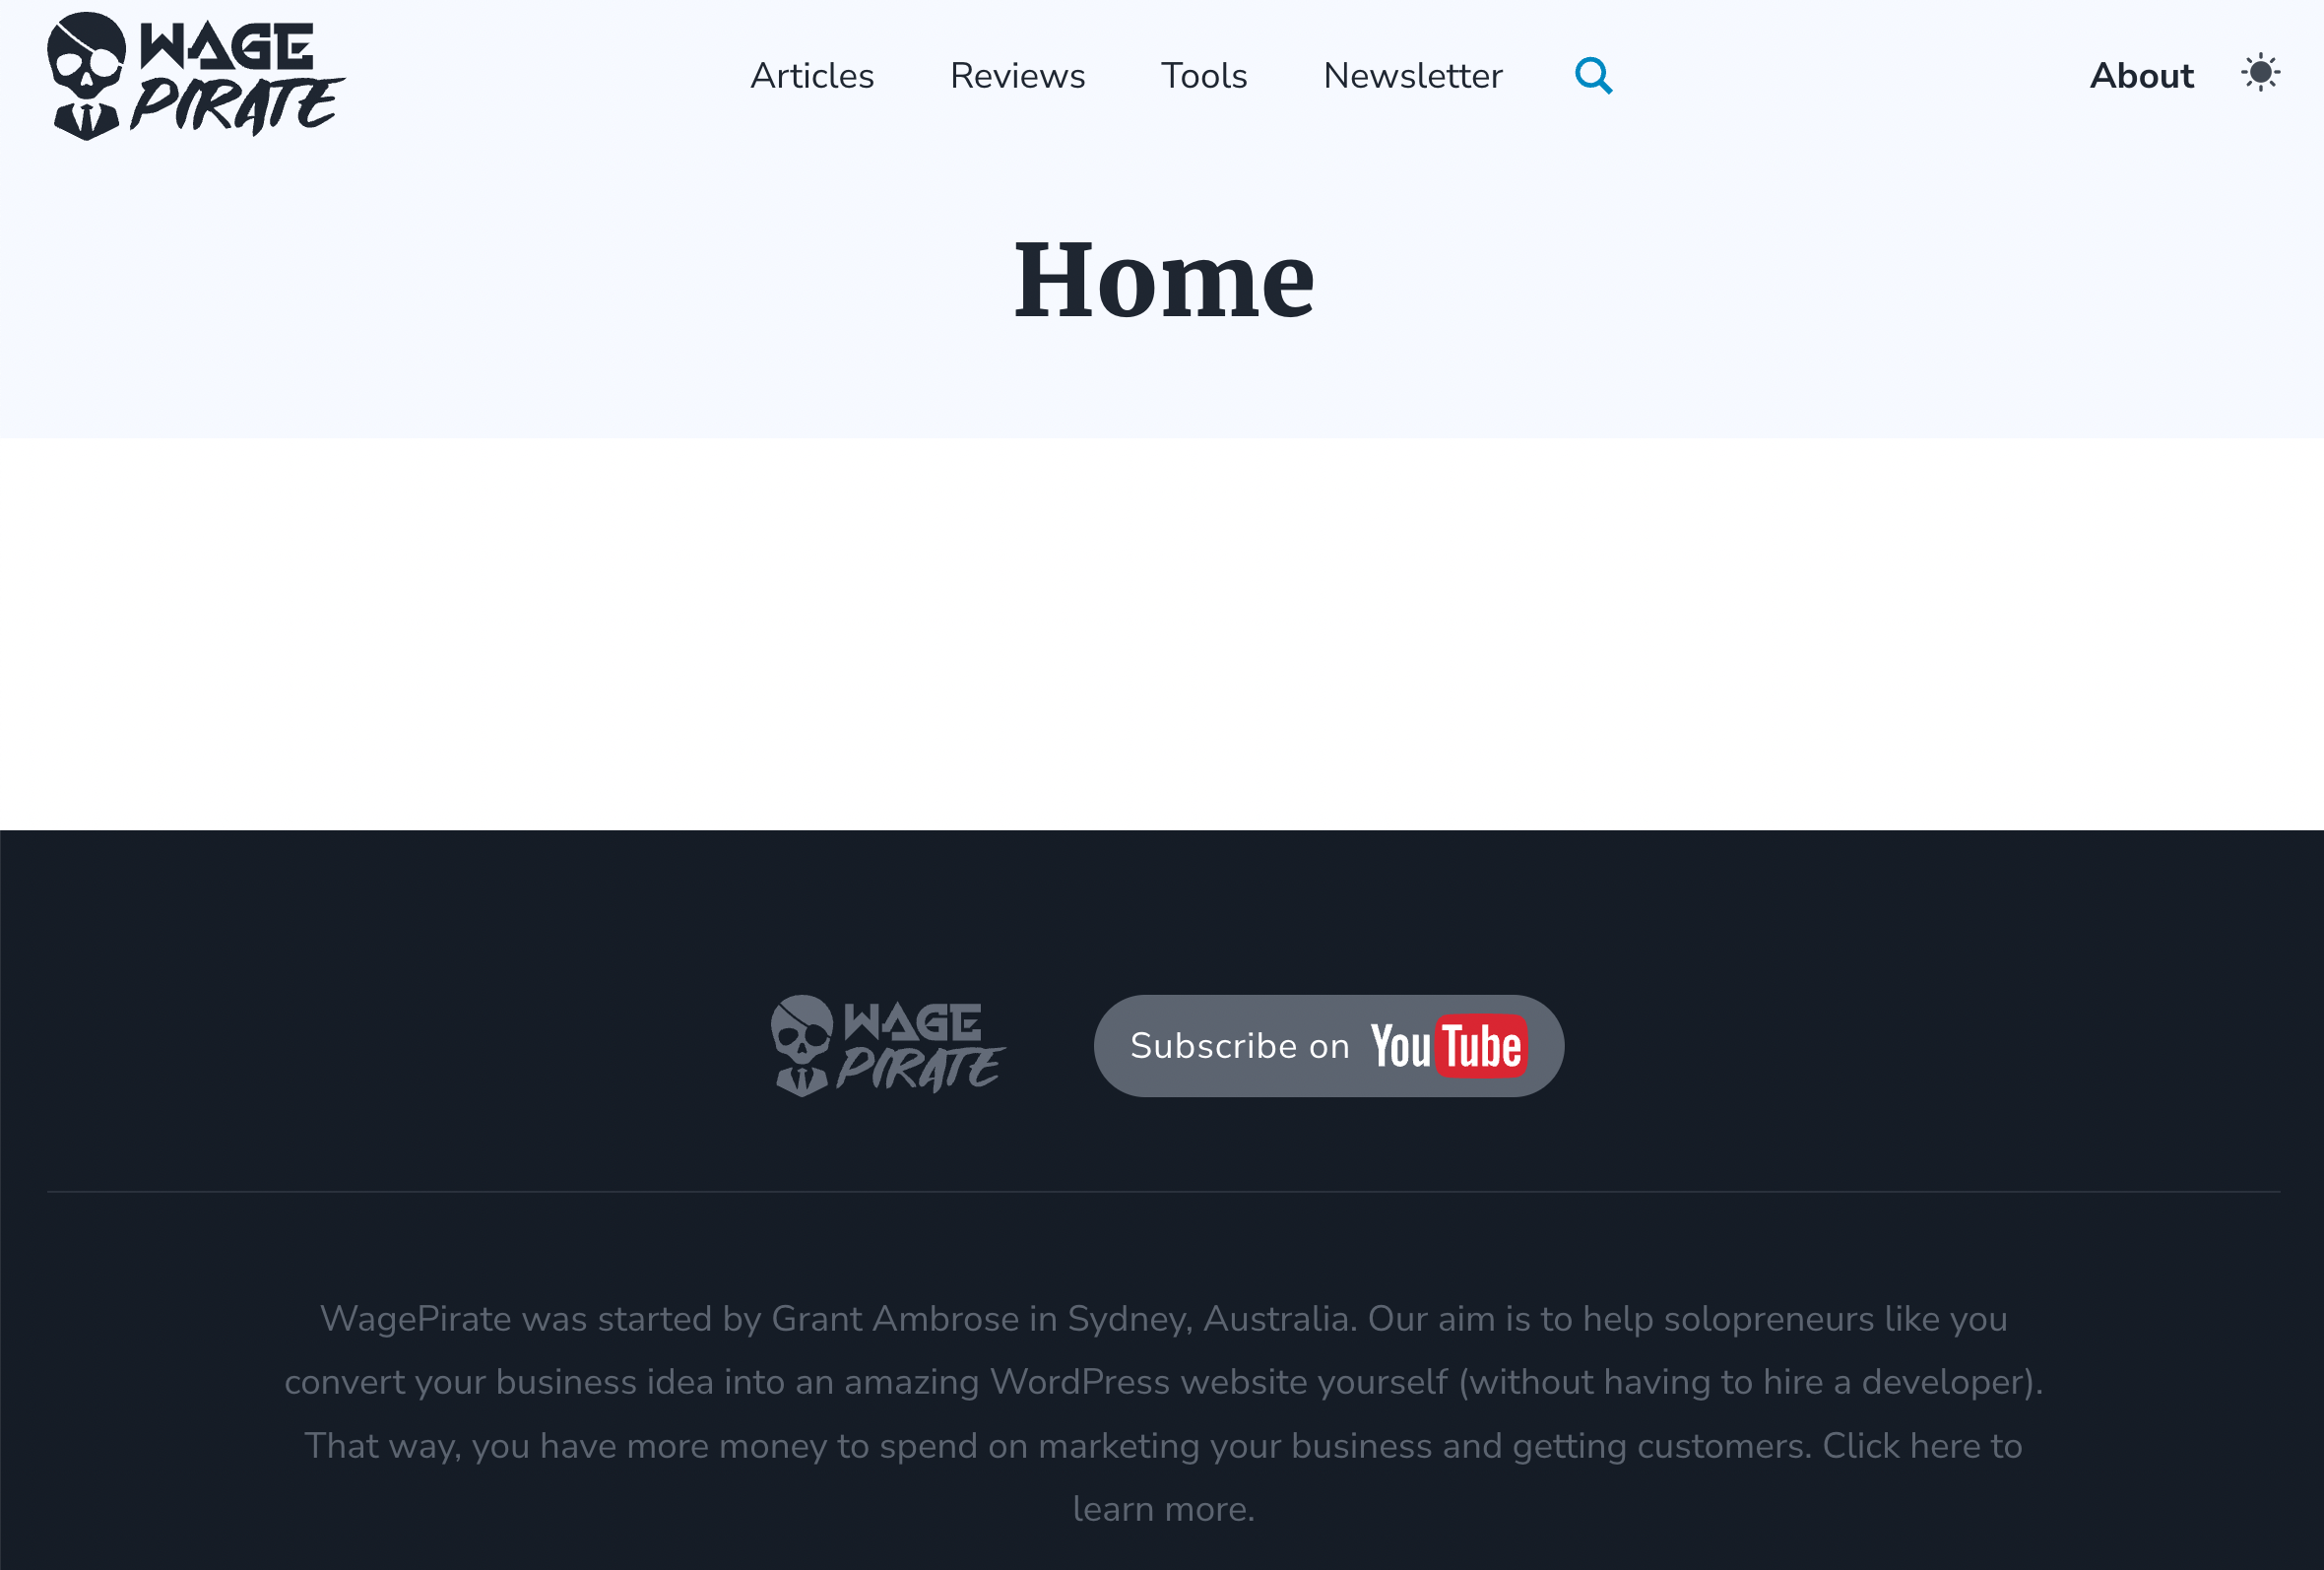
And this was where I noticed I had an issue to solve.
From memory – when I designed websites using Beaver Builder, I could apply templates across my website…
BUT if I edited a specific Page directly and designed the Page using Beaver Builder, my edits there (being local to that page) would take priority and override the default Template I had set across my website.
But that is NOT the case in Bricks (so I realised).
Even though I had designed my Home Page using Bricks directly for that page – my Single Posts template was overriding it because its condition was set to apply to my Entire Website.
And obviously, my Home page is a single post of the “Page” post_type and thus the template is applying to it.
So I had to find a way to be able to do the following:
- Have my Single – Default template apply across my Entire Website as the default layout
- But if I edit a page / post / custom Post Type directly and design it using Bricks Builder, I want that design to override the Single – Default template.
And I’ll tell you what…
after thinking for a bit – I found MORE than 1 way to set this up.
Option #1 – Set exclusion rules in my Single Posts template
The first option is the obvious one.
I could edit the Single – Default template and set an exclusion rule to NOT apply this template to my Home page.

That would have given me the result I wanted for the Home page, but the problem was maintenance.
For every single post or page on my website that I wanted to design full-width using Bricks, I would have to add it to the exclusions here.
That wasn’t feasible long-term, so I scrapped this option.
Option #2 – Create 1 Bricks Template using has_blocks()
The second option I had was to customize this Single – Default Bricks Template and add two Post Content elements to the page.
One Post Content element would have its Data source set to WordPress and the other would have its data source set to Bricks.
Then I would use the has_blocks() function to not render elements on the page.
It was a viable option – so much so that I just published a Blog Post that runs you through how you could do this.
But as you already know – this isn’t the option I chose to implement for my website.
Here’s why…
At the time of writing this article, I have this Reading Progress Bar feature.
As you (or another reader) scroll down my Article, it loads across the page to let my reader know how much more of the Article they have left to read.
I find it’s better for usability, especially because I am writing many long Articles lately and I feel seeing the progress helps the reader not feel so lost on the page.
Side note – I have a Blog Post that runs you through how I added it (linked below)…
RELATED: Reading Progress Bar to WordPress in 30 seconds! (EASY Method)
But I don’t want you to focus specifically on the Reading Progress Bar.
The main thing is that I have this unique feature added to this Bricks Template.
And in this particular case, the Reading Progress Bar had the following requirements on my website:
- Javascript & CSS
This Reading Progress Bar requires loading a javascript file and CSS stylesheet onto the page - Conditions
I want to show this reading progress bar in this Single – Default Bricks template ONLY if I have used Gutenberg for the Content. If I have designed the content of the post / page using Bricks (for example my Homepage) then I do NOT want to output this Reading Progress Bar
If you read my Blog Post I published a couple of days ago on using the has_blocks() function to hide elements on the page…
I could have done something like the below code and only enqueued the necessary Javascript and Stylesheet if the Post Content does NOT have any Gutenberg Blocks (i.e. we must be using Bricks to design the content area of the post / page)…
// load scripts and styles
add_action('wp_enqueue_scripts', 'c_enqueue_reading_progress_bar');
function c_enqueue_reading_progress_bar(){
    if(!has_blocks()) { // if the post content does NOT use Gutenberg...
        return; // stop, as the post must use Bricks
    }
    // else - we load the CSS
    wp_register_style('reading-progress-bar-css', plugin_dir_url(__FILE__) . 'custom.css');
    wp_enqueue_style('reading-progress-bar-css');
    // and we load the JS
    wp_register_script('reading-progress-bar', plugin_dir_url(__FILE__) . 'custom.js');
    wp_enqueue_script('reading-progress-bar');
}Code language: PHP (php)
and it would have worked and given me the result I wanted.
But I couldn’t help but feel a bit…weird… mixing the Gutenberg and Bricks Builder content in the 1 template and using a PHP check like this for this specific use case.
The designs were completely different (in my head) as 1 design uses Gutenberg for the content and the other design uses Bricks.
If I was to come back and look at my website in a few months and review this code, it wouldn’t be apparent to me what was going on here.
Option #3: Use Bricks Scoring & its PHP Filter
So now that we’ve covered how to set everything up and the options I DIDN’T choose…
Let’s get into…
The Bricks template scoring system!
This is the option that I chose to implement in my website for this task and why I’m writing this post today.
Here’s how it works…
When Bricks Builder goes to show your Post or Page to a visitor, it decides which Bricks template will be used to render your content using its built-in “scoring system”.
The scores are on a scale from 0-10.
0 = the least specific
10 = the most specific
Bricks Scoring: Creating my Single – Page Builder template
Once I knew this, I knew that I needed to create the two templates and somehow control their score using PHP.
Already having the first template – the Single – Default template for my Gutenberg content…
I went ahead and created a second template for the Bricks full-width content (for my Home page etc).
I went to Bricks > Templates and clicked Add New.
I named this template Single – Page Builder (1), selected its type as Single (2), saved the template (3) and then clicked Edit with Bricks (4).
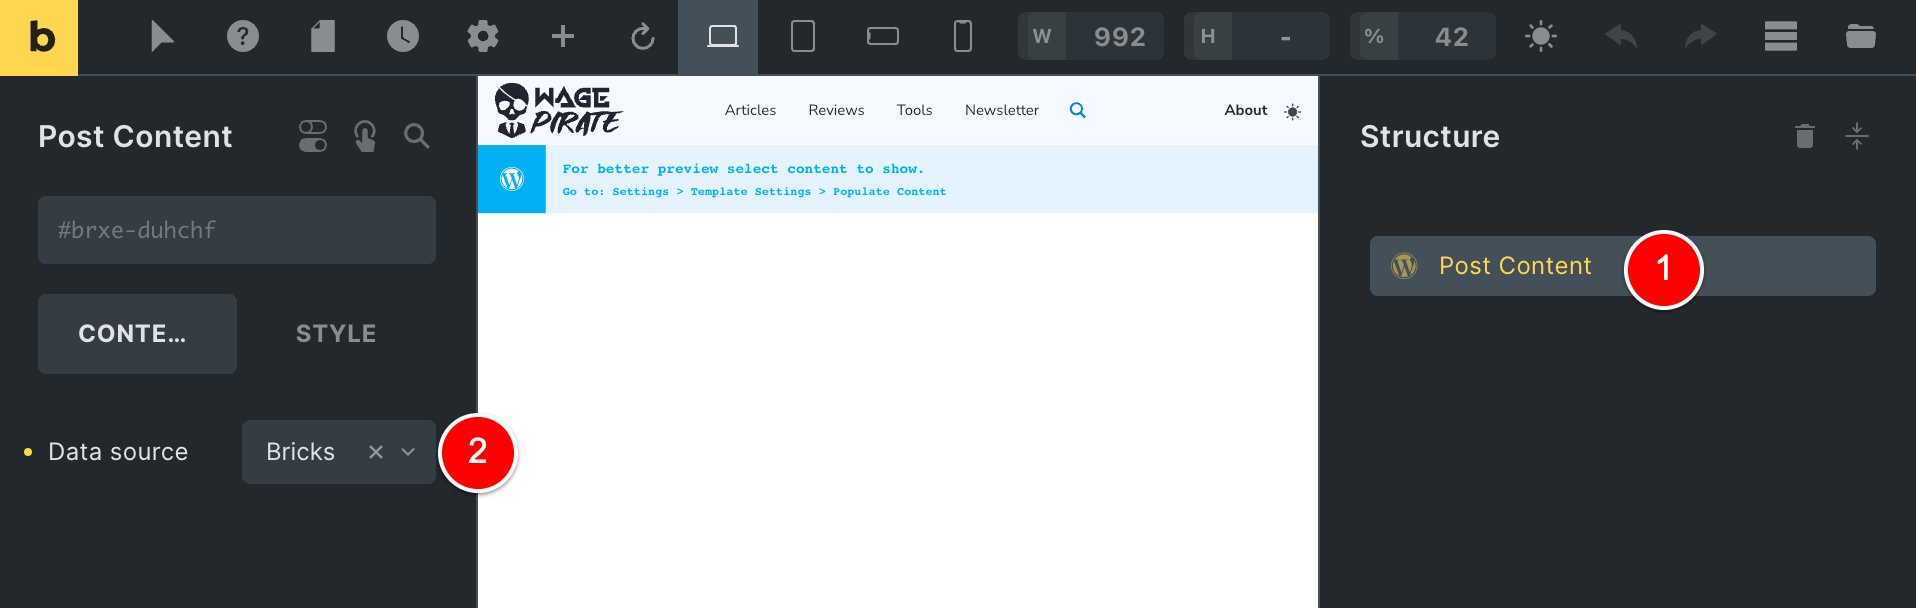
All I added to this page was one Post Content element (1) with its Data source set to Bricks (2).
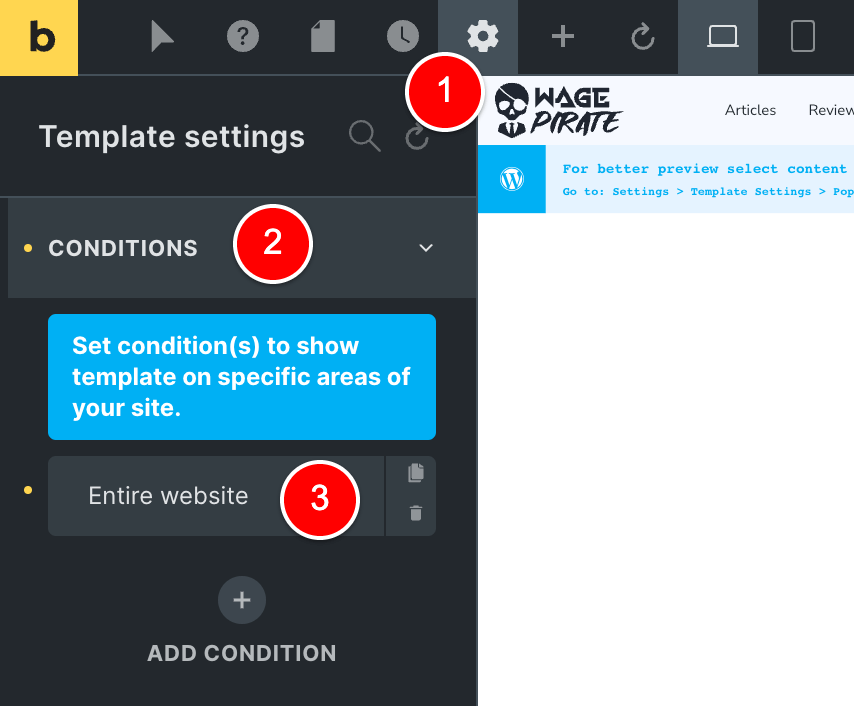
I went to Settings (1) > Conditions (2) and set this new Bricks template to apply to my Entire Website (3) and saved the template.
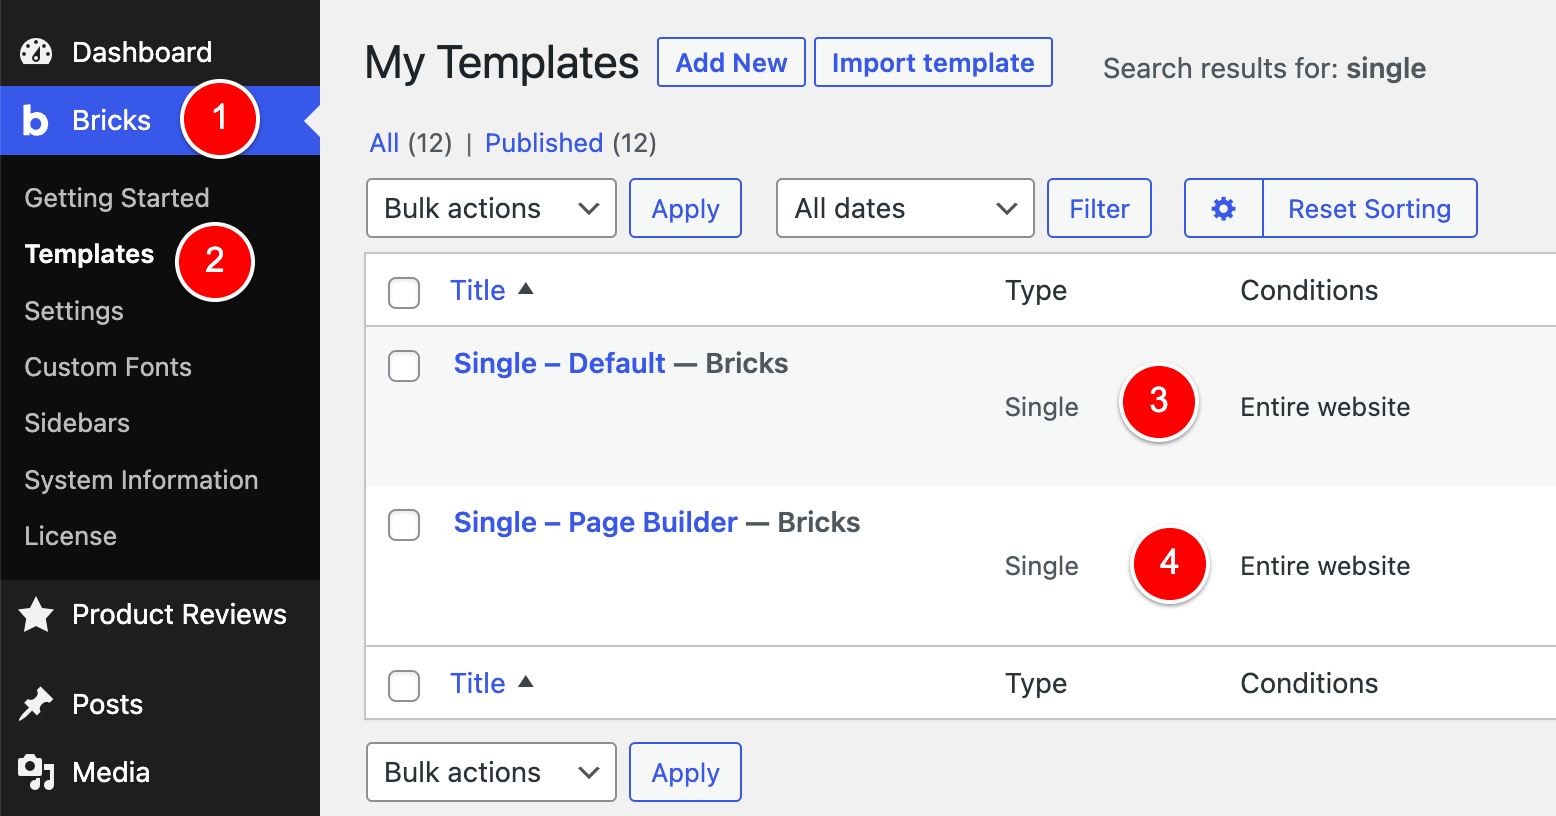
Navigating to Bricks > Templates (2)…
You can see that I now have two Bricks Templates (3) (4) that are both type = Single and they are both applying to my Entire Website.
Bricks Scoring: Investigating how the PHP Filter works
With both of these templates set up the same, I speculated that they would each hold the same score in Brick’s eyes when it tried to select which template to render.
But there was only one way to find out – to have a look at the code.
On the Bricks website, they provide the following example code for this PHP Filter.
add_filter( 'bricks/screen_conditions/scores', function( $scores, $condition, $post_id, $preview_type ) {
  // Run custom logic to score the template/theme style $condition
  // $scores[] = 5;

  return $scores;
}, 10, 4 );Code language: PHP (php)
I had no idea what it was doing from this example, so I added a few PHP lines to output the arguments passed to the filter to see what values they contained.
add_filter('bricks/screen_conditions/scores', function ($scores, $condition, $post_id, $preview_type) {
    echo '<div style="display:grid;grid-template-columns:repeat(4, 1fr);"</div>';
        echo '<pre>', c_var_dump($scores, 'blue'), '</pre>';
        echo '<pre>', c_var_dump($condition, 'red'), '</pre>';
        echo '<pre>', c_var_dump($post_id, 'green'), '</pre>';
        echo '<pre>', c_var_dump($preview_type, 'orange'), '</pre>';
    echo '</div>';
    return $scores;
}, 10, 4);Code language: PHP (php)
NOTE: c_var_dump() is just my own version of var_dump() that I created to allow me to pass a color and help make the output easier for me to follow.
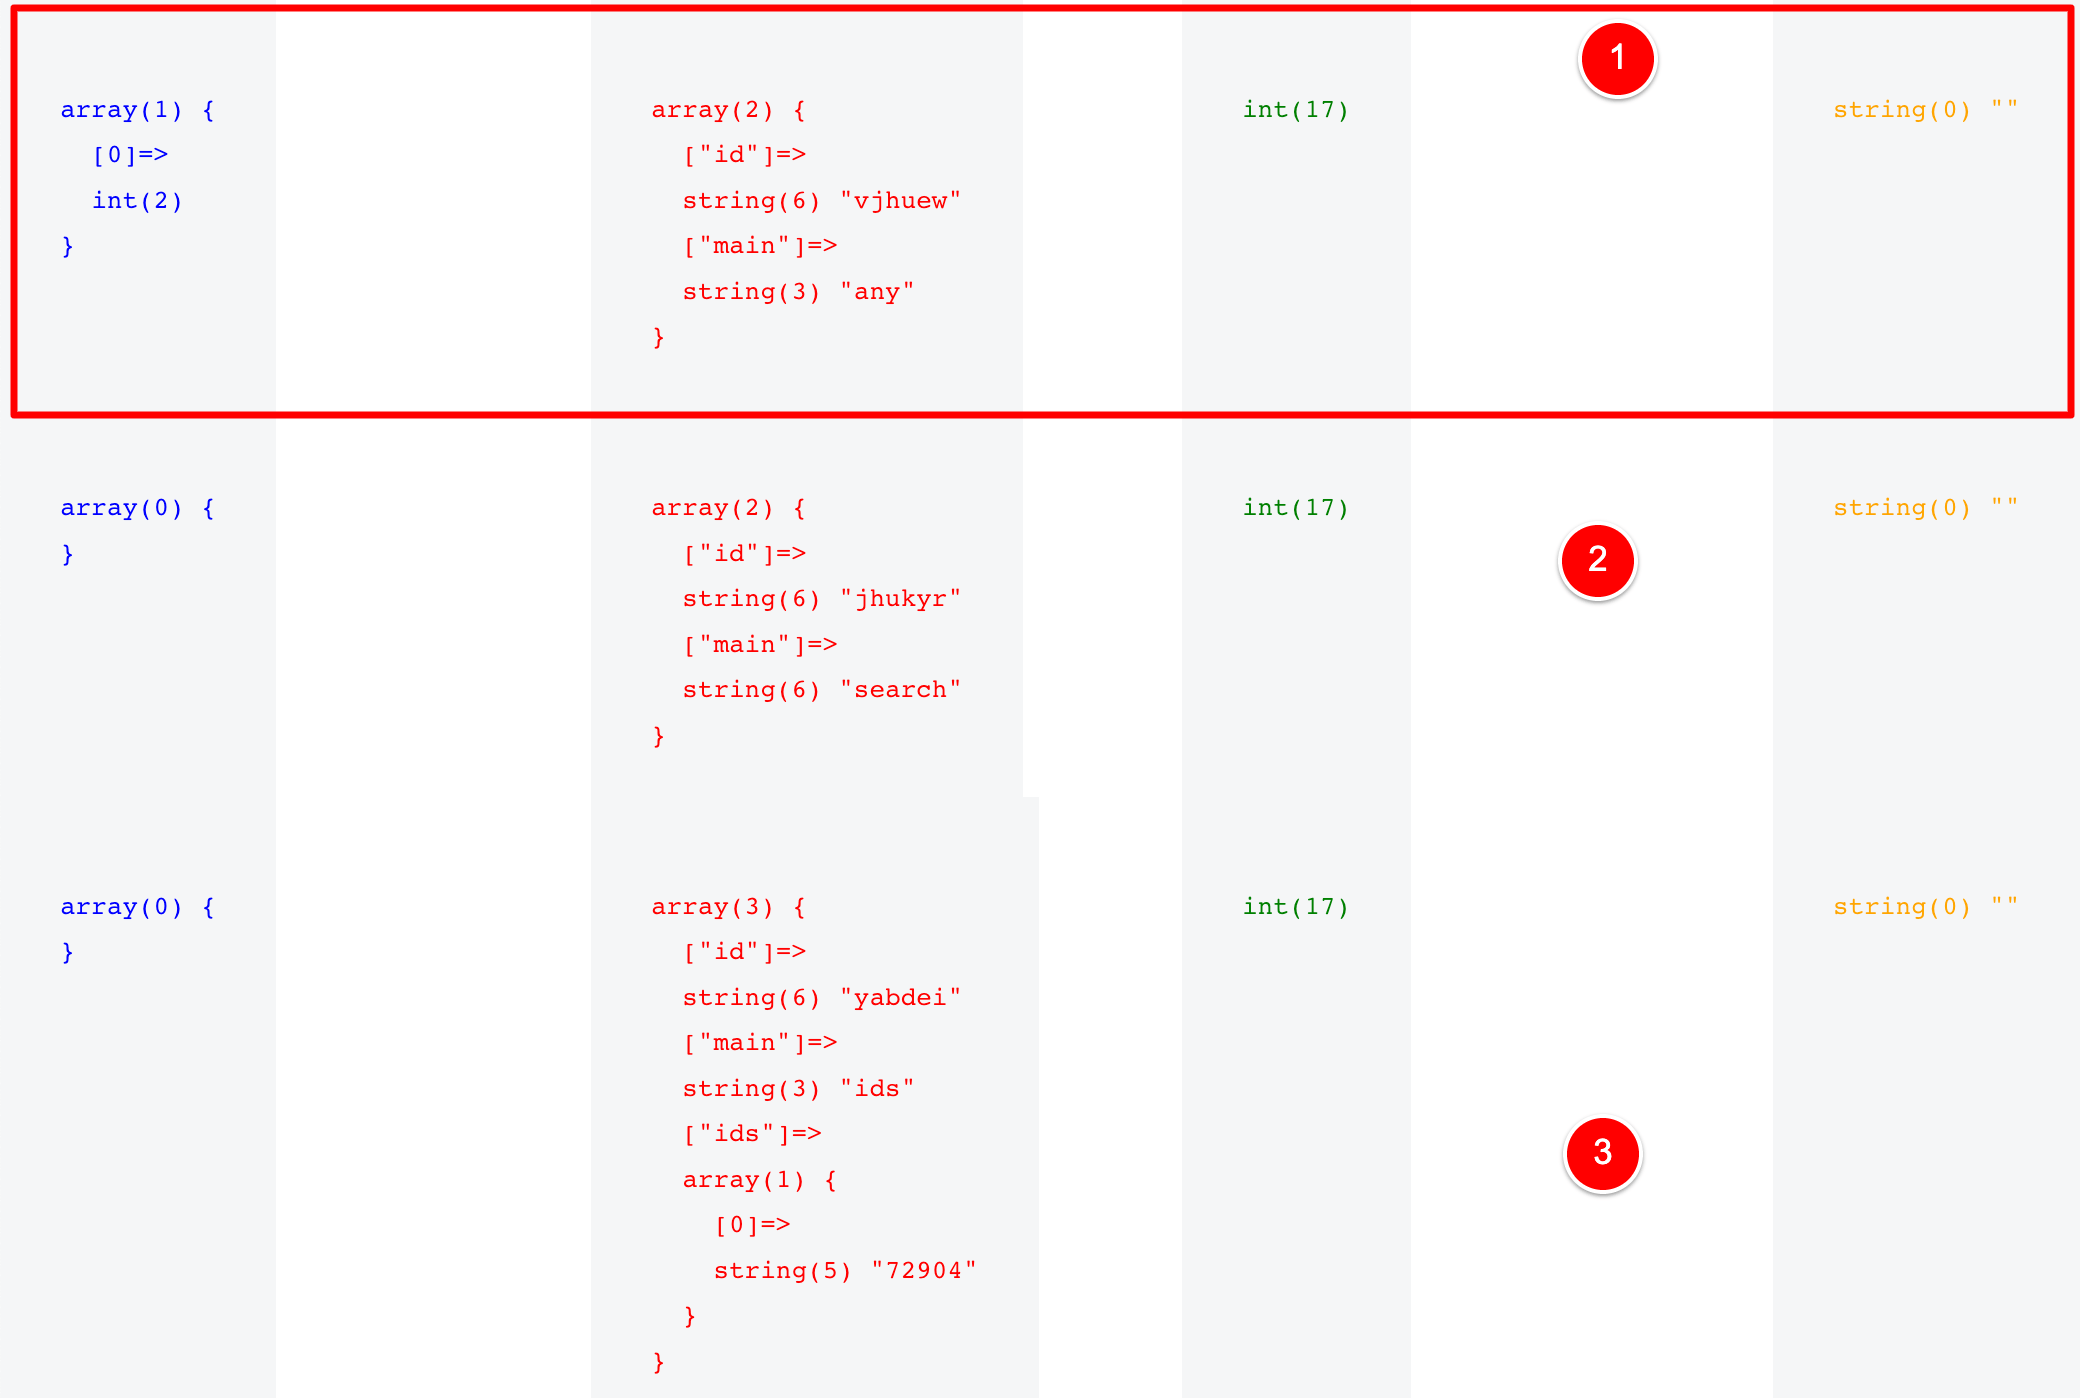
After running the code above, I got a lot of information output on my page.
There’s too much to put into 1 image, but here are 3 conditions (they run across the page horizontally).
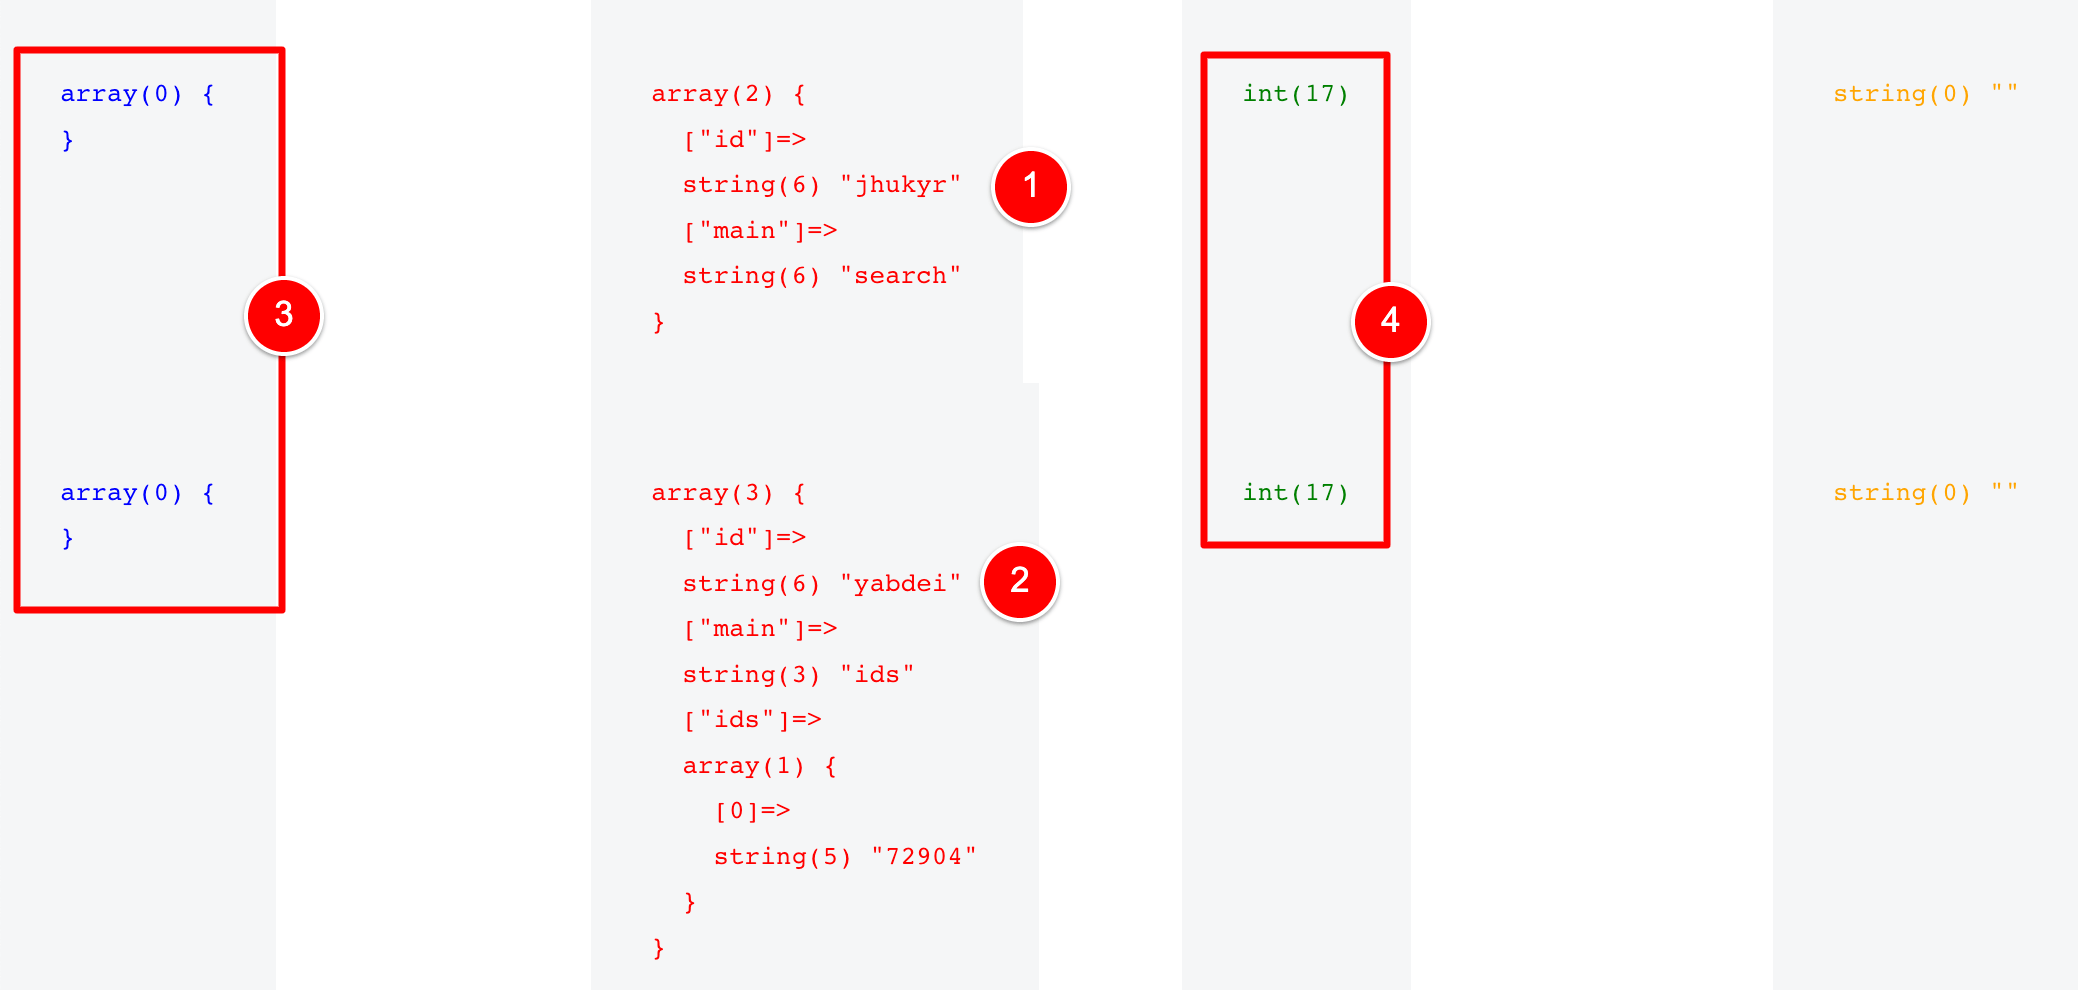
Here’s how to interpret the image below:
- Blue = the Score that Bricks has assigned this Condition for the currently viewed post page.
- Red – the ID of the condition and what it’s doing (more on this in a bit)
- Green – the Post ID (i.e. this is for my Home page which is the post ID in WordPress of 17 – this is why for all the conditions listed below they all say 17.
- Orange – an empty string. To be honest, I don’t know what this does and haven’t really needed to look into it yet to achieve what I need.
If I zoom right out on my Homepage, here are all the Conditions output.
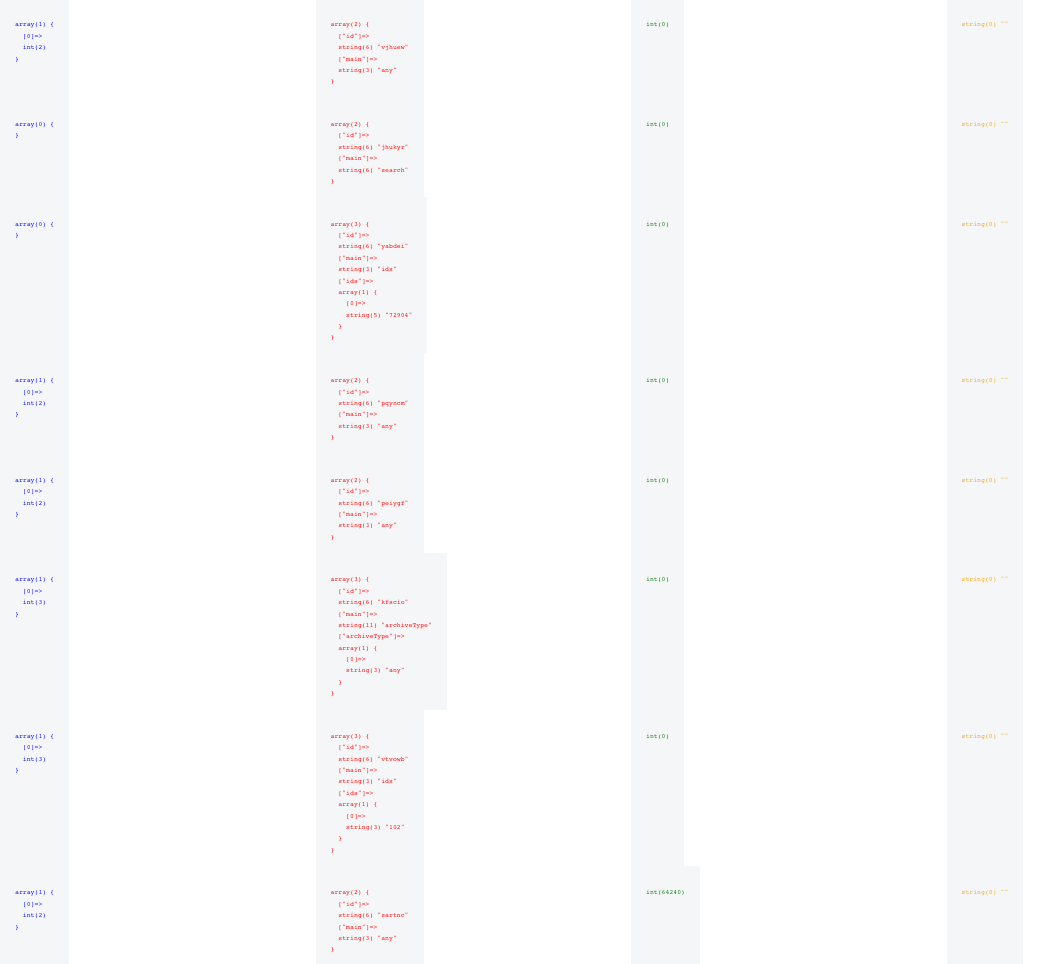
If you count the rows in the above image, there are 8 Conditions being output here for my Home page.
But when I considered what Templates would be affecting my Home page, it’s really just the 2 templates we’ve created in the article today
- Single – Default
- Single – Page Builder
And both of those have 1 Condtion applied for each of them – our Entire Website condition.
Knowing that, I was a bit confused as to why I was seeing 8 Conditions output in my PHP debugging code – but then it started to make sense.
Our function is outputting EVERY Condition set in ANY Bricks Template that is on our website.
And if I view all the Bricks Templates on my website, I have 7 in total and they each have Conditions.
But notice something… if we could the number of Conditions set at (2)…
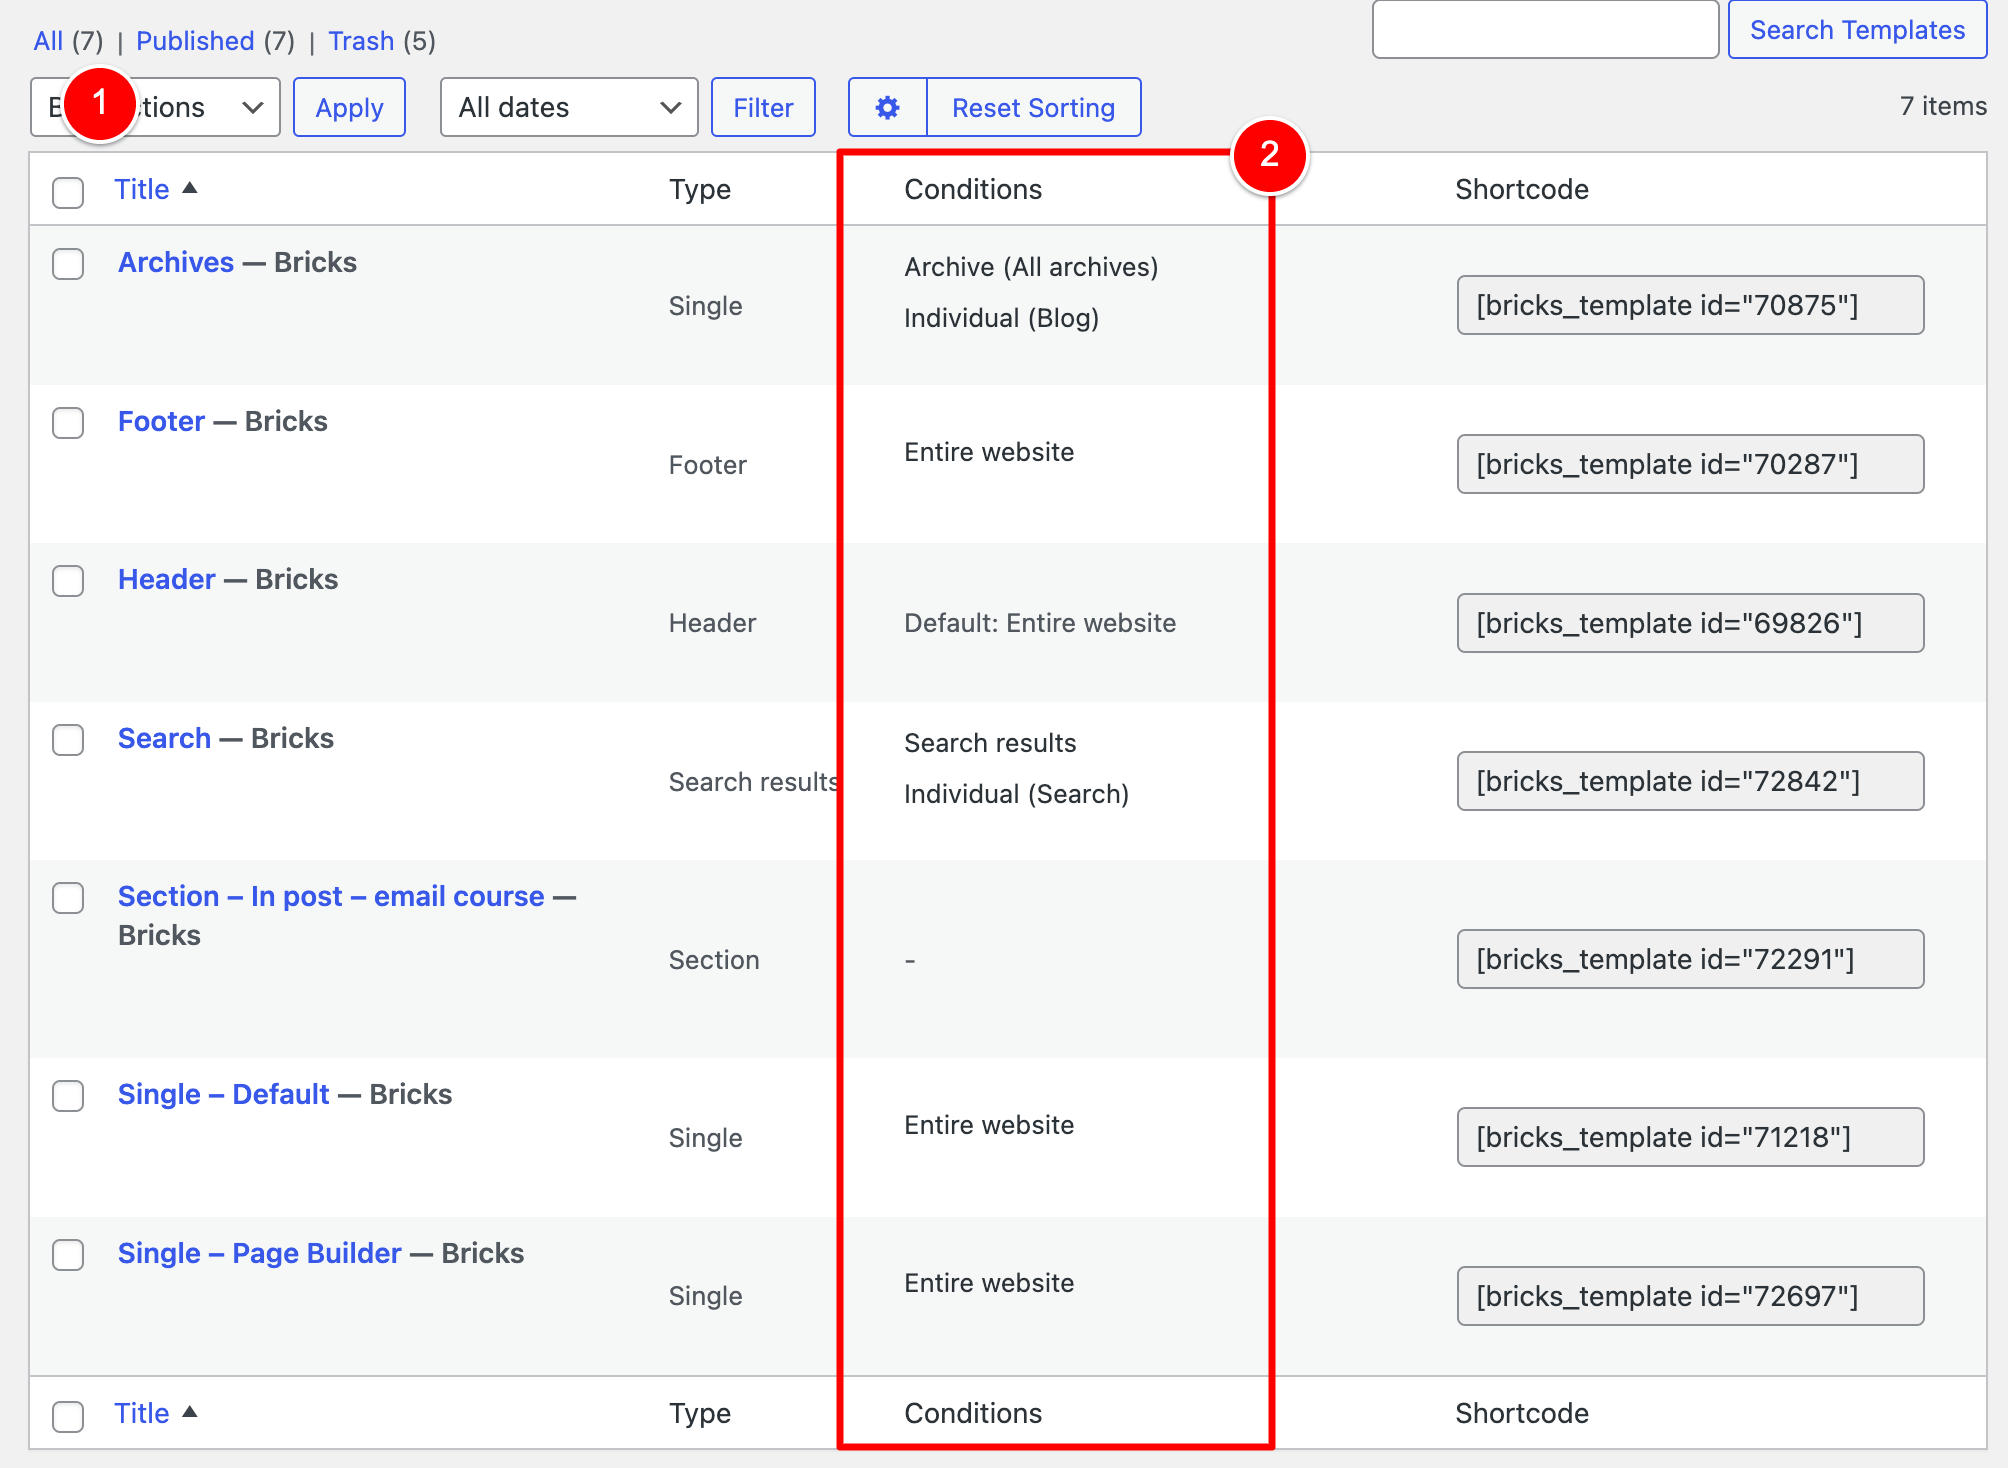
…it adds up to 8!
And that matches the number of Conditions we are seeing in our debugging PHP code.
Bricks Scoring: How to find the ID of a Condition
Now that I’d been able to wrap my head around what I was seeing, the next question I had was…
How do I find the ID of a Condition?
The debug code isn’t very helpful – the ID is just 6 random letters (1) (2).
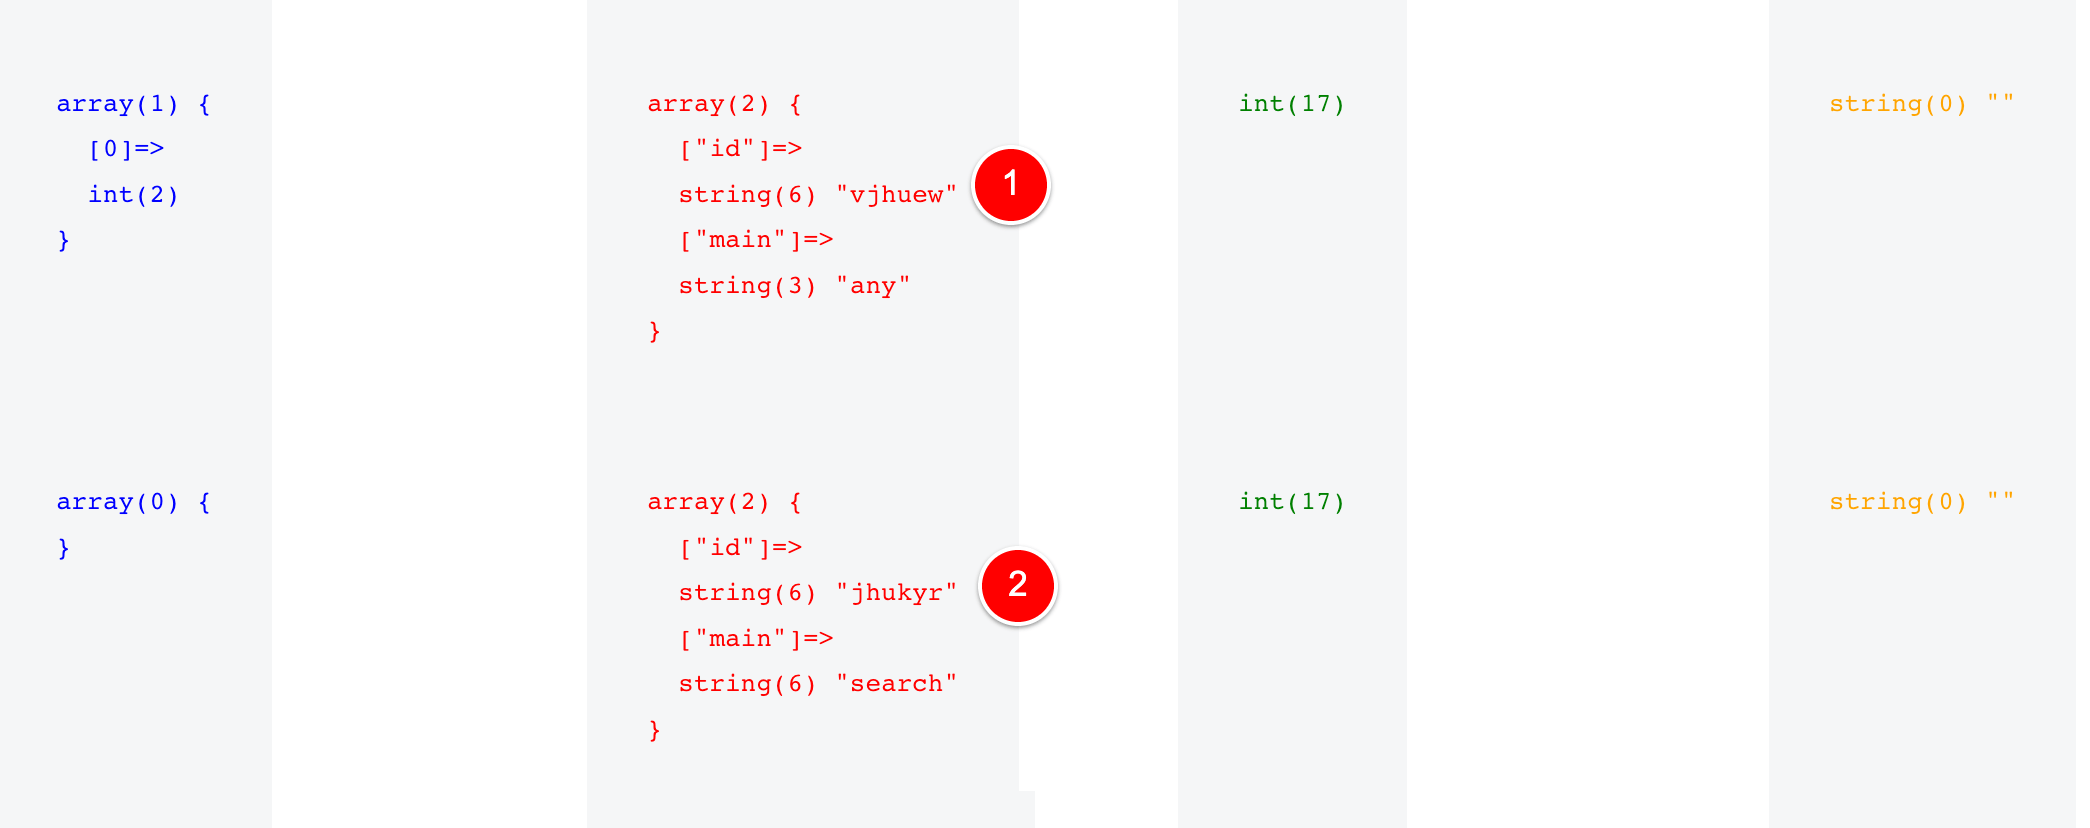
But looking at the code above, I could see that the second Condition had something to do with my “Search” Page and the condition set there had the ID of jhukryr.
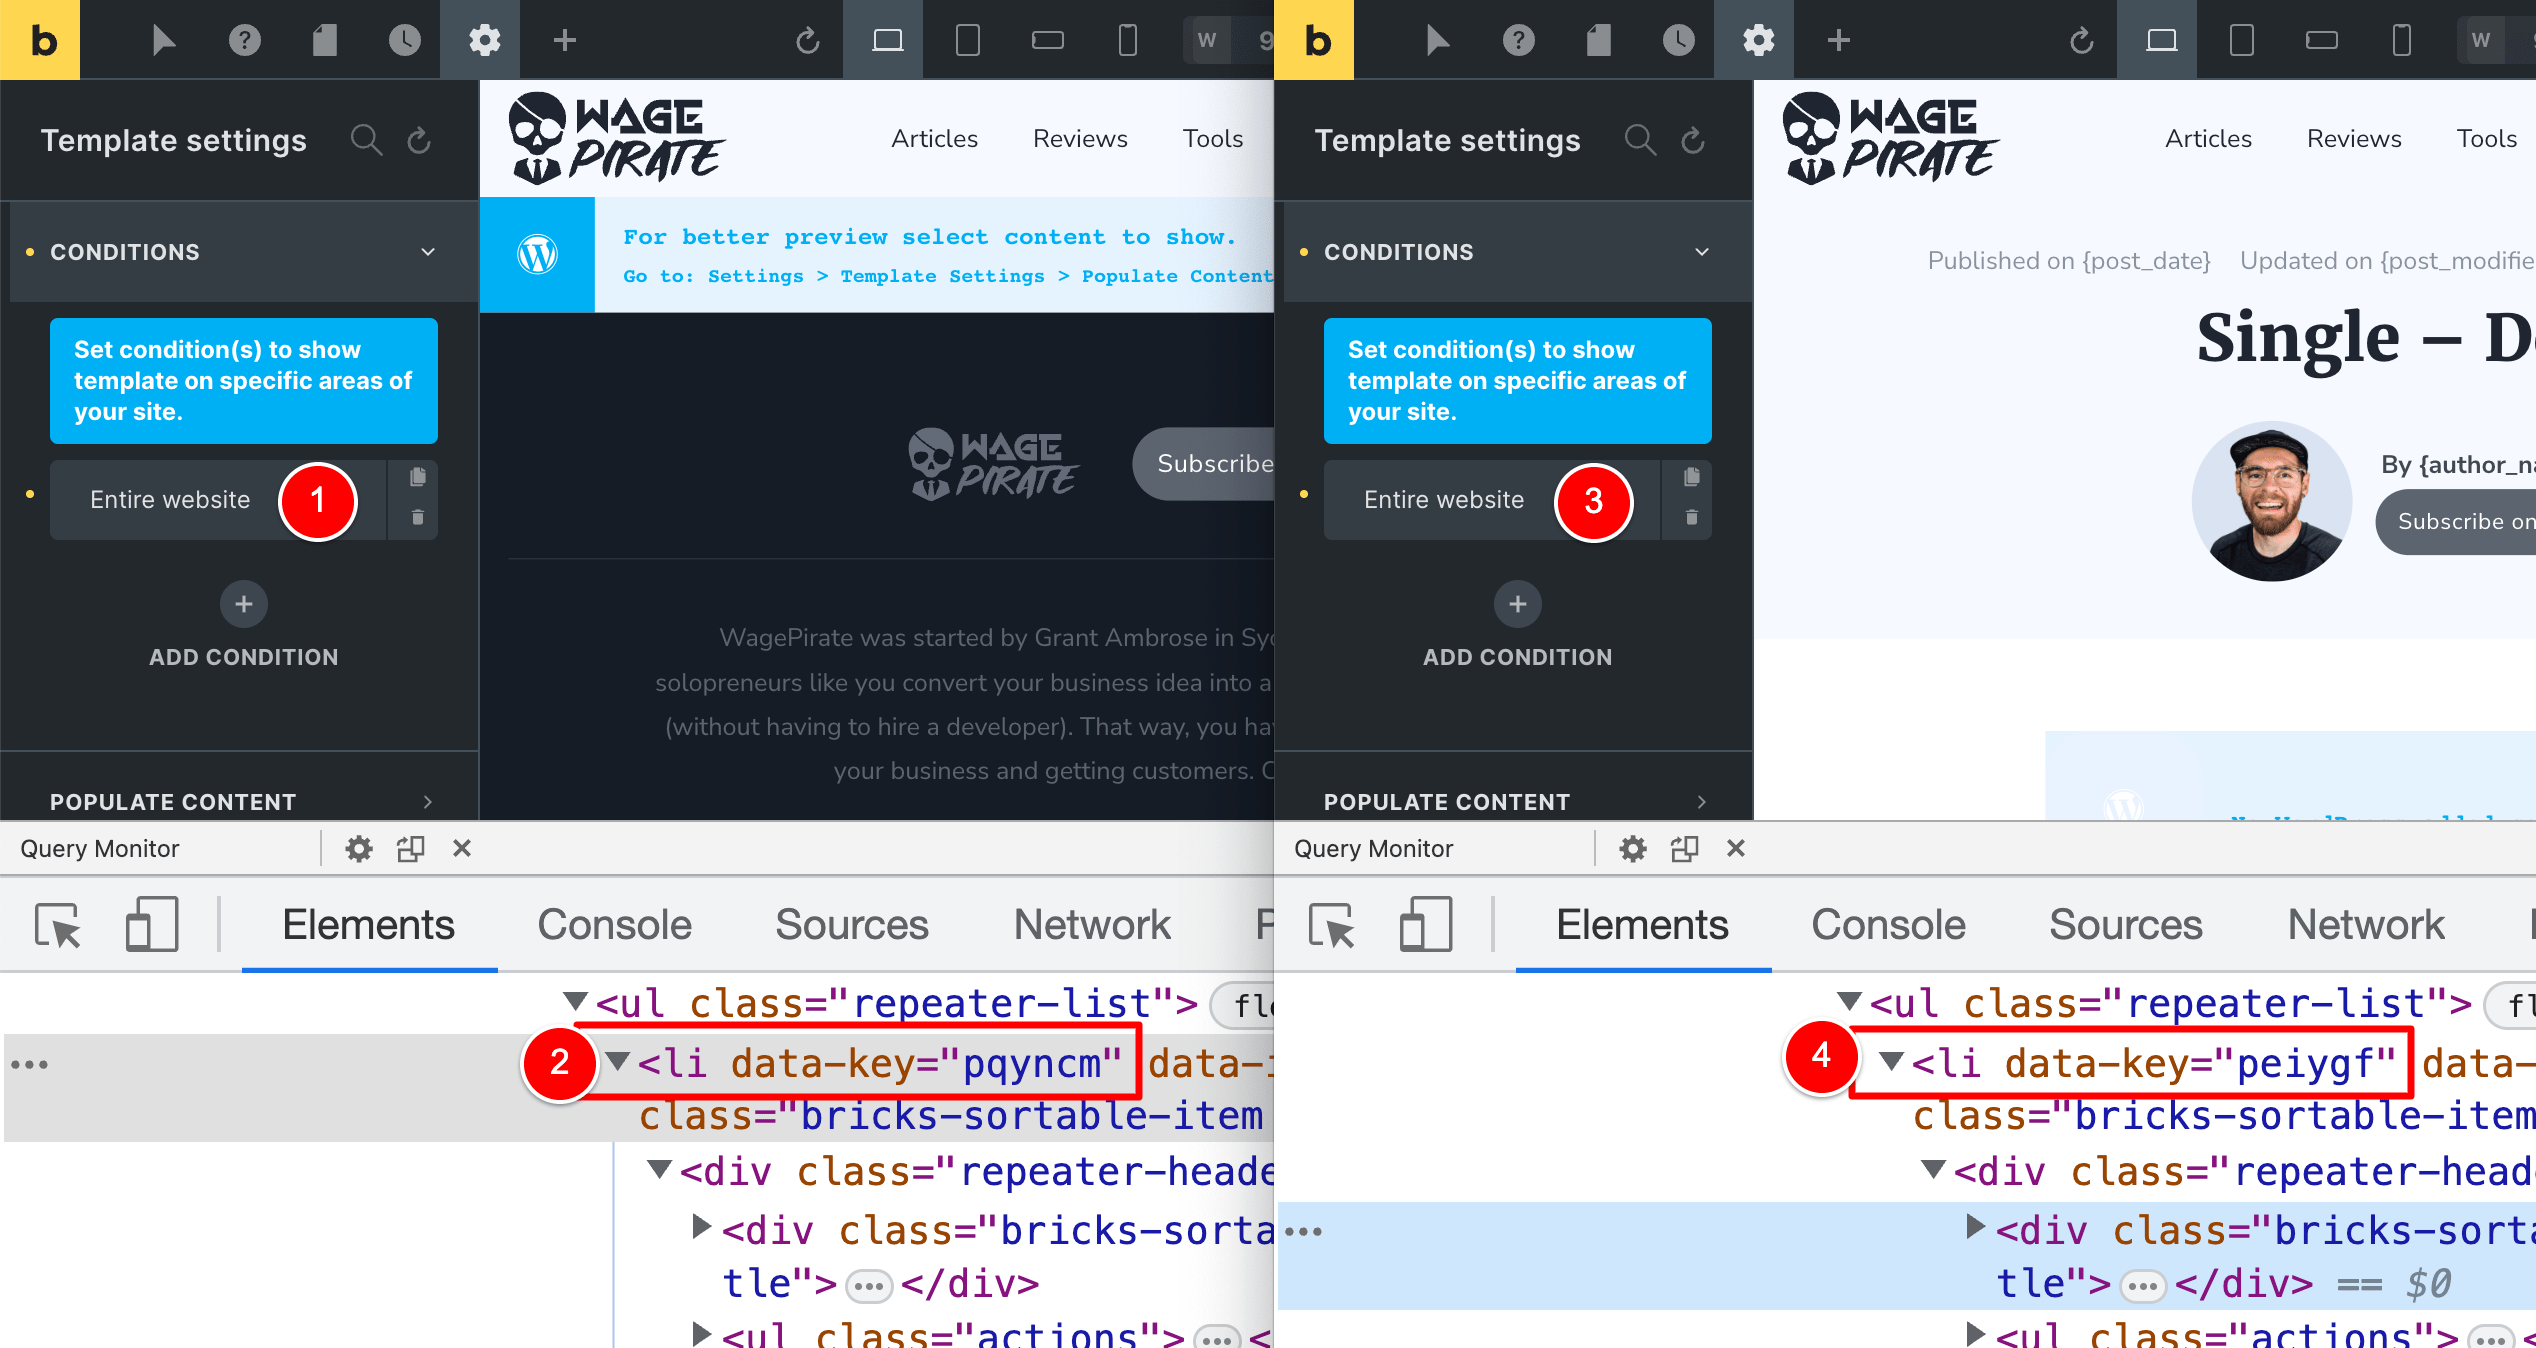
So, I went to Bricks > Templates (1) and knew that it had two Conditions set (2).
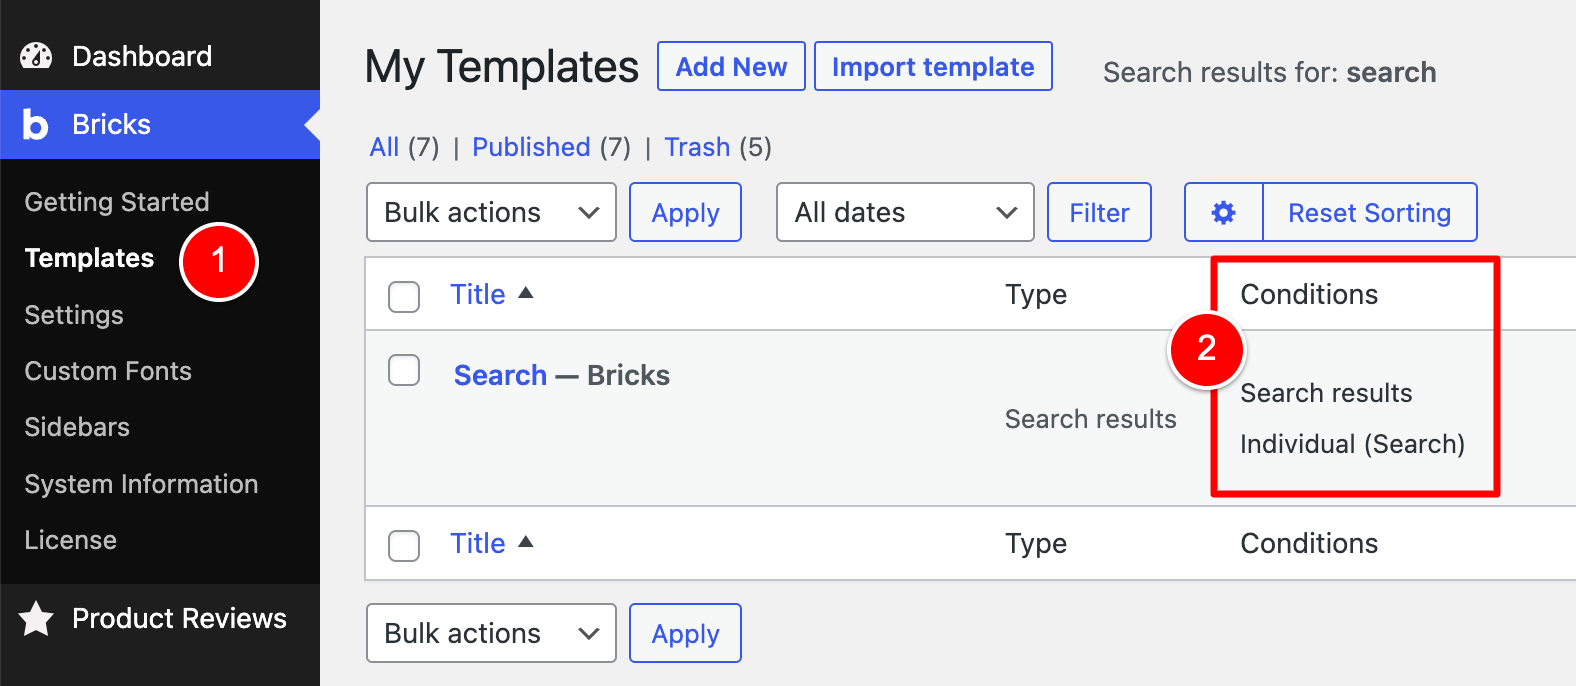
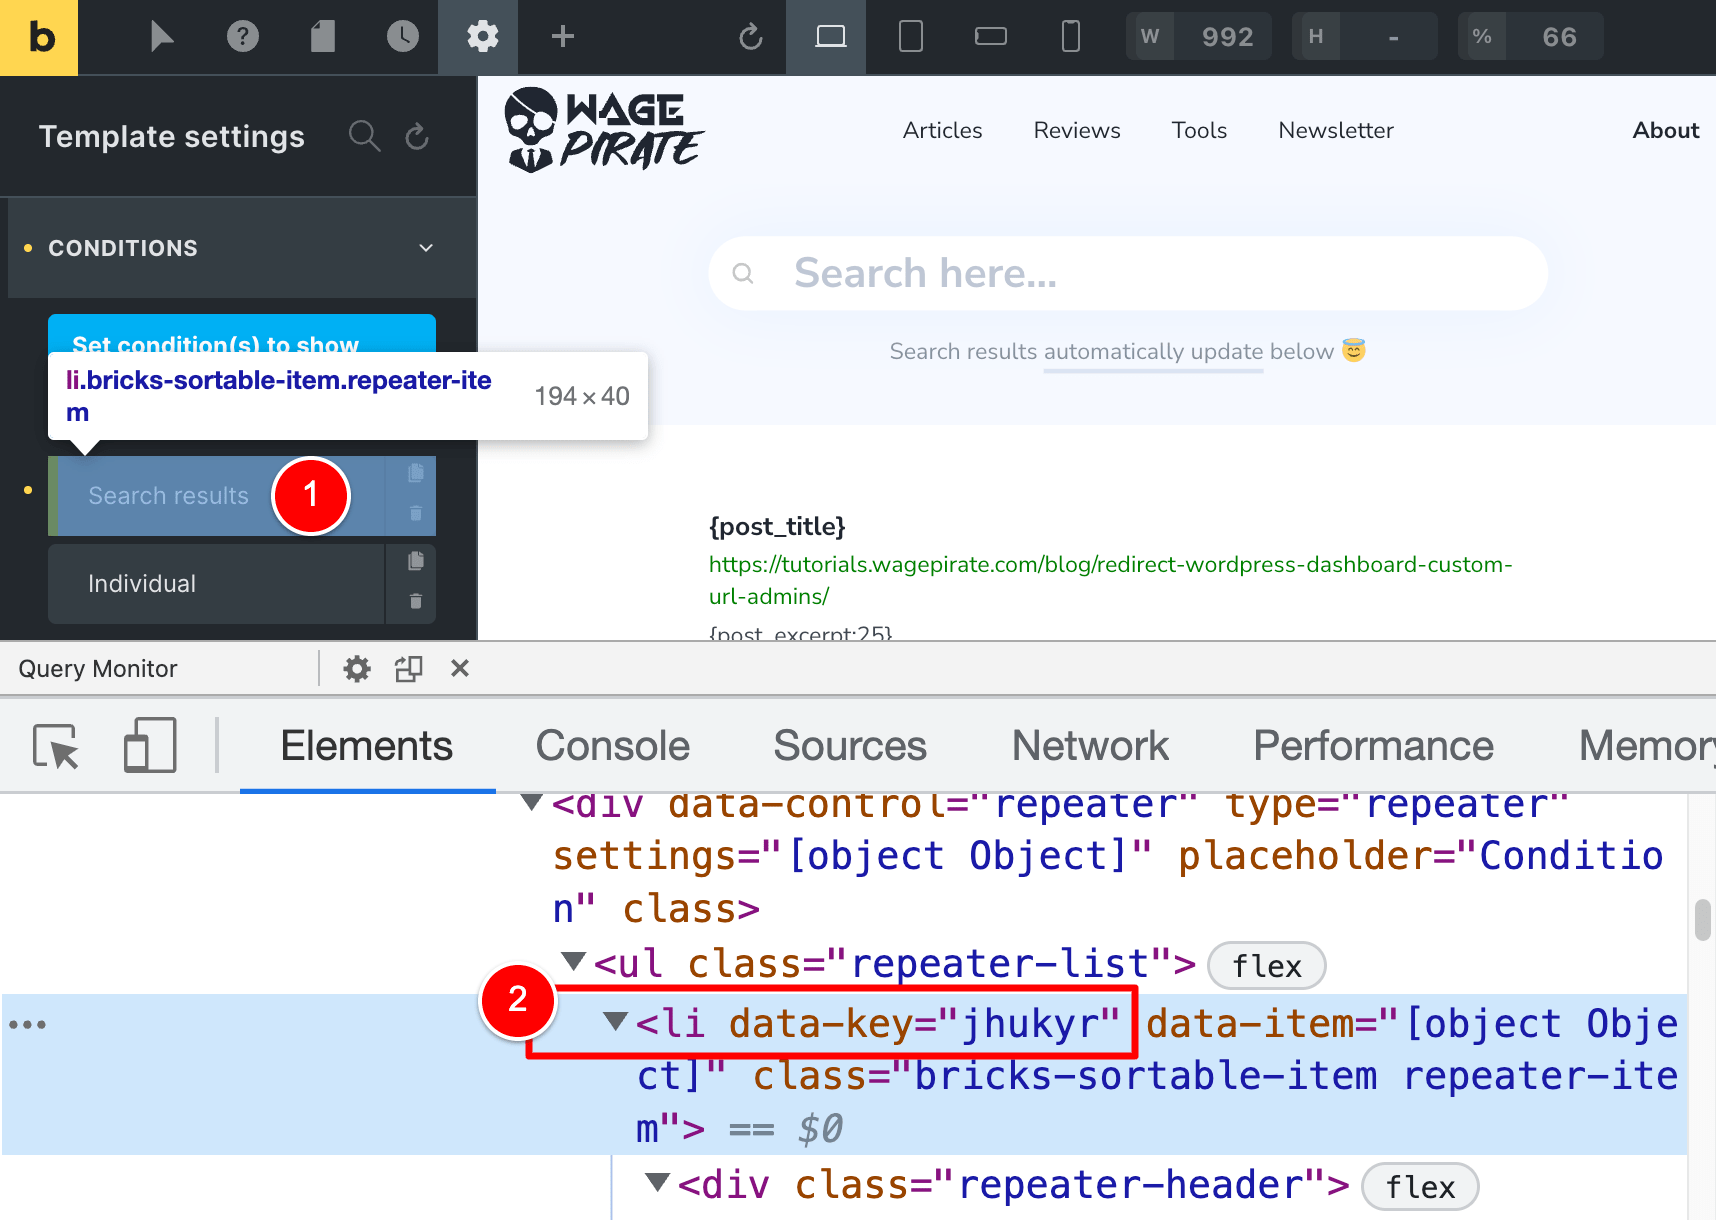
I edited this Search template in Bricks, went to Settings > Template Settings > Conditions and then Inspect Element’d the first condition and found jhukryr (2).
I then went and Inspect Element’d the second Condition on this Search Template and found its ID to be yadbei (2).
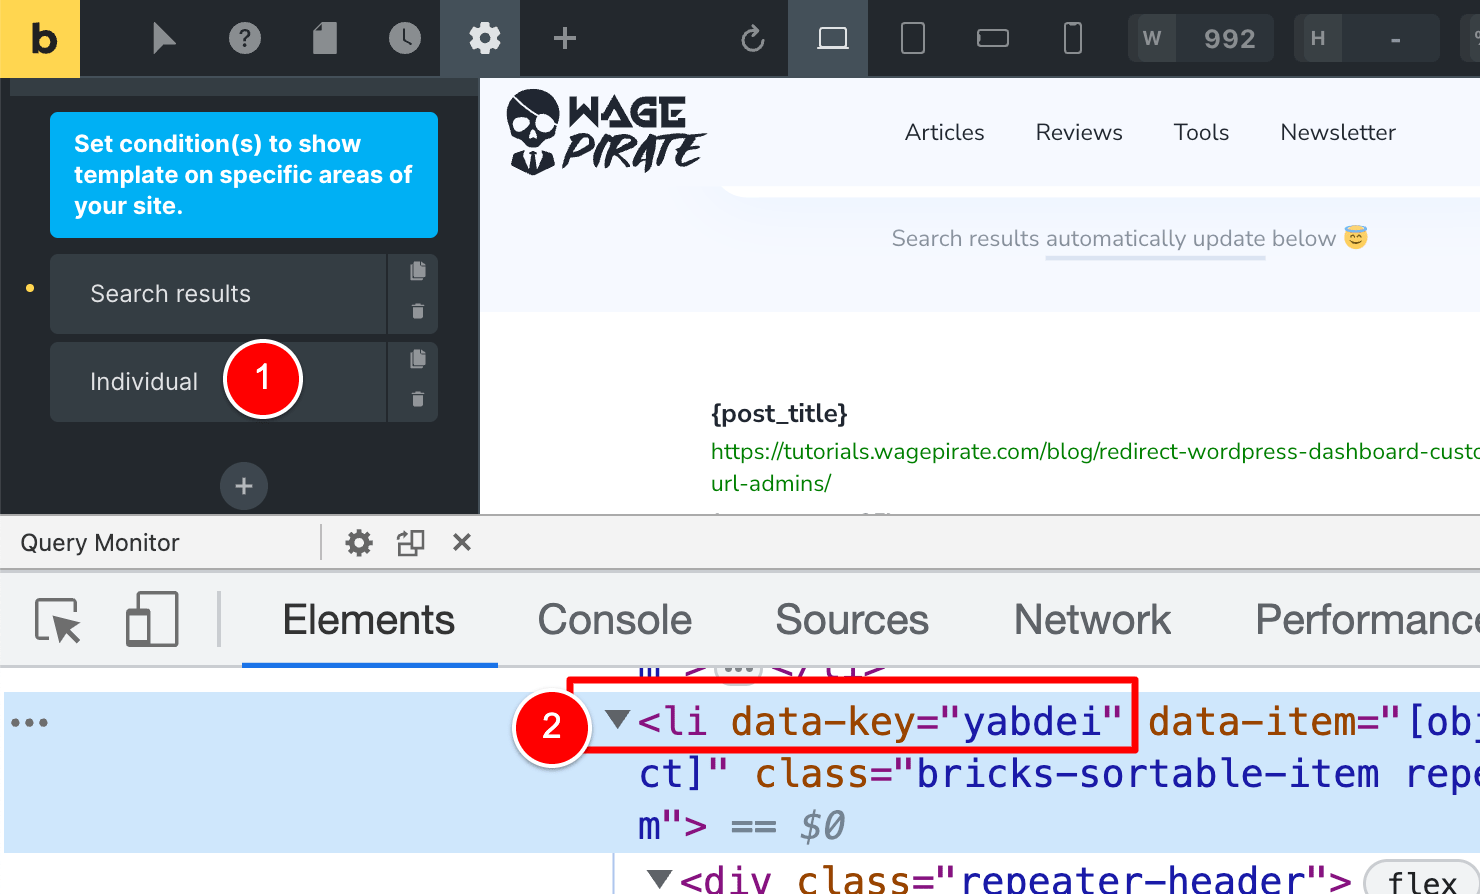
I matched it up with our debug PHP code and found it just after our first Condition (1) at (2).
So now I knew how to match the ID of a Condition in my debug code to a Condition in the Bricks UI.
Bricks Scoring: How Conditions update between posts & pages
Considering the above image in the previous section, I was also able to work out the following:
- This code is output on my Home page which has the ID of 17 as shown at (4) above.
- But these two Conditions set for the Search Template (1) (2) do NOT cause the Search Template to affect my Home page. What I mean by this is that…
- Their scores on my Homepage are empty (3) as they have no scores to affect my Home page.
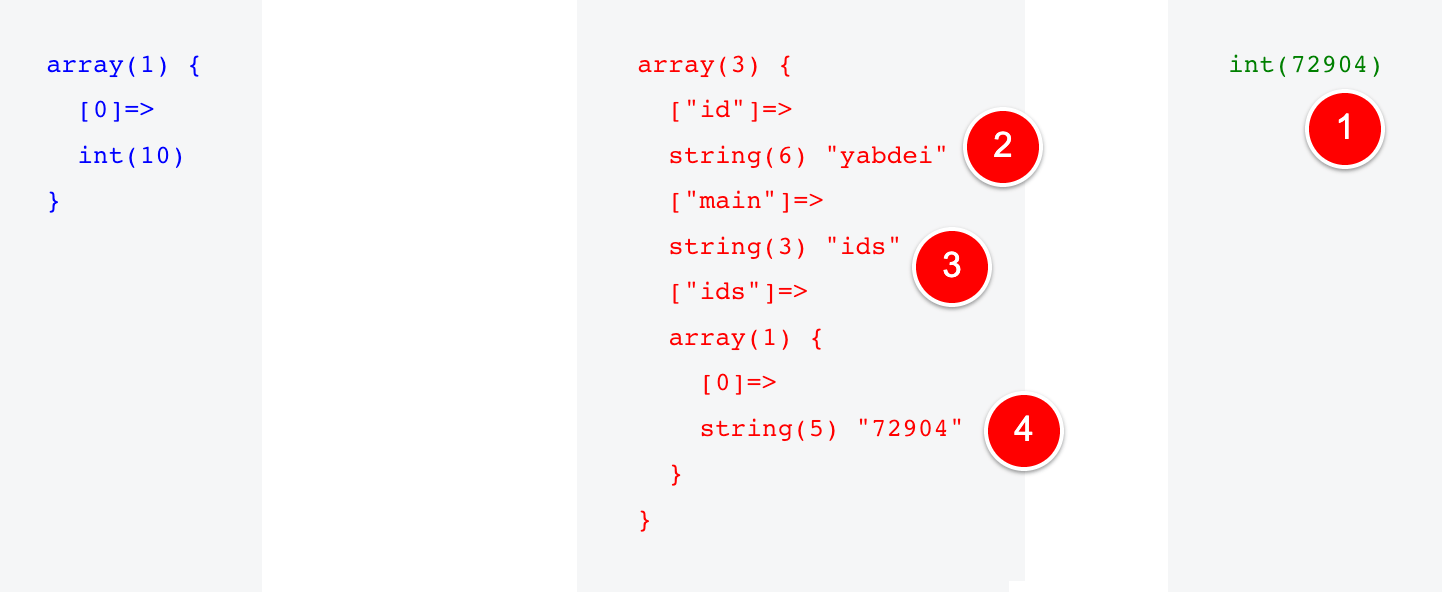
But if I go to my Search Page where this Search Template’s Conditions DO affect the page, I can see that the score for this second Condition updates to a score of 10 (1).
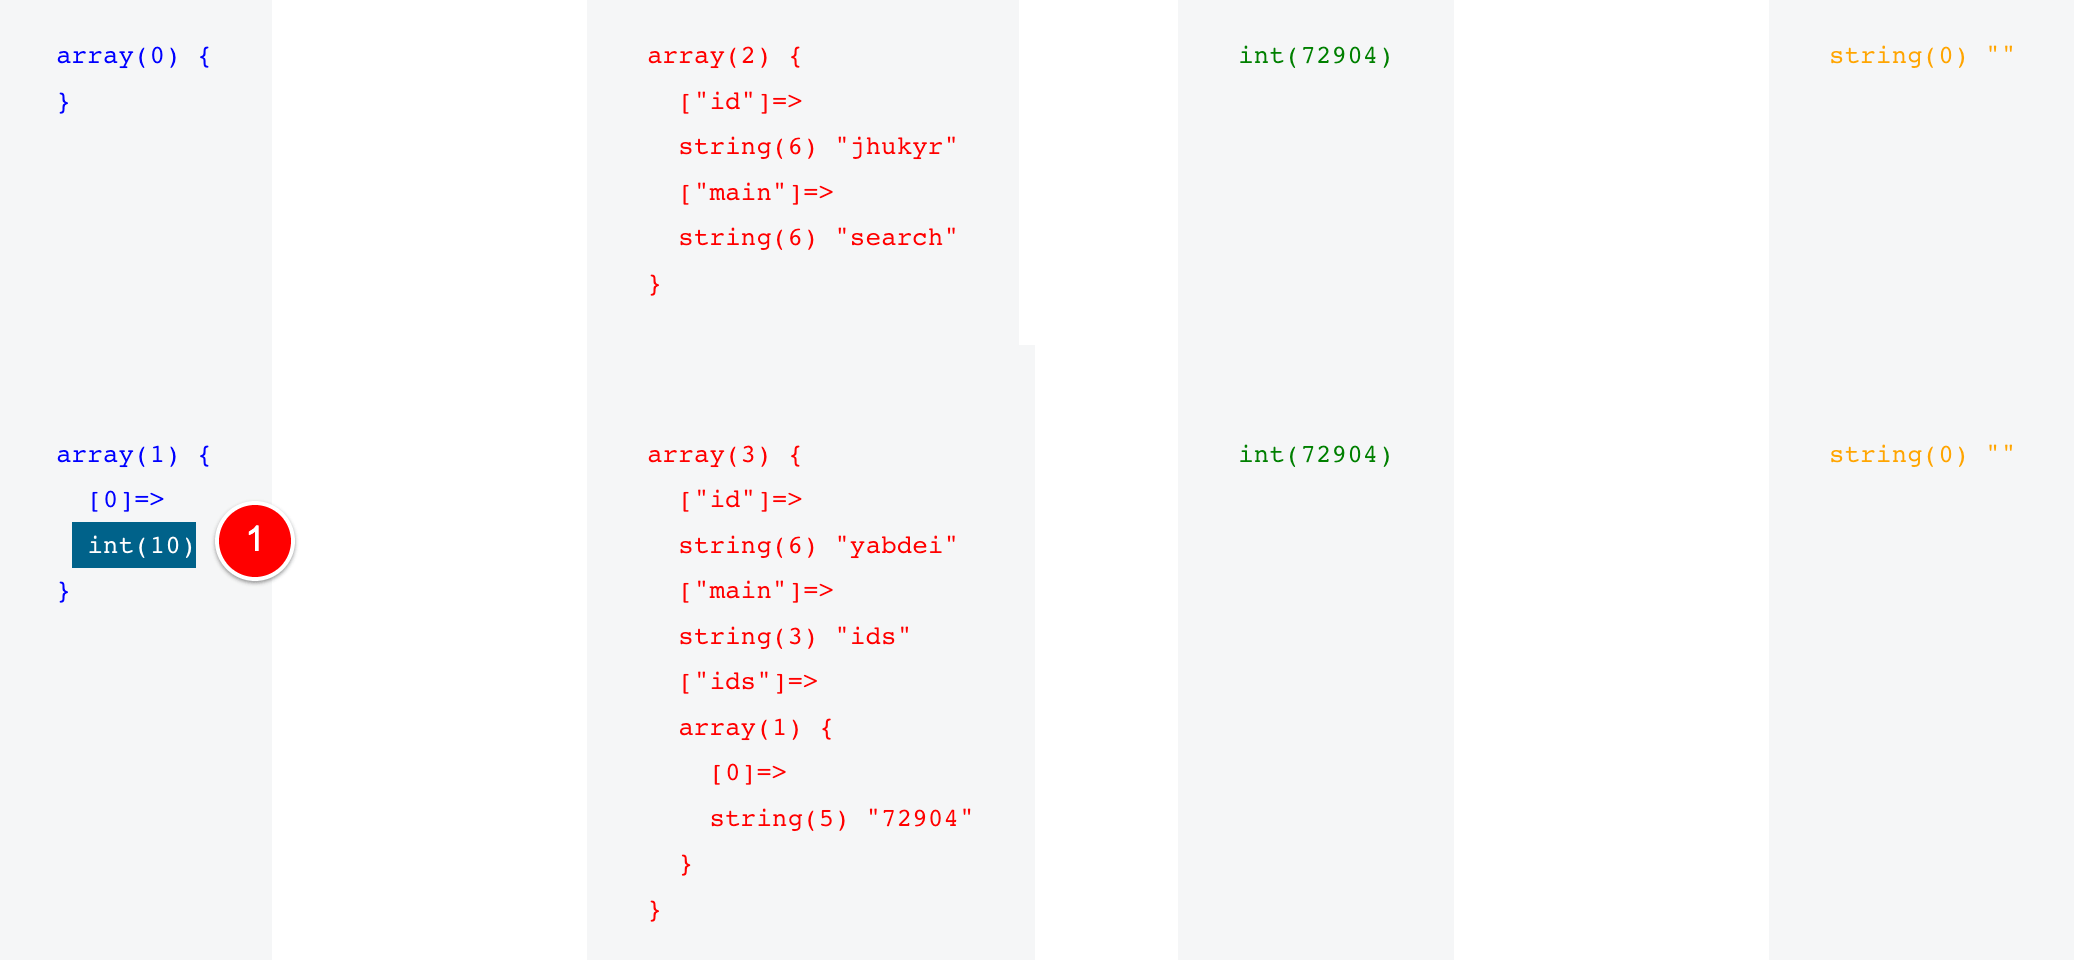
Remember – 10 is the MAXIMUM score a Condition can have.
And the reason this second Condition is a 10/10 Score is because the post ID of my Search Page is 72904 as shown at (1) when I visit it on the front-end.
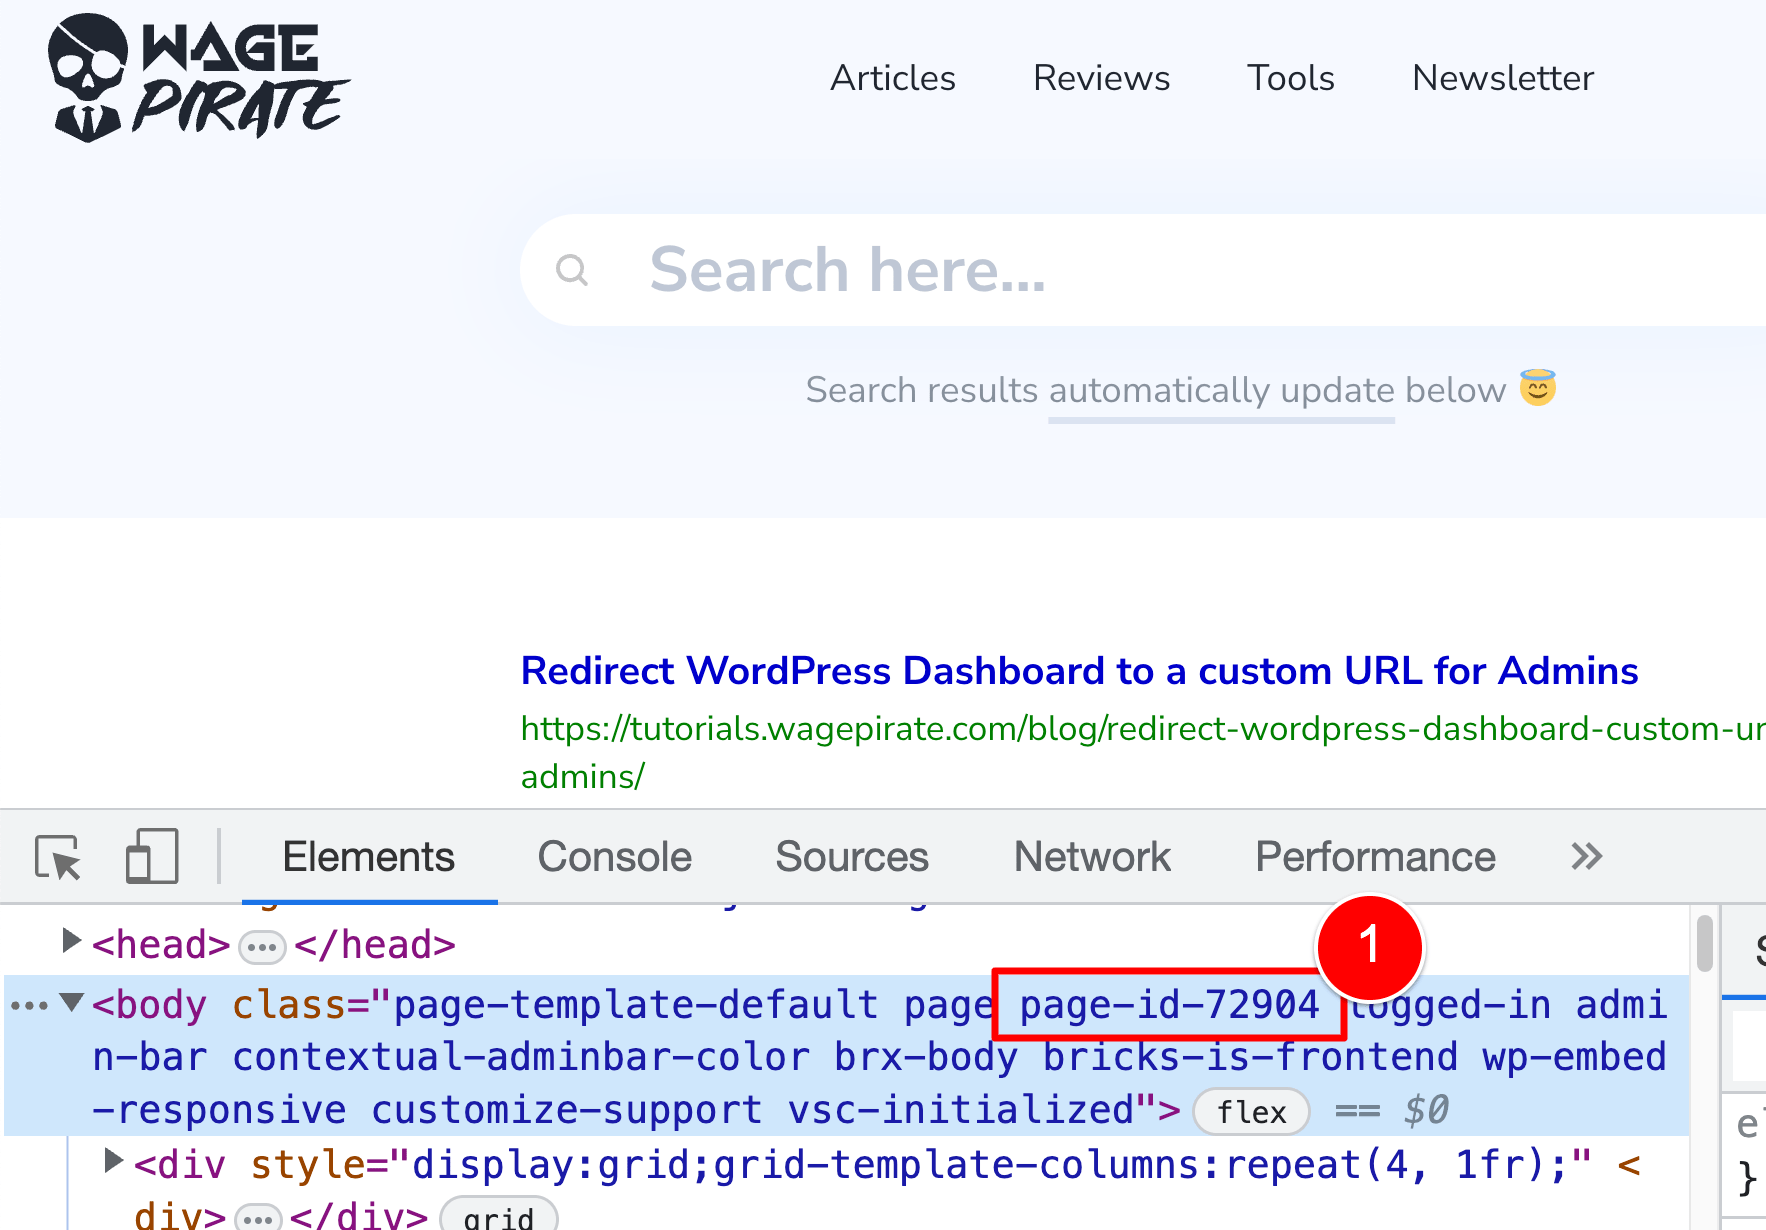
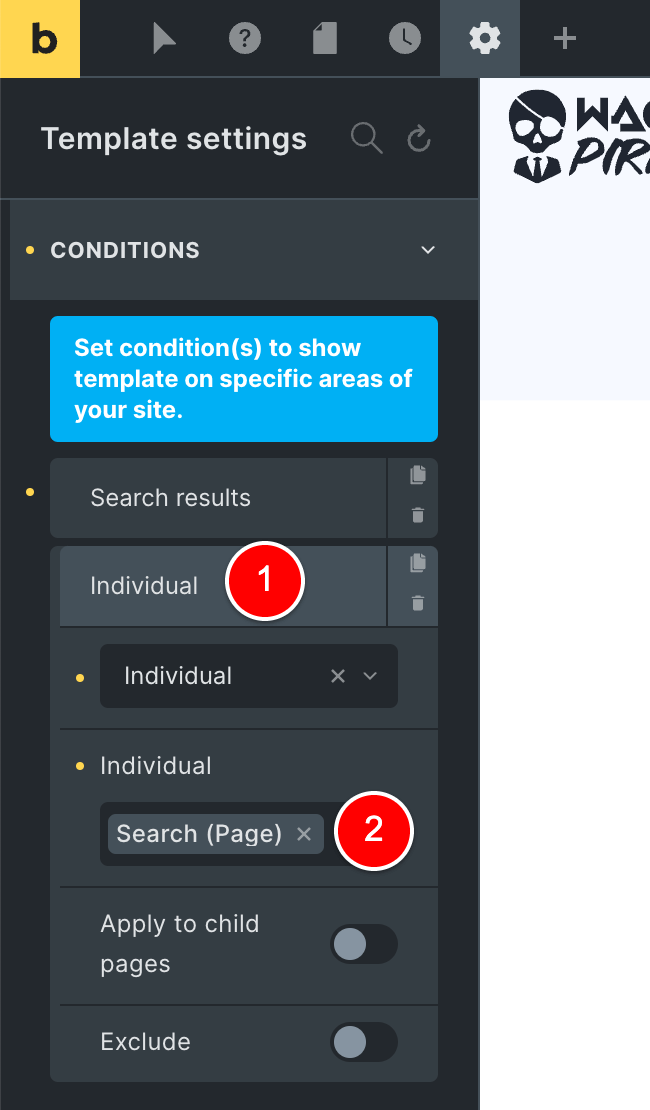
And for this Condition in Bricks, I have specifically set this Template to apply to my “Individual” Search Page (1)(2) that has the post ID of 72904.
To pull this all together, our debug code gives us the complete picture of how Bricks scoring works.
We are on the Search Page with its post ID of 72904 (1) and we have a Condition in one of our Bricks Templates that is specifically set to trigger for that post id (2)(3)(4)…
… and so whichever Bricks Template has this condition is the one that is used to render this page on our website.
If you are going and applying a Bricks Template to a specific Page, you 100% intend for that template to be used for that page / post ID…
so its score should be a 10/10 because it’s the most specific way to set a template – by the Post ID.
Then scores would decrease in specificity from there.
Finding the default Score assigned to a Bricks Template
Using what I’d just learnt from reviewing how the Search Conditions and their scoring worked, I now needed to shift focus and finish off this Page dilemma that I was trying to solve.
And to be honest – from here, it was very simple to finish and implement.
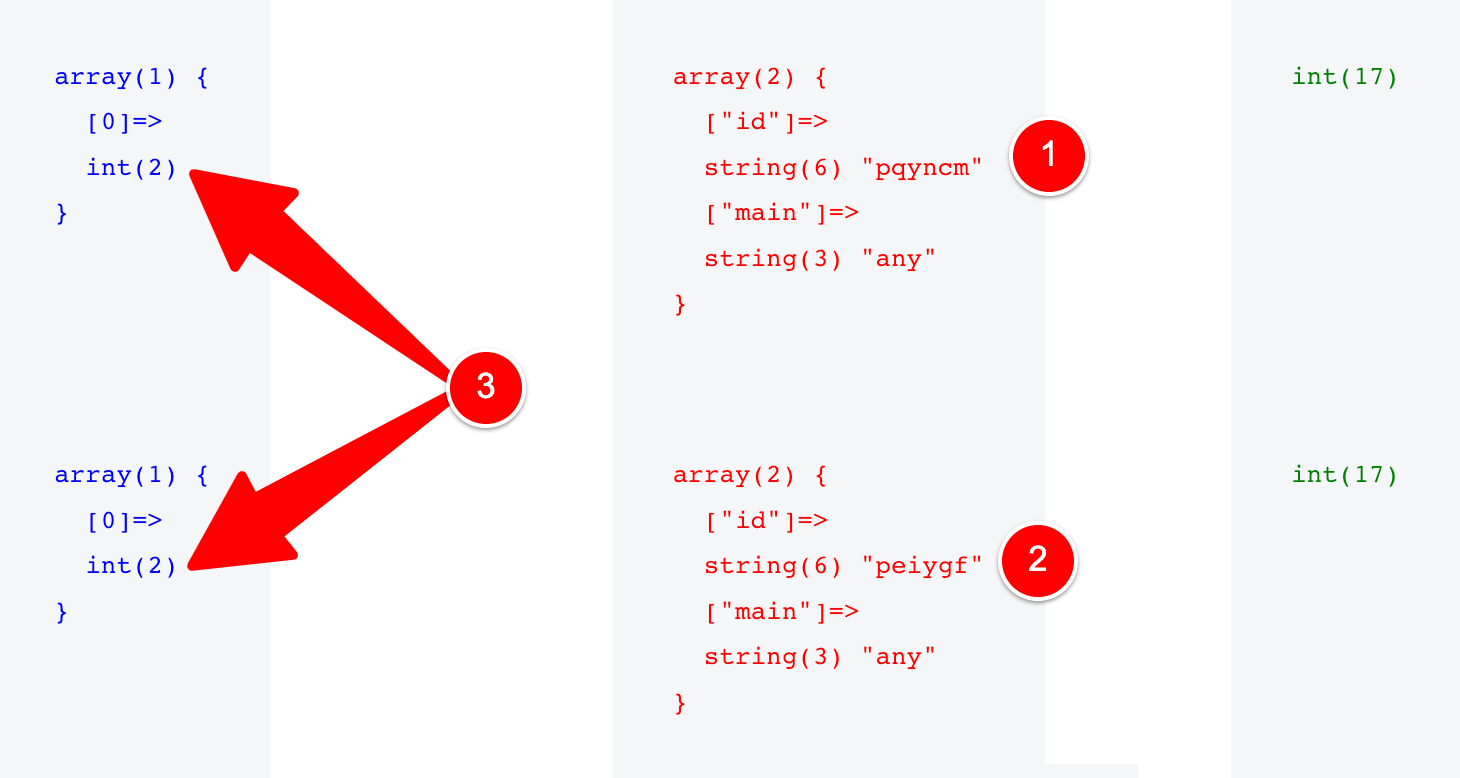
I opened both of the Bricks Templates and found the ID of their Conditions to be the following
- Single – Page Builder
ID:pqyncm(2) - Single – Default
ID:peiygf(4)
I went to my Home page and found these two Conditions by their ID’s in my debug code (1) (2) and from that I could work out that, they both had a score of 2 in Brick’s scoring system (3).
Now that I knew their scores…
All I had to do is set the score of the Condition in my Single – Page Builder template to be greater than 2 under the conditions I needed it to so that it would take priority over my Single – Default template.
Setting a custom Score only for my Homepage
To keep things simple while testing, I focused on my Home page only.
I rewrote my PHP Filter code to the following:
// Bricks scoring for template selection
add_filter('bricks/screen_conditions/scores', function ($scores, $condition, $post_id, $preview_type) {
    // pqyncm is the ID of the condition in Bricks
    // for the Single - Page bricks template
    if(!is_front_page()){
        return $scores;
    }
    if ($condition['id'] === 'pqyncm') {
        $scores[] = 9;
    }
    return $scores;
}, 10, 4);Code language: PHP (php)
Here is an explanation of what the code is doing:
- If it is NOT the front page of our website (i.e. our Home page), return the scores as bricks has them by default – we don’t want to do any tweaks to scores
- BUT… if it IS the front page (our Home Page) then we check the ID of the condition being processed
- If the ID of the Condition being processed by the PHP Filter currently is
pqyncm(which is the ID we are looking for) then we will set its score to be greater than 2 - I opted to set its score to 9 in this instance. Anything above 2 would have worked, but I think reserving 10 only for applying conditions by Post ID is a good rule to follow.
I saved this code and… it worked!
My Home Page was now using the Single – Page Builder template (1) while my Blog Posts and other single posts on my website were using the Single – Default template (2).
And that meant I had 1 last task left to do.
Adjusting the score of a Bricks Template using an ACF Field
I needed a way to be able to specify when a page should use this Single – Page Builder template and override the default Single – Default template.
And I decided to do this using Advanced Custom Fields to keep things simple.
I already had the Advanced Custom Fields plugin installed as I use it for other things on my website.
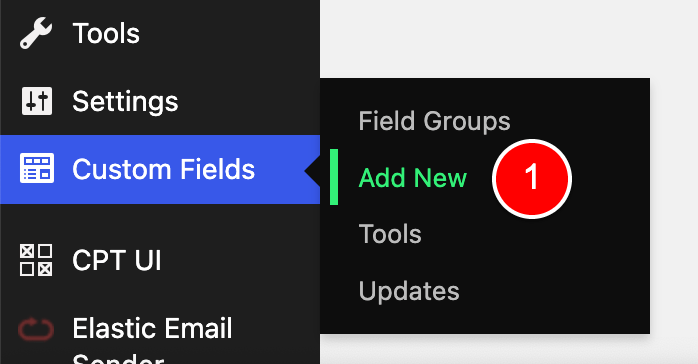
So I went to Custom Fields > Add New (1).
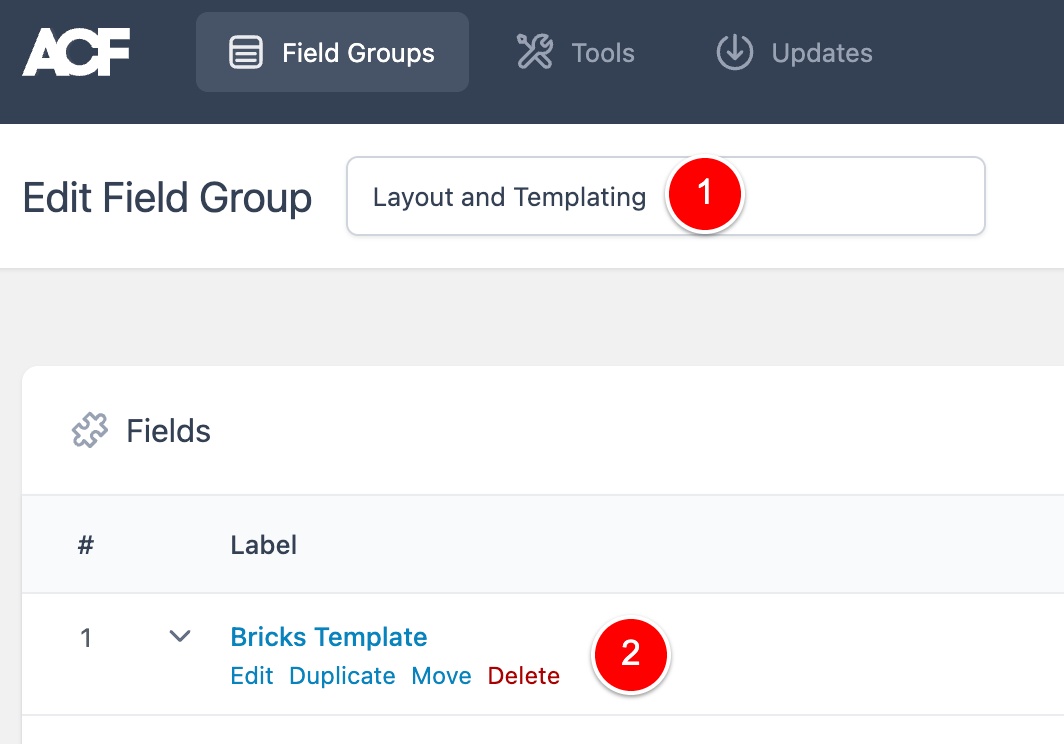
I named this Field Group Layouts and Templating (1) and added 1 field to this group (2).
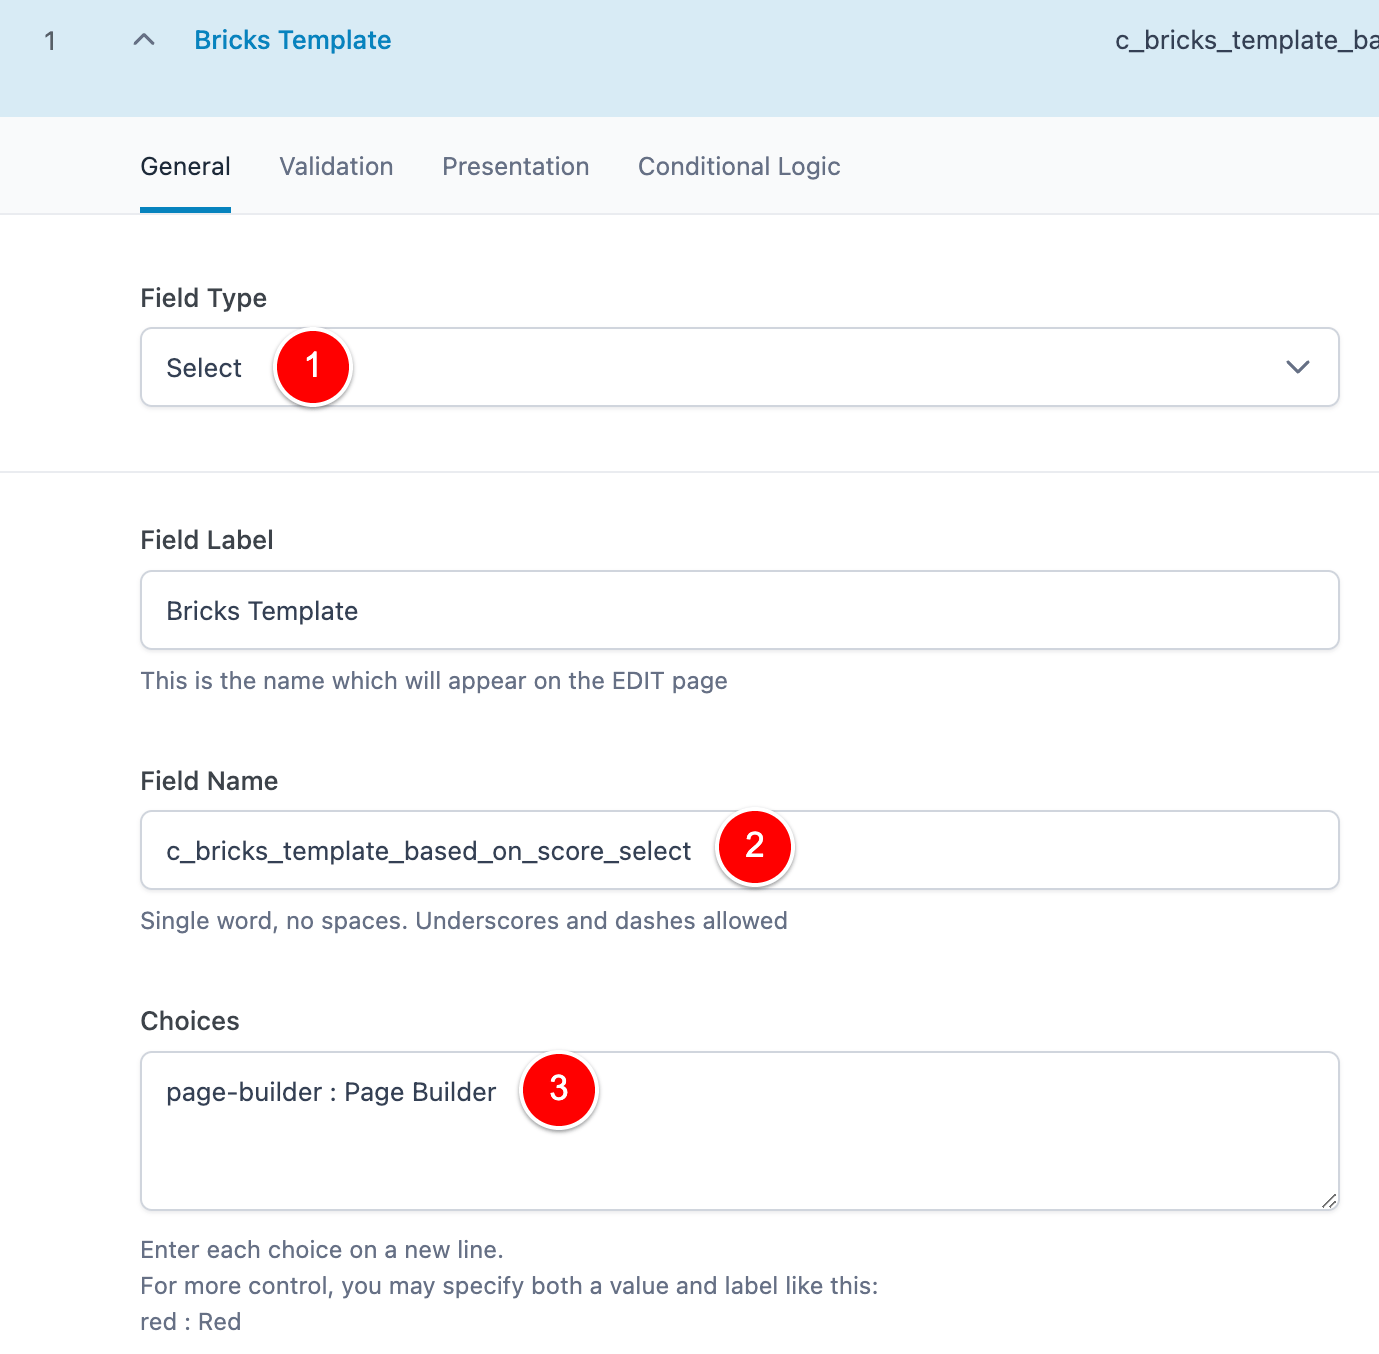
This field is a Select field (i.e. a dropdown) and I gave this field the ID of c_bricks_template_based_on_score_select (this is important to note as we’ll use this in a second).
I also set the choices for the Dropdown to be page-builder.
I then went to the Validation tab (1) and enabled the Allow Null setting.
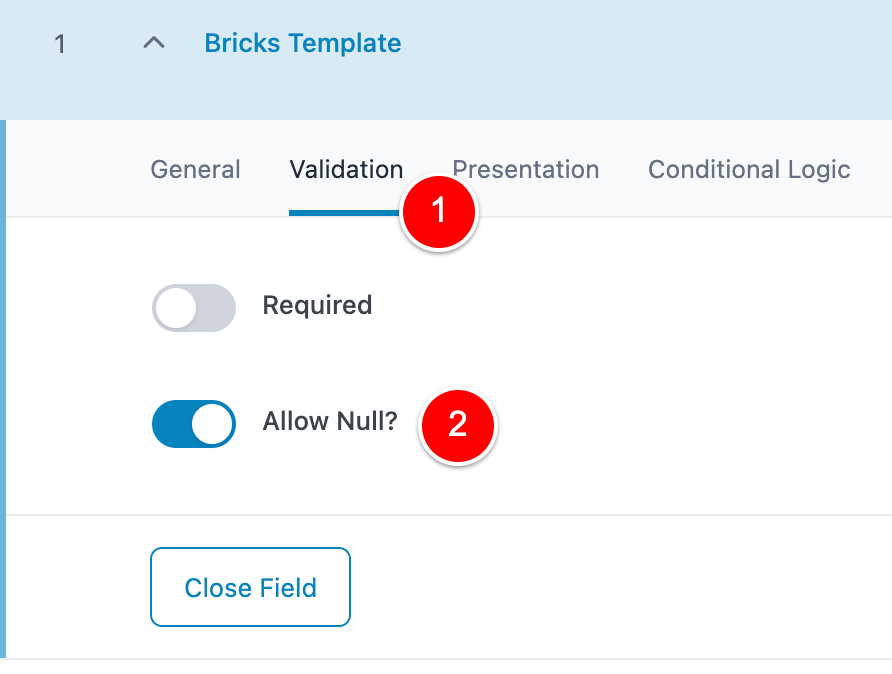
This allows this field to be empty and not default to our only choice of page-builder.
I scrolled to the bottom and set this Field Group to show when the Post Type is NOT the CTA Product post type.
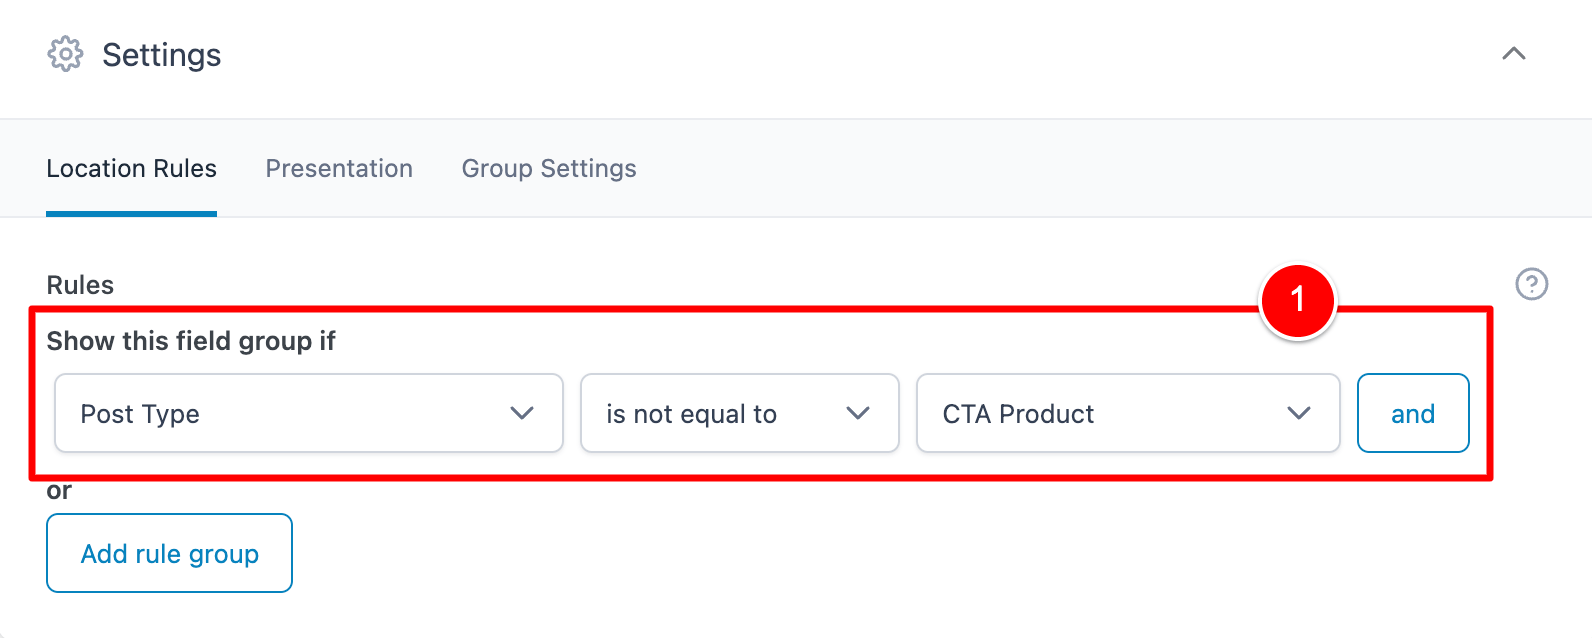
The CTA Product post type is just a random post type I have on my website to manage content and it is never output on the frontend. So by choosing NOT this post type here, I am basically in turn having it show for all the Post Types on my website.
Alternatively, I could have done something like the below…
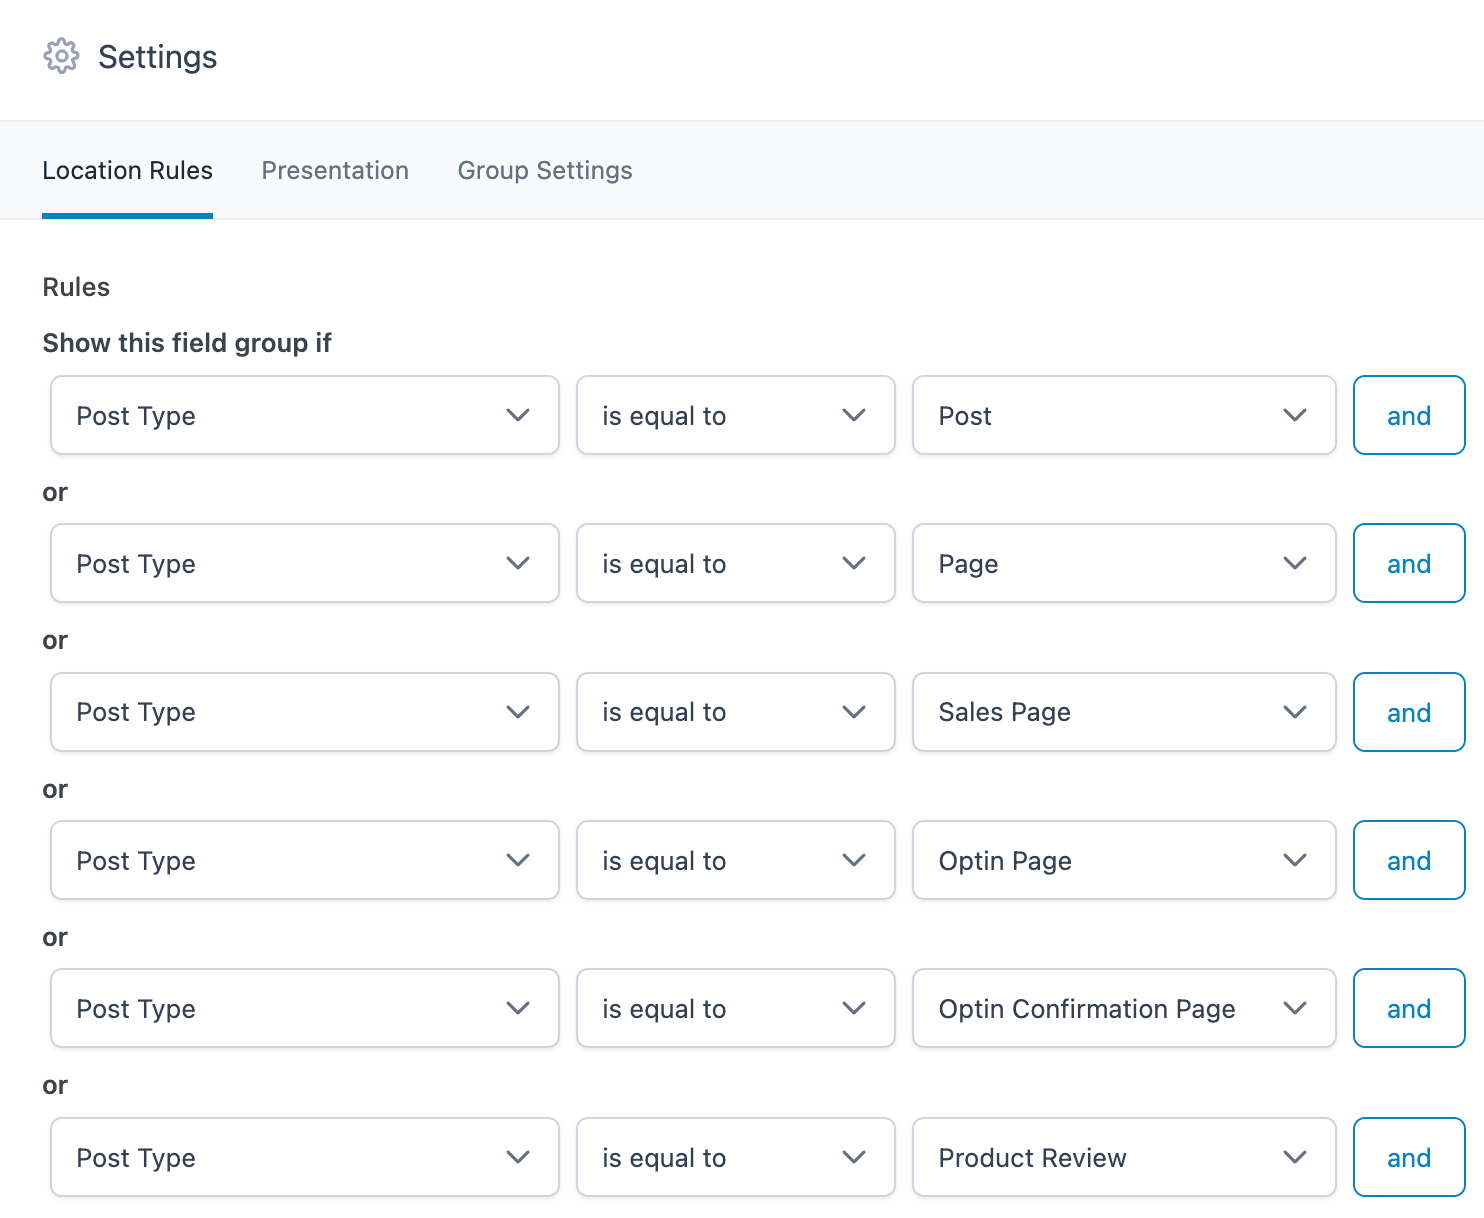
But as you can see, it’s more work and conditions and I also need to remember to come back here and add any new Post Types that my website uses in the future.
But – do what makes sense for your website here.
Lastly (and this is just personal preference) I went to Presentation (1) and set this Field Group to show on the Side (2).

I then saved my Field Group and went to my Homepage and can successfully see the ACF field output here on the side (1).
Oh, and see how it says – Select – … that’s what enabling the Allow Null setting did.
It has no choice set by default but we can click into the dropdown to select our Page Builder option.
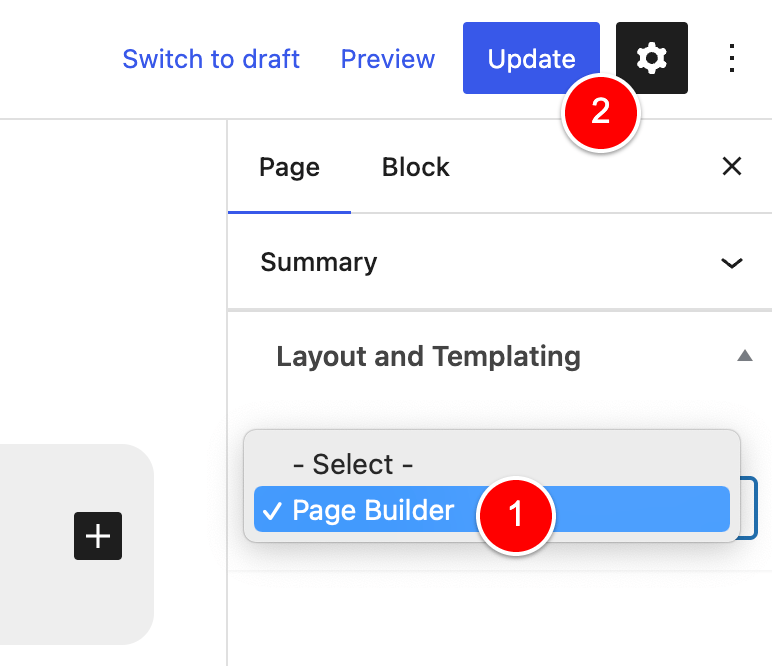
I went ahead and chose Page Builder in our new field (1) and Updated the Homepage (2).
All that was left to do was go back into our PHP Filter and update our code to modify our scoring based on the value of this ACF field.
The Final Code (with an explanation)
Here is the final code (I have added comments in the code to help explain what’s happening.
// Bricks scoring for template selection
add_filter('bricks/screen_conditions/scores', function ($scores, $condition, $post_id, $preview_type) {
    // pqyncm is the ID of the condition
    // for the "Single - Page Builder" bricks template
    // c_bricks_template_based_on_score_select = ACF dropdown field ID
    $acf_bricks_template = get_field('c_bricks_template_based_on_score_select');
    if(!isset($acf_bricks_template)){
        return $scores;
    }
    // if the code gets here, there is a setting in the ACF dropdown
    // so we will apply our custom Scoring Logic
    if ($condition['id'] === 'pqyncm' && $acf_bricks_template == 'page-builder') {
        $scores[] = 9;
    }
    return $scores;
}, 10, 4);Code language: PHP (php)
Here is how the code works:
- I set the value of this ACF Custom Field to a PHP variable named
$acf_bricks_template - If this variable is NOT set (i.e. I have not selected an option in the dropdown on the current page / post), then we don’t need to do any custom score logic and we can just return the $scores to Bricks untouched.
- If I HAVE selected an option in the ACF dropdown, then we get to the next bit of code which checks the ID of the current Condition being processed in PHP.
- If the ID of the current Condition being processed =
pqyncm(which is the ID we are wanting to target) then we check if the value of the ACF field = page-builder. - If both of those Conditions match, we modify the score of this condition in Bricks to 9
- And a score of 9 beats the score of all the other Conditions fighting to render this Page (as we saw previously, the score we needed to beat was 2)…
- And so this template Single – Page Builder is used to render the current post / page.
Now I can go to any post / page / custom post type in my website, change the dropdown for this ACF field to page-builder and, in doing so, I can override the Single – Default template and design full-width using Bricks.
Did you make it this far?
Let me know in the comments below!
I put a lot of effort into this Post and wrote it over a couple of days.
I’d love to know that it helped at least 1 person manage their Bricks website in a more straightforward manner.
Leave a Reply