After many years of building WordPress websites, I feel that FunnelKit is the BEST Coming Soon Page plugin for WordPress (and I want to show you why).
Here is a sneak peak of the Coming Soon page we will set up using FunnelKit (a Coming Soon page + form to let people subscribe to your Mailing List while your site is being designed + much more!)…

The Final Result of this tutorial (VIDEO)
Here is a quick 45 second video that shows the end result of what we’re setting up today.
Why FunnelKit is the best Coming Soon page plugin for WordPress
Here is why I recommend FunnelKit for making a Coming Soon page:
FunnelKit allows you to build an entire Coming Soon page funnel
FunnelKit will make it EXTREMELY easy to design your main Coming Soon page but it will also allow you to set up your Opt-in form to collect email addresses while you build your website.
FunnelKit allows you to build your Coming Soon page with your favourite Page Builder
Elementor / Beaver Builder / Bricks Builder etc – they all work with FunnelKit and integrate very well to make designing your Coming Soon page fast and easy.
FunnelKit will allow us to see our conversion rate on our Coming Soon page
FunnelKit has built-in reporting. We will add an email subscribe form to our Coming Soon page and using FunnelKit reporting we can see what percent of people are putting in their email address here. This is VERY useful to you as a business owner and it’s all native to FunnelKit (you don’t need any extra software to do this reporting).
FunnelKit integrates with the amazing FunnelKit Automations CRM plugin for WordPress
We will use FunnelKit Automations to send emails to customers once they reach our Coming Soon page and then put in their email address. Using FunnelKit Automations, you don’t need to use ActiveCampaign, Mailchimp etc – you can do all of this from inside of WordPress!
Instead of me describing why FunnelKit is the best Coming Soon page plugin for WordPress, let’s get into the tutorial and actually show you.
VIDEO: The Video Tutorial
Here is the ENTIRE tutorial in Video format, in case you’d prefer to watch vs read this blog post.
Step 1: How to create a Coming Soon Page in WordPress
Let’s create our Coming Soon page with an email capture form (just in case people want to be notified when our website launches in the future).
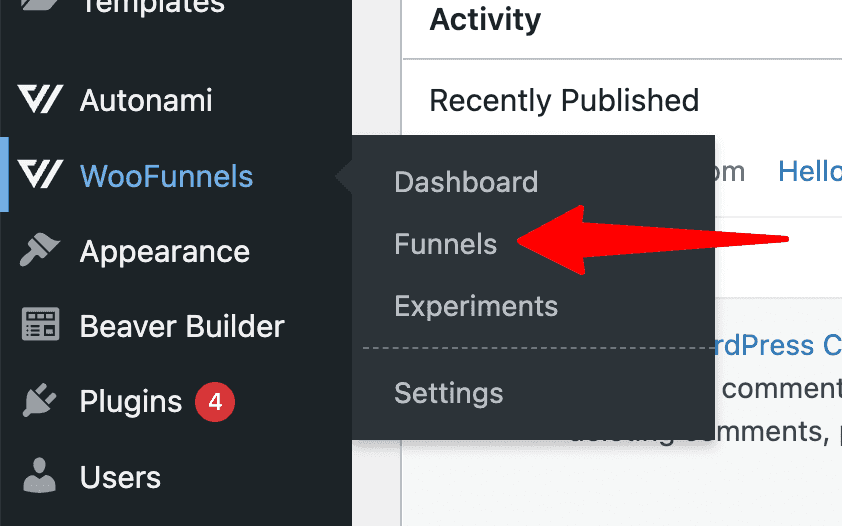
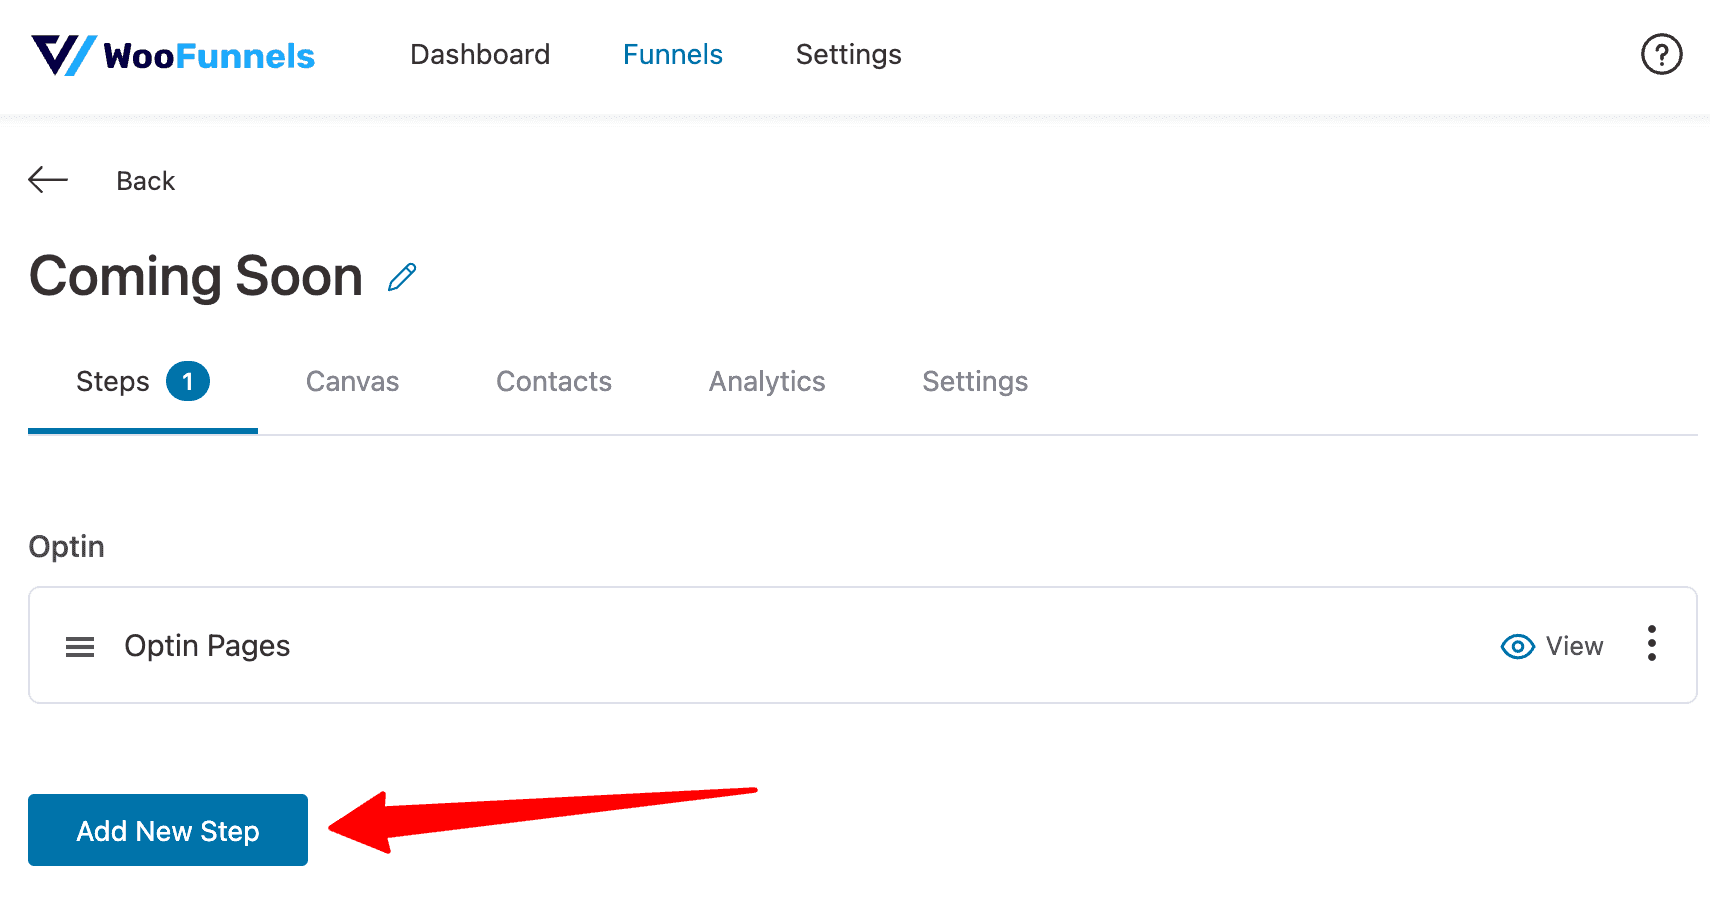
To do this, go to FunnelKit > Funnels…
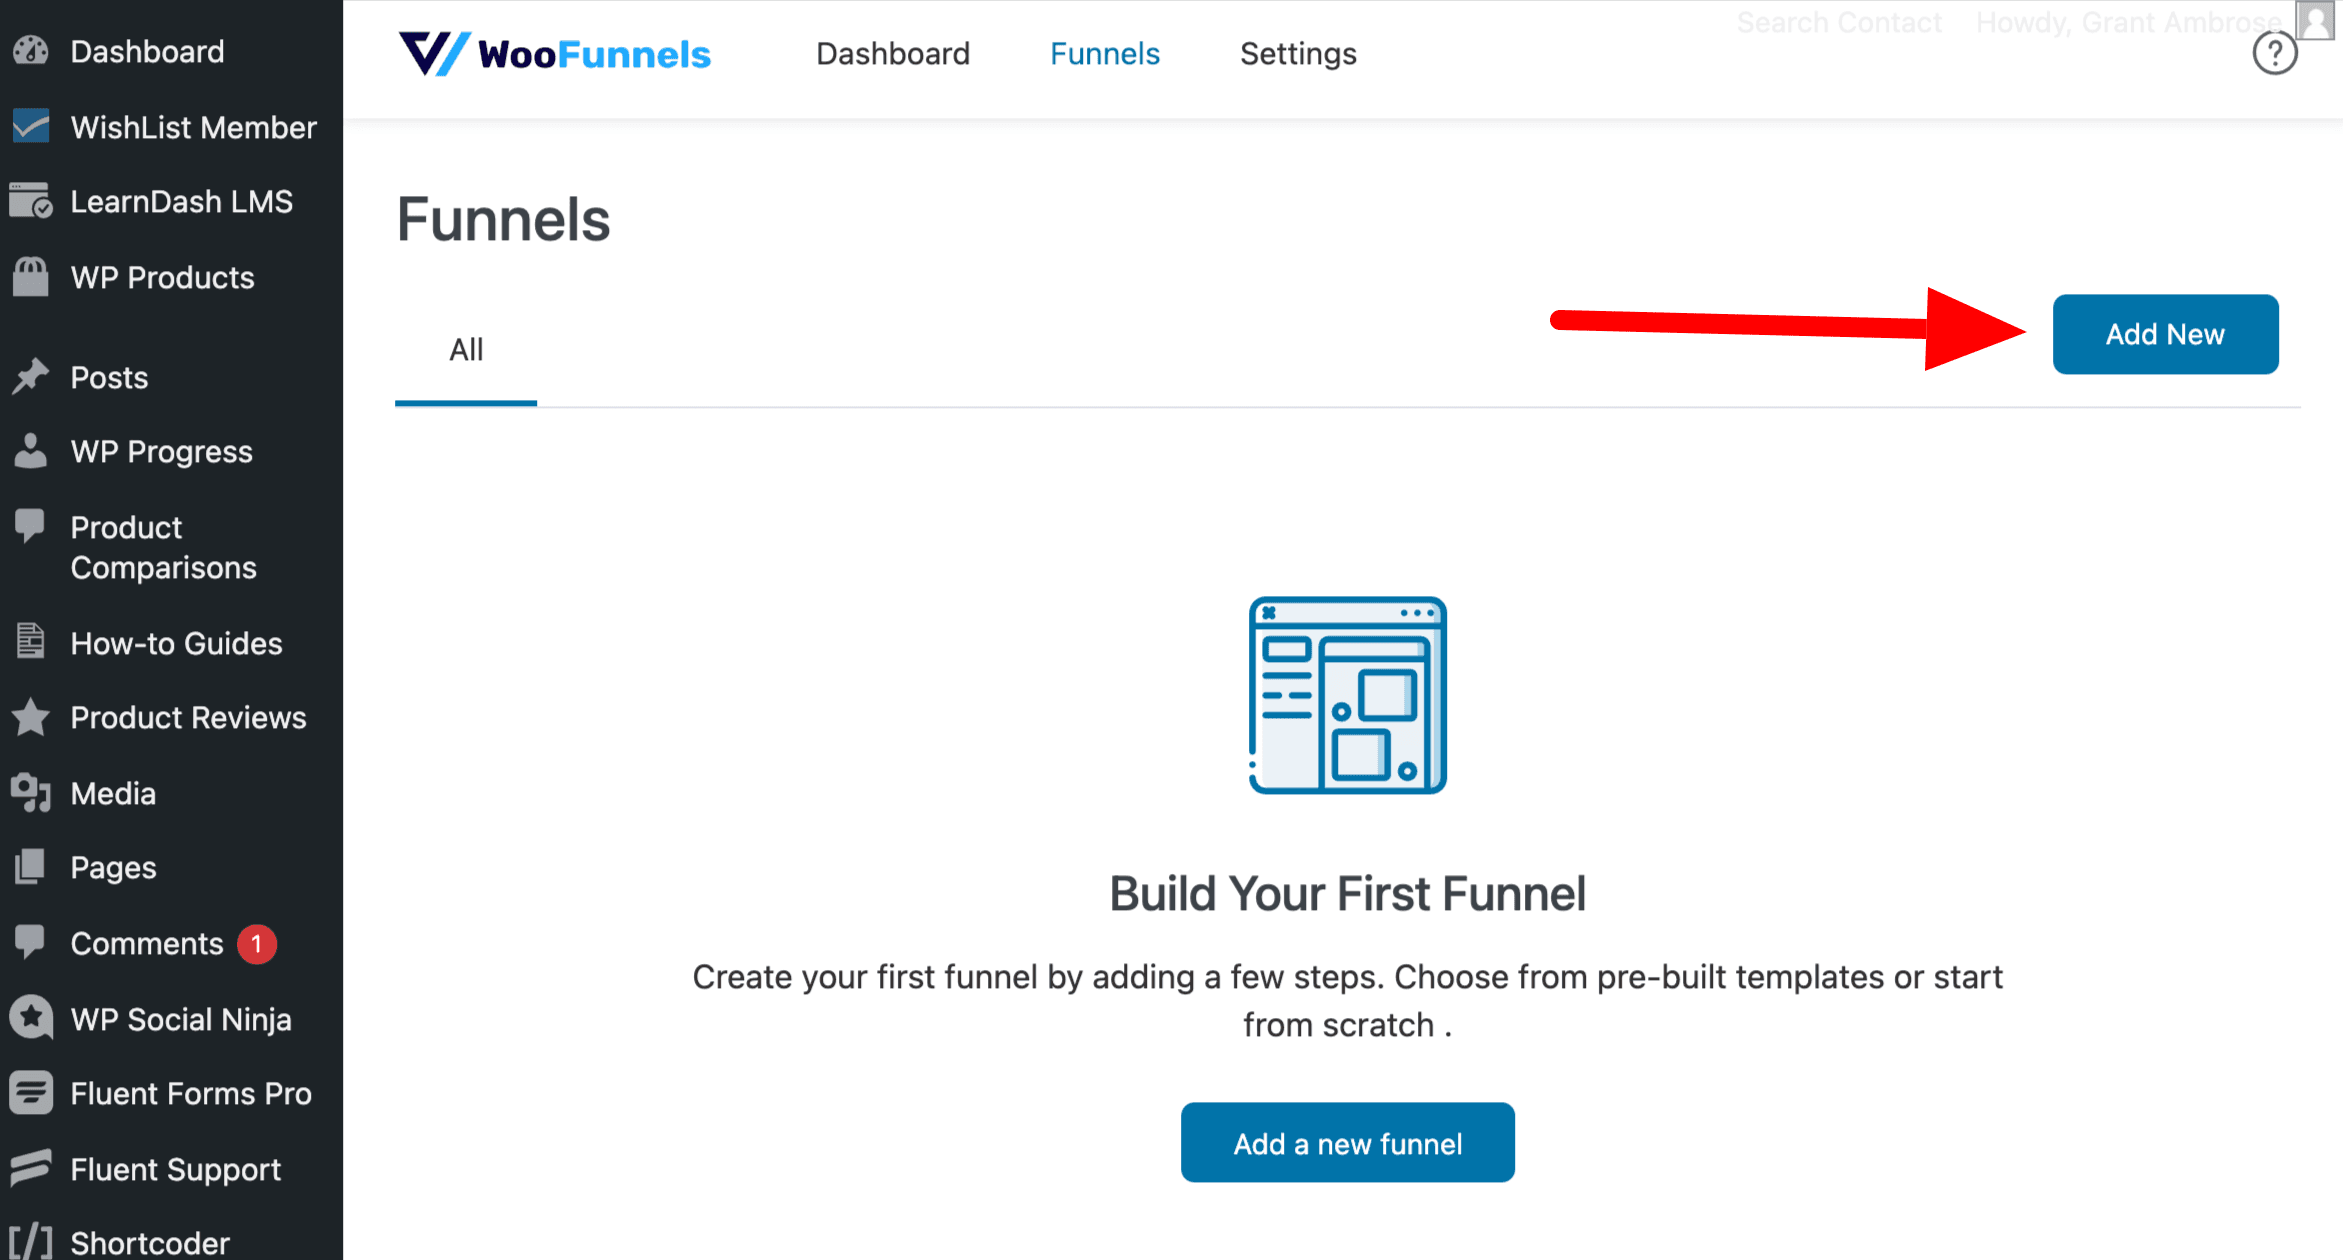
Then click Add New to create our funnel.
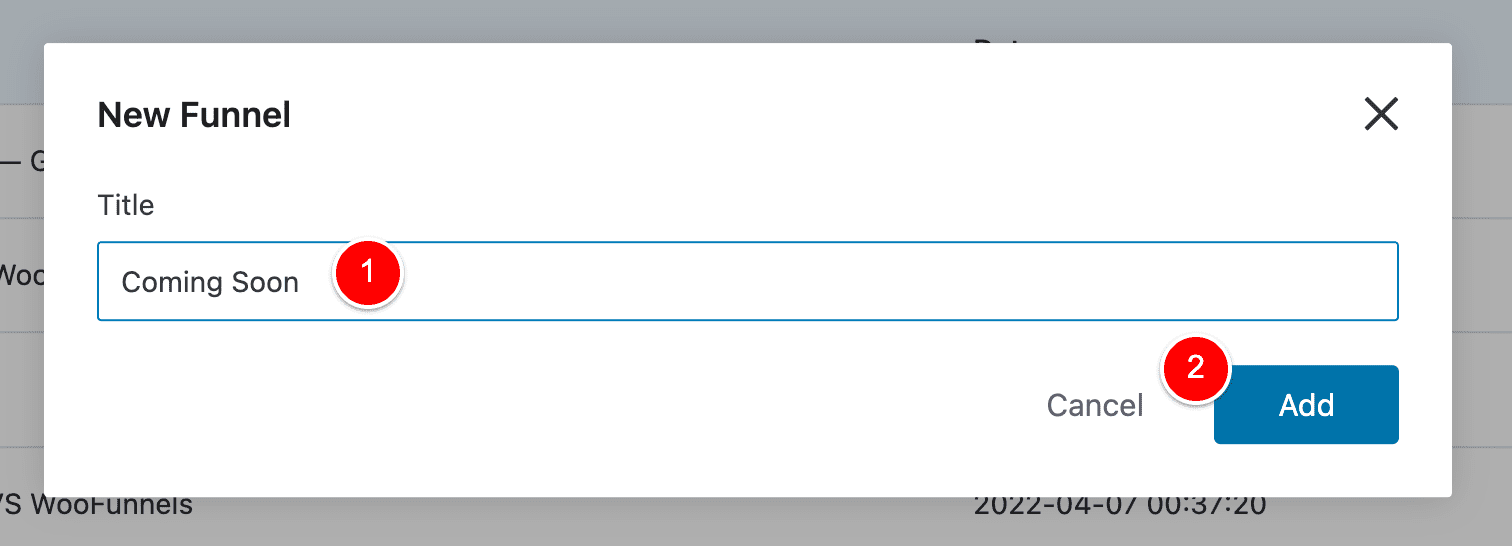
Let’s name this funnel Coming Soon (1) and then click Add (2).
So, for this tutorial, I’ll build my Coming Soon page with Bricks Builder…
BUT you can use ANY Page Builder with FunnelKit.
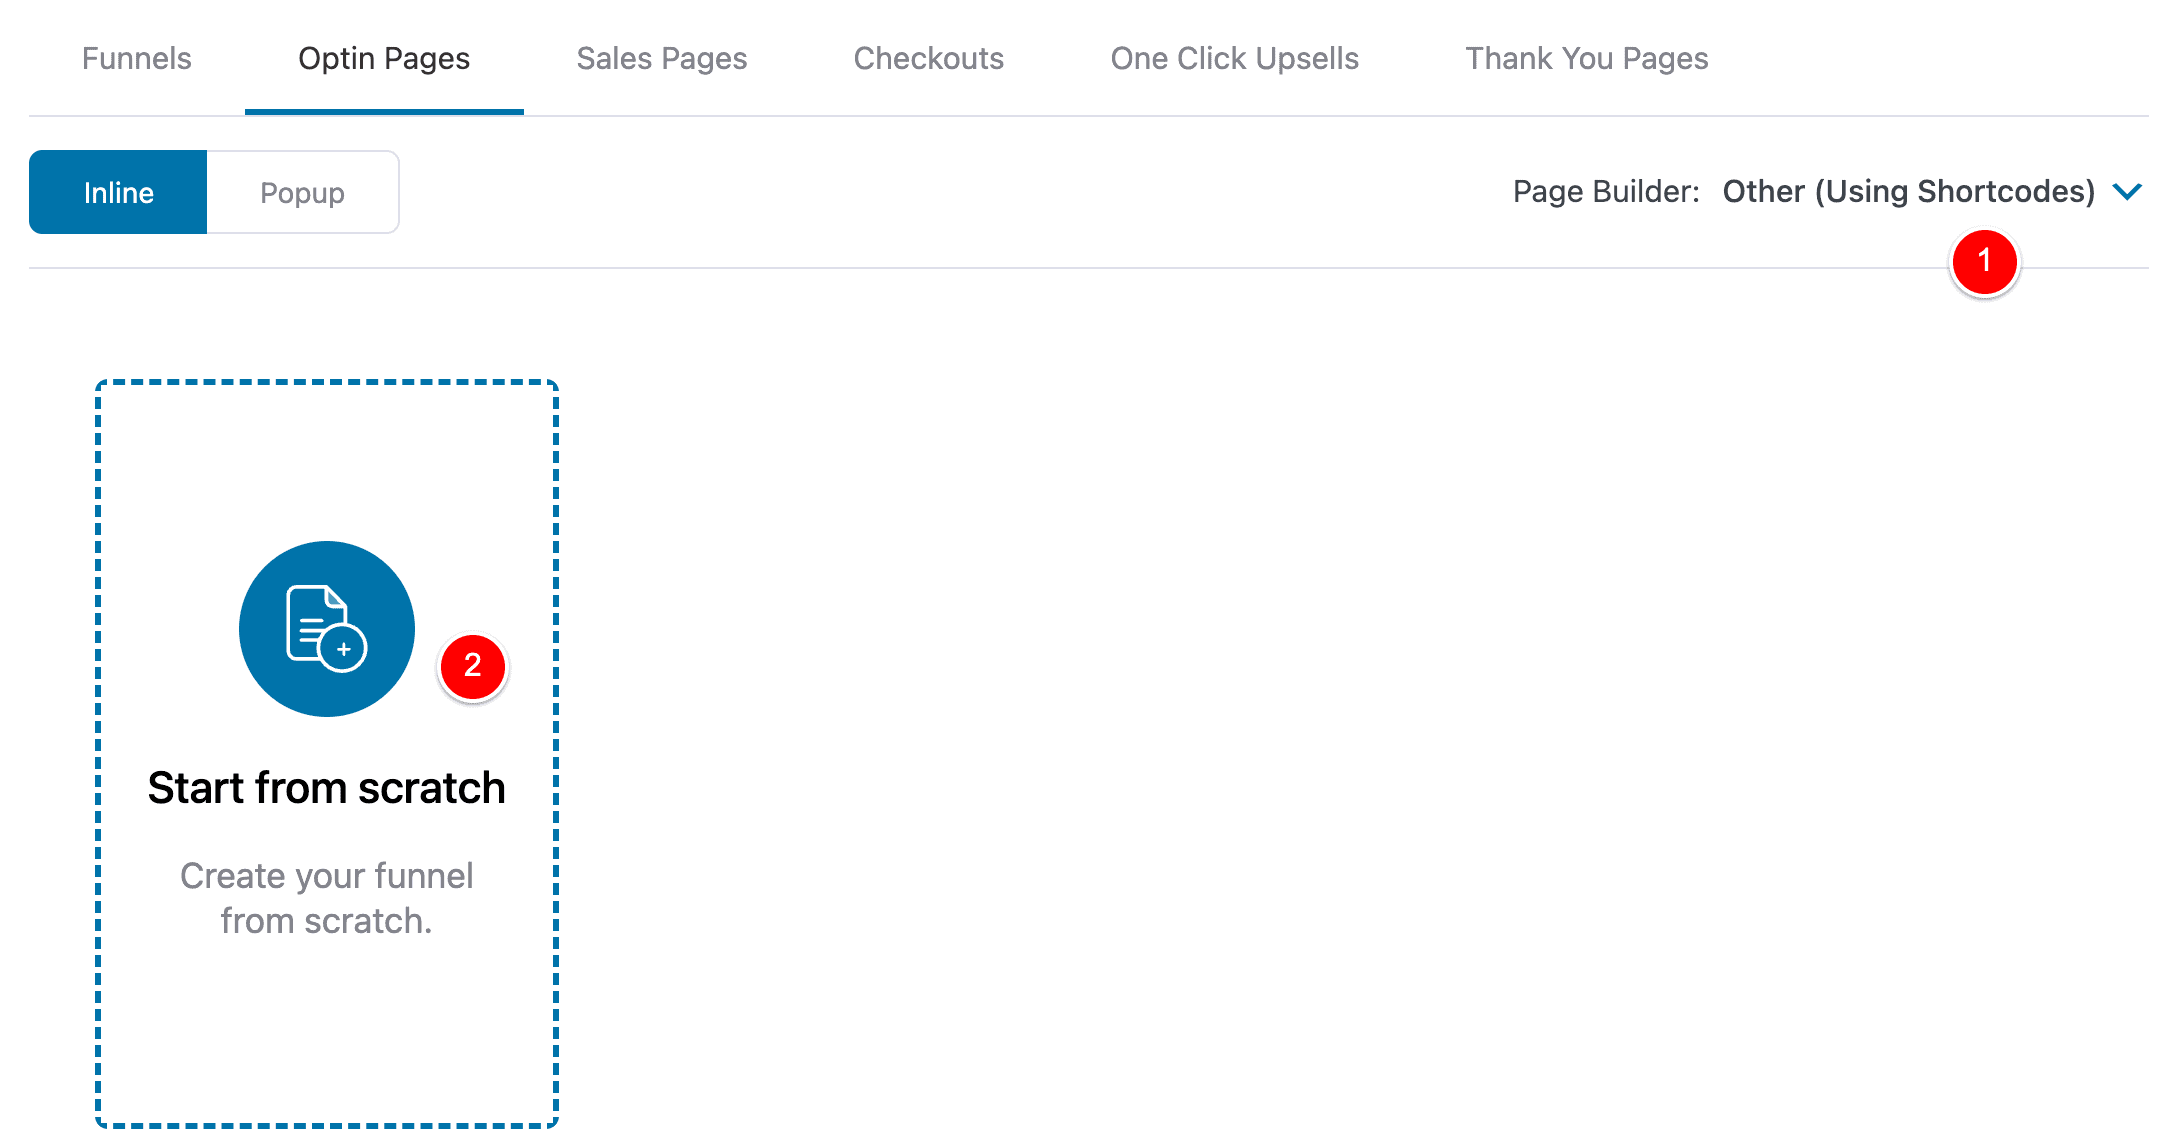
Continuing, click on Optin Pages at (1) (this is important) and then select your Page Builder at (2).
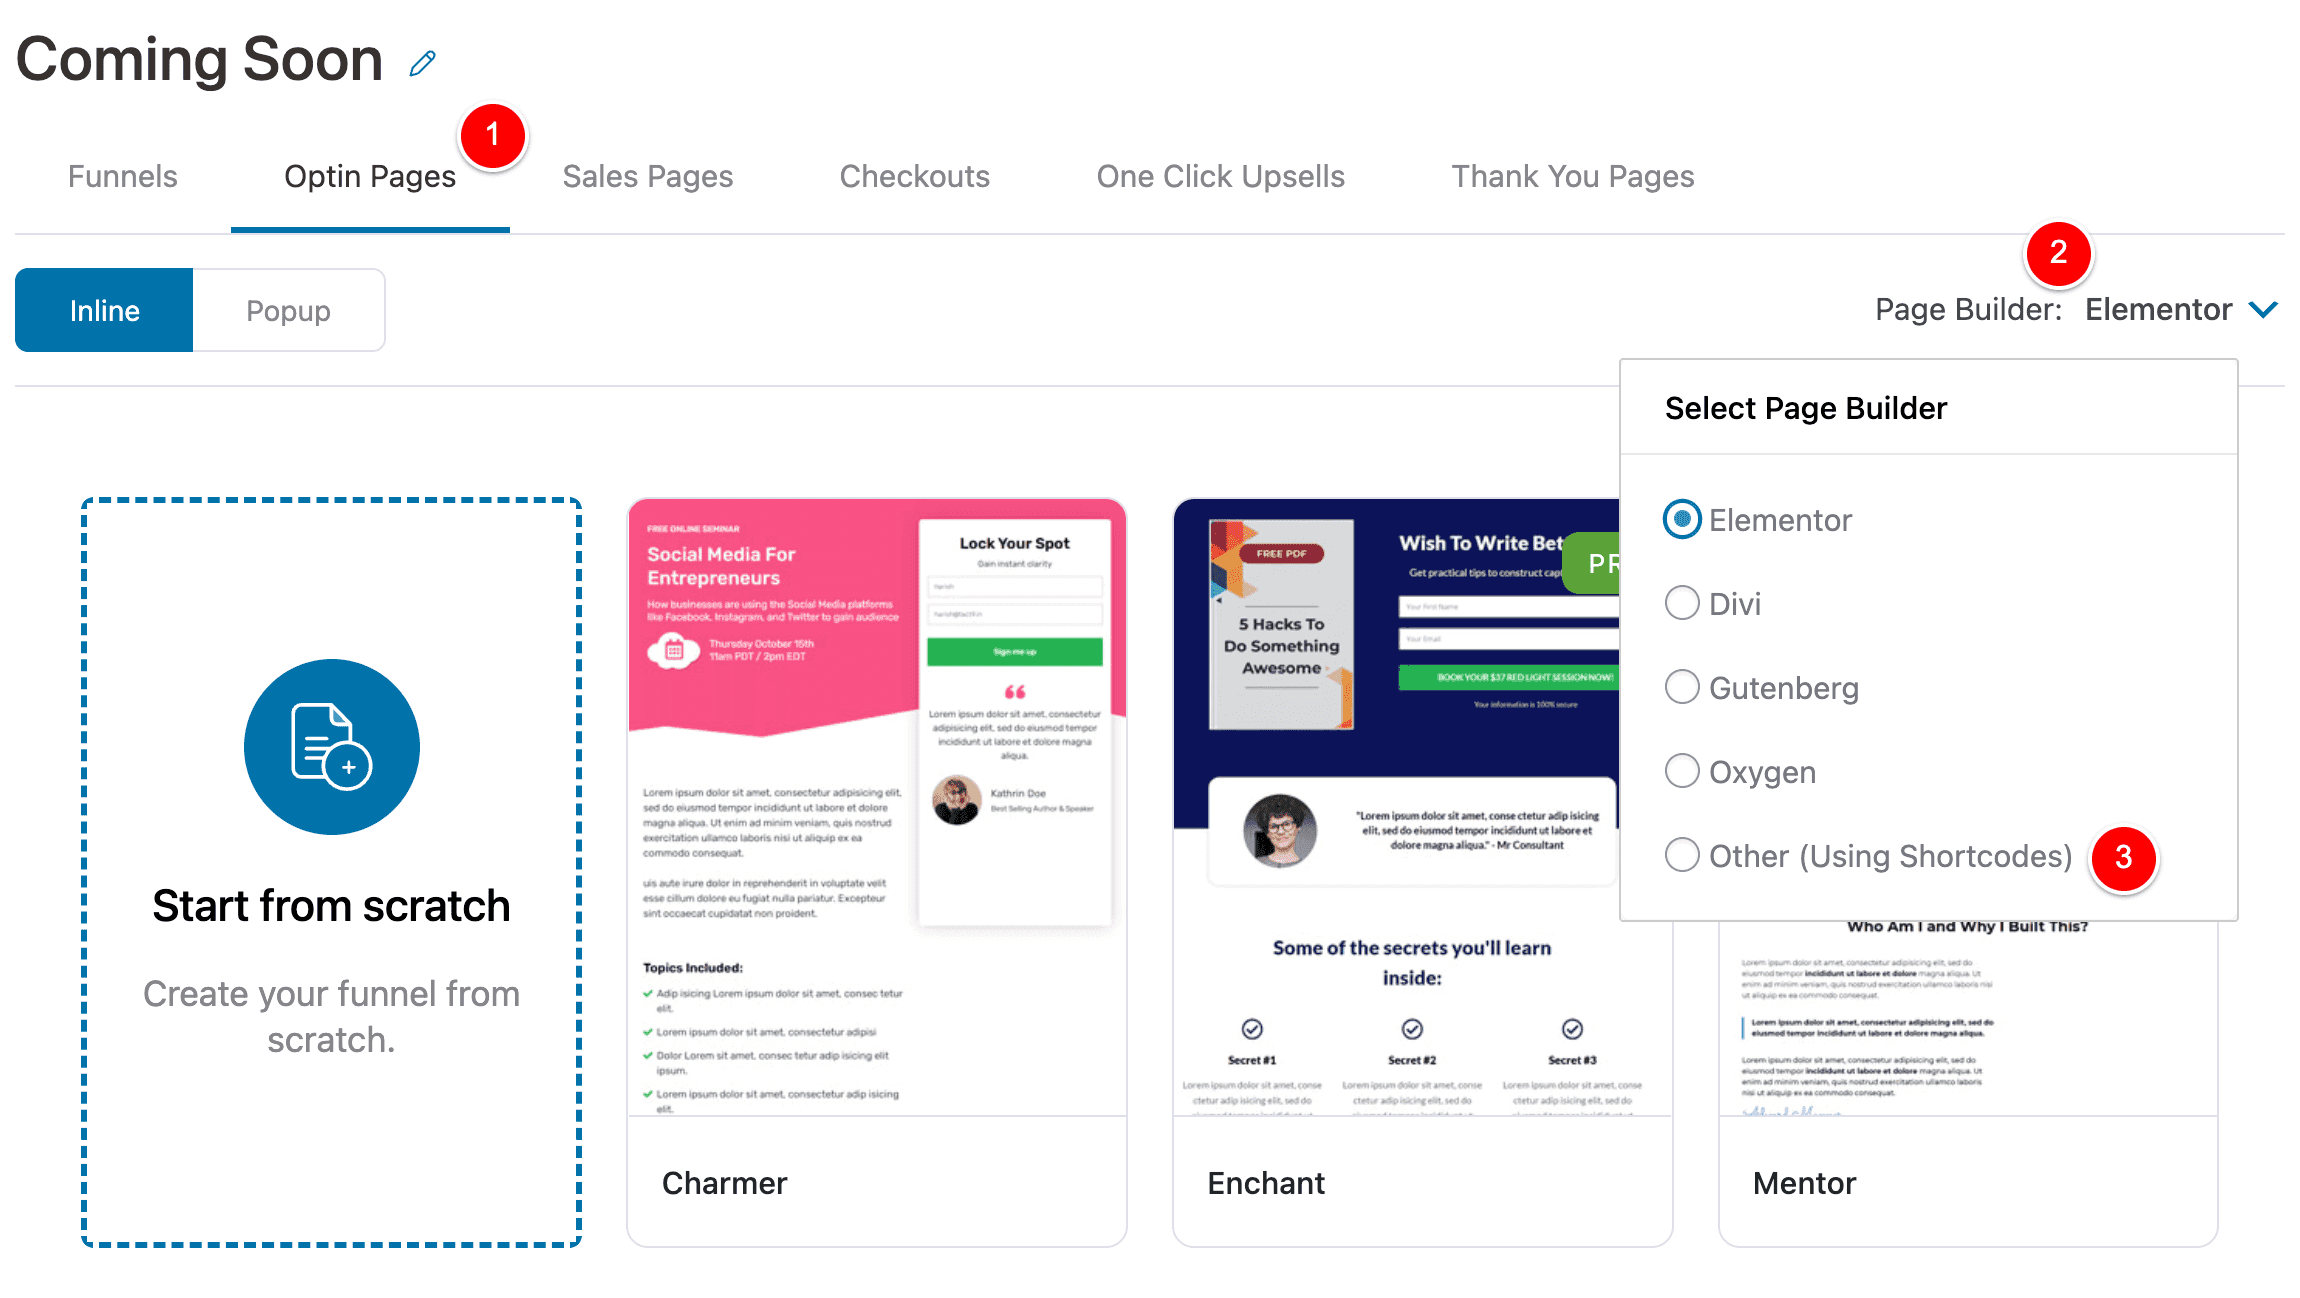
If you’re using Elementor / Divi / Gutenberg / Oxygen – you would select that option here.
As Bricks Builder is not listed, I will select Other (Using Shortcodes) – you’d do this too if you’re using Beaver Builder or any other page builder not listed here.
Once I have selected Other (Using Shortcodes) at (1) I’ll click Start From Scratch (2).
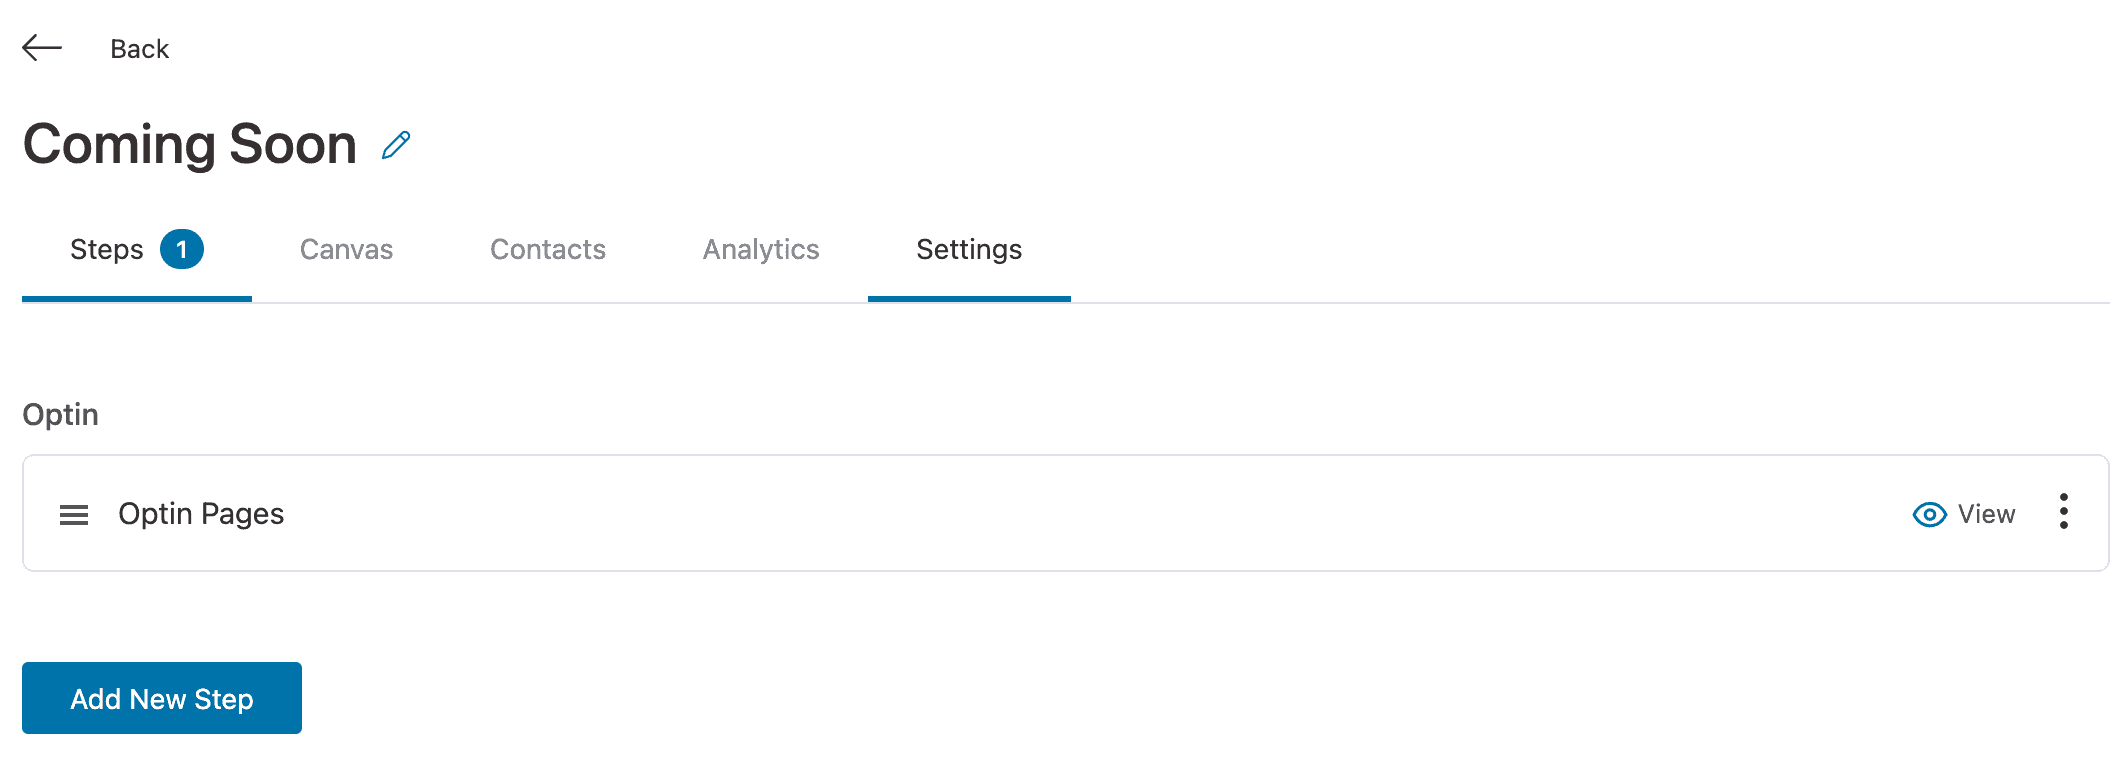
Once you do that, your funnel will have been created with your first step – the Optin step.
Next, go ahead and design this page using your Page Builder however way you want.
For Bricks Builder, I’ll click on the funnel step to Edit…
Then I’ll click Edit Template.
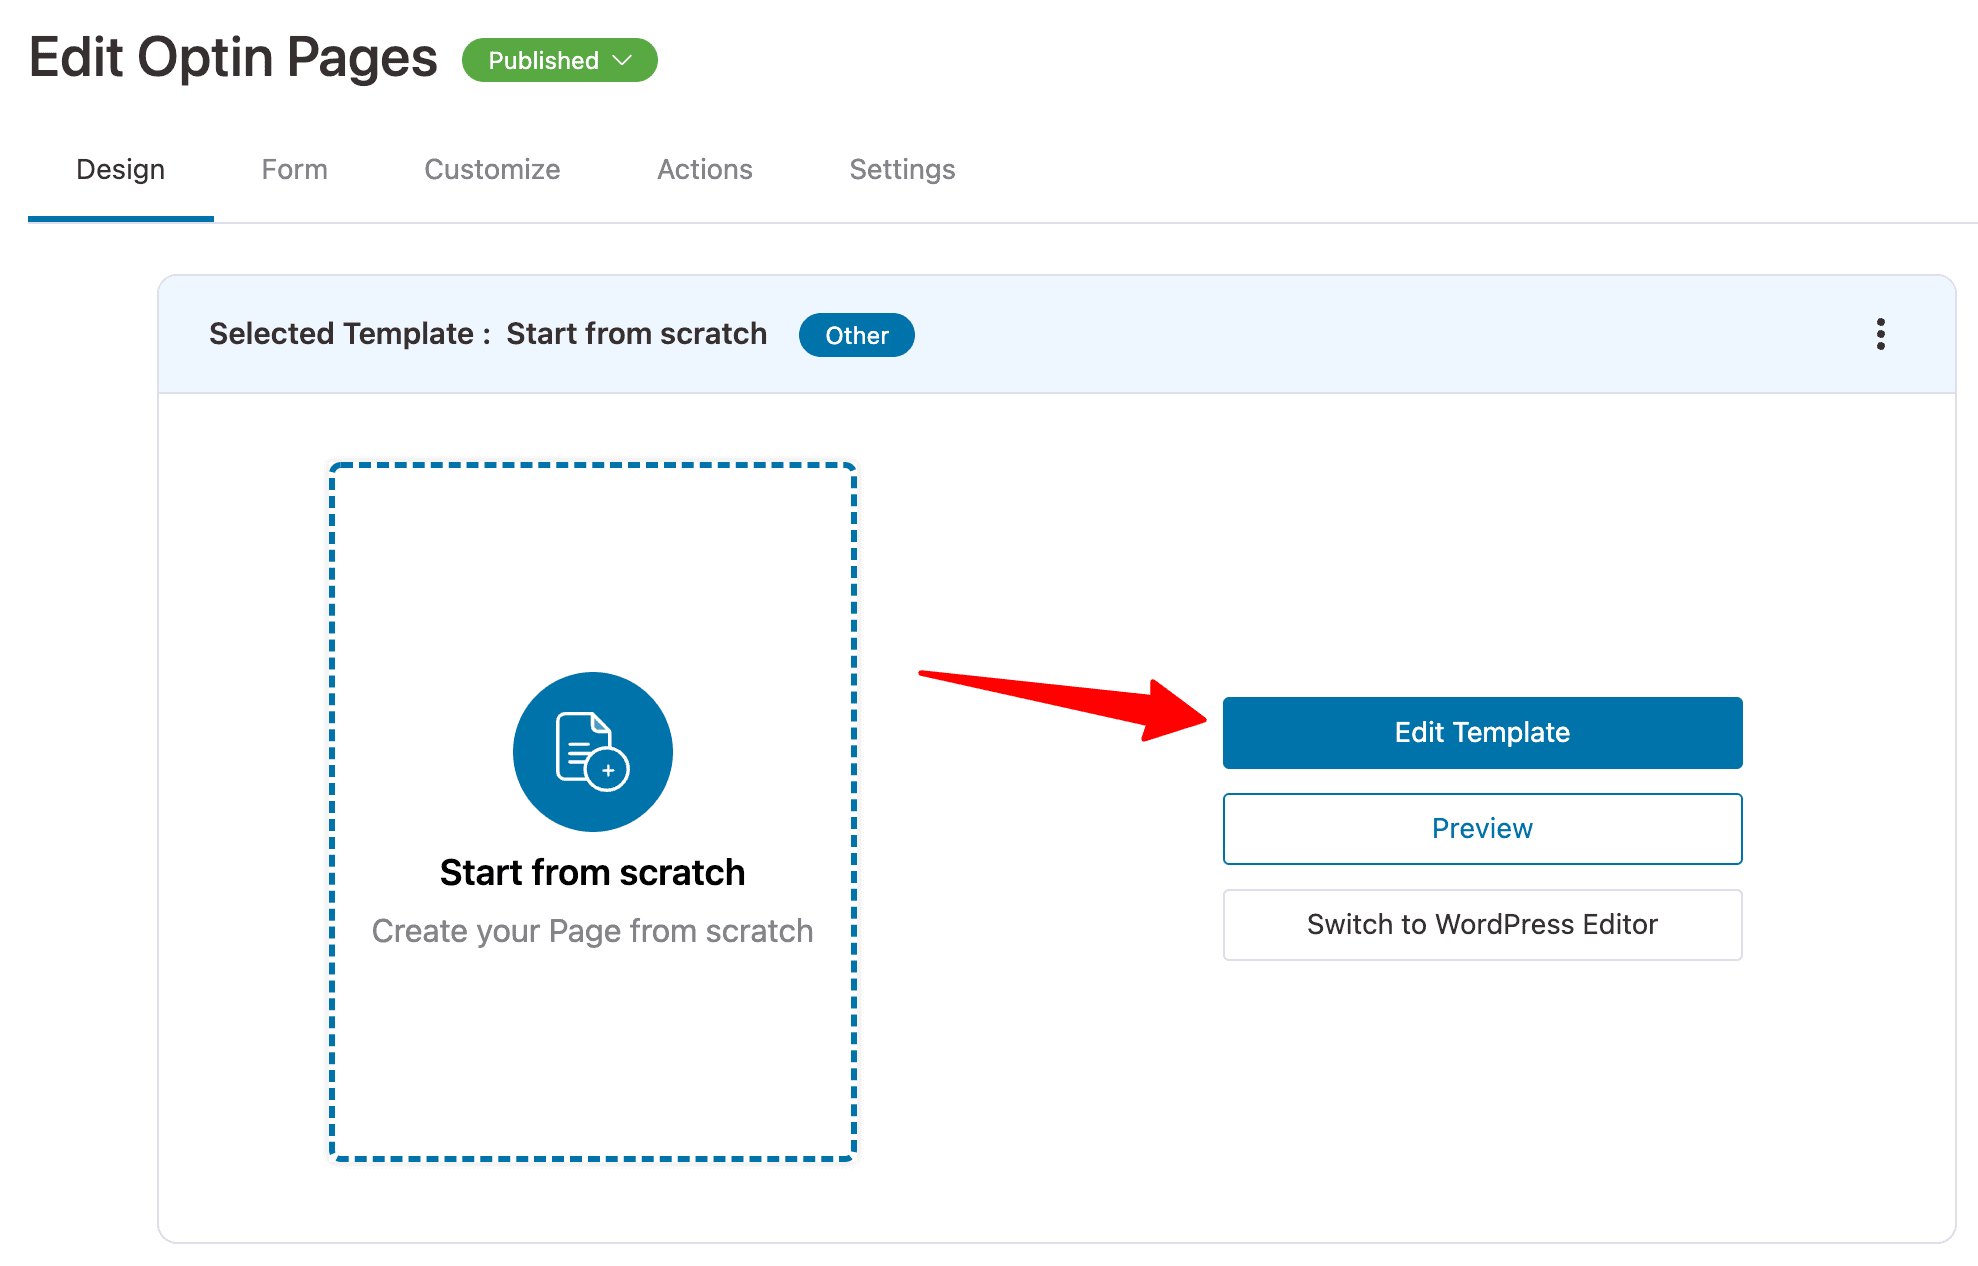
And Edit with Bricks.

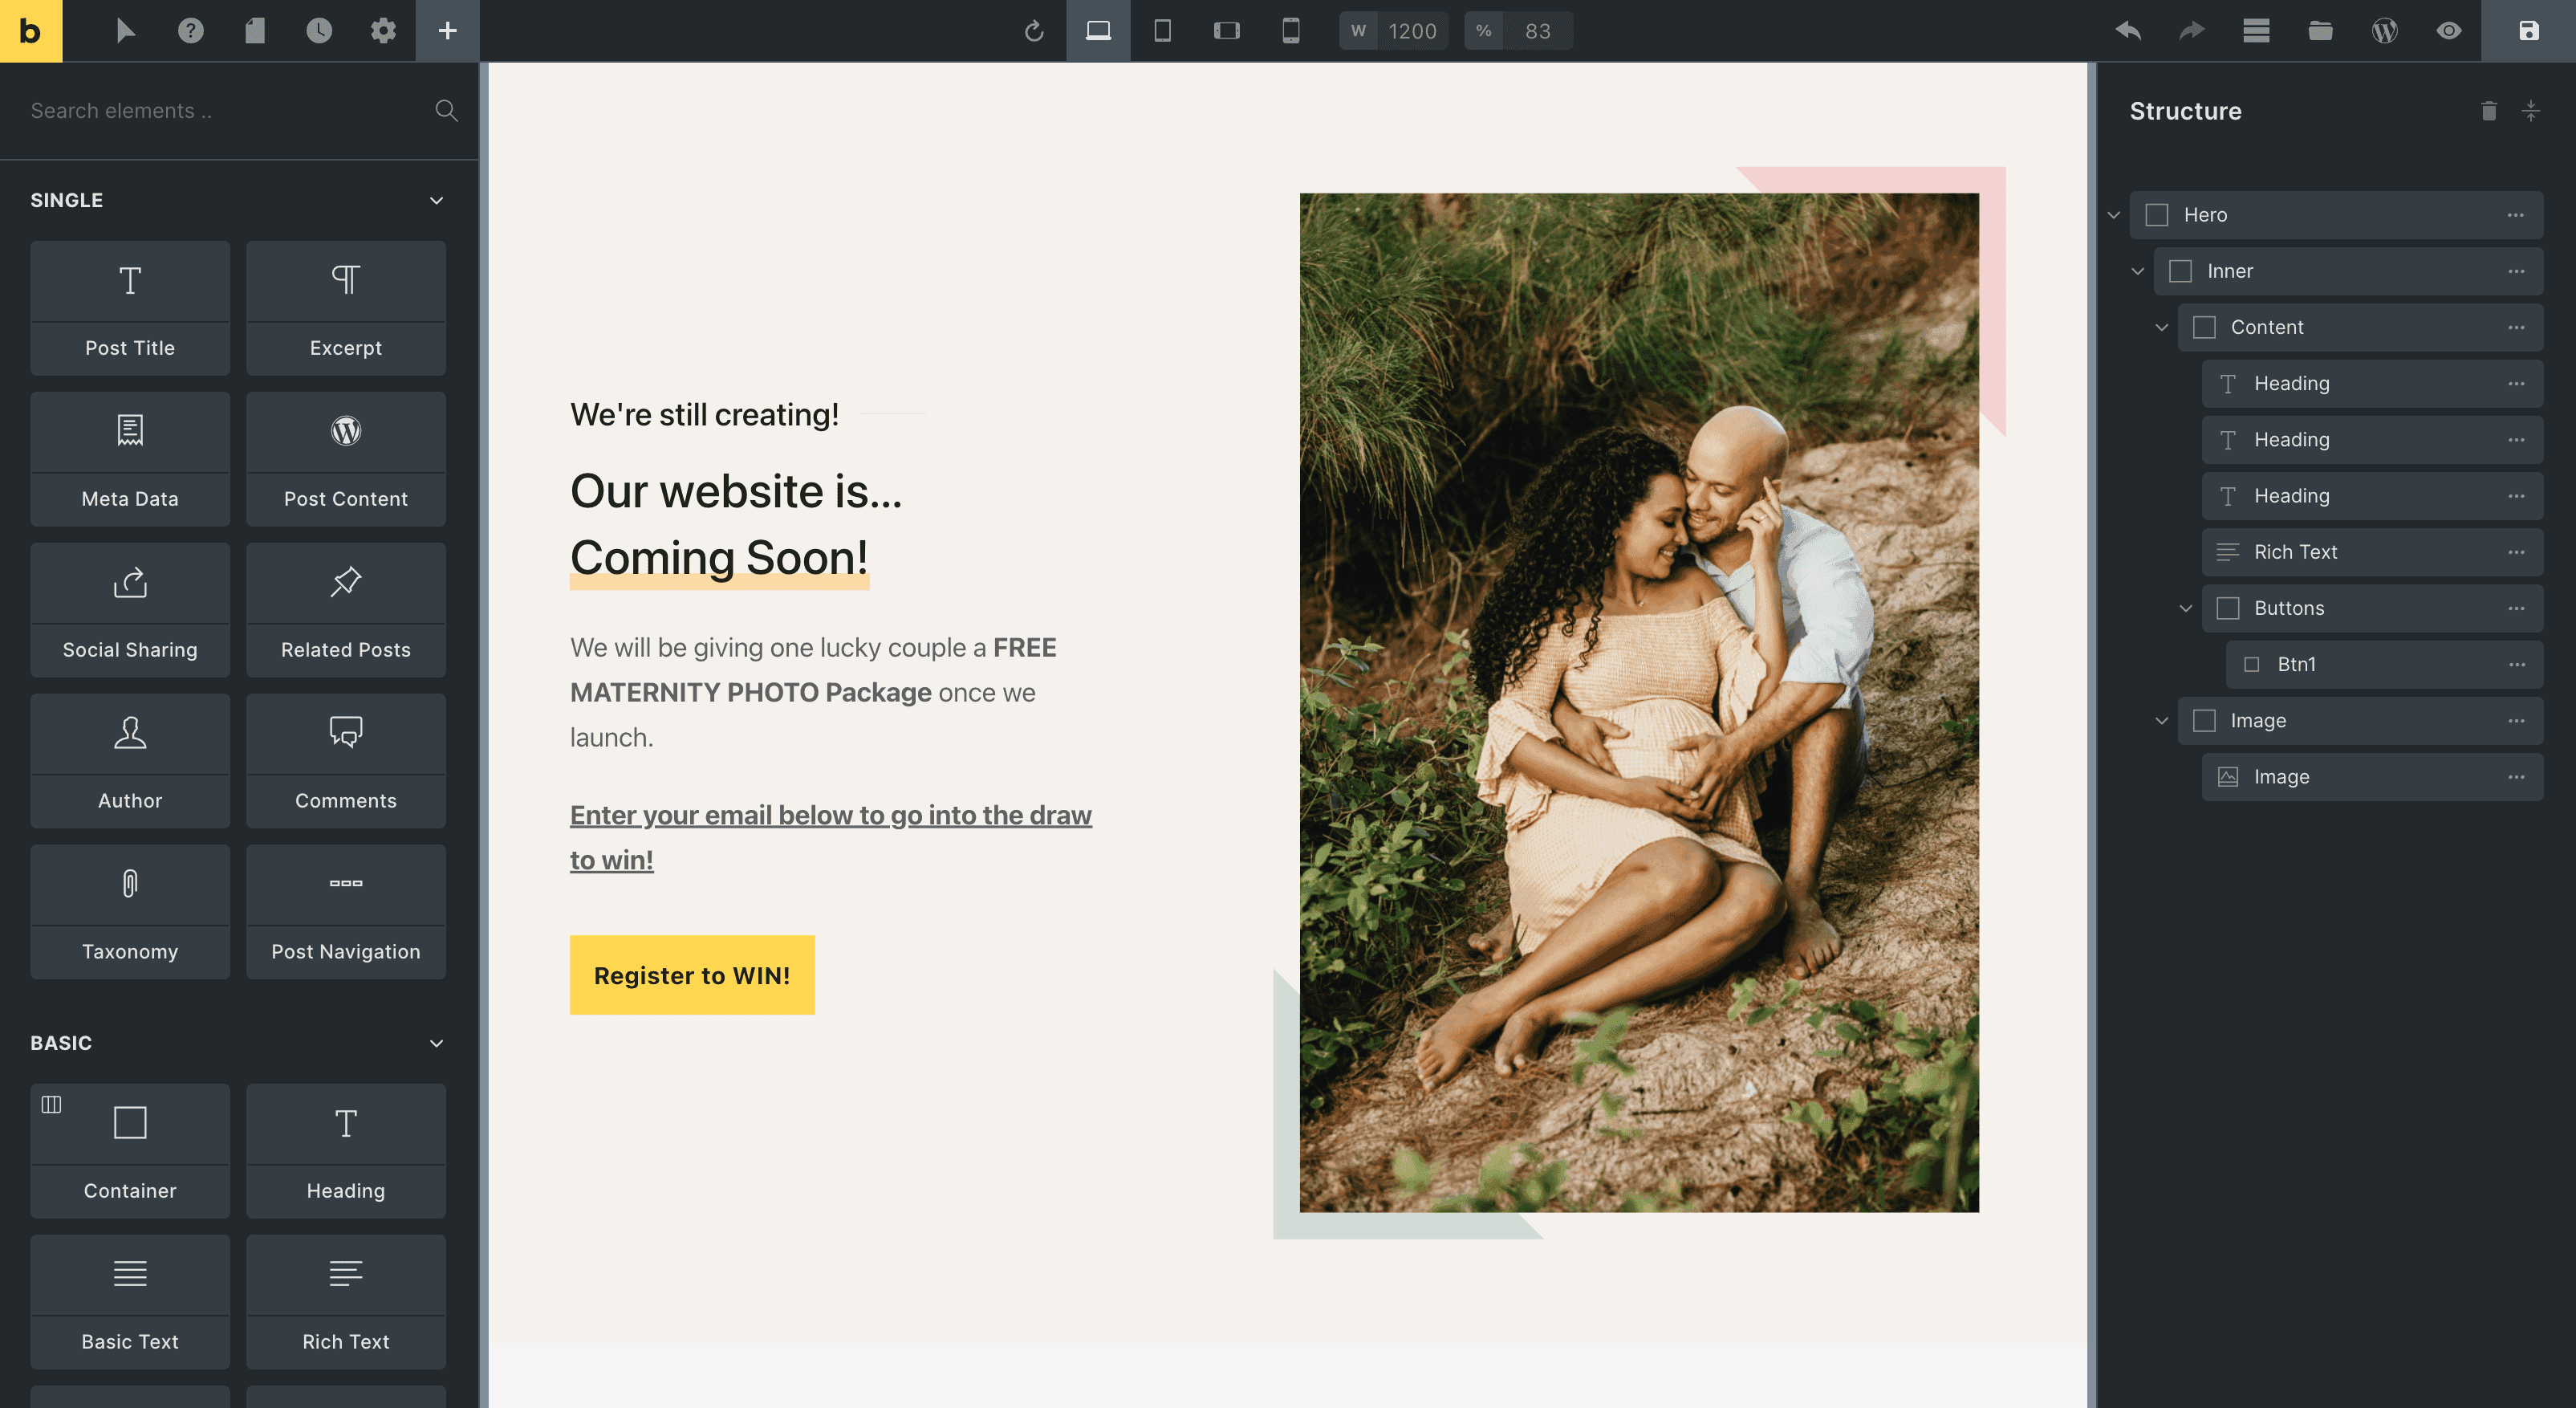
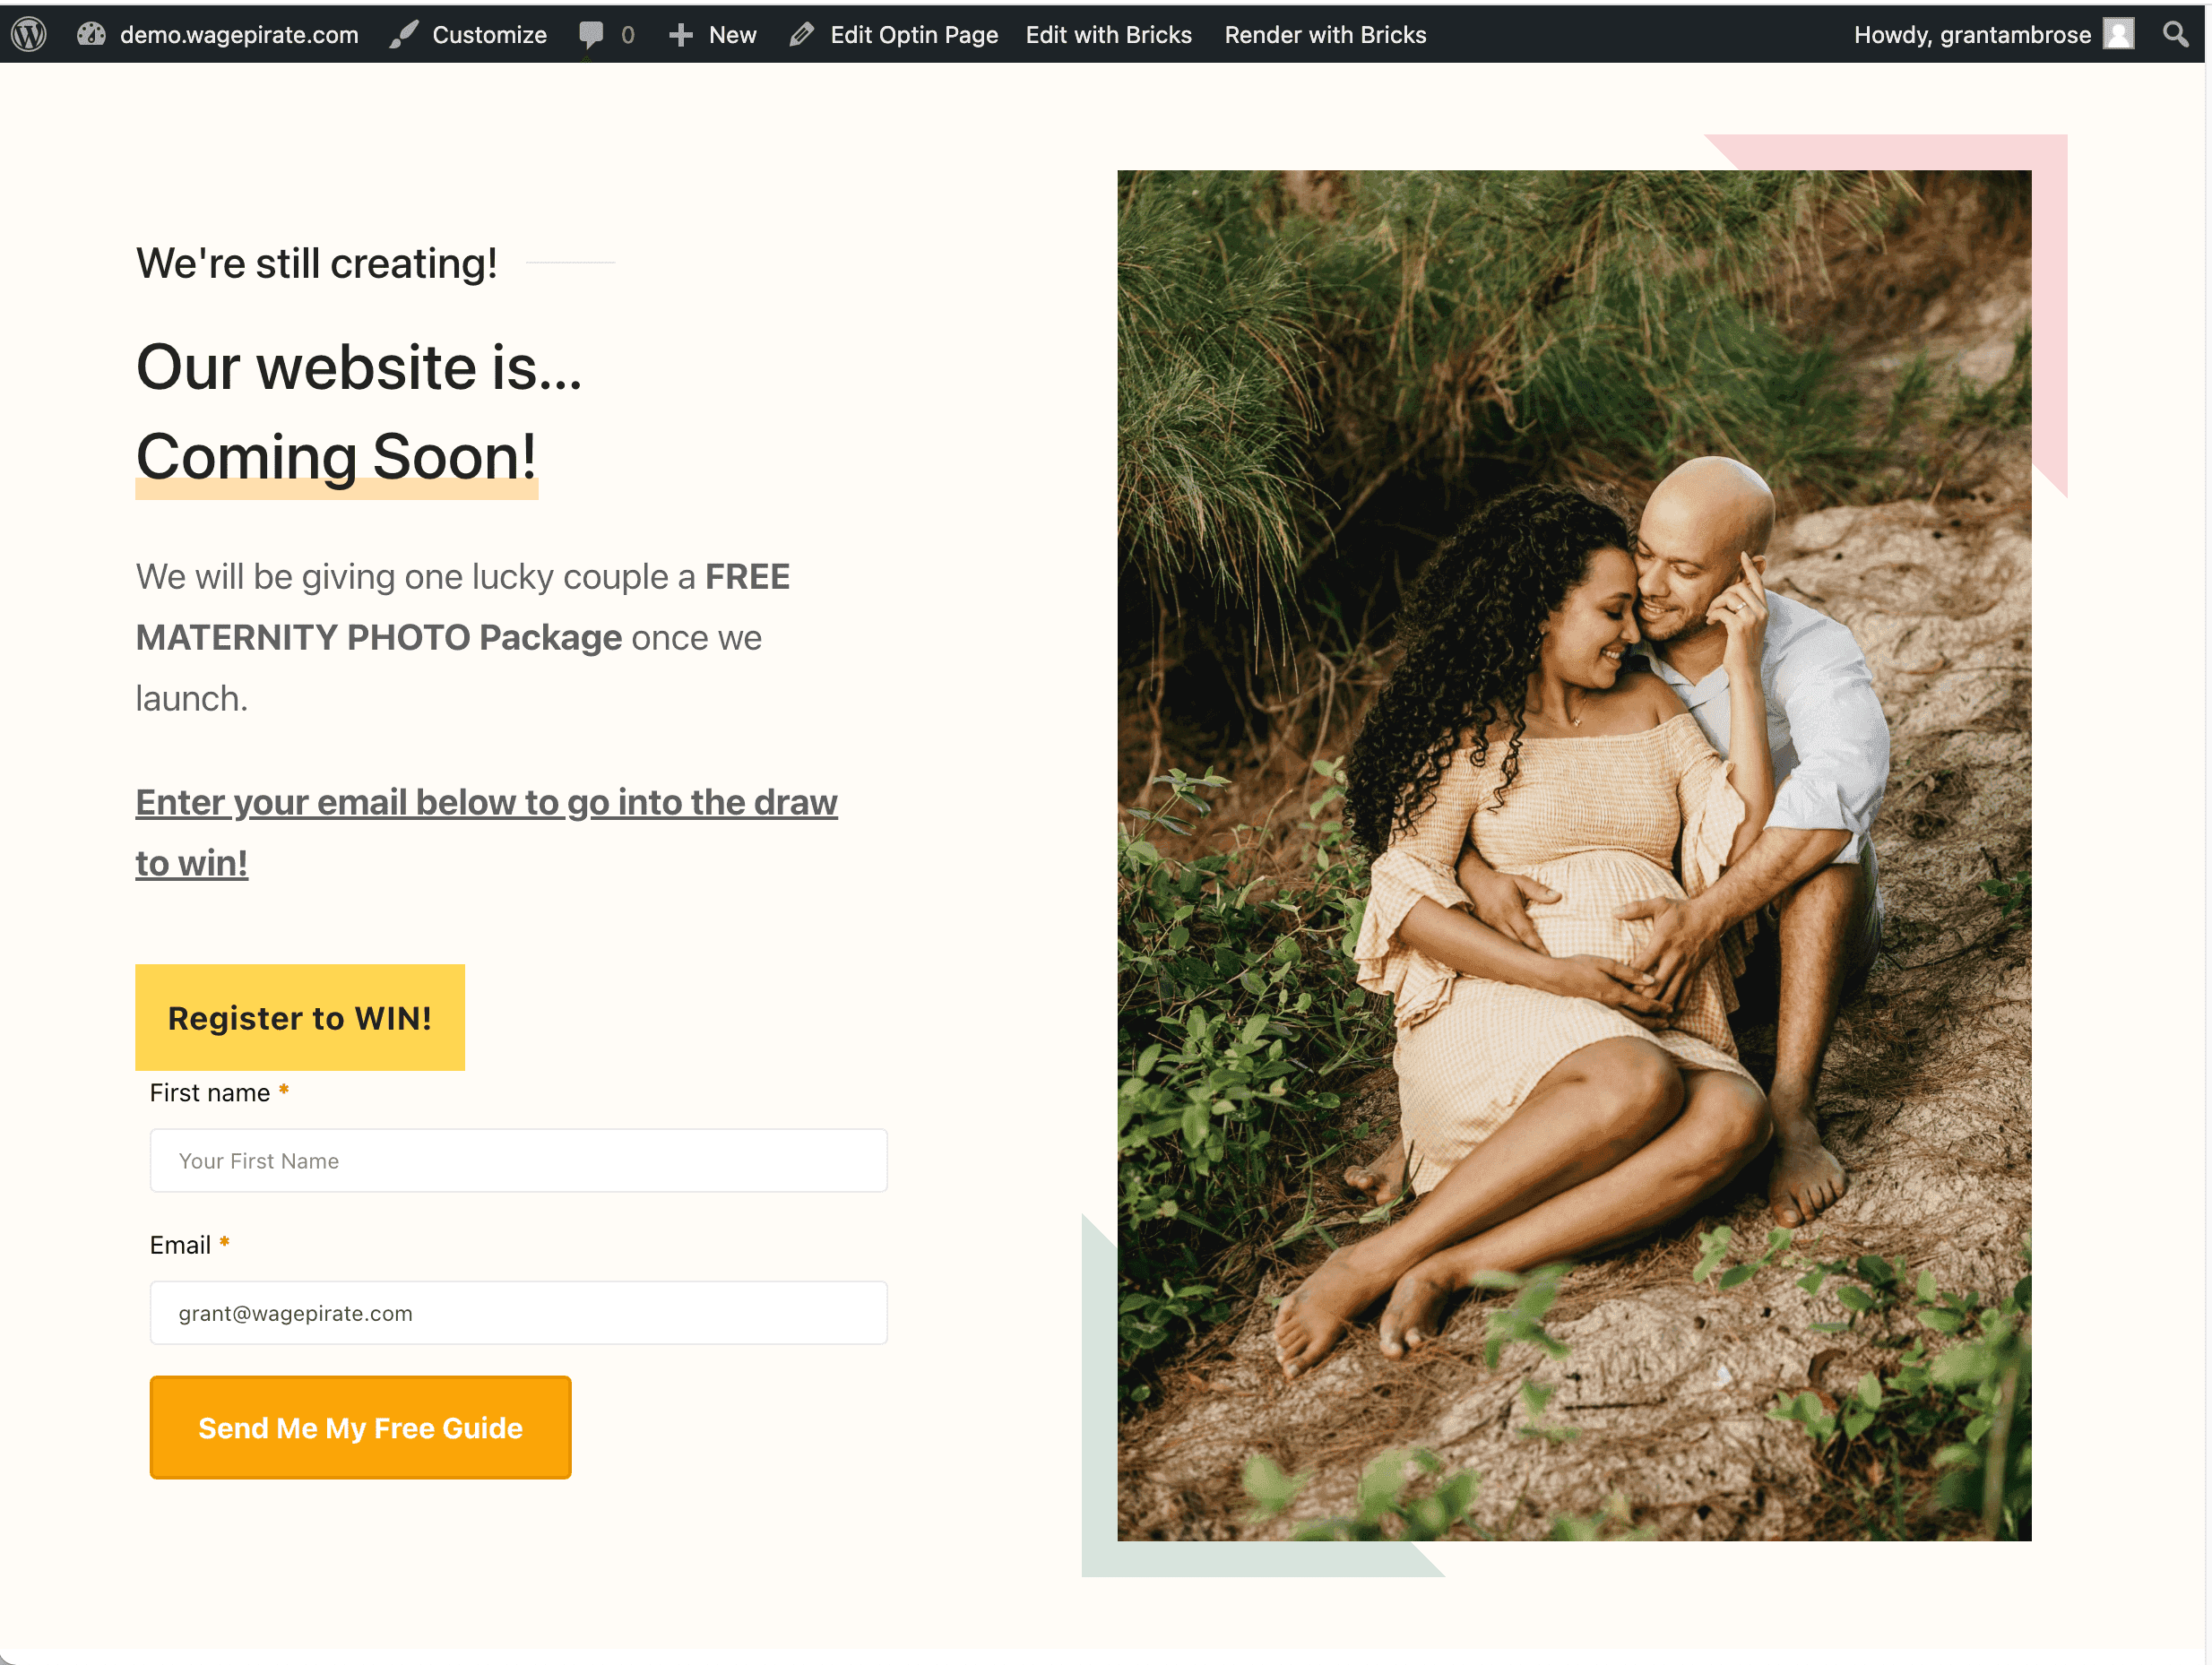
Here is a design I build very quickly using one of the pre-built designs that come with Bricks Builder.
Optional: Add an Incentive for people to join your Mailing List
Let’s add an Email Subscribe form to our Coming Soon page so we can collect email addresses while we build our website and start building our Mailing List.
In the above image, you can see that on my designed Coming Soon page I added an Offer where people can register their email addresses and go into the draw to receive a FREE Maternity photoshoot.
If you are getting quite a bit of traffic to your coming soon page and something like this makes sense, then sure – I’d recommend doing this and giving people an incentive to hand over their email address to you.
If your coming soon page is only going to be up for a few days and no-one will find it, then I wouldn’t bother with giving something away for free – it’s up to you!
For this tutorial, we’re going the whole nine yards and I’m showing you how to set everything up.
You can take what you need from this guide and use it as you need for your business.
Add an Email Capture form to your Coming Soon Page
FunnelKit has a built-in system that allows us to easily add an opt-in form to our Coming Soon page (no extra Form plugins required!)
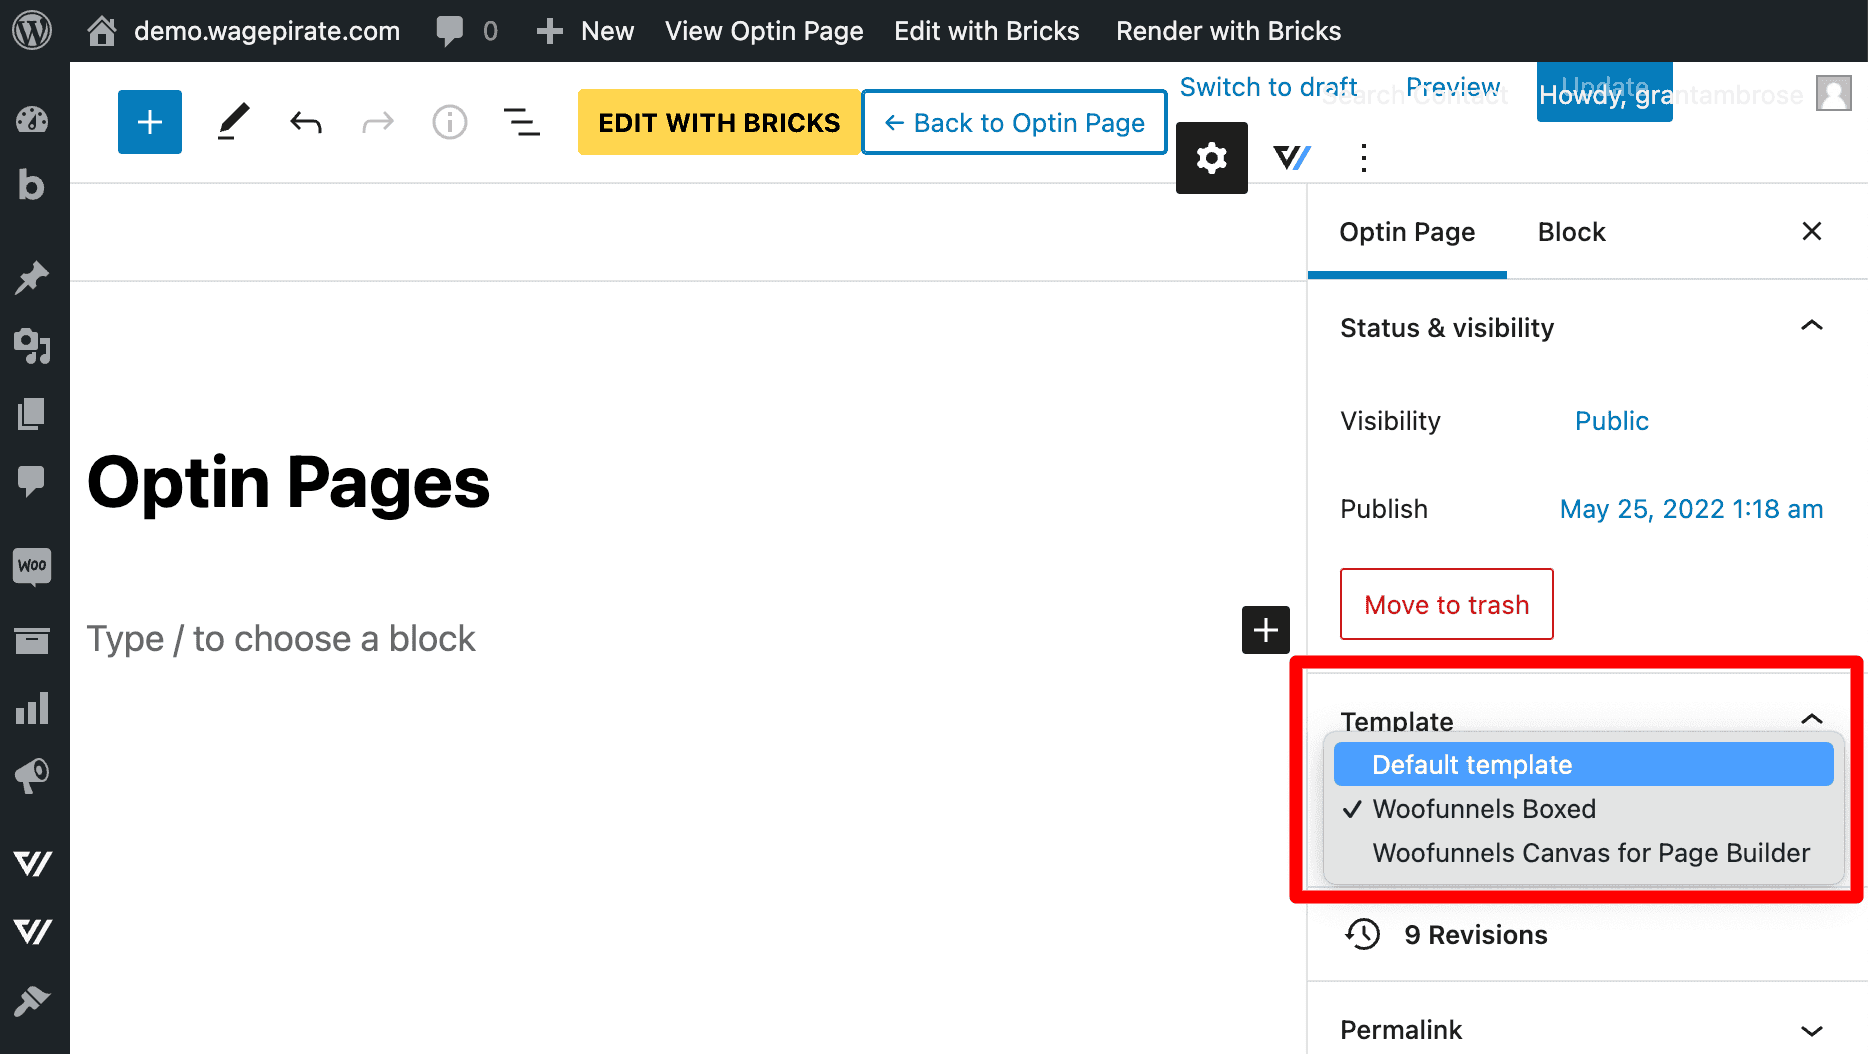
If we go back into FunnelKit and edit our Optin Form step, in the Design tab…

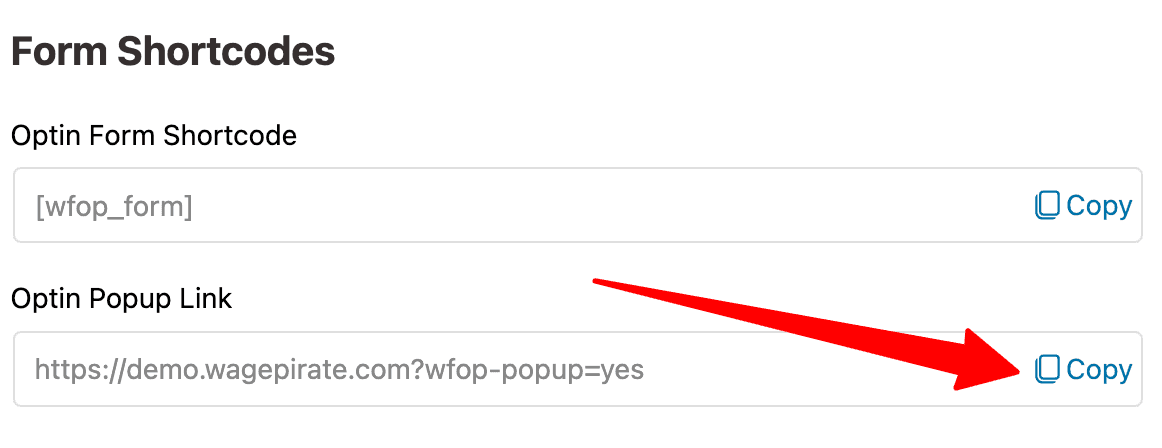
If we scroll down a bit we can see that we have two options to output a FunnelKit opt-in form:
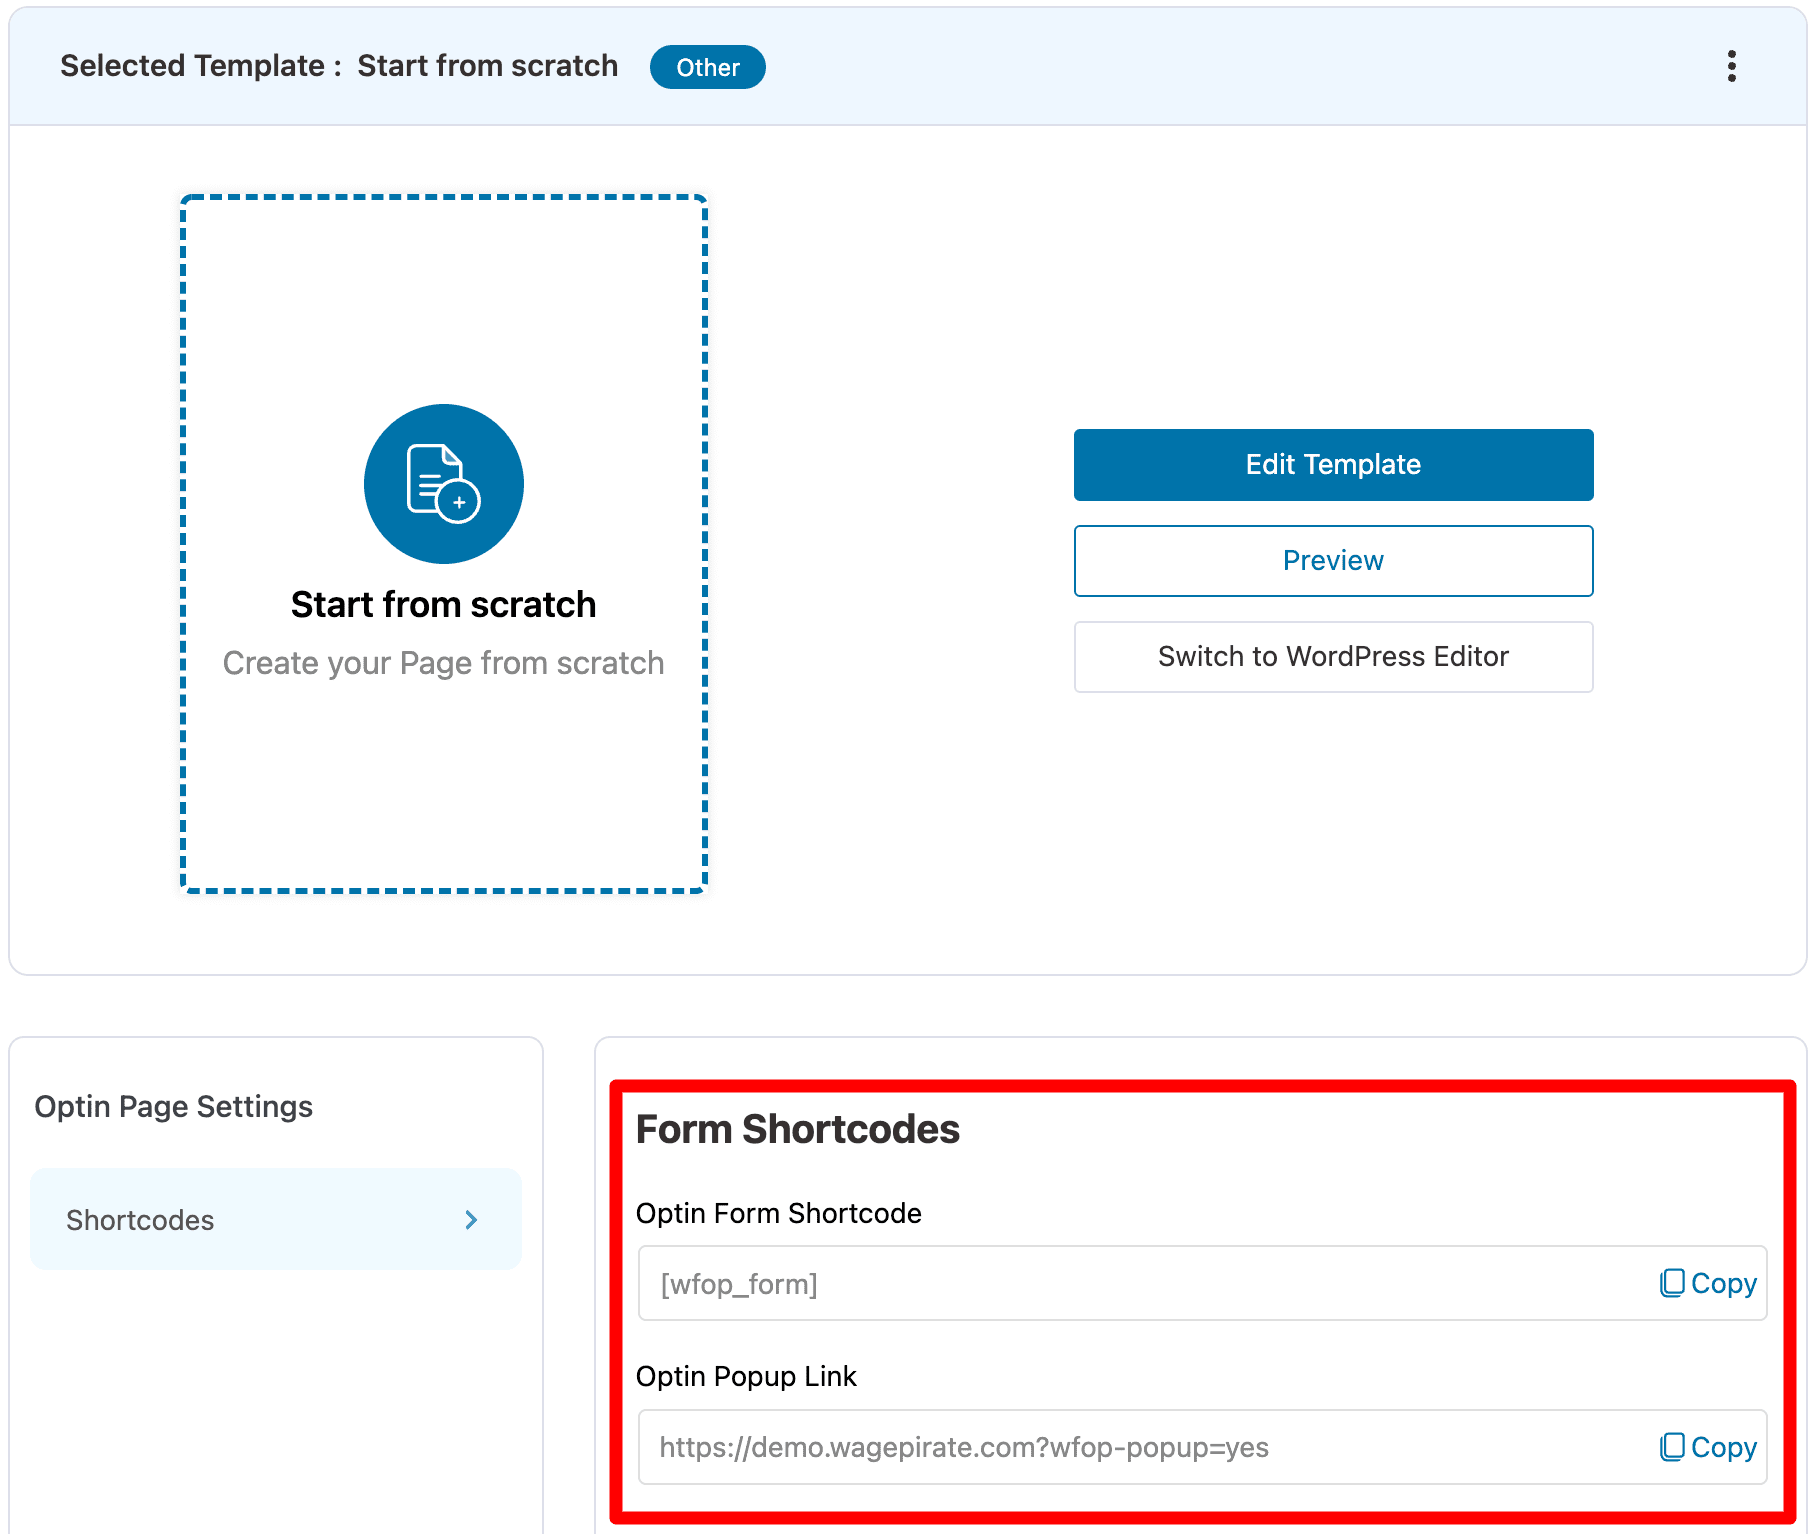
The first option is to use the Shortcode and the second option is to use the URL on a button so that when you click the button, the Opt-in form shows in a lightbox / popup / modal.
Let me show you how these both work, starting with the shortcode implementation.
FunnelKit Optin Form Shortcode
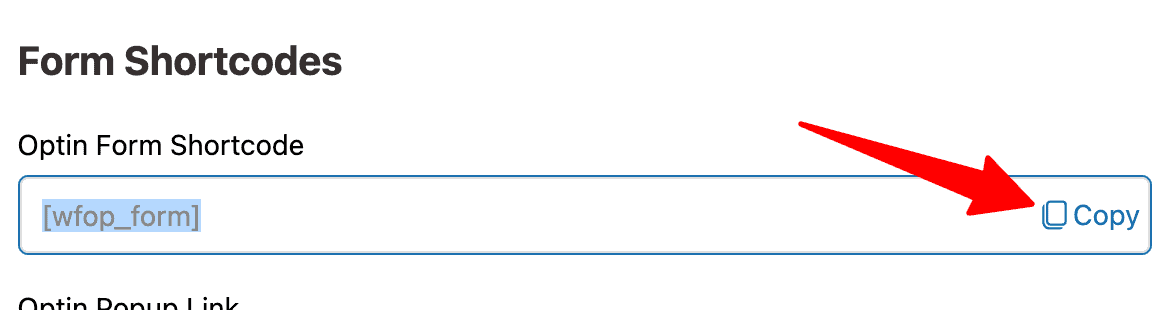
Click on Copy, as per below:
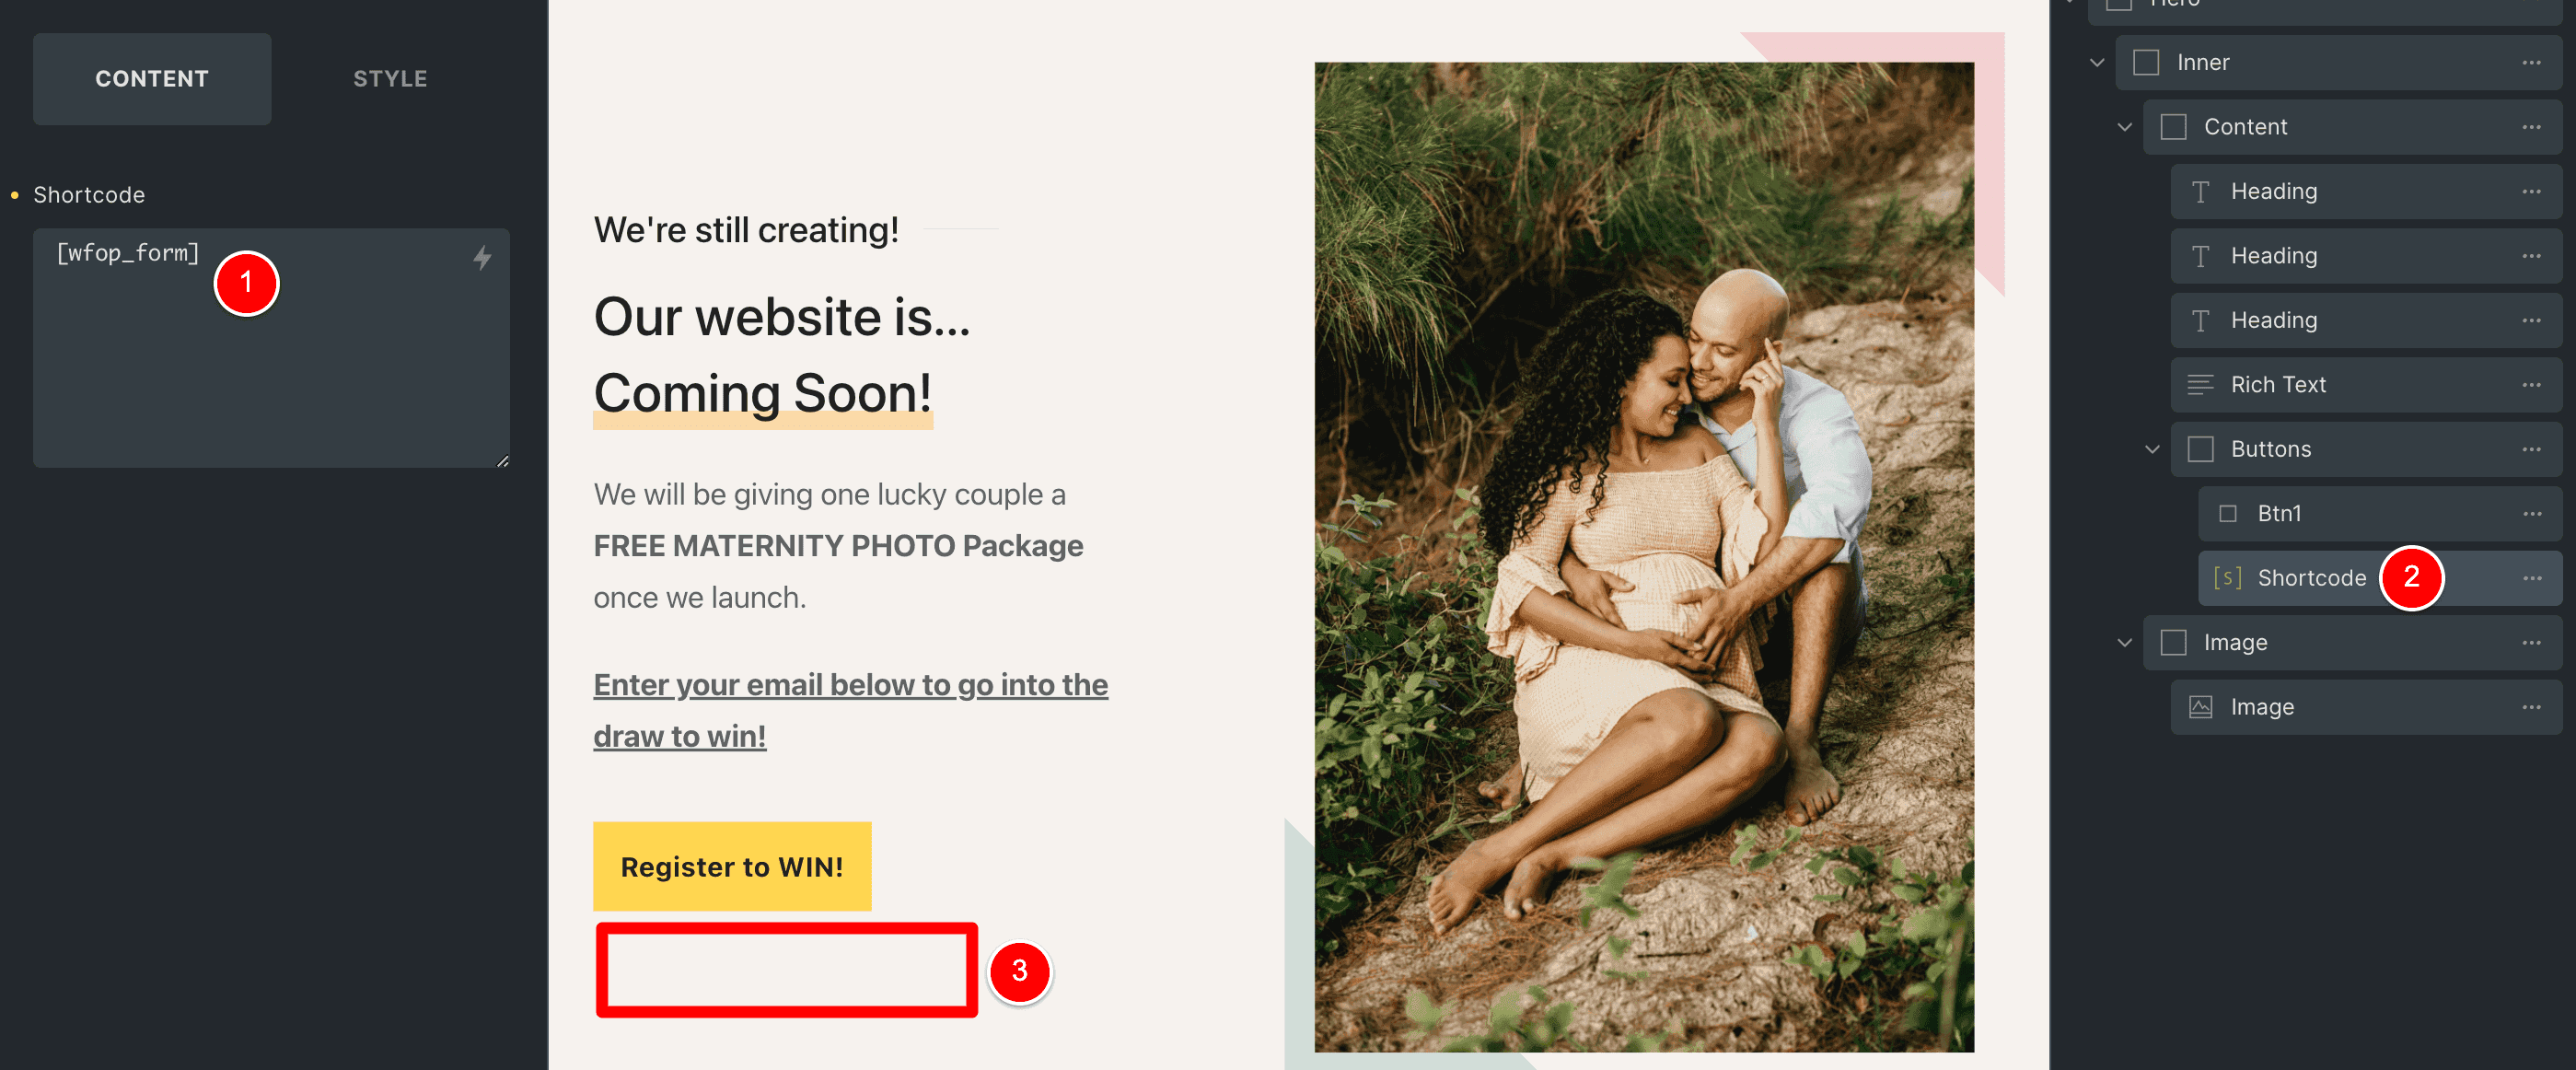
Then head back into your Page Builder and paste this shortcode wherever you want the form to be output.
In my case, inside Bricks Builder I added a Shortcode element (1) under the button element, as shown in (2) and (3).
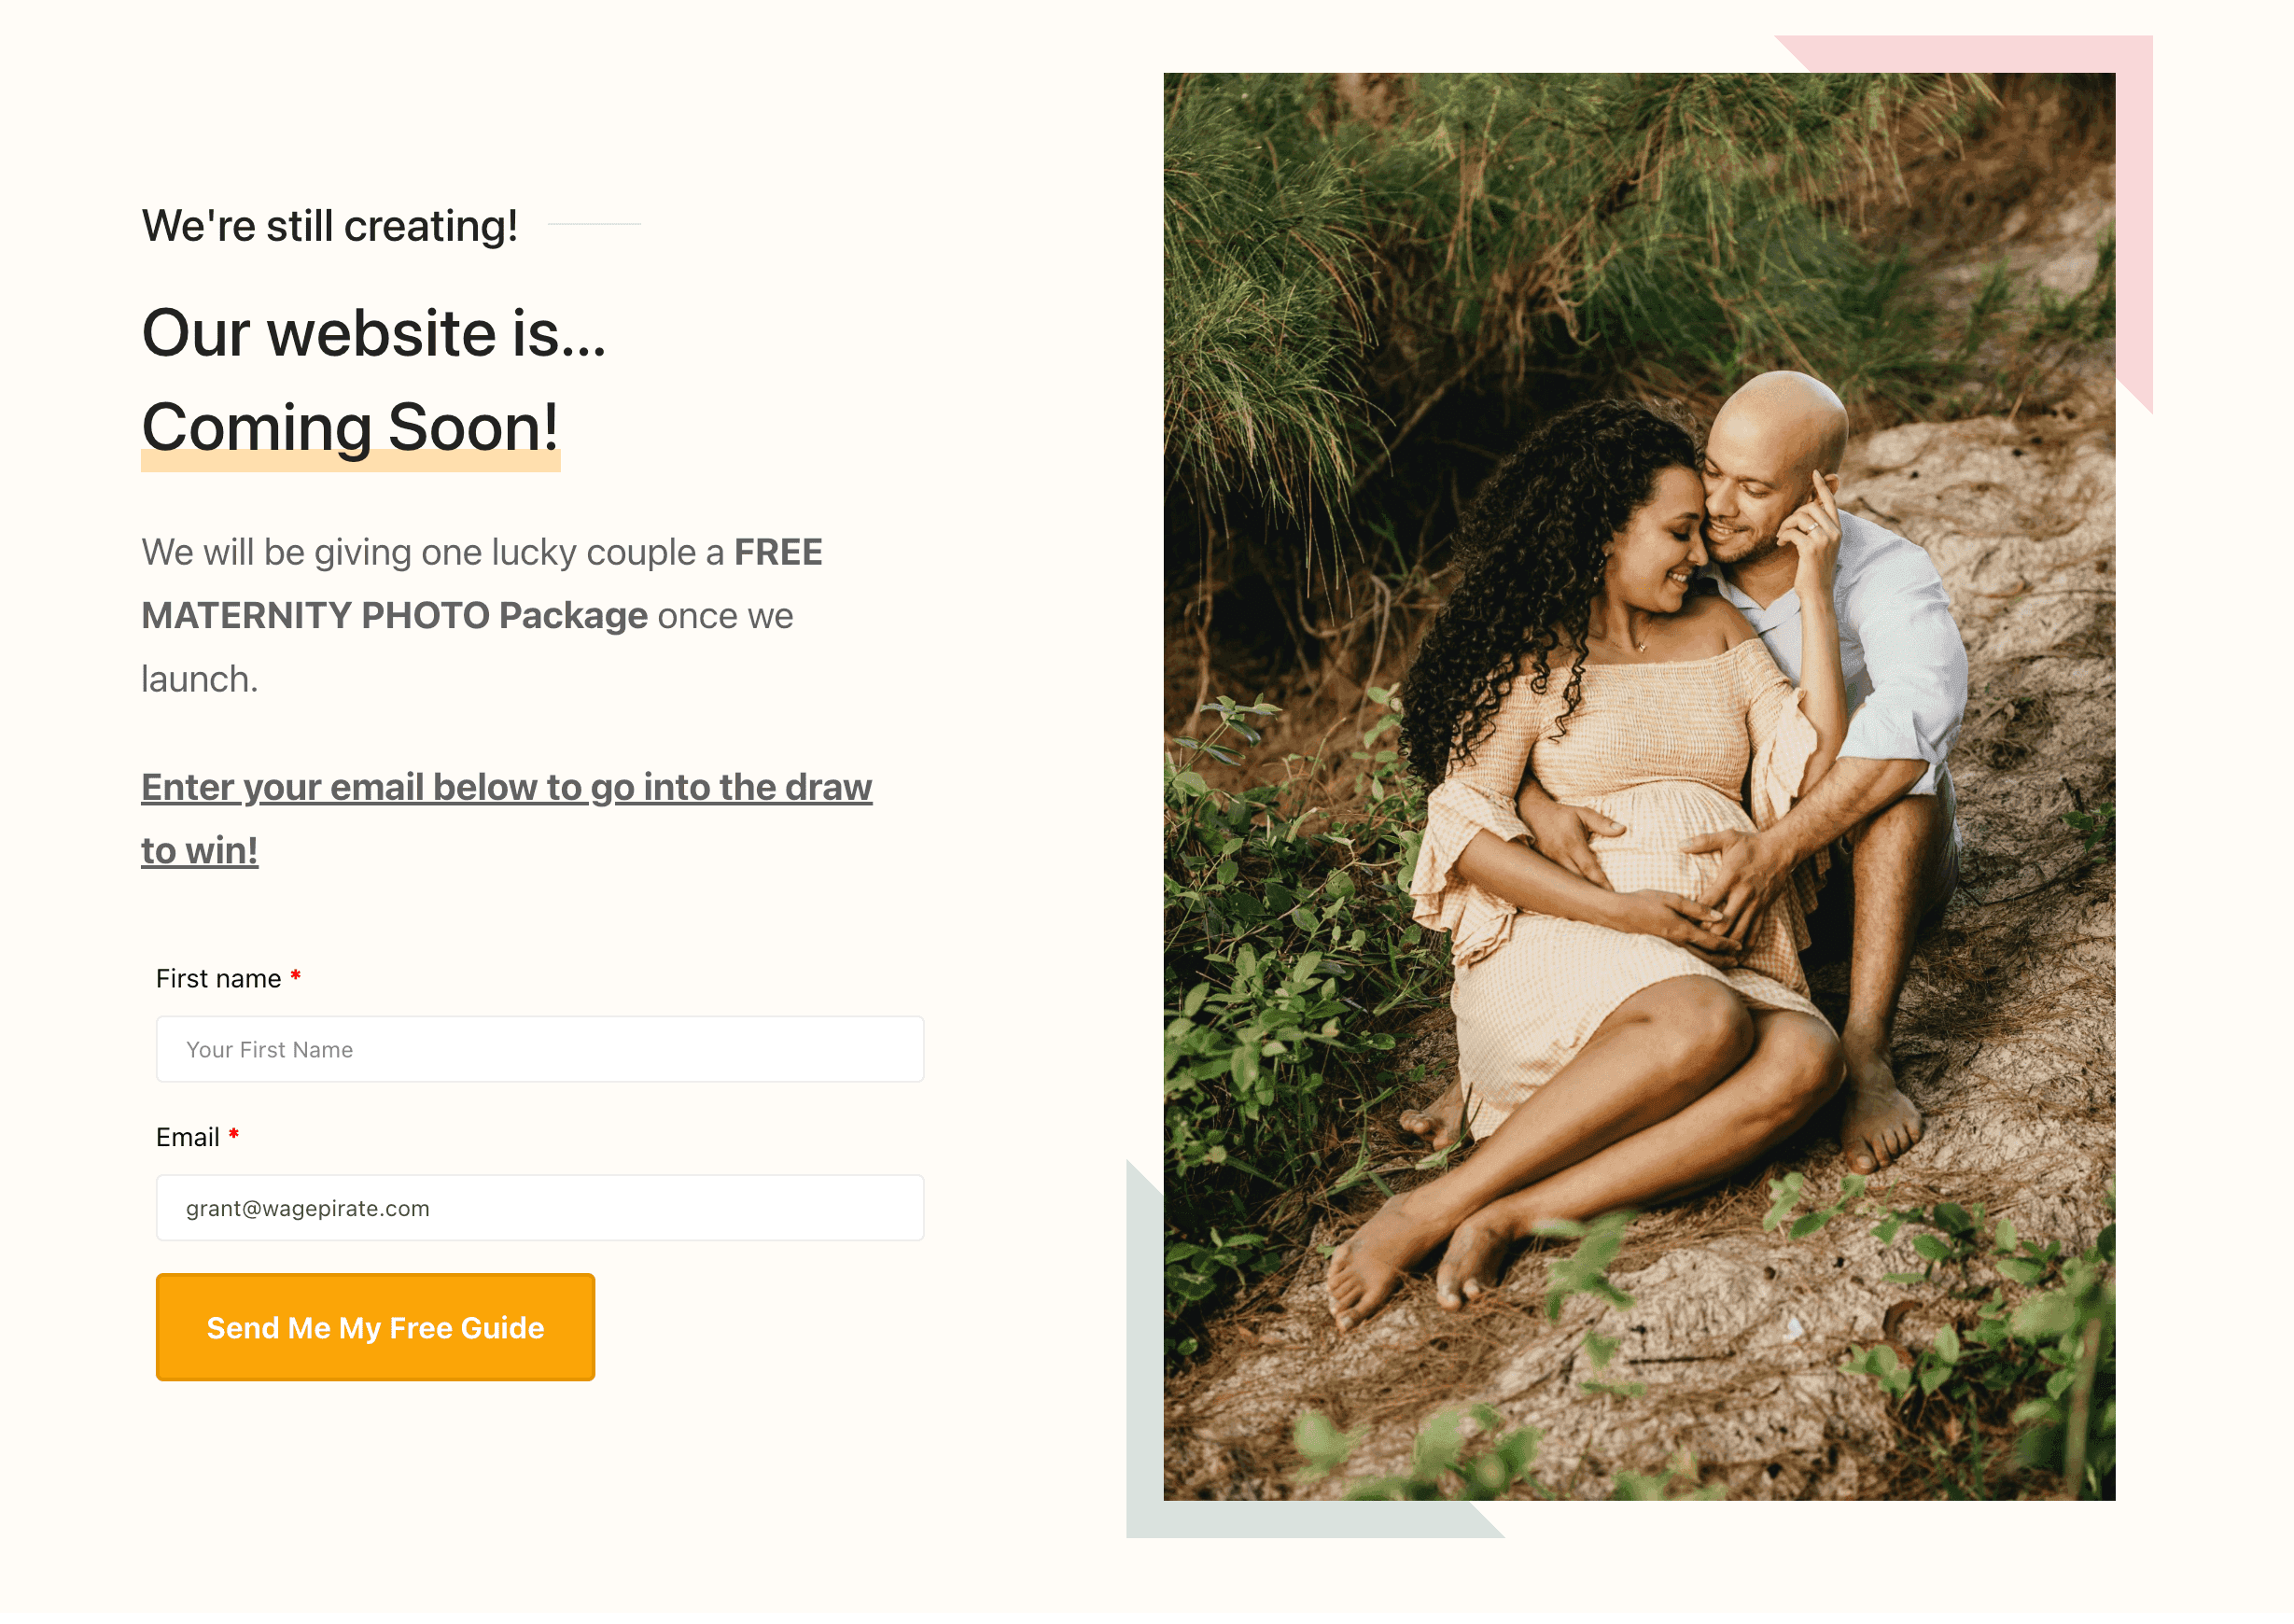
You’ll notice that we can’t see anything here in our Page Builder, but if we go to the frontend of our website and view the live page, at runtime the form is output, as shown below.
Obviously, if we are using this shortcode method and embedding the form, we would remove the “Register to WIN button”, as the form is already on the page – no need for the button.
So the final page using the shortcode to output the FunnelKit optin form would look like the below.
NOTE: If FunnelKit is not showing your Page Builder content, go back and edit the step in the Funnel and change the template to Default template or FunnelKit Canvas for Page Builder (try both and see which one works with your page builder).
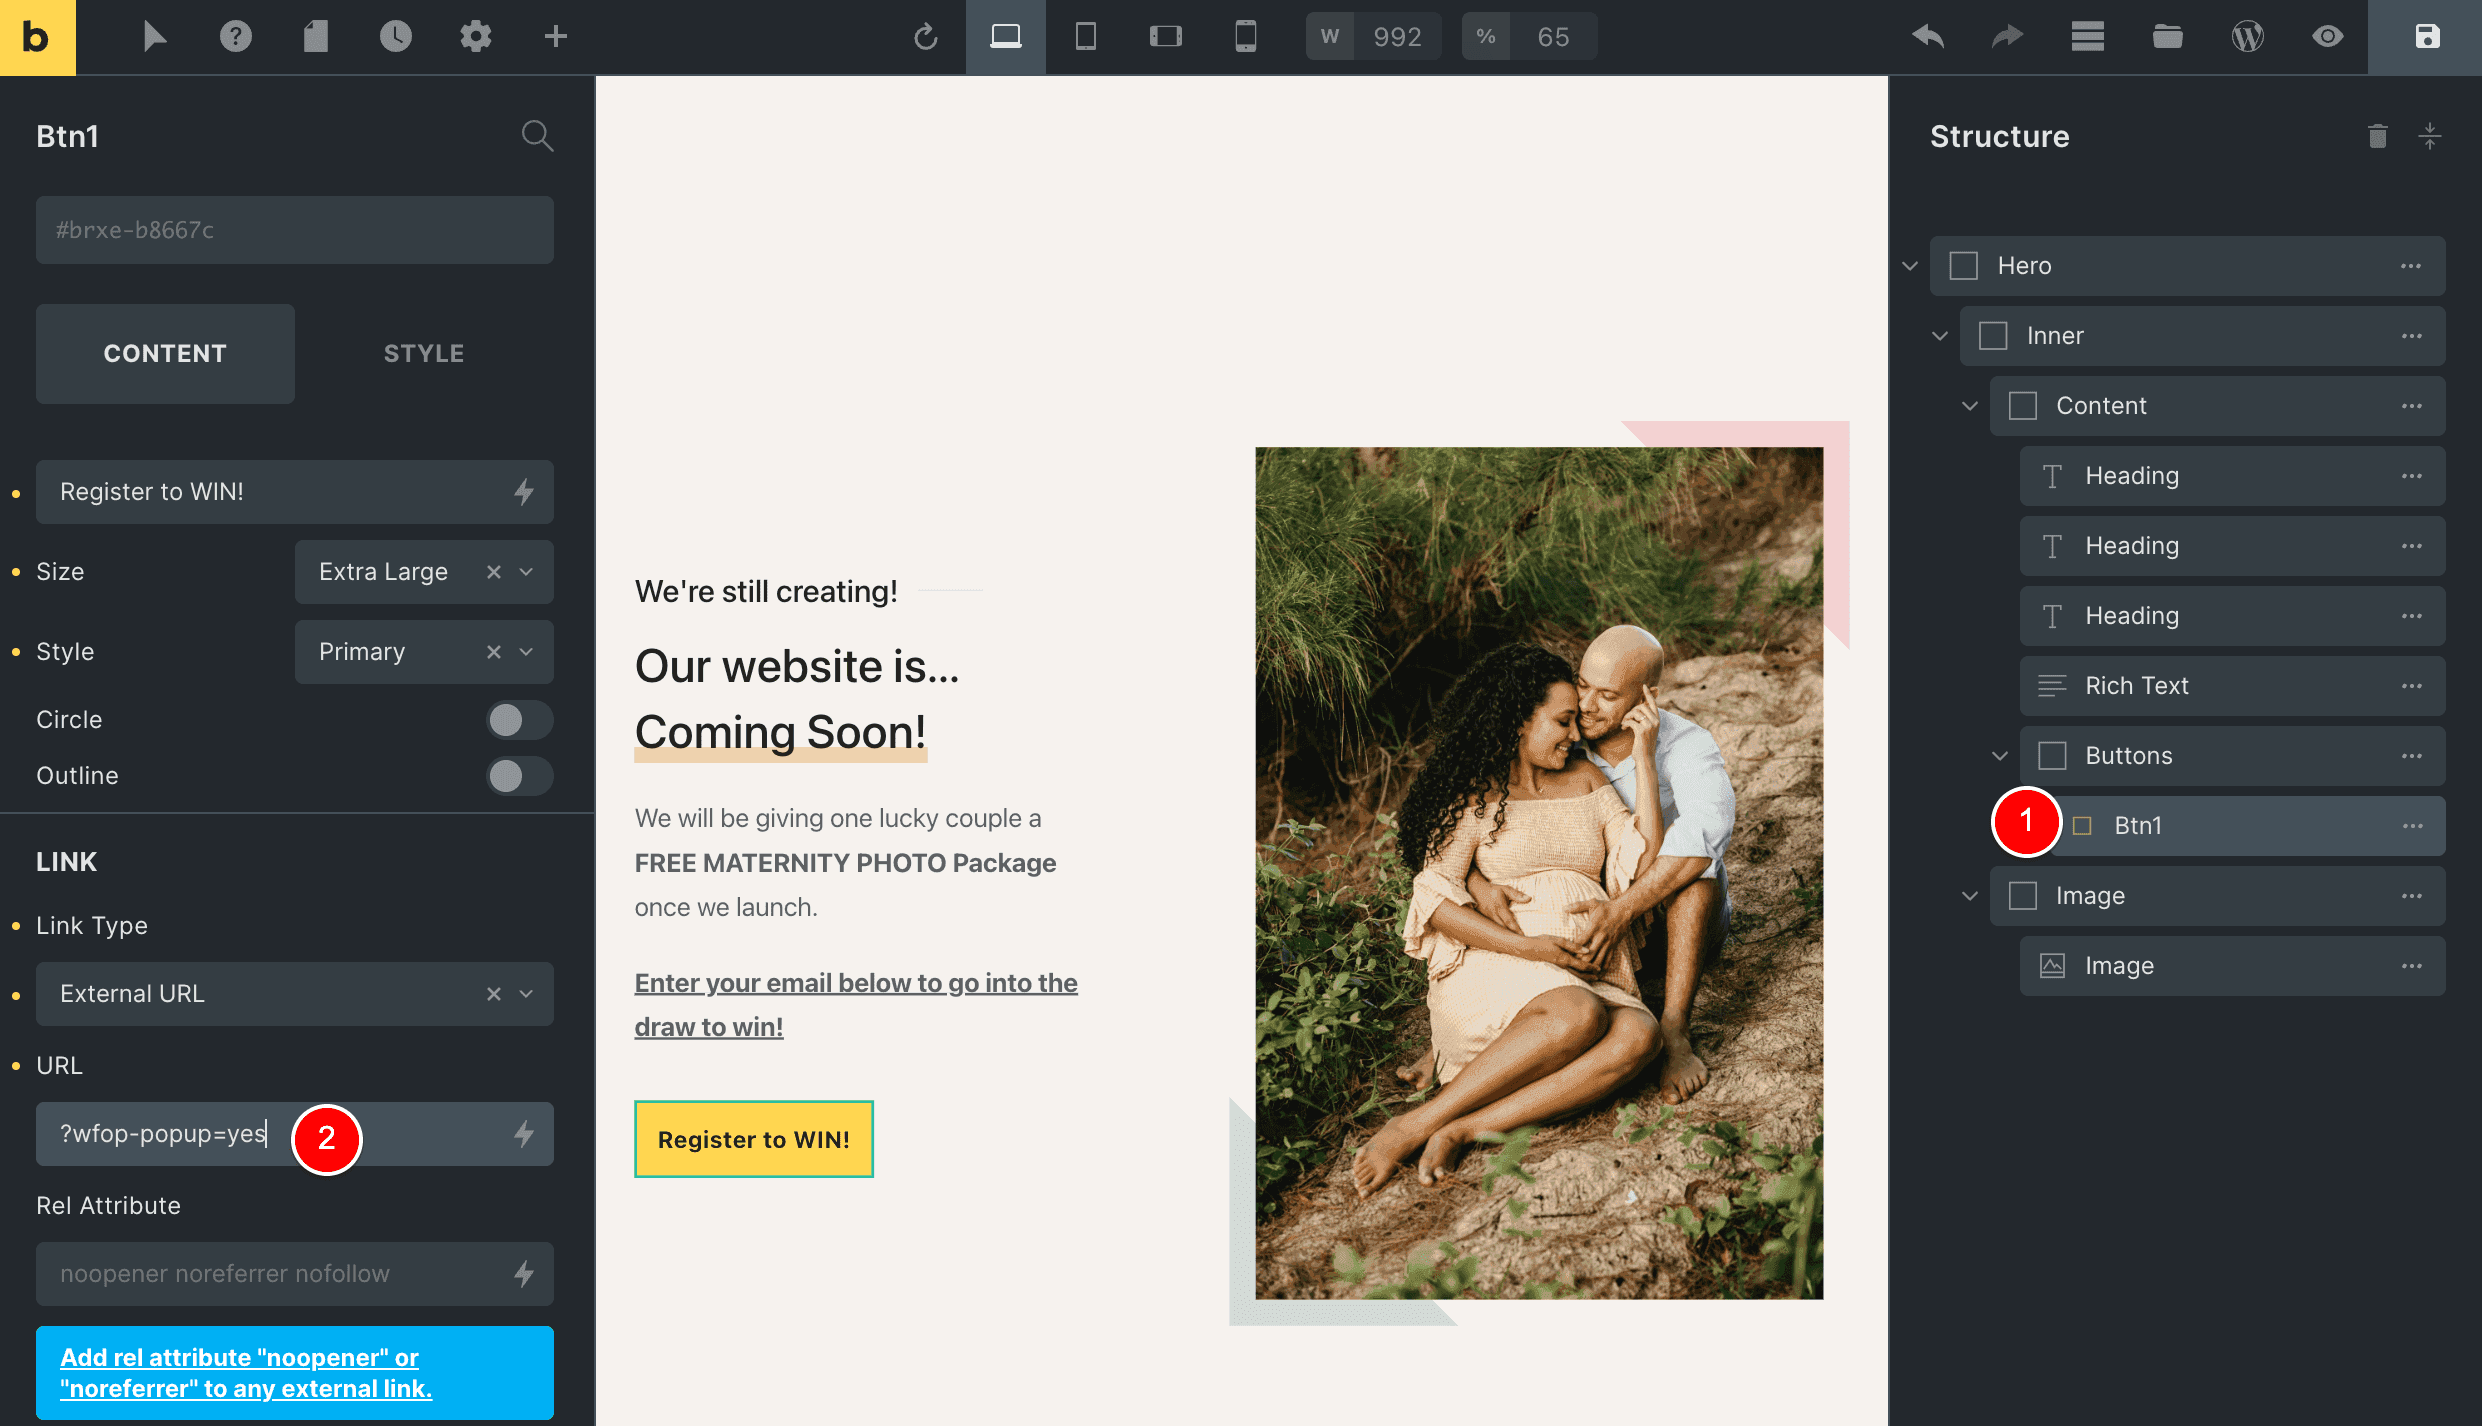
FunnelKit Optin Form in a Pop up
Add your Email Subscribe Form to a Popup is very easy inside FunnelKit.
Go back to your Funnel inside FunnelKit and head to the Optin Form step > Design tab and copy this…
Then paste this link into the Button you want to use to open the Popup.
In my case, I edited my Button element in Bricks Builder (1) and pasted this link to the button URL field, as shown below at (2).
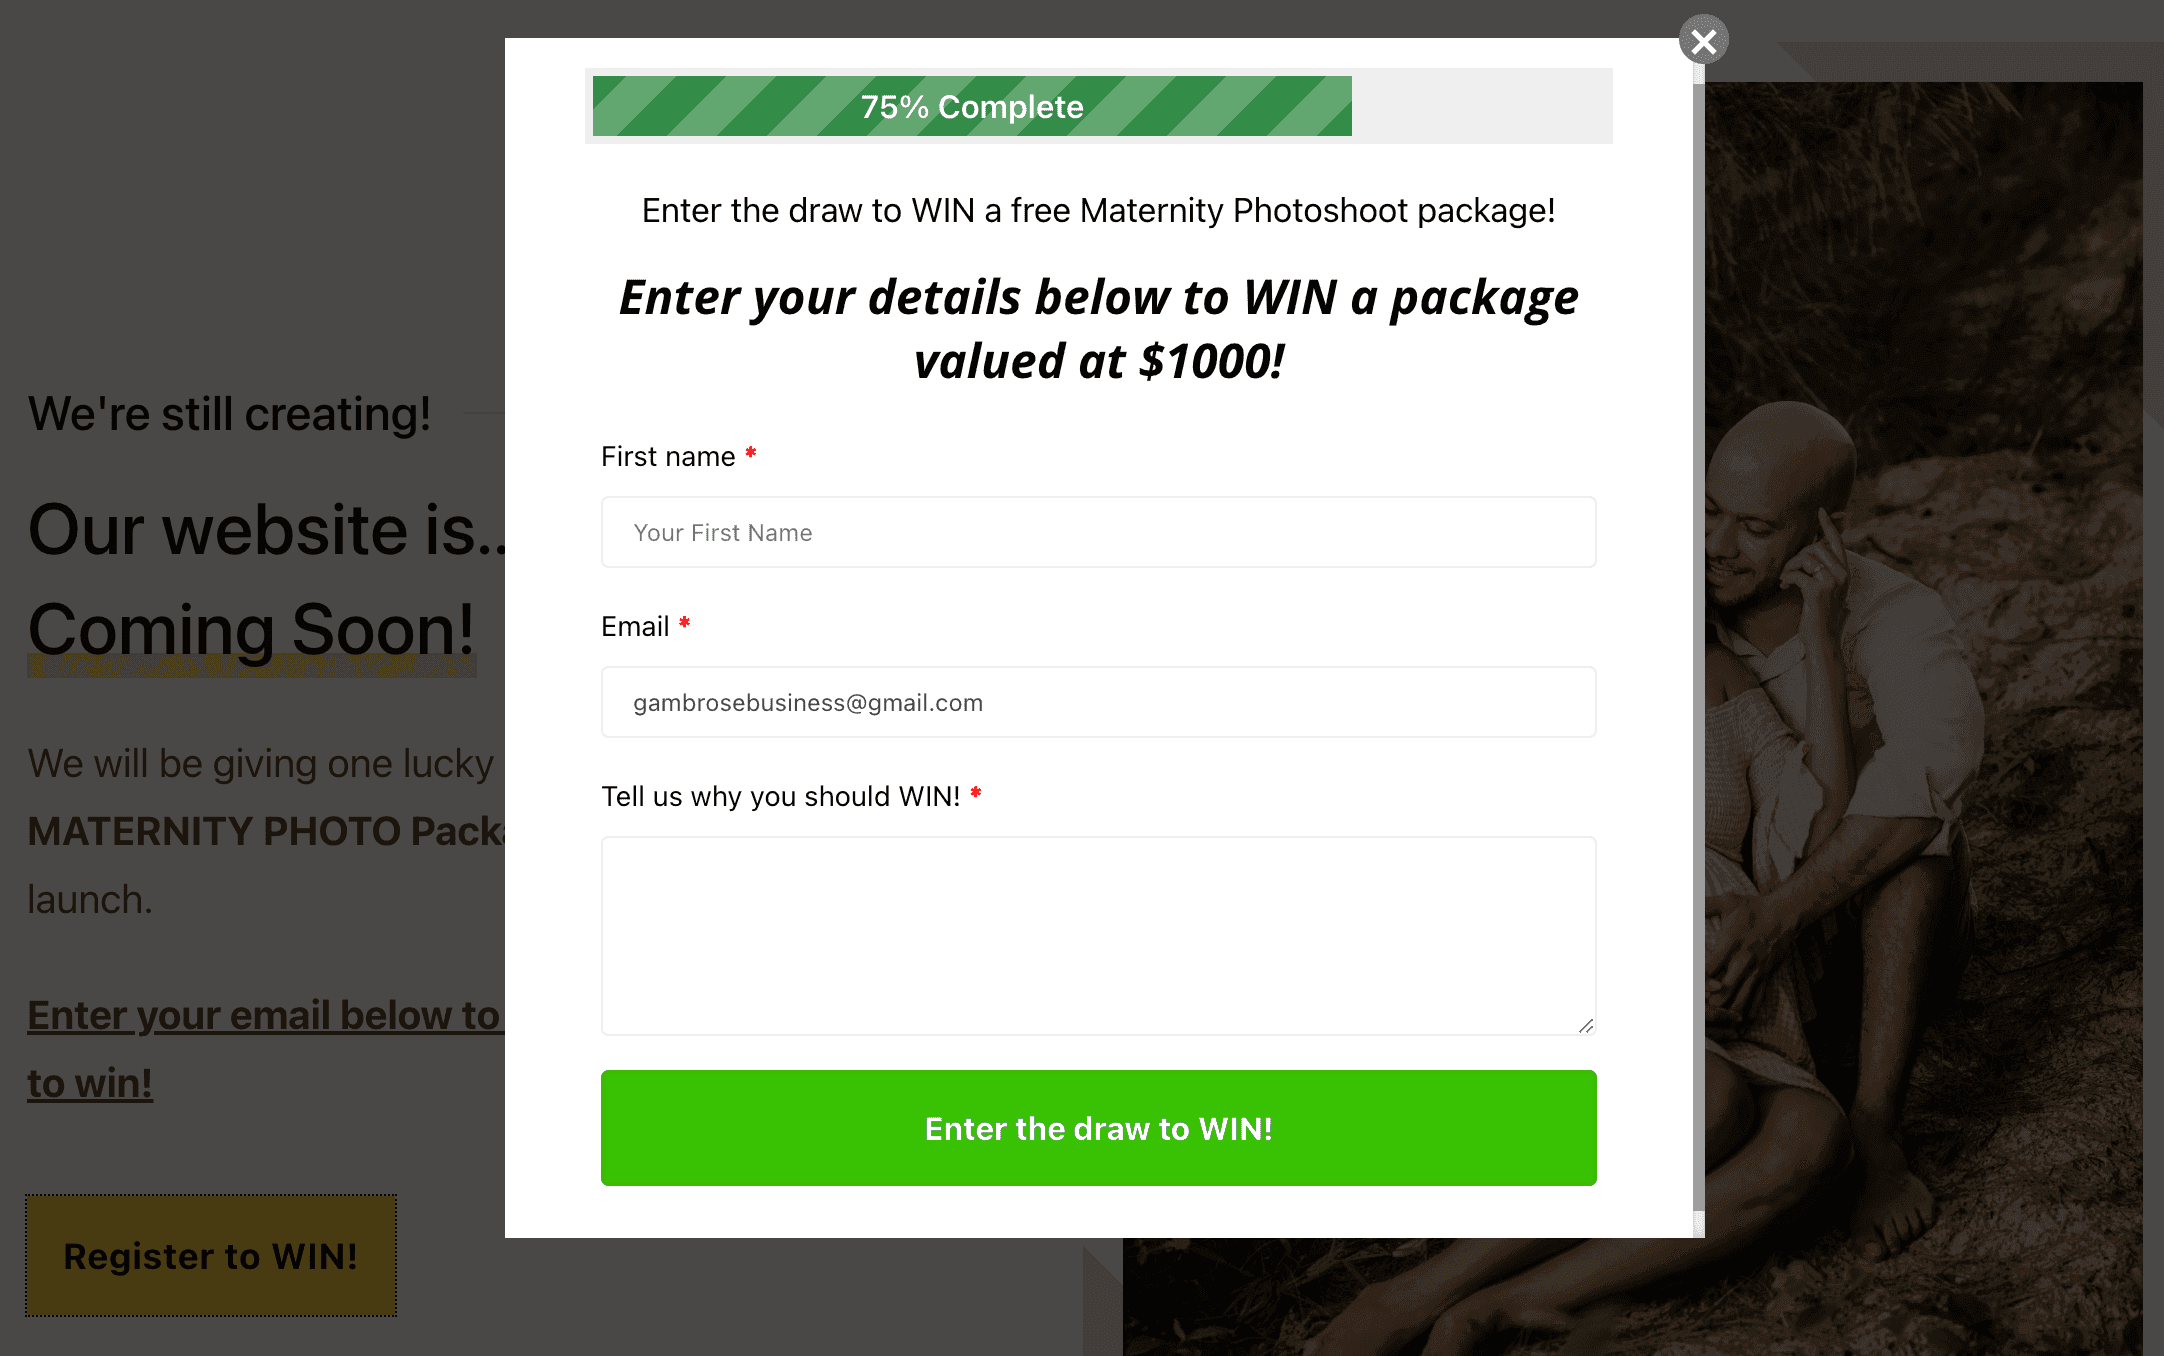
Now, if we preview our Coming Soon page, we can click our Register to WIN! button and it will open up our Email Capture form in a popup.
Here it is in action below.
Customize the fields on your Email Subscribe form
FunnelKit makes it very easy to add / remove fields from your Optin Form on your Coming Soon page.
If you head back to FunnelKit and edit your Optin Form step in the funnel, you can click on the Form tab (1) to customize the fields in your form. You can add fields from (2) and they show at (3) below.
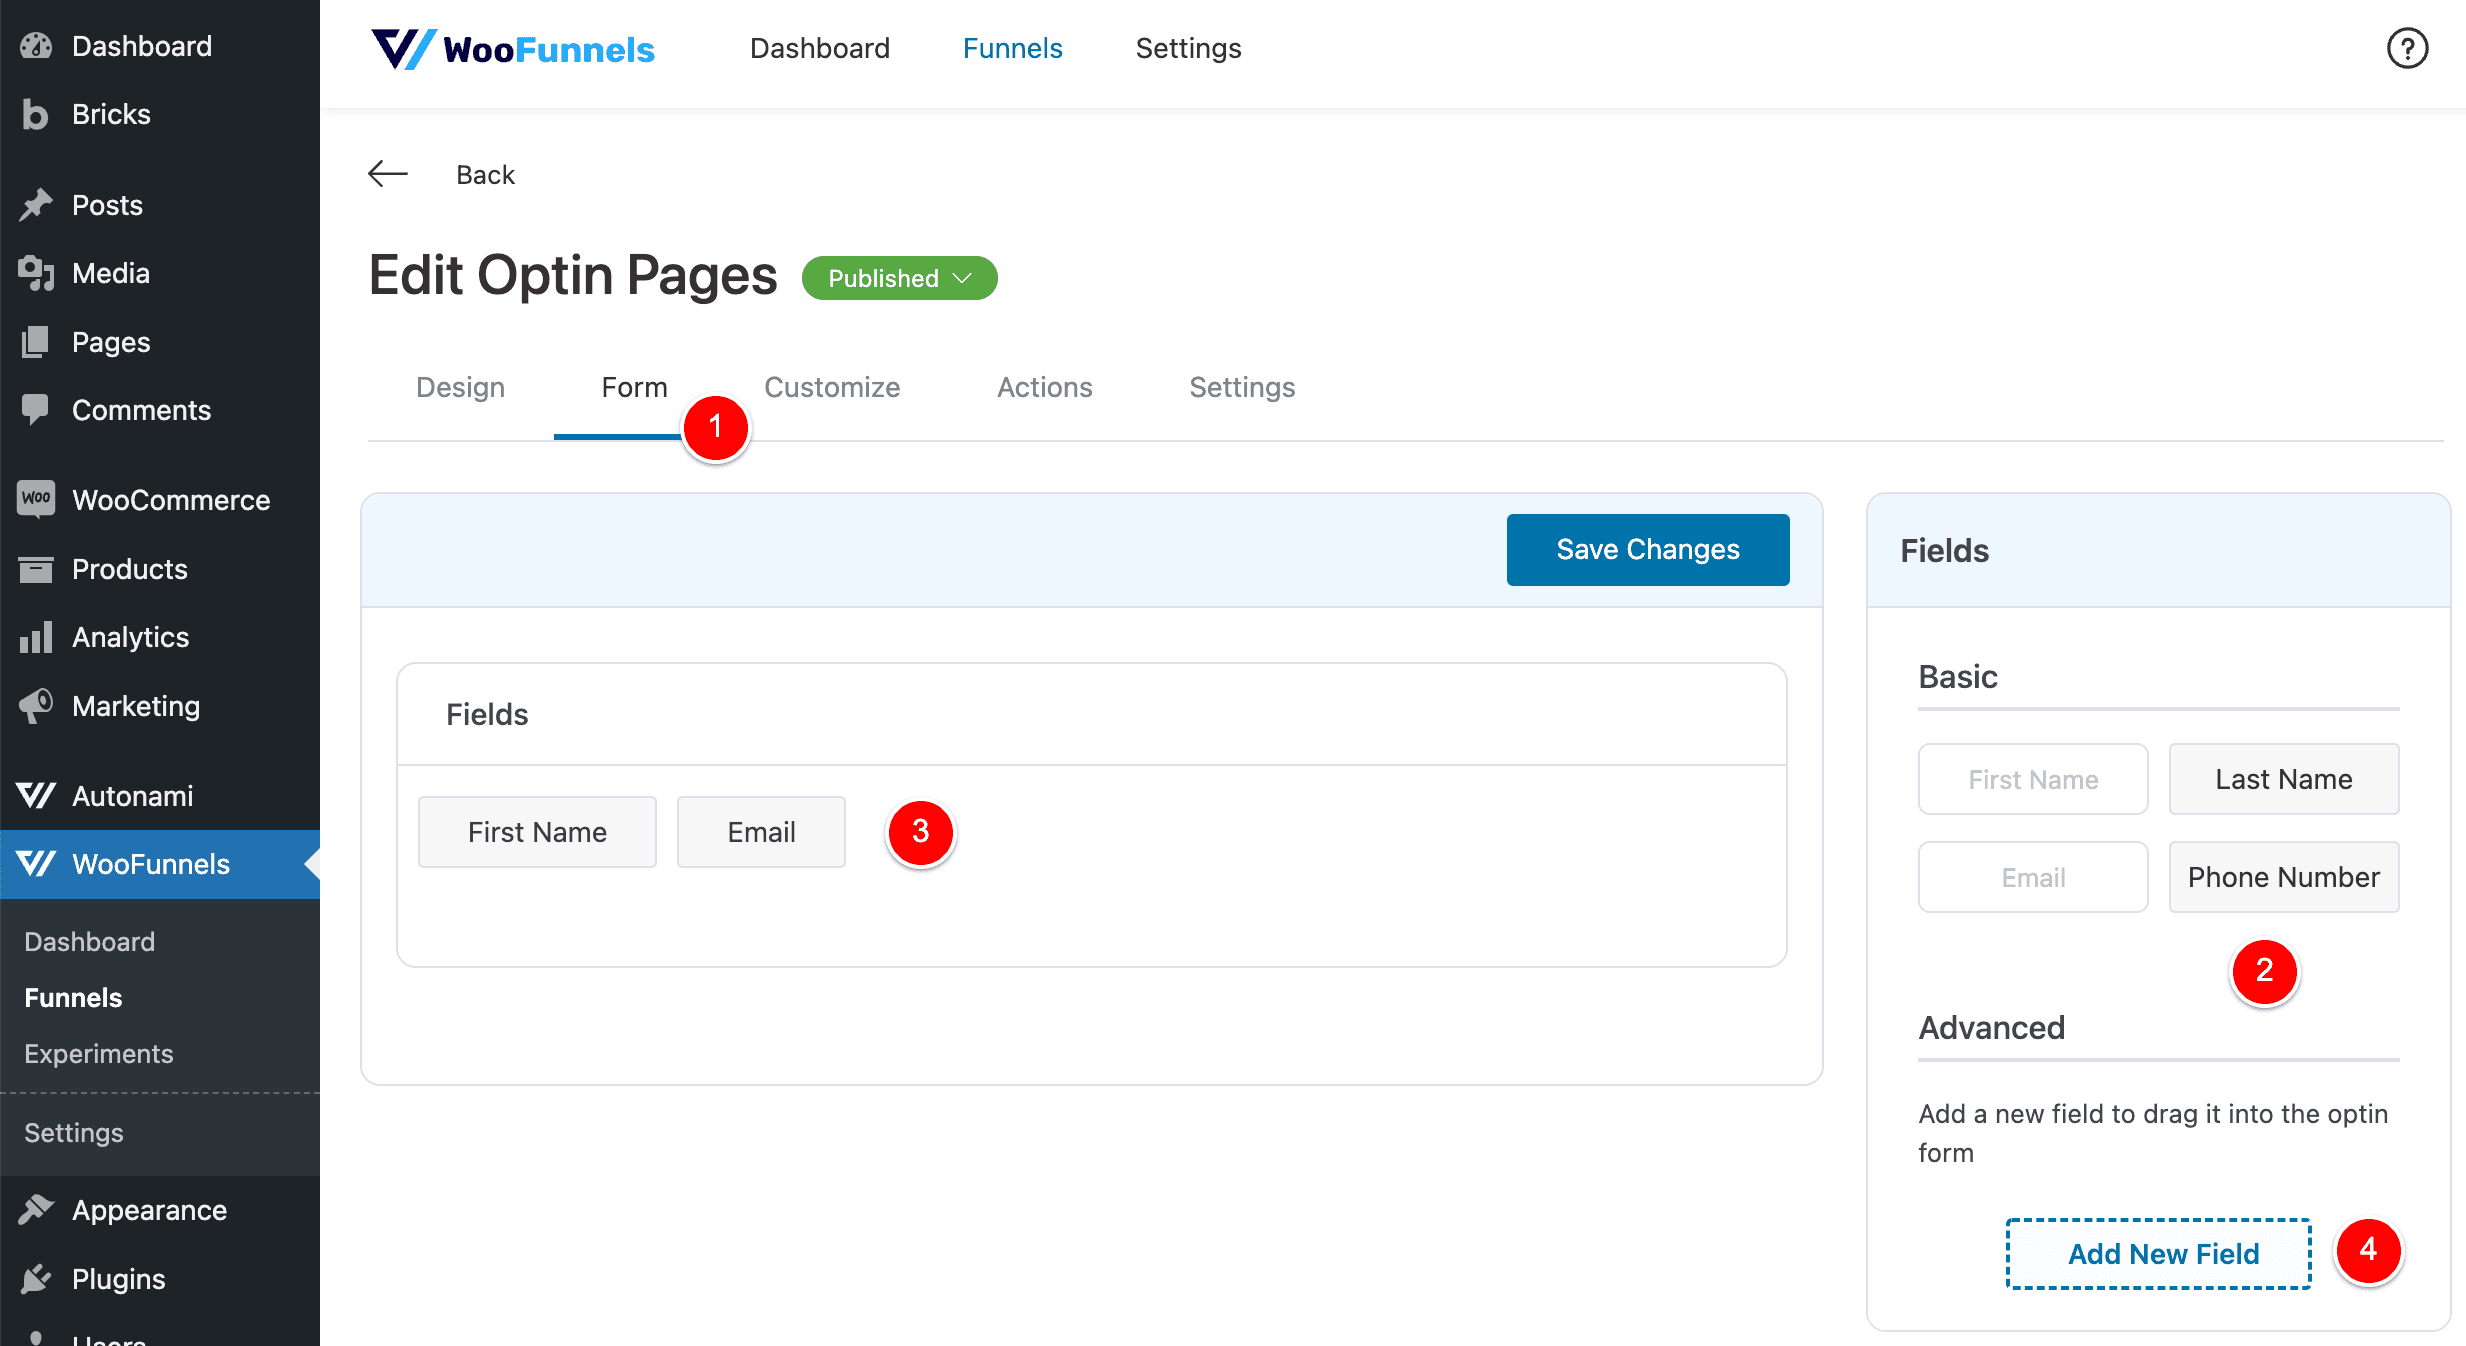
At (4) you can even add your own custom form fields.
An idea could be that we are doing this FREE Maternity photoshoot and the winner will be the person who gives the best reason as to why they should win the free package.
You could do something like the below, where I add a Textarea field called “Tell us why you should WIN!”.
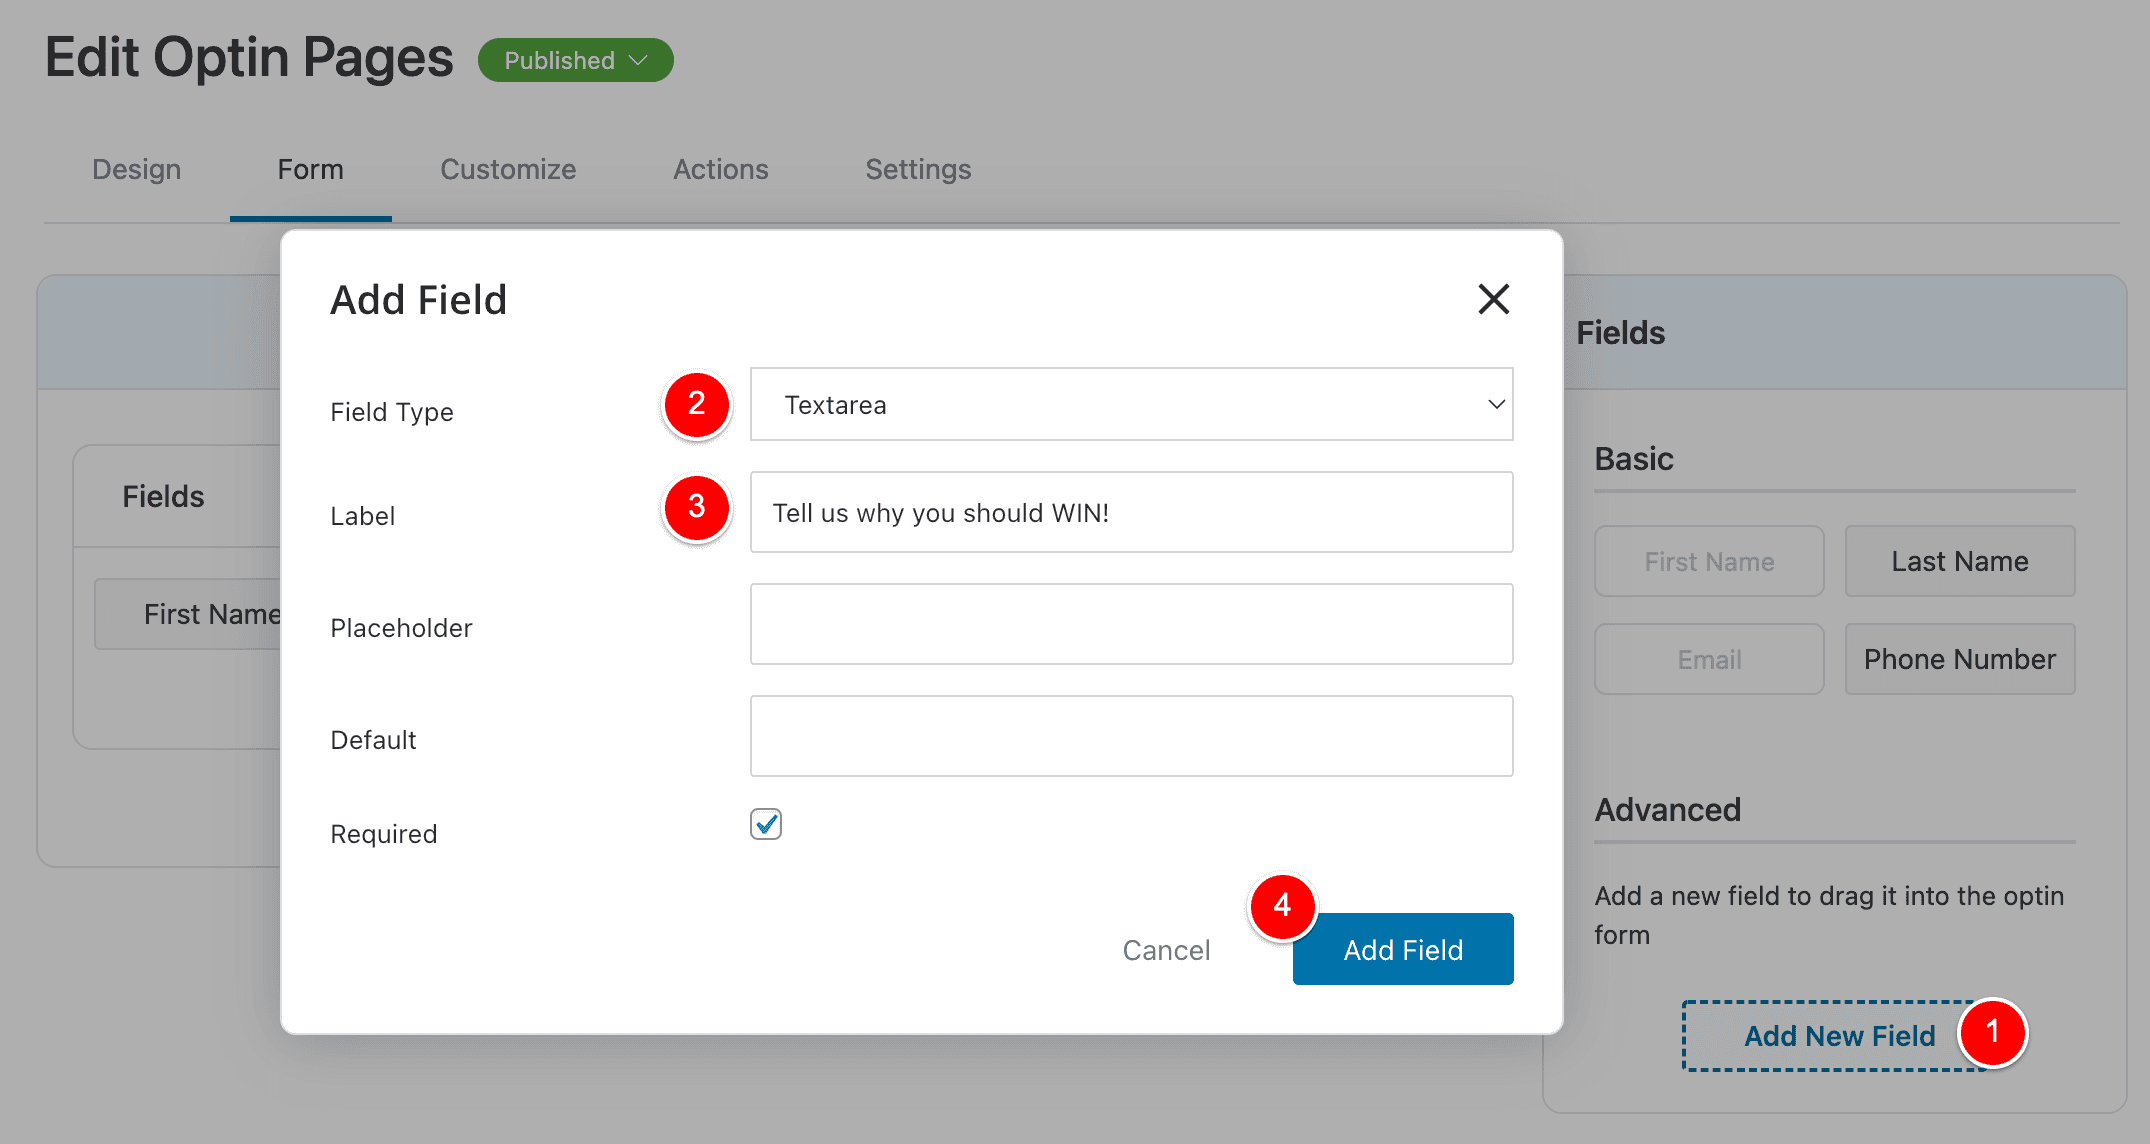
Then I would add this field to the form…

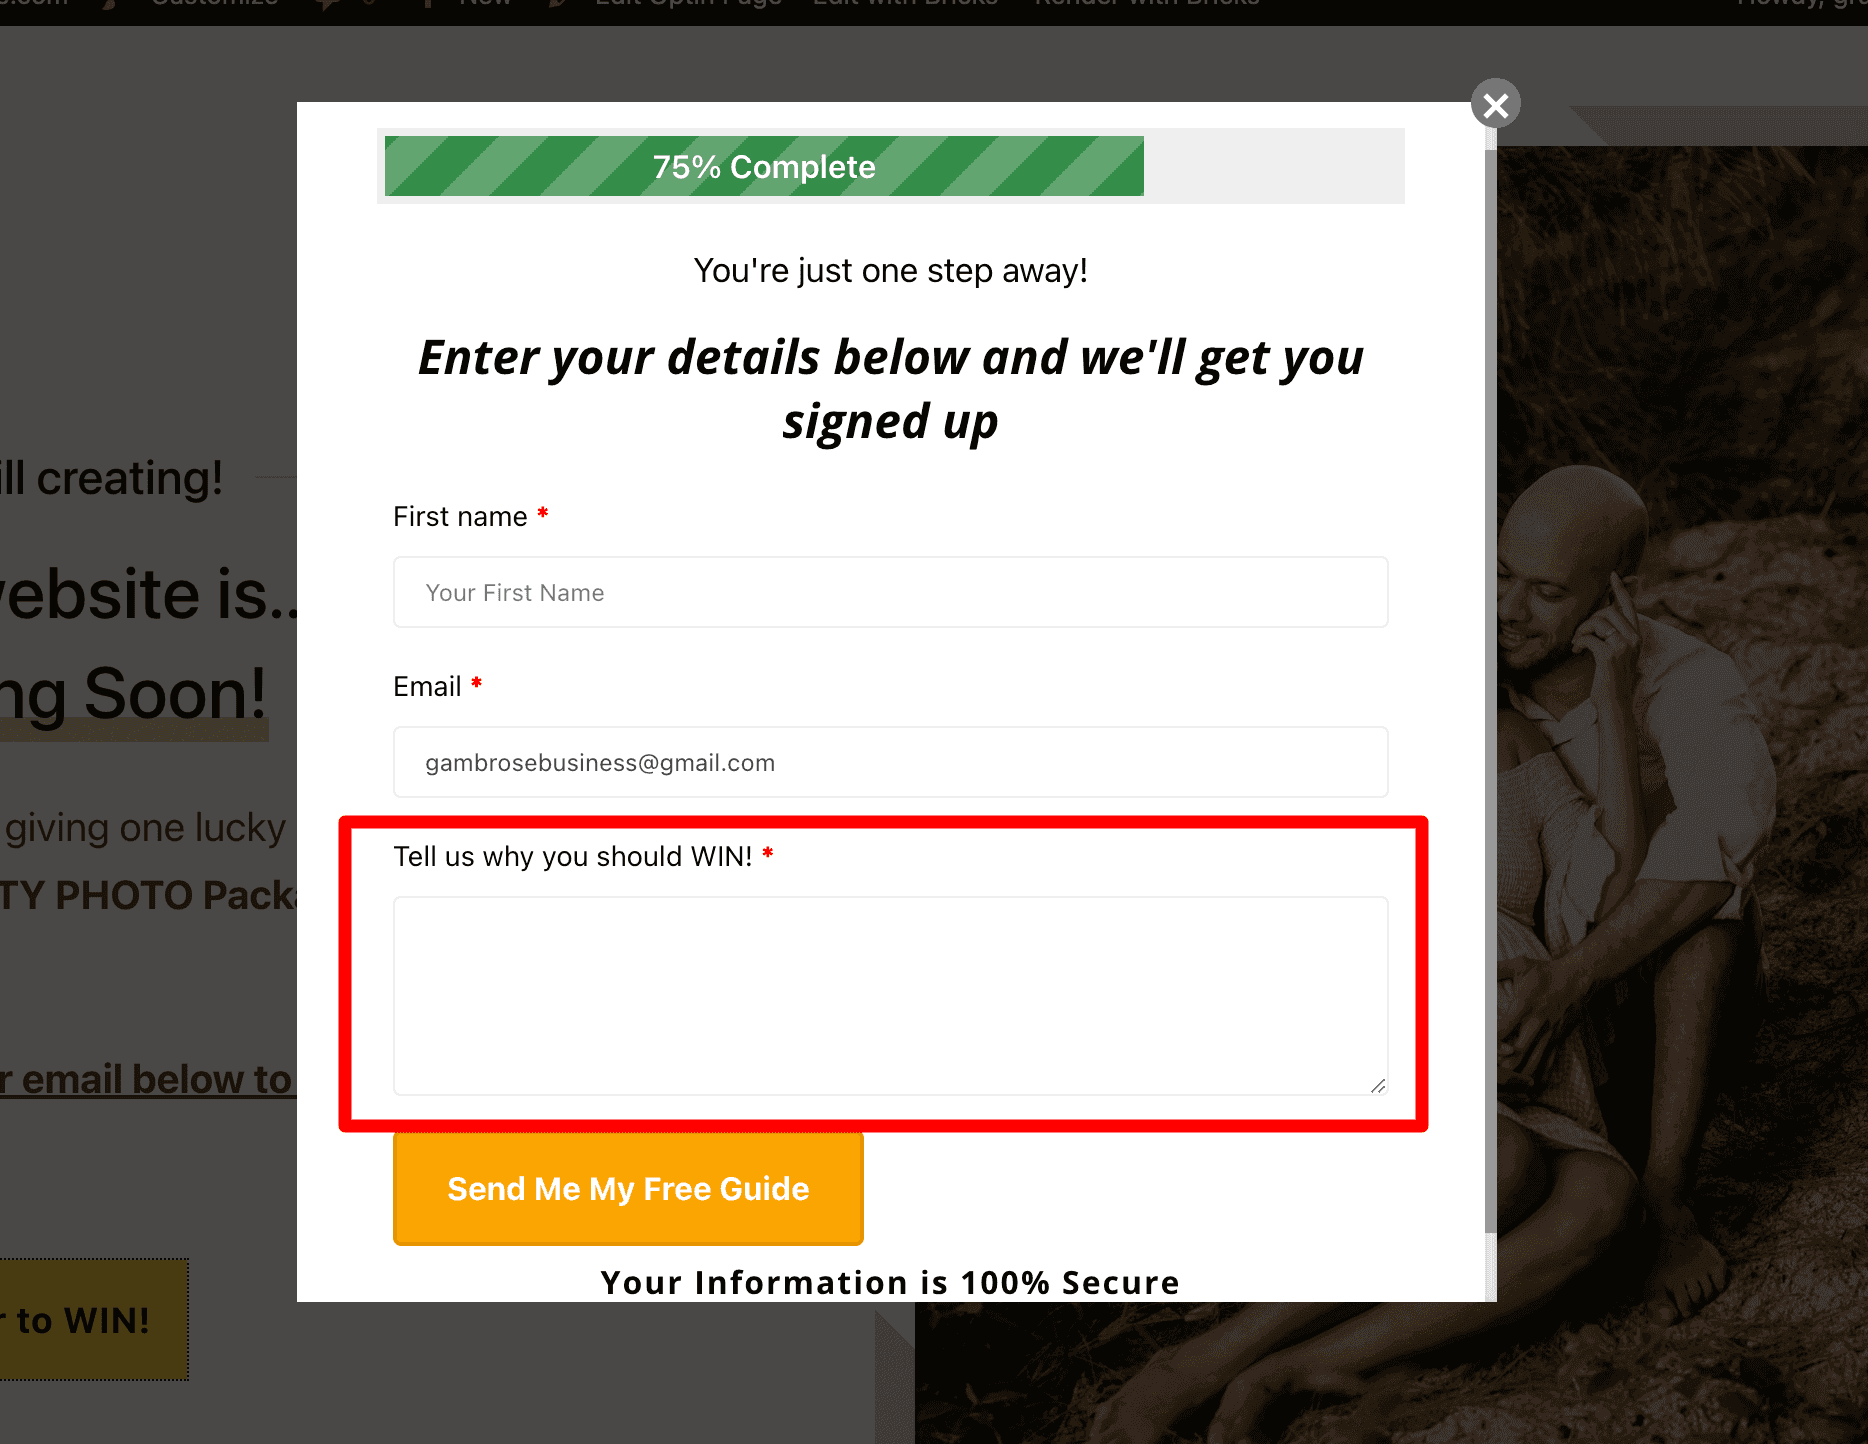
And that would then show for our users when they click the button to open the Pop up.
Customize the FunnelKit Optin Form
FunnelKit makes it very easy to customize how your Optin form looks on your Coming Soon page.
While editing your Optin Step inside FunnelKit, click on the Customize tab (1) and then choose the type of form you’re using (Inline i.e. Shortcode method or Popover) and then style your fields at (3).
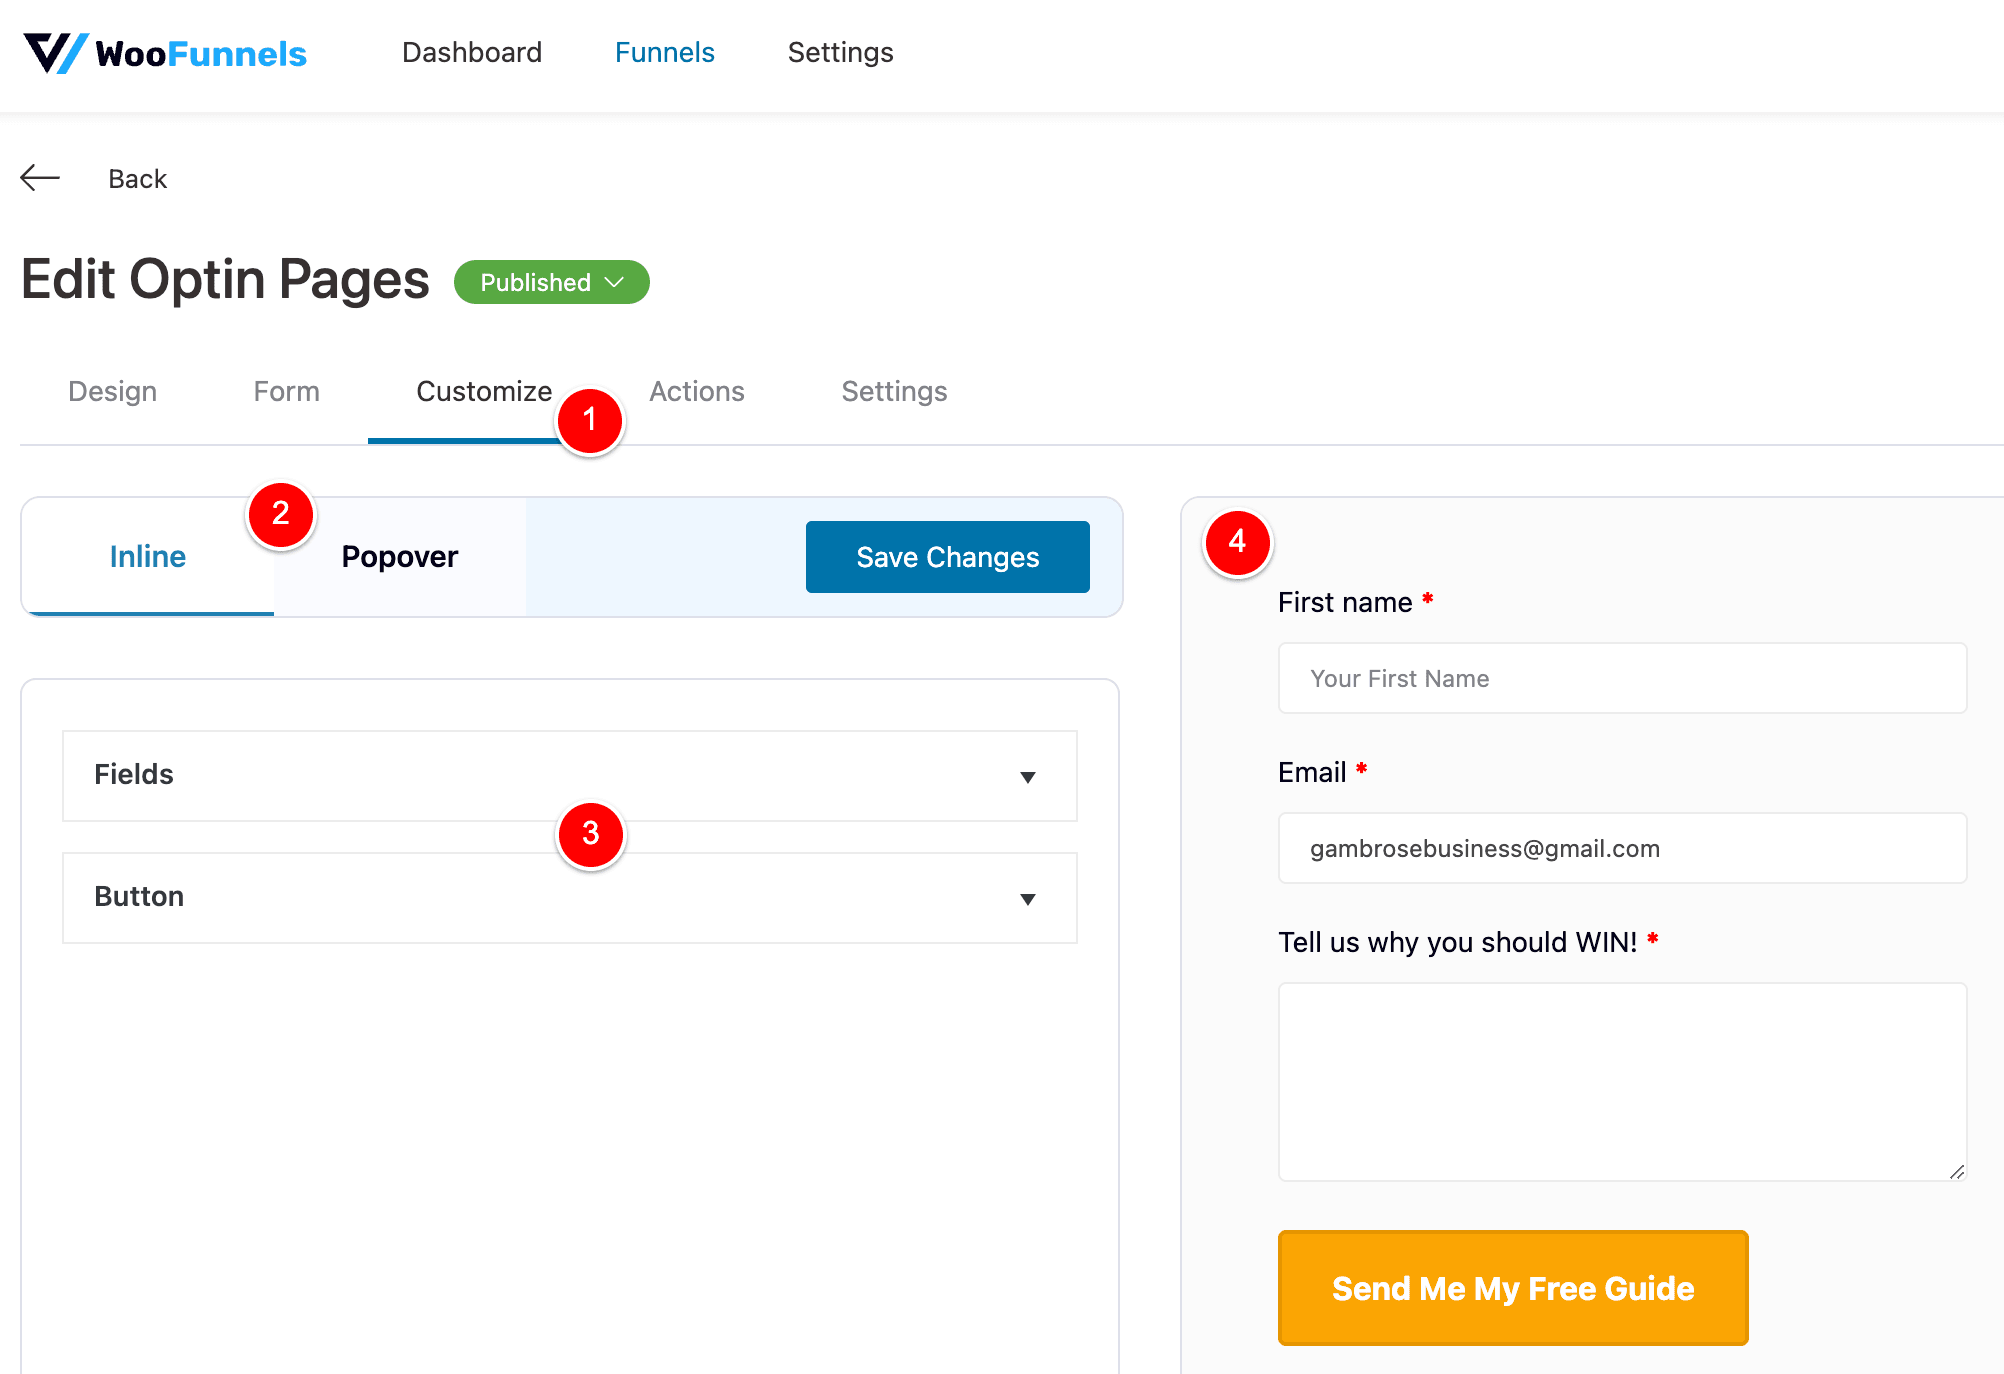
You also get a preview at (4).
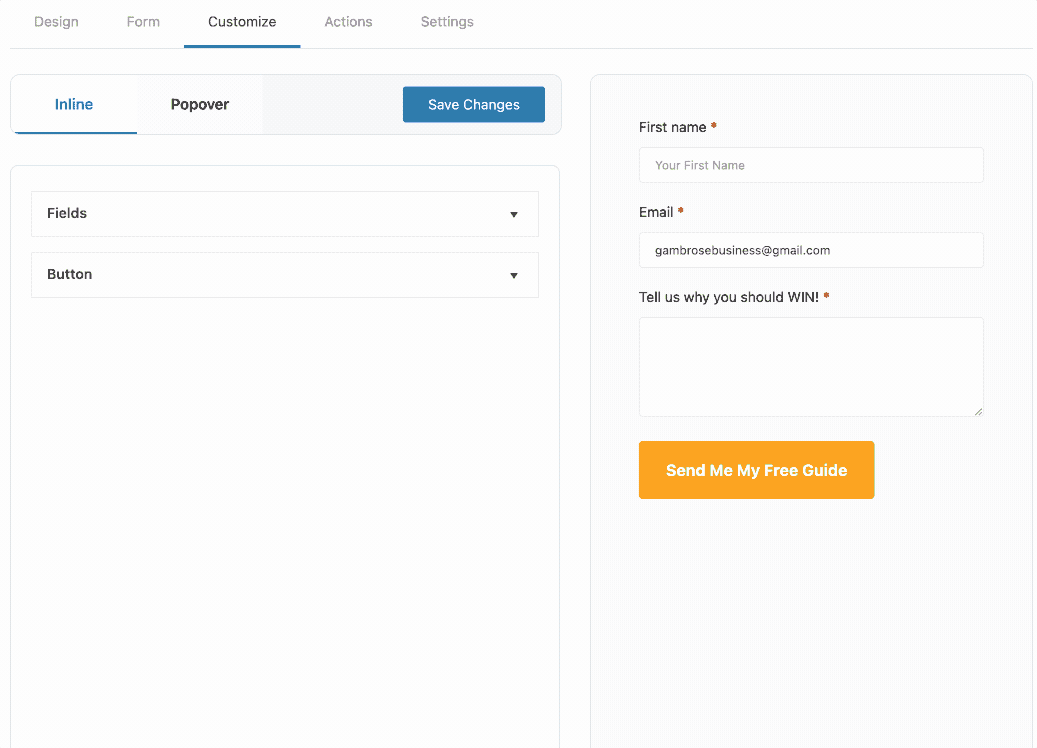
Below is an animation showing me changing the button to be green and also full-width.
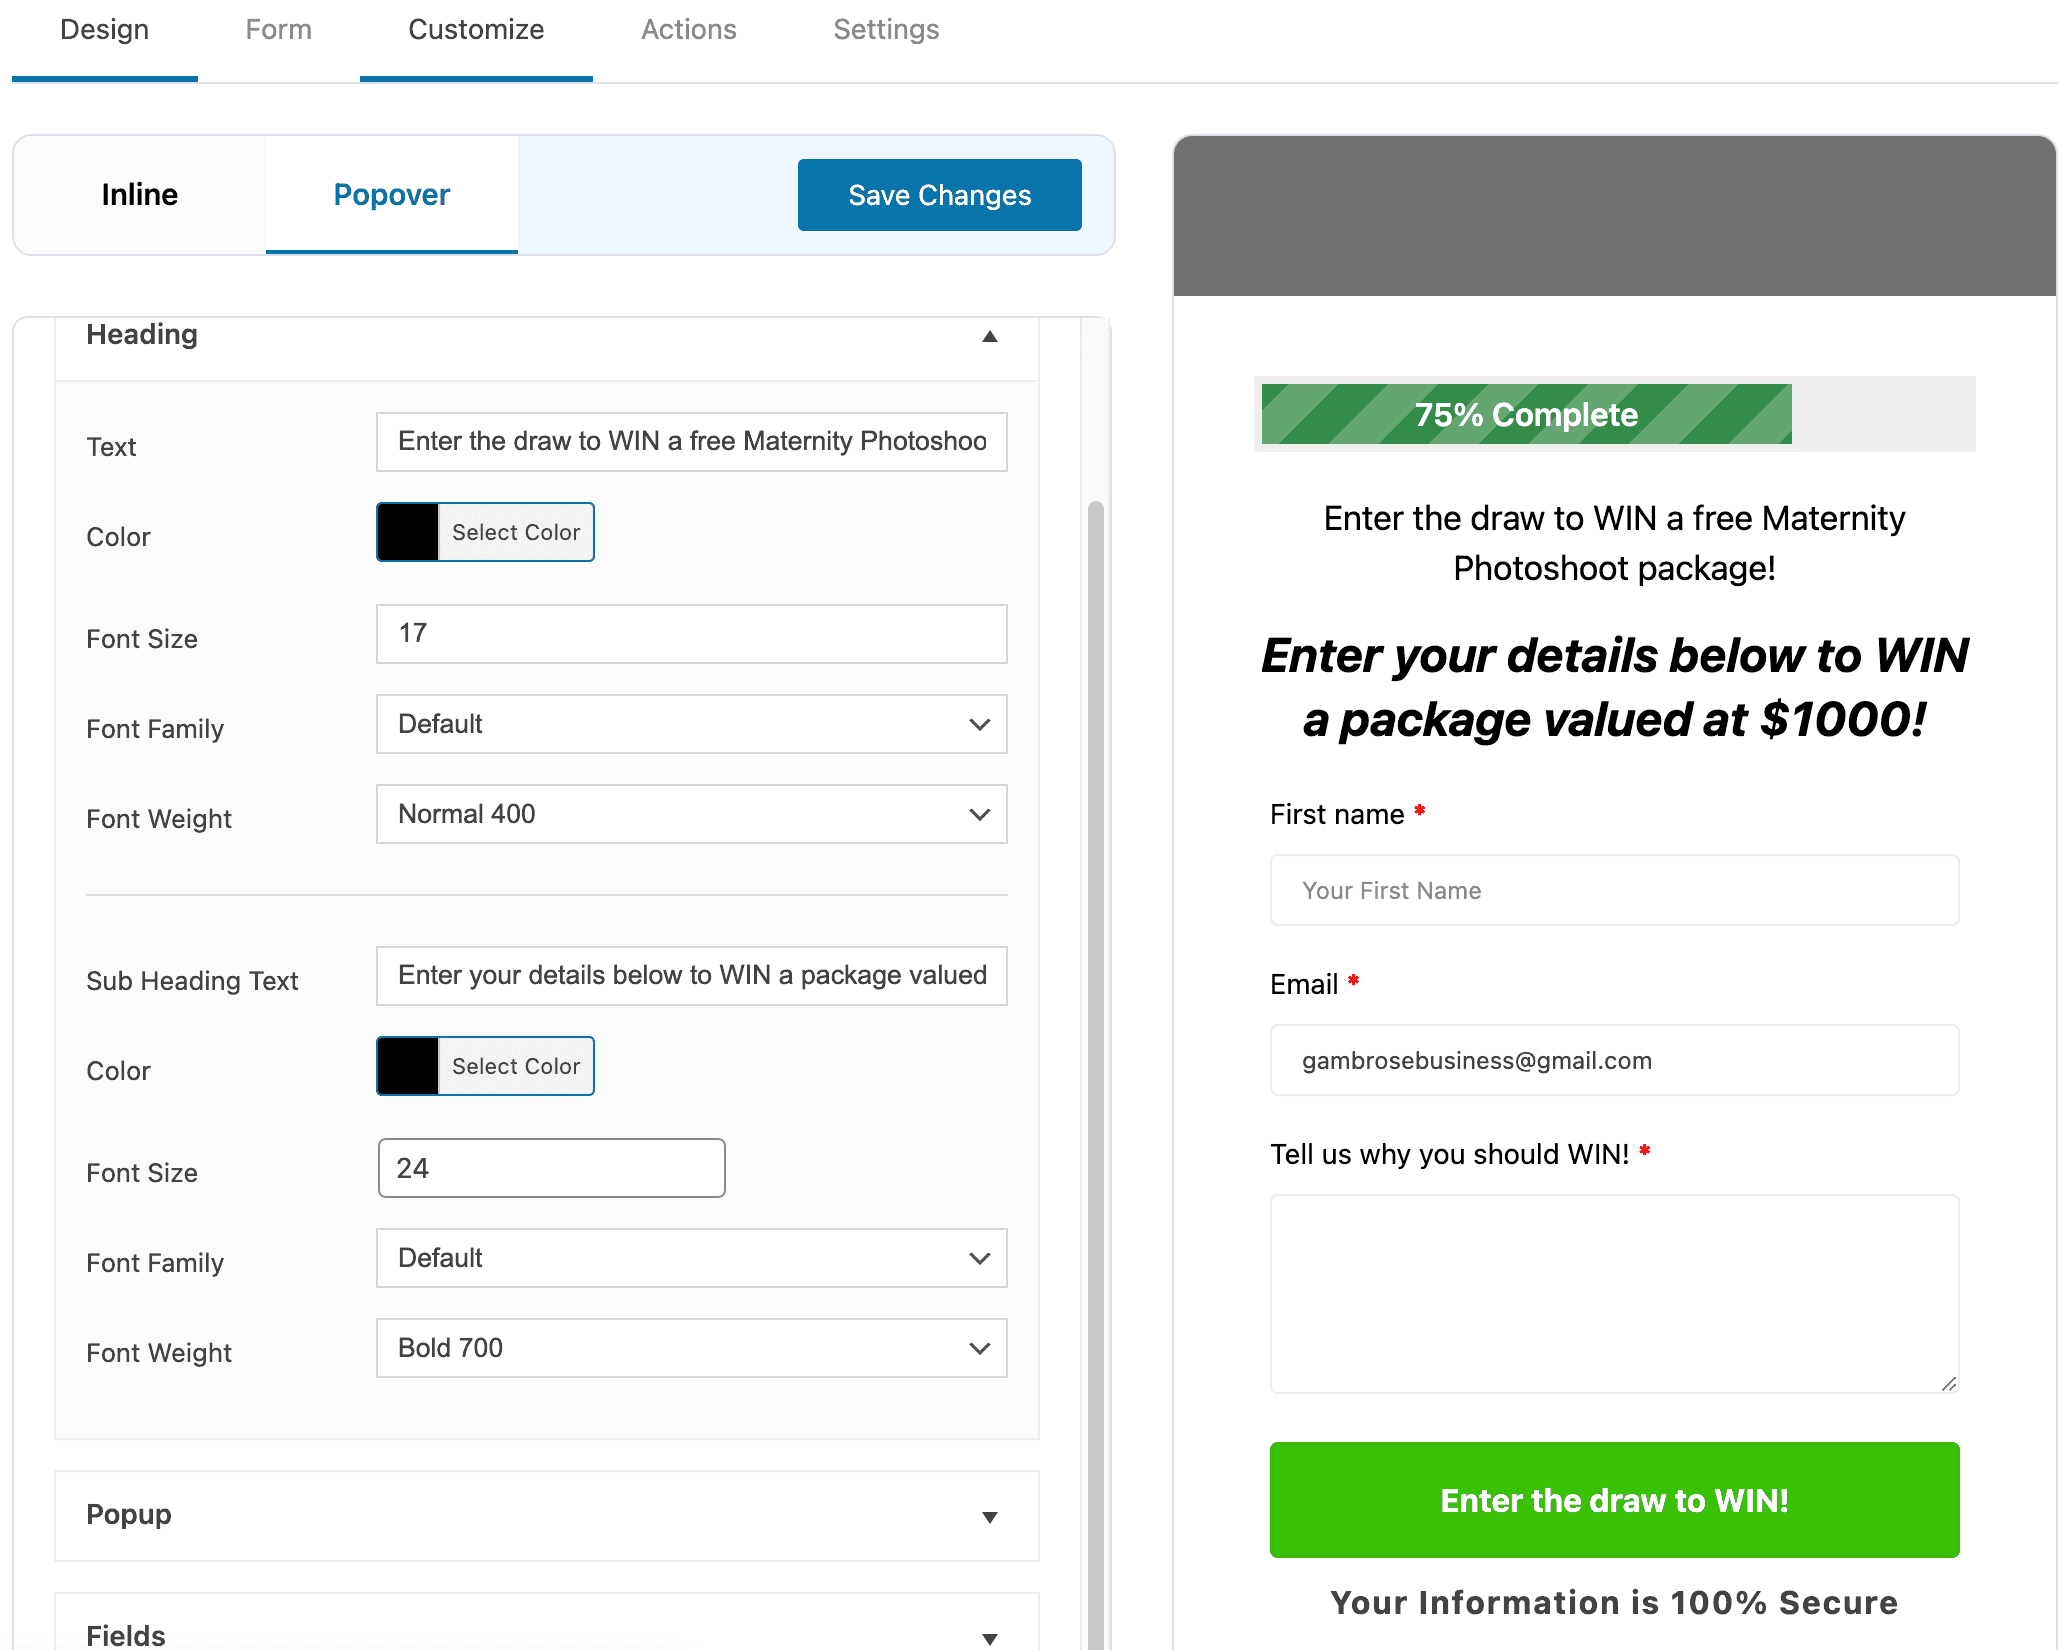
Below I edited the Popup text to relate to our free Maternity Photoshoot we’re doing in this Coming Soon page tutorial.
If we go back to our Coming Soon page and click our Register to WIN! button, our popup is all complete and people can put in their email address on our Coming Soon page.
Again, this is all done in FunnelKit, without any need for a third-party form plugin.
However, this tutorial is about showing you why FunnelKit is the best Coming Soon page plugin for WordPress and I haven’t covered the best bit yet – reporting!
Let’s create the Thank You page that people will see once they complete our subscribe form on our Coming Soon page.
Adding our Thank You page
FunnelKit allows us to easily create an Email Confirmation page in WordPress.
Creating our Thank You page step in the funnel
If we go back to our Coming Soon funnel in FunnelKit, you can see that we currently have our 1 Optin Page step.
Go ahead and click Add New Step.
And select Optin Confirmation.
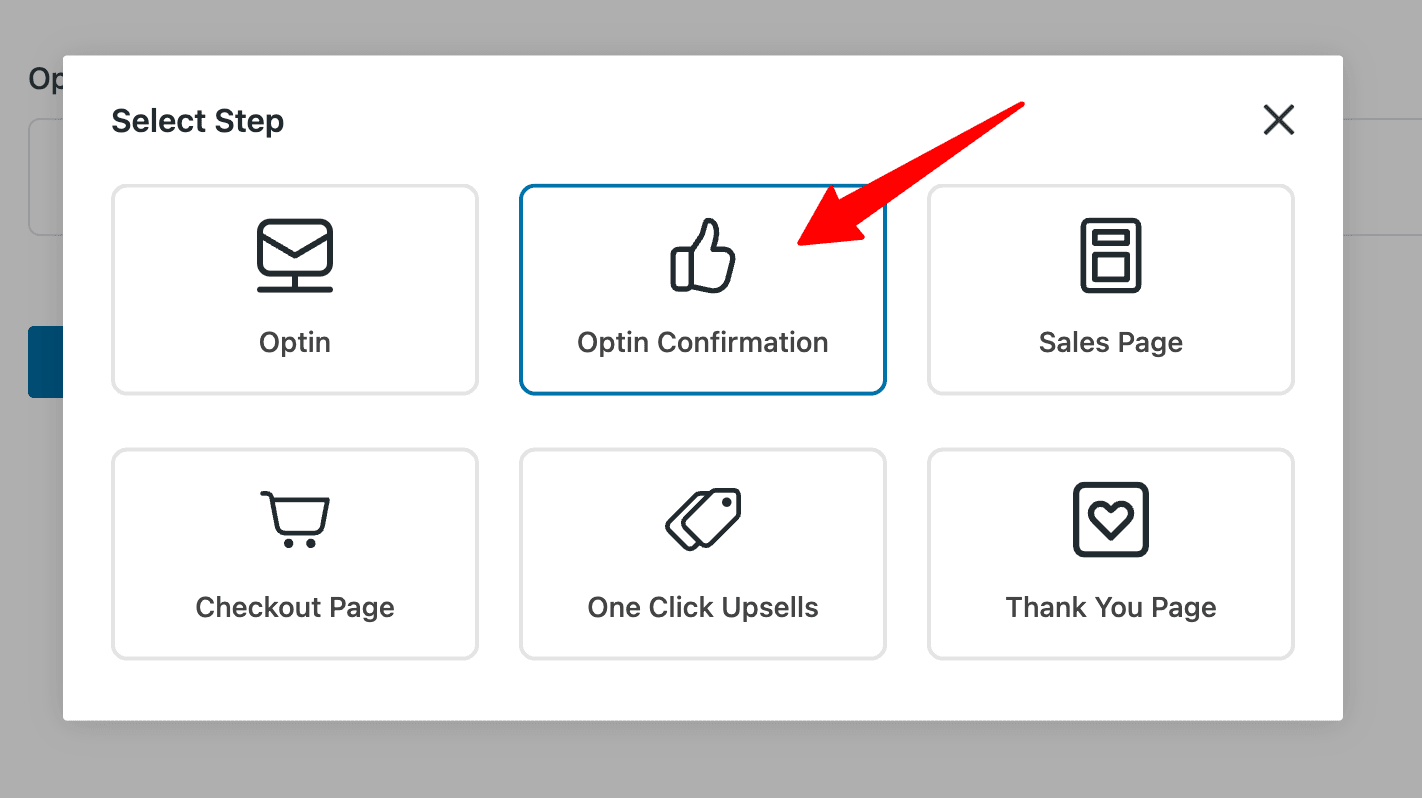
Once you click Optin Confirmation, give your new funnel step a name and click Add.

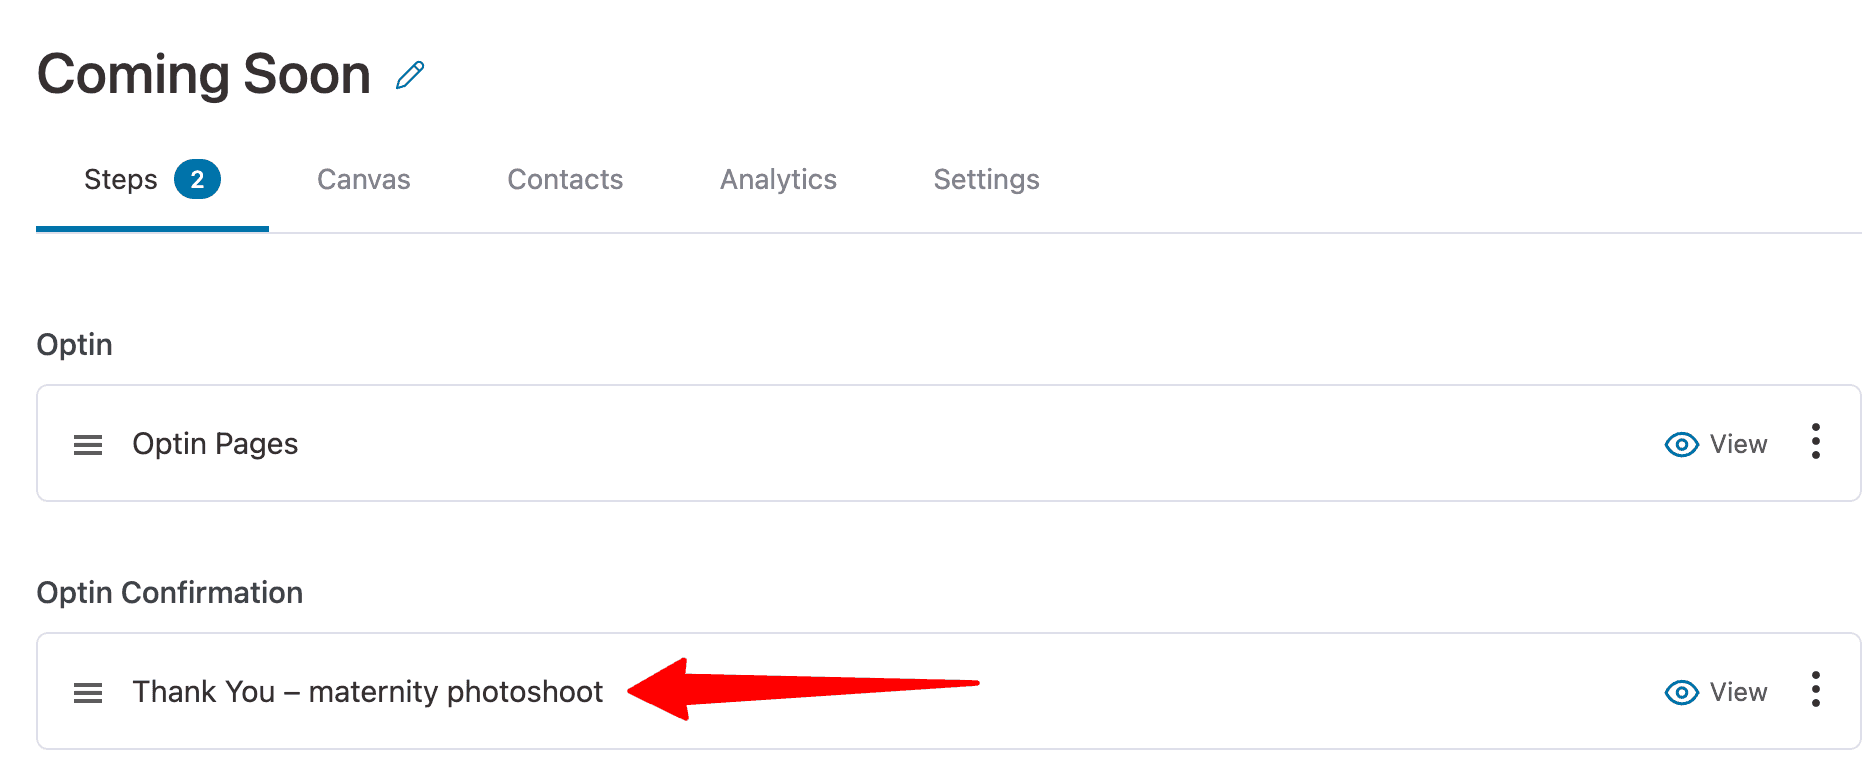
Once you complete that, you’ll now have two steps in your funnel, as shown below.
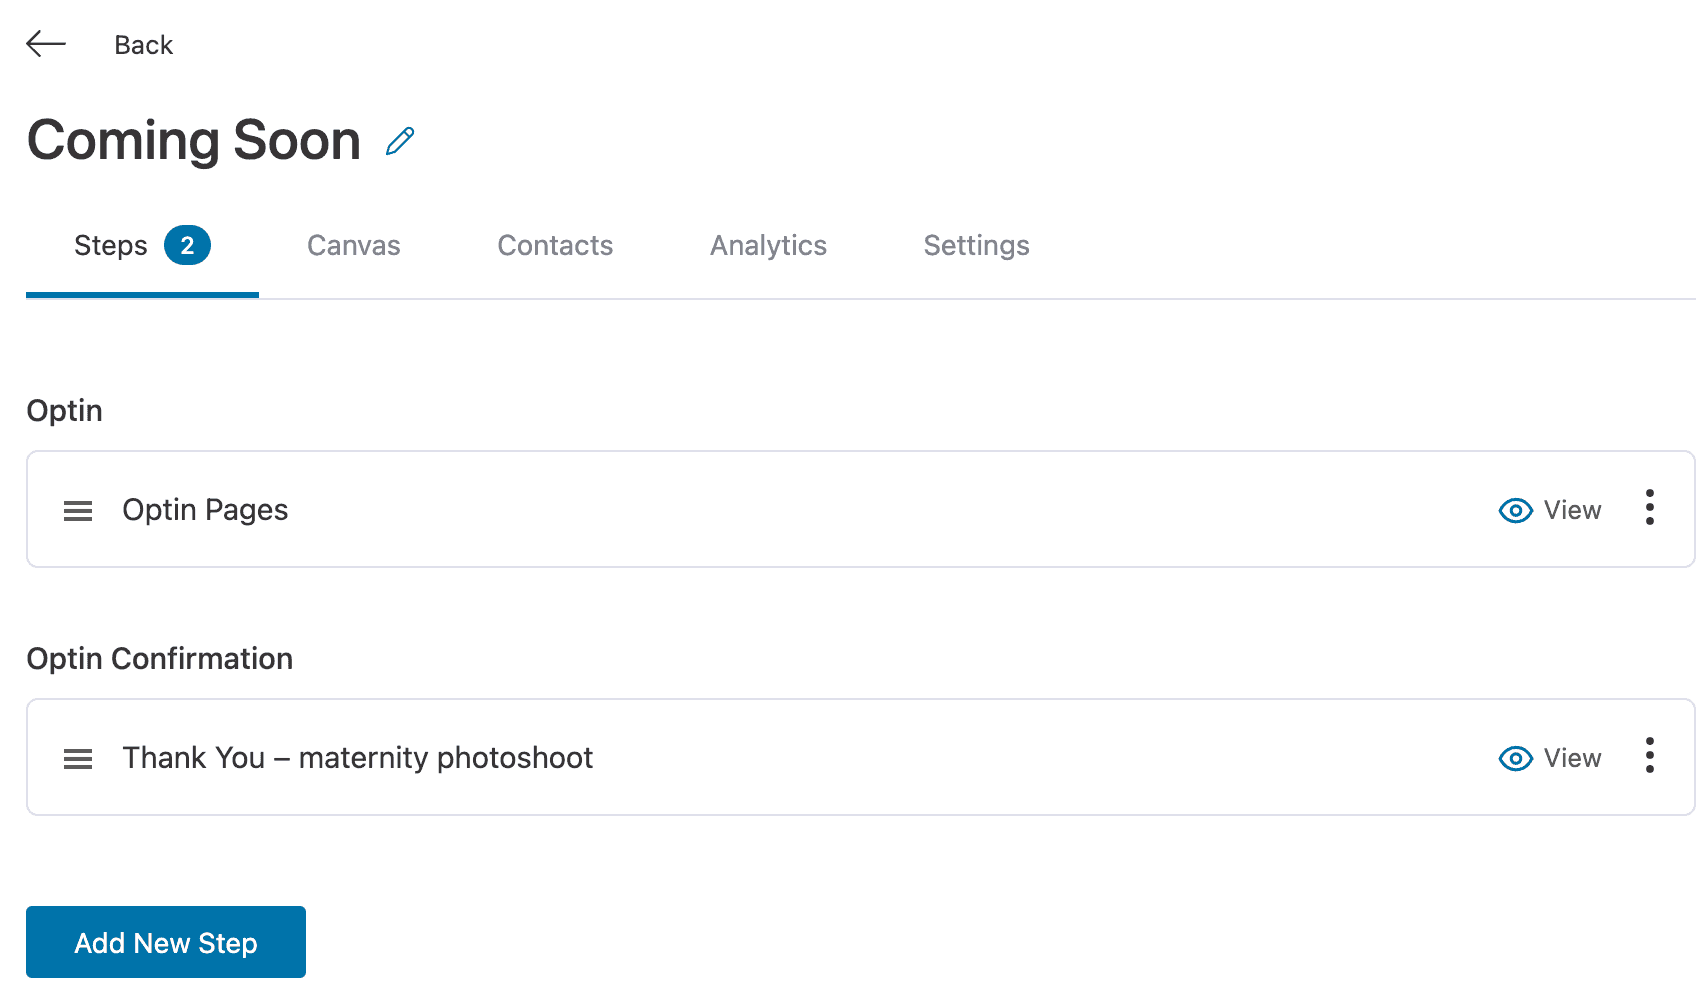
NOTE! What’s really clever about FunnelKit is that it already knows to send people from our Optin Page step to our Thank You step we just created as both these steps are in the same Funnel.
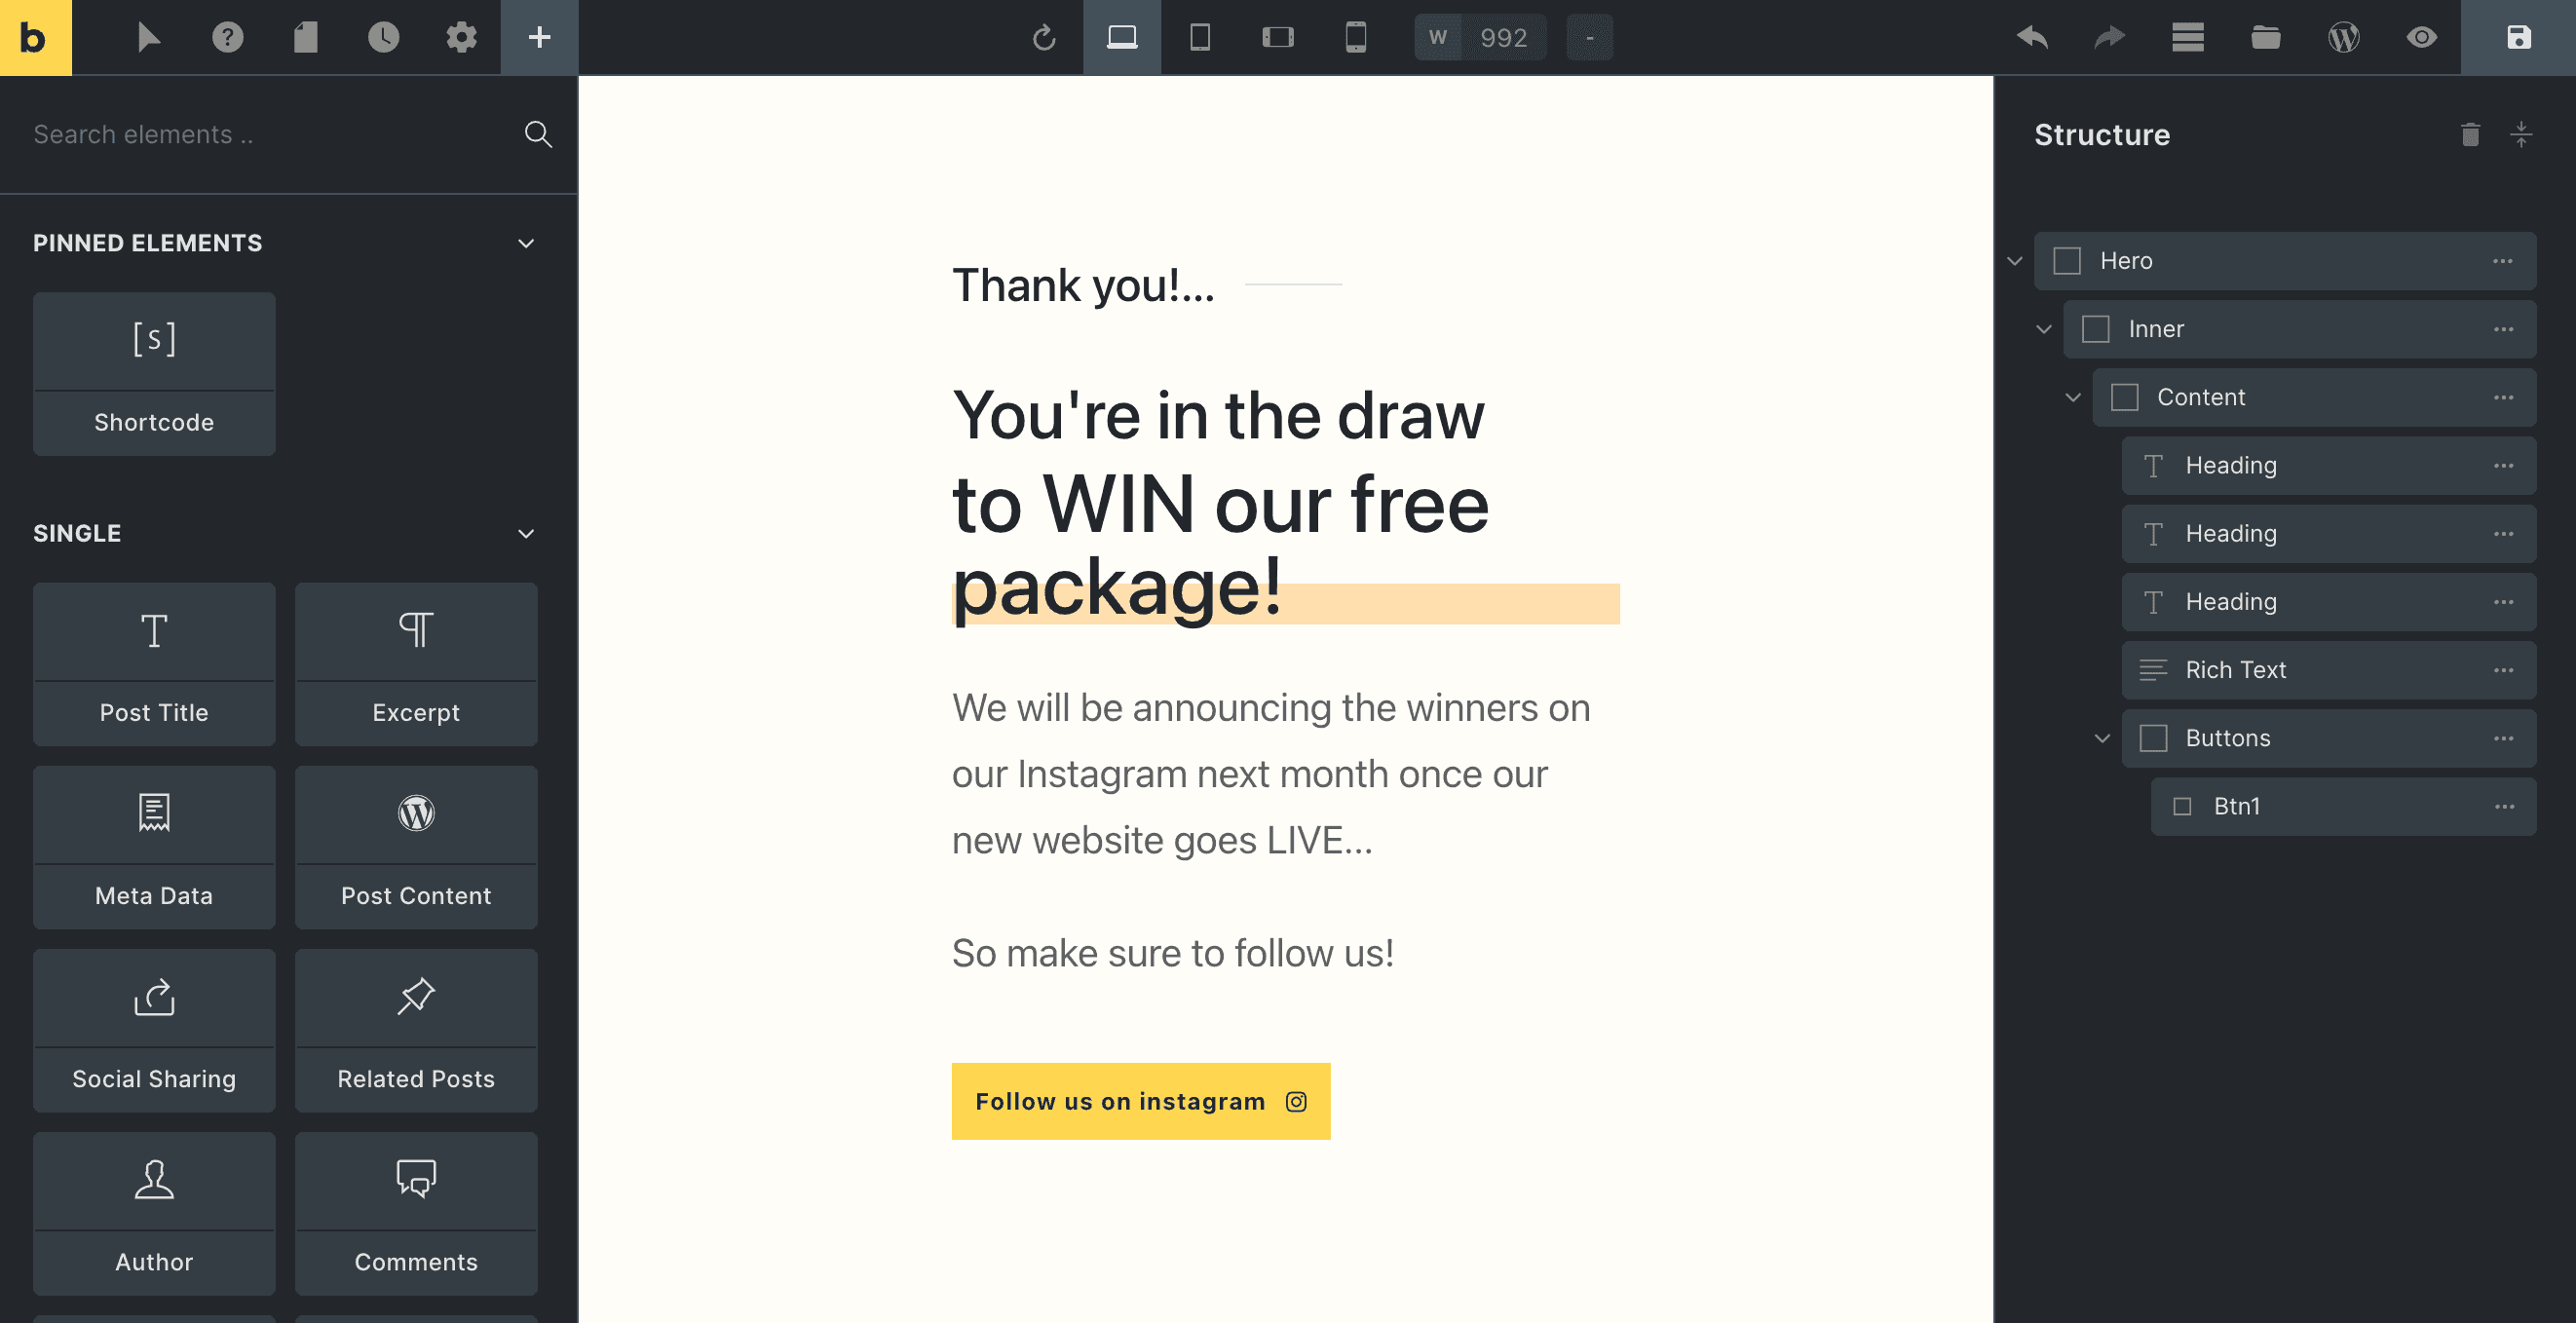
Designing our Thank You page
So now we just need to design our Thank You page and we do it the same as we did the Coming Soon Page.
Click into your Thank You page step in the funnel…
And then design it using your favourite Page Builder as you would any other page on your website.
Here is what I designed using Bricks Builder.
The Final Result
Here is everything we’ve created up until this point, in one animation.

How to see our Conversion Rate for our Coming Soon page
Once I show you this, you’ll hopefully agree that FunnelKit is the best Coming Soon page plugin for WordPress.
Because FunnelKit allows you to build entire Sales Funnels, it has built-in reporting so you can see what Conversion rate your Coming Soon page has.
In FunnelKit, edit your Funnel and then click on the Analytics Tab (1) and then you should all the data below.
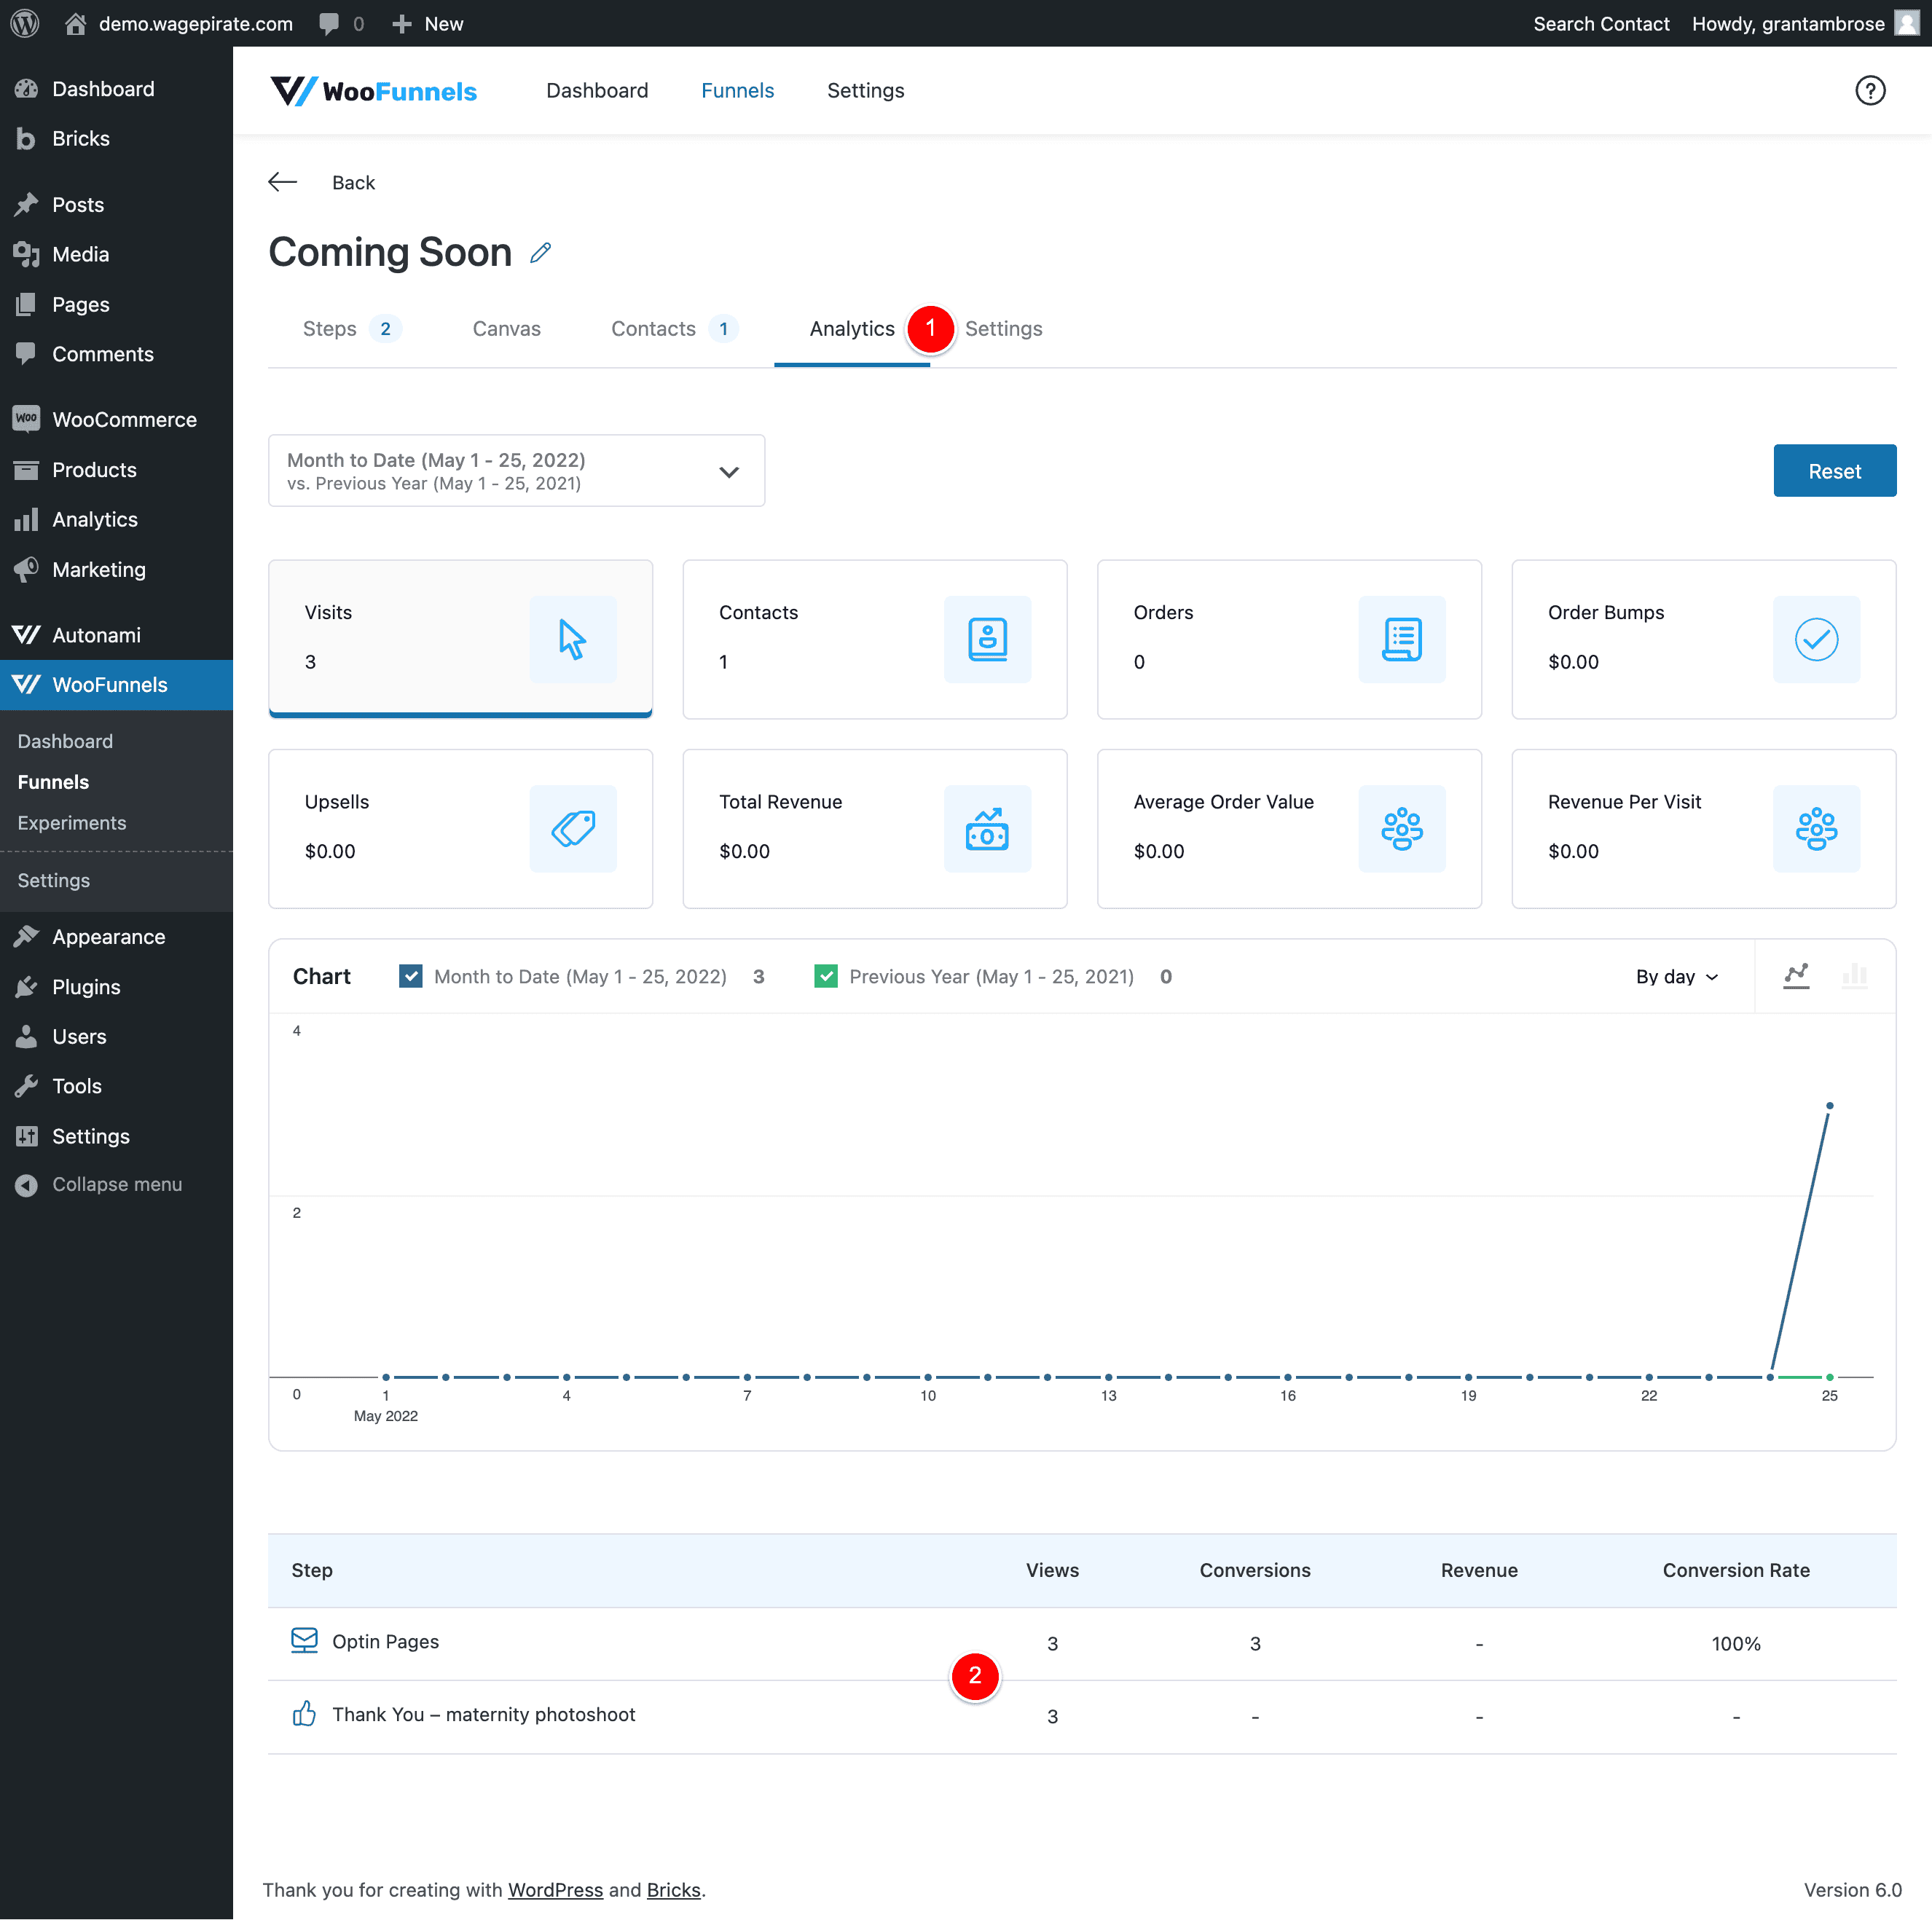
If we focus at (2) above…
While creating this tutorial, I viewed the Coming Soon page 3 times and I completed the Optin Form every single time – hence the 100% conversion rate.
Once I completed the Opt-in form, I was redirected to the next step in the funnel – our Thank You page, thus that step has 3 views.
Now, if I go back to the Coming Soon page and REFRESH and don’t complete the Opt-in form, we can see the stats update as per below.
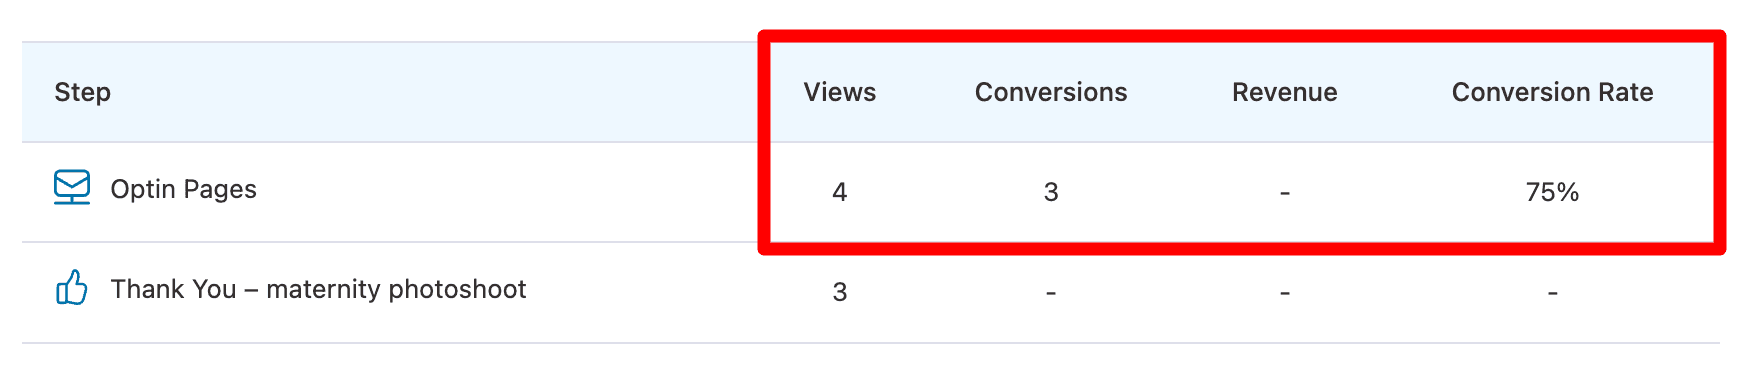
So now that I have viewed that Coming Soon page 4 times and only completed the Opt-in form 3 times, the conversion rate is now 75%.
I know, I know – we can only dream of a 75% conversion rate – but I’m going to run with it here.
Again, this all comes built-in with the FunnelKit plugin for WordPress and this is why I think FunnelKit is the best alternative to ClickFunnels.
RELATED: Don’t forget to read my full review of the FunnelKit plugin here.
Connect your Subscribe Form to your Email Marketing software
Currently, when people complete the Email Form on our Coming Soon page, they are not added as a Contact in our CRM / Email Marketing software. Let’s fix that!
Connect your form to ActiveCampaign / Mailchimp etc
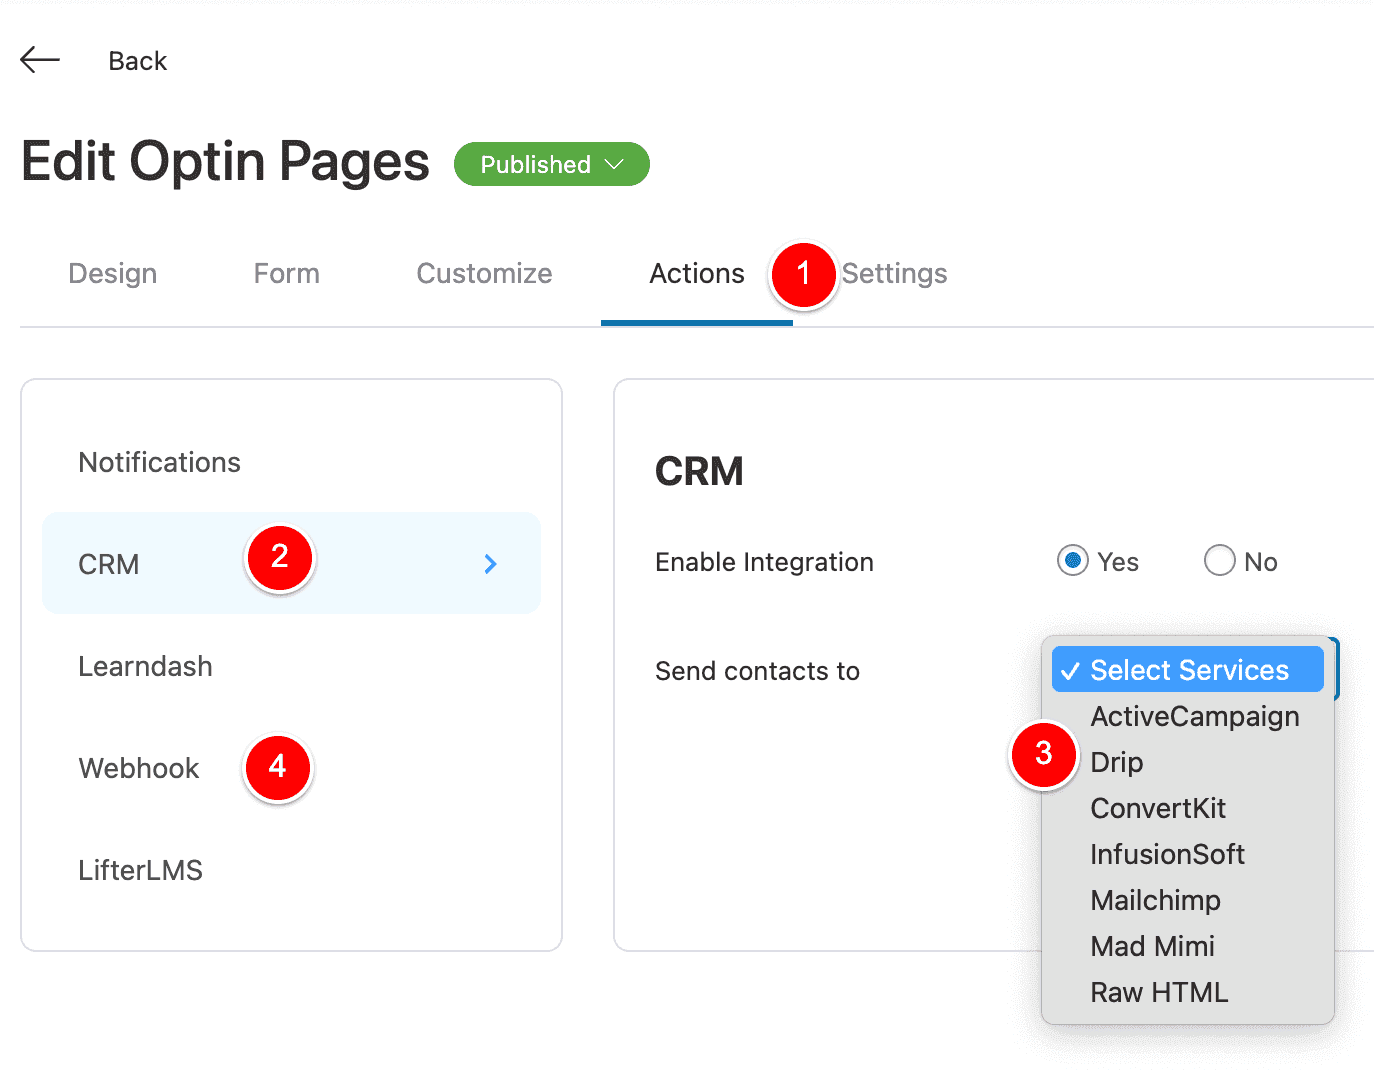
When you edit the Optin step in your funnel, you can click on the Actions tab (1) and under CRM (2) you have a few options here that you can integrate with (you also can send to a webhook URL as shown at (4) below ).
Connect your Optin Form to FunnelKit Automations
For my businesses, I use a WordPress plugin called FunnelKit Automations as my CRM and Email Marketing solution.
What is the FunnelKit Automations CRM for WordPress
Here are some articles I strongly suggest you read next because I am saving a lot of money since I moved to FunnelKit Automations and left ActiveCampaign and you might be able to do the same.
RELATED: FunnelKit Automations Review 2022: The BEST CRM for WordPress & WooCommerce (with Screenshots)
RELATED: Best ActiveCampaign Alternative (100% WordPress solution – FunnelKit Automations)
One of the biggest benefits of getting FunnelKit Automations is that it’s actually developed by the same company as the FunnelKit plugin.
For this reason, you can actually get FunnelKit Automations + FunnelKit as a bundle deal and save, as shown below.
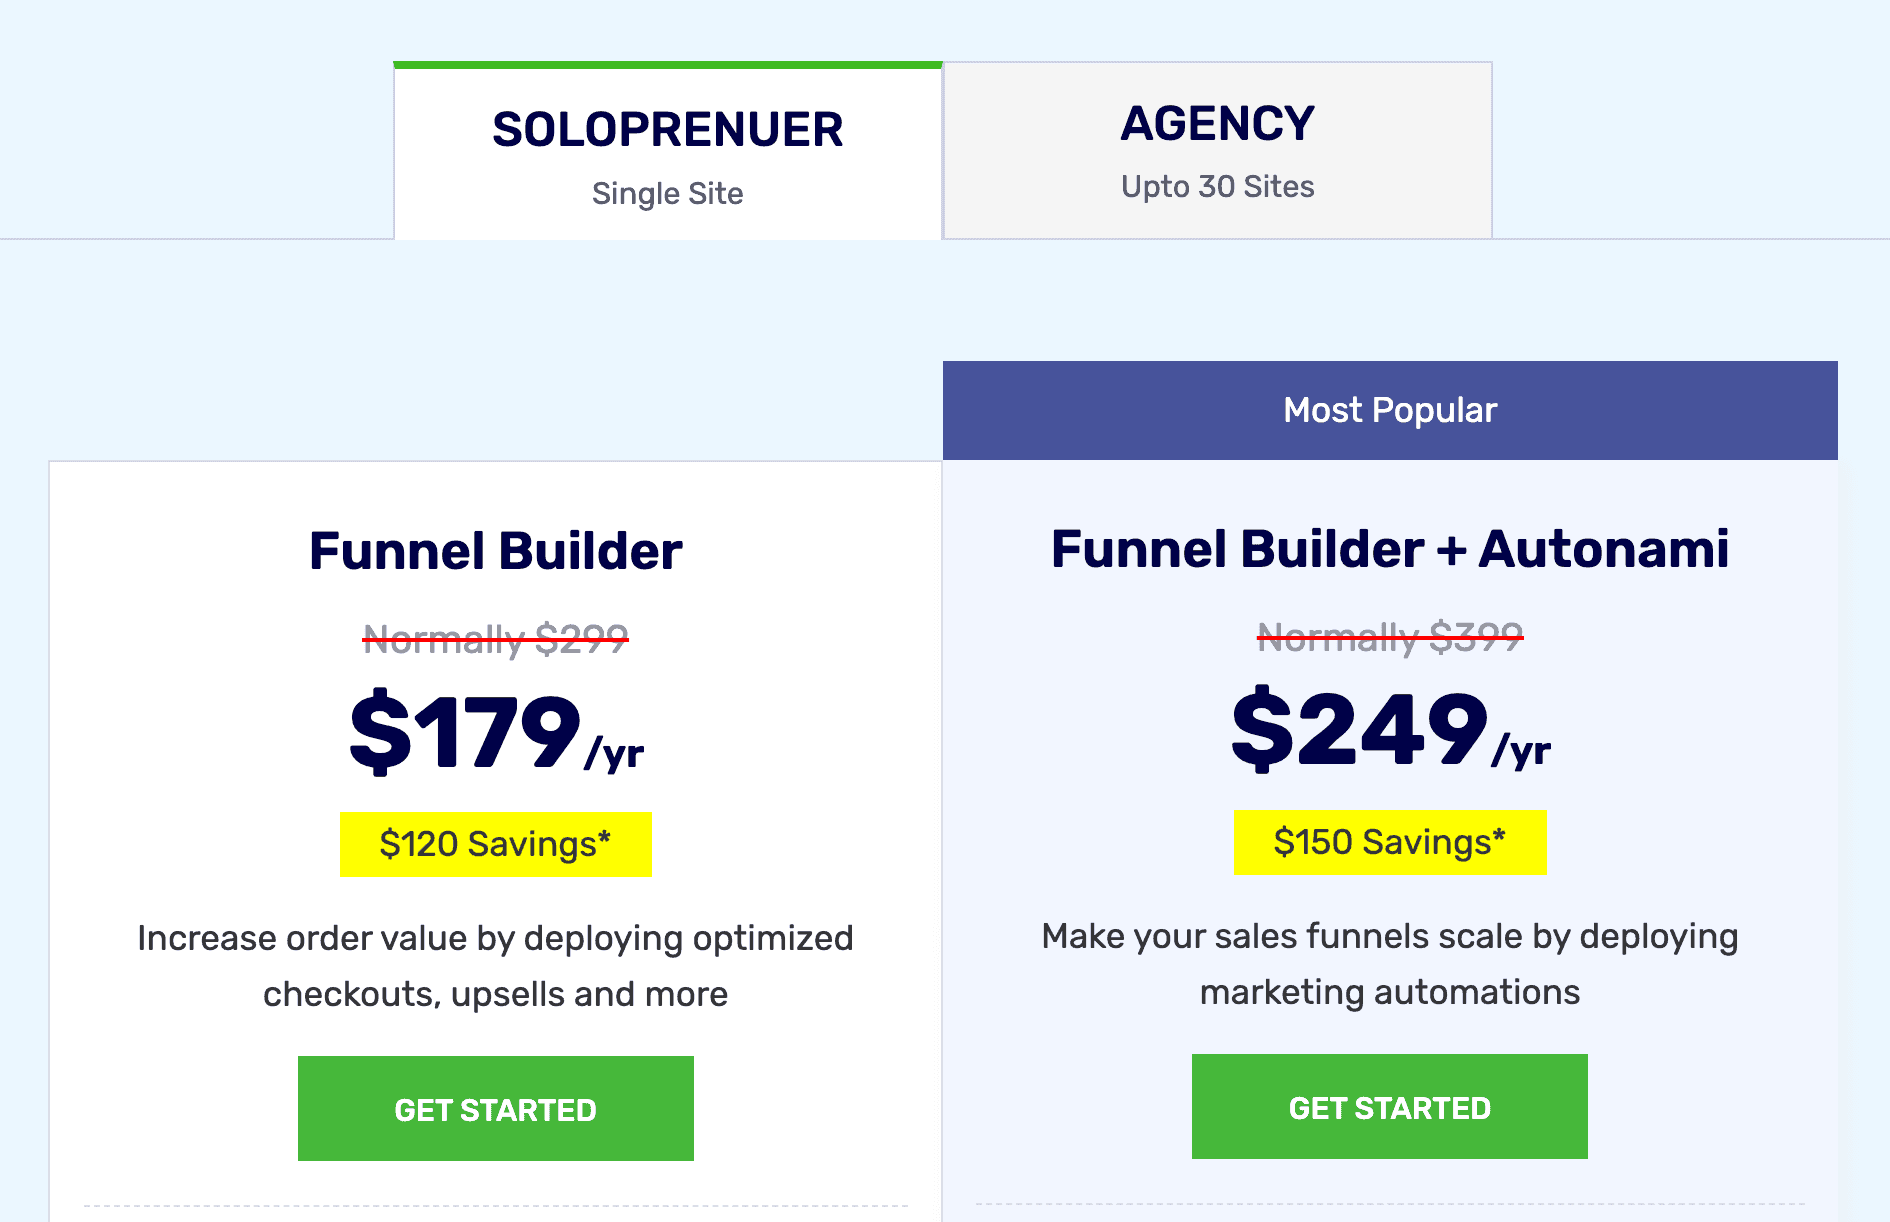
And because they’re built by the same team, you not only save money with the bundle – but you also get a very tight integration between the two systems, as you’ll see in the next bit of this tutorial.
NOTE: Click below to go directly to the FunnelKit / FunnelKit Automations website to read more about how it all works.
How to Connect your form to FunnelKit Automations
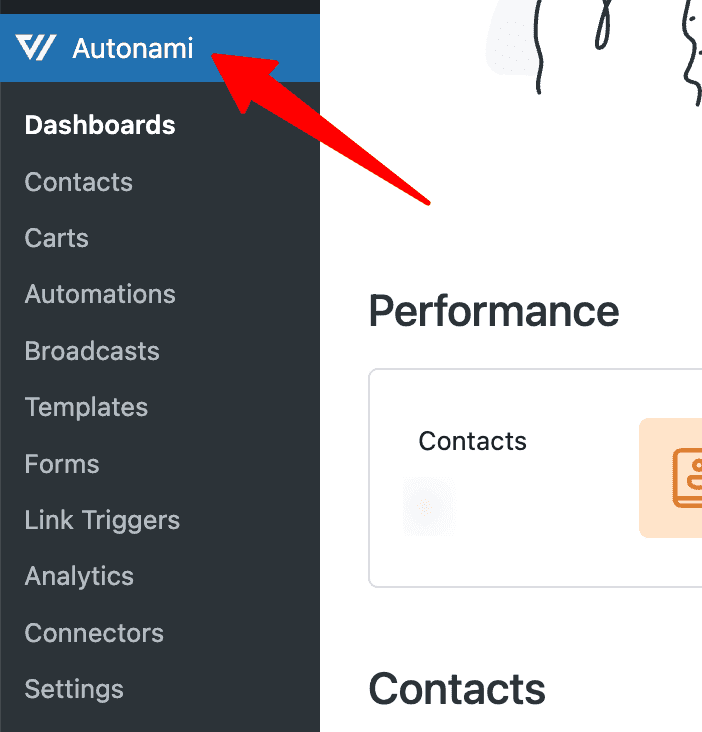
Once you install the FunnelKit Automations plugin for WordPress, you’ll see a new menu option in your WP Admin menu.
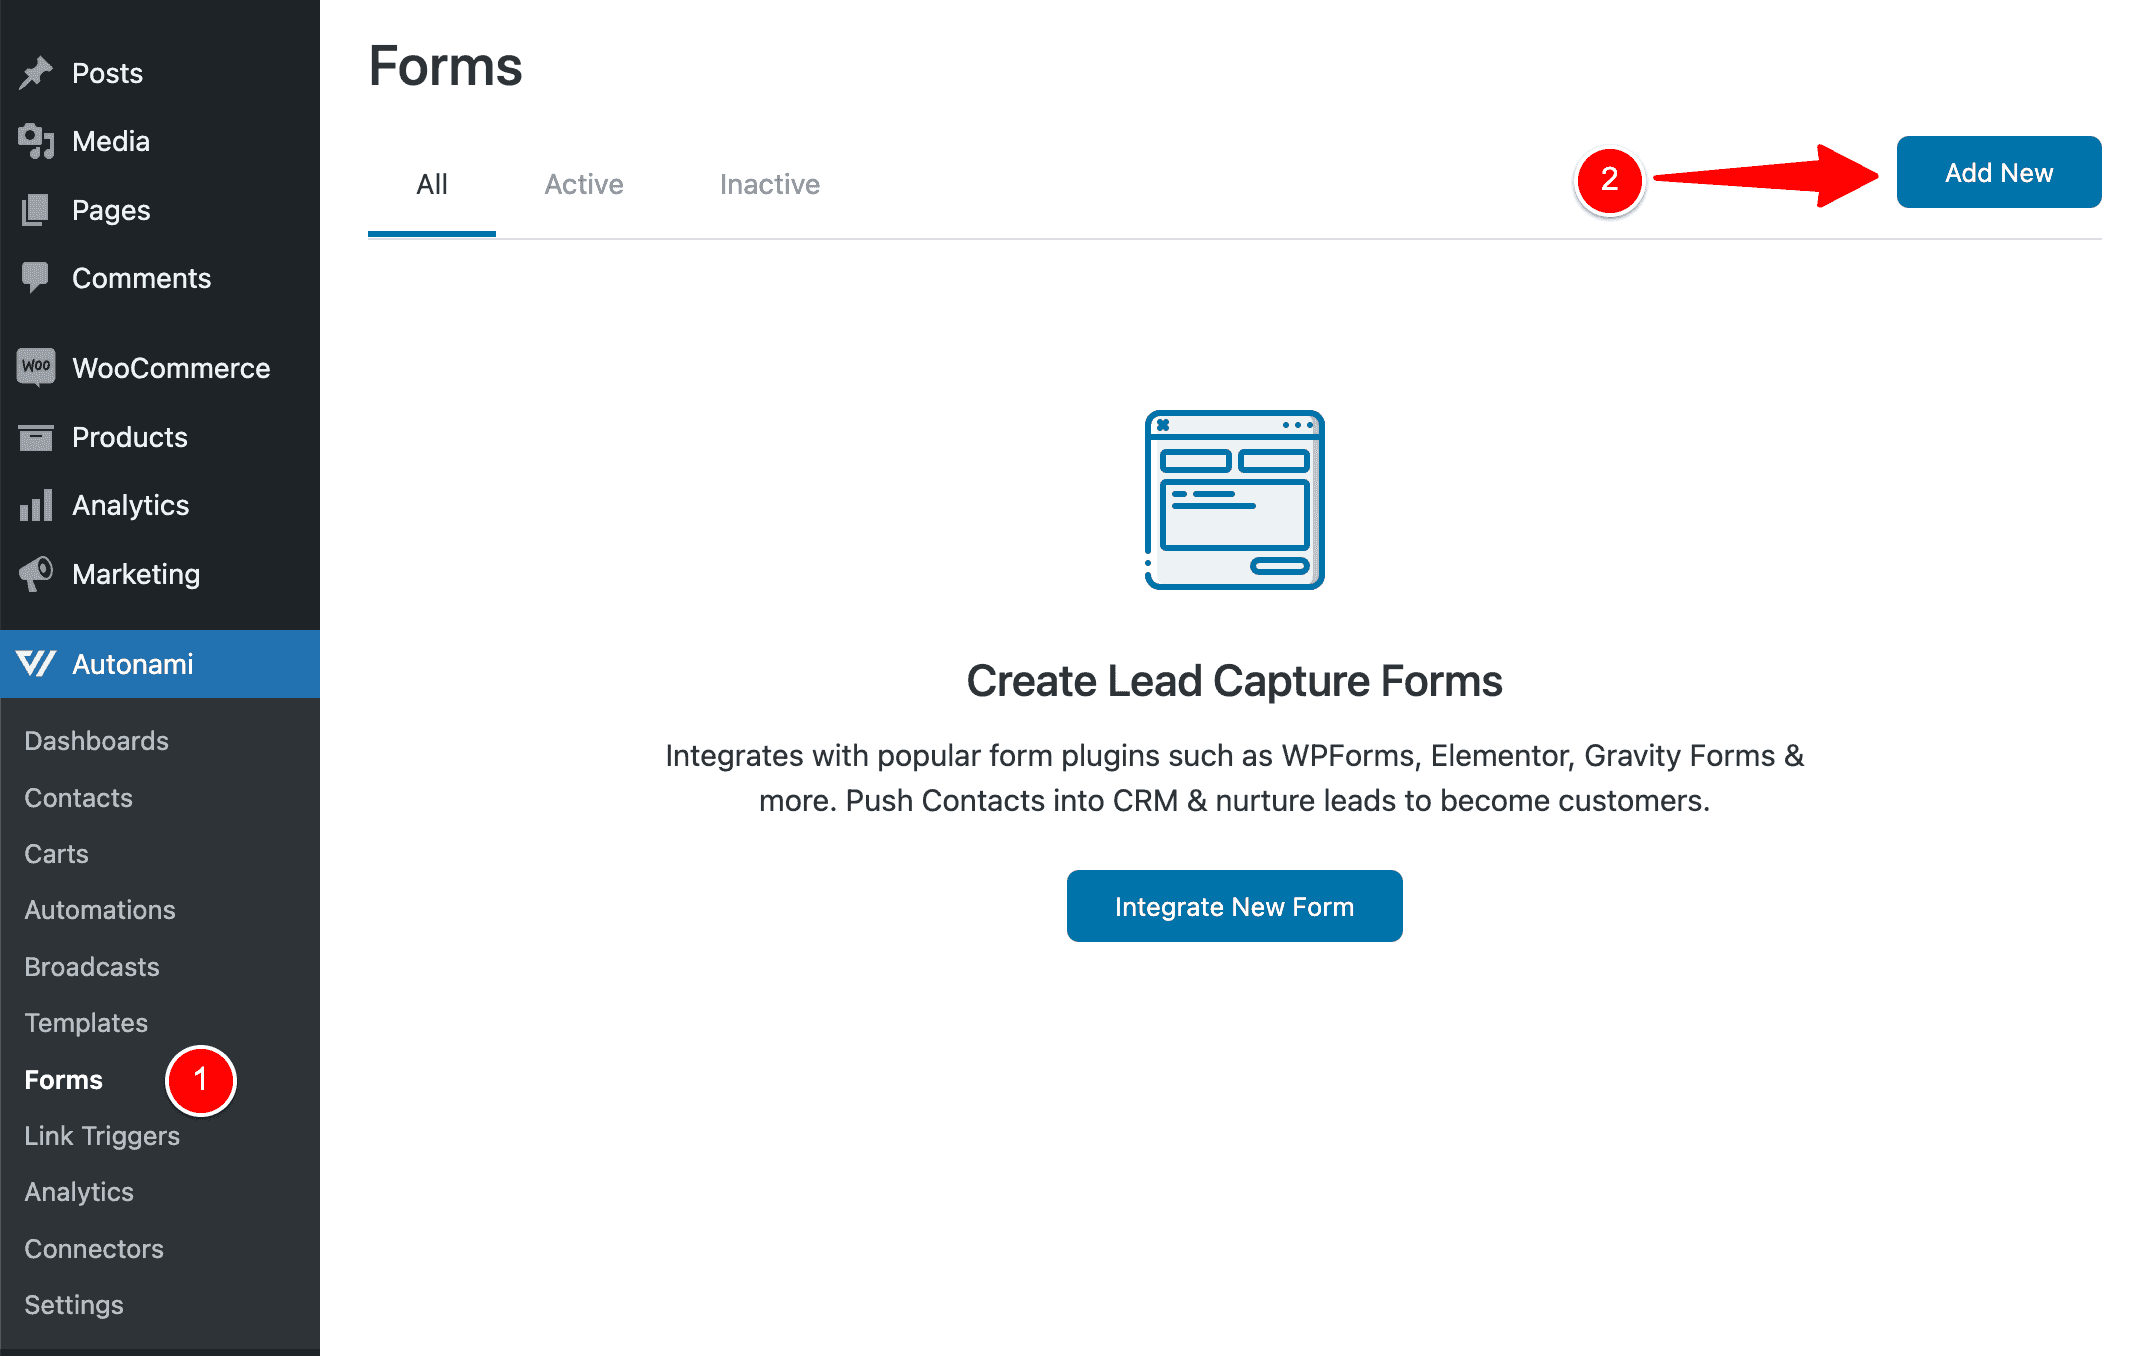
Go to FunnelKit Automations > Forms (1) and then click Add New (2).
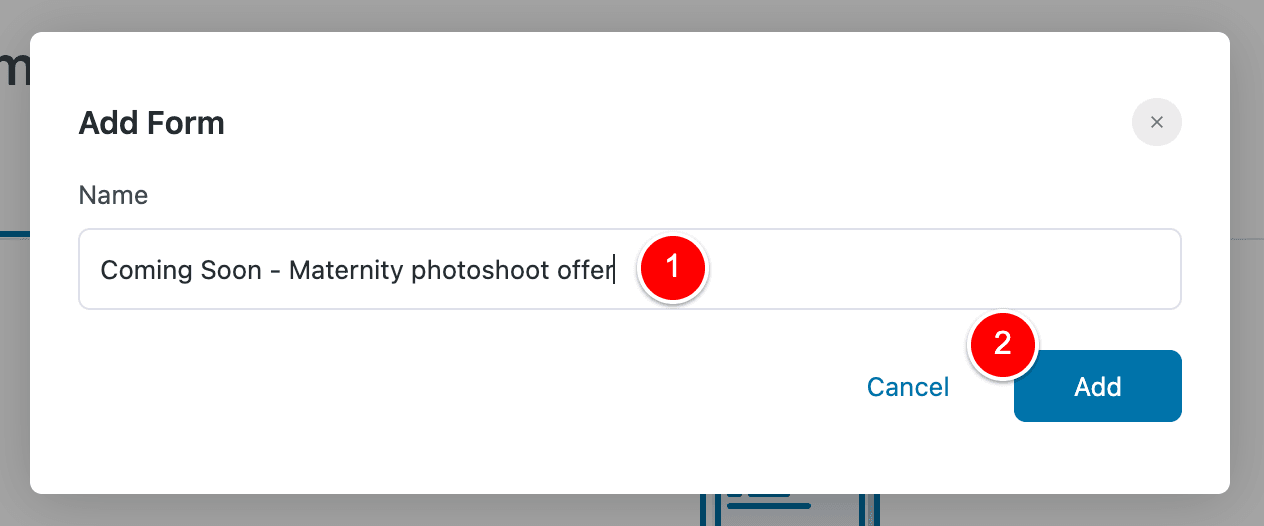
Give your Form a name (1) and then click Add (2).
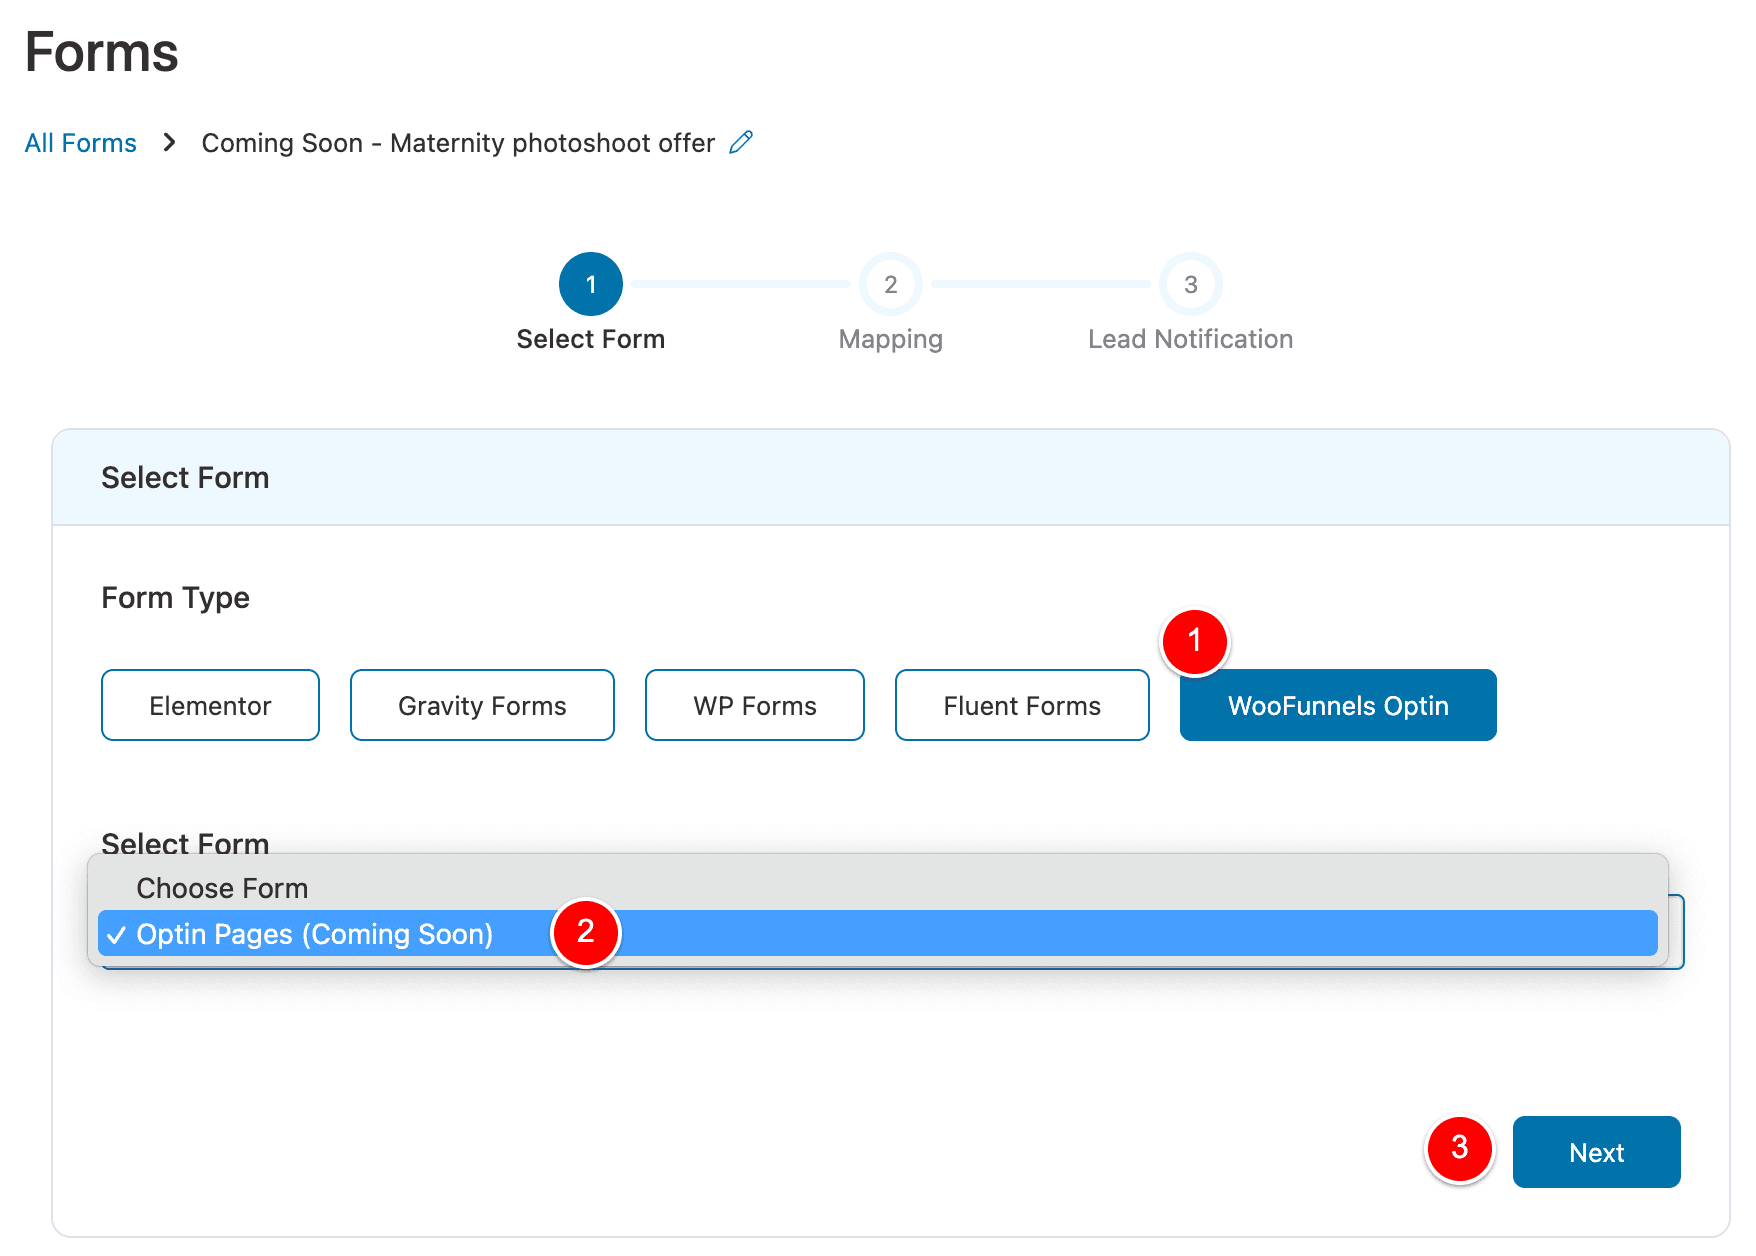
Click FunnelKit Optin as your form type (1), select your Form at (2) and then click Next at (3).
In the next step, we need to map the fields from our Opt-in form (1) to the Contact Fields in FunnelKit Automations (2), as shown below.
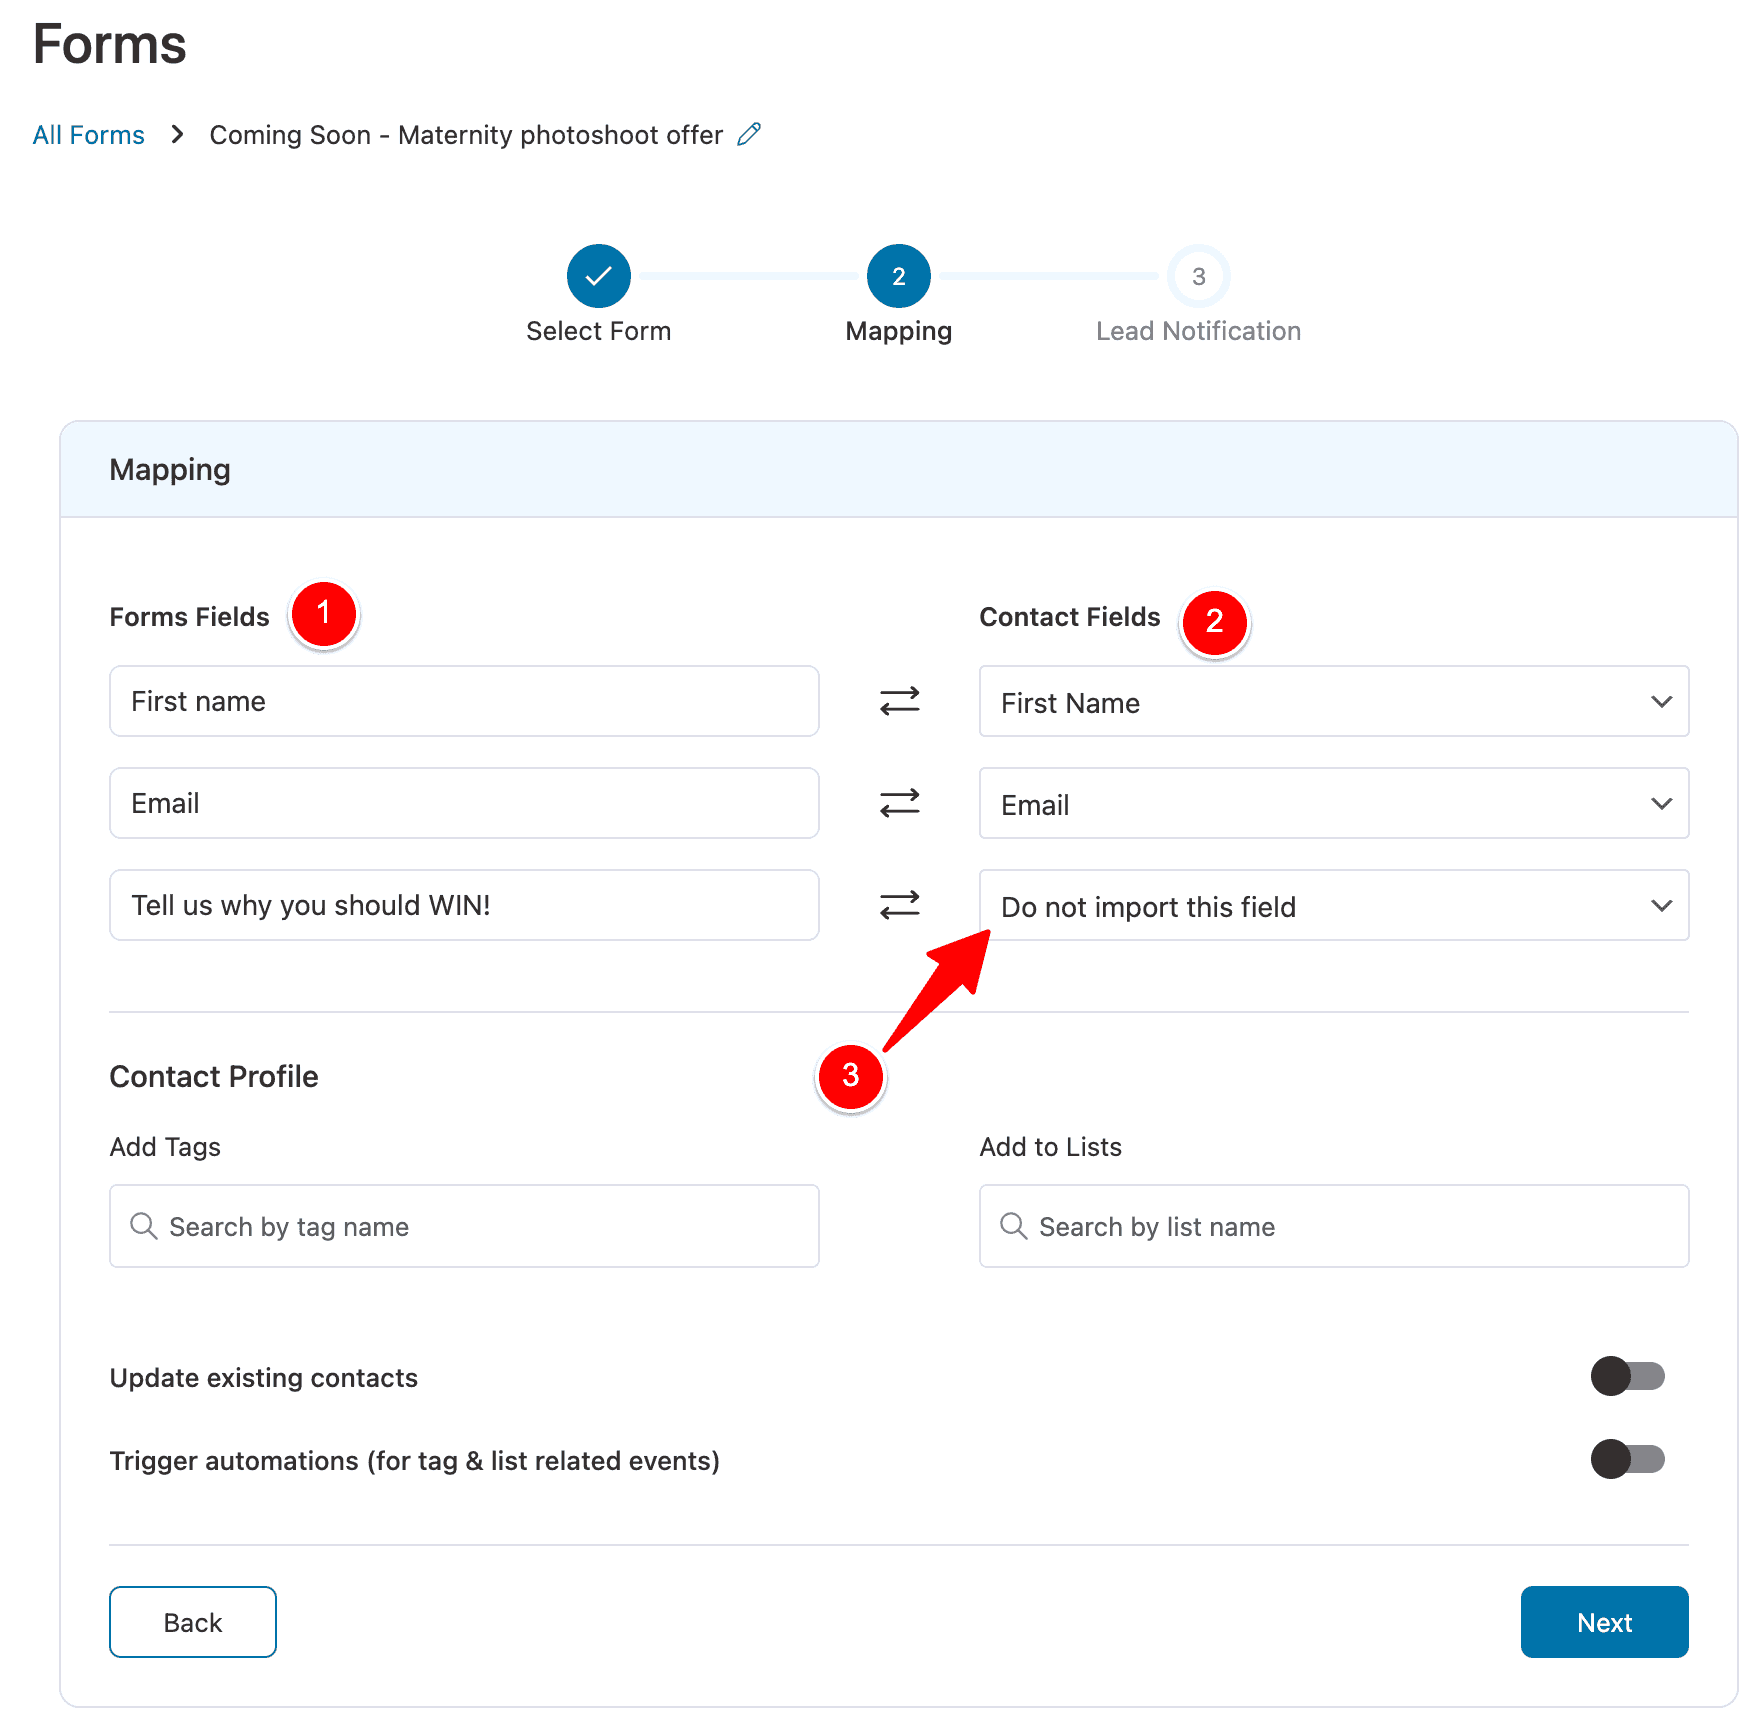
But we have a problem – we haven’t created the “Tell us why you should WIN!” field in FunnelKit Automations, so we have no field to save this data to.
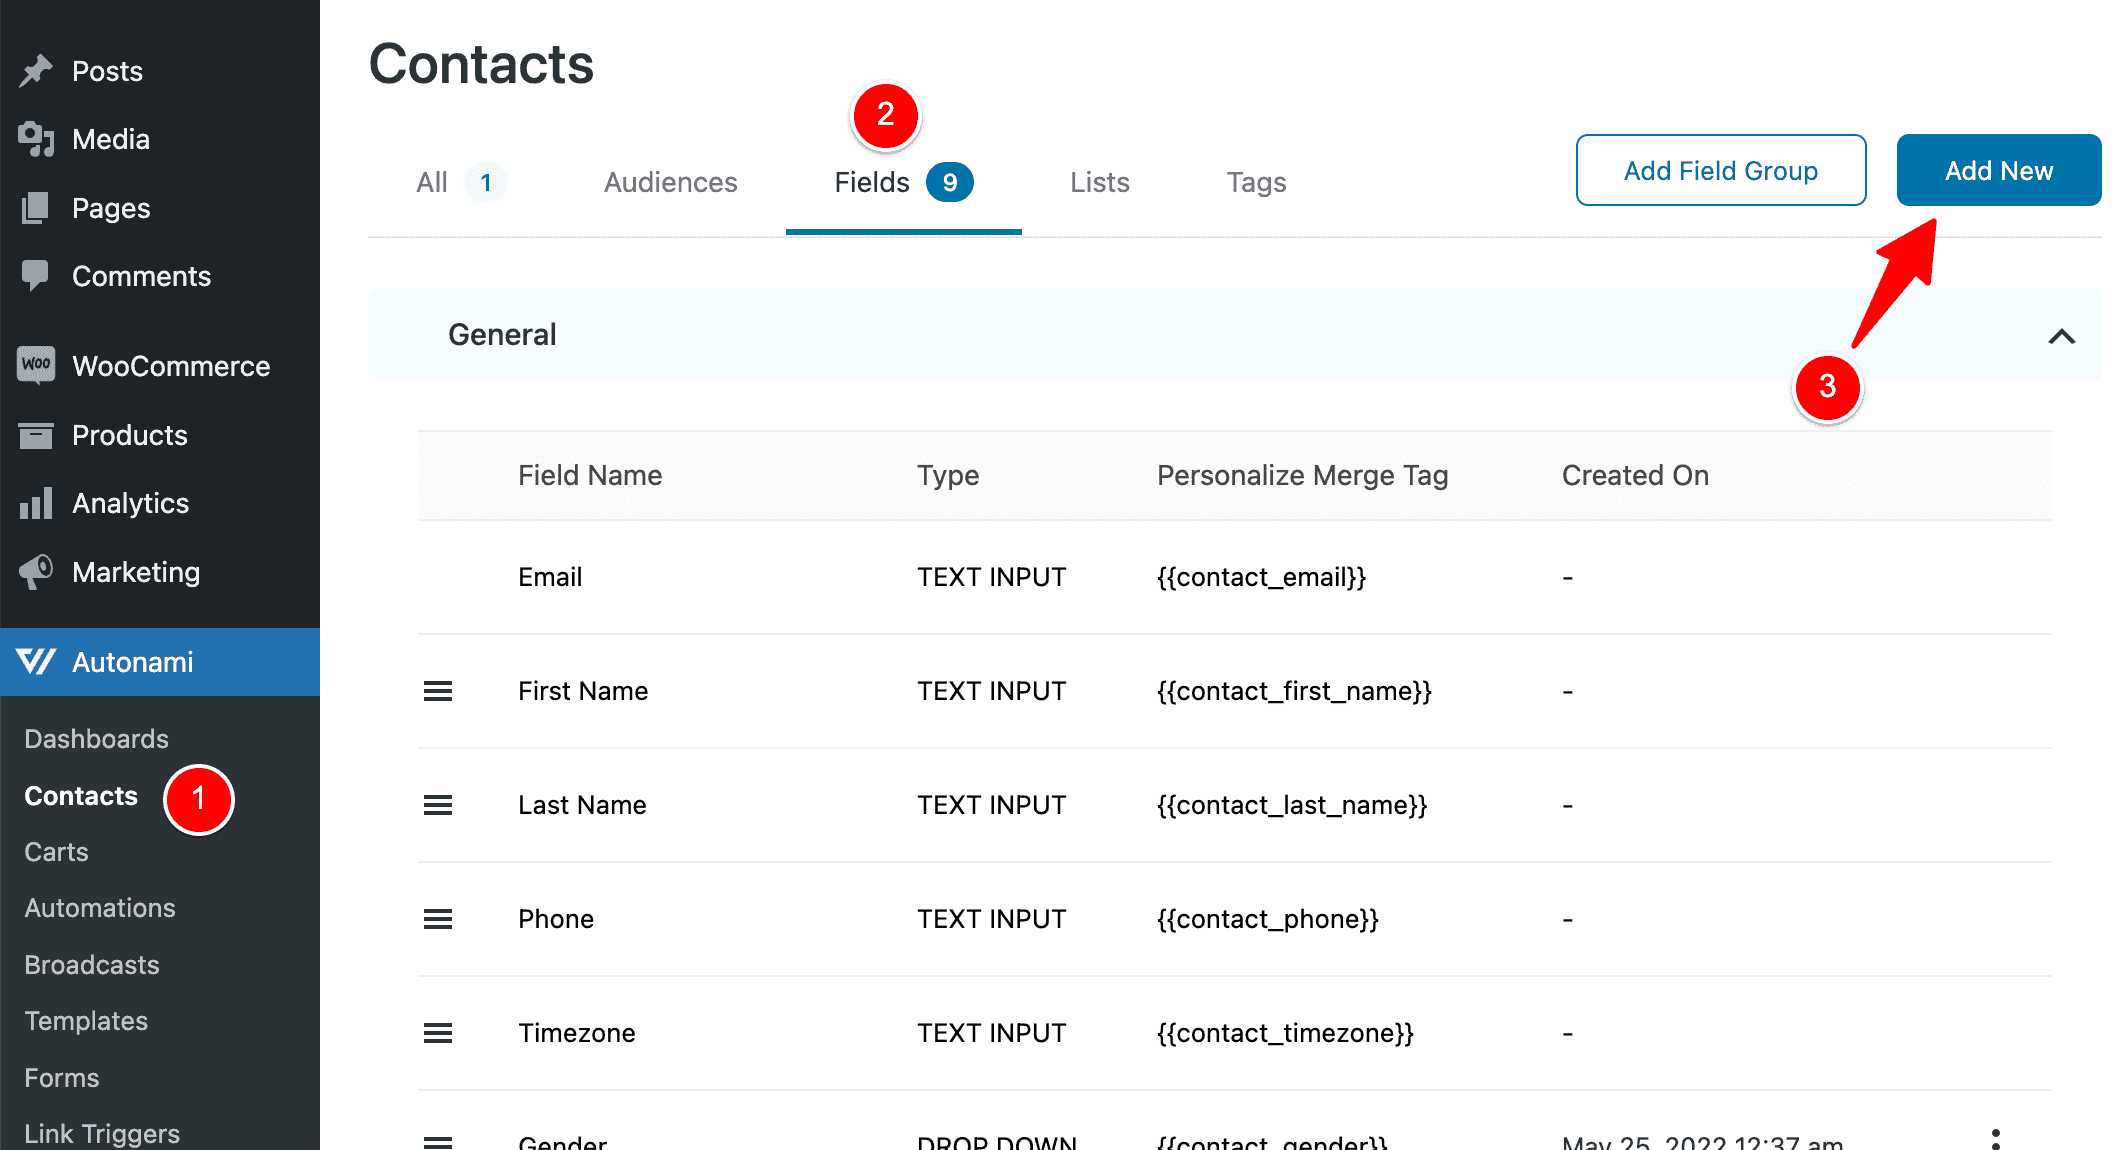
To create this field, go back to FunnelKit Automations > Contacts (1), click on the Fields tab (2) and then click Add New (3).
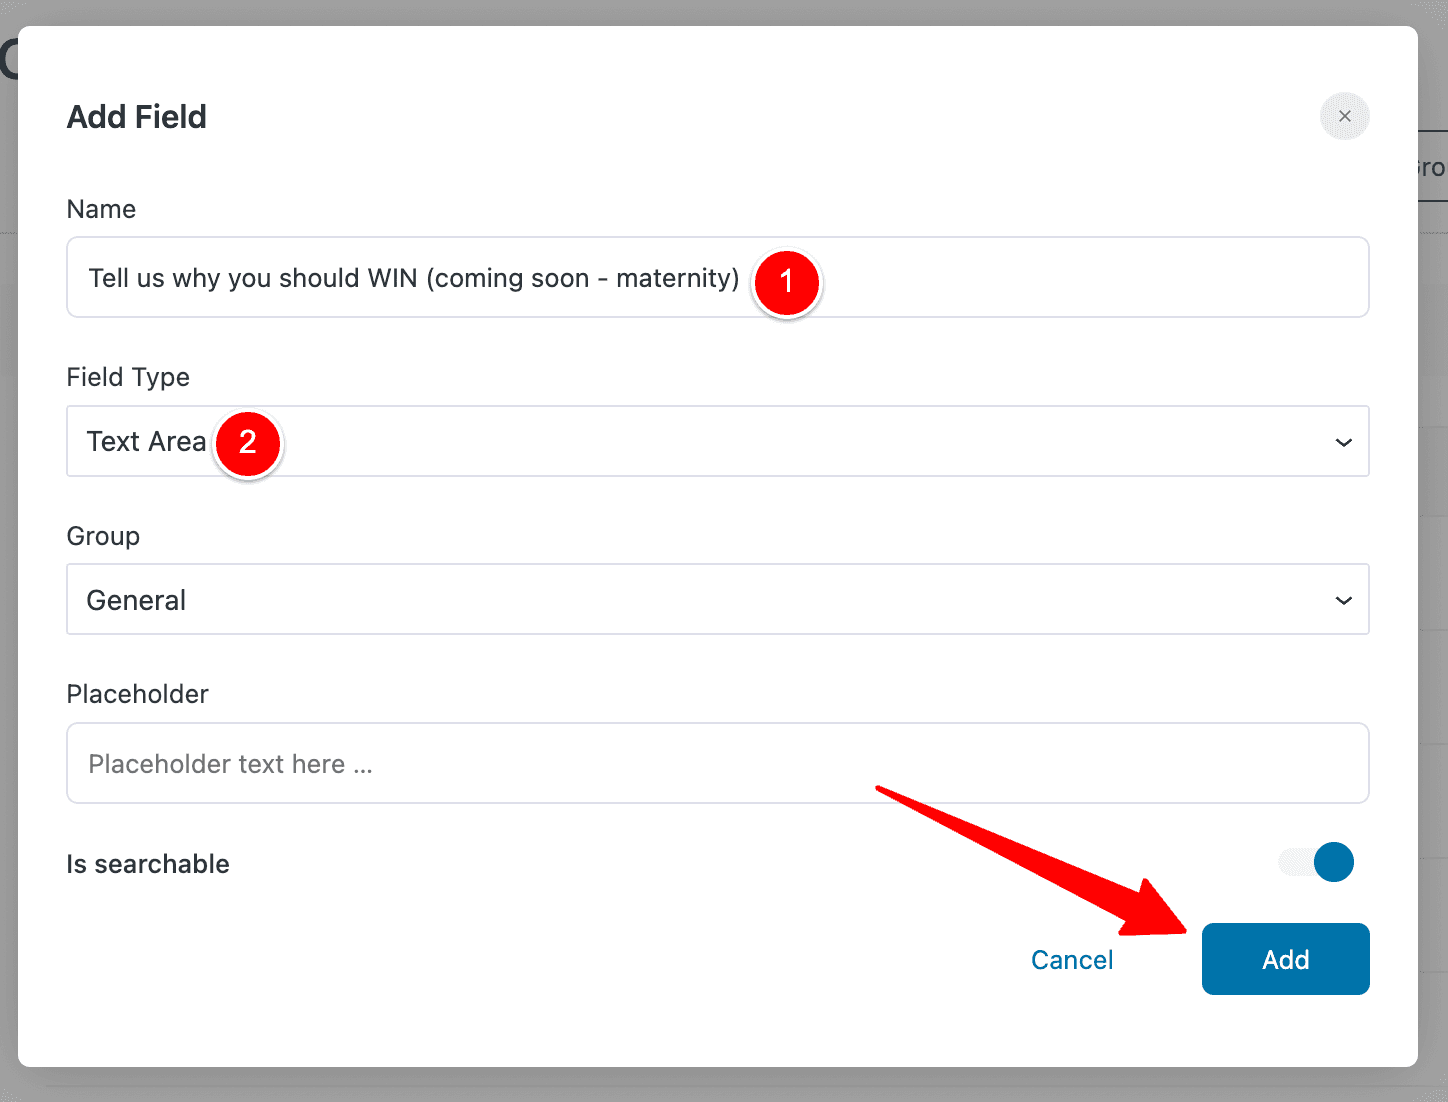
Give your field a name you’ll remember (1), select the field type to match the type of field you used when you created the Optin Form in FunnelKit (we used Textarea for this field so I’ll select the same here at 2) and then click Add (3).
Now if we go back to mapping our fields, we can select this new field to map our “Tell us why you should WIN!” data to, as shown below at (1).
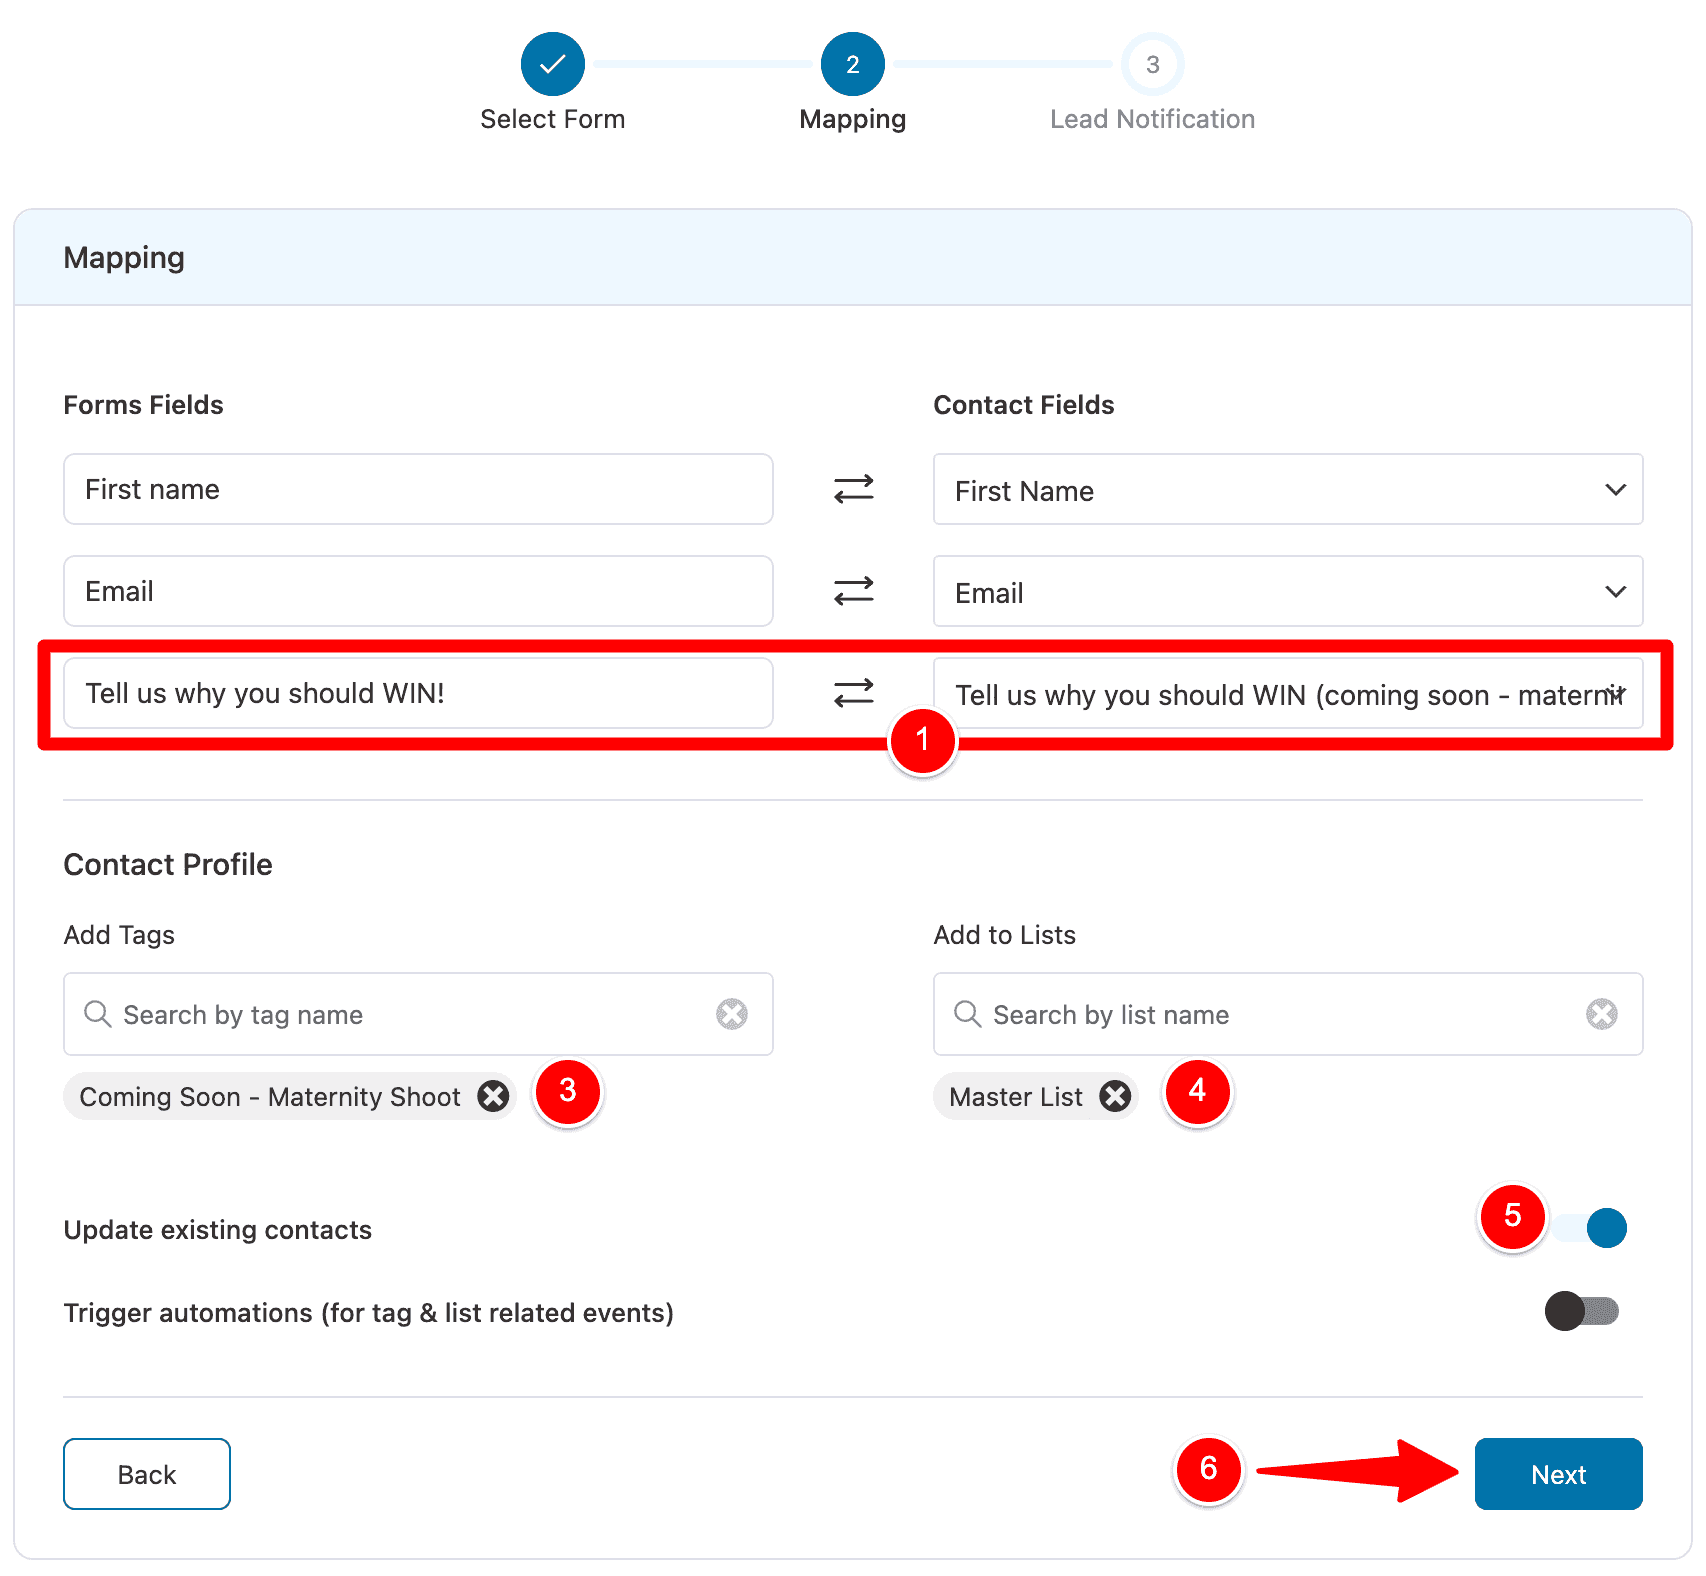
At this stage, you can also tag contacts at (3) and add them to a specific Mailing List (4) inside FunnelKit Automations (it’s up to you).
Once you’re done, click Next at (6) in the image above.
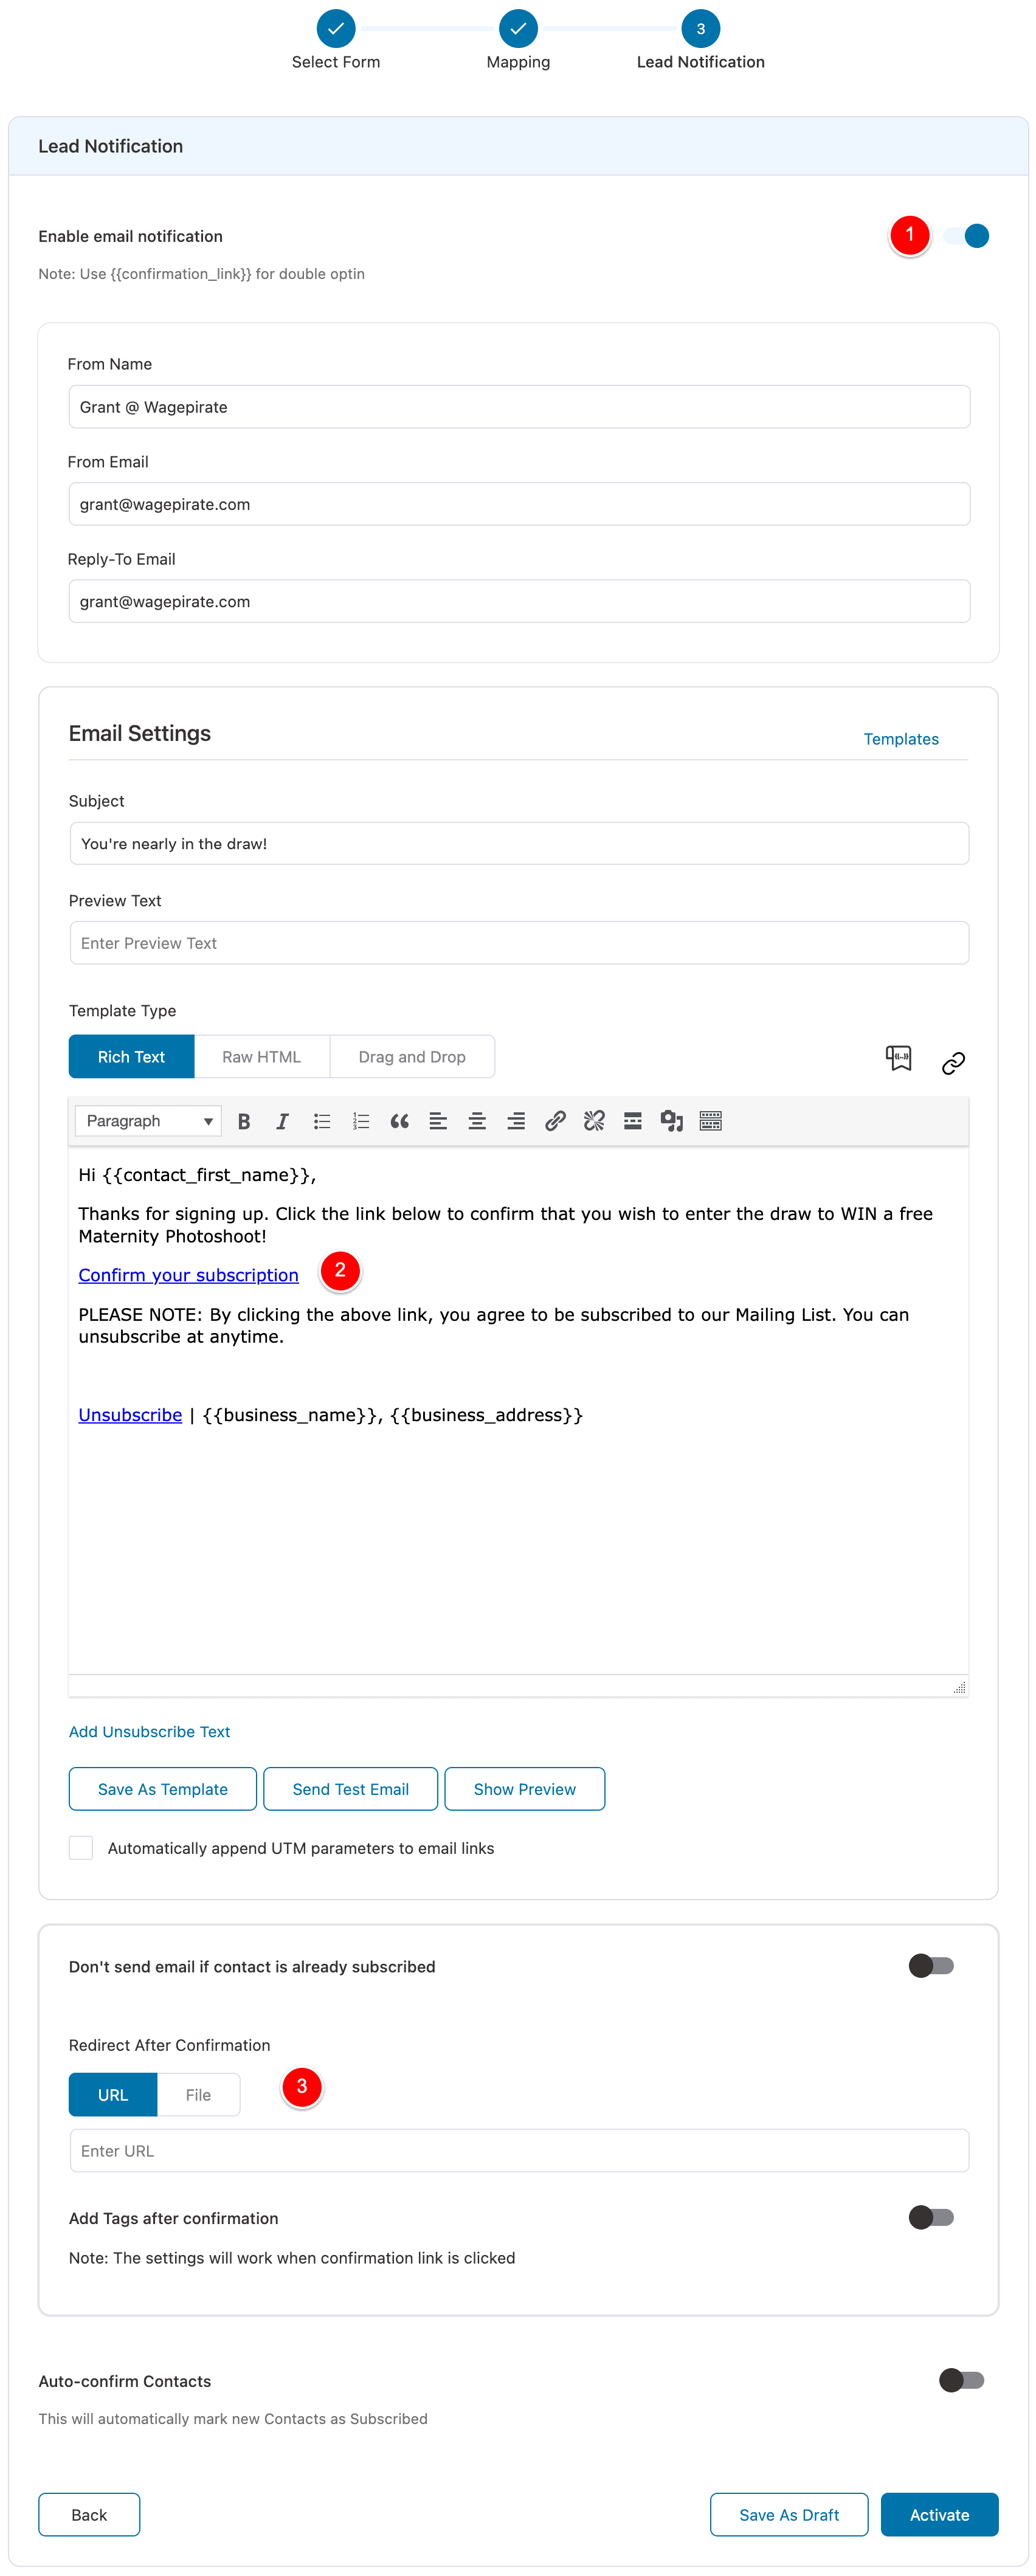
On the last screen Lead Notifications (shown below), we have a few things I want to point out here.
Before we get into the settings, let me explain the workflow here so you know what we’re trying to achieve here:
- Our customer lands on our Coming Soon page and sees our offer to enter their email address to go into the draw to WIN our free maternity photoshoot package.
- The customer puts in their name and email address, tells us why they should WIN and then once they submit this form, they land on our Thank You page
- Once they submit this form, we will send them an email that asks them to click the link to confirm they want to go into the draw to WIN and we also state that by clicking this link they agree to join our Mailing List
- NOTE: The reason we ask them to click a link in their email before we subscribe them to our Mailing List is to ensure that they are using a real email address and not a fake spam one.
Now that we know this, let’s review these settings below.
Please review the image below and then I’ll discuss what’s happening with our settings after the image.
Ok, so let’s go through what we’re doing here
- At (1) we are enabling Email Notifications. This means that once a user completes this form on our Coming Soon page, we will then send them an email – that’s all this setting is doing.
- At (2), the content of the email clearly states that they must click the link in the email to confirm they want to go into the draw to WIN the free photoshoot. We also clearly state that by clicking this link, they are agreeing to join our Mailing List so we can email them in the future.
At (3), well… you can see I’ve left that empty.
That’s because we need to set up one last thing.
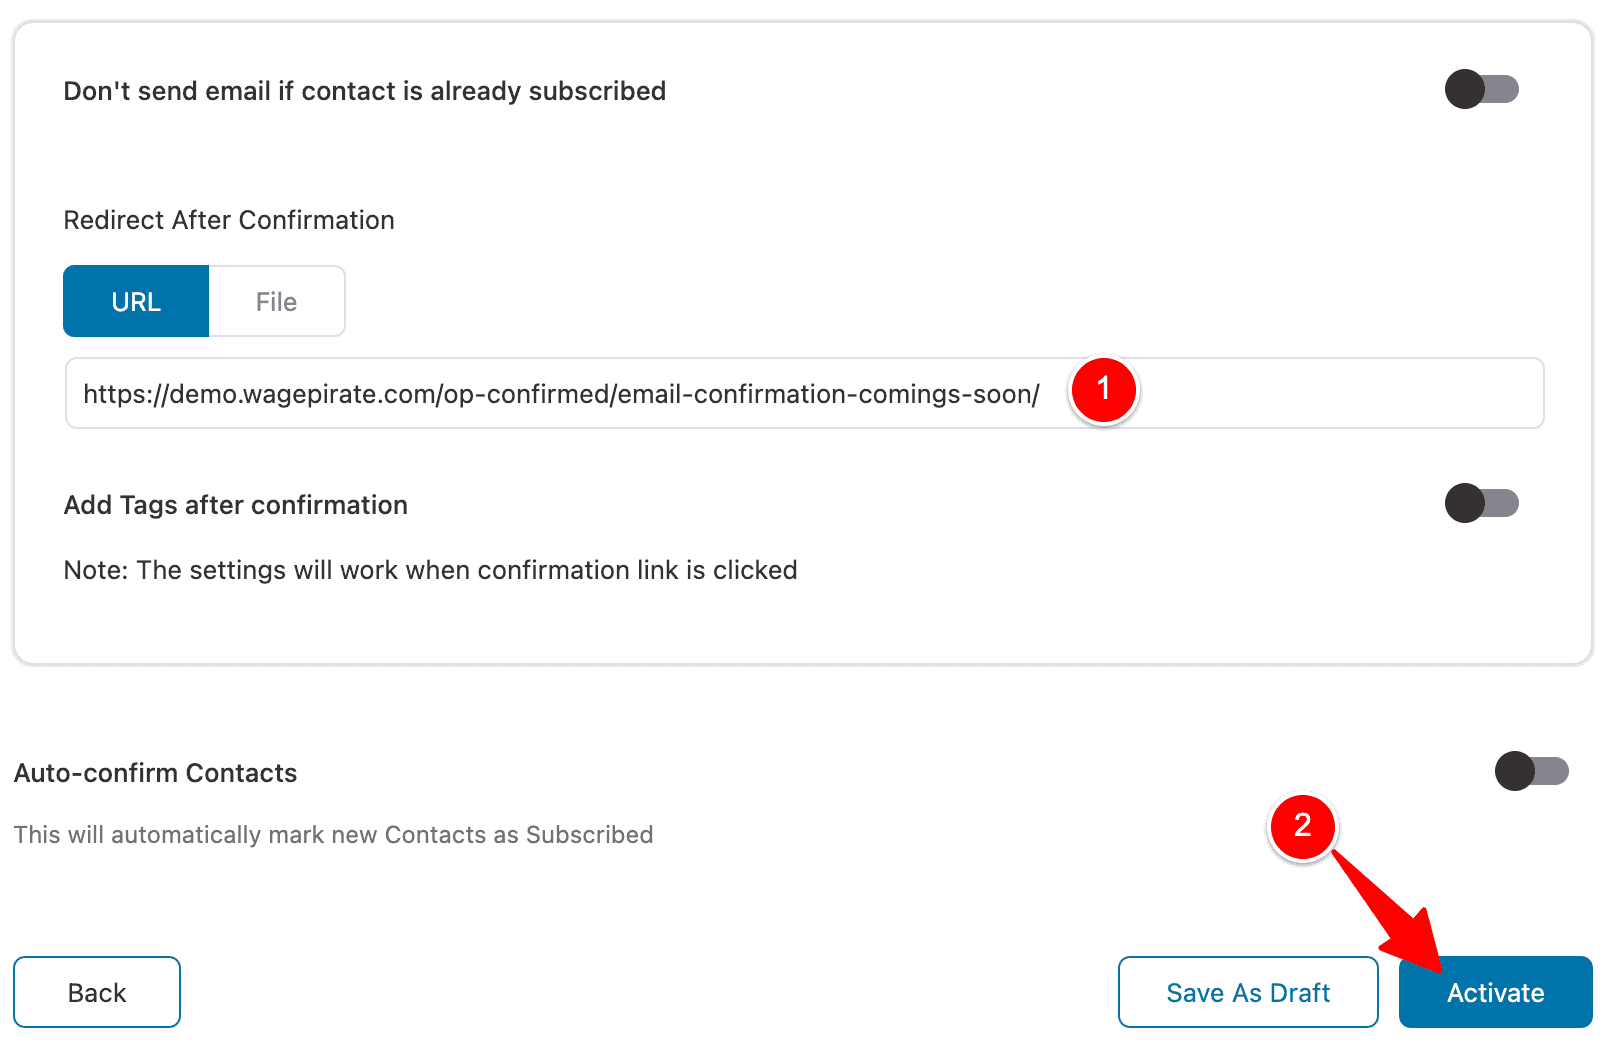
At (3) in the image above, we need to enter the URL that a user is redirected to once they click this link in the email we send them after they complete the form.
Don’t worry – it’s easy to do.
Creating our Email Confirmation page
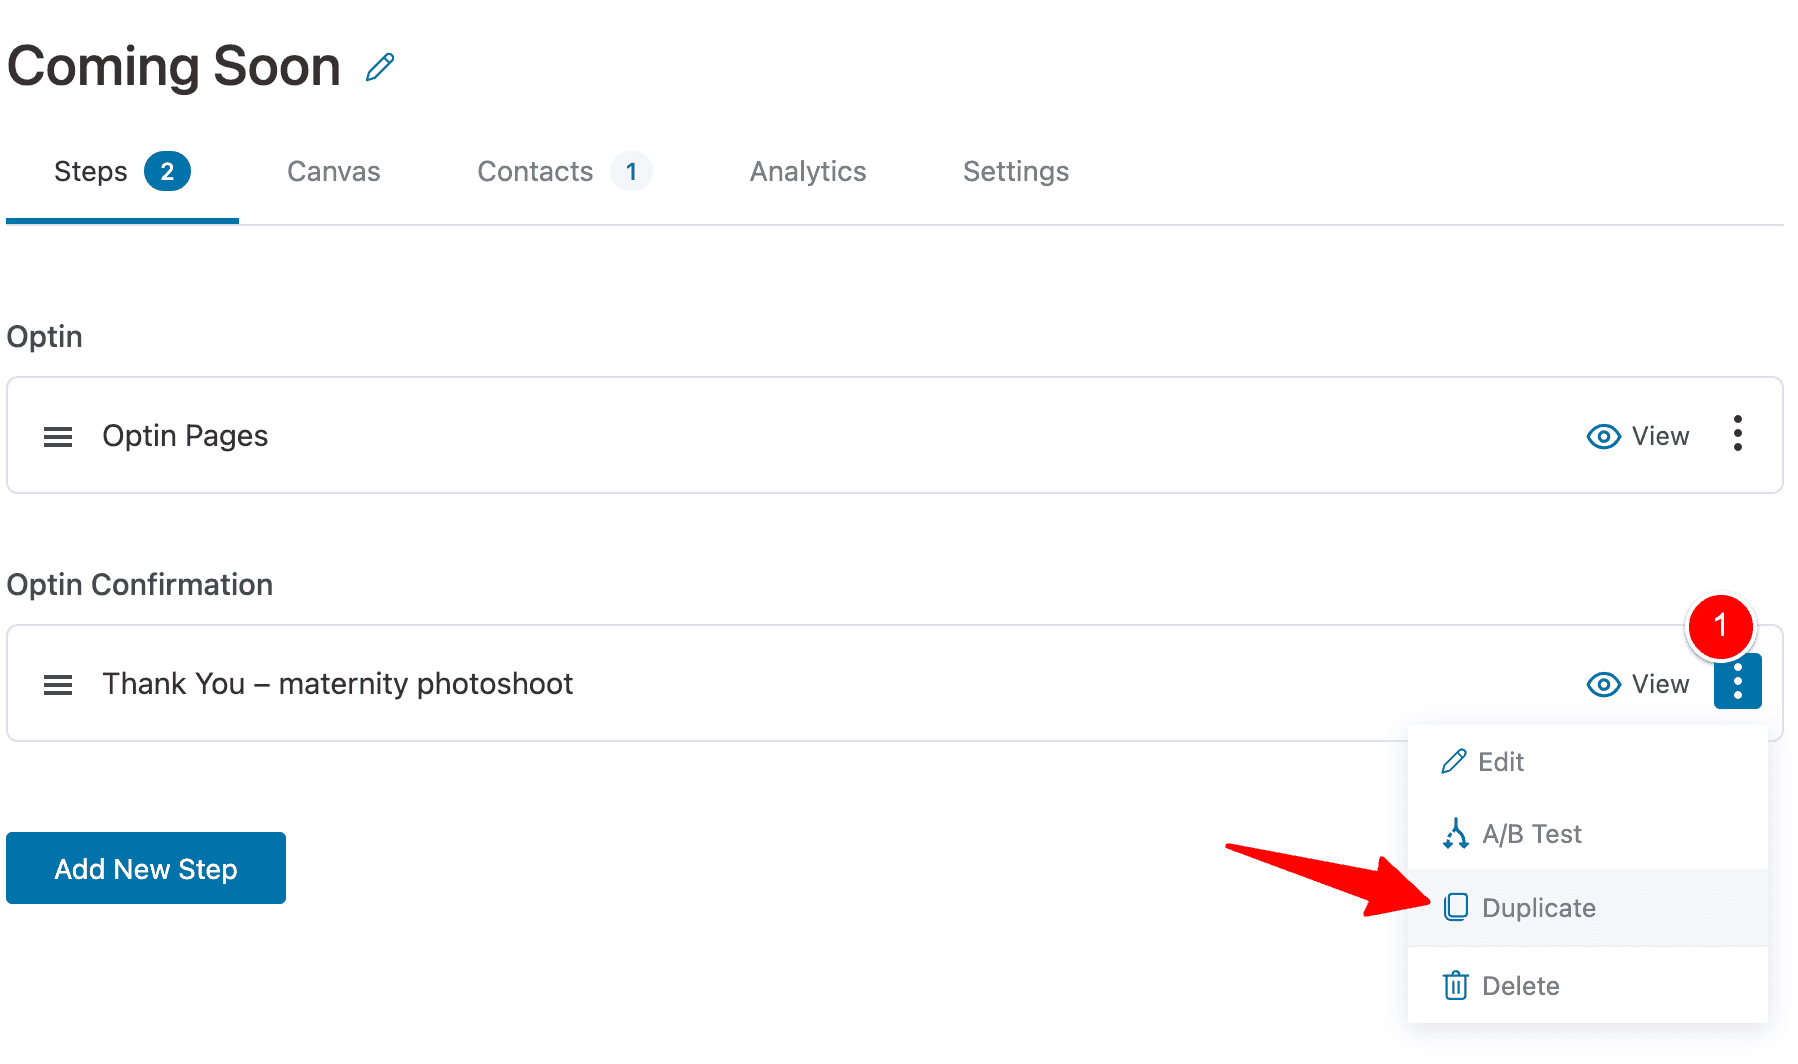
The Email Confirmation page is the page our users will land on once they click the link in the email to confirm they want to be subscribed and go into the draw to WIN our free maternity photoshoot.
To create this page, we go back to FunnelKit and edit our Coming Soon page funnel.
Click the 3 dots on the Thank You funnel step and then select Duplicate.
Next, click to edit the new funnel step.
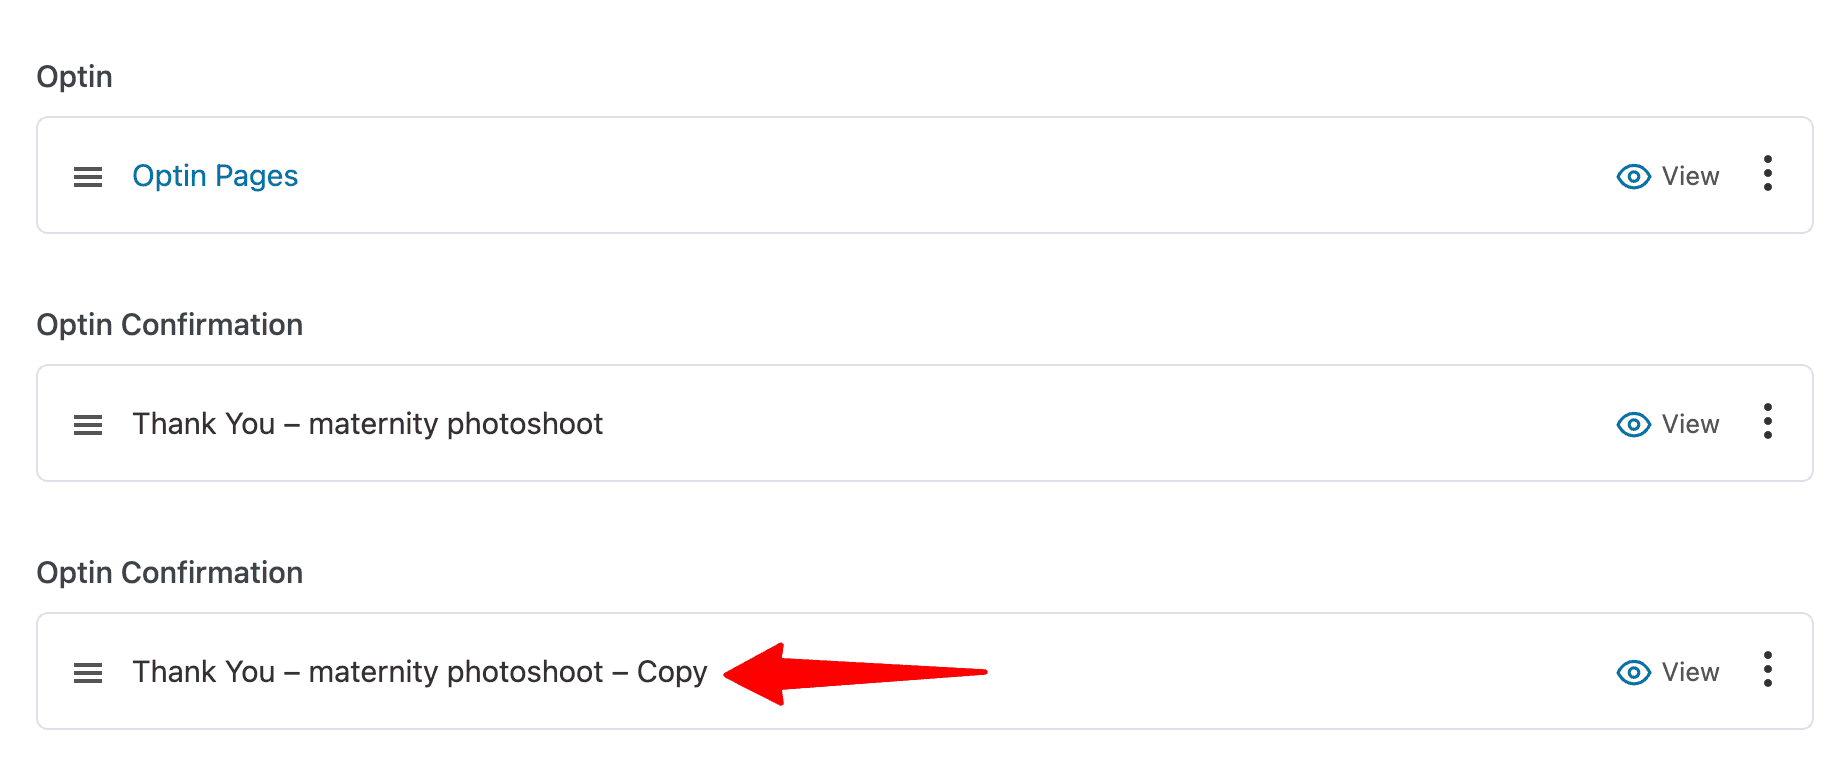
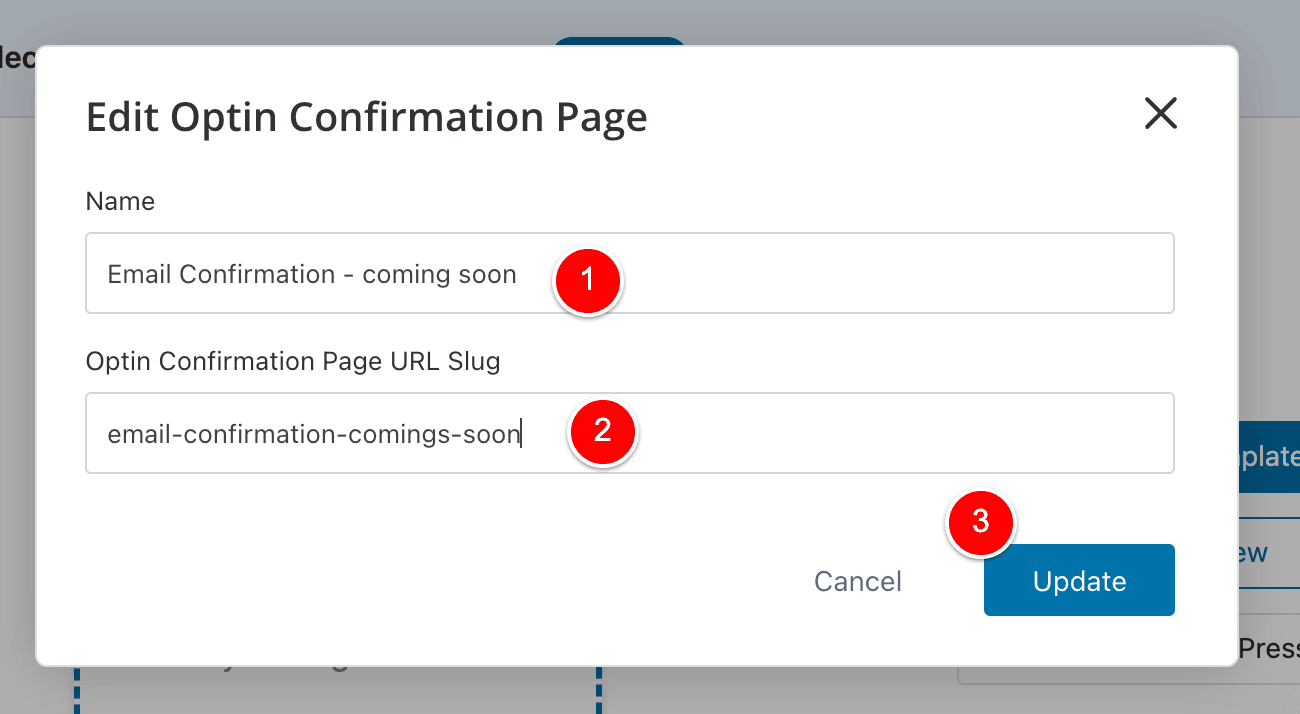
Rename the step by clicking at (1) and then clicking Edit at (2).
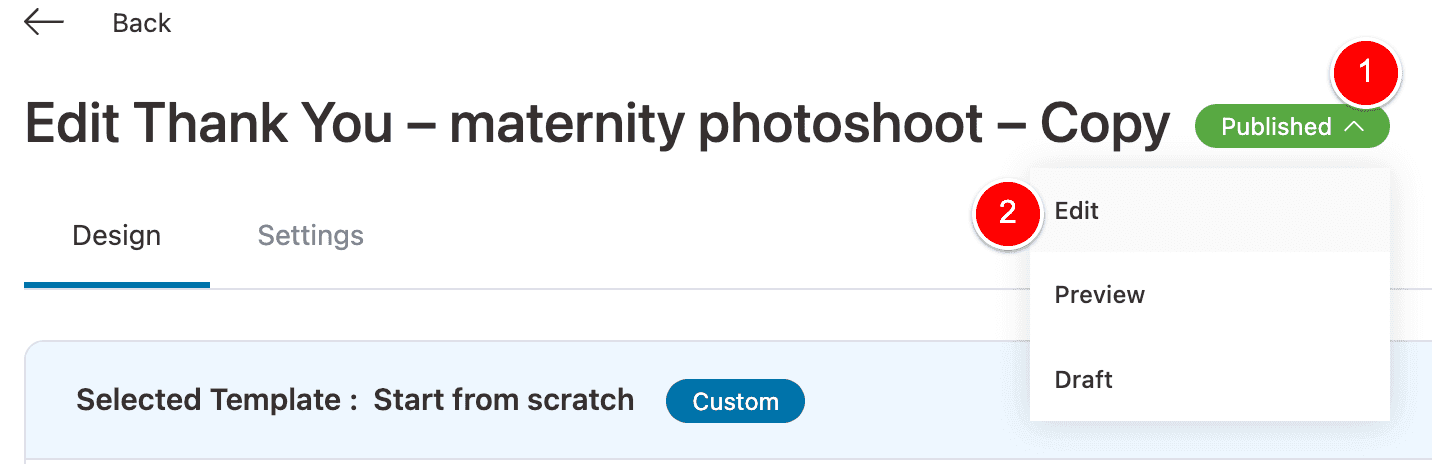
Something like the below will do. Once you’re done click Update at (3).
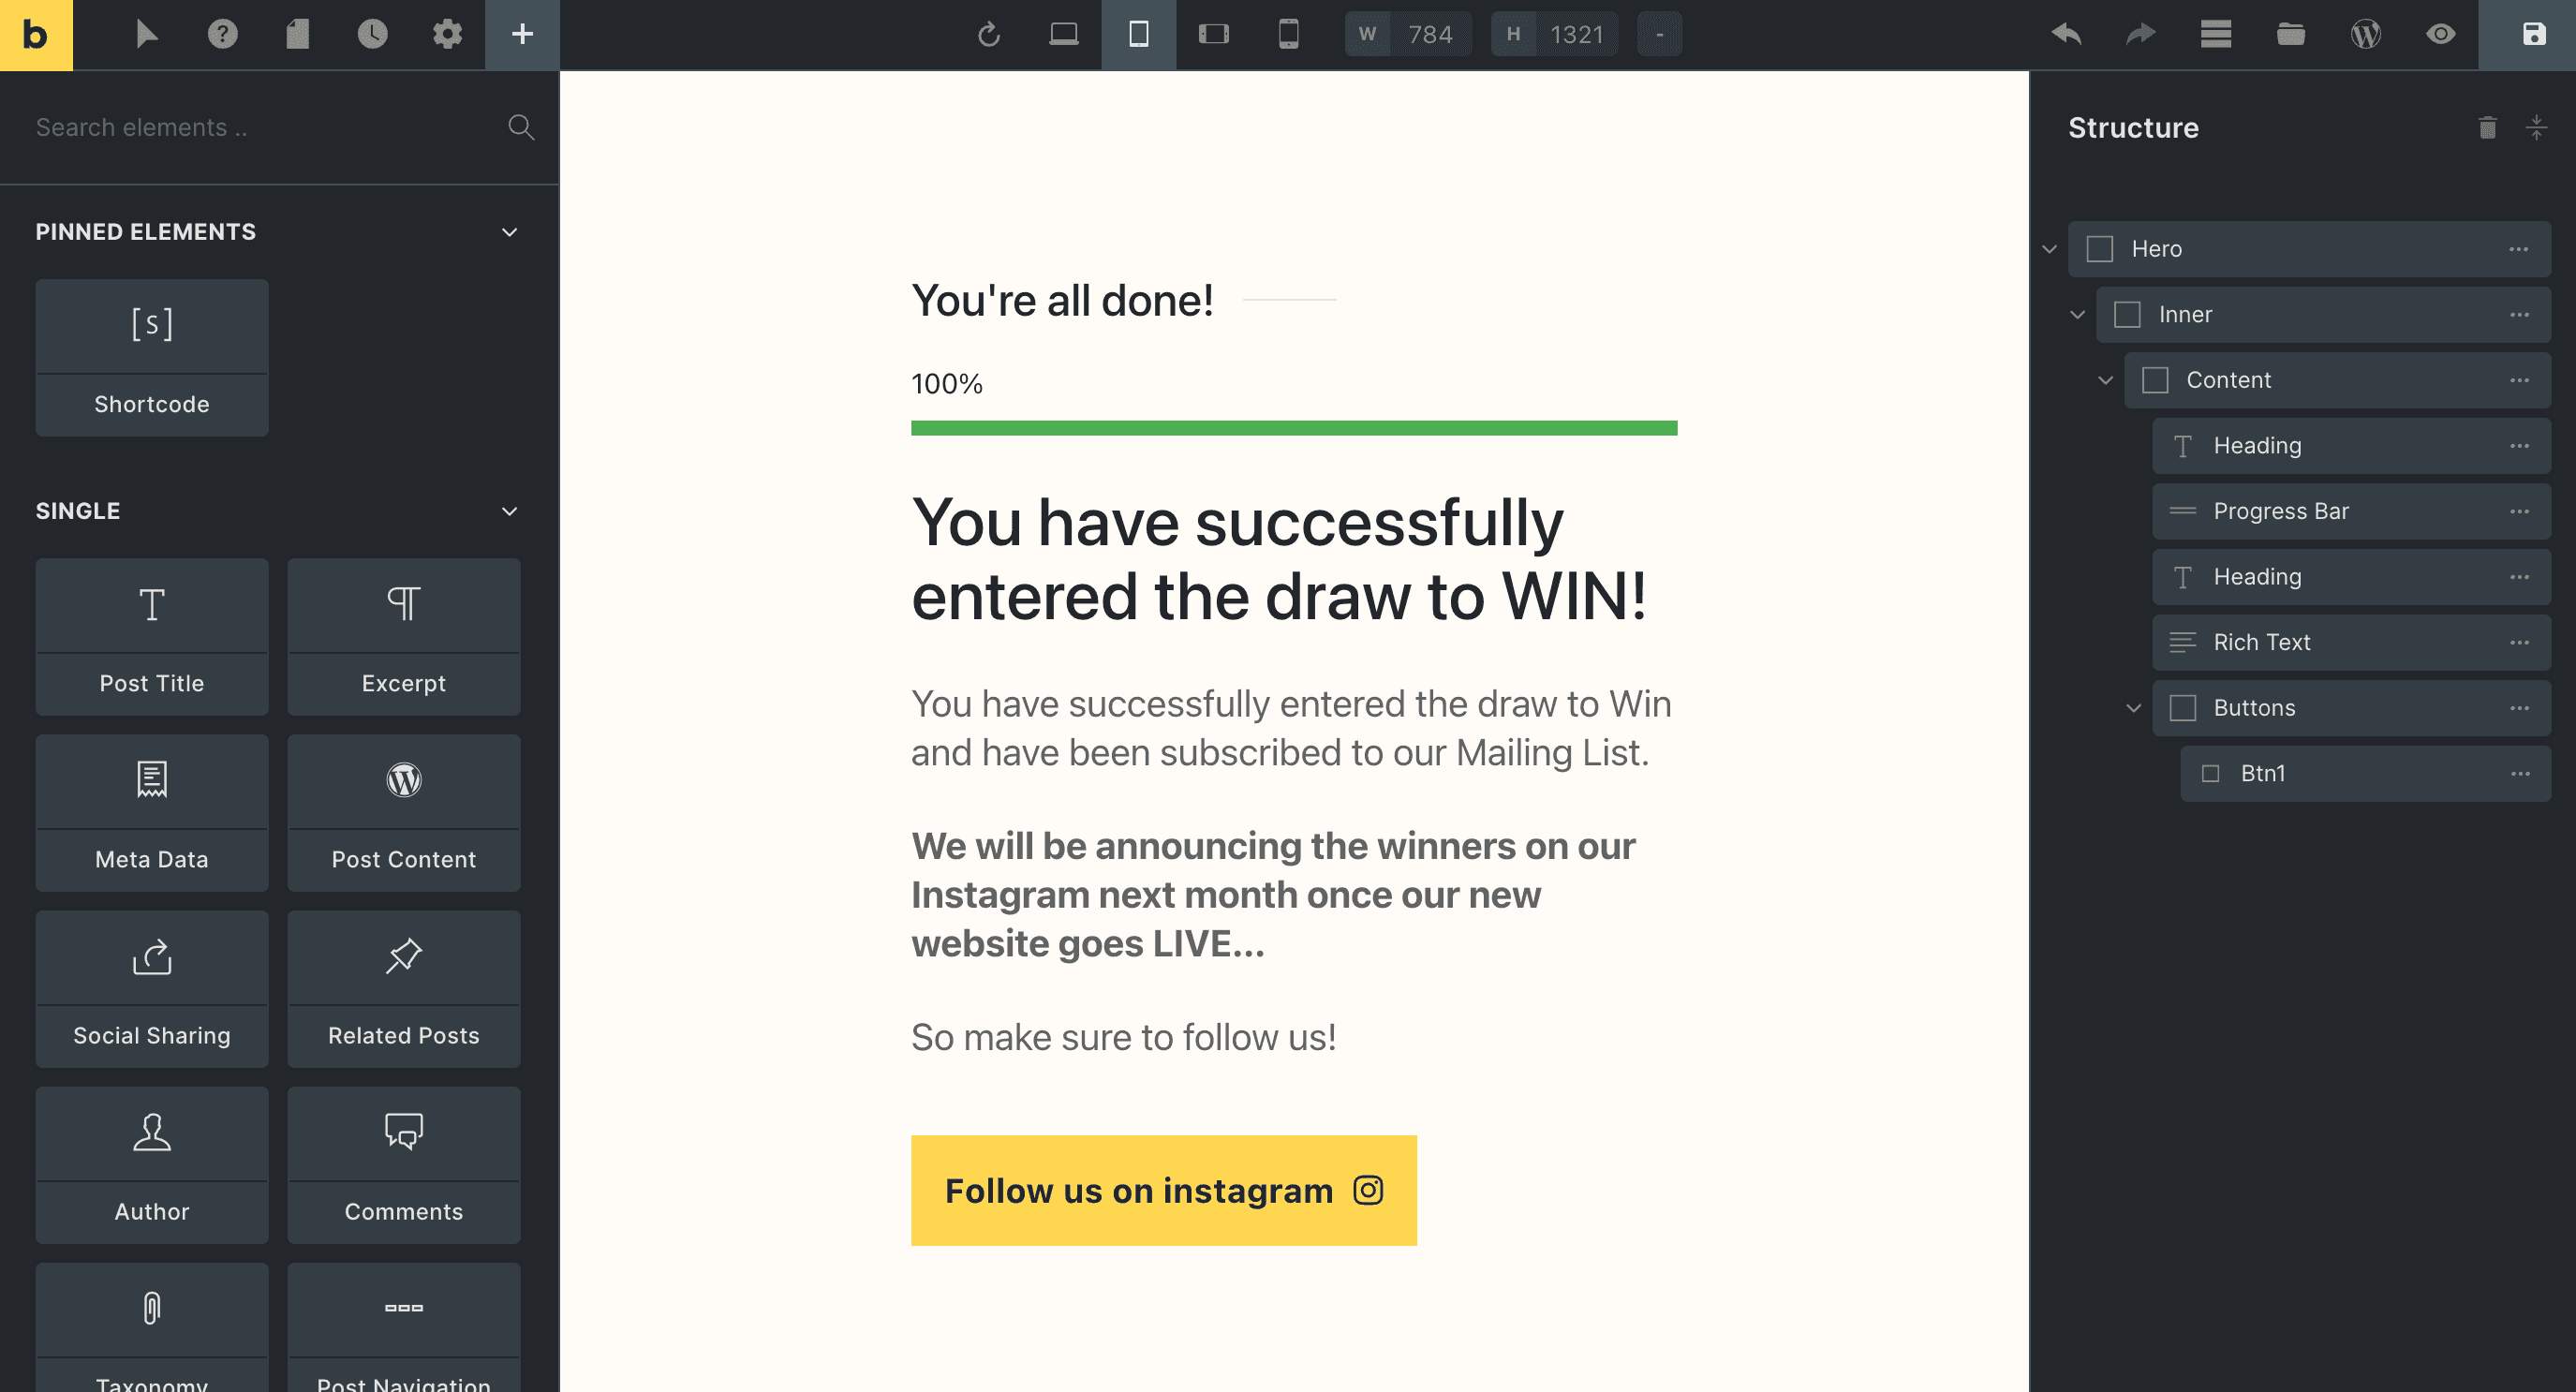
Now, continue to edit this page with your page builder of choice as you would any other page on your website.
Here is what I have done with Bricks Builder for this tutorial.
So now that we’ve finished this Email Confirmation page, we can get the URL of this page…
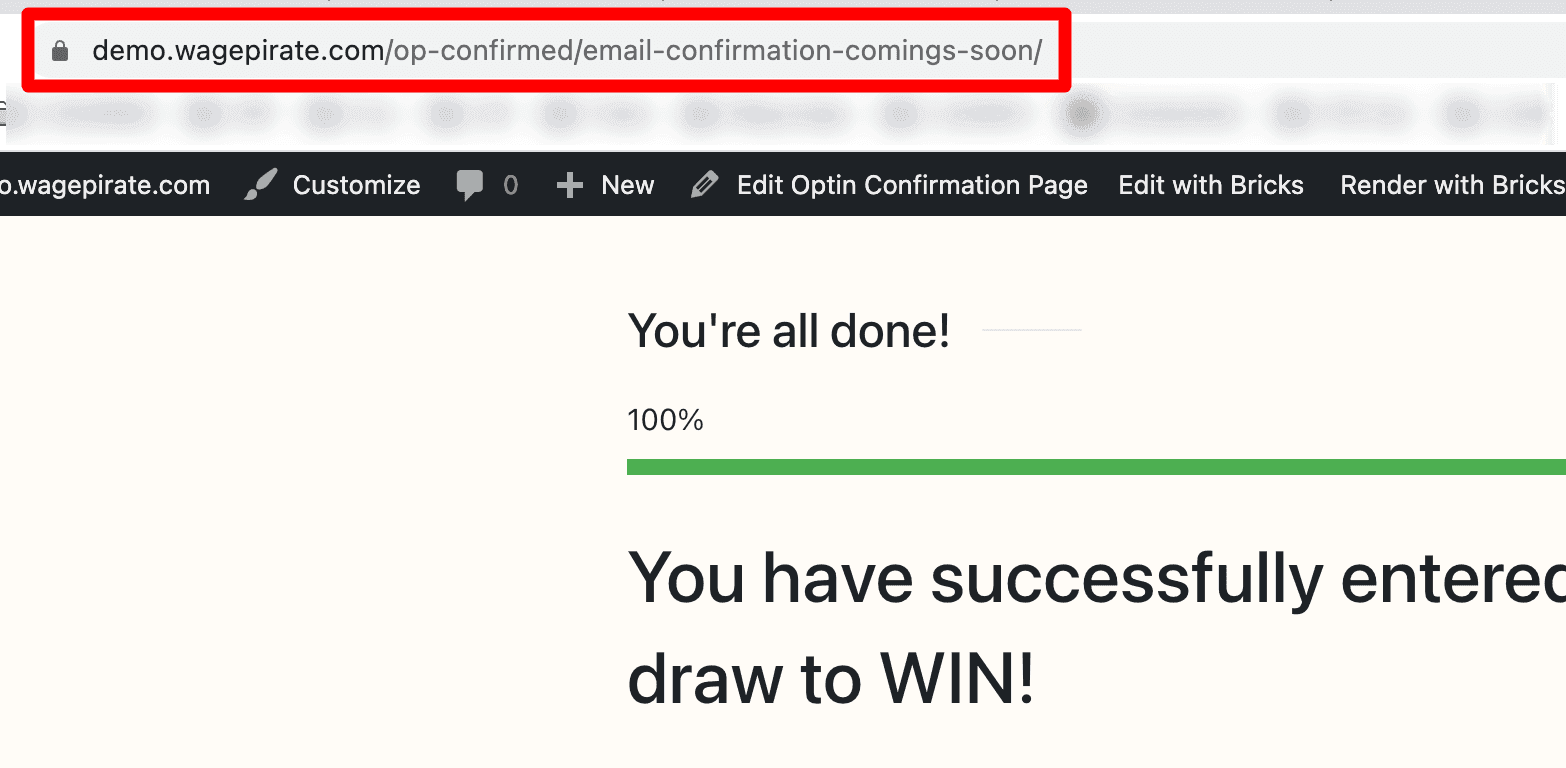
And paste into FunnelKit Automations in the Redirect after Confirmation section (1) and then click Activate (2).
And… we’re done! (nearly)…
Sorry – we have 1 thing that doesn’t make sense with our Coming Soon page funnel that we need to fix.
Updating our Thank You page
We need to update our Thank You page to tell people to check their email.
I could update this tutorial to not need to go back and edit this, but I sort of like it – this blog post represents how ad-hoc building your website can be sometimes.
Let’s go back and edit our Thank You page.
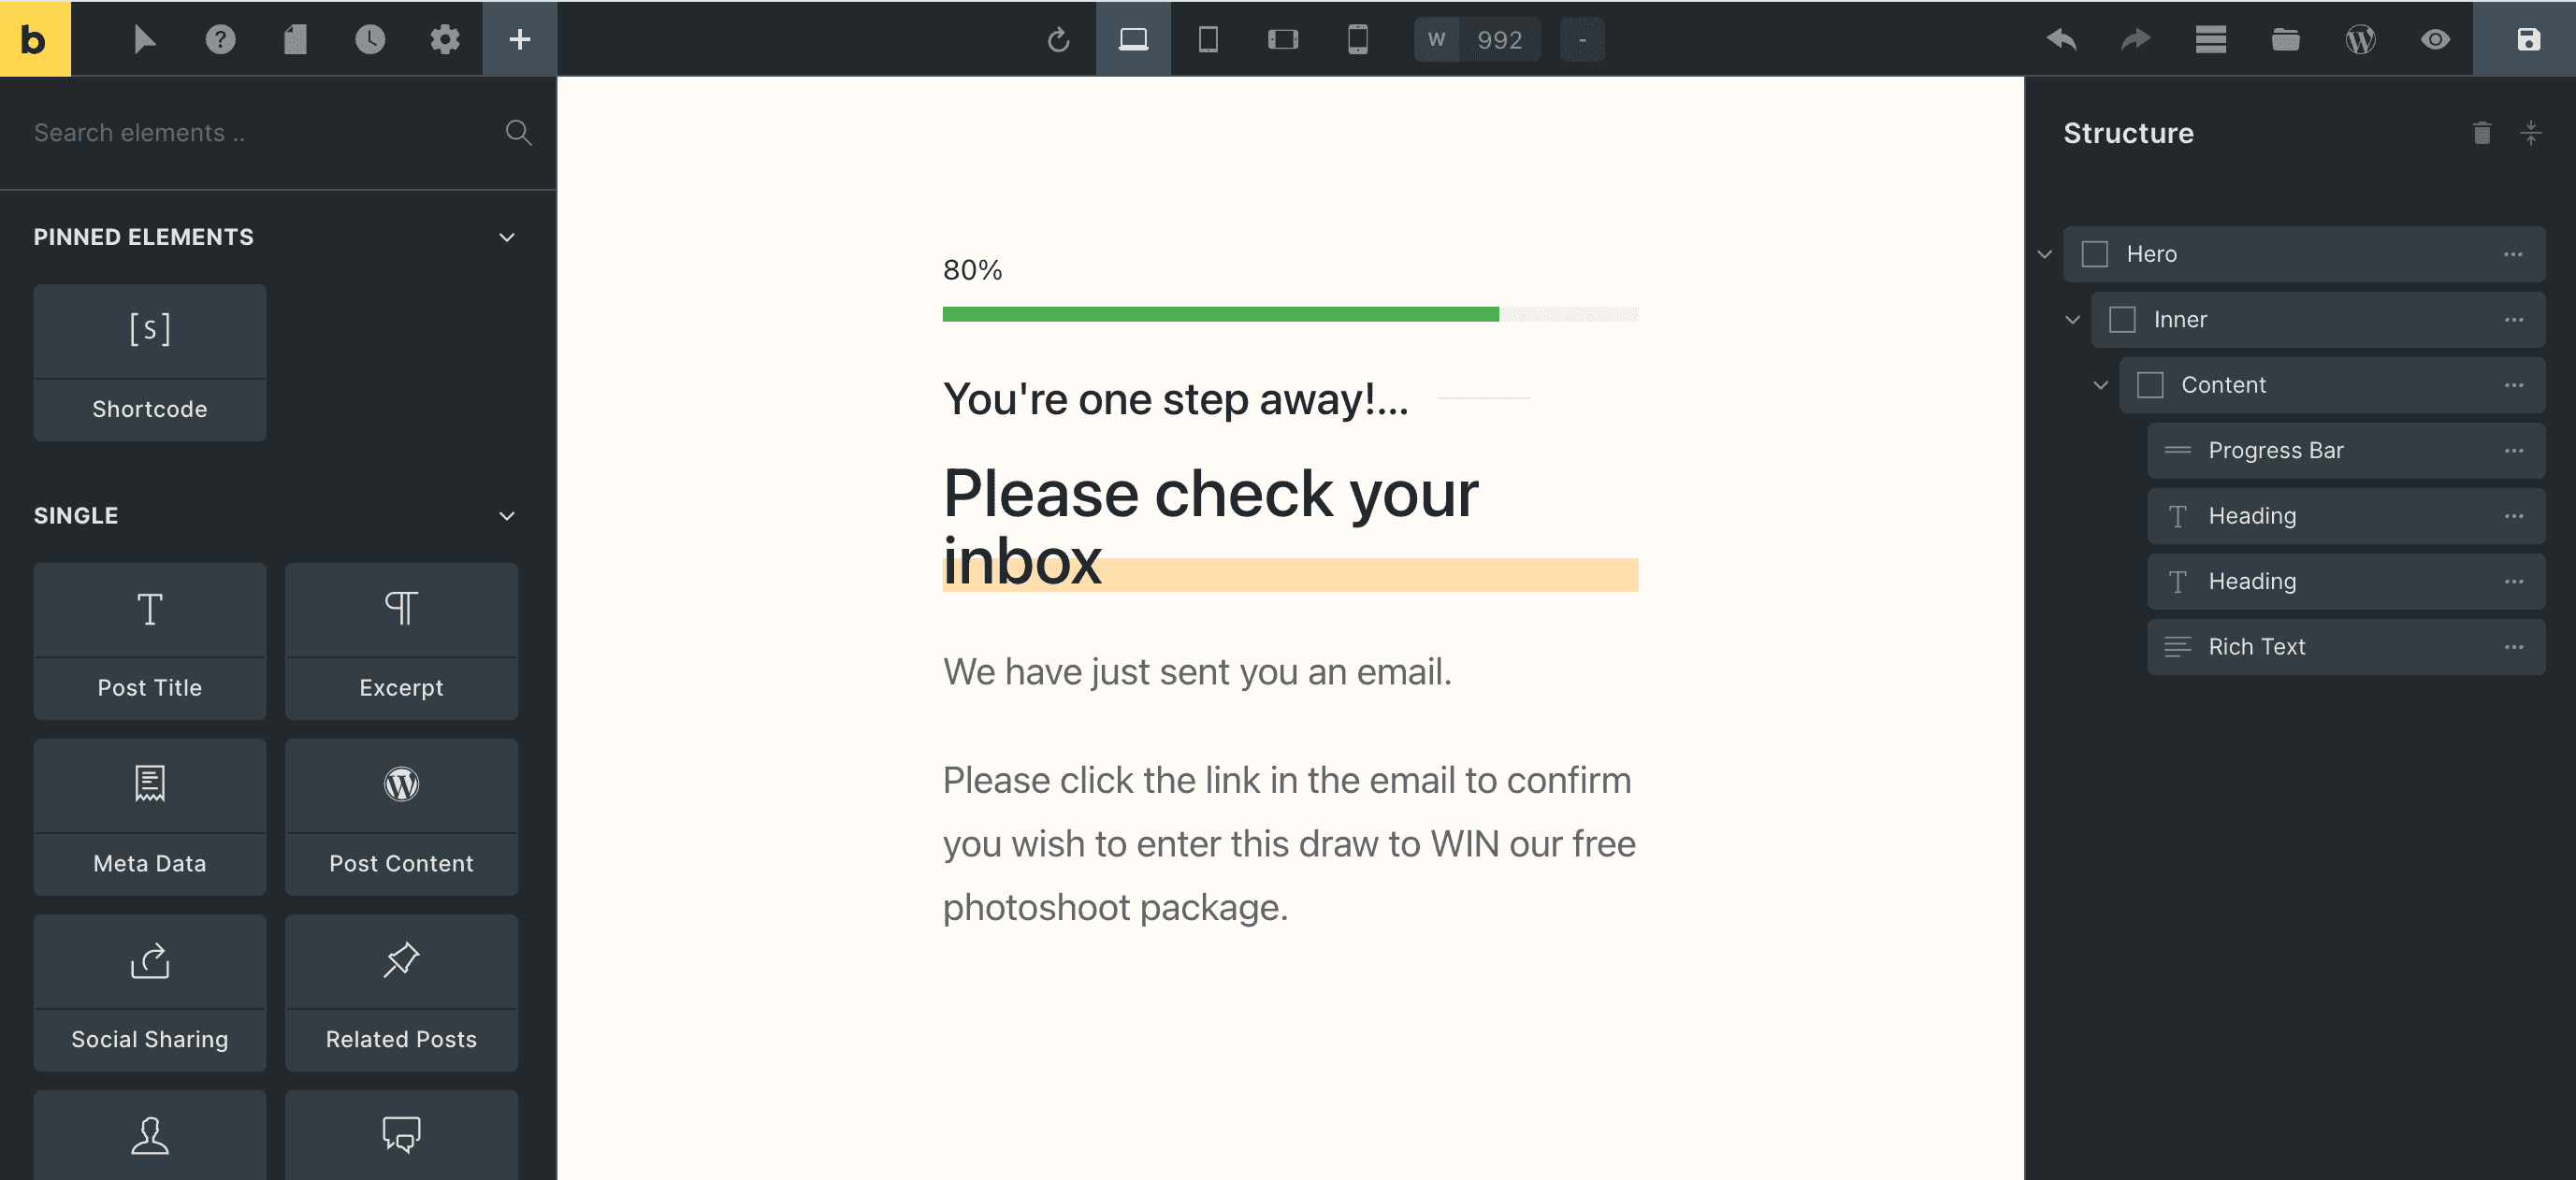
Because the user is not entered into the draw until they click the link in the email we send them, we need to update this Thank You page and remove our message that tells them they are in the draw…
and update it to the below message where we tell them to go and check their inbox to confirm they want to enter the draw.
Redirect to a custom Coming Soon page
WOW – I nearly forgot to add the most important part to this tutorial – the redirect script that will send people to our Coming Soon page.
Go back to FunnelKit and edit your Optin Page step which will be your main Coming Soon page.

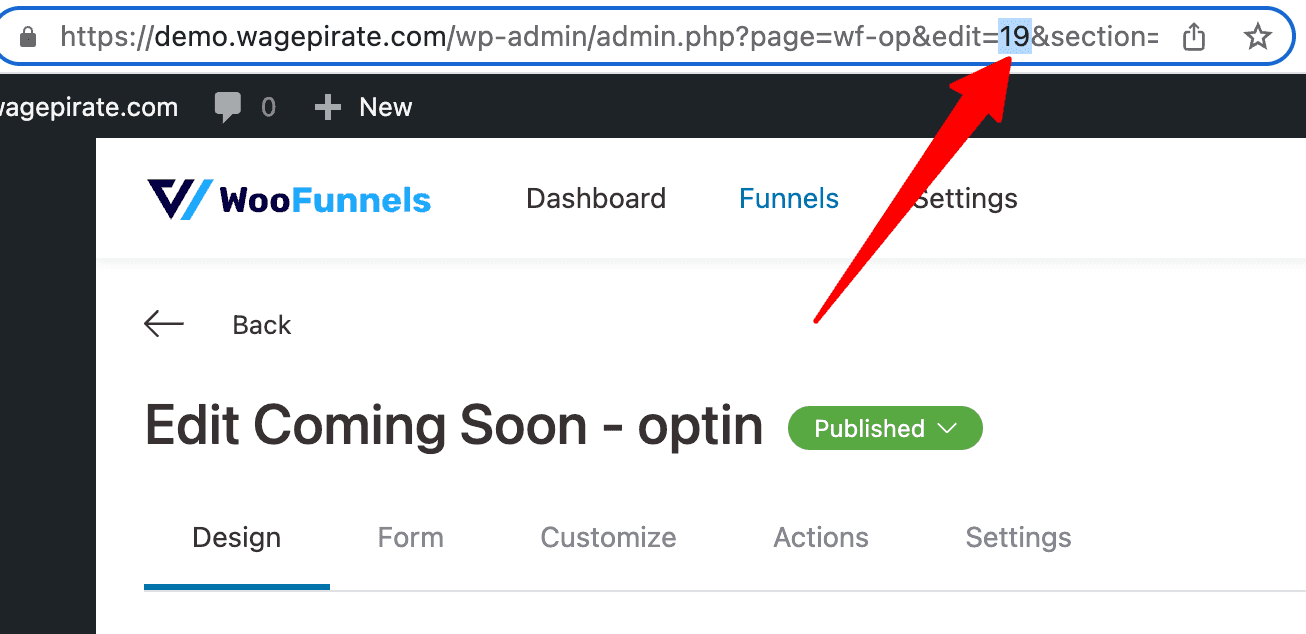
On this page, check the URL for the part that says edit= and whatever number follows after this is the ID for your Coming Soon page inside of WordPress.
In my case, the ID of my Coming Soon page is 19.
Now that you have the ID of your coming soon page, edit the below PHP Code and update the number 19 to the ID of your own coming soon page ID and repeat the process for your Thank You page and also your Email Confirmation page.
add_action( 'template_redirect', 'wpirate_comingsoon' );
function wpirate_comingsoon() {
    // change the IDS below to match your website. In my case...
    // 19 is the ID of my optin page
    // 41 is the ID of my Thank You page
    // 47 is the ID of my Email Confirmation page
    $comingsoon_page_funnel_ids = array('19', '41', '47');
	if( !is_user_logged_in()
	    && !in_array( get_the_ID(), $comingsoon_page_funnel_ids )
	){
		 wp_redirect( get_permalink(19) );
		 exit();
	}
}Code language: PHP (php)
This PHP code above is basically saying – redirect everyone to our coming soon page:
- Unless they are logged in to your website (i.e. you would be logged in to build your website so you don’t want to redirect yourself)
- Unless they are accessing one of the pages in our Coming Soon page funnel (i.e. don’t redirect people if they are already loading our Optin coming soon page, thank you page or email confirmation page).
Once you update that PHP code with the IDs of your Coming Soon funnel pages, all that’s left is to add this PHP code to our website.
Let’s do that now.
Add this PHP using the WPCodeBox plugin
TIP! After battling with a long functions.php file for quite some time, I recently started using a WPCodeBox to add all my custom PHP / CSS / JS.
To give you an idea of how I add this PHP code using WPCodeBox…
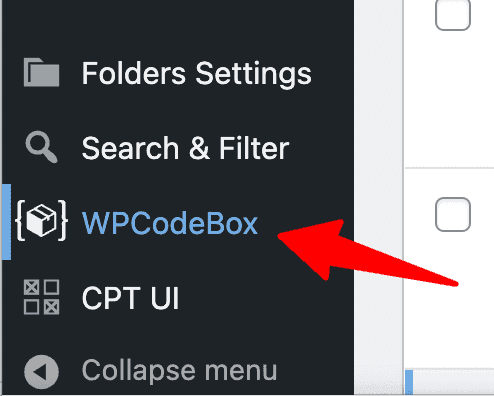
Click on WPCodeBox in your WP Admin menu.
Then click New Snippet (1), give it a meaningful name and description (2) and then paste your code at (3) and then click Save / Enable at (4).
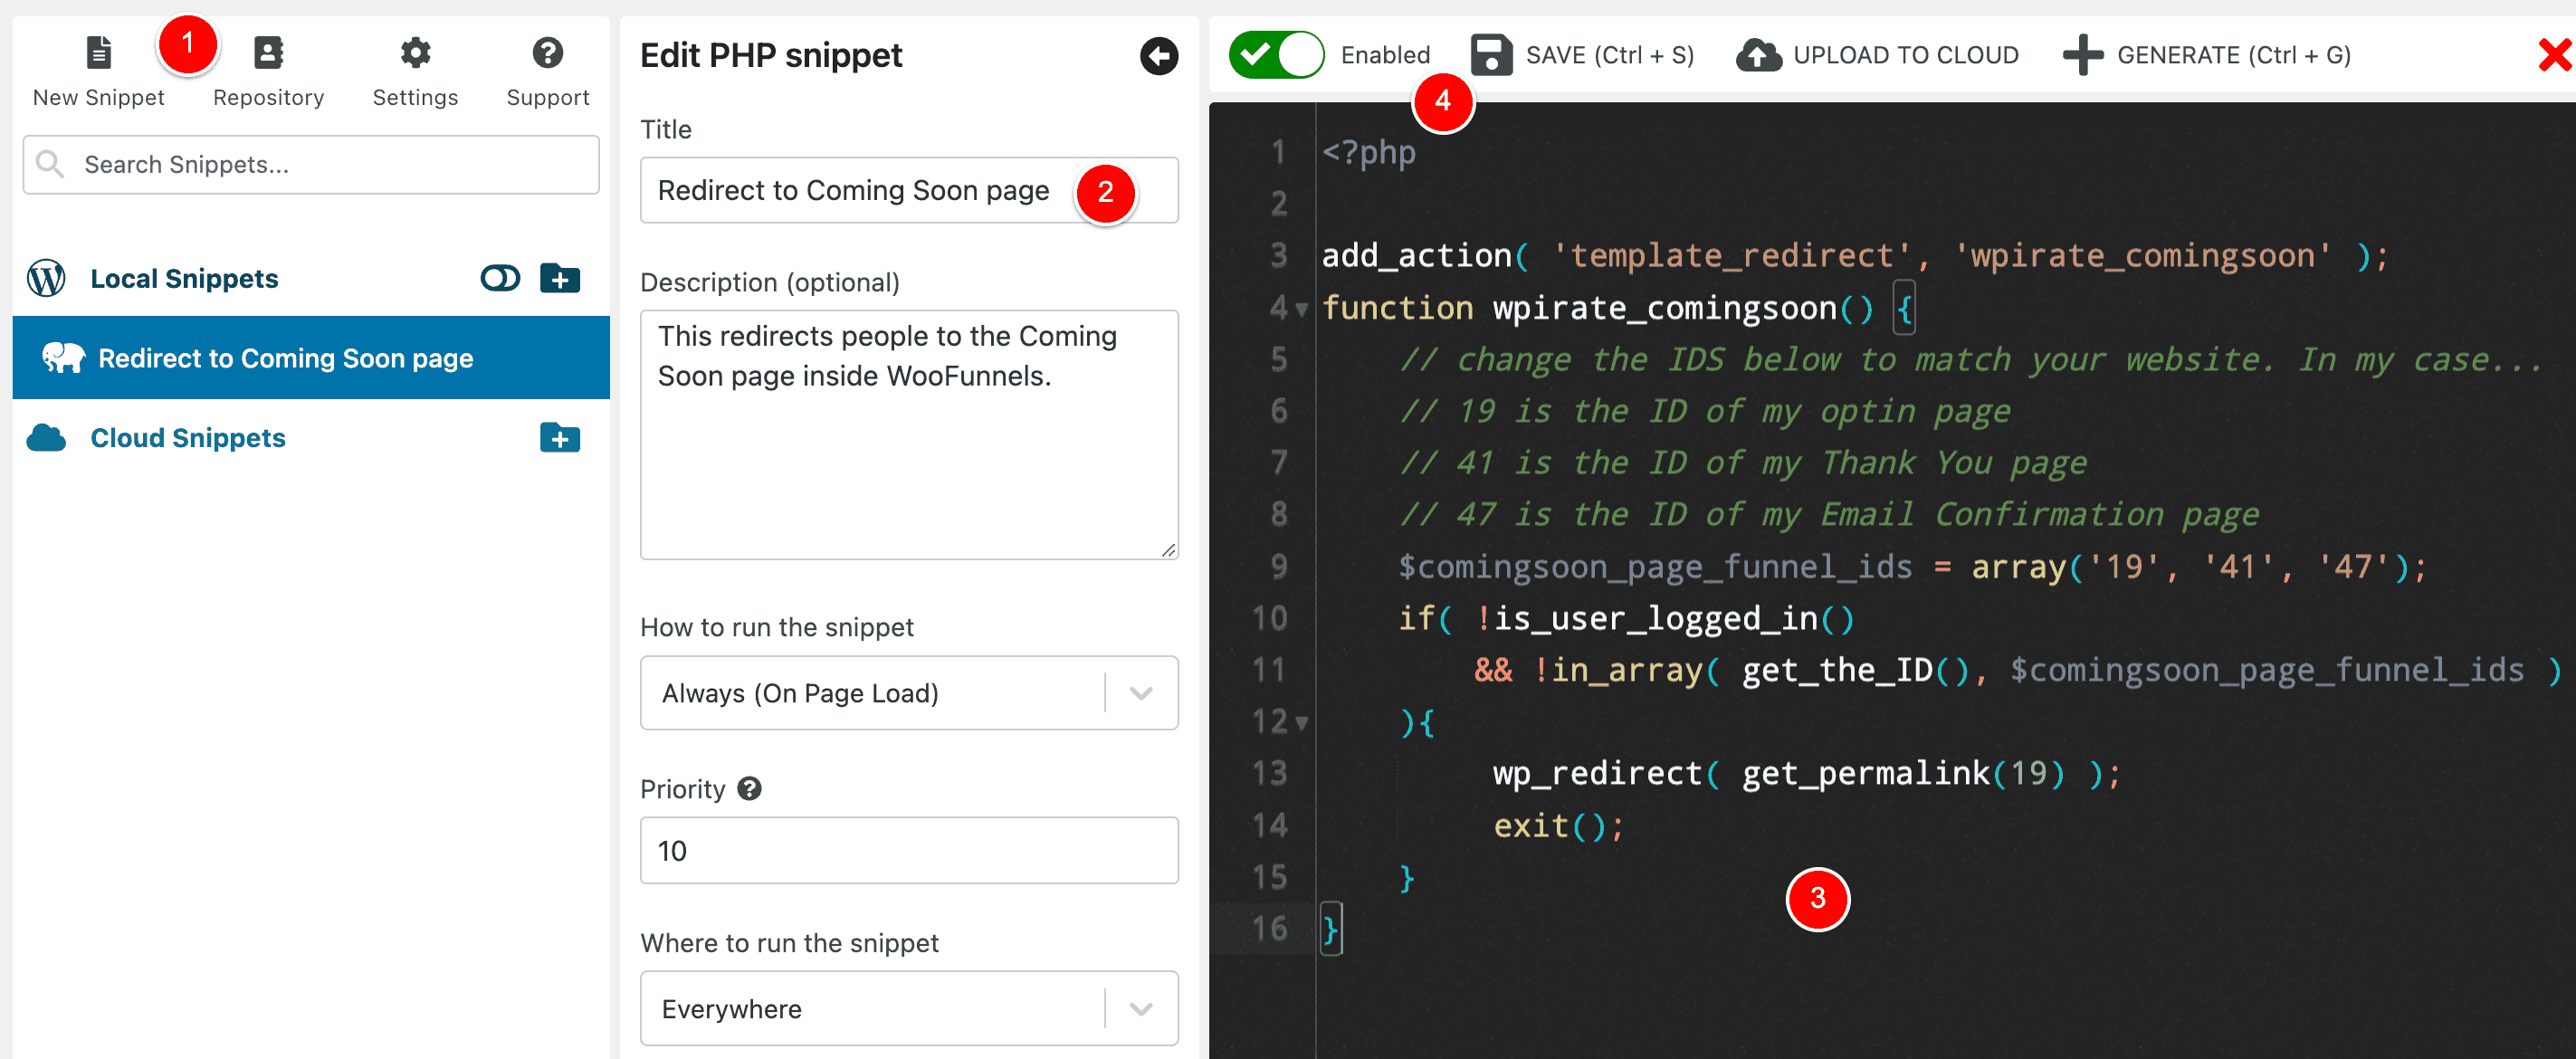
Now that’s all working and live and your visitors are actively being redirected to your Coming Soon page.
If you’d like to learn more about WPCodeBox, here is my review below…
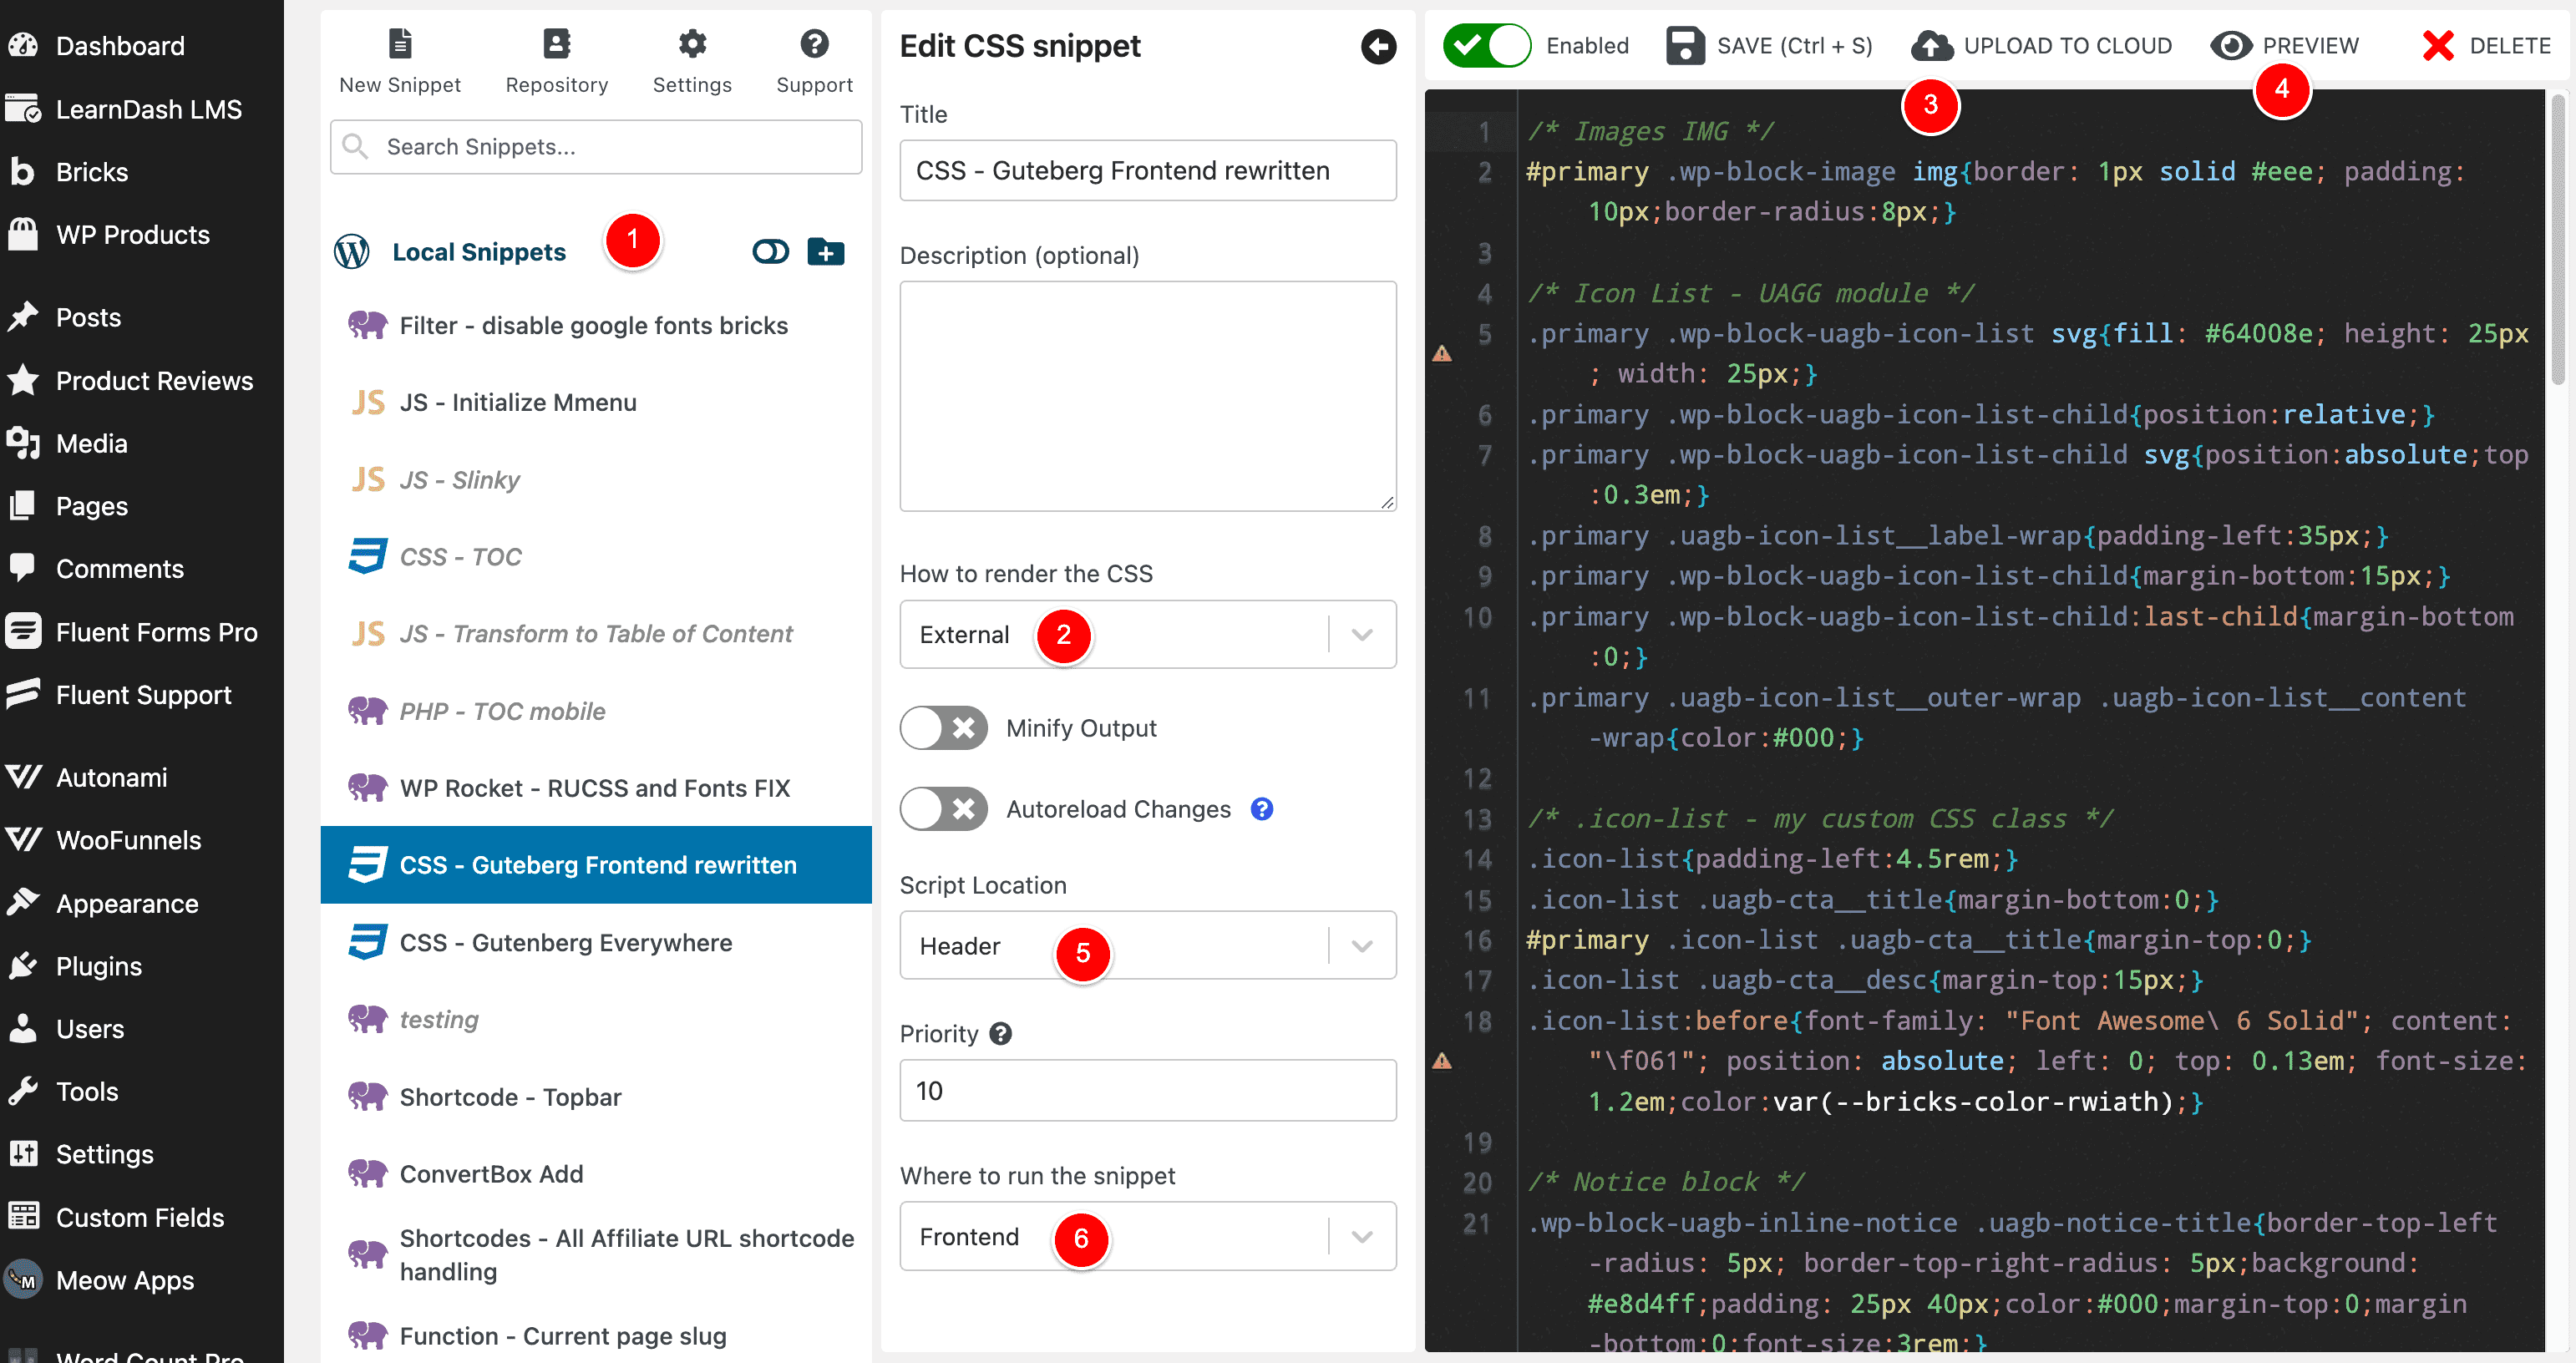
And here is an image showing all the other snippets I currently have active on wagepirate.com (you can see there is a mix of PHP/JS/CSS.
Add PHP for your functions.php file
If you don’t want to use something like WPCodeBox, you can add this PHP code for free into your theme’s functions.php file.
In your WP Admin menu, go to Appearance > Theme File Editor.
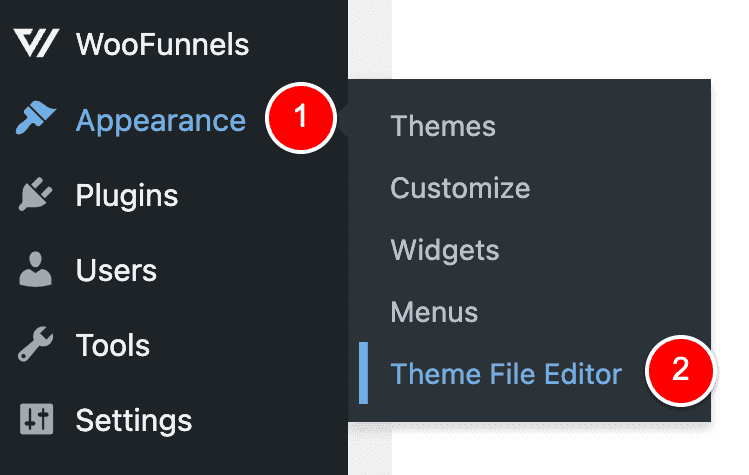
Make sure your WordPress theme is selected at (1) and then click functions.php at (2), paste the PHP code at the end of the file at (3) and then click Update File (4).
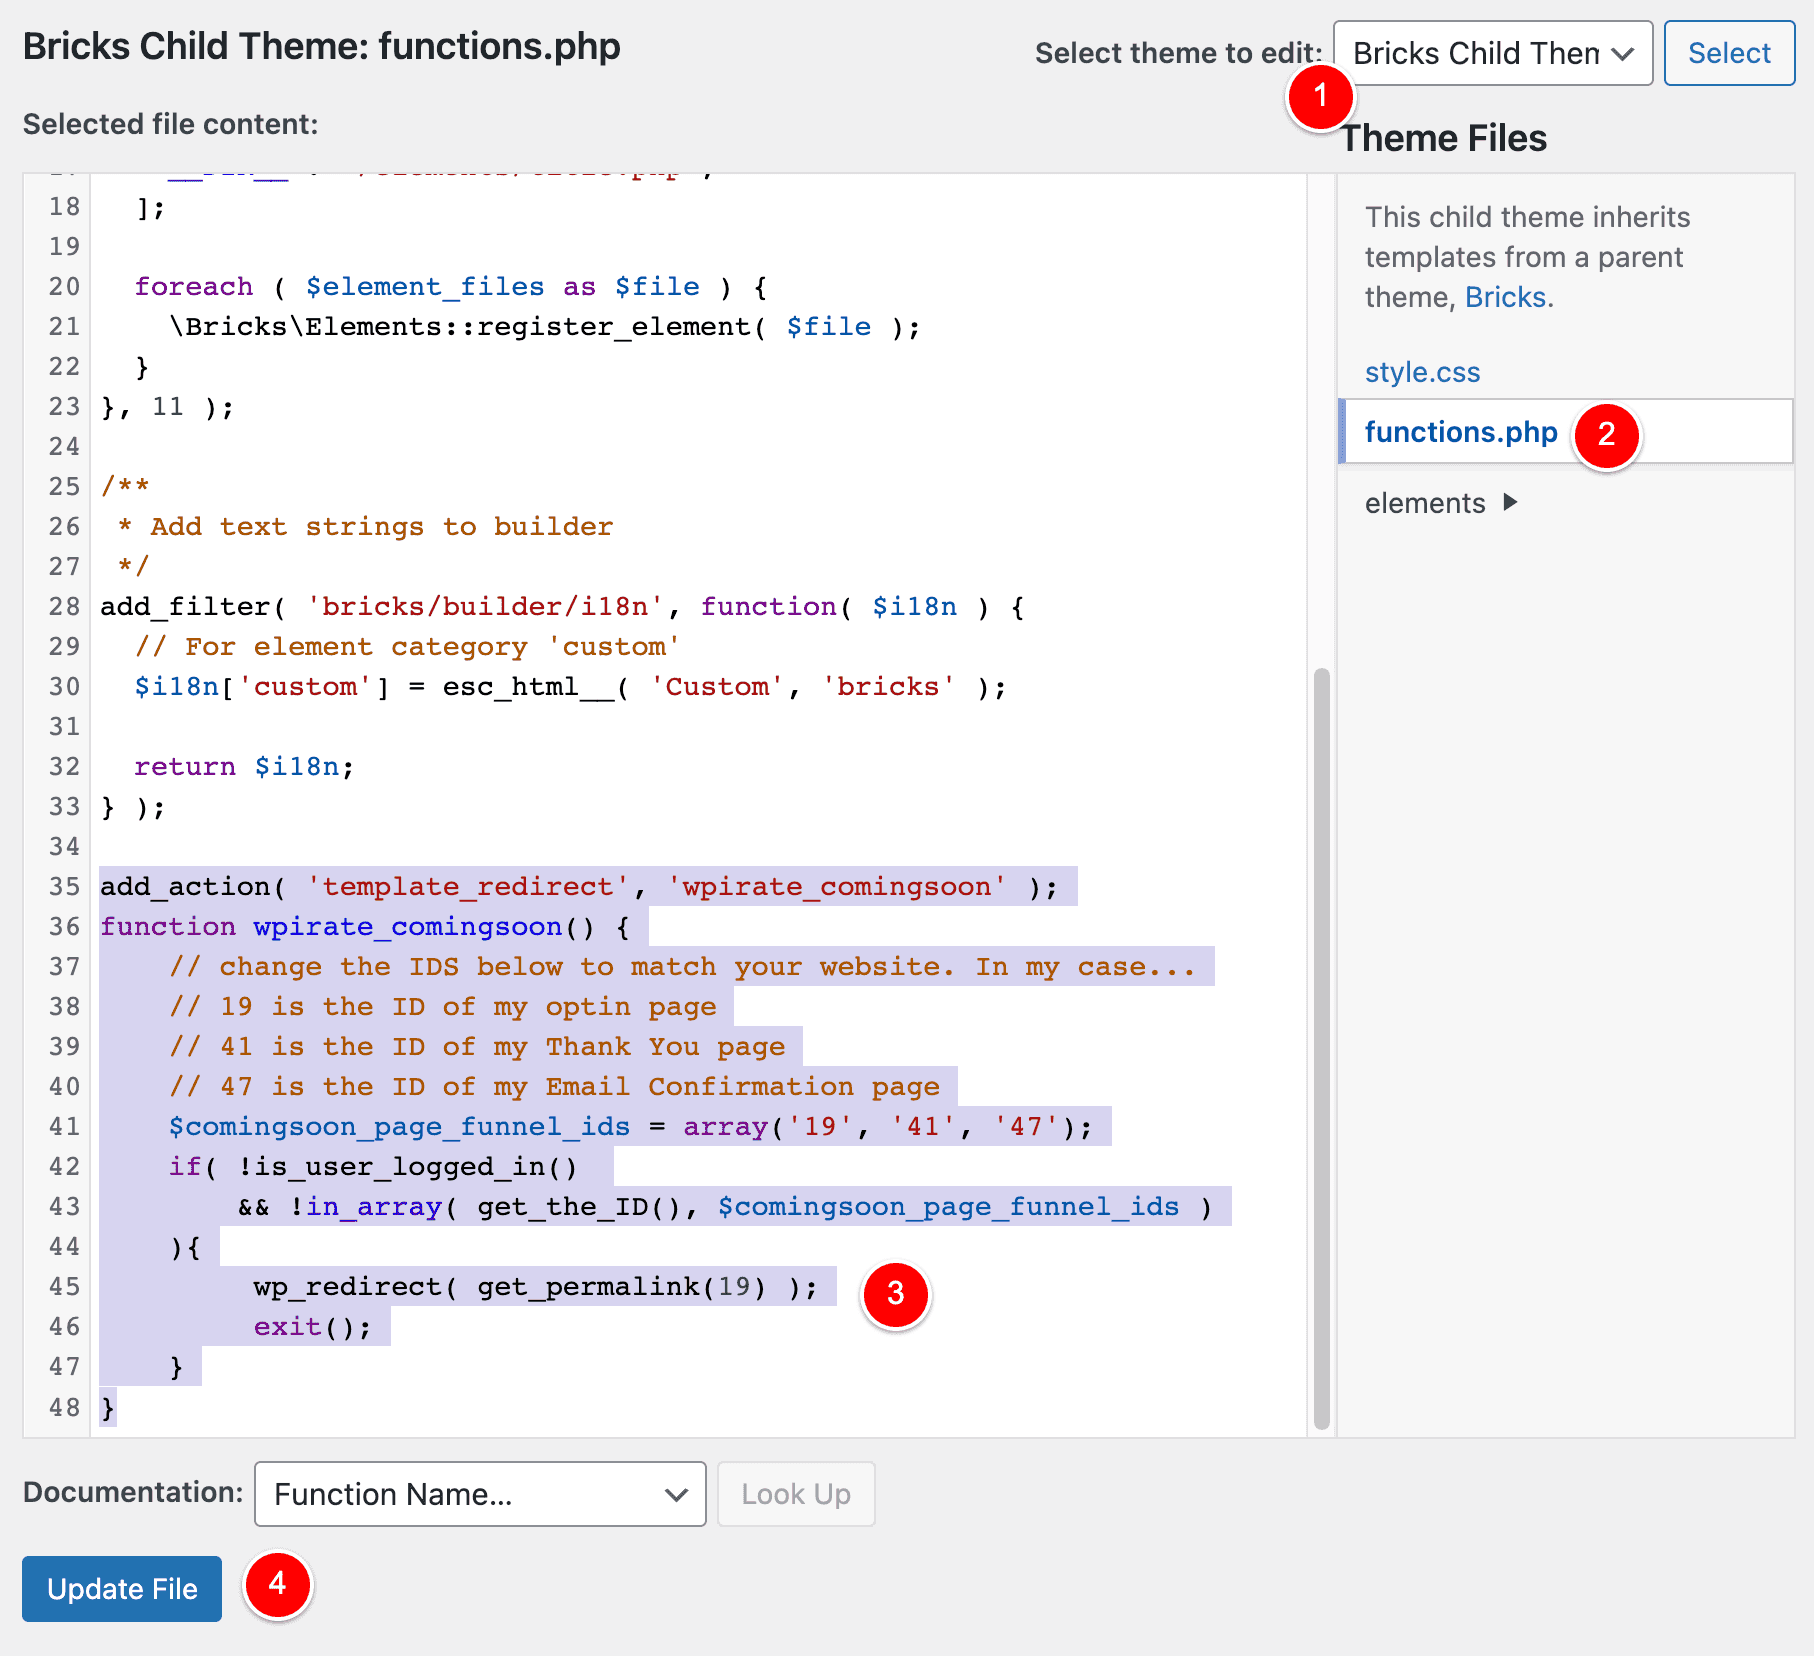
…and now you’re 100% done!
Every page in your Coming Soon funnel has been set up, is active and all your traffic is now being redirected to it if they are not logged in.
What you can do next
If you do anything today, I really do suggest you go and take a deep-dive into FunnelKit Automations + FunnelKit and what they can do.
FunnelKit Automations is a CRM that can store your Contact details as I showed you in this article…
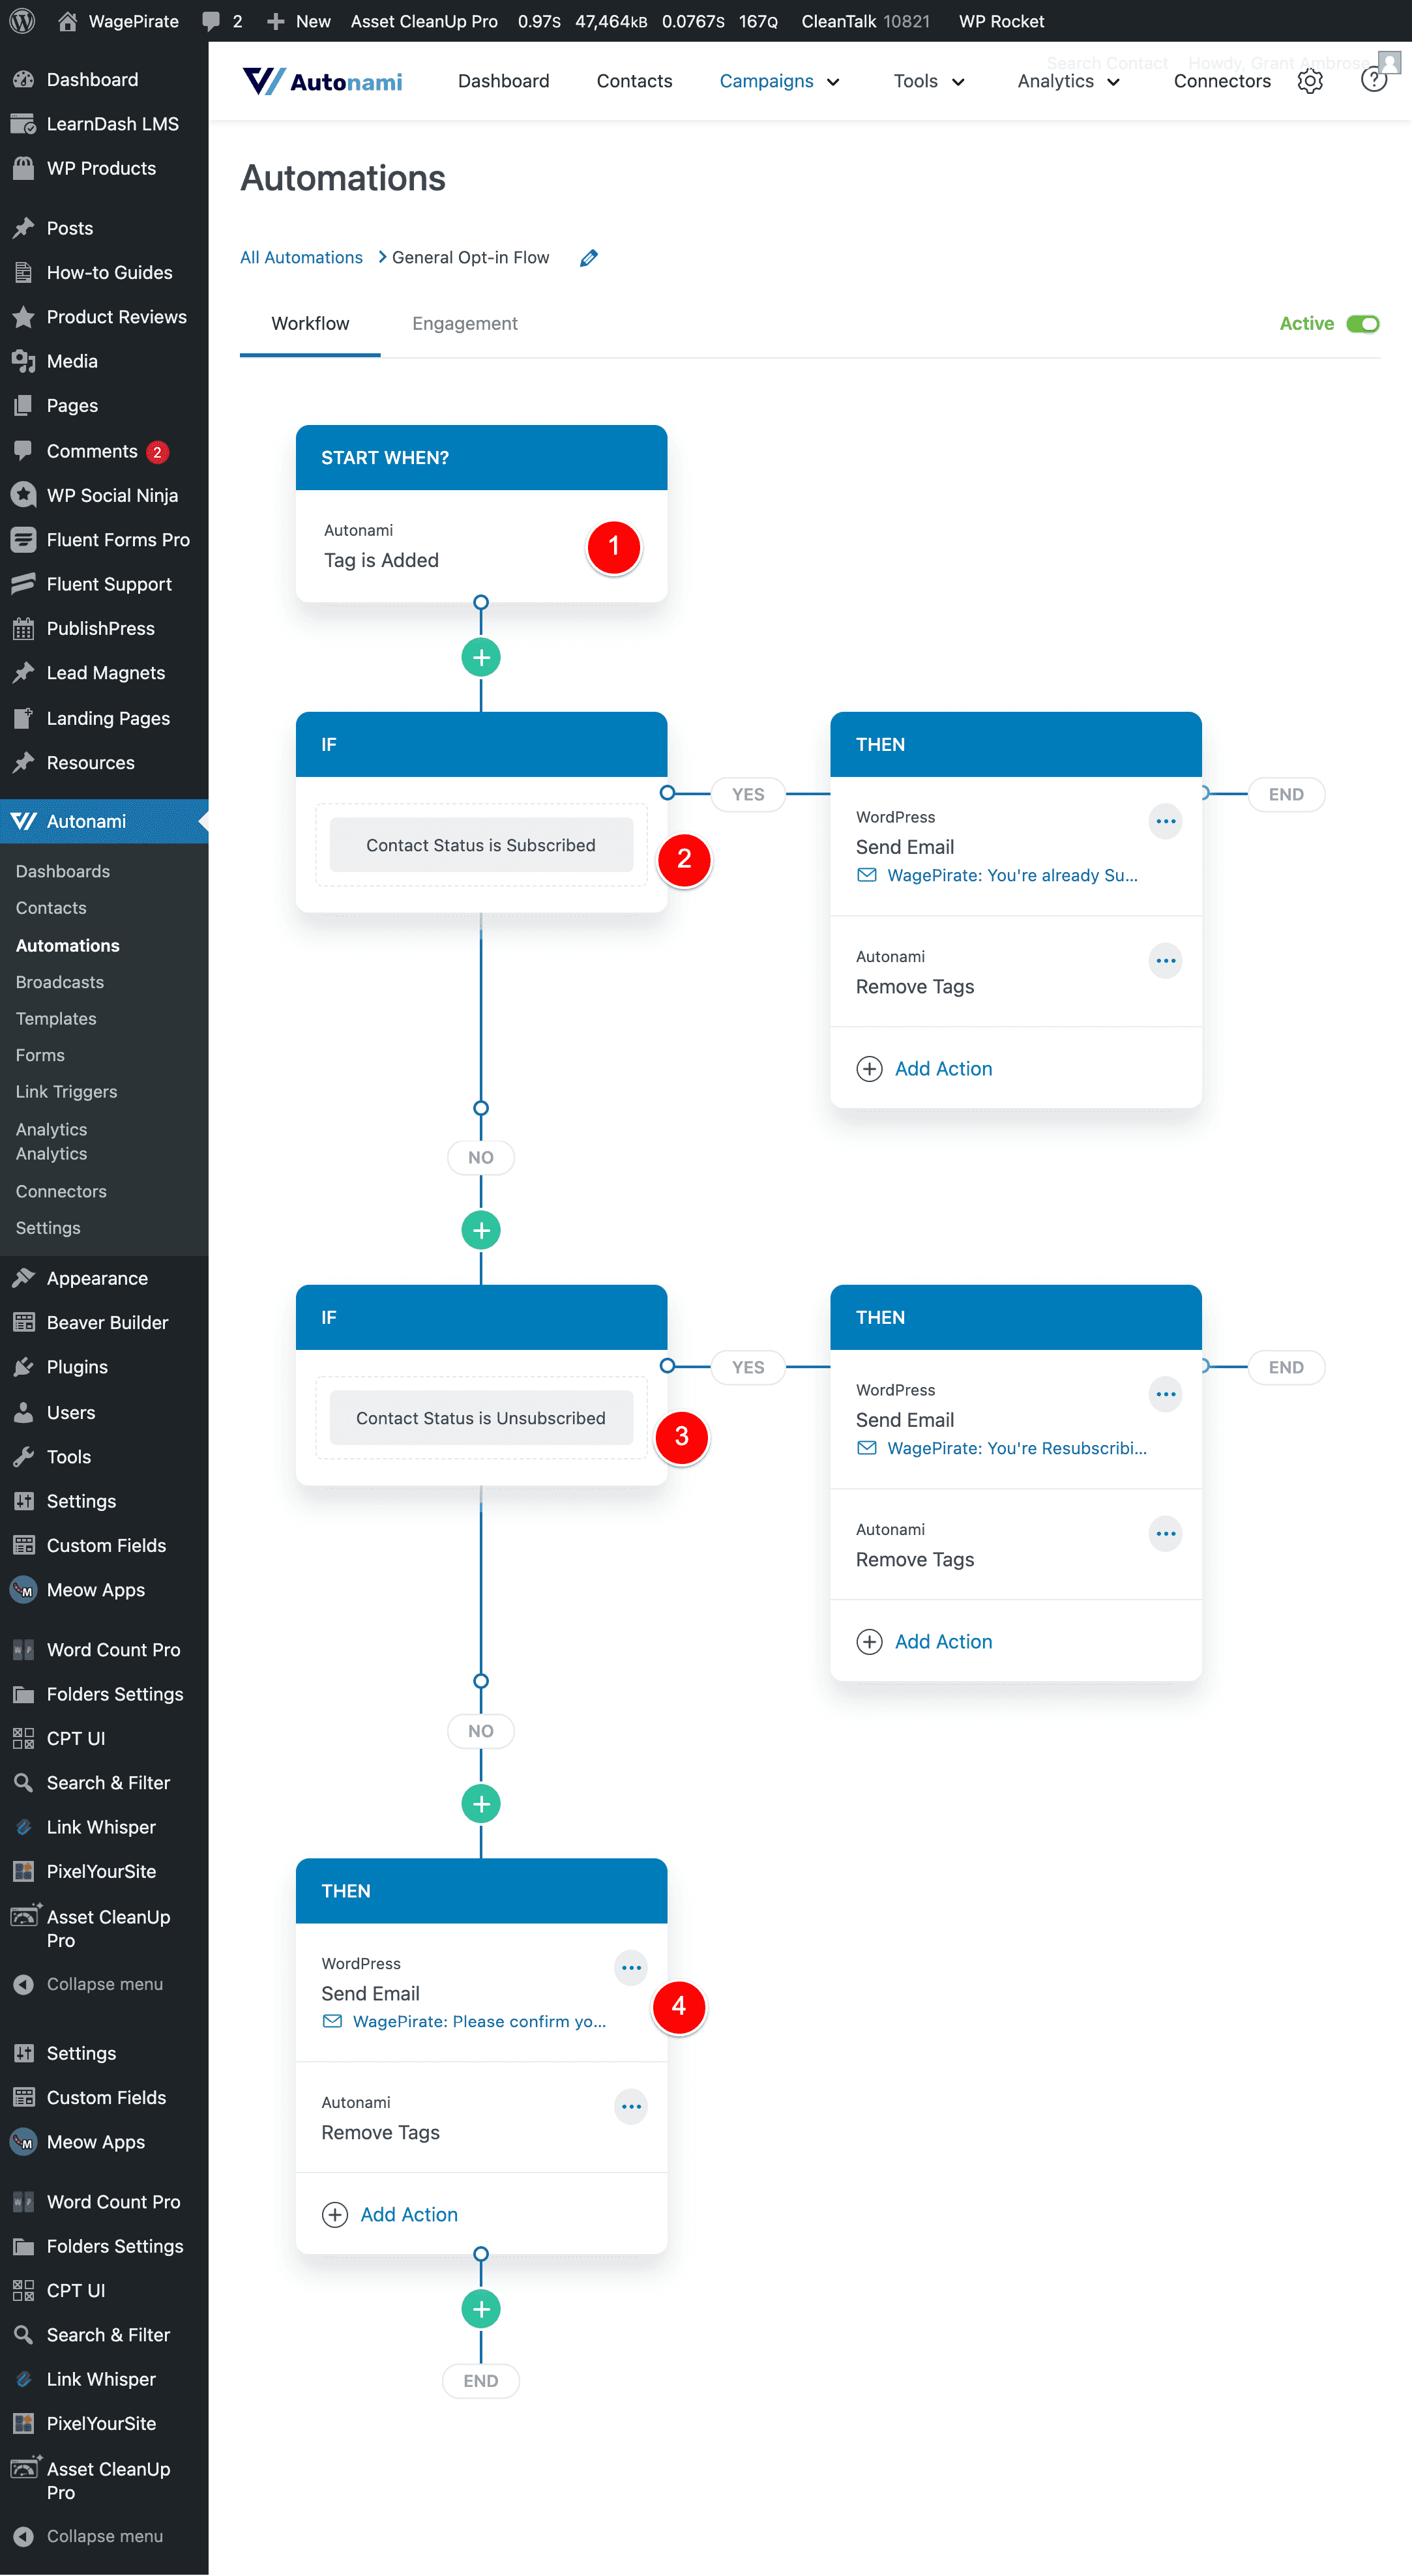
BUT FunnelKit Automations also completely replaces ActiveCampaign and Mailchimp to allow you to build Email Newsletters and Automations (like this one below).
RELATED: FunnelKit Automations Review 2022: The BEST CRM for WordPress & WooCommerce (with Screenshots)
If you’re using WooCommerce, you can also use FunnelKit Automations to design all your WooCommerce emails using a drag-and-drop builder, as I show in this video below:
Coming into [year], I really feel like the FunnelKit + FunnelKit Automations bundle is one of the best offerings in the WordPress community.
And if you want a faster website, I would say go and do some research on Bricks Builder.
For me, it seems to be the fastest page builder for WordPress.
And if you’re reading this article to set up a Coming Soon page for your new website, now just might be the time to make the switch.
Leave a Reply