This article shows you how to create a Single Post template in Bricks Builder that allows you to use Gutenberg AND Bricks Builder to create your content area.
Here’s what we’ll set up in the article and why you might want to do it in your website.
We will create a new Single Post template inside of Bricks that has 2 Post Content elements added to the page.
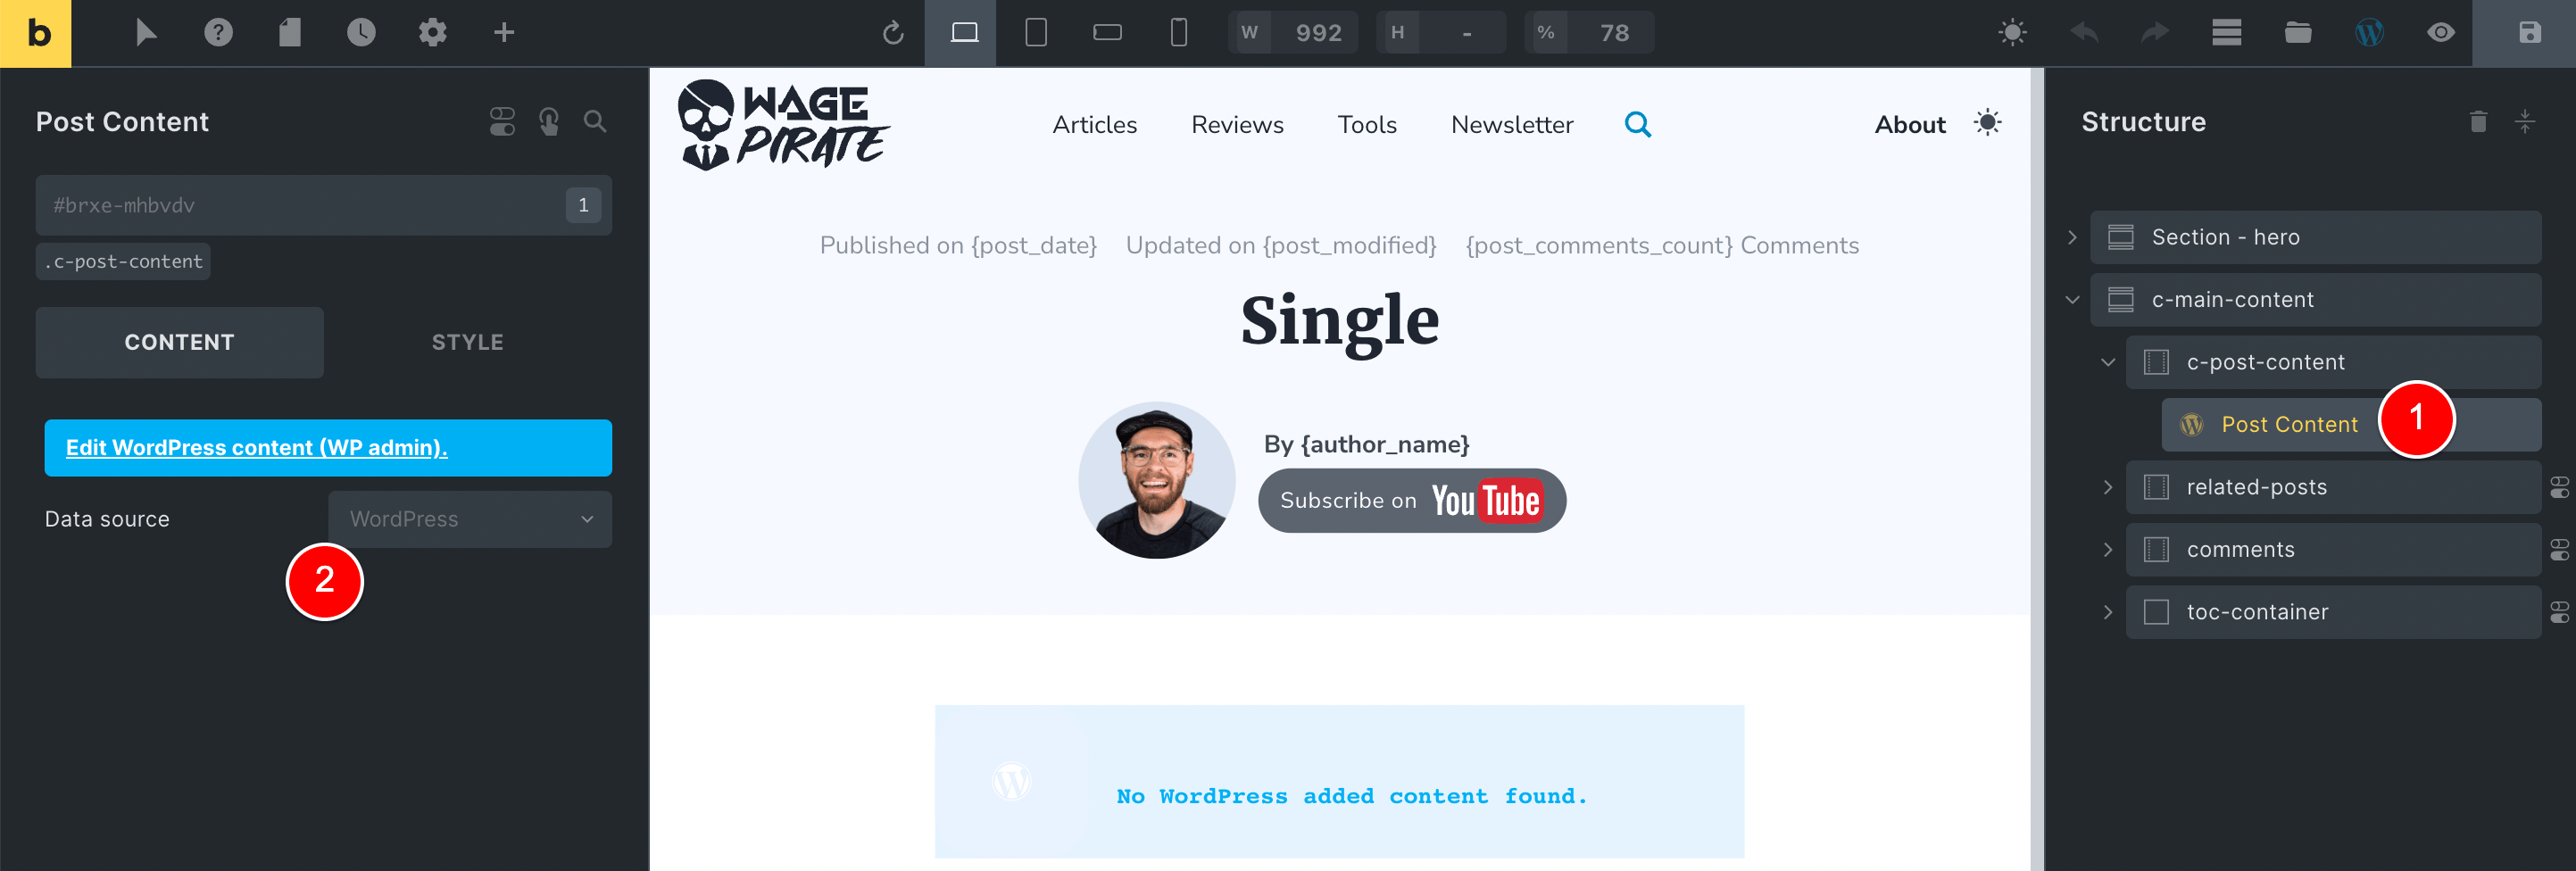
The first Post Content element (1) will have its Data source set to Bricks (2)…
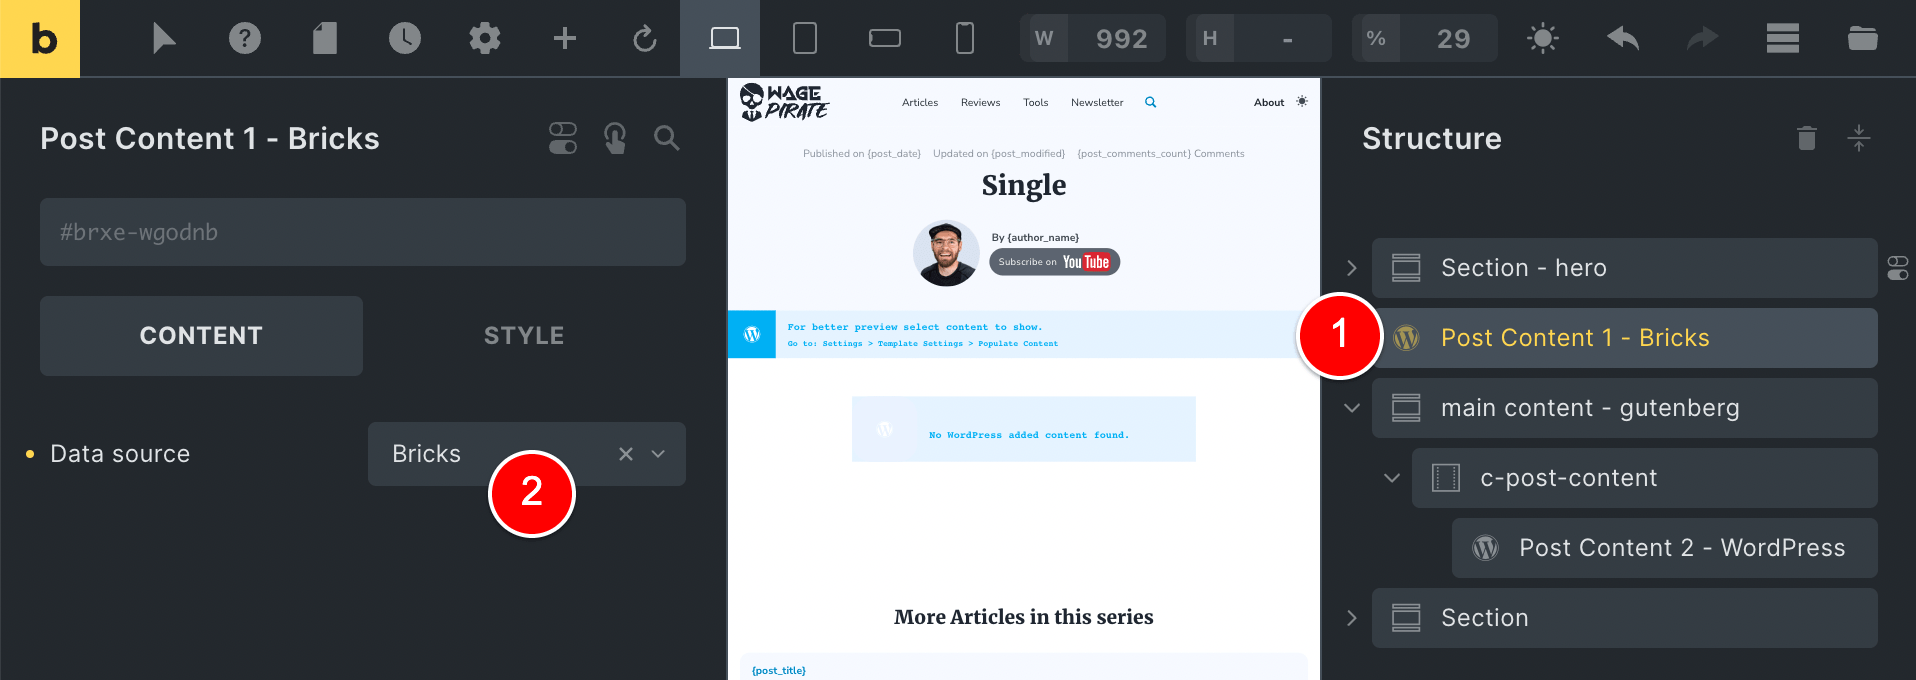
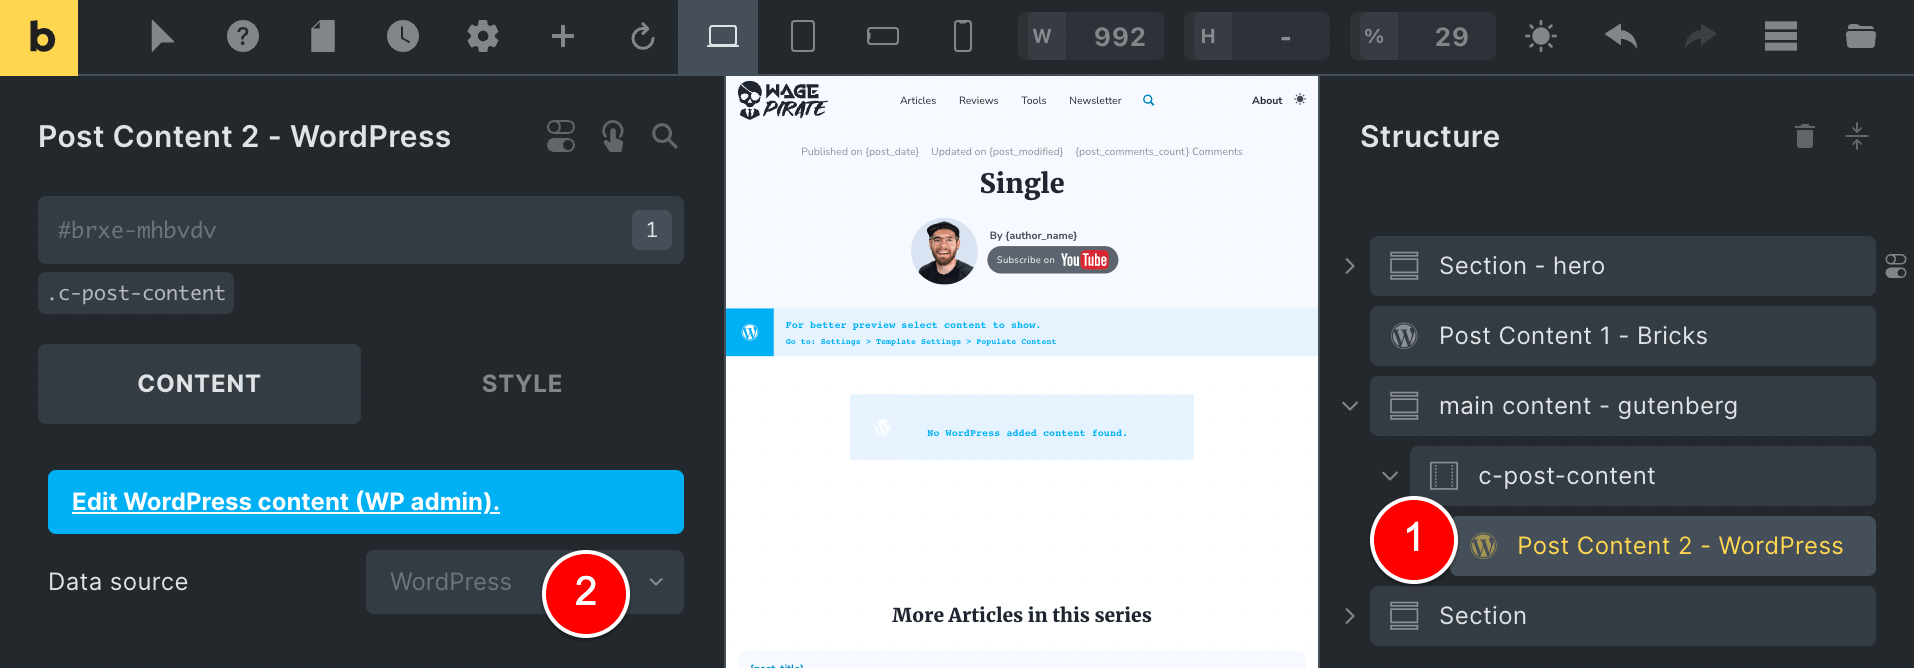
And the second Post Content element in our page (1) will have it’s Data source set to WordPress (2) which outputs Gutenberg content into our Bricks template.
One situation you might find yourself wanting to do something like this is for the Pages on your website.
Some pages you want to put in a bit of extra effort for and design them properly so they look professional (like your Homepage).
For these pages, you want to design your content area with Bricks and have it stretch the full width of the page so you’re designing everything with Bricks between your Header and Footer.
For some Pages, you might want to use Gutenberg.
Examples of where I use Gutenberg for my pages VS Bricks Builder ranges from my basic Terms and Conditions pages…
All the way to my long-form content pages where (if you’re like me) you write faster using the Gutenberg editor.
A good example of this on my website currently is my About page.
So I have 1 post type “Page” with two designs I want to have the option to:
- (1) Use Gutenberg
- (2) Use Bricks Builder
And when I am using one of these, I want to NOT render the other.
And that’s what we’re going to achieve by the end of today’s tutorial.
The Video Tutorial
Here is a video that compliments the content of this article.
Like with most things in WordPress, there are many options available to you to achieve this outcome and the one you choose can depend specifically on the type of content in your website, your needs and also your technical experience.
In this tutorial, I will show you about 3 different options you can choose from (with a bonus 4th one at the end).
As I dealt with this recently when creating my own website…
I thought it would be best to go through the process I took to build my website so that you can see exactly why this can become an issue if you don’t consider a few things…
And like all good web nerdians, I started with my Homepage…
Step 1: Creating the Home Page
I created a new Page, named it “Home” and proceeded to design it using Bricks Builder…
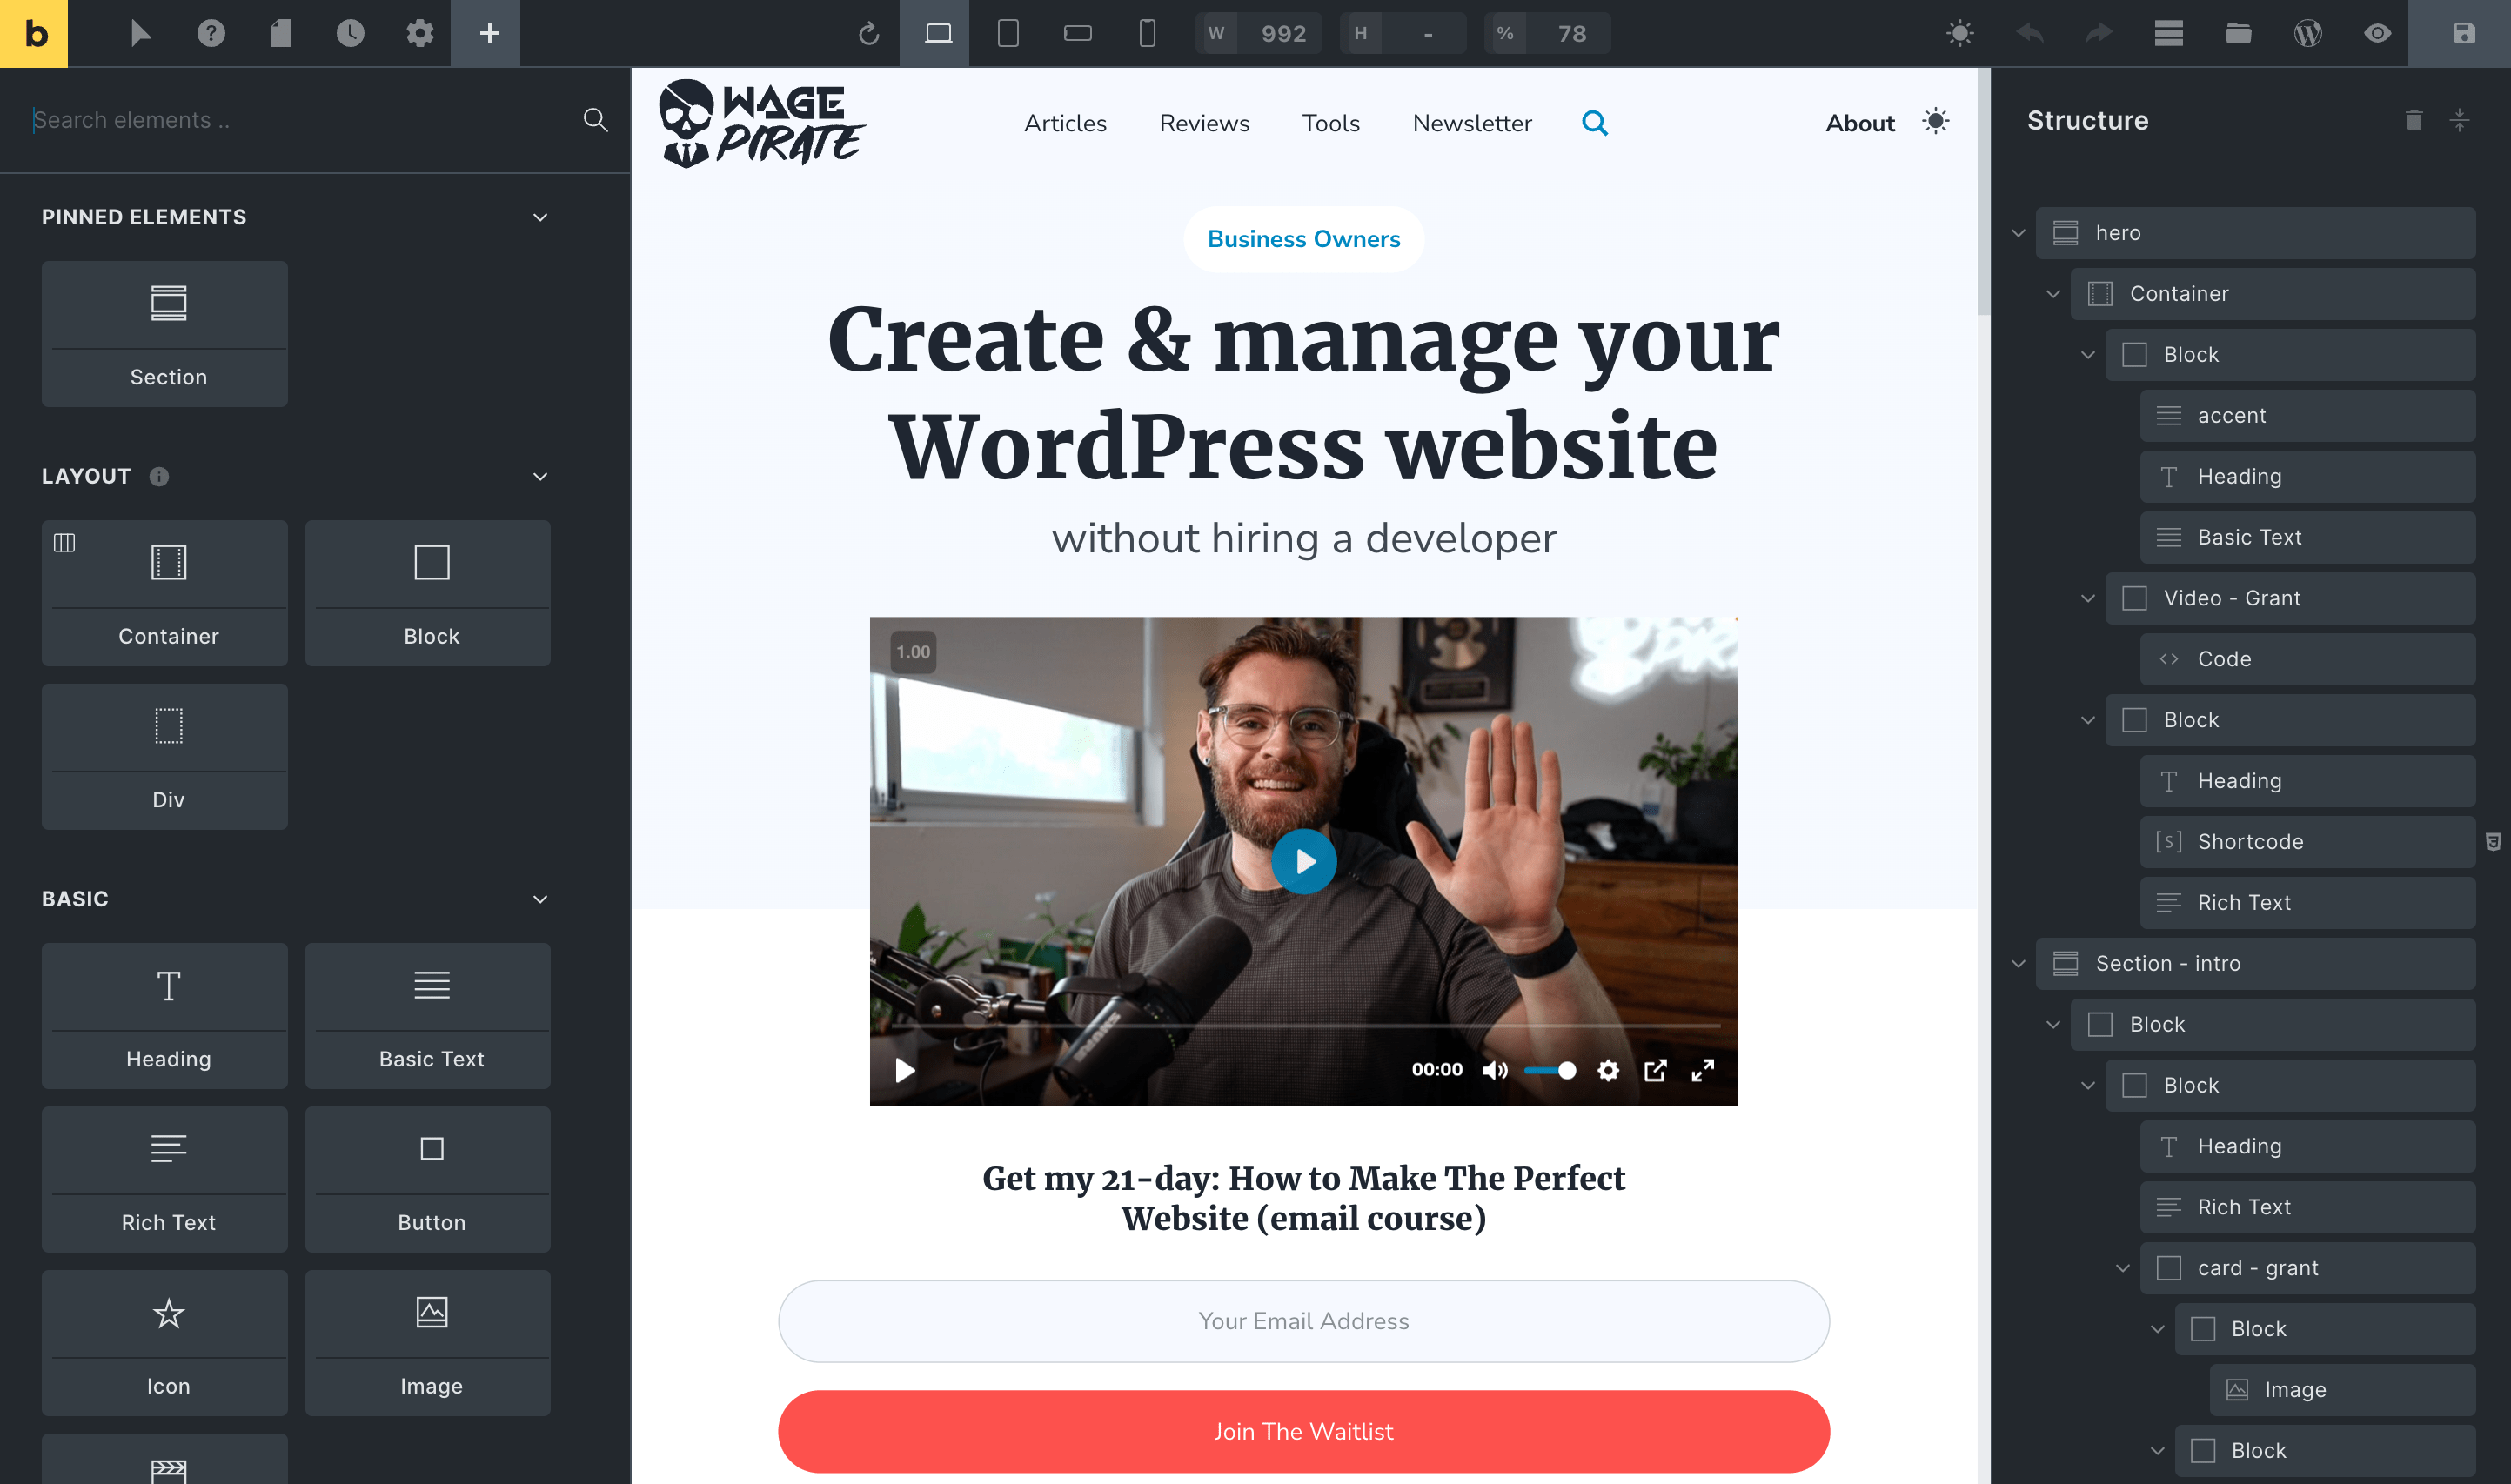
Perfect – that’s all straightforward – nothing tricky here.
Step 2: Creating the Single Post template
Next, I went and designed the template for my single Blog Posts aka my Single Posts template.
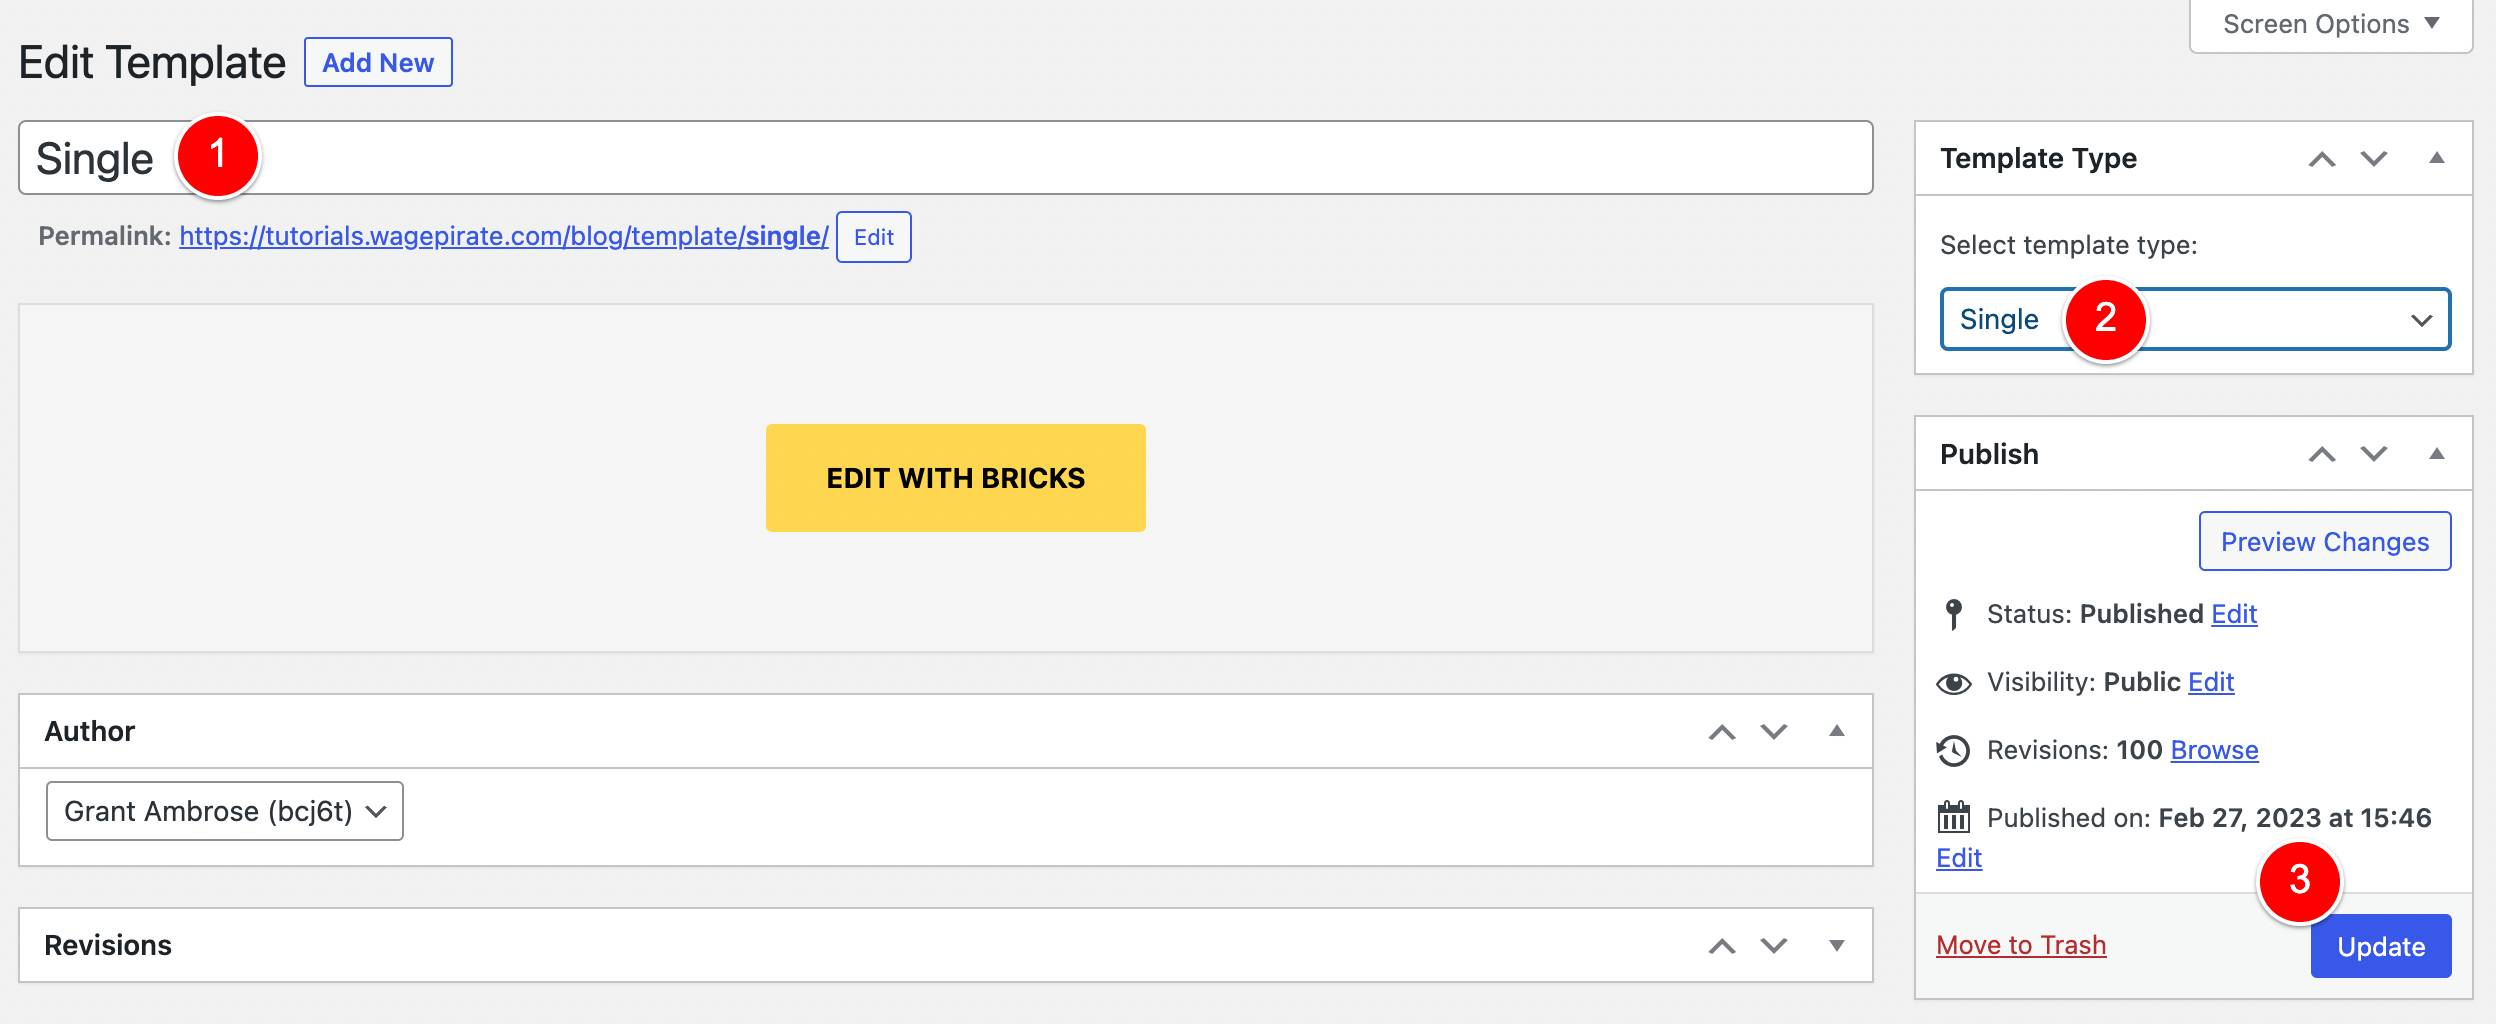
I went to Bricks > Templates > Add New…
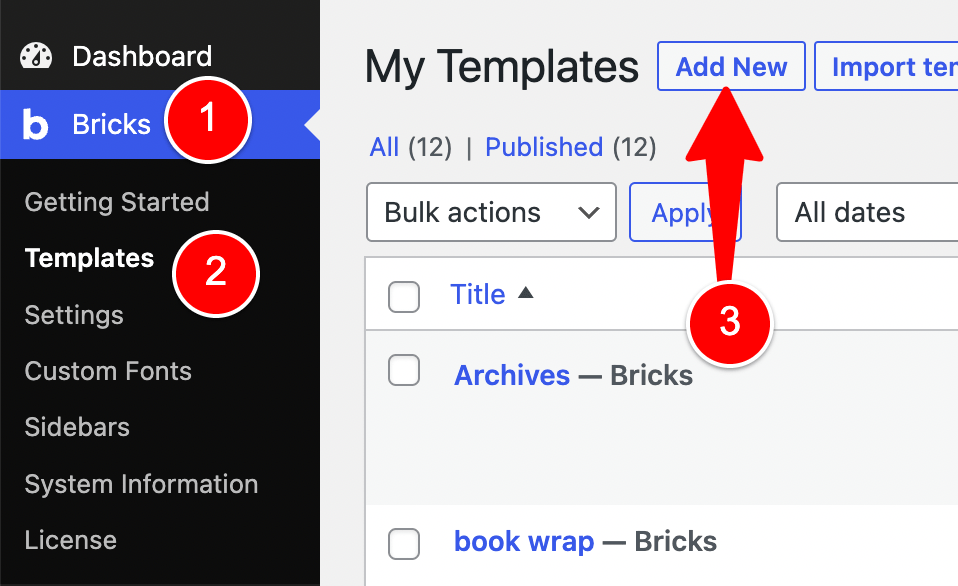
I named it Single (1), Selected the template type to be Single (2), published / updated (3).
I then clicked Edit with Bricks and created the following design in Bricks.
The design is quite simple but the main thing to take note of here is that at (1) above I have added a Post Content element (1) and set its data source to be WordPress (2).
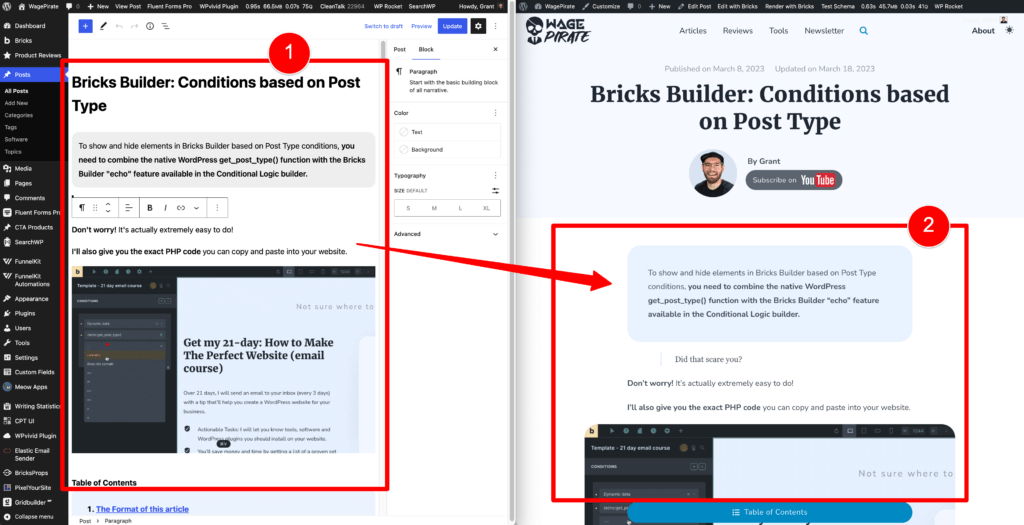
In case you haven’t used that element before, that allows me to write content for that post / page using Gutenberg (1) and then output it within my Bricks template (2).
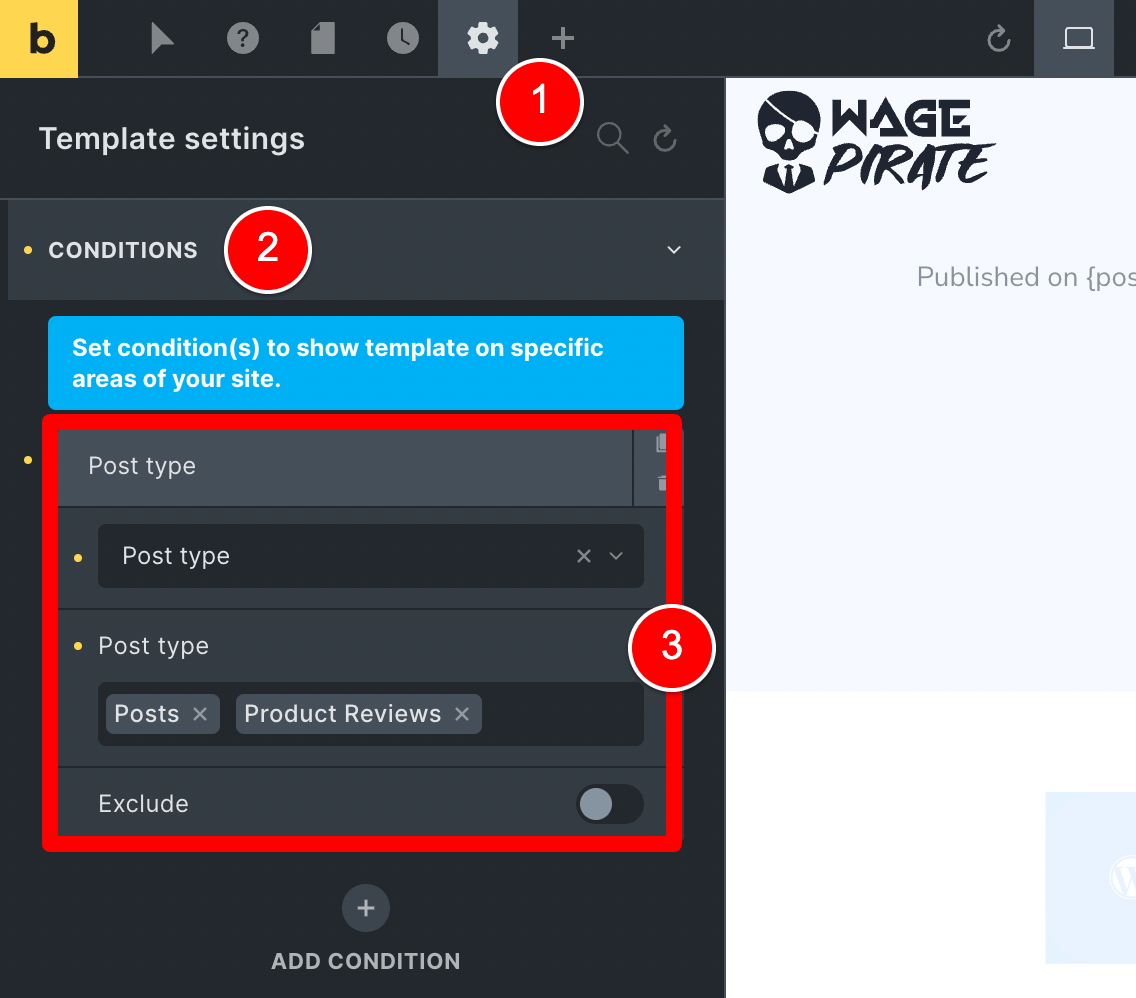
Once I finalised my design for this Single Post template, I went to Settings (1) > Conditions (2) and set this template to apply for 2 post_types
- Posts (blog posts)
- Product Reviews (a custom post type I use for my reviews of plugins).
But as we know, creating a website is an ever-evolving process…
Step 3: Creating the “basic” Pages
On all websites, we have basic Pages that we always need to add but they don’t require any design work.
Think of Pages like:
- Terms and Conditions
- Privacy Policy
- Contact Us (simple contact us form)
You know – the types of Pages that you just want to jump into Gutenberg for, write whatever needs to be written and hit save and move on to the next task.
This is where the problem we are aiming to solve today started to take hold…
Because I knew:
- I wanted to use Gutenberg for these Pages and I wanted the design to be simple, and thus:
- I knew that the Single Post template I had created above for my Posts and Product Reviews would work perfectly here.
I just needed a way to apply that template to only SOME of my Pages – these basic Pages.
But not ALL my Pages.
Because for other Pages on my website (such as my Homepage) – I still wanted to edit my content area using Bricks and be able to edit the full-width of the page.
So after thinking a bit, I realised I had a couple of options available to do this and I tried both…
Option 1: Assign the template directly to the Page using Conditions
An obvious option I had was to edit the Single template I had created and just add conditions to apply that Single template to the individual Pages.
Here is what it looked like when I set that up.
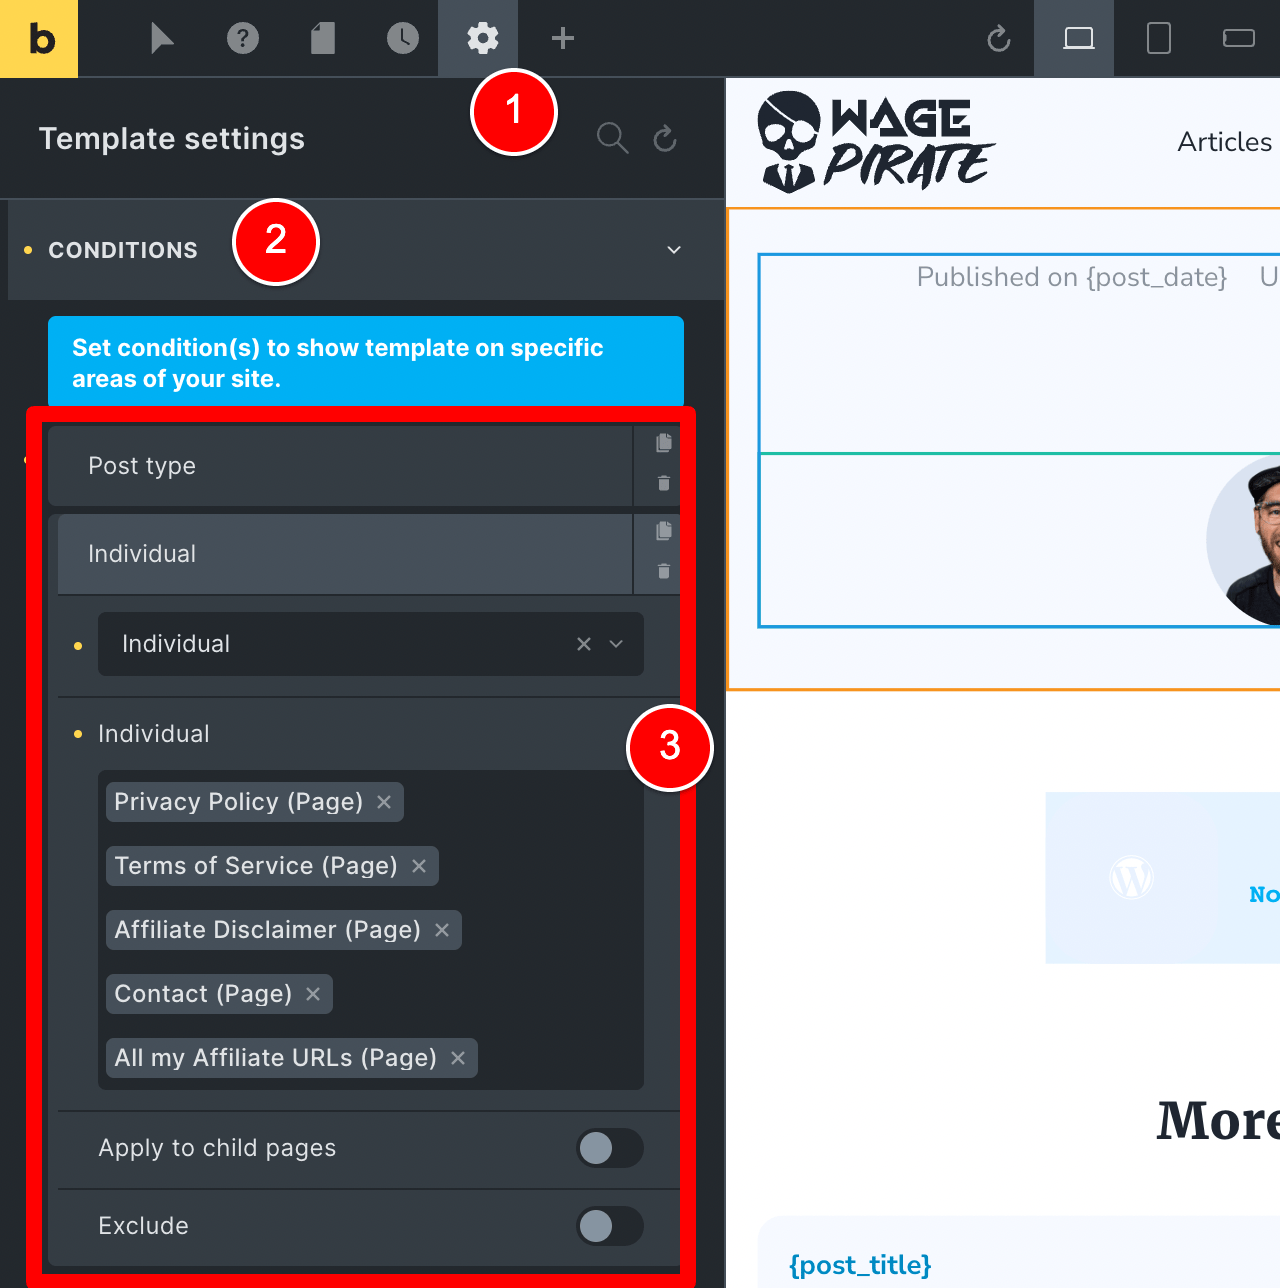
But long-term I could see this being a hassle to maintain, as I needed to always add the page into this template and this list could get quite long over time.
I mean, this way was fine and would have worked…
but I just couldn’t help but feel there was a better way.
Option 2: Add Two Post Content elements with Conditional Logic
Another option I tried was to add two Post Content elements to the template.
- Post Content 1 – Data Source: Bricks
- Post Content 2 – Data Source: WordPress
It looked like the below design, where I have added a Post Content element at (1) with its Data source set to Bricks on the left.
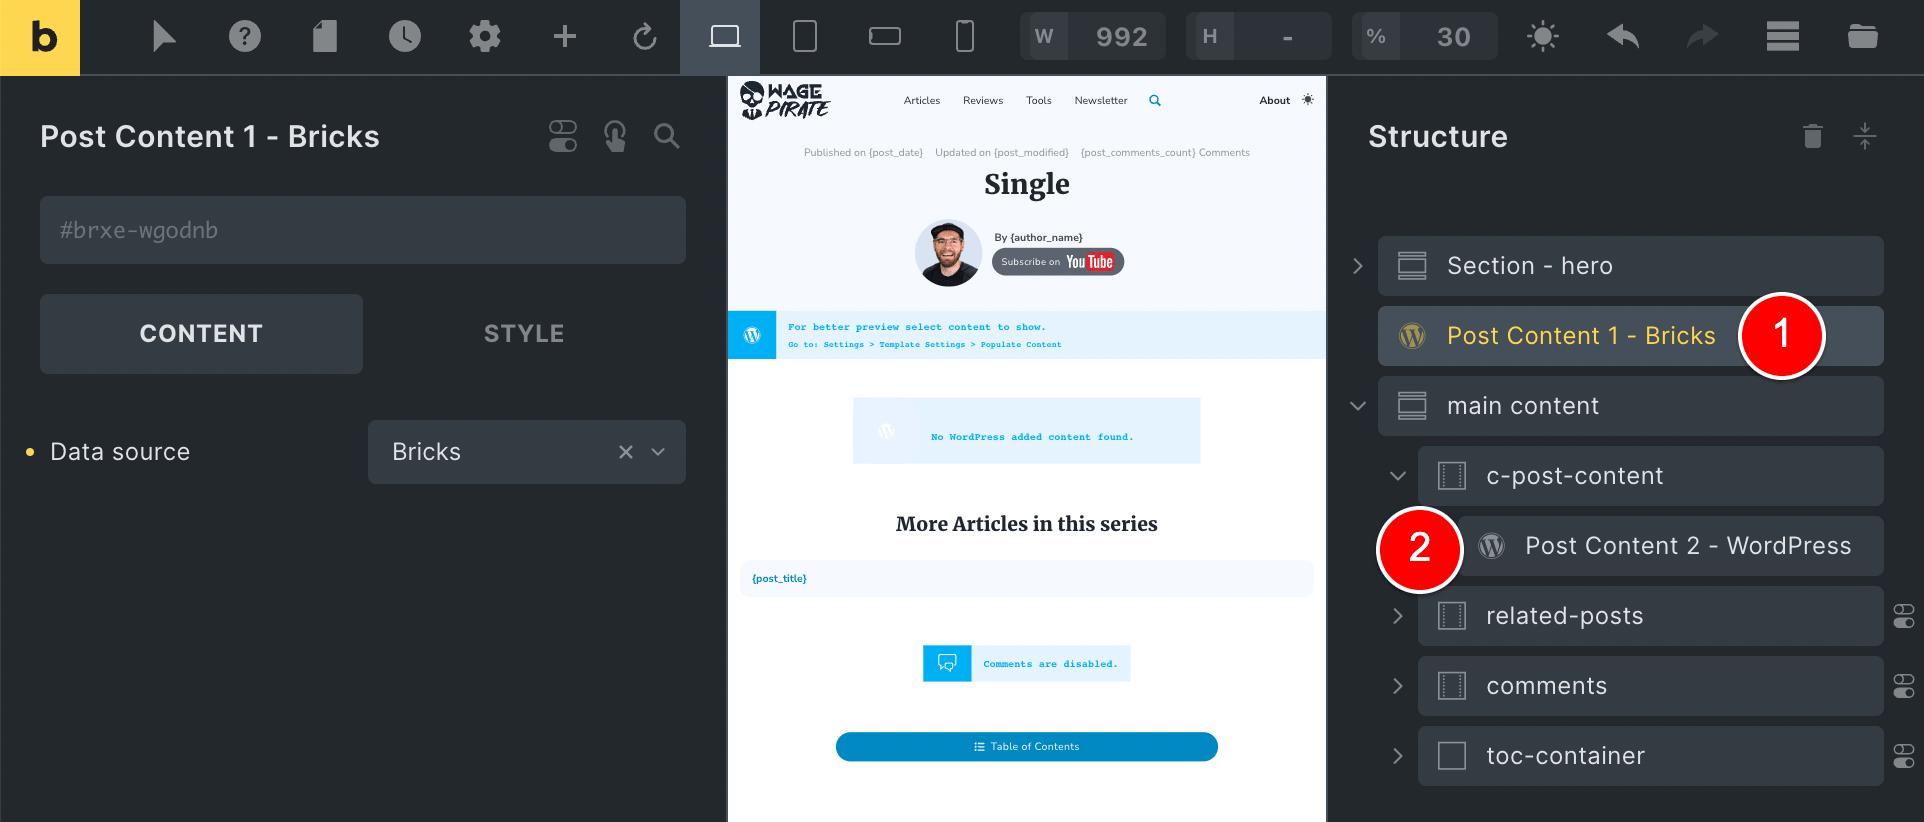
The Bricks Post Content element is on its own with no container wrapping it so it could take up the full width of the page.
Then a second Post Content element is at (2) in the image above and that would output the Gutenberg content within the container it’s in.
With this set, all the single posts (for all post types) on my website now take on this template.
And what’s cool is that Bricks will automatically only output 1 Post Content element on the page and not output the other one.
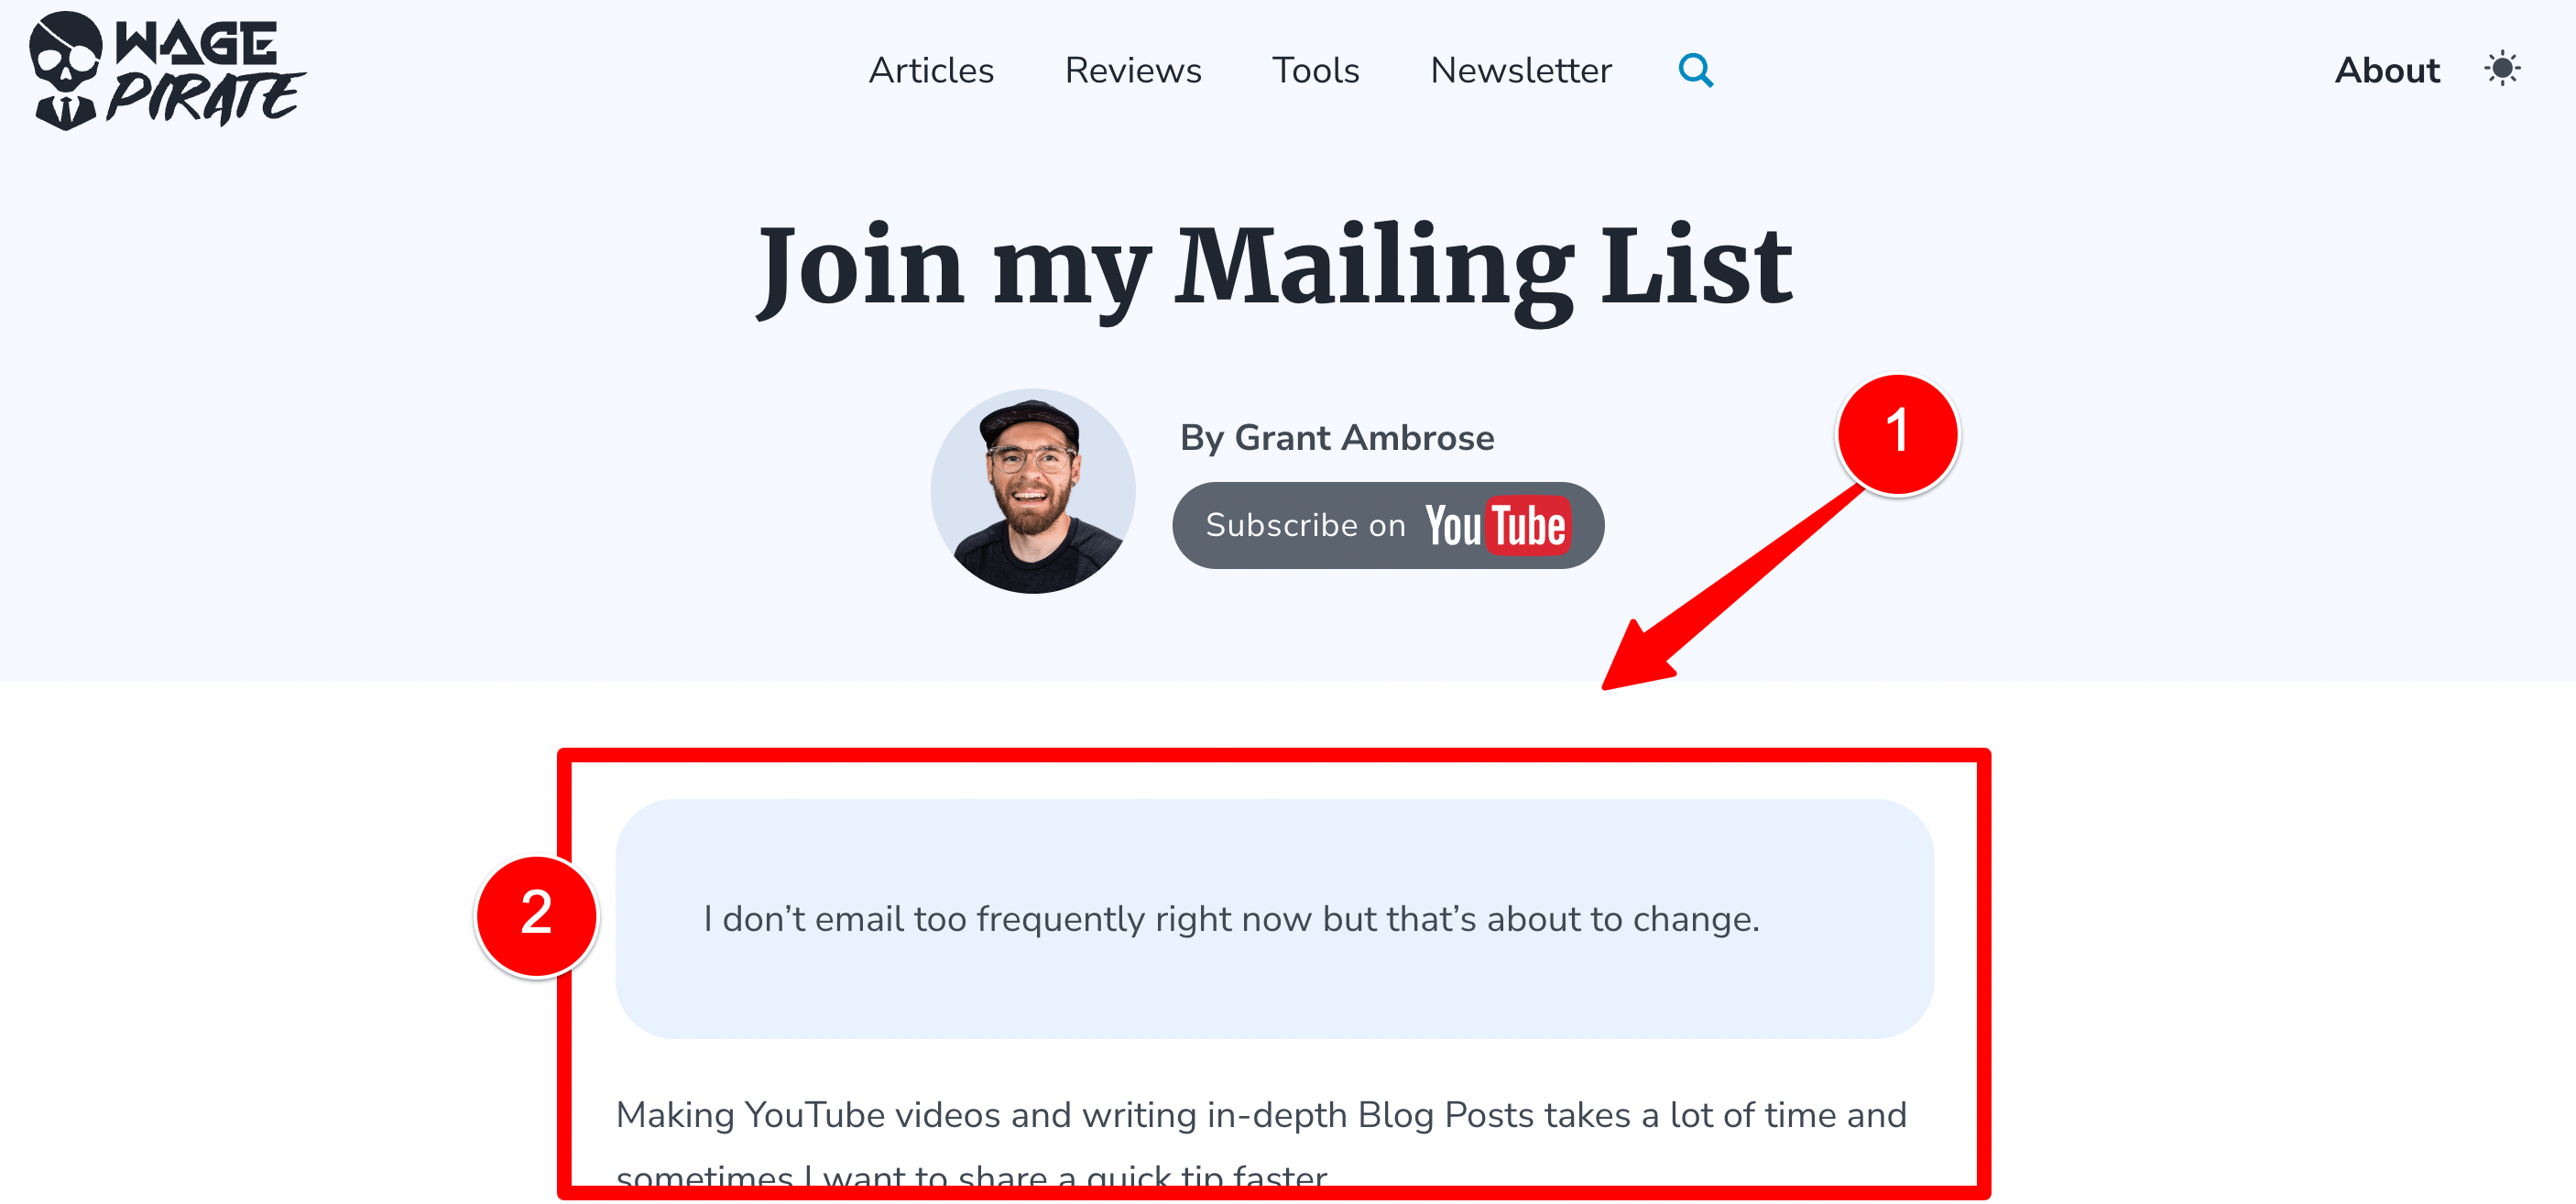
So if I go to my Newsletter page, write my content using Gutenberg and view the front-end of this page…
Bricks does not output my first Post Content element for Bricks content (1) and only outputs my Gutenberg content at (2).
But the problem with this method is that this clever Brick..(ery?) of only outputting 1 Post Content element only helps us show the correct content on the page.
We still have the other sections on the page to add Conditional Logic to, such as the top post-meta area with the post title / date / author info…
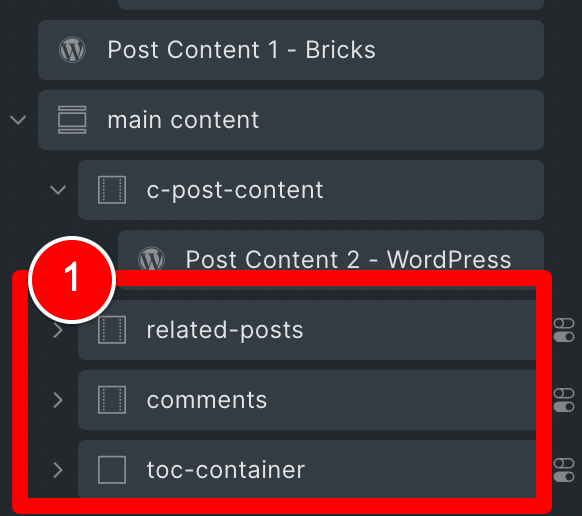
and the other parts such as the comments / related post / table of contents sections with elements inside.
Worth pointing out is that if we view our Homepage (which we build with Bricks) with the current setup, we can see the home title up the top (which we don’t want)…
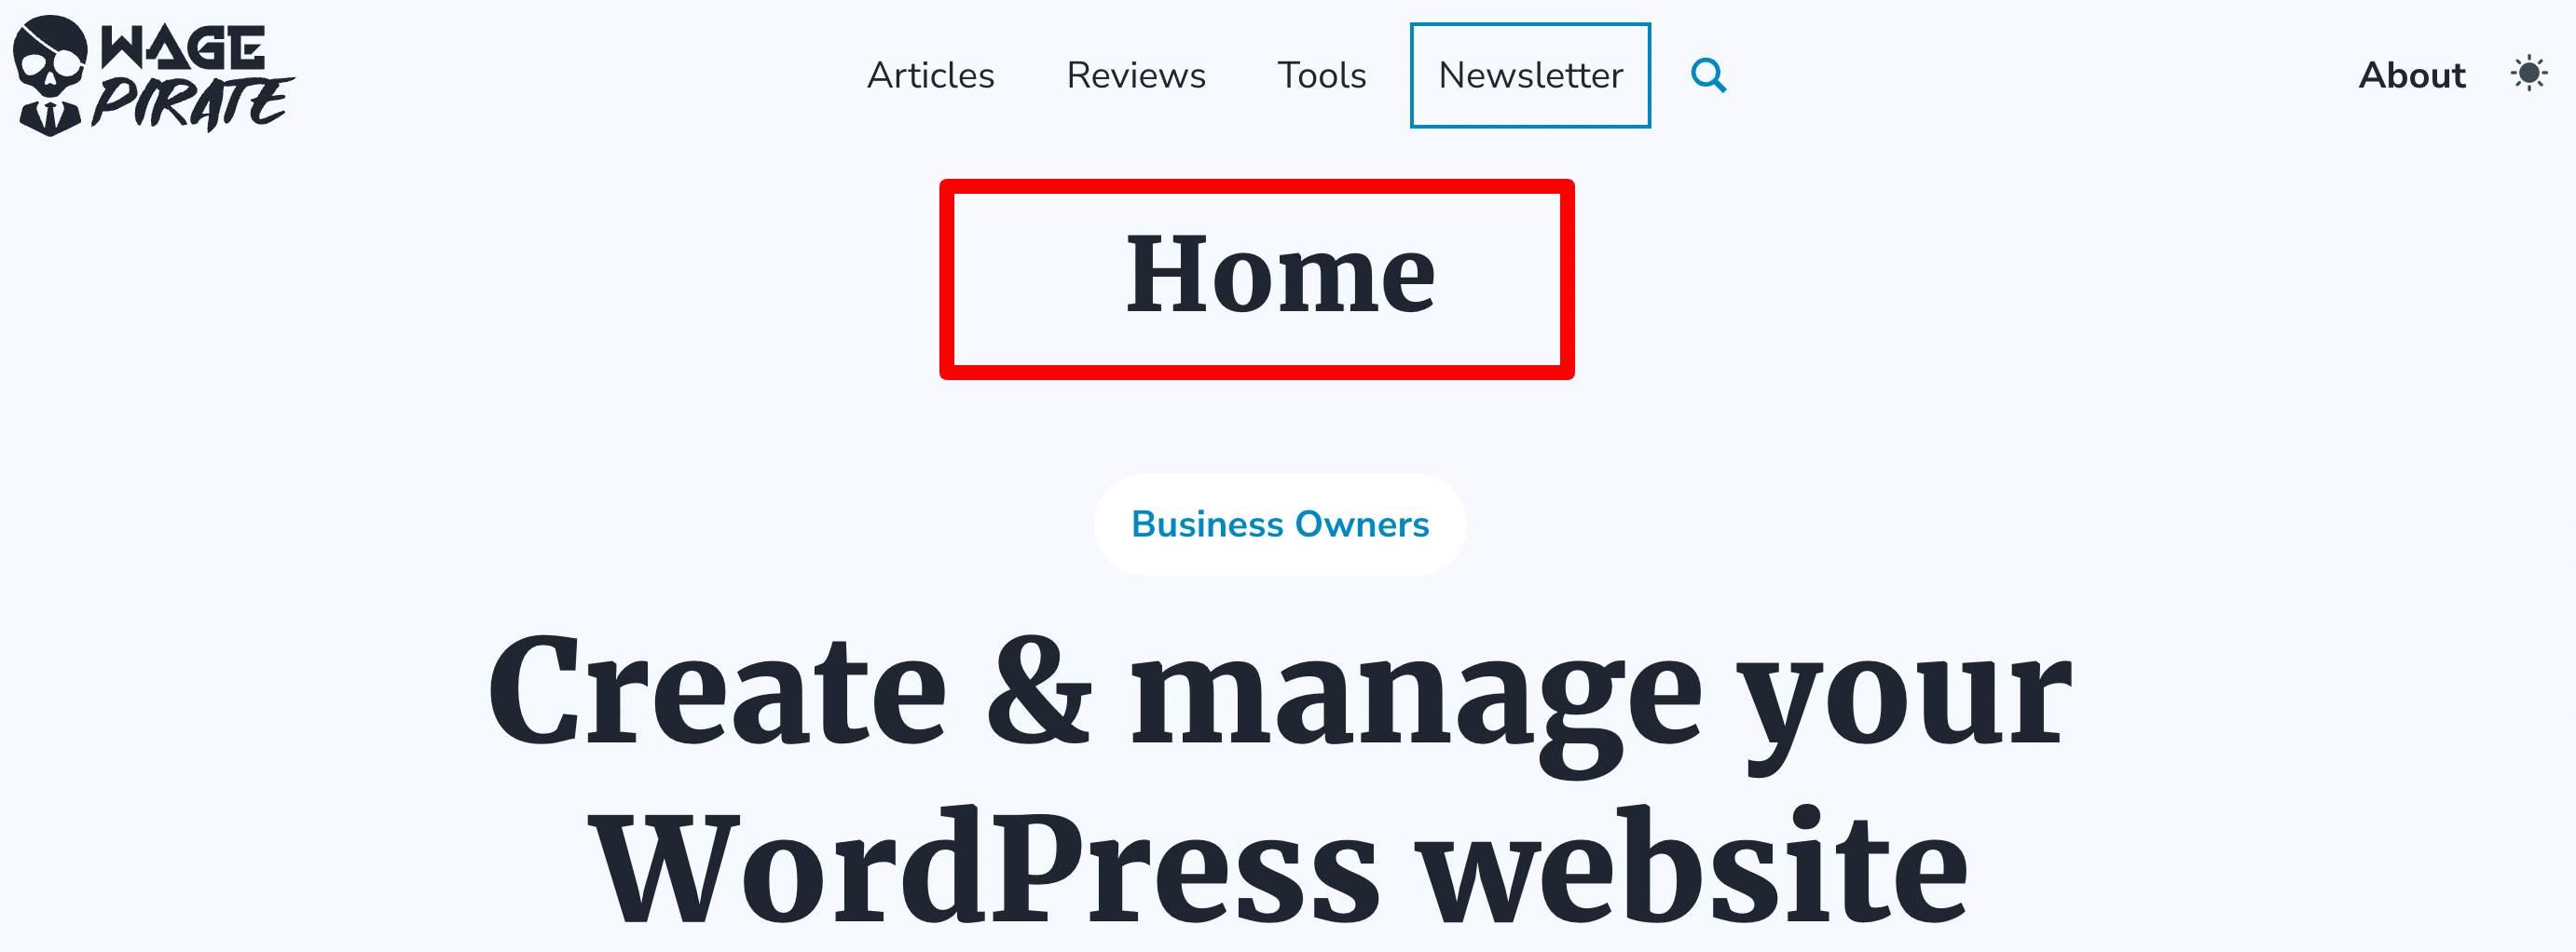
and because Pages don’t have Comments, after we render our Bricks content (see below where it says data-source=”bricks” at 2), the bottom elements of our template are output on the page with nothing inside (i.e. empty divs)…
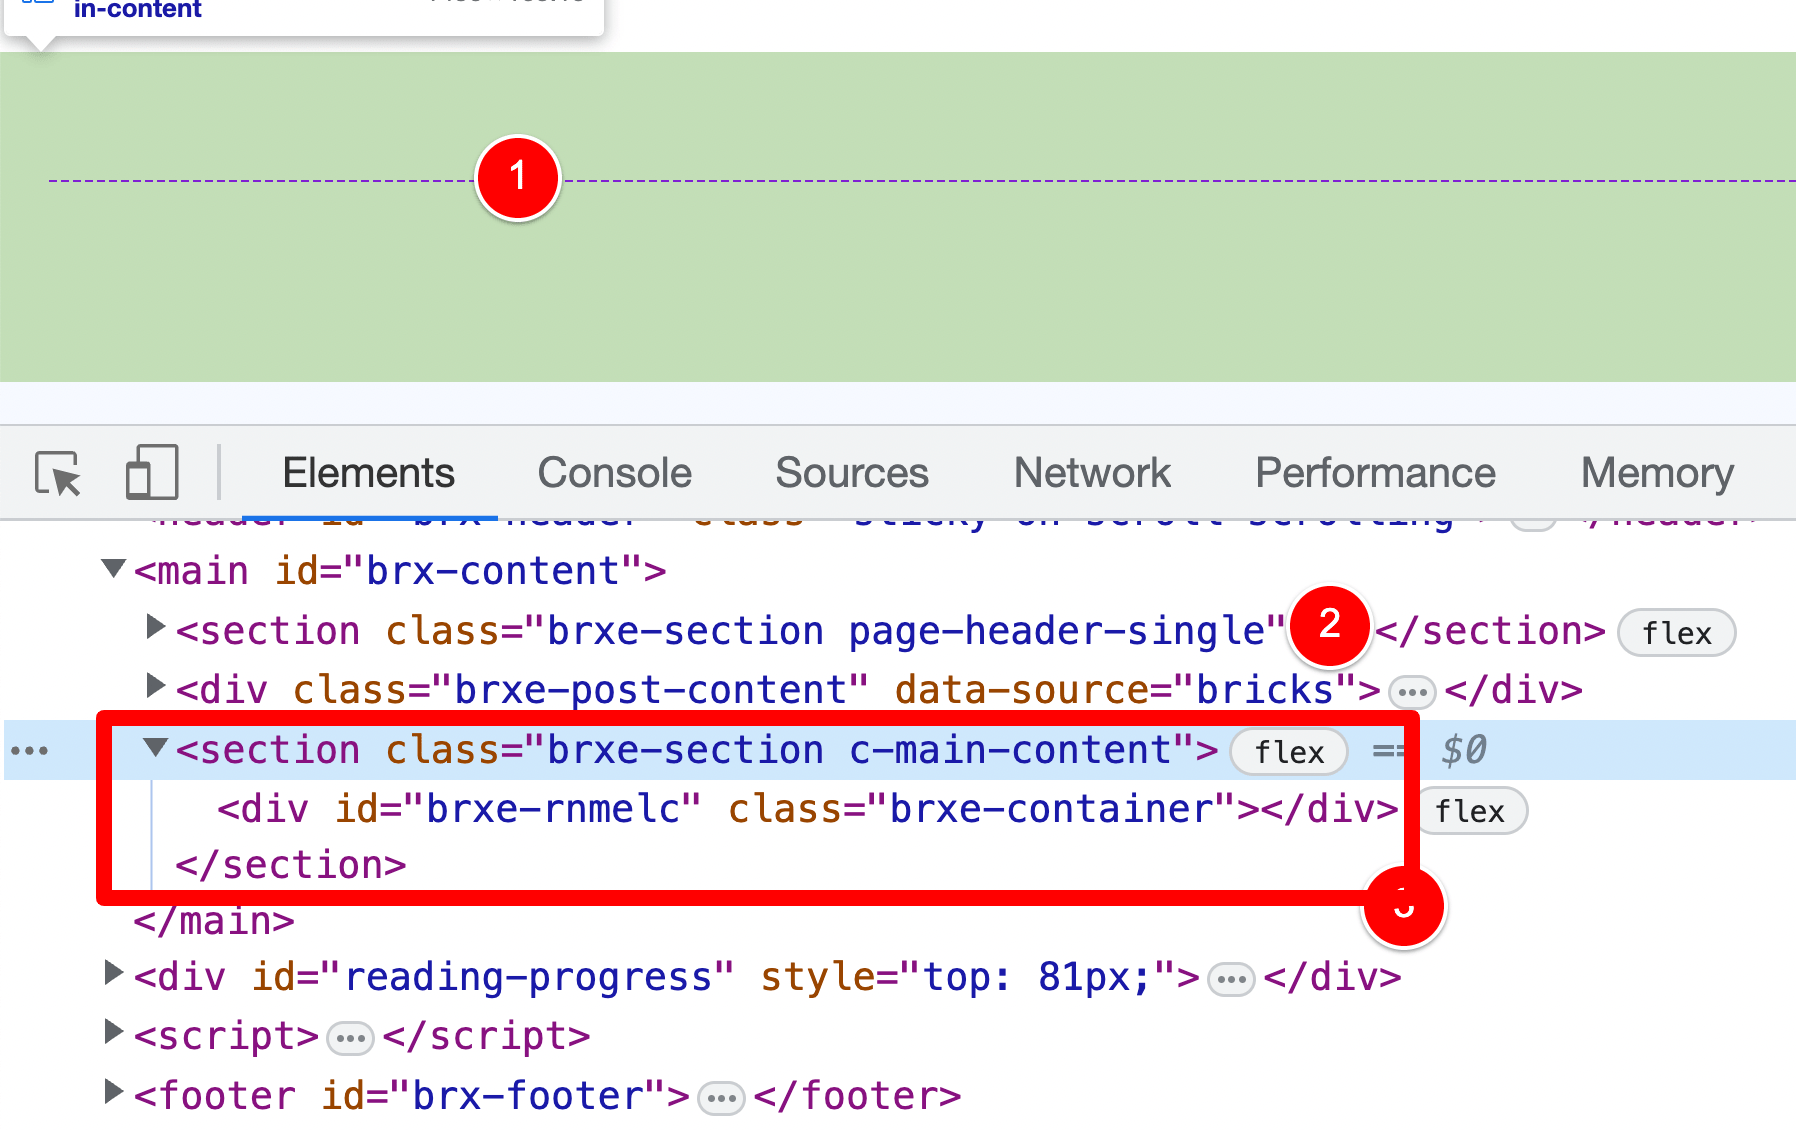
So it’s not the cleanest solution right now.
BUT!… we can clean this up and go one step better.
We could check to see if the current post has Gutenberg content and if it does NOT, we could hide all elements on this template EXCEPT for the Bricks Post Content element.
Option 2: Hide elements in Bricks if we are NOT using Gutenberg for content
One of my most used features inside of Bricks is the echo feature.
And we’re going to use it right now to help solve our issues!
With the release of Gutenberg, there were a few functions added to WordPress Core for developers to utilize.
One of them is…
has_blocks()You can read more about it here but in essence, it returns TRUE if the current post has Gutenberg Blocks in its content.
Let’s combine this with the echo feature of Bricks Builder…
Inside our template, I’ll go to the top hero section that contains our Post Title and Post Meta (1), click on Conditions (2) and then set the below condition.
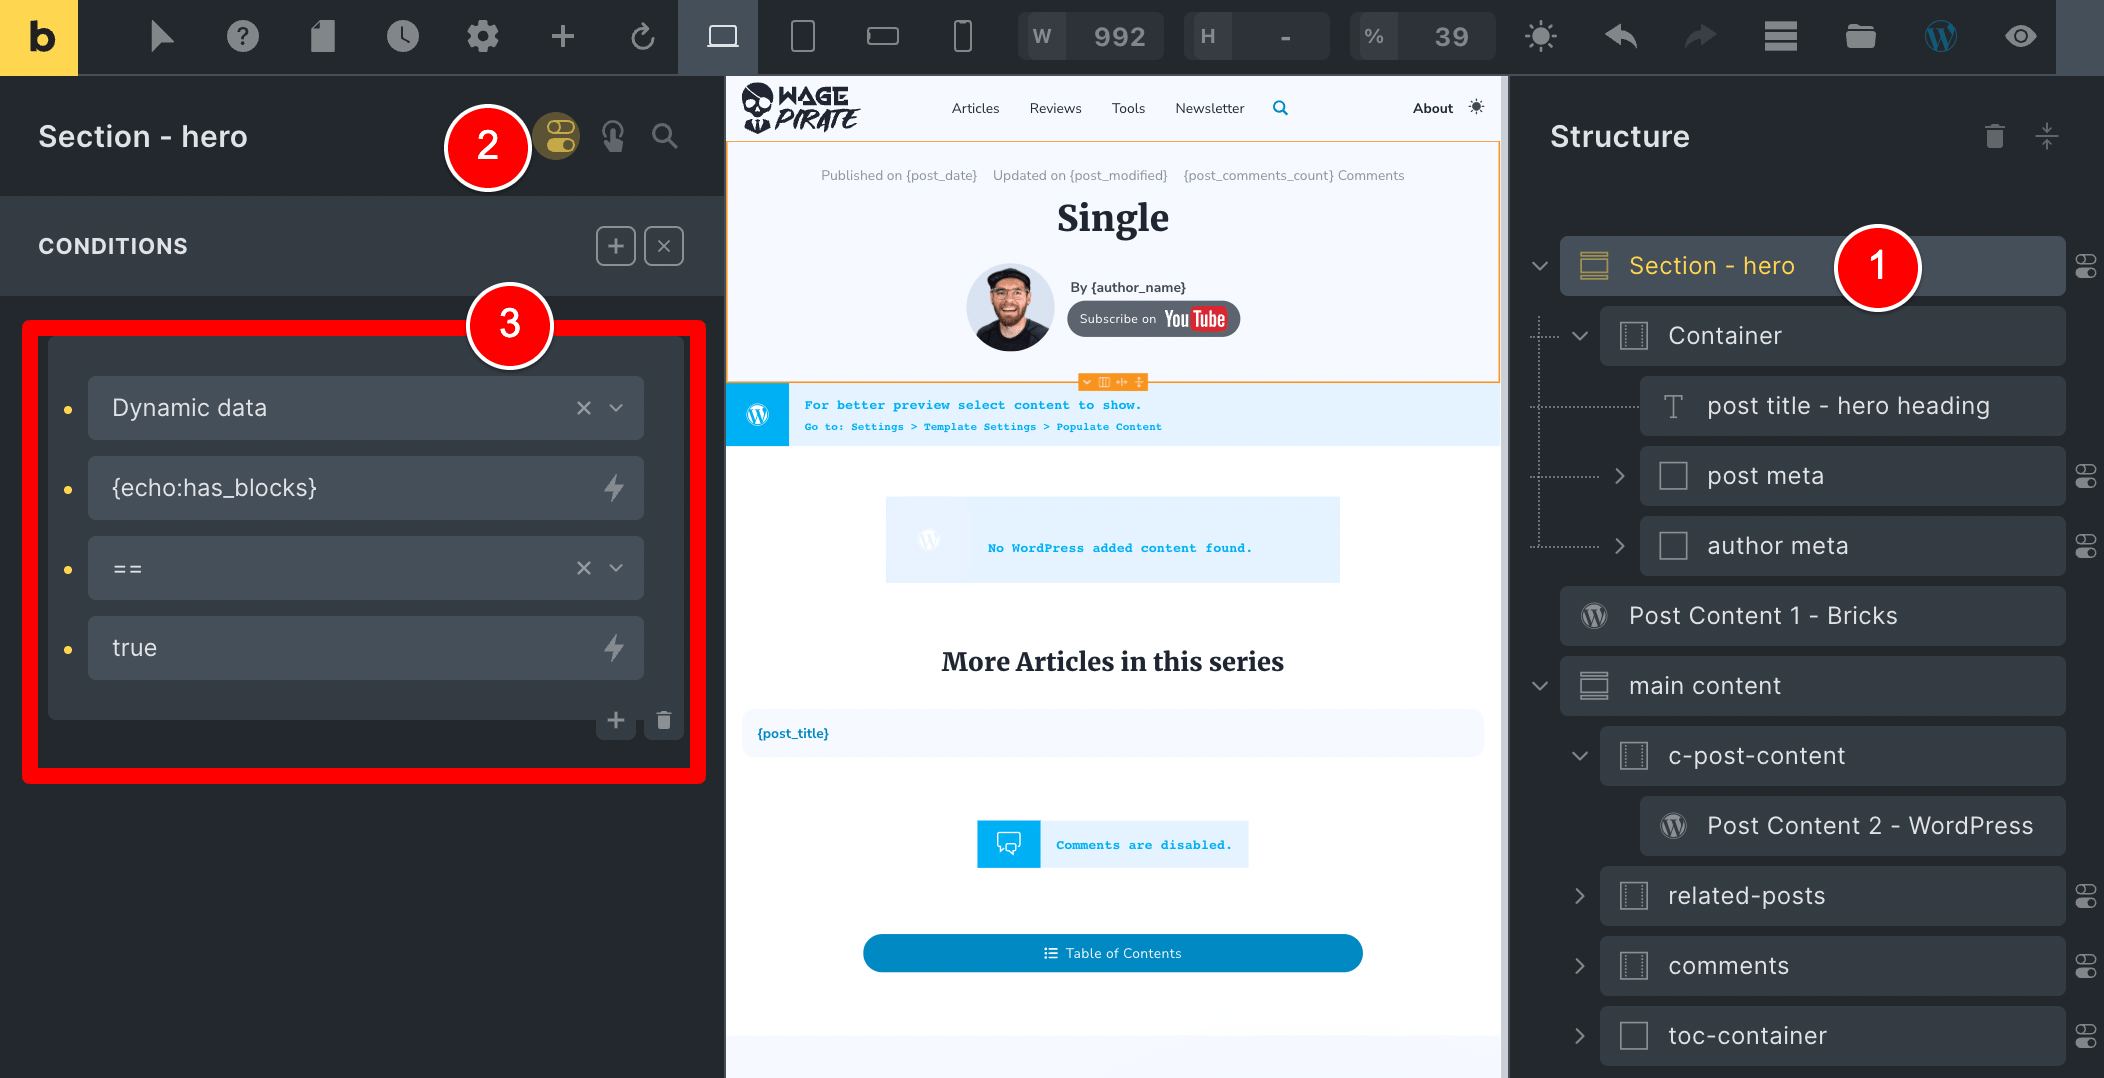
With this condition set, the hero section and all its inner elements will now only show if the current post content contains Gutenberg blocks (i.e. has been edited with Gutenberg.
If there are NO blocks found, we can assume we have created the content of this page using Bricks…
this has_blocks would be FALSE and (thus) this section will not output for posts / pages built with Bricks content.
If I save this and view our homepage now, you can see the Post Title does not output on the page…
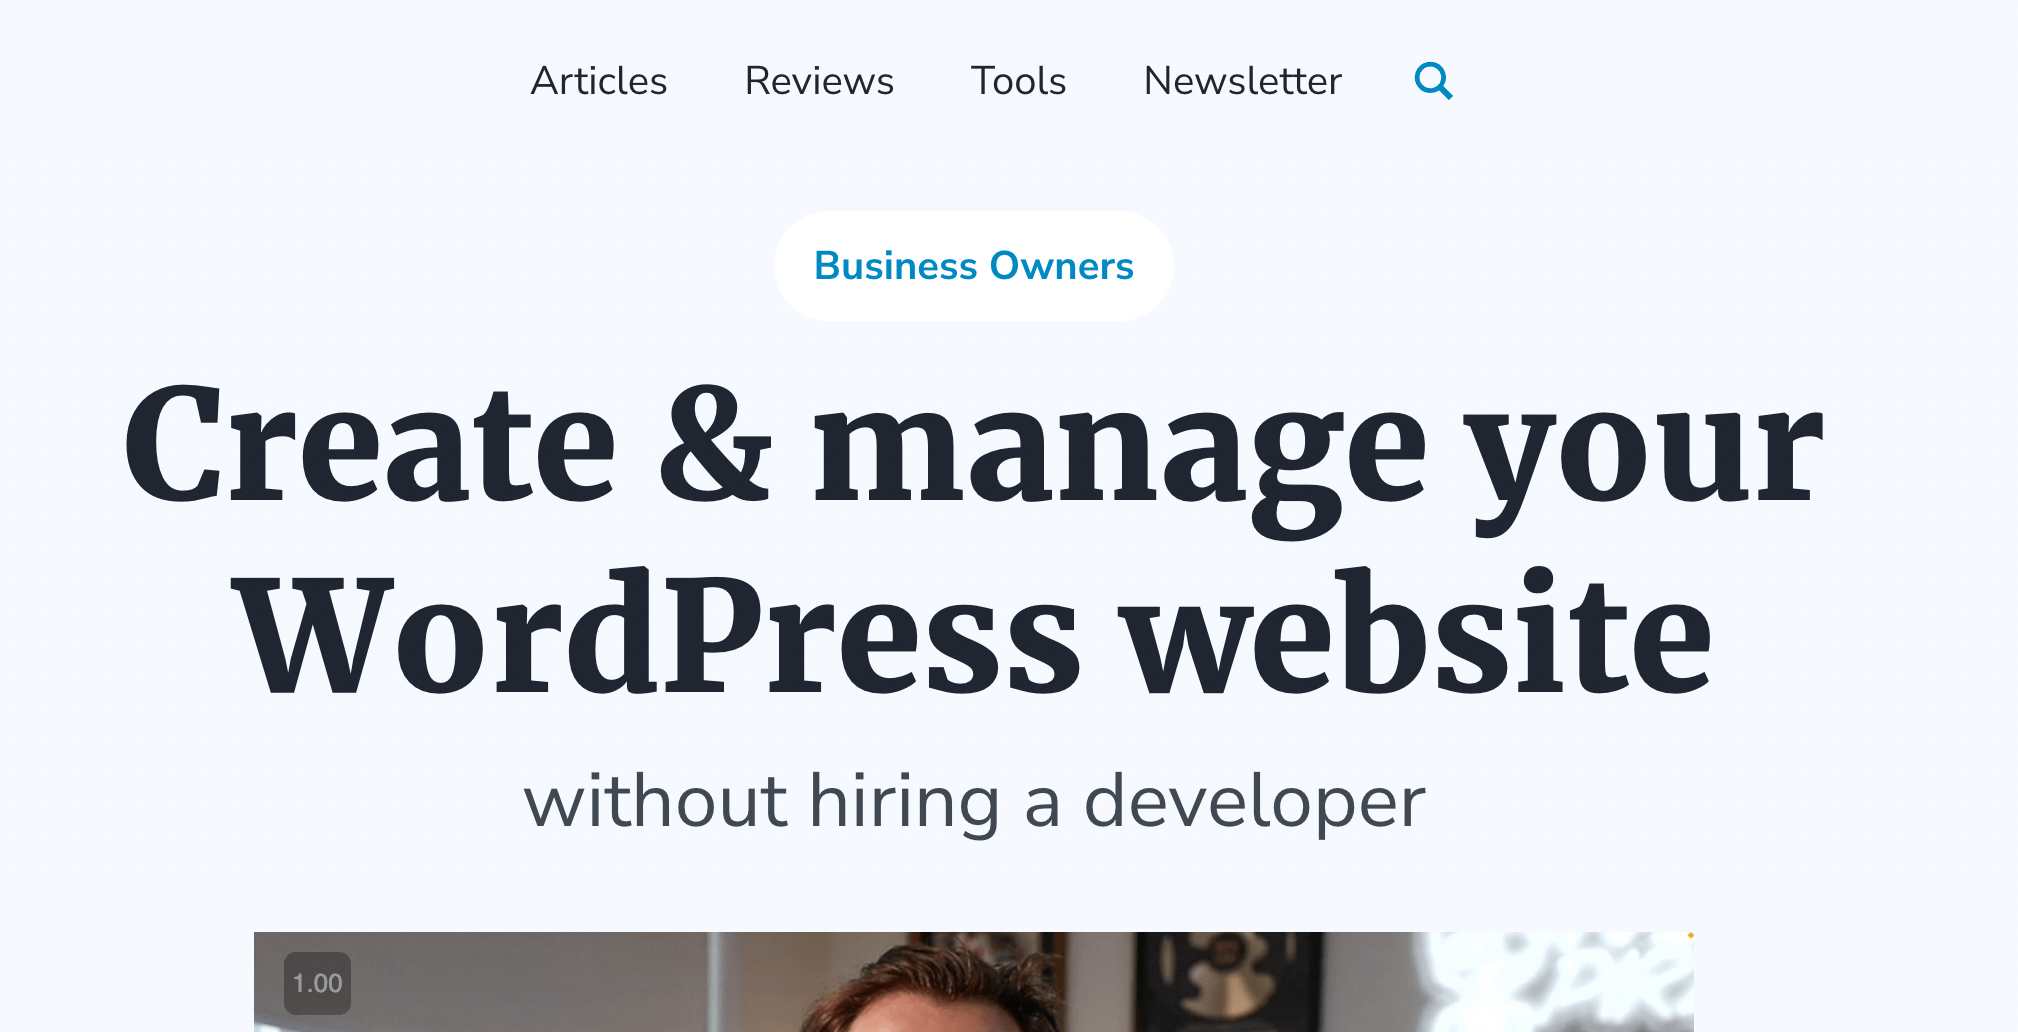
…which is what we want!
And if we repeat the process and set the same Conditional Logic on the other section that we only want to show when we’re using Gutenberg to write our content…
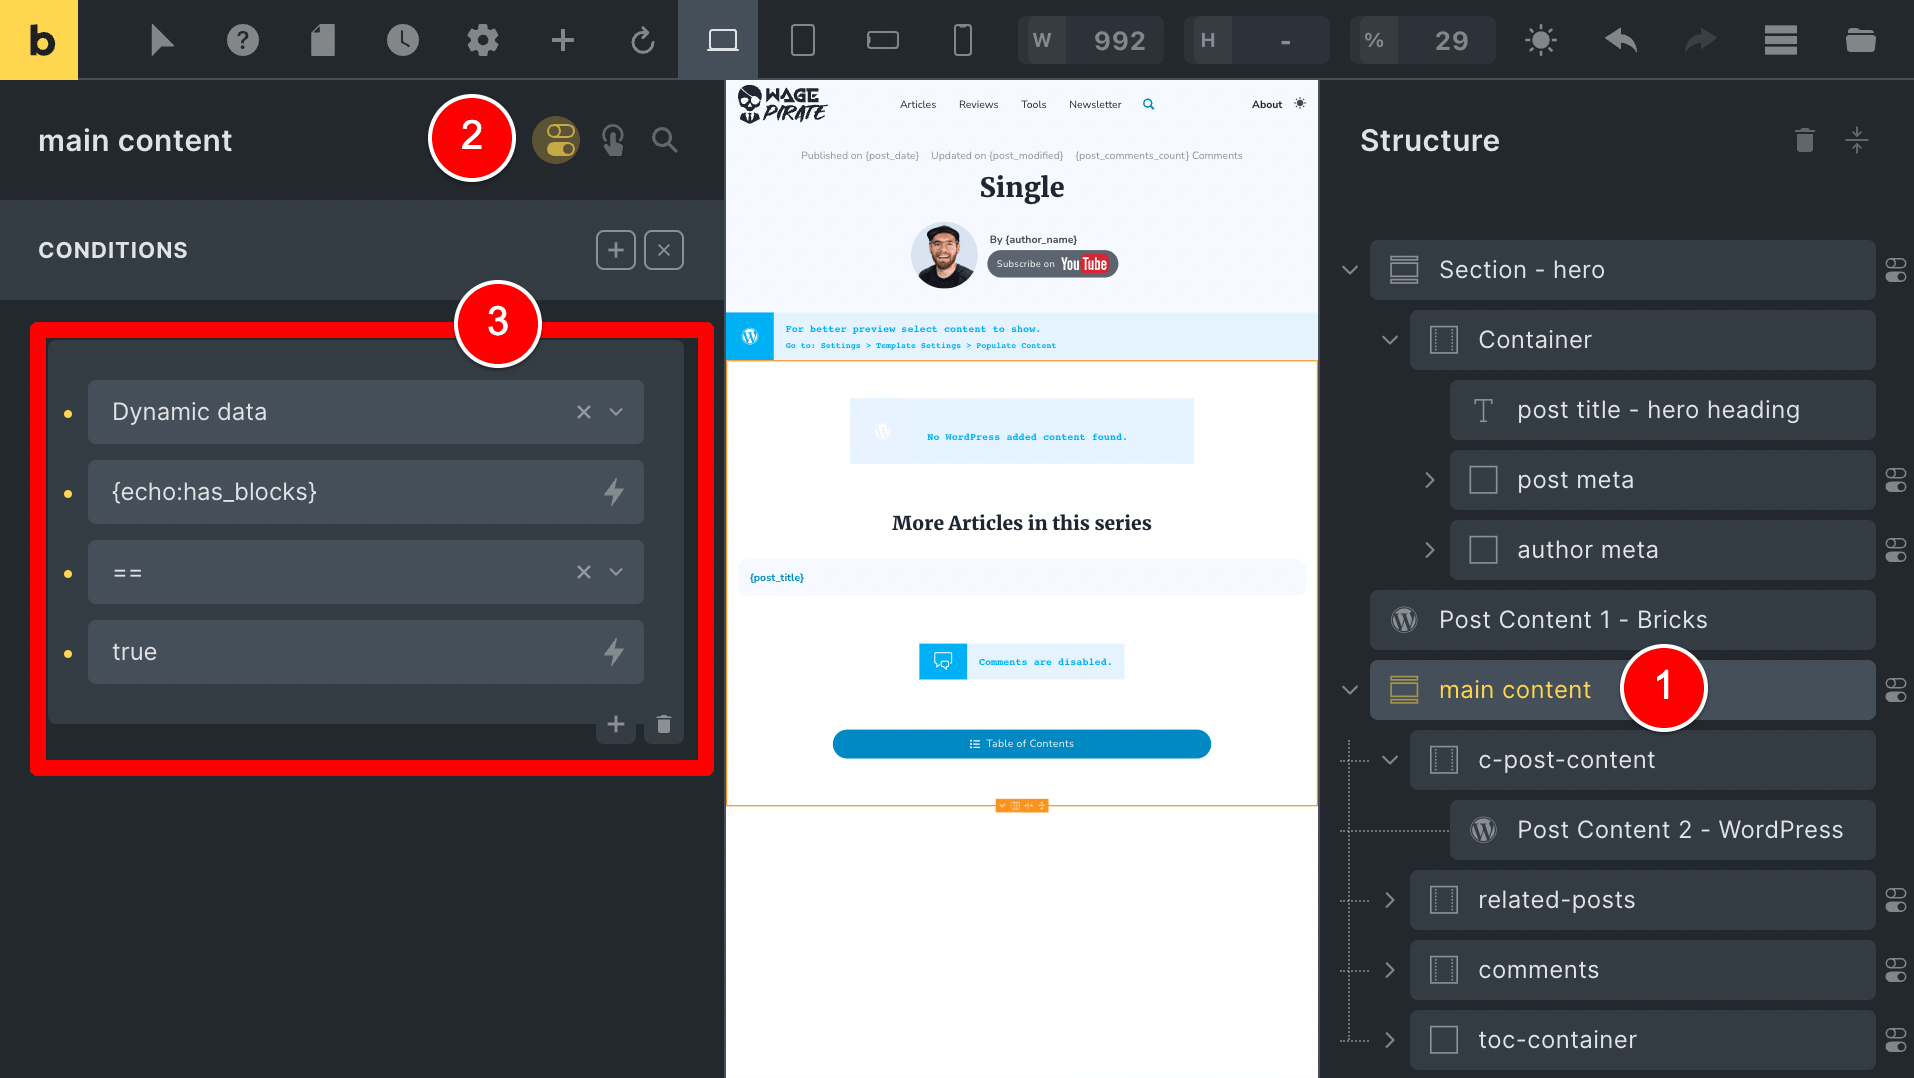
We successfully prevent those empty divs from being rendered at the bottom of posts / pages that are using Bricks for their content.
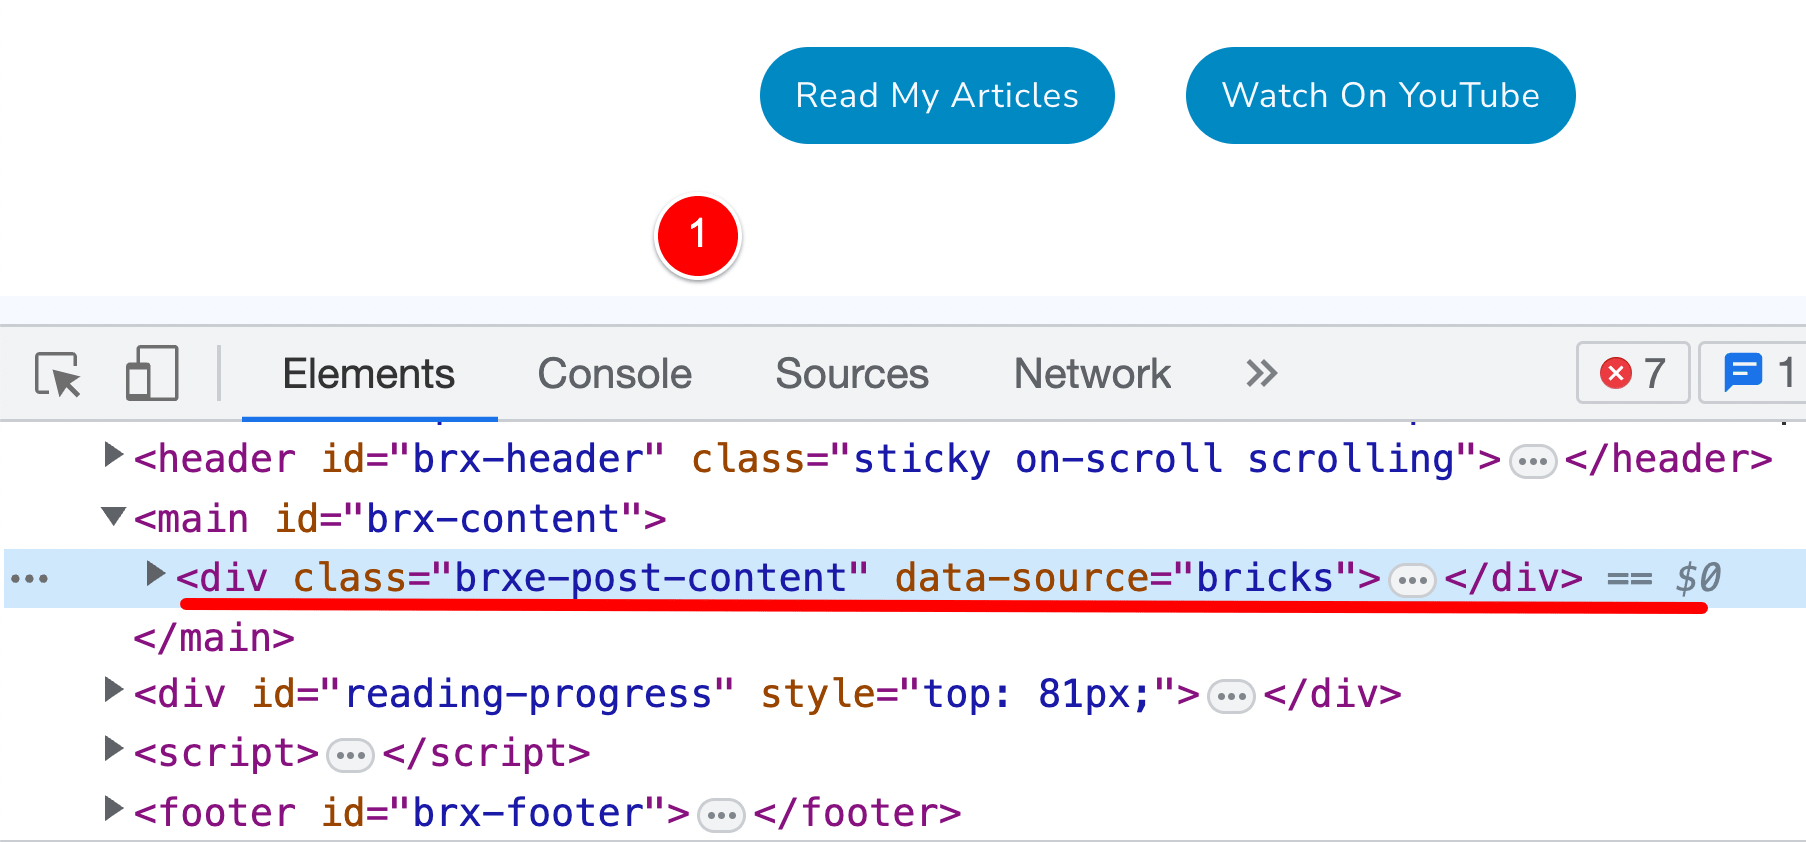
This is confirmed below when I revisit and inspect our Homepage design and now after the line…
<div class="brxe-post-content" data-source="bricks">Code language: JavaScript (javascript)We have removed the empty divs that previously output where the red line is below and causing extra white space from padding at (1).
You do NOT need to do anything for the Bricks Post Content element
Worth noting at this point is that we do NOT need to tackle anything related to the Post Content element that has Data source: Bricks.
Because this element is not wrapped in any other elements.
So when Gutenberg is being used for the content area and Bricks automatically prevents rendering this element, there are no empty divs or anything.
It all works without extra effort for this one.
Lastly – let’s tidy up the remaining elements
If we stop and consider what we’ve set up to this point, if we are editing a page and only using Bricks content – these designs are all sorted.
Our conditions in the previous section have taken care of this side.
But on the flip side…
We need to tidy up the pages and posts that are using Gutenberg for content.
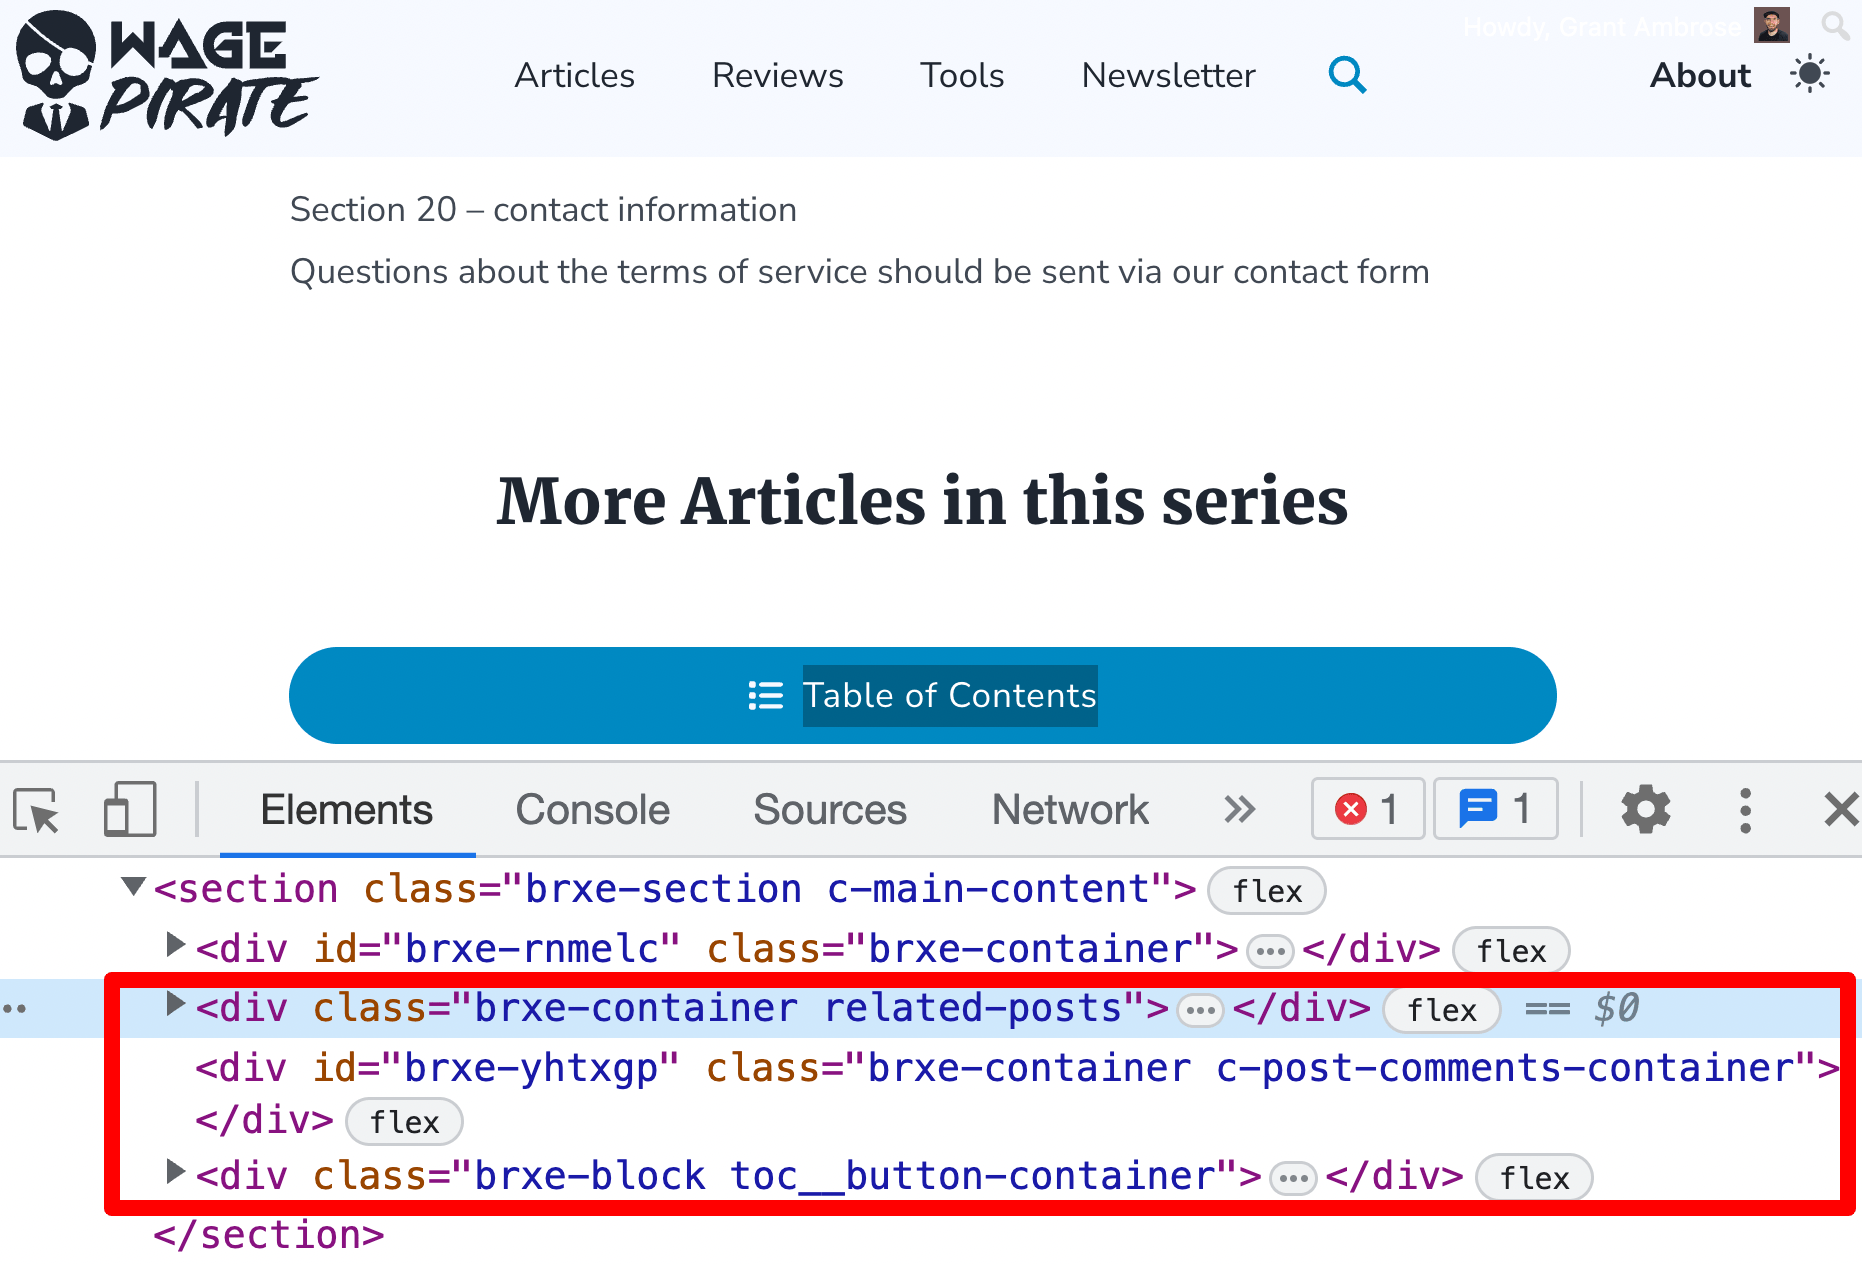
For example, if I go to my Terms and Conditions page and view the code, you can see 3 sections on our page that we do not want outputting:
- Related Posts
- Comments
- Table of Contents (TOC)
But this is an easy fix.
We probably only want these 3 sections showing for our Blog Posts, so we can just hide them if the post_type = post.
Here is what that would look like if we set that condition for the Related Posts section.
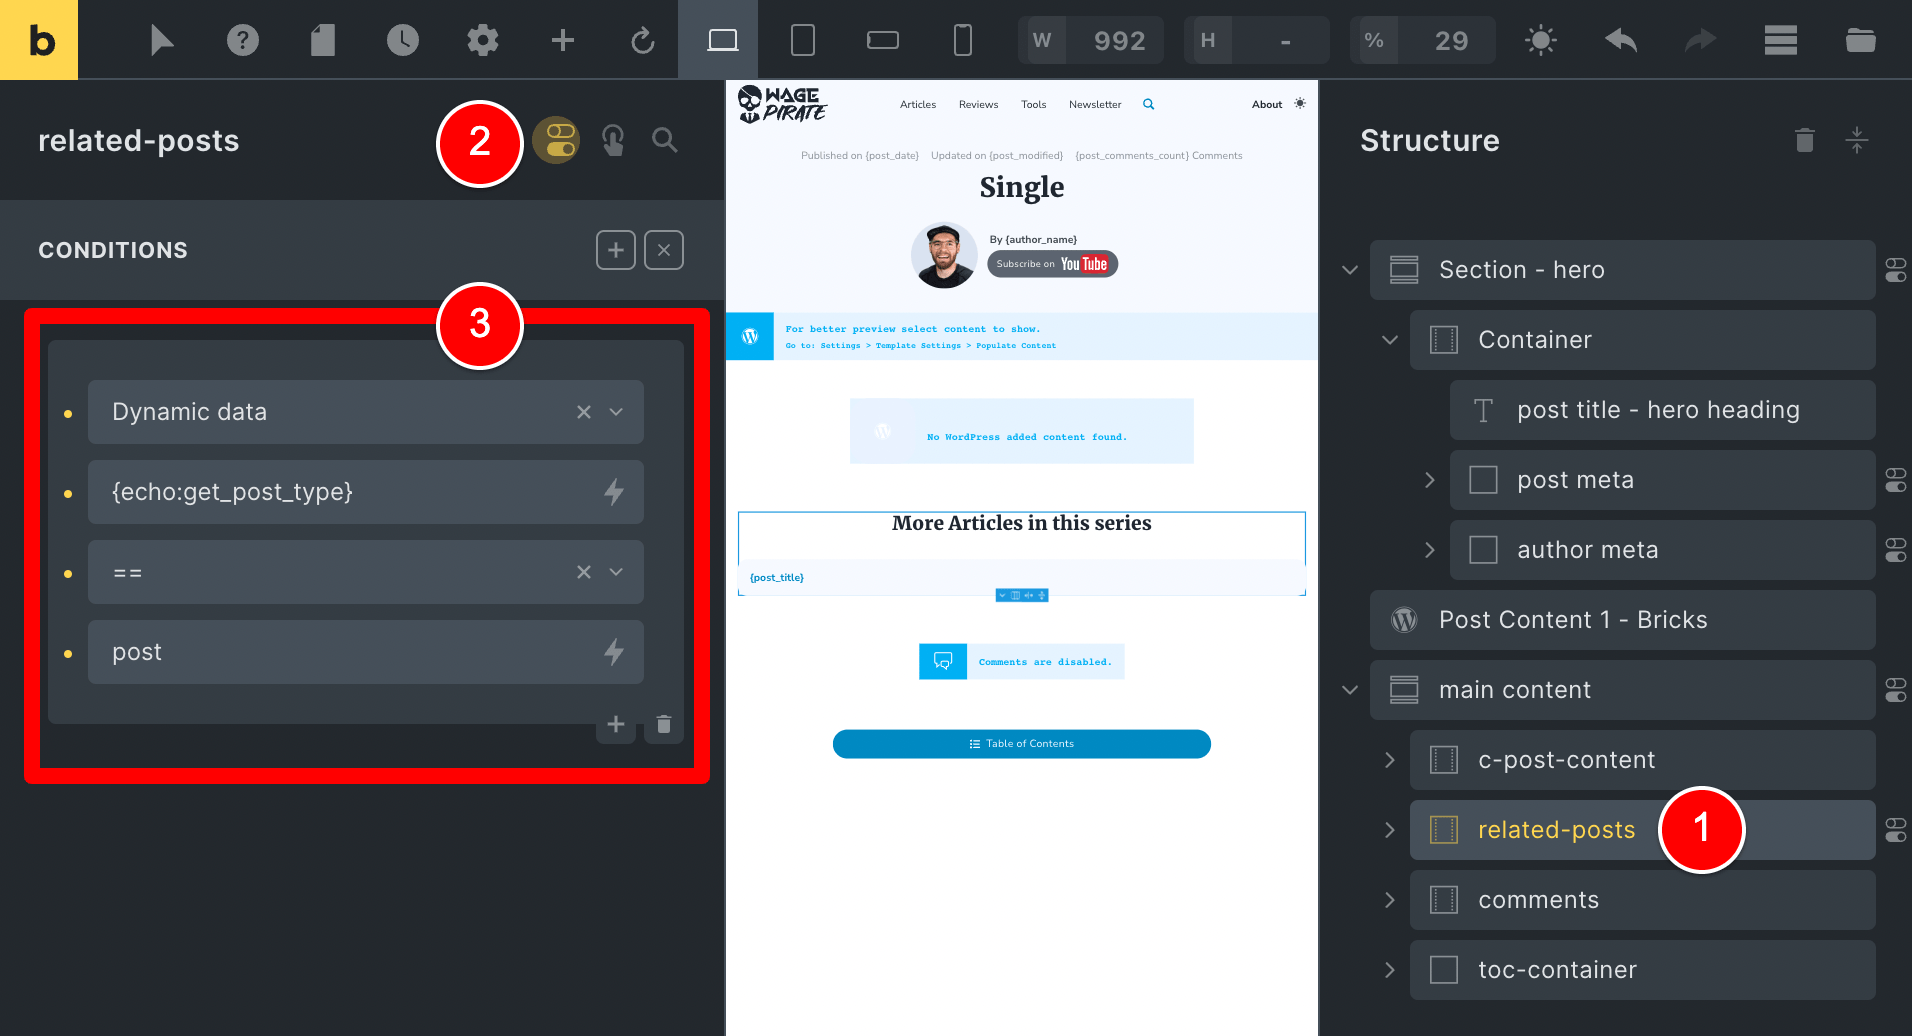
You would just repeat that process for the other 2 elements.
Also, to make things easier, you could even break these 3 items out into their own section and then set the 1 Condition on the section that houses them, like the one below.
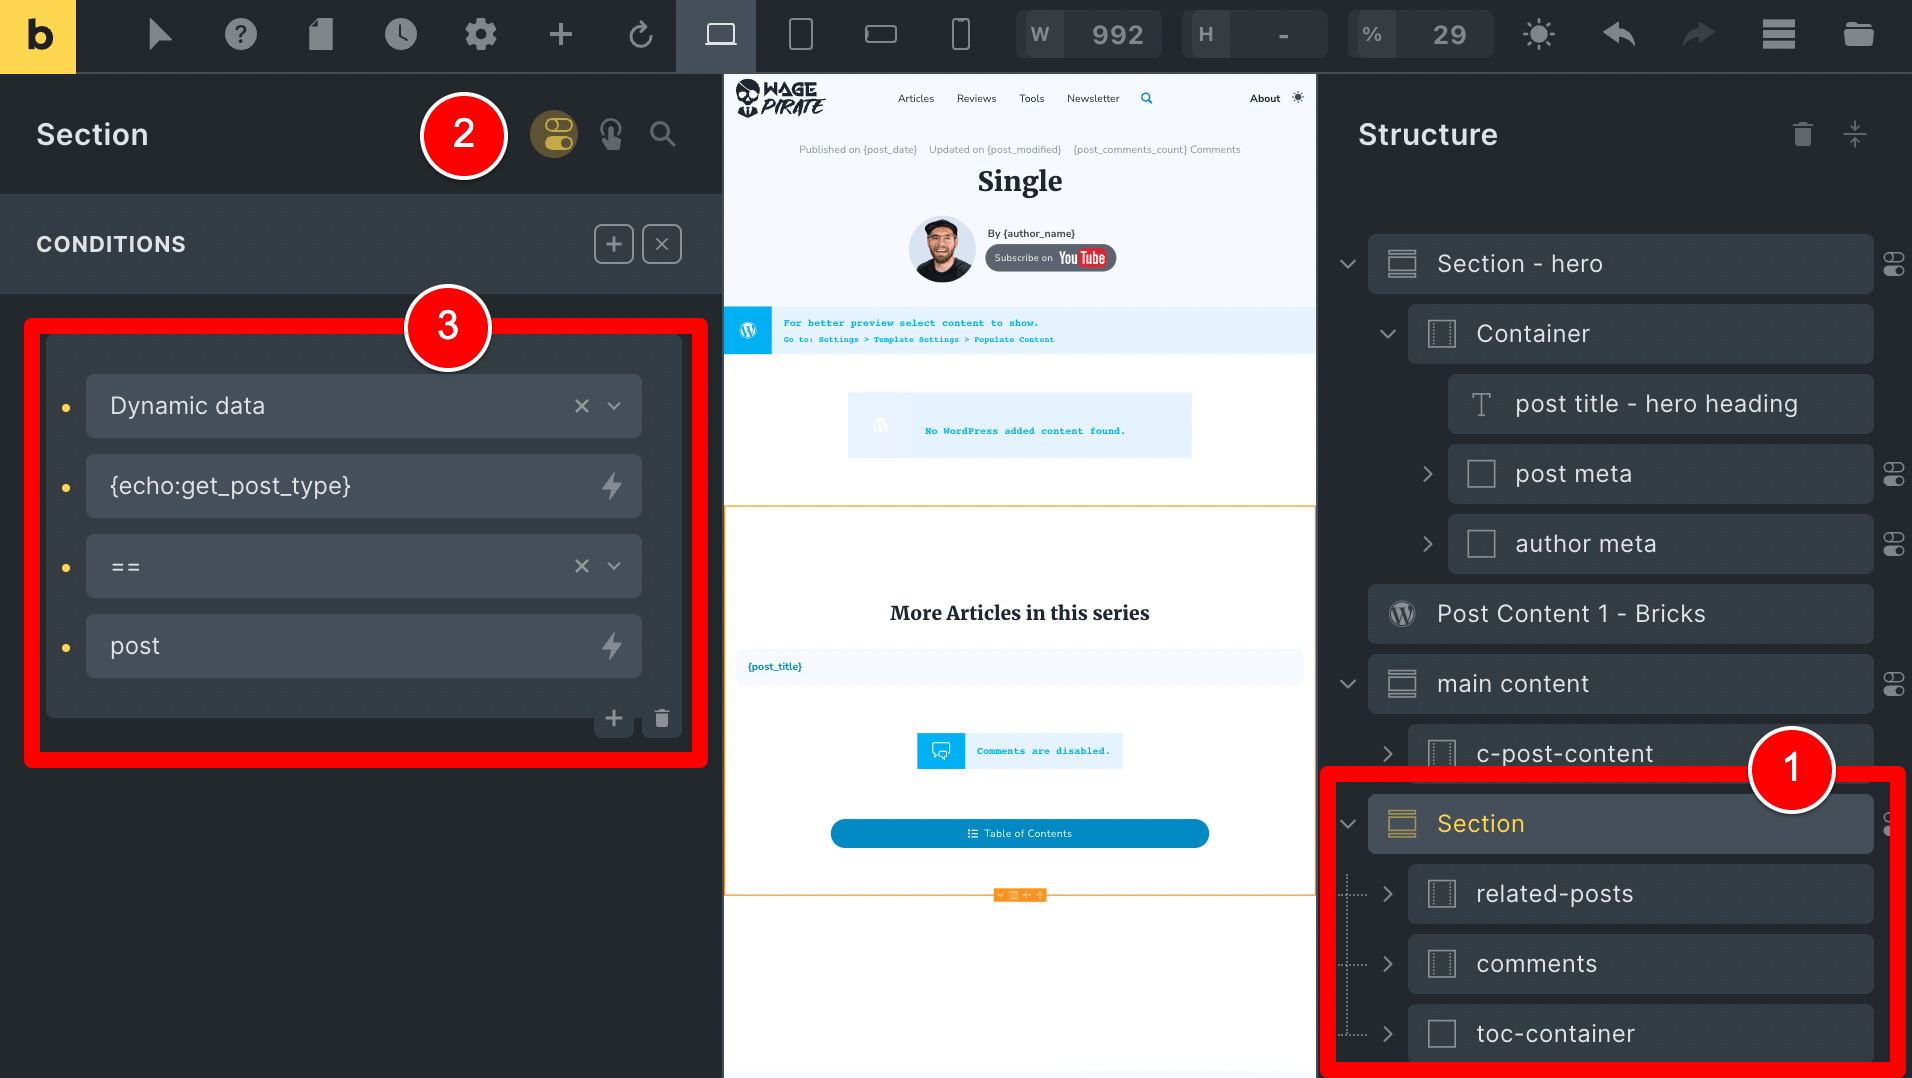
The benefit of doing this is that you just need to manage the conditions on 1 element instead of 3 individually and then try to ensure they all remain in sync.
Option 2 is complete!
And with that all done, this is all working as we need.
Phew! we’ve covered a lot so far.
But there is one last method I want to talk about in this article that MIGHT be an even better option for you.
Option 3: Using Advanced Custom Fields
Yep! Advanced Custom Fields would be a good tool for the job.
Here’s how you could use ACF to use Gutenberg and Bricks in the same Bricks template…
a) Set the Single Post template to apply to our Entire Site
From the last section, we already have this set up…
But for those who skipped straight to this area…
I will go to my Single Post template and then Settings > Conditions and set it to apply to my Entire website.

So now this is Bricks Template is being applied to all the post types on my website as their single template.
And this messes up the designs that we only want to use Bricks Builder on and not Gutenberg.
For those who have read the article until this point, we are back to having a messed up Homepage…

b) Creating a new Custom Field
I’ll go to Custom Fields > Field Groups and click to Add a new Field Group.
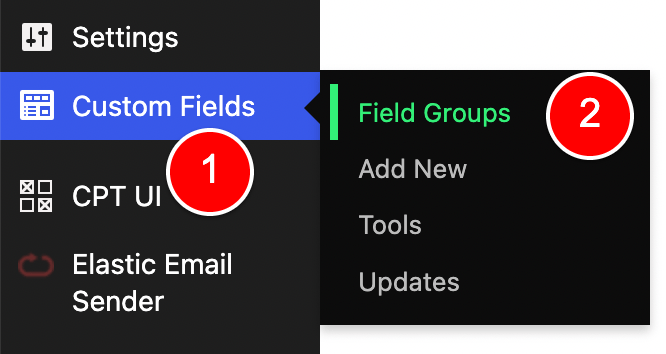
I’ll give it a meaningful name…

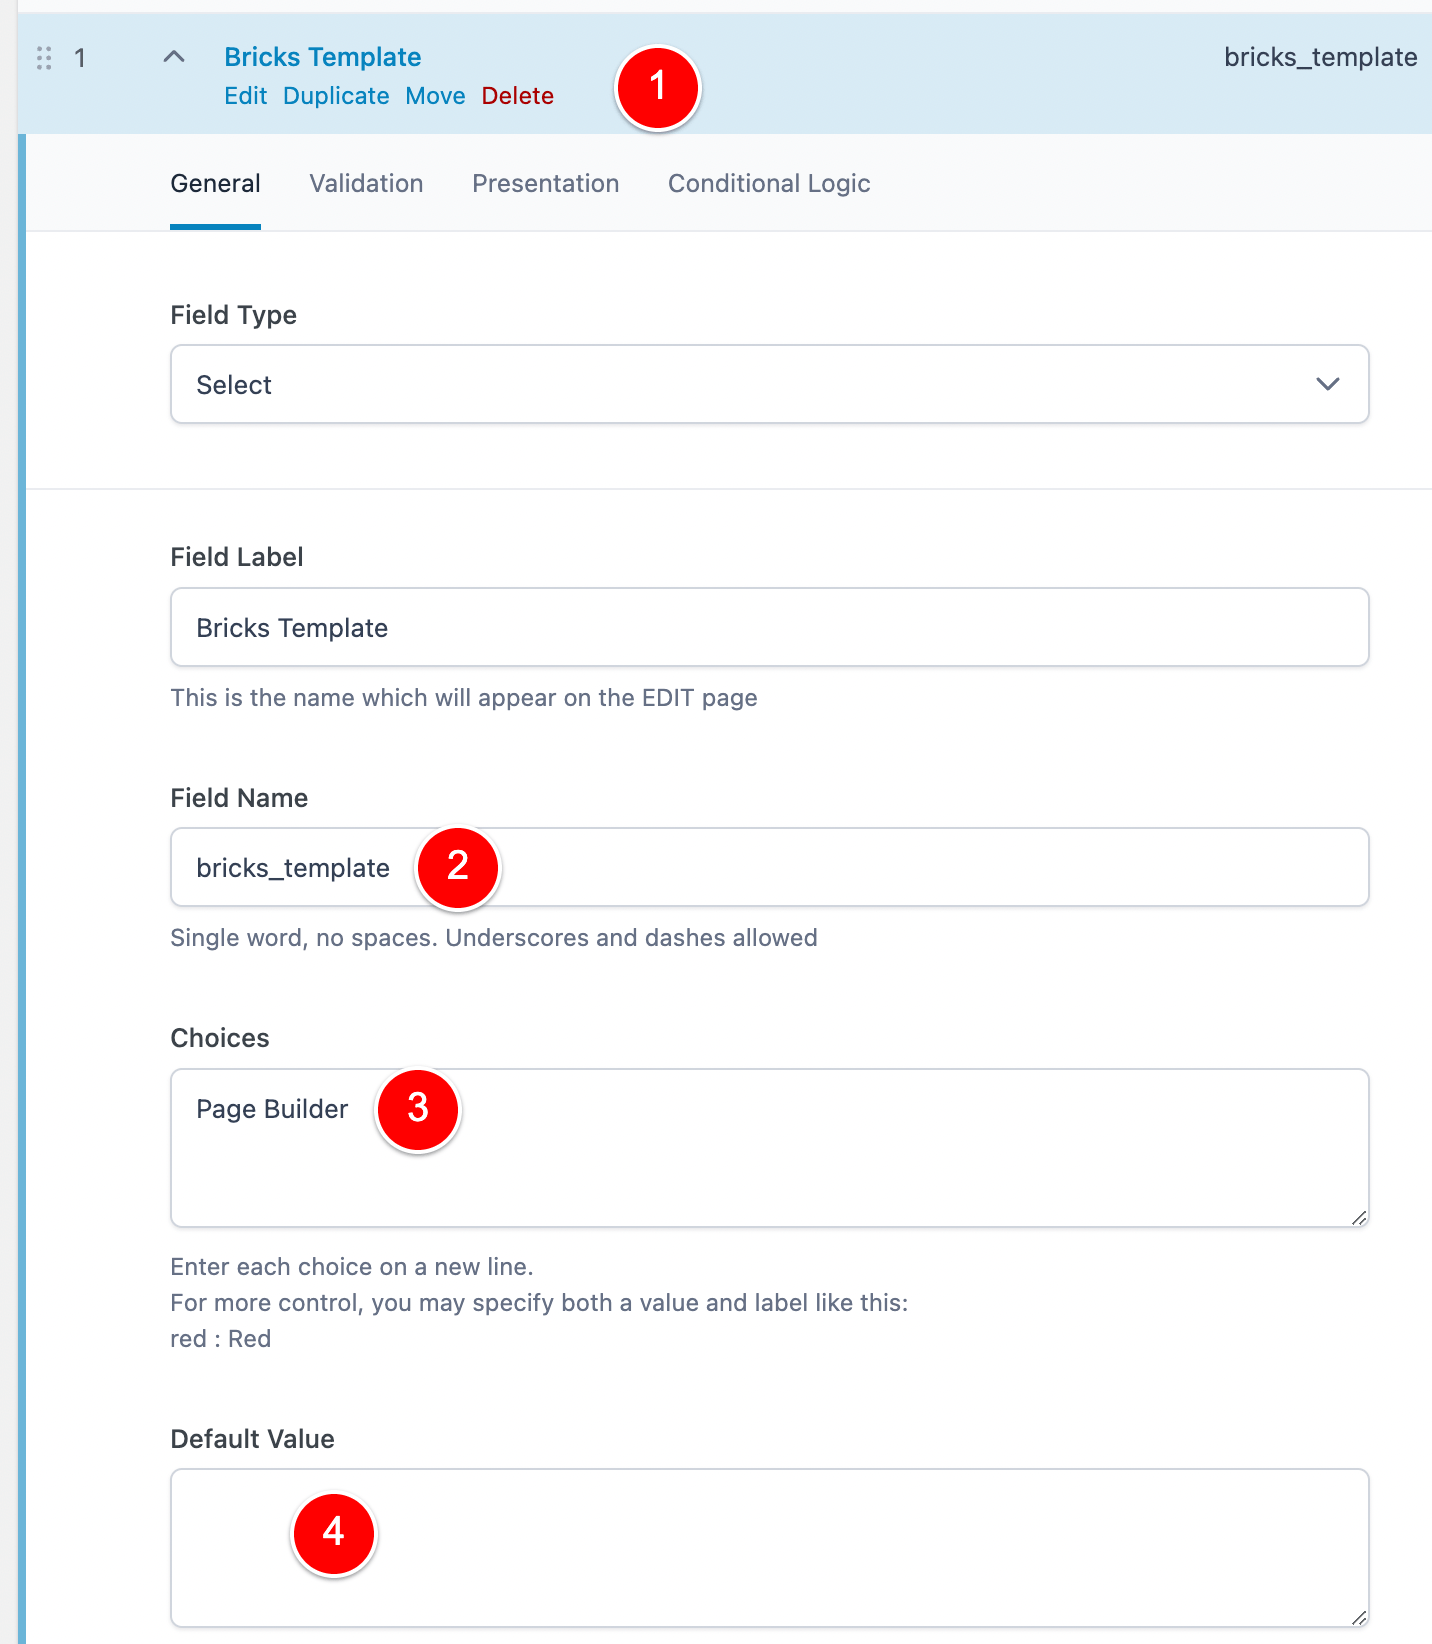
And I’ll create it with the following settings.
Click on Validation and enable Allow Null.
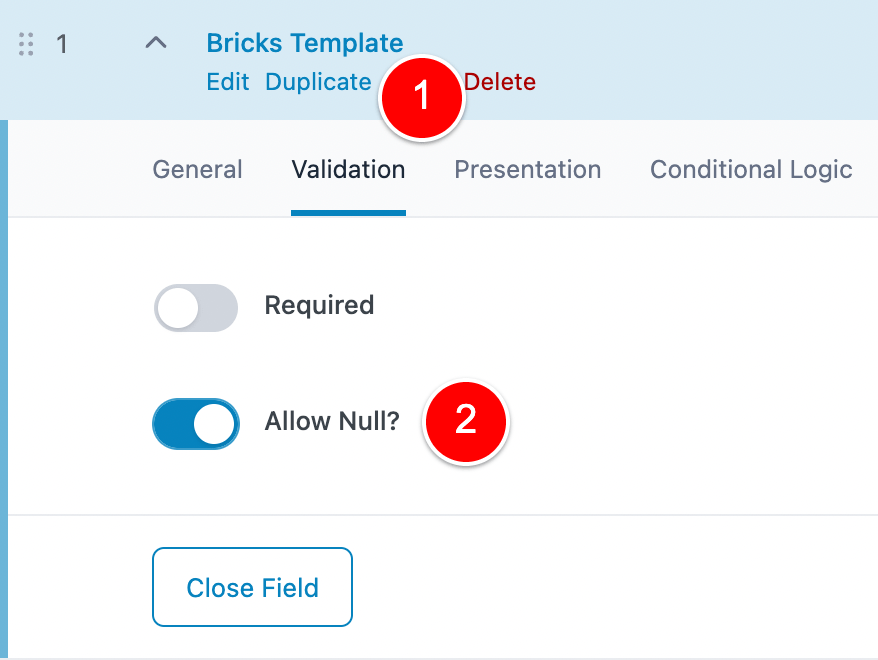
By doing this, we aren’t forced to select an option and when we create posts and pages we can just ignore our custom ACF field unless we actually want to use Bricks content (more on this in a second).
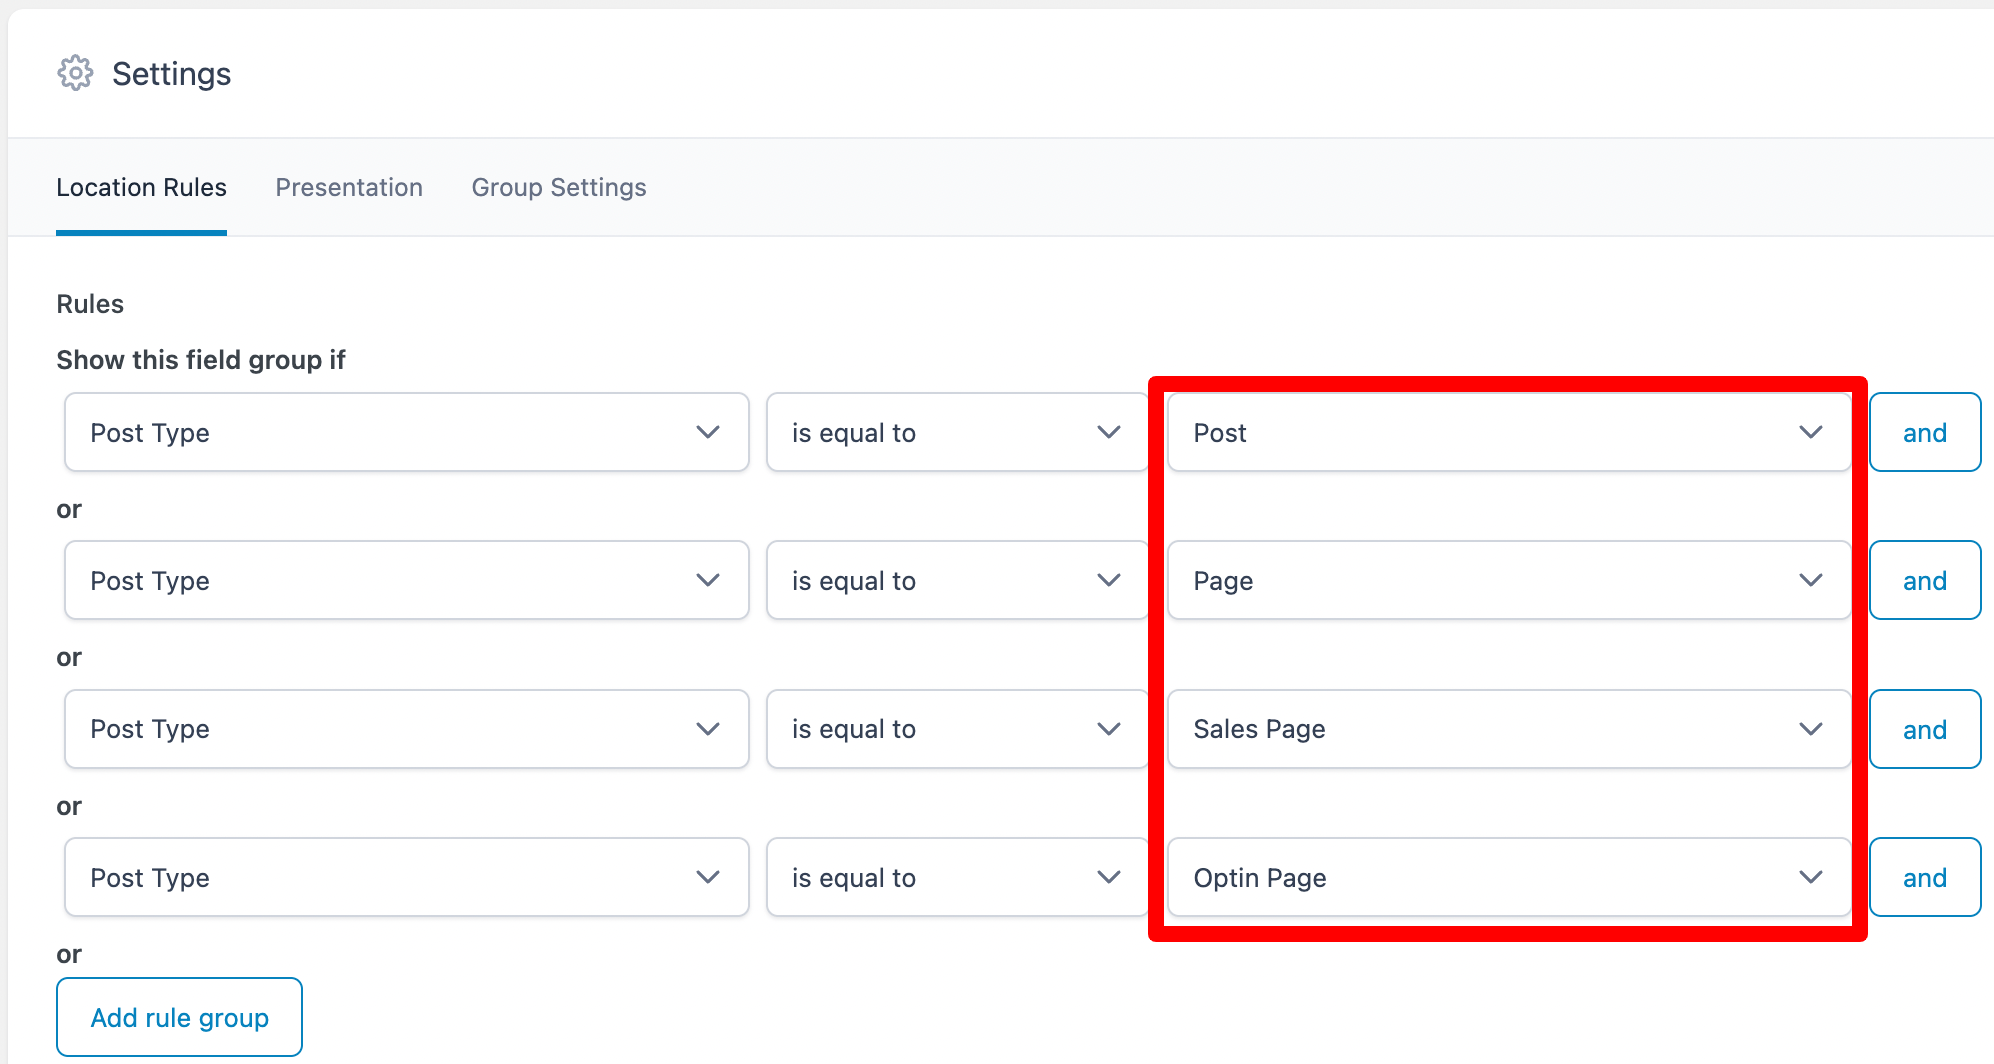
Once done, scroll to the bottom and set this Field Group to show for the Post Types that you want to have the option of using Gutenberg OR Bricks for.
In my case, I choose my Blog Posts / Pages / and then my Sales Pages and Optin Pages that I build using FunnelKit.
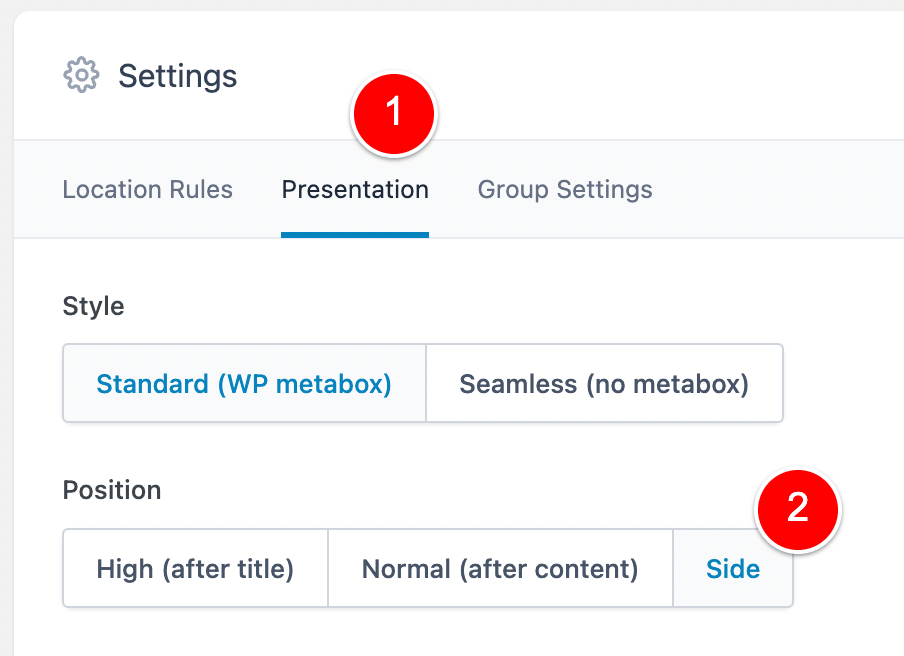
Lastly, I write long blog posts (as you can see) so I like my fields to the side.
I’ll go to Presentation > Side and then Save the Field Group.
I’ll save this Field Group and then go to my Home Page and I can see this new Custom Field we just created.
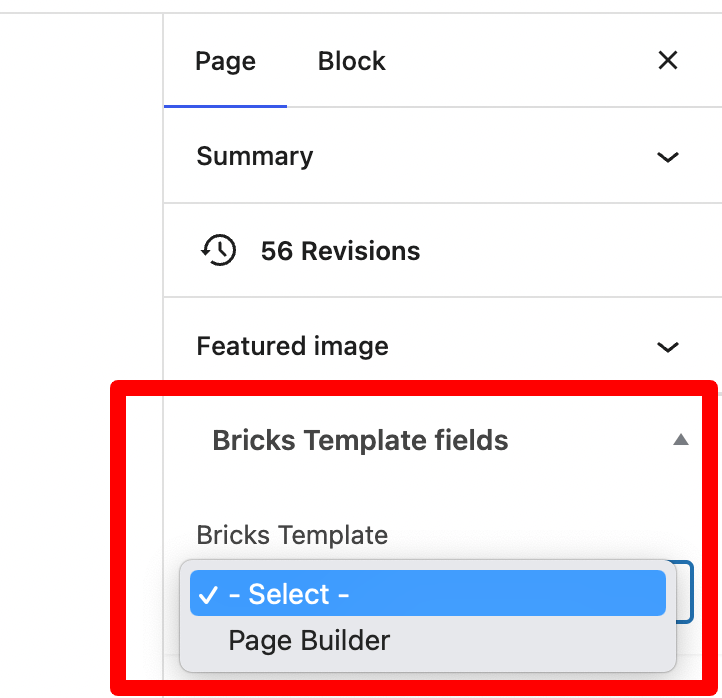
Because this is our Homepage and thus we want to design this Page’s content using Bricks, I’ll select our new “Page Builder” option here and save the Homepage.
Setting Conditions on Bricks elements based on our new Custom Field
I’ll go back and edit the Single Post template we’ve been editing in this article today and select the Top hero section that we want to NOT output for the pages that we’ll use to Bricks to design our content.
I’ll click on the section (1), click Conditions (2), select Dynamic Data (3) and then (this is very handy) I’ll click on the lightning bolt at (4) and find the ACF group of values shown at (5).
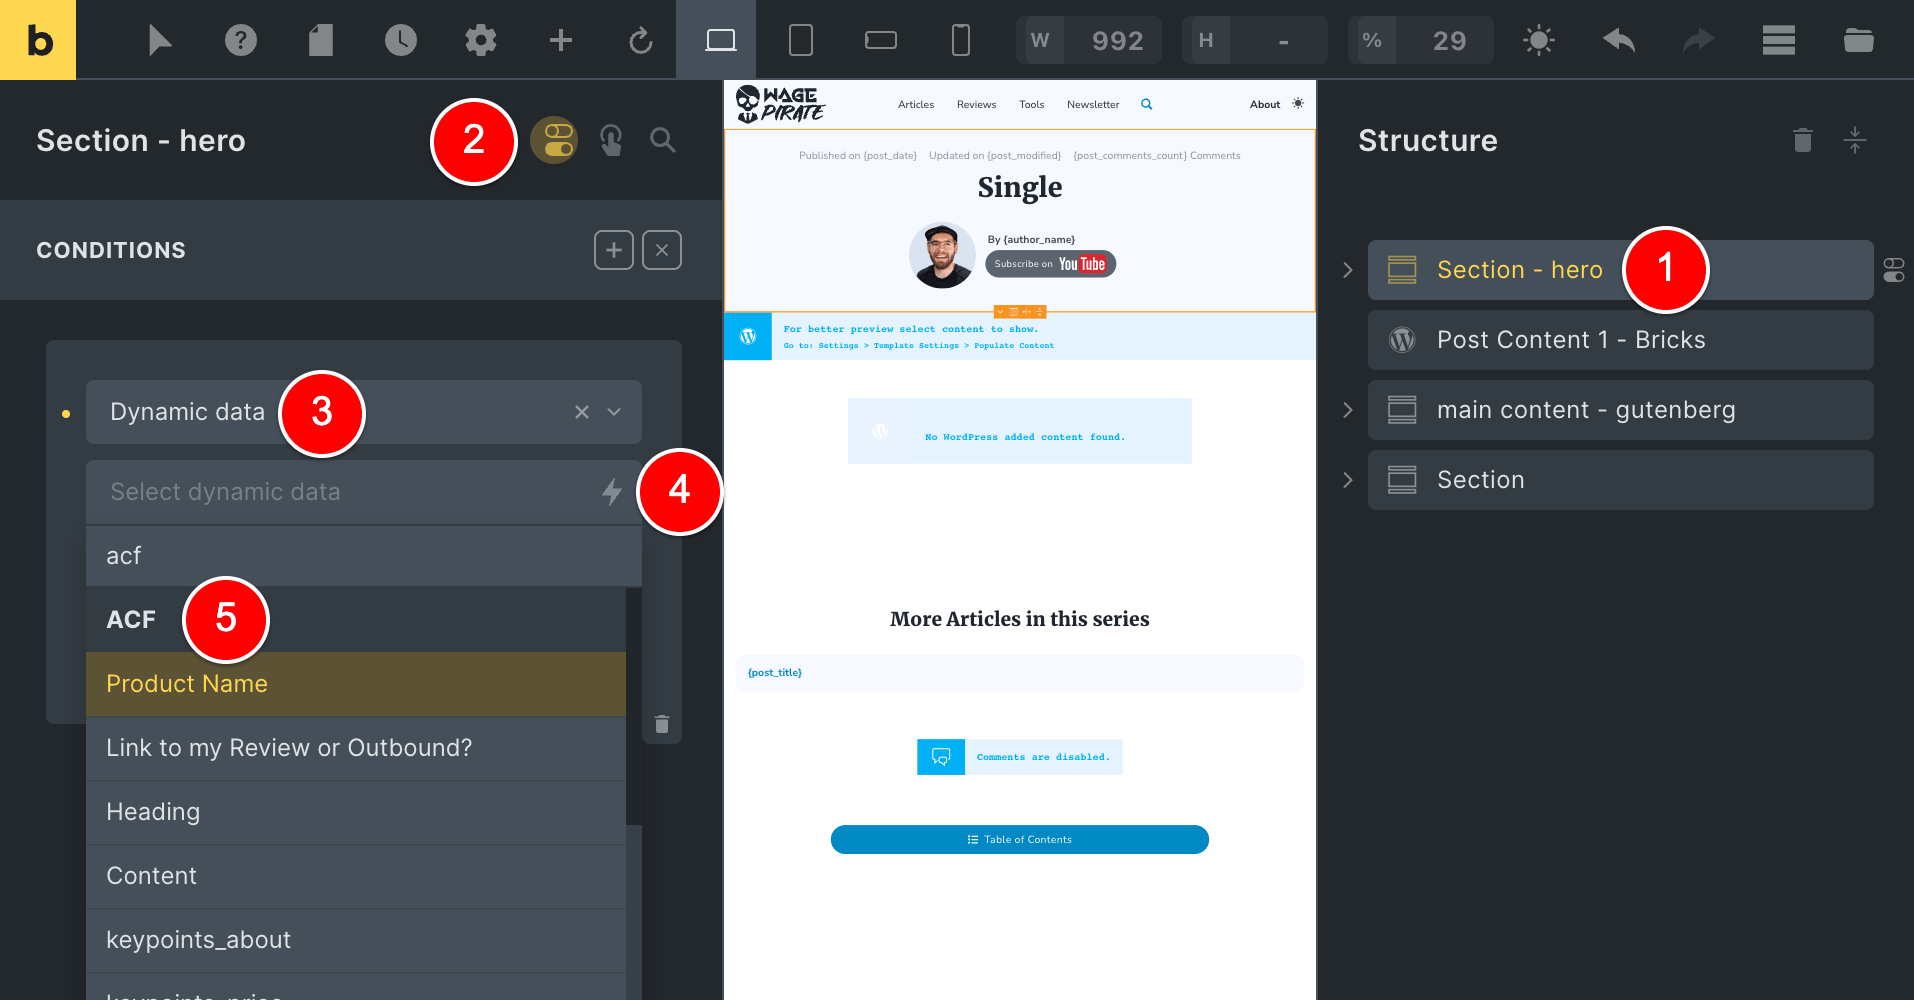
Yep! Bricks integrates with ACF out-of-the-box which makes our lives easy here.
We named our dropdown field “bricks_template” when we created it in Advanced Custom Fields (1) so I find that in the dropdown in Bricks (2).
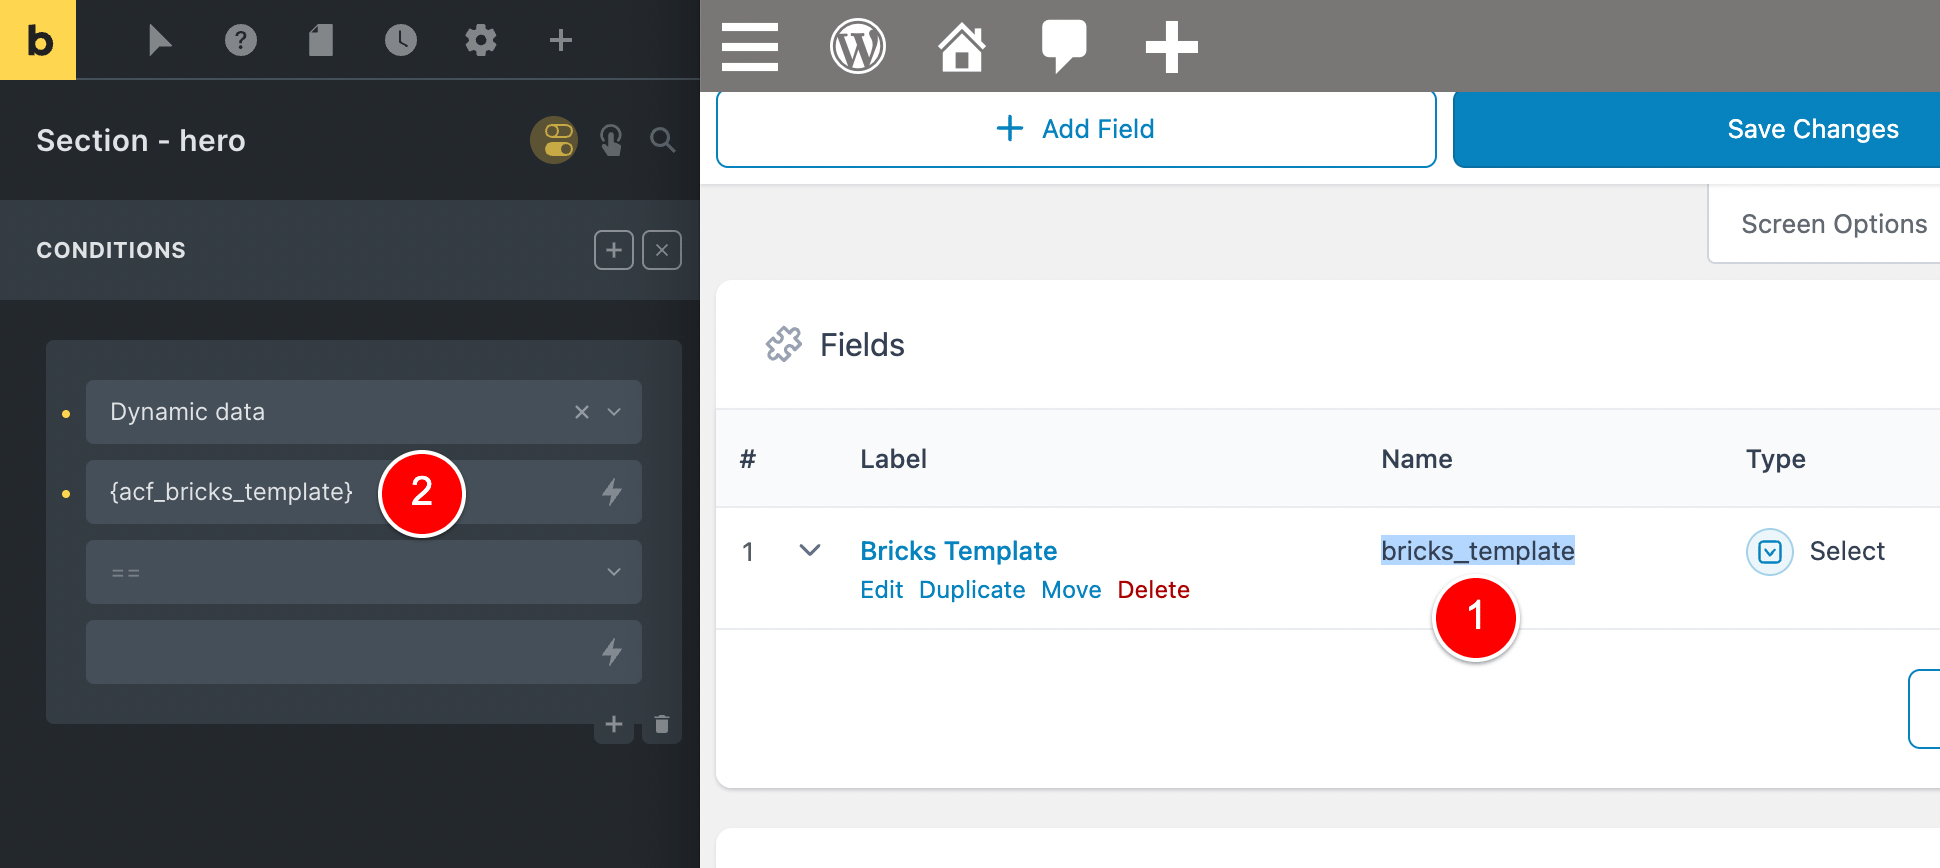
The final Condition we’ll set is below.
As you can see, we are setting this section to show on the page if our ACF field equals nothing / empty.
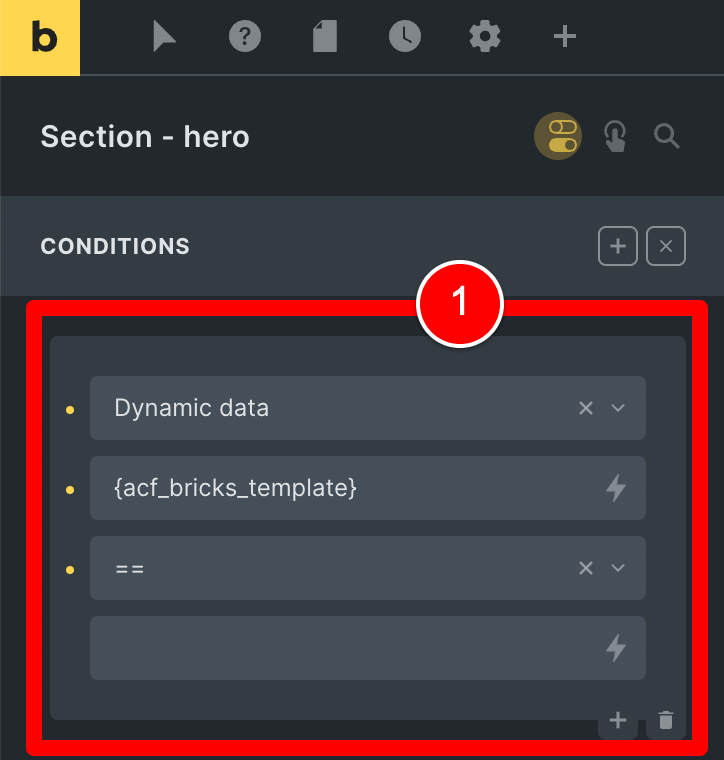
This makes sense, because when we want to design with Bricks for the content area.
So we set the ACF field to be “Page Builder” and thus this ACF field would NOT be empty and this section would show on the page.
Lastly, we need to deal with 2 last sections:
- The section that contains the element that outputs our Gutenberg content
- and the Section that contains our Related Posts / Comments / Table of Contents.
Both of these sections are highlighted at (1) below and the Conditions I have set on both of these sections are at (2) and (3).
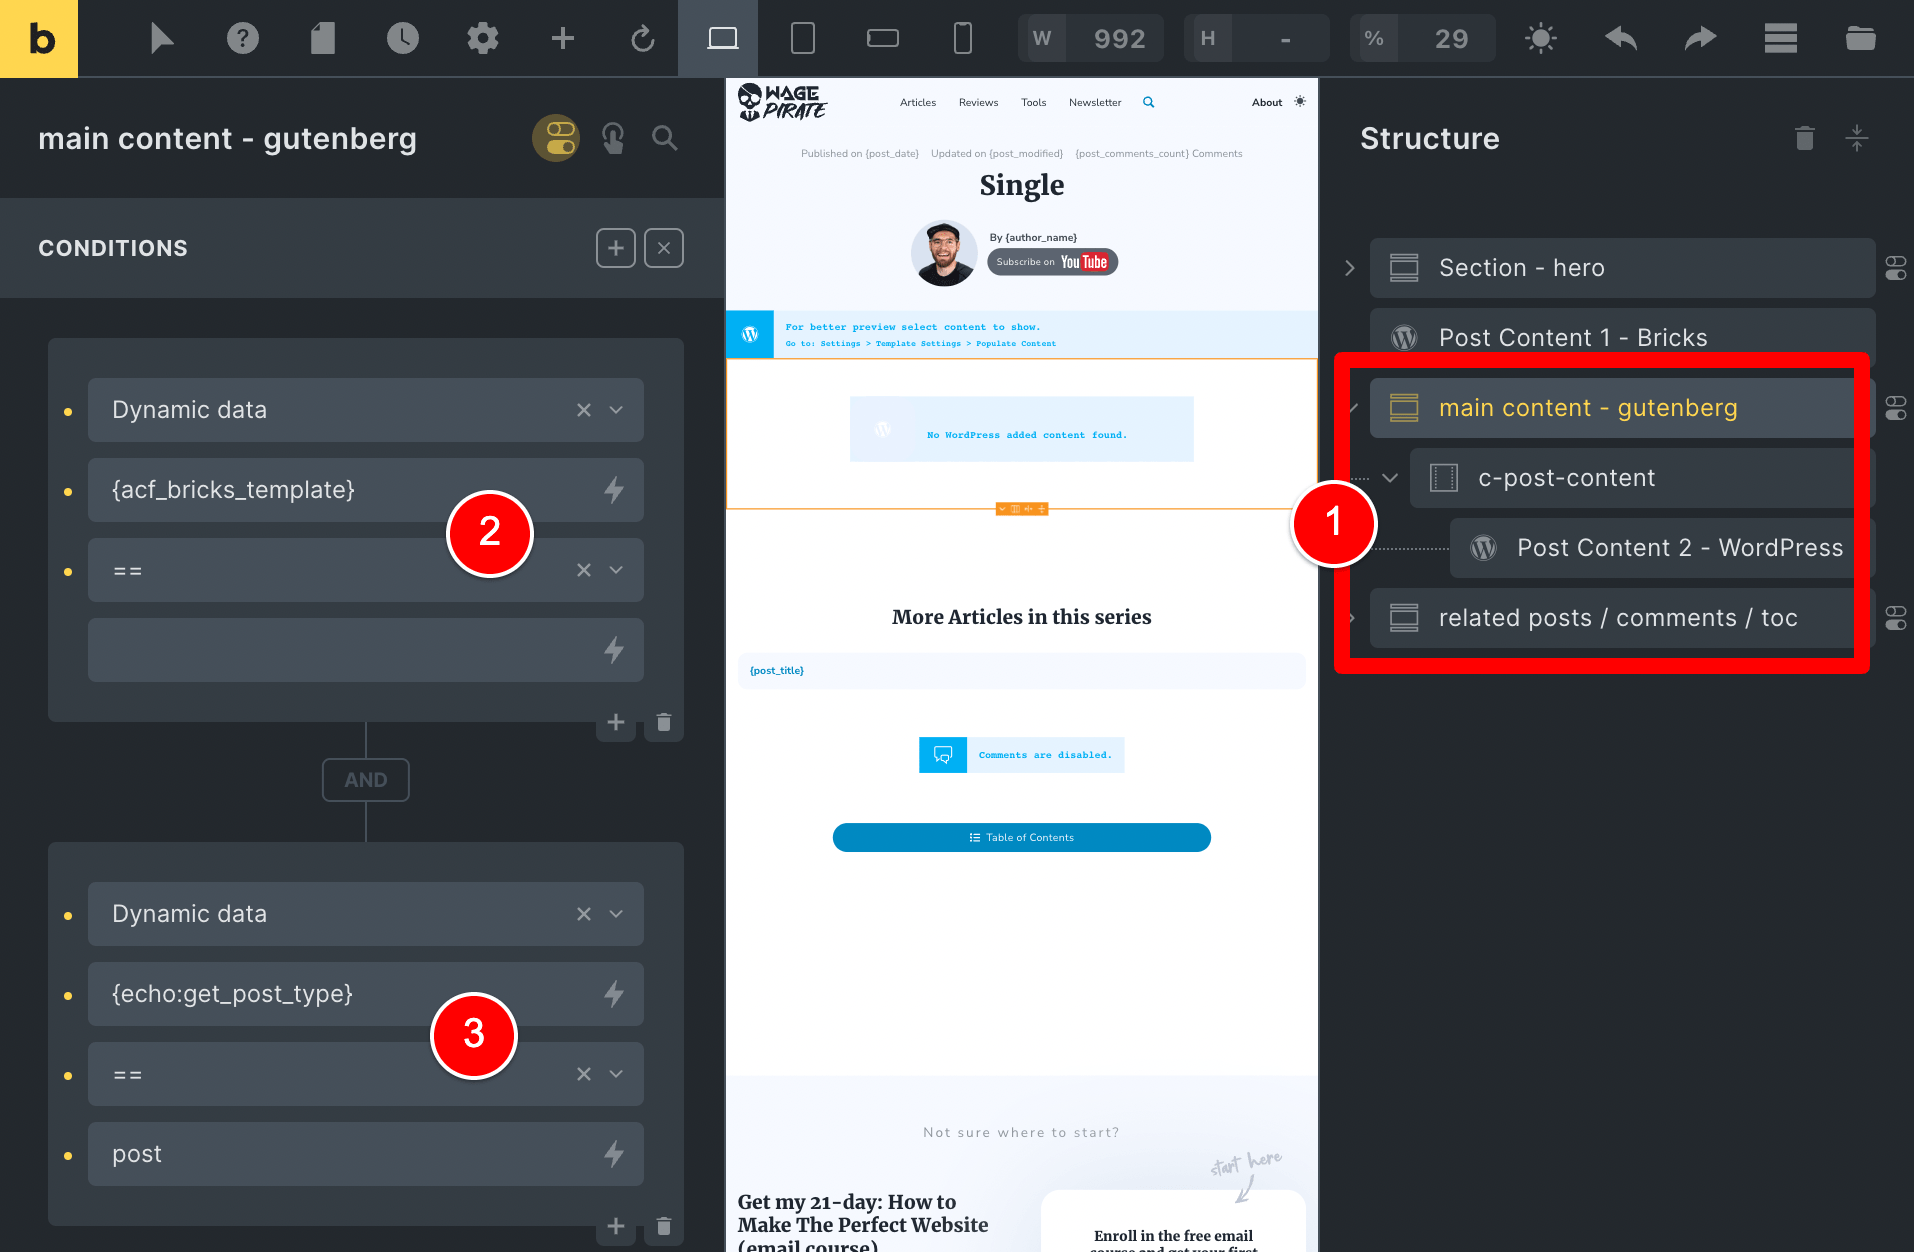
Based on these conditions, this is how our site now works (and these rules apply to any Page or Post Type we assigned our Custom Field to):
- We can edit any Page / Post etc and when we select an option like “Page Builder” for the ACF field that would cause our bricks_template field to have a value
- This causes the first condition above to be FALSE as the field is not empty, so these Sections would NOT output on the page.
- We can edit any page or custom post type and NOT select a value for the ACF field, so this would be empty and thus the first condition is true…
- And if the post type is also a post, the second condition is true and thus our Gutenberg content / table of contents / comments and related posts get output on the page
- If the post type is NOT a post post_type (i.e. a blog post) then this second condition is false and thus they don’t output on the page.
Advanced PHP Method: Using Bricks’ Template Scoring System
There is one more method you can use to create a template in Bricks Builder with both Gutenberg content and Bricks content and achieve what we’ve done today.
It’s a bit more advanced and it does require knowing a little bit of PHP…
But this method is VERY powerful and can allow you to do some complex things with your Bricks Builder Templates.
This method is using Brick’s Template Scoring system.
This Scoring system is what Bricks uses within it’s code to select the correct template when someone is trying to view your content…
BUT!
You can use this PHP Filter to hook in and override the Template Bricks was going to use to render your page and specify another template you’d like to use based on the code you write.
And the link to learn all about it is below…
It’s definitely worth taking a look at.
RELATED: Set a Bricks Builder Template using PHP (and Bricks Scoring)

Leave a Reply