After searching for the best alternative to Elementor and Beaver Builder, I have finally found the fastest Page Builder for WordPress – and I mean, it’s INSANELY fast.

I’ve fallen in love with Bricks Builder so much that I recently converted my Astra/Beaver Builder website over to Bricks Builder (as shown below) and in this review I want to give you a very thorough reason as to why I decided to make the switch.
I wanted to cover AS MUCH as I could to help you see if Bricks Builder is right for you before you spend your money, so please feel free to use the Table of Contents to get around and navigate this extensive review.
Yep! open a few pages of this website in a new tab and try clicking around to get an idea of the speed of it and some of the things you can build using Bricks Builder. I’m still playing around with it and getting to know the advanced features, but *spoiler* I am BLOWN AWAY by how good Bricks is.
Bricks Builder Lifetime Deal LTD
This is very in-depth review of Bricks WordPress and as a result, I wanted to put this high on the article so that you know where to find it if at any stage you want to give Bricks a go.
Below is the link you can use to go to Bricks and get their lifetime deal.
The FASTEST Page Builder for WordPress that I have ever used.
RELATED: I also wrote an article explaining more about the Bricks Builder lifetime deal, including why I bought it and why so many people are leaving Elementor / Beaver Builder and Oxygen and swapping over to bricks.
Bricks Builder Lifetime Deal 2022: Unlock with this link here…
Currently, there is no affiliate program for Bricks Builder. I am writing this review to genuinely show you why Bricks is my favourite page builder currently, in case you’re looking to leave your current plugin. If Bricks do release an affiliate program at a later date, I will update my link to be an affiliate link and update this article.
Oh… and firstly…
VIDEO: Bricks Builder Review
Here is my Bricks Builder review on YouTube…
The perspective I am writing from
I wanted to quickly explain the two types of websites I run and their business models, so that you can understand the perspective I am writing this review from.
I have a WooCommerce website
My main business currently is running my WooCommerce website that gets a decent amount of traffic.
This store has been running for many years and is built using the Astra WordPress theme and then using the Beaver Builder page builder to design the content areas of the site.
I wanted to point out here my previous stack I used (Astra / Beaver Builder) because they’ll be what I will be comparing my experience with Bricks Builder to throughout this Bricks review.
NOTE! I am no longer running this store but I wanted to keep this in here to explain that I have experience using the Astra + Beaver Builder combo in an Ecommerce store environment.
I have my Blog
The website you’re currently on is my blog where I share WordPress tutorials and thoughts about making money online.

WagePirate.com was using the Astra / Beaver Builder combination that I’d built all my websites with over the last 5 or so years.
This was, until I recently gave Bricks Builder a trial and was hooked on how fast it loaded and its ability to do a few of the things I will cover in this review today.
So my perspective today will also be from someone who converted their website from the Astra / Beaver Builder set up over to Bricks Builder and I’ll share along the way if there was anything in Beaver Builder I wish Bricks had or stuff I couldn’t do.
So now that you have an idea of where I’m coming from, let’s dig into the pros and cons of Bricks and hopefully give you an idea of why I switched.
Keypoints | |
| 📗 About | I recently went all-in with Bricks Builder and converted my websites over to using it because Bricks Builder is the fastest page builder I’ve ever used. It’s also a one-time payment. |
| 💵 Pricing | Pricing starts at $79 one-time payment for a 1 site license or a $199 one-time payment for an unlimited site license. |
| 😍 Good | The pages you build with Bricks will load extremely fast for your visitors AND the actual Bricks editor is the best page building experience I’ve ever used. I can build a complex website with custom loops very fast (without writing code) and it has all the features beginners and advanced users are looking for. |
| ❗ Bad | There are not many pre-built designs in the template library (they are on the roadmap). |
| 🤔 Verdict | I spent time converting my website from Beaver Builder over to Bricks Builder because of all the benefits Bricks offers. For a one-time payment, I have created the fastest website I’ve ever built, the editor loads in 1-2 seconds so I can edit my content very quickly and it has all the other benefits I mention on this page. |
Pros and Cons
Price Point
Starts at just $79 for a lifetime license for 1 site, or $199 for a lifetime licence for UNLIMITED Websites.Editor speed
Extremely (unbelievably) fast. It takes 1-2 seconds for you to be inside the Bricks builder editing your content (see the video on this page later in the article).Technology
Bricks is coded using Vue.JS which is one of the newest technologies a page builder can use and it allows the builder to load VERY fast.For Web Designers
Yes! Bricks Builder is a Theme + Page Builder all-in-one. I was skeptic at first, but once you use it, it makes a lot of sense. You set all your global styling in the Theme settings, and then all your header / footer / page builder elements take on this styling and match across your entire website.Creates a FAST website
Yes! Bricks uses Flexbox and Containers for layouts of your pages (more on this later), which generates less HTML and thus a lightweight page that loads faster for your users. Using Bricks, my website loads faster than it ever has before using other page builders.Global CSS Classes
Yes! You can create CSS classes and use the UI to set up the styling for the CSS Class. Then, you just click on elements on your website in Bricks Editor and assign the element this Global CSS Class and they take on that styling. This feature is incredible and has allowed me to build my website faster while ensuring page elements match their styling throughout my website. Web designers will love this feature.Full-Site Editing
You use the Bricks editor to design every part of your website, including your Header and Footer, the content of your Pages / Posts / Custom Post Types. you design your page templates, your single.php / archive.php / sidebars – everything. It is the most intuitive experience I’ve had in WordPress and I have found it easier than what I was using previously, which was Beaver Builder + Beaver Themer.For Web Developers
Yes! I discuss advanced features later in this review, but here are some… There is a module API to register your own builder elements. Also, there are super helpful things I’ve used myself, such as the echo tag that allows you to render the output of any PHP function inside the builder in an Element’s field. For example, for the value of a Heading element, you could write and then in your theme’s functions.php file you’d have this function and return its value to be output whenever you specified in the builder. Hard to explain.. but the main thing is yes – it is very flexible for developers.Build custom query loops using drag-and-drop
In Bricks Builder, you can design your entire loop for your main and secondary loops using the drag-and-drop builder. You add in all the elements you want for the loop item (post title, excerpt, ACF custom fields etc) and then you can use the builder to style each element using Bricks UI. You get a Live Preview of what everything looks like while you do this.Bricks is a “developers dream”
To put it into words… I love building websites with Bricks. It’s reignited my excitement for building websites (something I lost a while ago). It is just “fun” to work with and you can pretty much create anything you want.
Features change between versions
I love this about Bricks but others wont (maybe because I just manage my one website and not client sites, so it’s manageable)… but Bricks is a small team making rapid changes and improvements. From 1 version to the next, there could be an overhaul of how a feature works and that could frustrate some and it does cause a few bugs. But because they move fast, bugs are fixed fast and versions released fast. Longterm I like this play myself as we’ll get to the best product possible faster.Minimal Pre-made Designs
If you are using Elementor, Divi or similar plugins that have been around longer and you rely heavily on their design library – Bricks Builder currently might not be the choice for you right now. There’s not many designs you can choose from to start creating your website so you have to start from a blank page. I personally don’t use pre-made designs so it doesn’t both me but it might bother you.
My thoughts on Page Builders as a whole right now
If you are reading this review of Bricks for WordPress, I’m going to assume that you’ve used some of the other popular Page Builders like Elementor, Beaver Builder, Divi and all the others.
I’m sure we can all agree that each of these can be used to build incredible designs and they all come with a lot of different elements that you can add into the page, plus everything else they all do.
For me, I feel like it’s getting to the point that the best Page Builders for WordPress are all very mature and you could pick any one of them to build the website you want to build and you’ll be able to achieve your vision with all of them.
So now that each of the Page Builders can produce what you need for your website, it’s really coming down to the finer details when choosing the best Page Builder, including:
- Speed – you want the page builder that will load the fastest for your user
- Extendability – can you create your own custom modules if you need
- Less PHP code the better – can you design every part of your website using the builder’s drag-and-drop interface, or do you still need to write code?
- Optimized code – you want the Page Builder to be coded well by the developers
- Support – how fast do your questions get answered by the support team
- Community – how active is the community behind the page builder
And I think that’s why I want to focus mainly on these things throughout this tutorial.
The next thing I want to focus on is…what actually is Bricks Builder?
Because it’s probably not what you think it is…
Bricks Builder is the THEME + Page Builder (All-in-one)
I was unsure whether this was a good thing or not at first and you might be in the same boat, so let me explain how my thought process on this subject evolved the more I used Bricks.
Ok, so I’m there with my WordPress website running on Astra and Beaver Builder and I come across Bricks Builder.
Bricks Builder reviews are all pretty positive, so I jump in and buy it, download the .zip file and then go to plugins > Add new and upload the .zip and…
It fails!
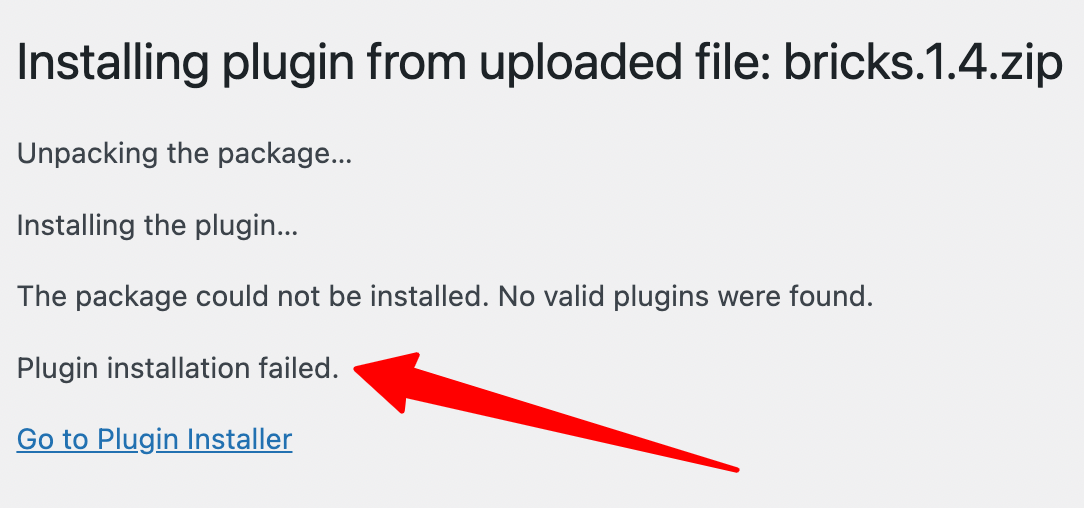
huh?
I dig a bit deeper and realize the Bricks Builder isn’t replacing the Beaver Builder plugin in my website….
But that Bricks Builder is actually a WordPress THEME with a Page Builder in it.
My first thought is… this isn’t what I want – I don’t want to be locked into using a Theme because all my content is built using the Page Builder in the Theme.
At this point, I was working on a staging website, so I decided – what the heck, it’s 2022 and it’s my year of change (seriously… I’ll be writing more about big changes in my personal life later – so keep an eye on that).
So I upload and activate the Bricks Theme on my staging site and start to design my website.
I design the header and footer, and then go and build some pages.
The more I used it the more it just…made sense.
When your Theme and Page Builder are the SAME THING, all the styling of the modules across your website match because they’re controlled by the same thing.
In Bricks Builder, when I go to the Global Theme Settings (more on this later) and set all my buttons to have a purple background, if I add buttons to my Header or Footer, into my pages, on my forms – wherever…
they all get this same button styling and thus my website all matches.
Take for example, what happens when I used the Astra Theme to set my default fonts and button styling.
Then, I go to build the content of my pages with Beaver Builder and Beaver Builder has it’s own button styling.
Sure, I can get Beaver Builder to override my Theme’s styling for buttons, but that means I am loading CSS from my theme and then overriding this CSS with other CSS from my Theme.
It just doesn’t make sense to me to do it this way and it’s never felt optimal.
Having your Theme + Page Builder all-in-one means that you set your styling once and then build your pages and you don’t have any weird CSS rules fighting and overriding each other.
After playing around with Bricks Builder I can safely say that (in my opinion) the thought of being locked into Bricks Builder shouldn’t deter you because…really, I have found it to be a massive benefits (reasons we will get into in this article).
Now that we’ve got the “What is Bricks Builder WordPress” out of the way, let’s now dive into the things I feel you must know before you use Bricks Builder.
Starting with speed…
The FASTEST Page Builder for WordPress that I have ever used.
Bricks Builder is FAST for visitors
In this section, we’re talking about the frontend of your website – i.e. what your customers and visitors see when they go to your website.
NOTE: Try clicking around my website now and get a feel of my website’s speed.
Now…
I know that clicking around my website might not be a good indicator of how fast Bricks is loading for my website because I am also using Cloudflare APO with FlyingPress caching active, but what I can say is this:
While I am logged into my website with no caching active, my website loads much faster as I click around and I can feel the difference.
In the next sub-sections on the frontend speed of Bricks, I’ll delve into more details, but I also wanted to let you know now while we’re here that I have a complete how-to guide that shows you how I speed up my WordPress websites that you might want to read after you finish this article.
RELATED: Speed Up WordPress Website 2022: I got 100% (here’s how) UPDATED!
Let’s continue…
Bricks Builder VS Elementor etc Speed test
The below table is taken from the Bricks Builder website to give you an idea of the results the Bricks team got when they tested Bricks VS other Page Builders.
| Bricks Theme | Elementor PRO | Divi Theme | Visual Composer | |
| Pagespeed mobile | 98 | 75 | 64 | 58 |
| Pingdom score | 98 | 79 | 82 | 79 |
| HTTP requests | 6 | 34 | 23 | 36 |
| Page size | 0.19 MB | 1.7 MB | 1.5 MB | 1.1 MB |
I’m not running these tests myself and there are far more technical people out there who can provide you with better speed test info…
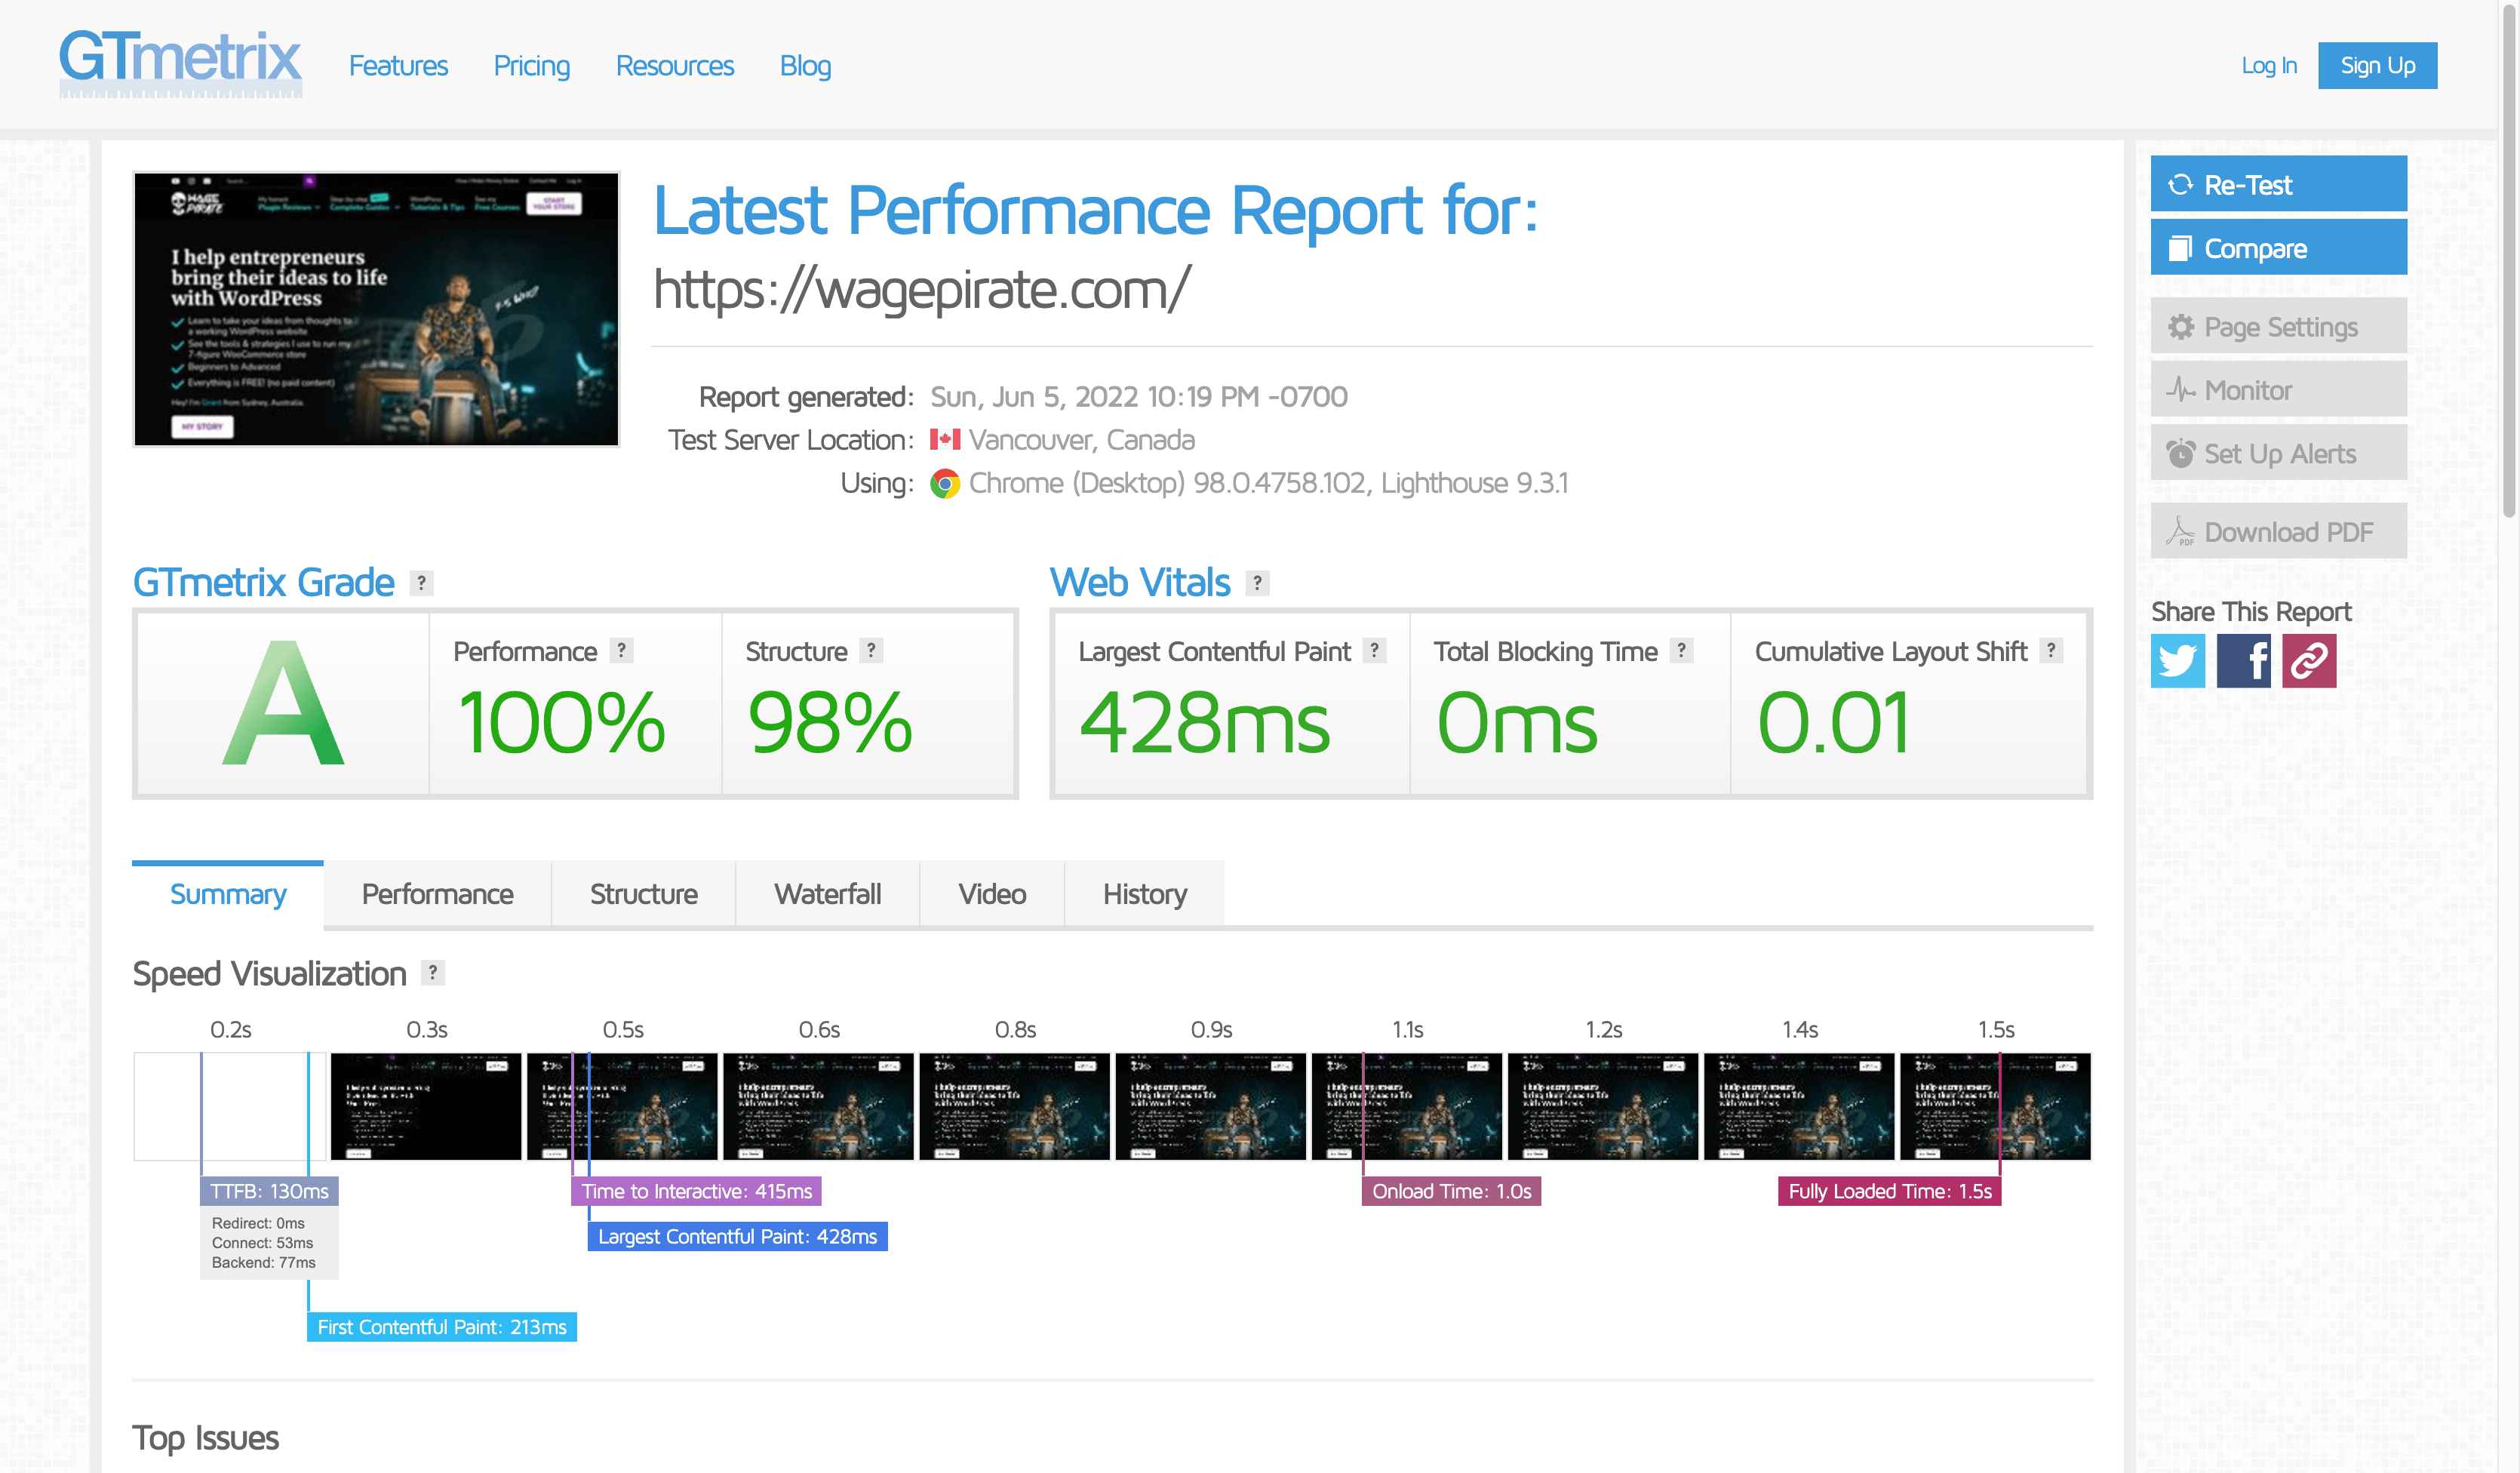
But (as I said above) when I am logged into my website (thus no caching is active) and I click around the frontend of my website, I can feel the difference in speed.
My website is definitely faster with Bricks.
While logged out, caching is taking effect but I’m still getting better results from my speed tests than when I tested my cached version of the Beaver Builder website.
Here is the current speed test of my home page.
If you check my article I wrote where I show you the steps I take to speed up my WordPress websites, you’ll see that I don’t do any technical wizardry that the average WordPress user couldn’t do for their own website.
I configure a few plugins, set up Cloudflare APO, optimize my images + a few other things I’ve found that really speed up my website – and that’s it.
I don’t spend any more than a few hours on it (if that) – as I focus more on writing content and the stuff that counts 🙂
For me, a fast-enough website is going to be good enough.
I had that with Beaver Builder, but now it’s super fast (with little setup) using Bricks.
RELATED: Speed Up WordPress Website 2022: I got 100% (here’s how) UPDATED!
To explain why the frontend of a website is fast with Bricks, we can look at the technologies Bricks uses to render it’s pages and also the code that is generated for each page…
Starting with Flexbox.
Bricks Builder uses Containers and Flexbox
Another reason Bricks is so fast is because it uses the Flexbox method for structuring pages.
But the benefit of using Flexbox VS rows / Columns with your Page Builder is that it produces less HTML code on your page.
If you’re currently using Elementor, you might have seen the news that they are ditching Rows and Columns and moving to using Flexbox and Containers.
RELATED: Click here to read a very in-depth article on CSS-Tricks that explains what Flexbox is.
The good news is that Bricks Builder already uses Flexbox by default, so it’s using the latest technologies that the other page builders are only just starting to adopt now.
Long story short – Bricks uses Flexbox to structure it’s pages, which reduces the HTML code needed to render the page and thus (because there is less code on the page) the website loads faster.
Speed aside – this is my first time using Flexbox and while it is a bit weird at first to understand how to best use it to build your pages, now that I’ve had a few days using it I am getting very fast at laying everything out and it MASSIVELY reduces the HTML on the pages.
To give you an example of why Bricks using Flexbox and Containers produces less HTML Code and thus a faster website, I have gone ahead and built a demo page as per below.
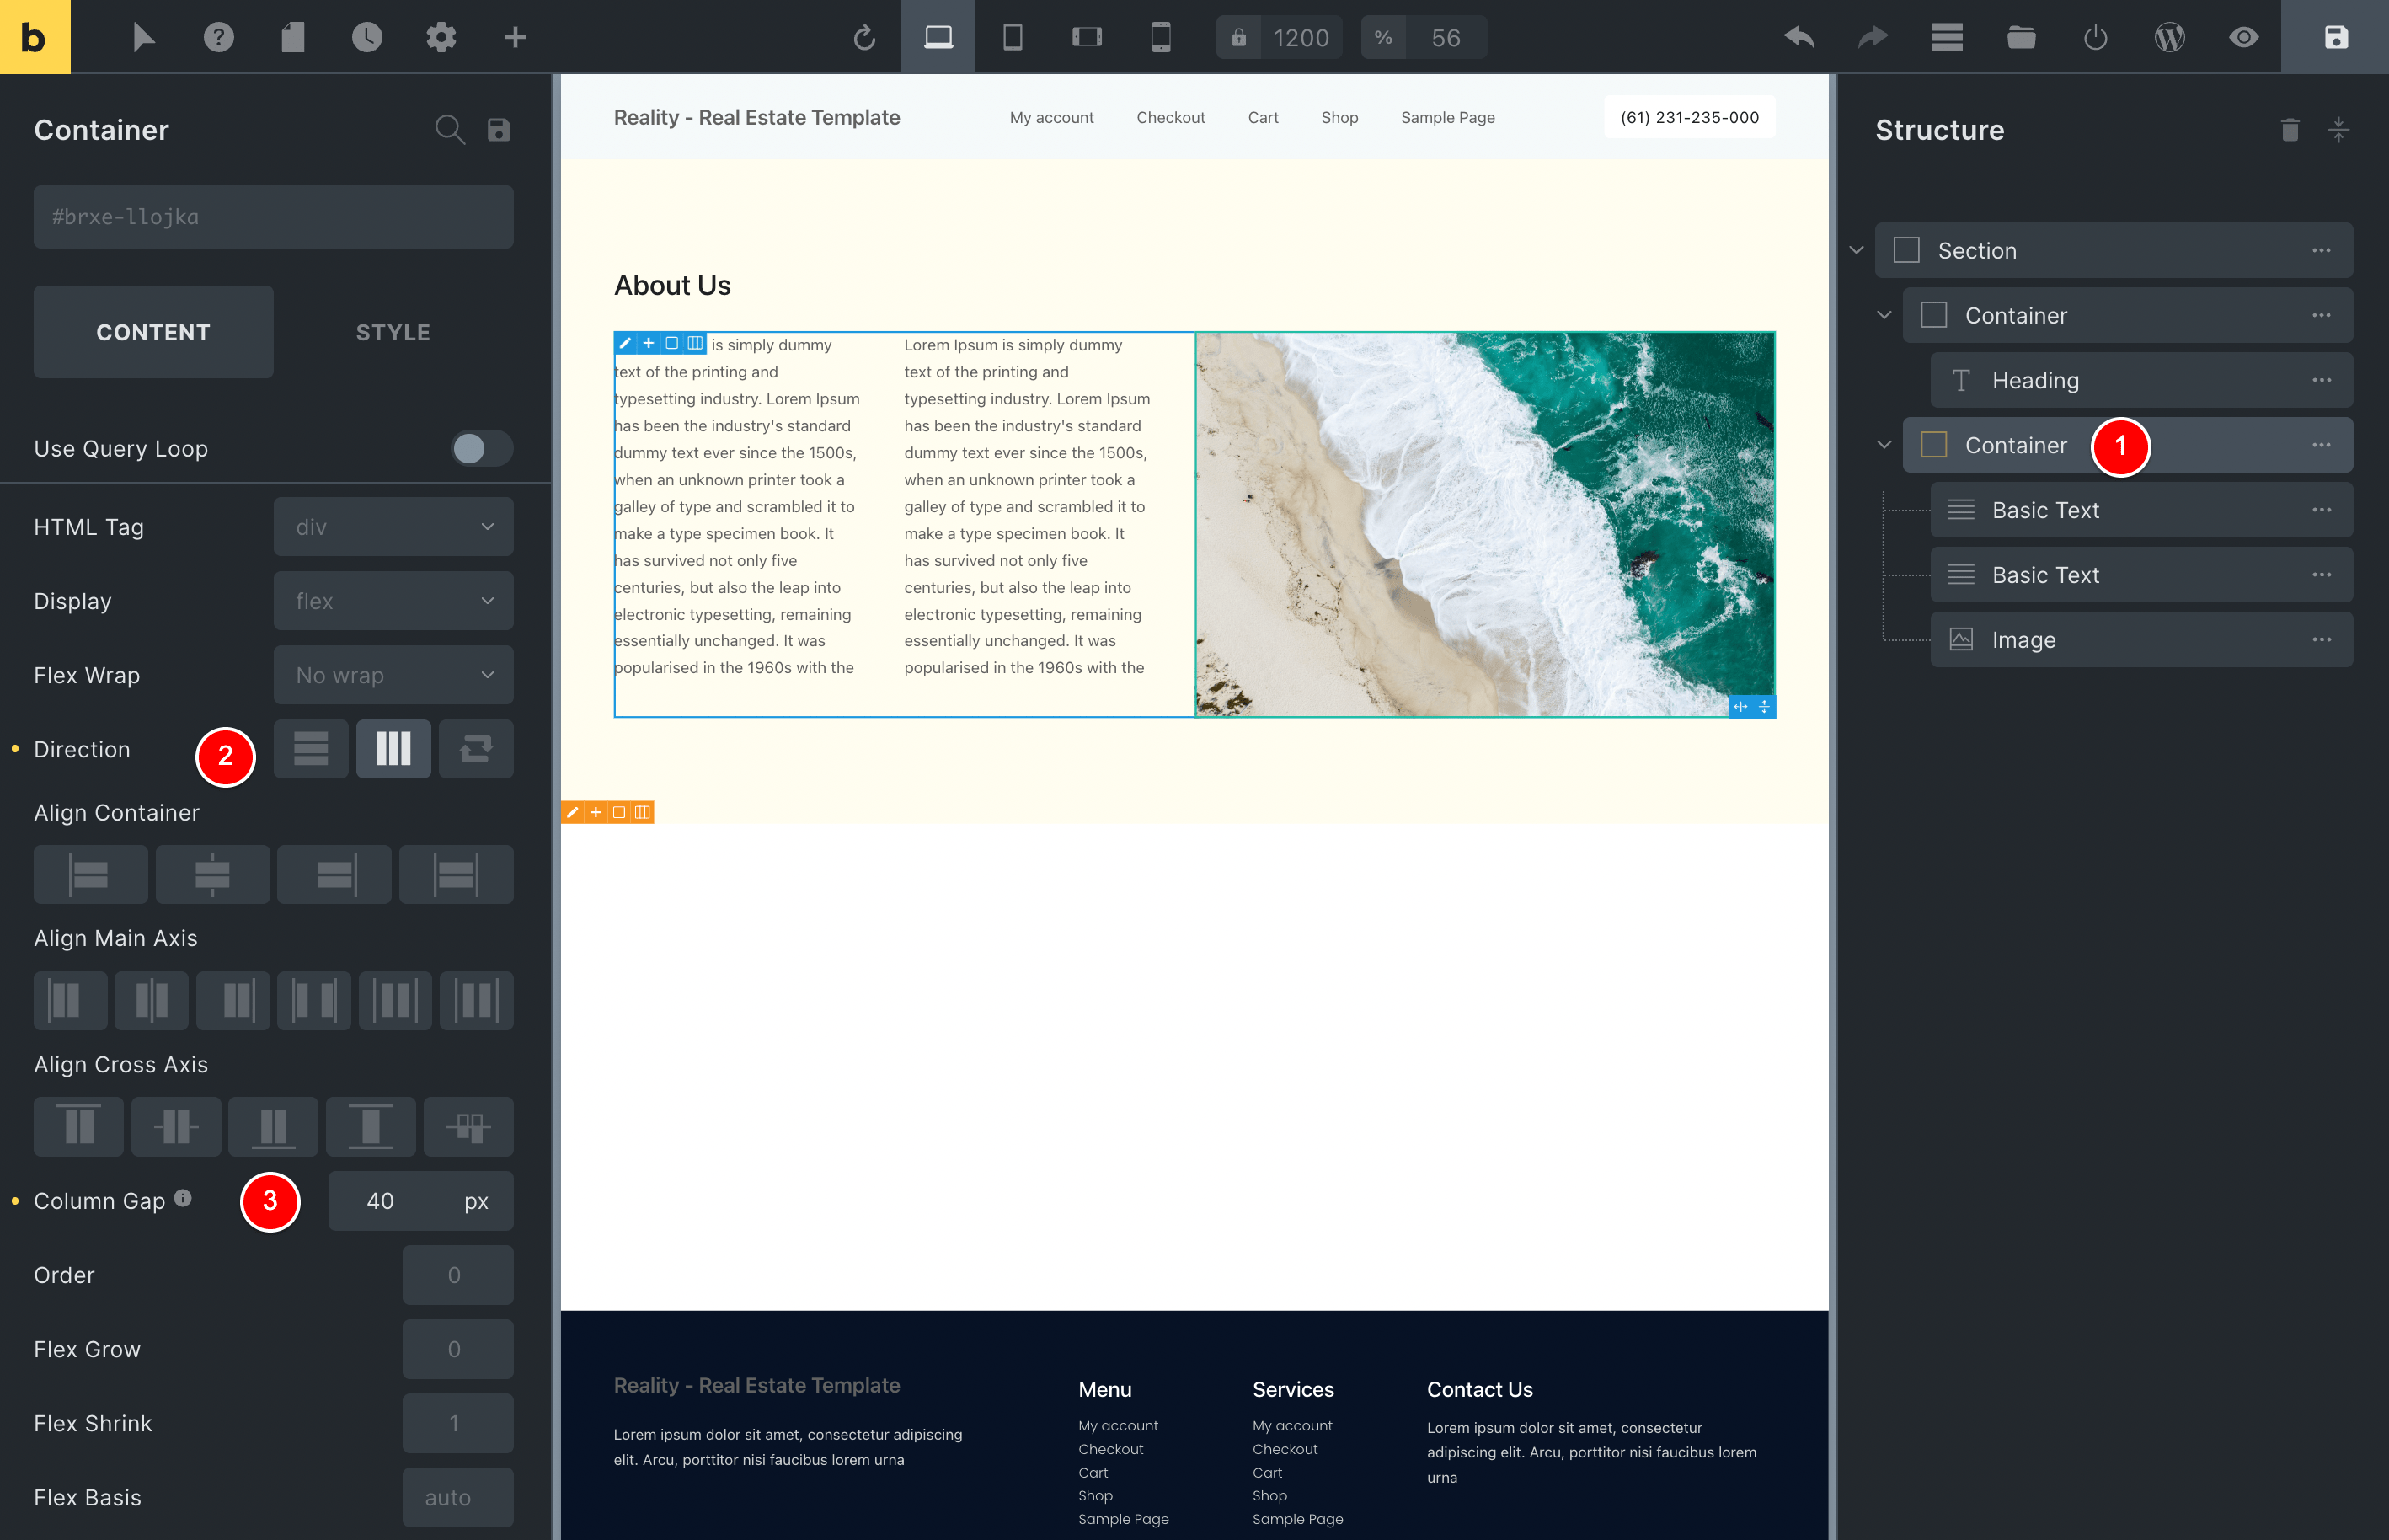
If we specifically focus on how I was able to create the Container at (1), you can see that this Container has 3 columns
- Paragraph
- Paragraph
- Image of the Beach
To set these columns, all I had to do inside Bricks was change the setting at (2) and that instantly put all the elements inside the Container into columns.
I then added column a Column Gap setting at (3) above to space them out and I was done.
If you consider how you would create these three columns using Divs, you would have to do something like the following image, where you wrap each of the paragraphs and image into a div and then give the divs widths and float them left with CSS.
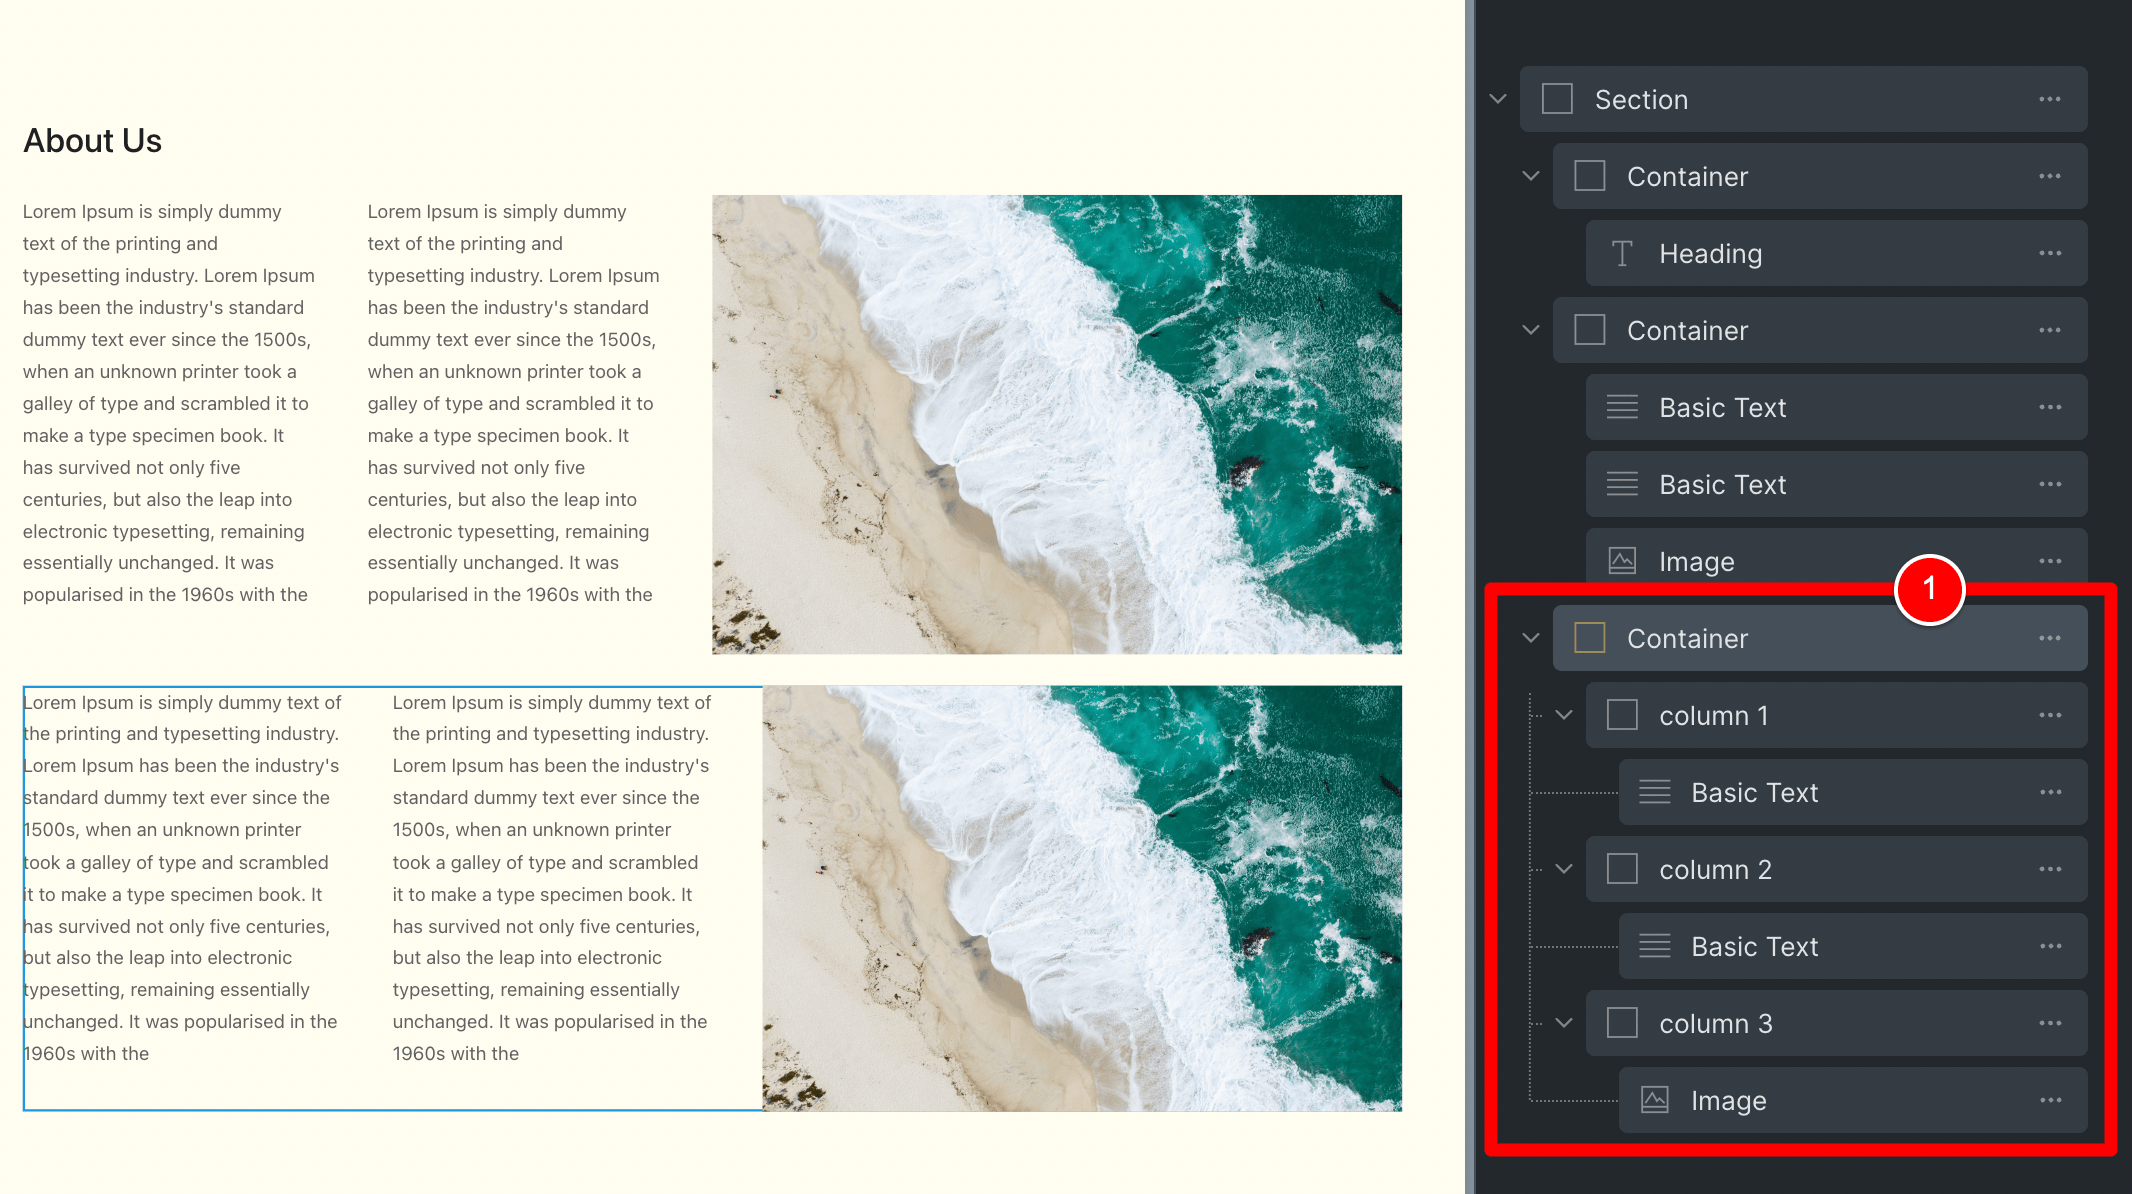
As you can see, if you compare our above code with what we had with Flexbox, you can see that flexbox creates less HTML and doesn’t need extra div wrappers etc to align elements.
Again, less code on the page will result in a faster website and the browser is processing less stuff.
Later on in this article I’ll also cover why using Flexbox gives you better control of your Mobile Layouts and allows you to organise your content better on tablets and mobiles.
But – in summary, if you find the Flexbox a bit hard to use at first – persevere as it’s definitely worth it.
Bricks Builder produces very lean HTML (smaller DOM)
We touched on this above under the Flexbox section, but I wanted to break it out into it’s own heading for the skim readers out there.
When you edit your page using Bricks Builder and then click SAVE, it creates a lot less HTML Code than other Page Builders.
Less code = less stuff for the browser to process and less data to transfer = a faster website.
The FASTEST Page Builder for WordPress that I have ever used.
The Bricks editor loads VERY FAST (editing content)
I have a lot to explain here but the best thing you can do to get a feel for what I mean is head over to the Bricks Builder website and try their demo for yourself.
In this section, I am referring to how fast you can click to edit content and be in the Bricks editor ready to edit and build your pages.
Bricks Builder uses Vue.JS
Whereas Beaver Builder and Elementor feel like they’re WordPress Plugins that are Page Builders…
Bricks feels more like a web app.
For the techies – Bricks Builder and it’s editing experience is coded using VueJS.
To be honest, I’m not at a level with coding where I can say what this means exactly, but I can say this…
When you click the Edit with Bricks button, the editor loads EXTREMELY fast.
I can click to edit a page on my website and be in there editing with Bricks in 1-2 seconds – it really is A LOT faster than Beaver Builder and other page builders that I’ve tried.
You really have to see it to believe it (again, that demo will be your best friend).
Video: Launching Bricks editing mode
Here is a video below where I filmed myself editing a page and then having the Bricks Builder load.
As you can see, it’s super quick to get into editing your content with Bricks.
It’s 100% the FASTEST page builder for WordPress I’ve ever used and it’s the small things with an editor (like being able to cut a few seconds of here and there) that really add up over the long run of you managing your website.
The FASTEST Page Builder for WordPress that I have ever used.
Web Designers can build websites faster with Bricks’ features
There are a few things that Bricks Builder does that allows you to design websites faster AND ensure that your styling is perfect across all the pages and elements on your website.
Copy and Paste between open tabs
Oh my lordy… how did I ever live without this feature???
Previously, with Beaver Builder, if I wanted to copy and paste a row between pages, I would need to save that row as a Saved Row and then add that saved row into the second page – which is a hassle.
With Bricks Builder, Copy and Paste between your open tabs is EXACTLY how you think it should be done.
Here is a video showing you how easy it is to Copy and Paste a section from one page to another in Bricks Builder…
In the video above, I used my mouse and did the Right Click > Copy and Right Click > Paste method to make it more evident for you, but in actual practice I just click on the element I want to copy and then I use Command + C to copy and Command + V to paste, just like I would in other programs.
You can Copy and Paste individual Elements or complete containers (including all their child items inside) and it will copy and paste all the content, css styling etc…
I can’t stress this feature’s benefit enough – it is a MASSIVE time-saver and works perfectly without bugs.
Global Theme Styles are a game-changer
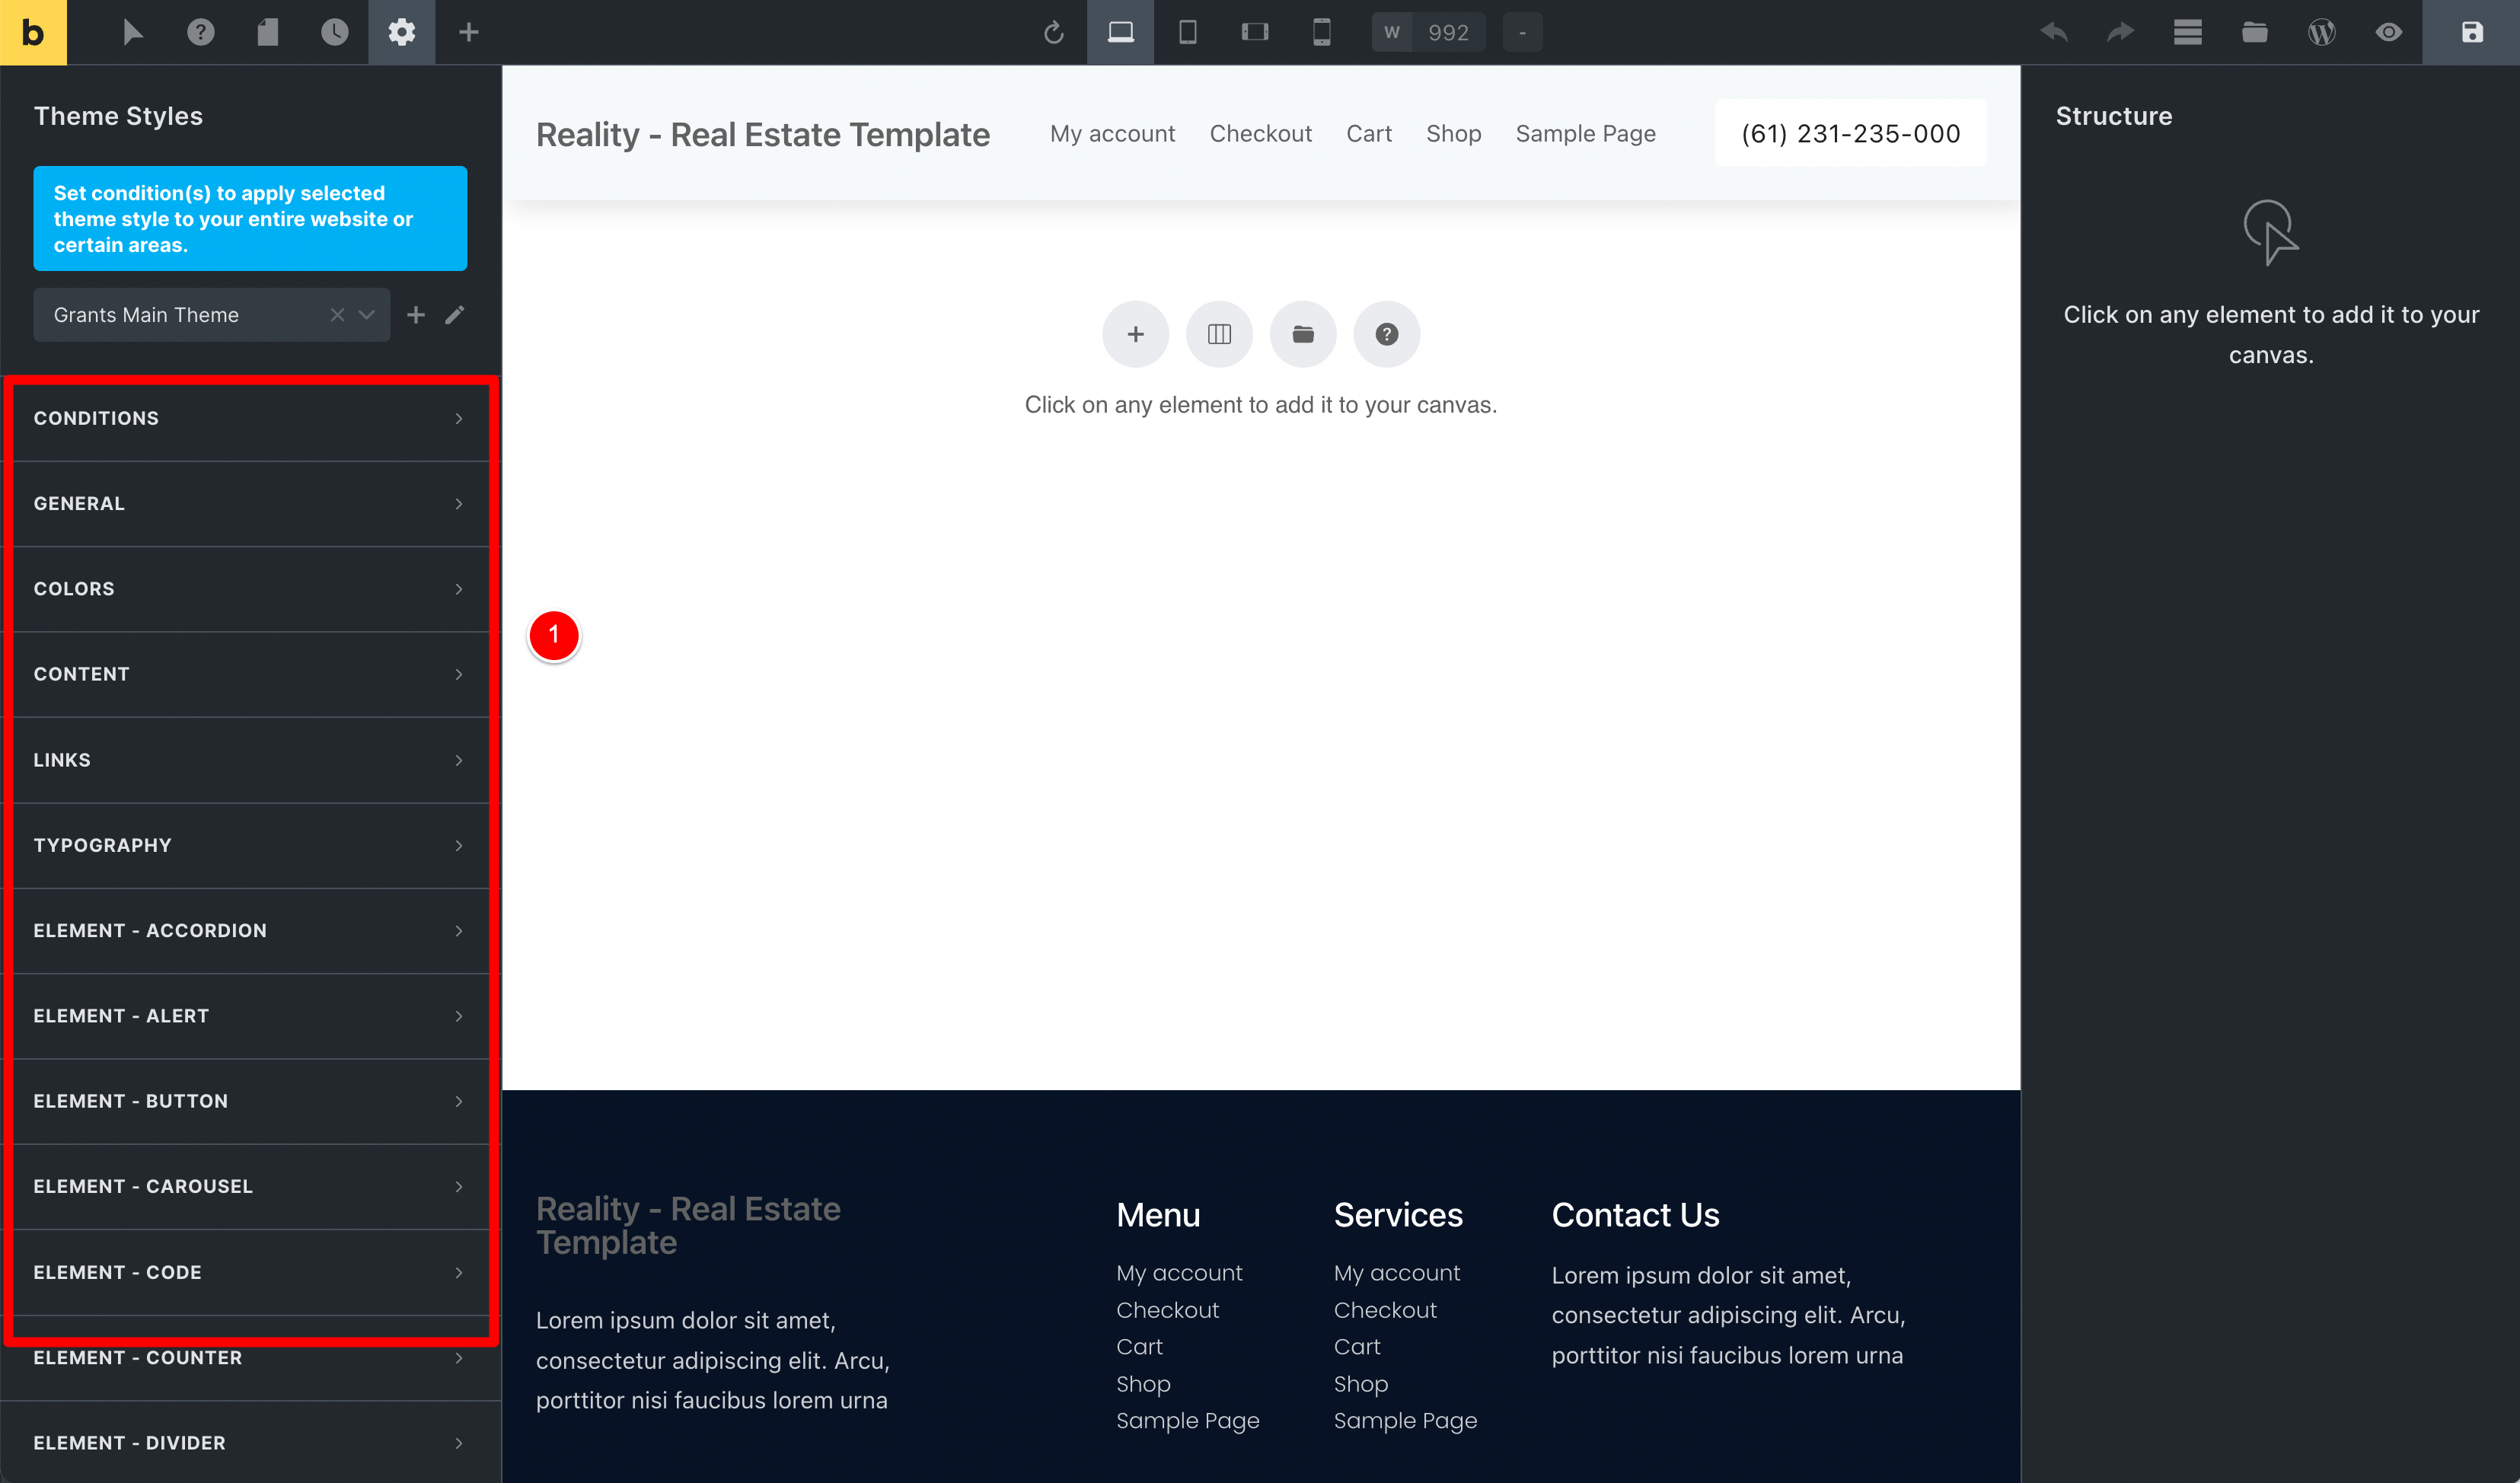
When you get going with Bricks Builder, you will want to head into this section first to set up the default styling for all your elements.
Global Theme Styles is the section in Bricks where you design how each element that you’ll use to build your pages will look.
We’re talking Button, Paragraph, Heading, Accordion etc) – anything you’d drag into your page while building it using the Bricks page builder.
Let me show you what I mean.
Let’s say you’re starting to build your website, so you create a new page name Homepage and then you click to edit it with Bricks Builder.
You would get something like the below image.
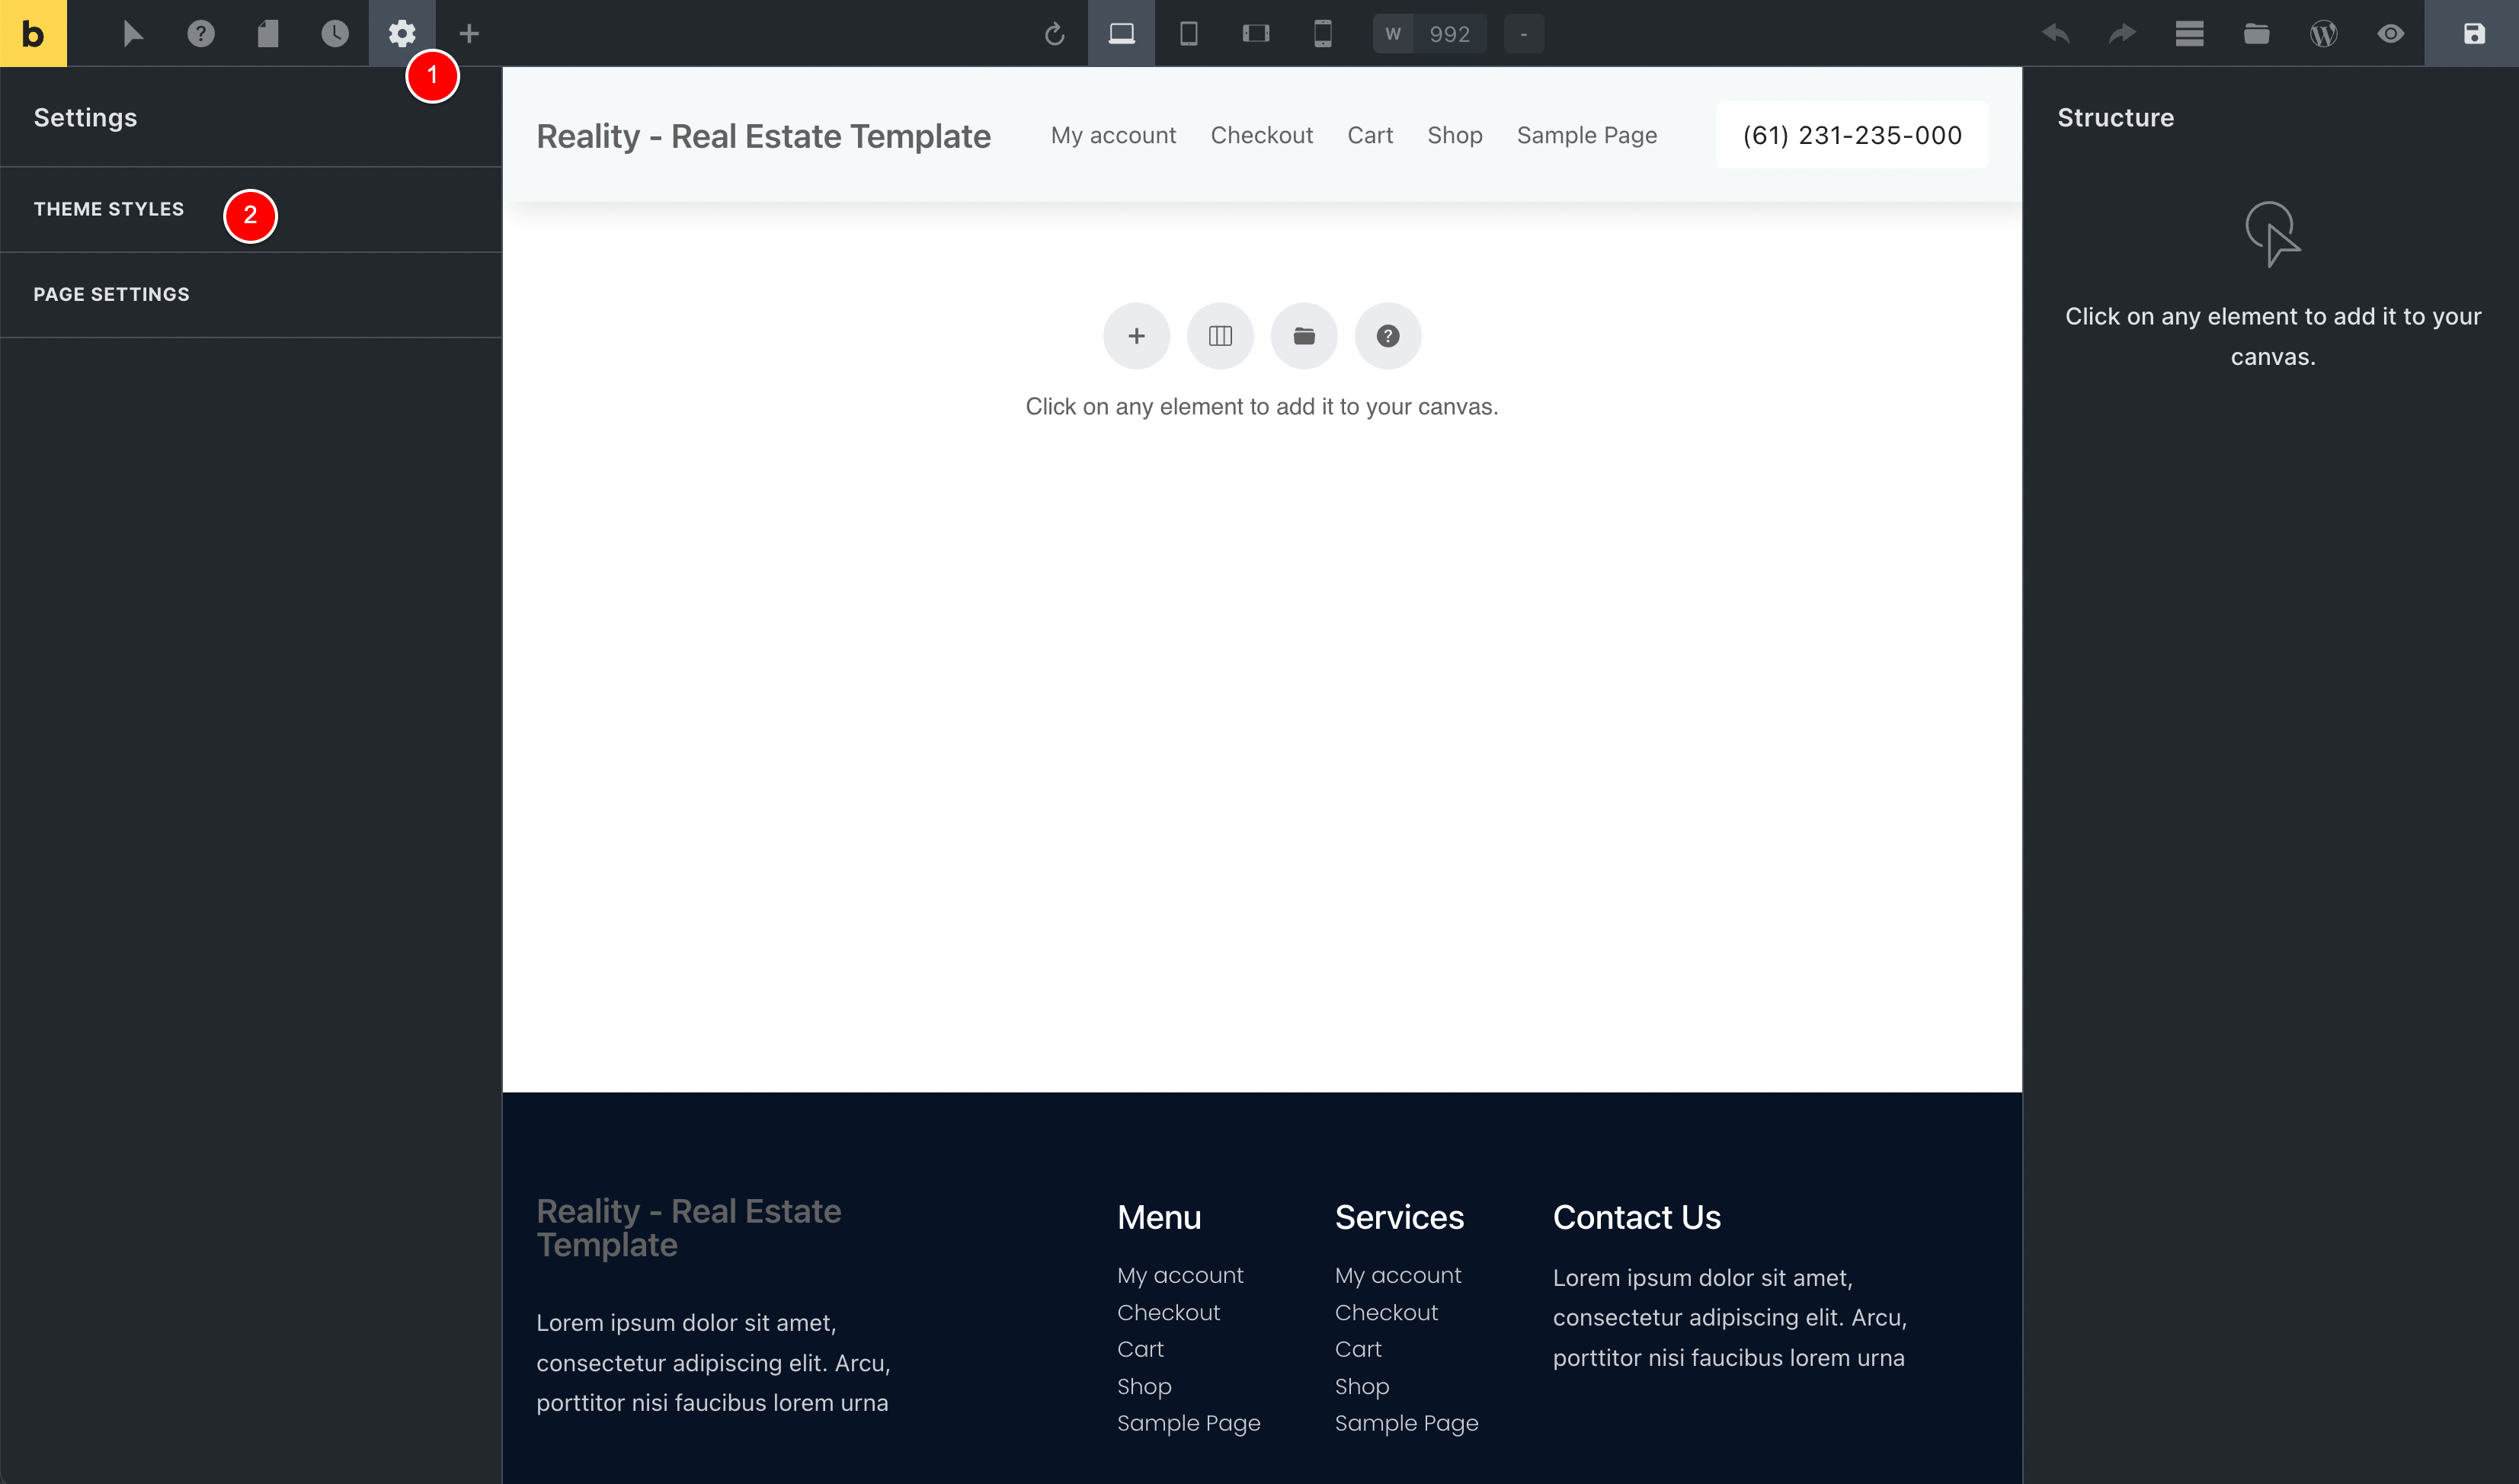
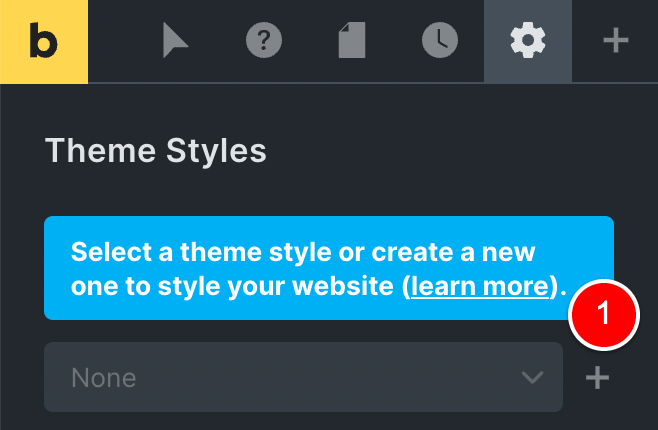
But if you click the Settings icon at (1) above and then go to Theme Styles at (2) above, you can click the plus sign at (1) below…
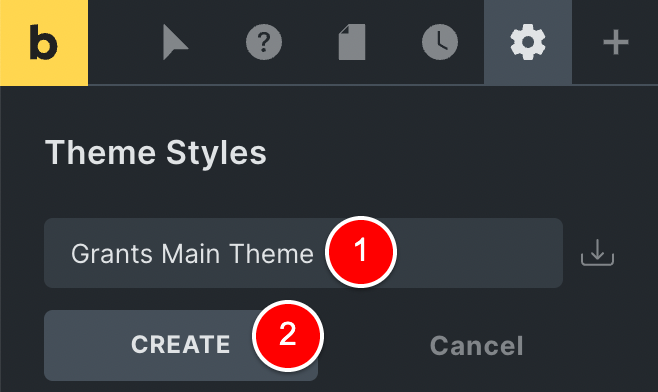
Give your new Global Theme Styles a name (1) and then click Create at (2)…
And then you are able to set all the default styling for your entire website as per (1) below where I have set my Global Theme Style to apply to my entire website.
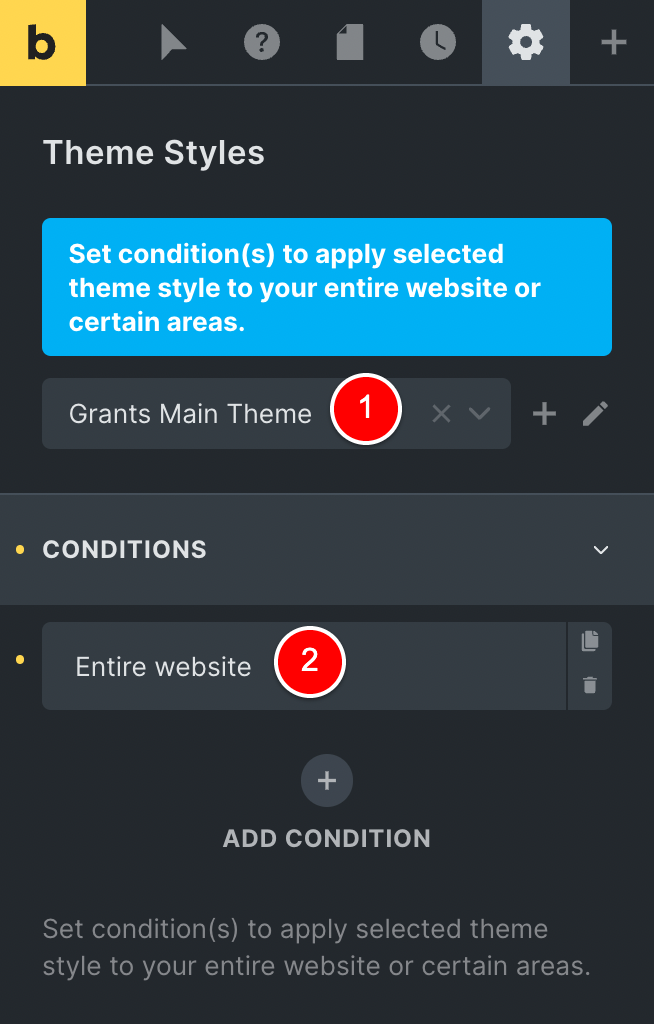
NOTE: Because you can conditionally apply where this template will apply, you could (for example) have a different Theme Style per Custom Post Type. Maybe your branding is Purple and Black, so your buttons on your website are Purple, but you want your buttons for your Optin pages to be Green because you’ve done some A/B testing and you know Green converts the Best.
To do that, you could do something like the below where you exclude the Optin page post type from getting your default Global Theme Styles…
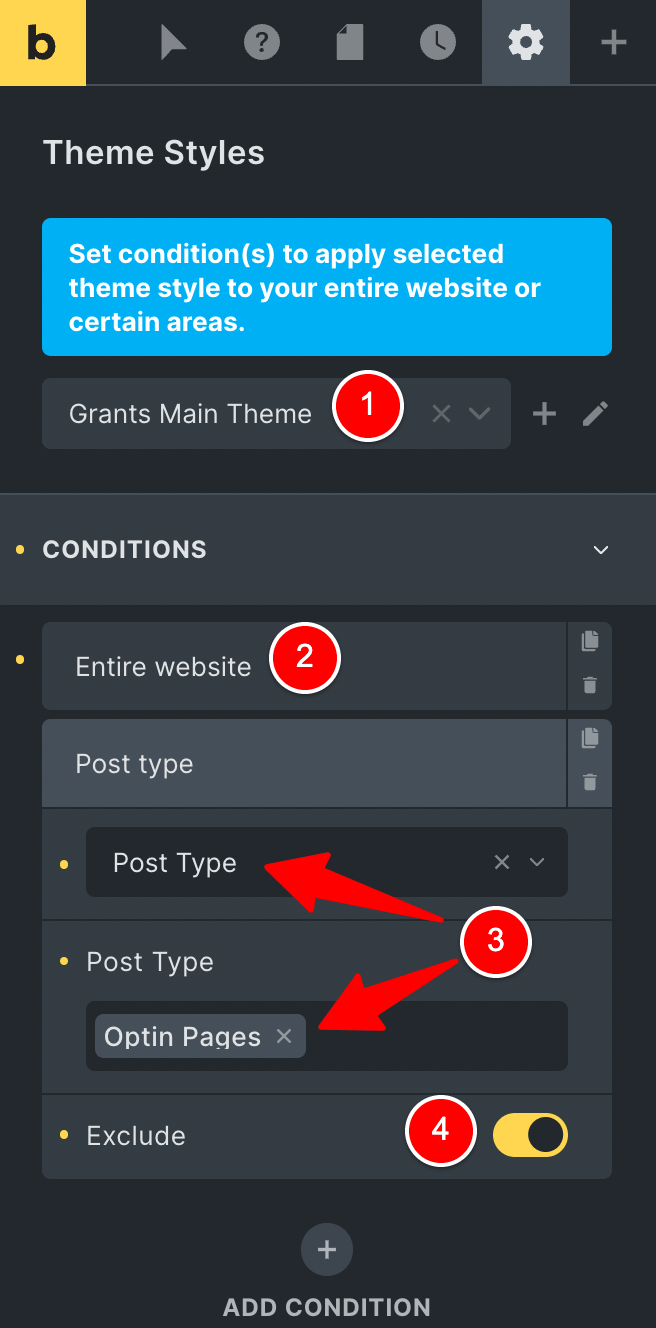
and then you create a second Global Style that only applies to your Optin Page post type.
Now, with these Global Theme Styles are you setting how your fonts and colors / links etc all look on your page, as well as all your Buttons, Accordions and all other elements you’d drag into your page to design your content.
i.e.
Element – Accordion
Element – Button
etc
This is where you set the styling for these elements for when you’re building your pages.
So you set the default styling here for each element and once you drag that element into any page, it would get this styling (but then you can overwrite styling locally for each element on a per-element basis, too).
You will use this in SOOO many ways and it’s so good to have this level of control for styling your pages, but one example I want to give you is how I use this to style the buttons on my website wagepirate.com
In our example below, I have created a page in Bricks Builder that has 3 Containers on the page and each container has 1 button element inside, as shown at (1).
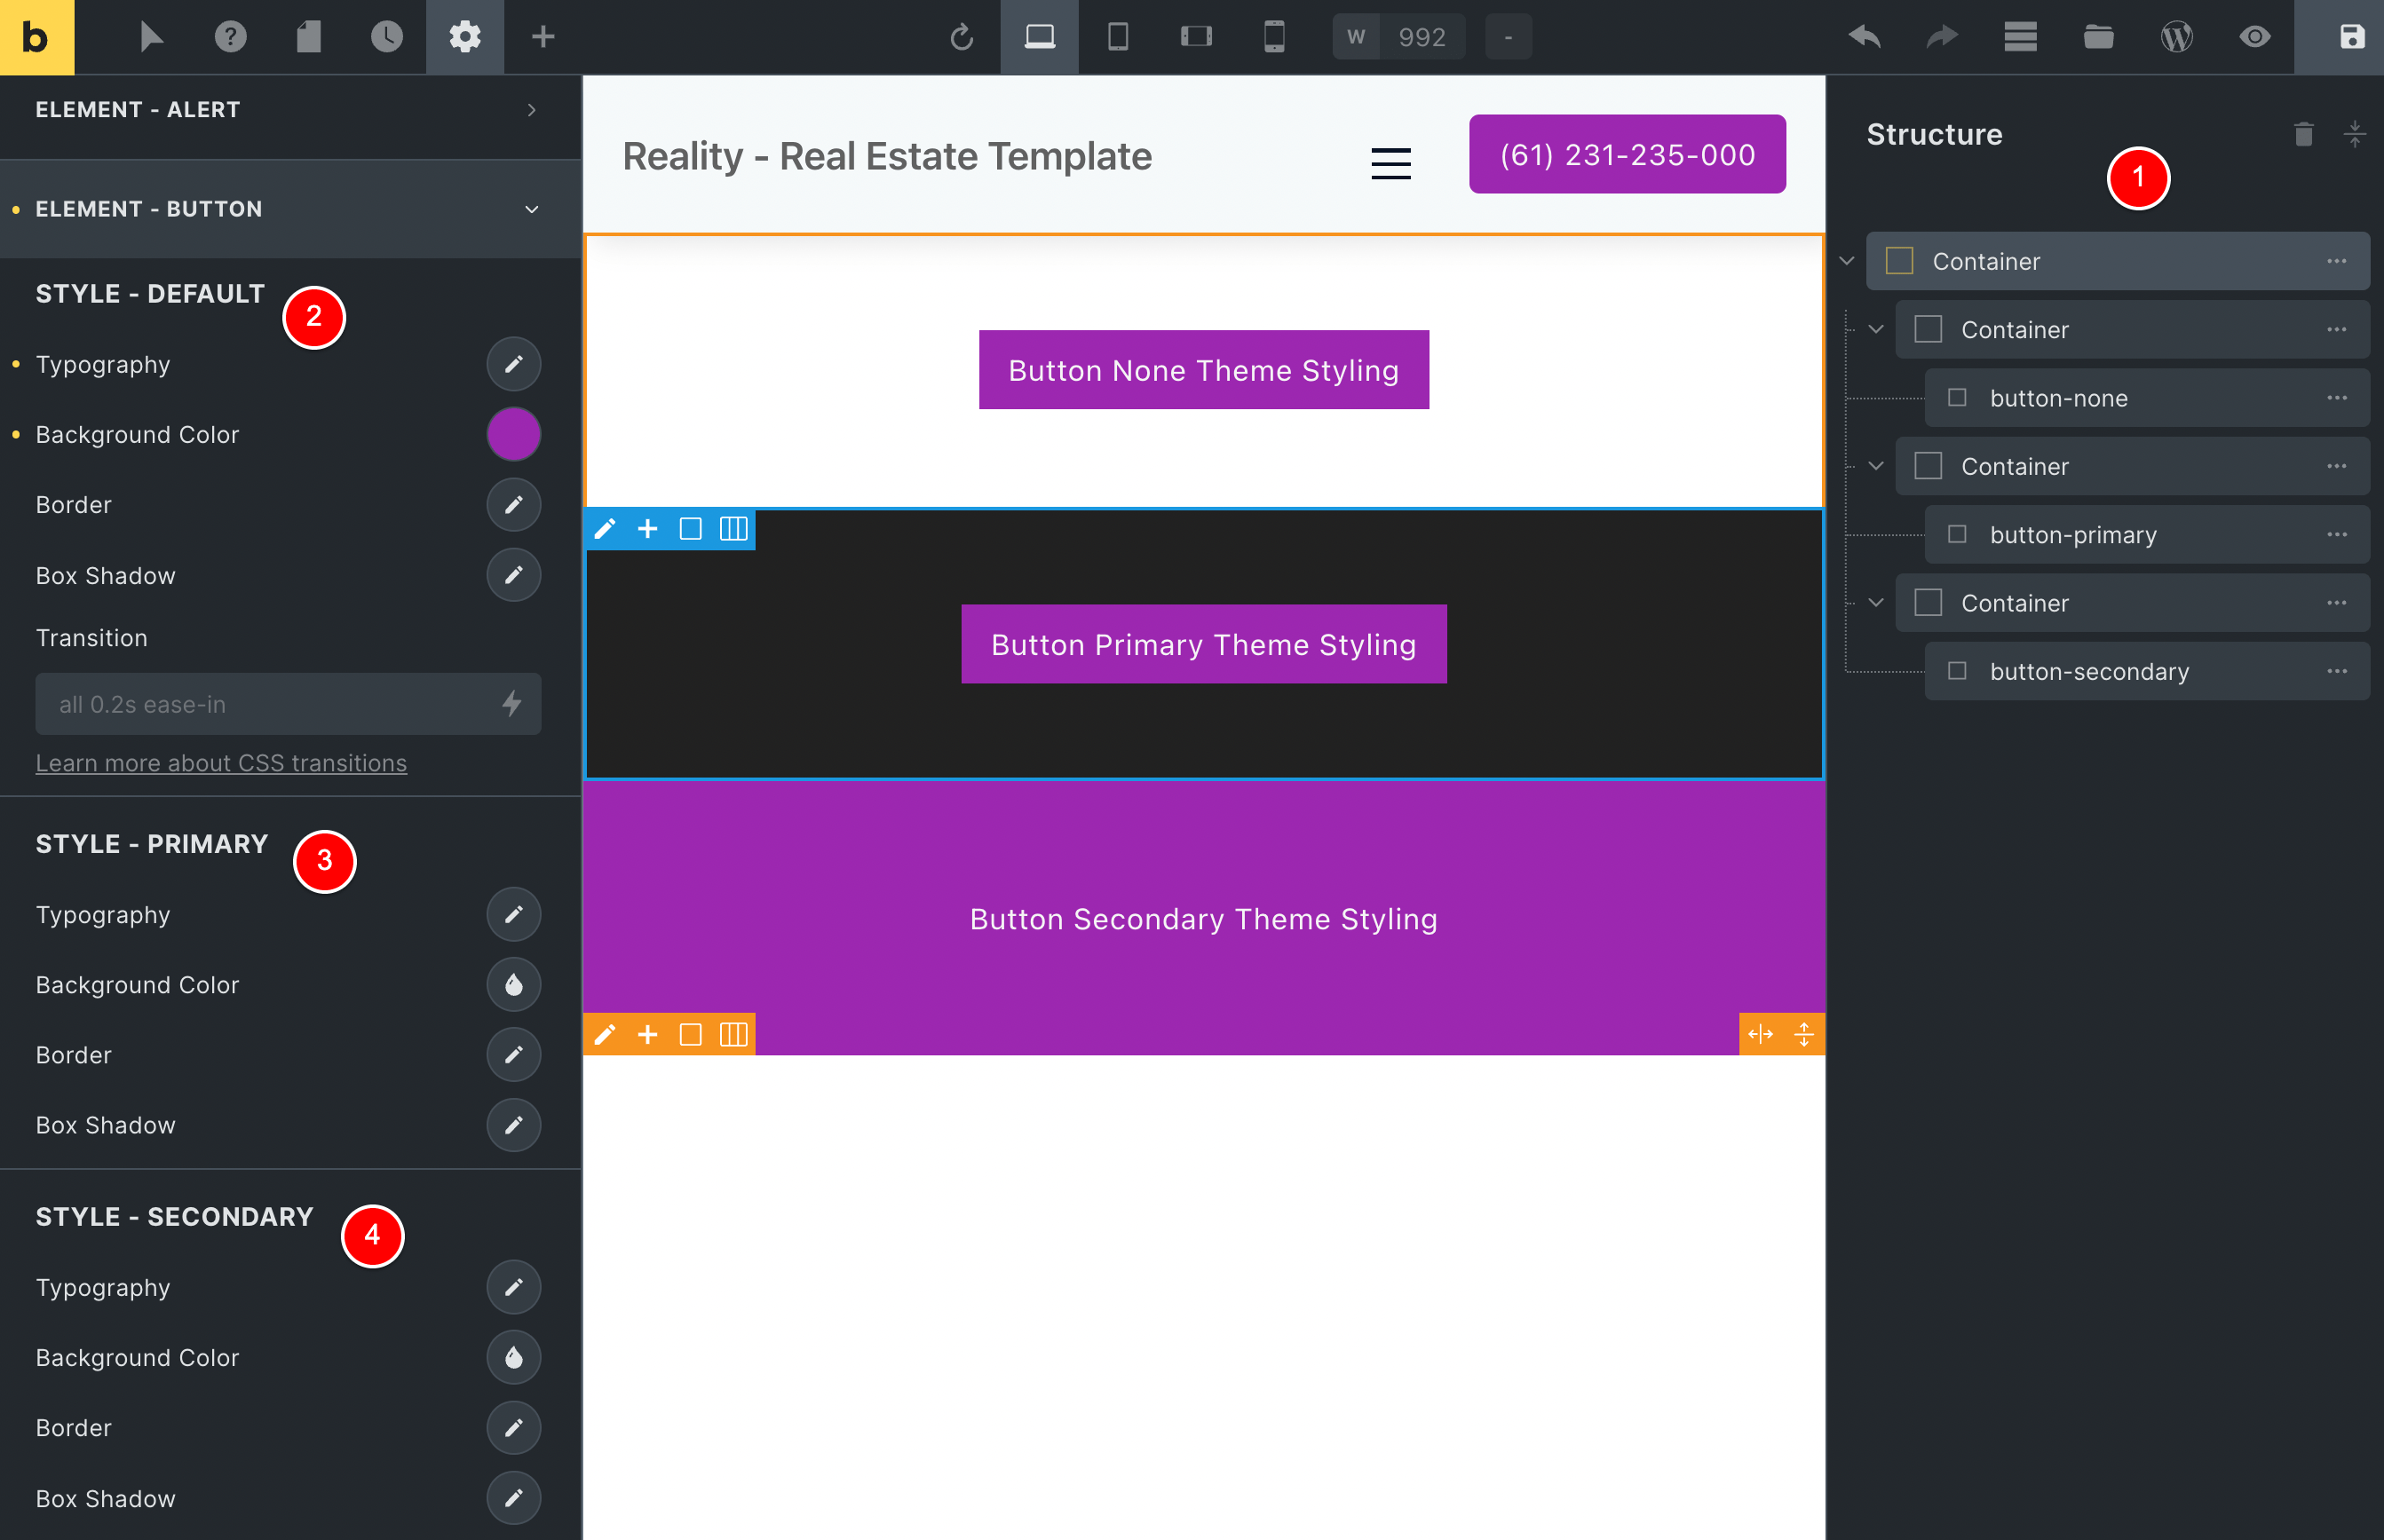
The None (default) styling is set to have a Purple Background with white text, thus all the buttons on the page get this styling.
But this isn’t ideal, as we can’t see the button on the Purple background.
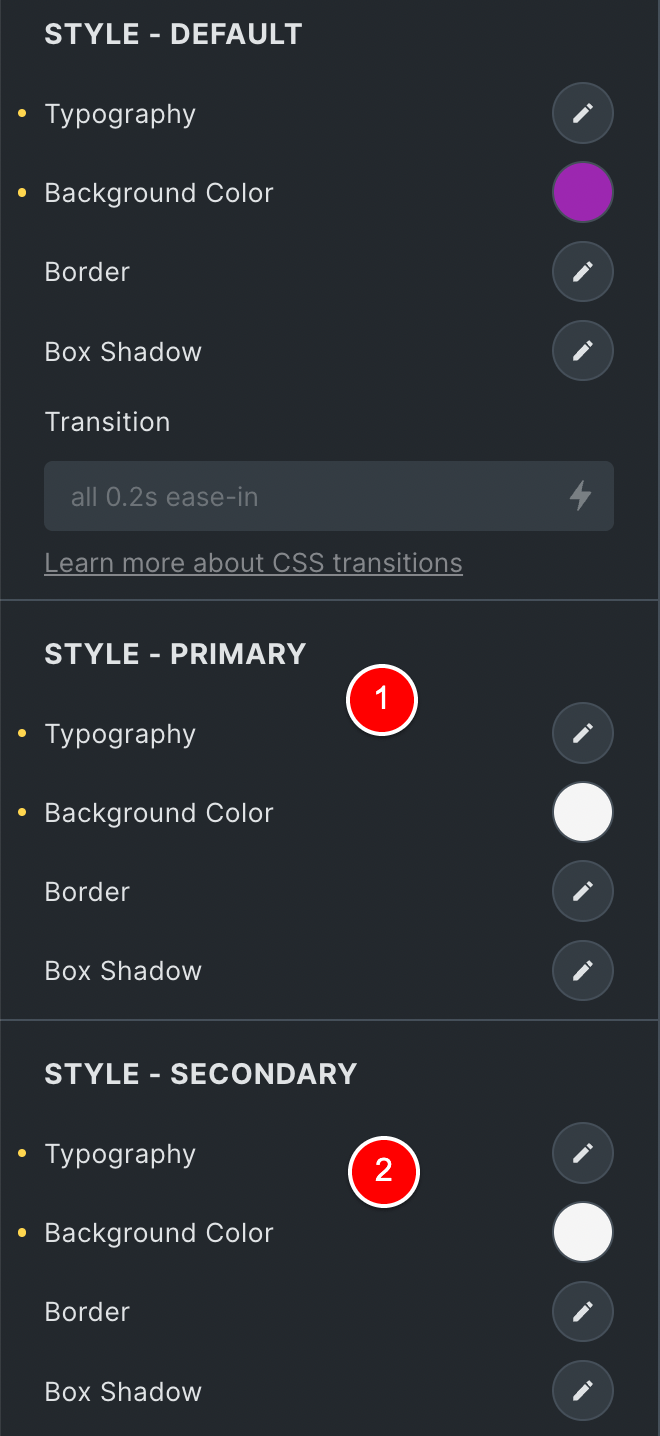
To fix this, in our Global Theme styles we can set the styling for the Primary (3) and Secondary (4) options as per the above image.
So, I’ll go ahead and set the Primary to what purple text + white background (1) and Secondary to have Black Text + white background.
Then I’ll click on the button element at (1) and change its style to be “Primary” and thus it updates to have the white background with purple text.
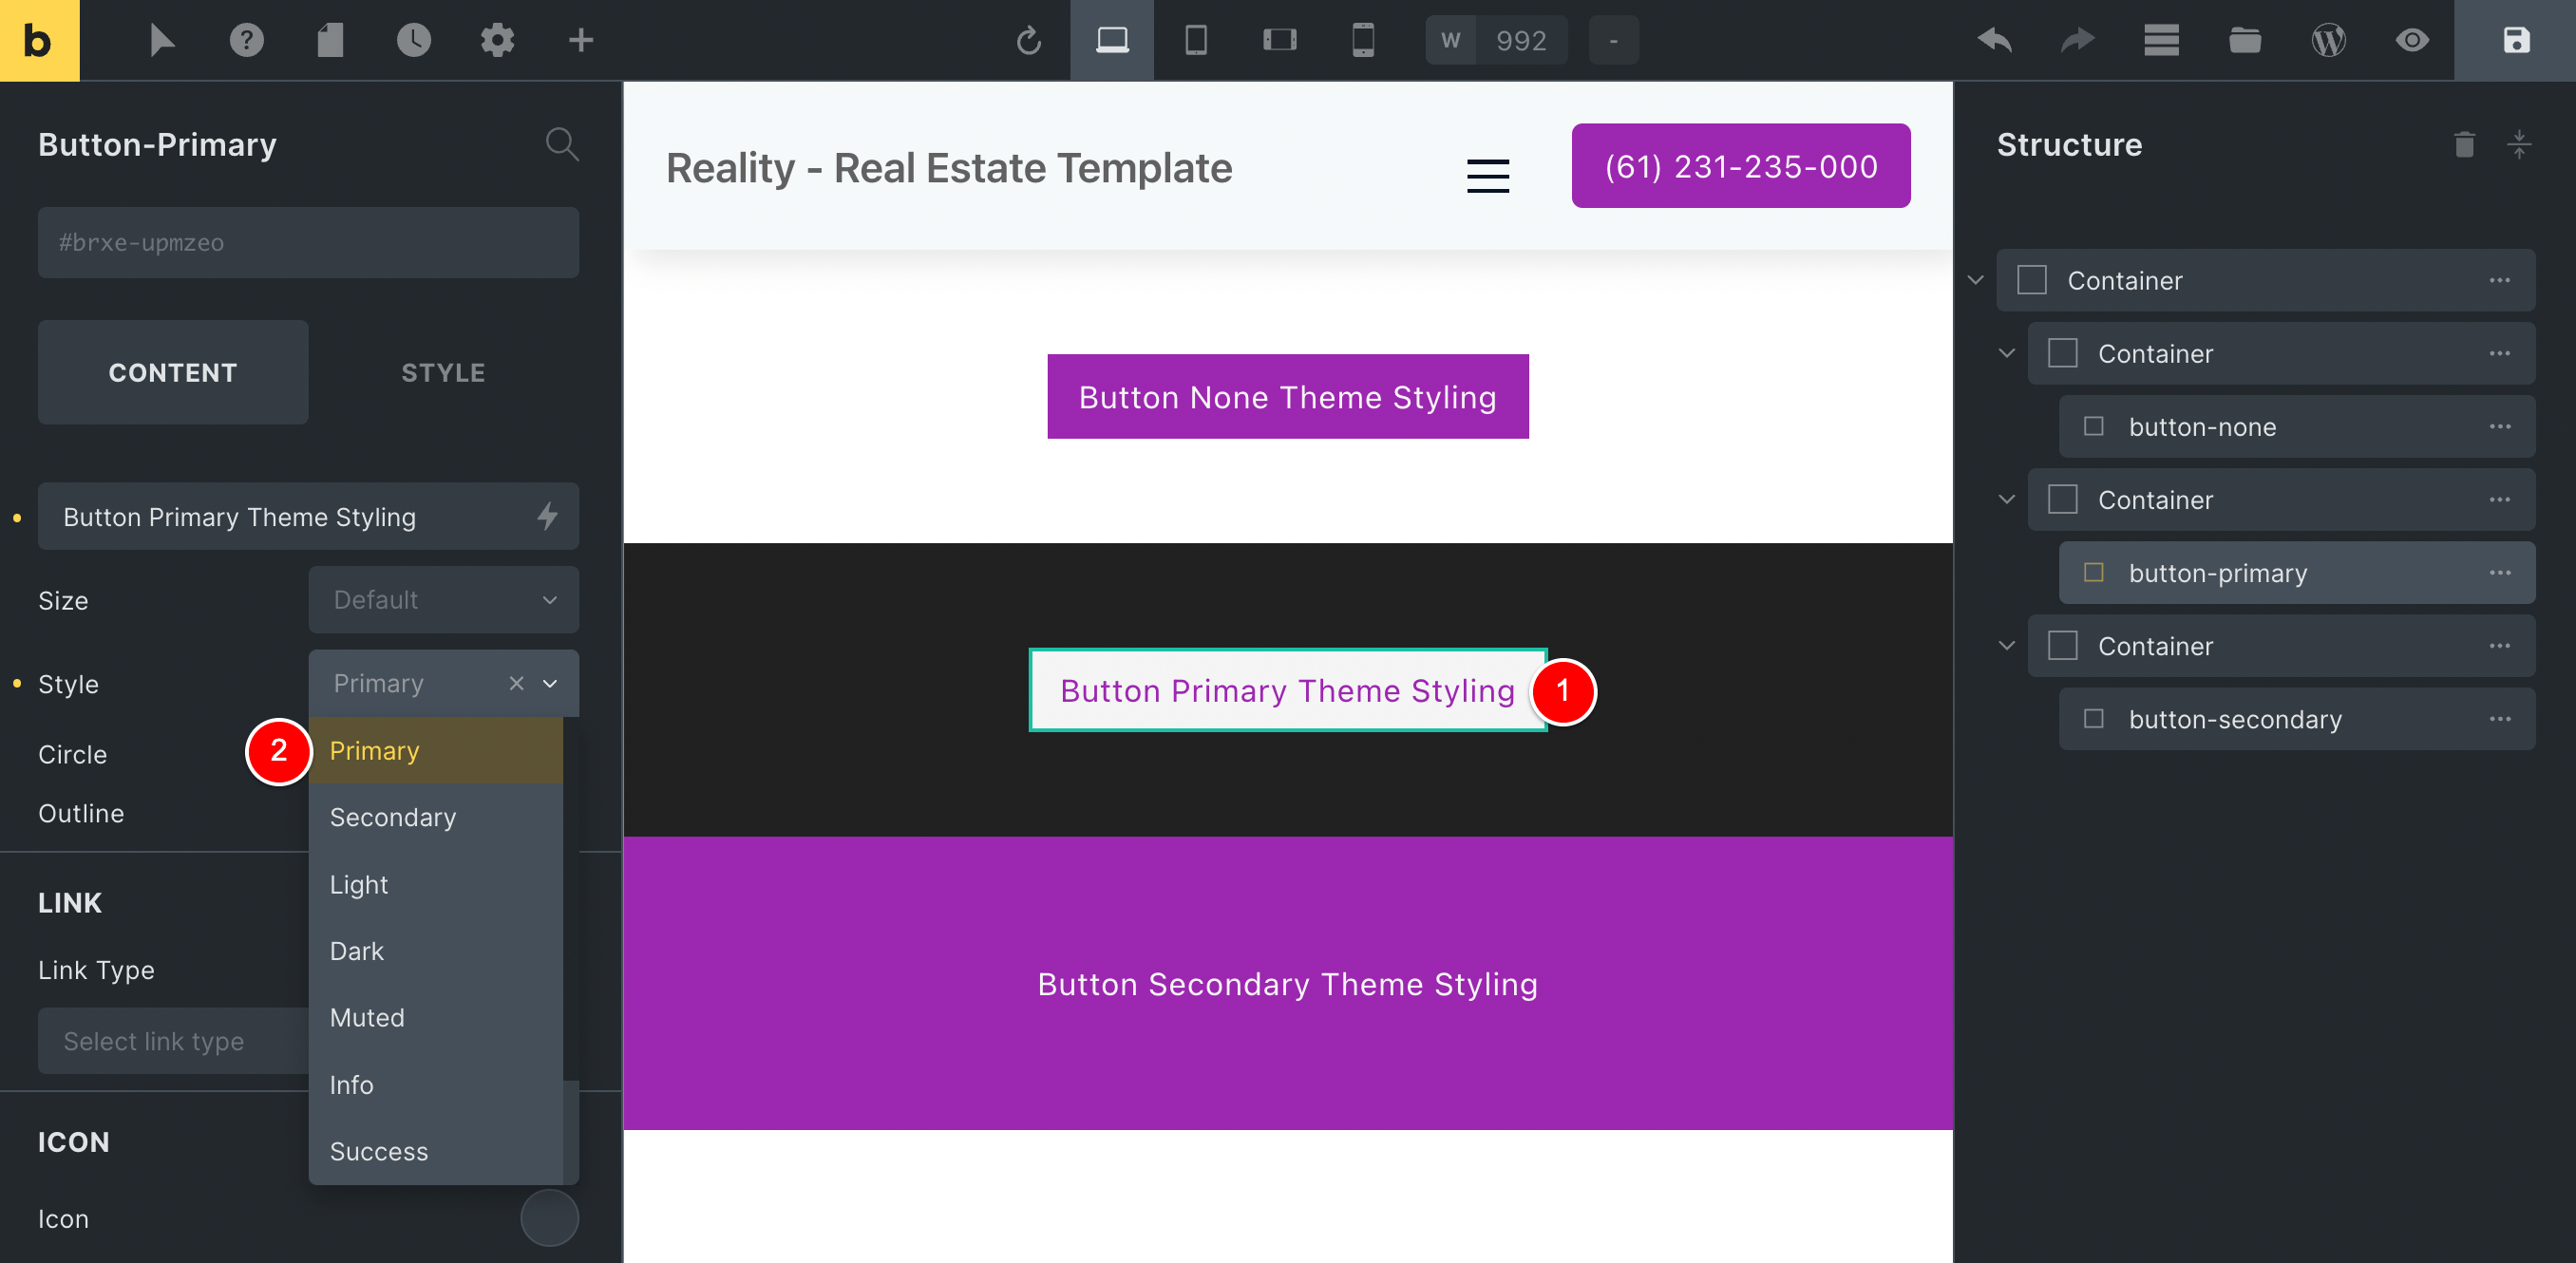
I’ll repeat the process with the next button just the same, but select Secondary to give it the white background + black text.

So now, anytime I am building my pages, I can drag in a button Element and then select Default / Primary / Secondary under Styling and it will take on the CSS styling I had set under my Global Theme.
That way, if I want to update it in the future, I just update it in one place and it updates across my entire website.
Global CSS Classes are a must-have feature
One feature that didn’t exist in Beaver Builder and that I couldn’t live without now is Global CSS Classes.
Again, let me lead with an example…
Here on my website wagepirate.com, I have a lot of instances where I put content into a container that has:
- lots of Padding
- a drop-shadow
- rounded corners
- a white background
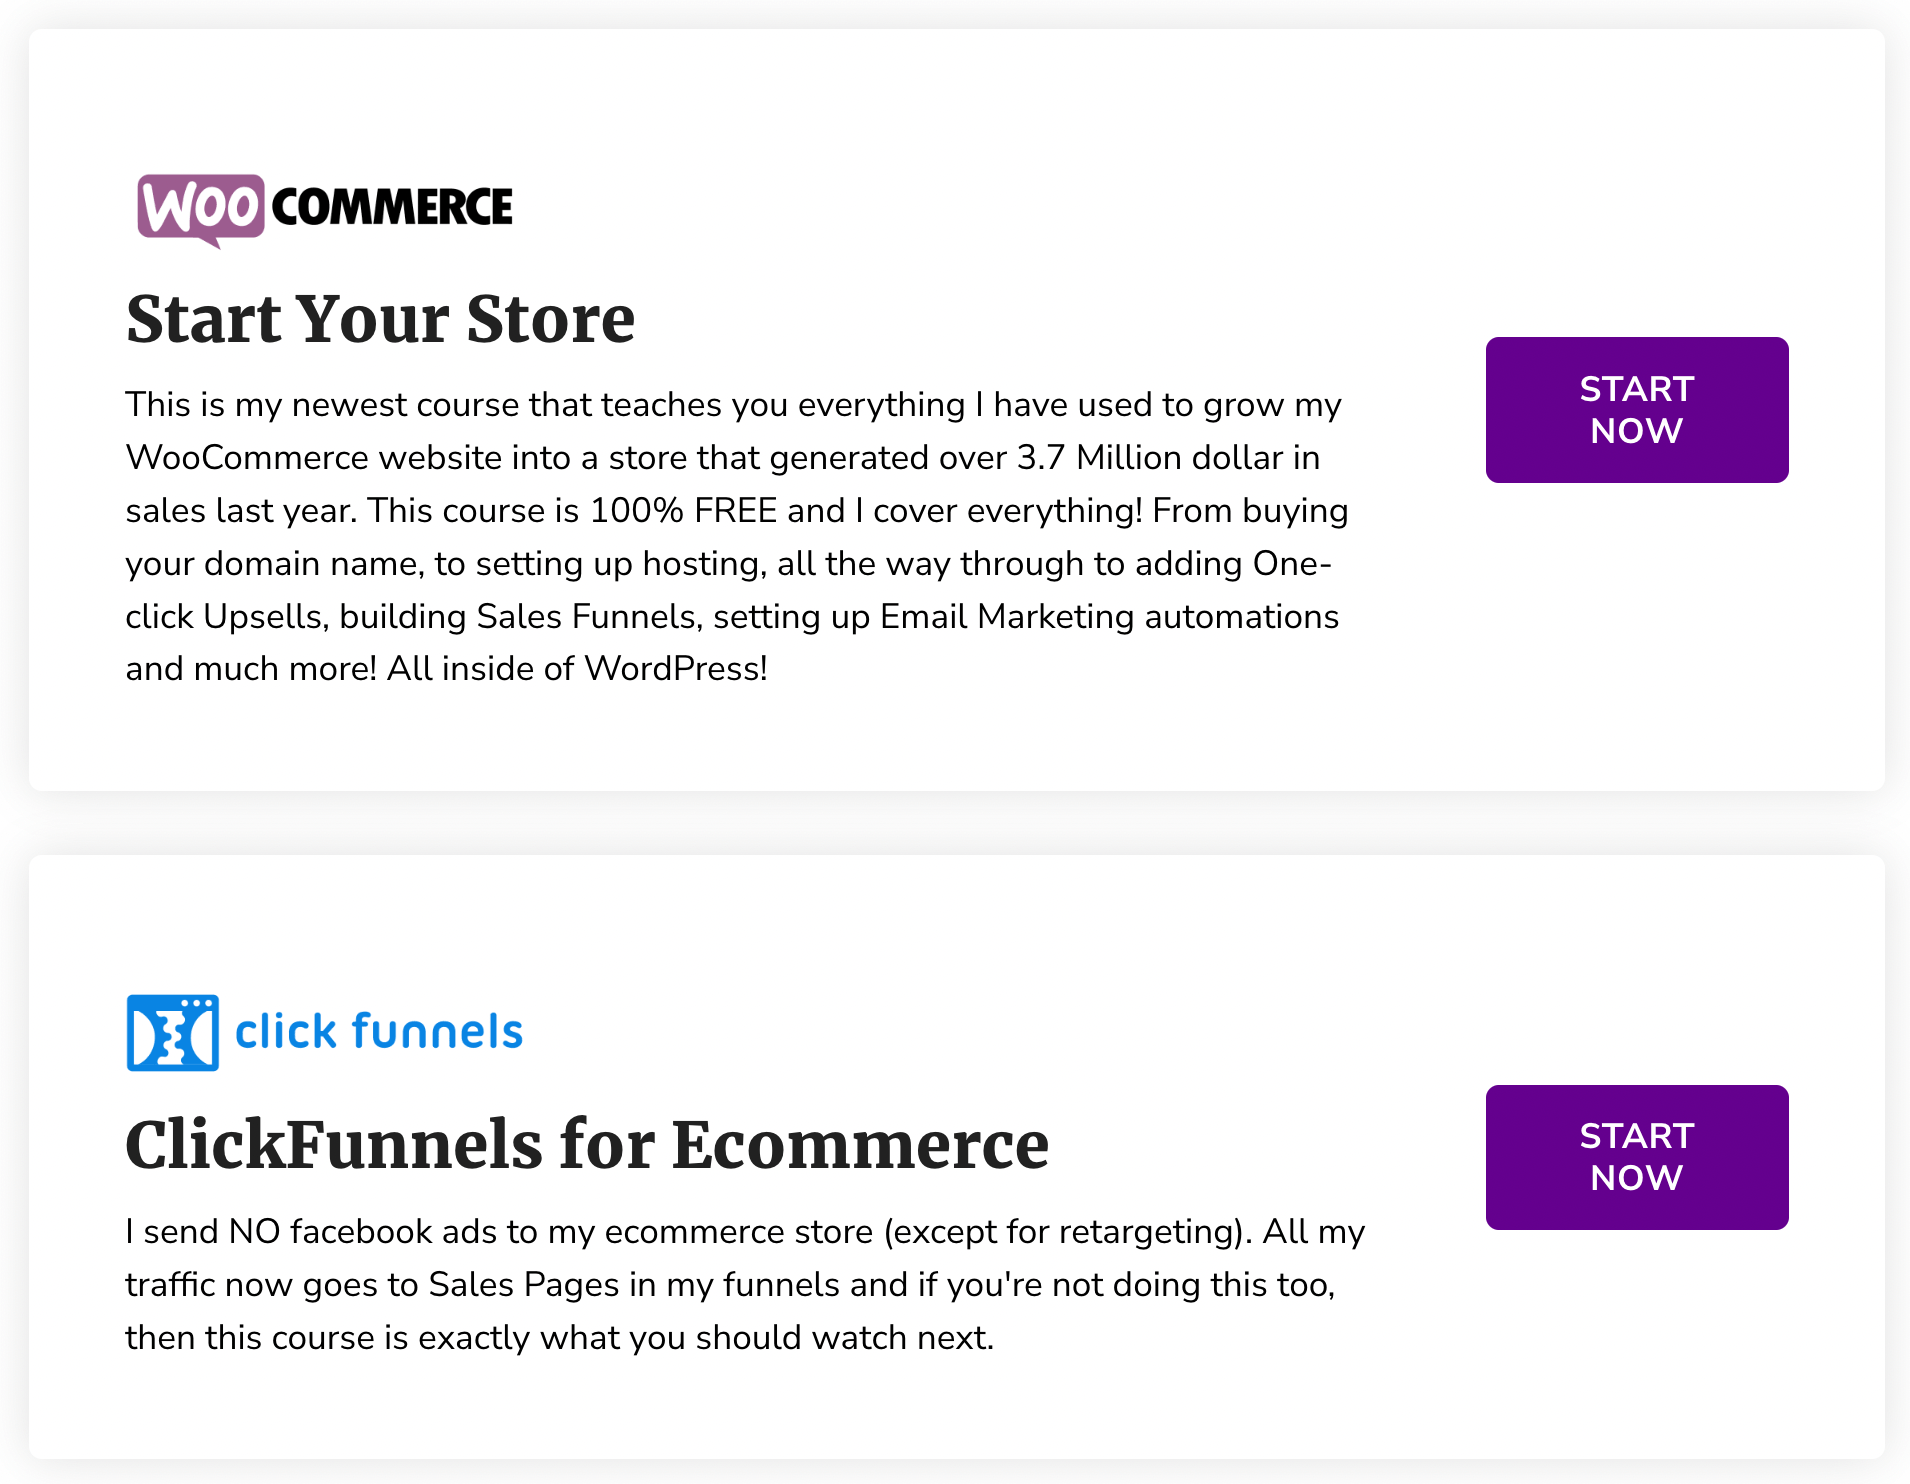
Here are some examples of where I have this currently on my website:
On my home page…

My Blog page…
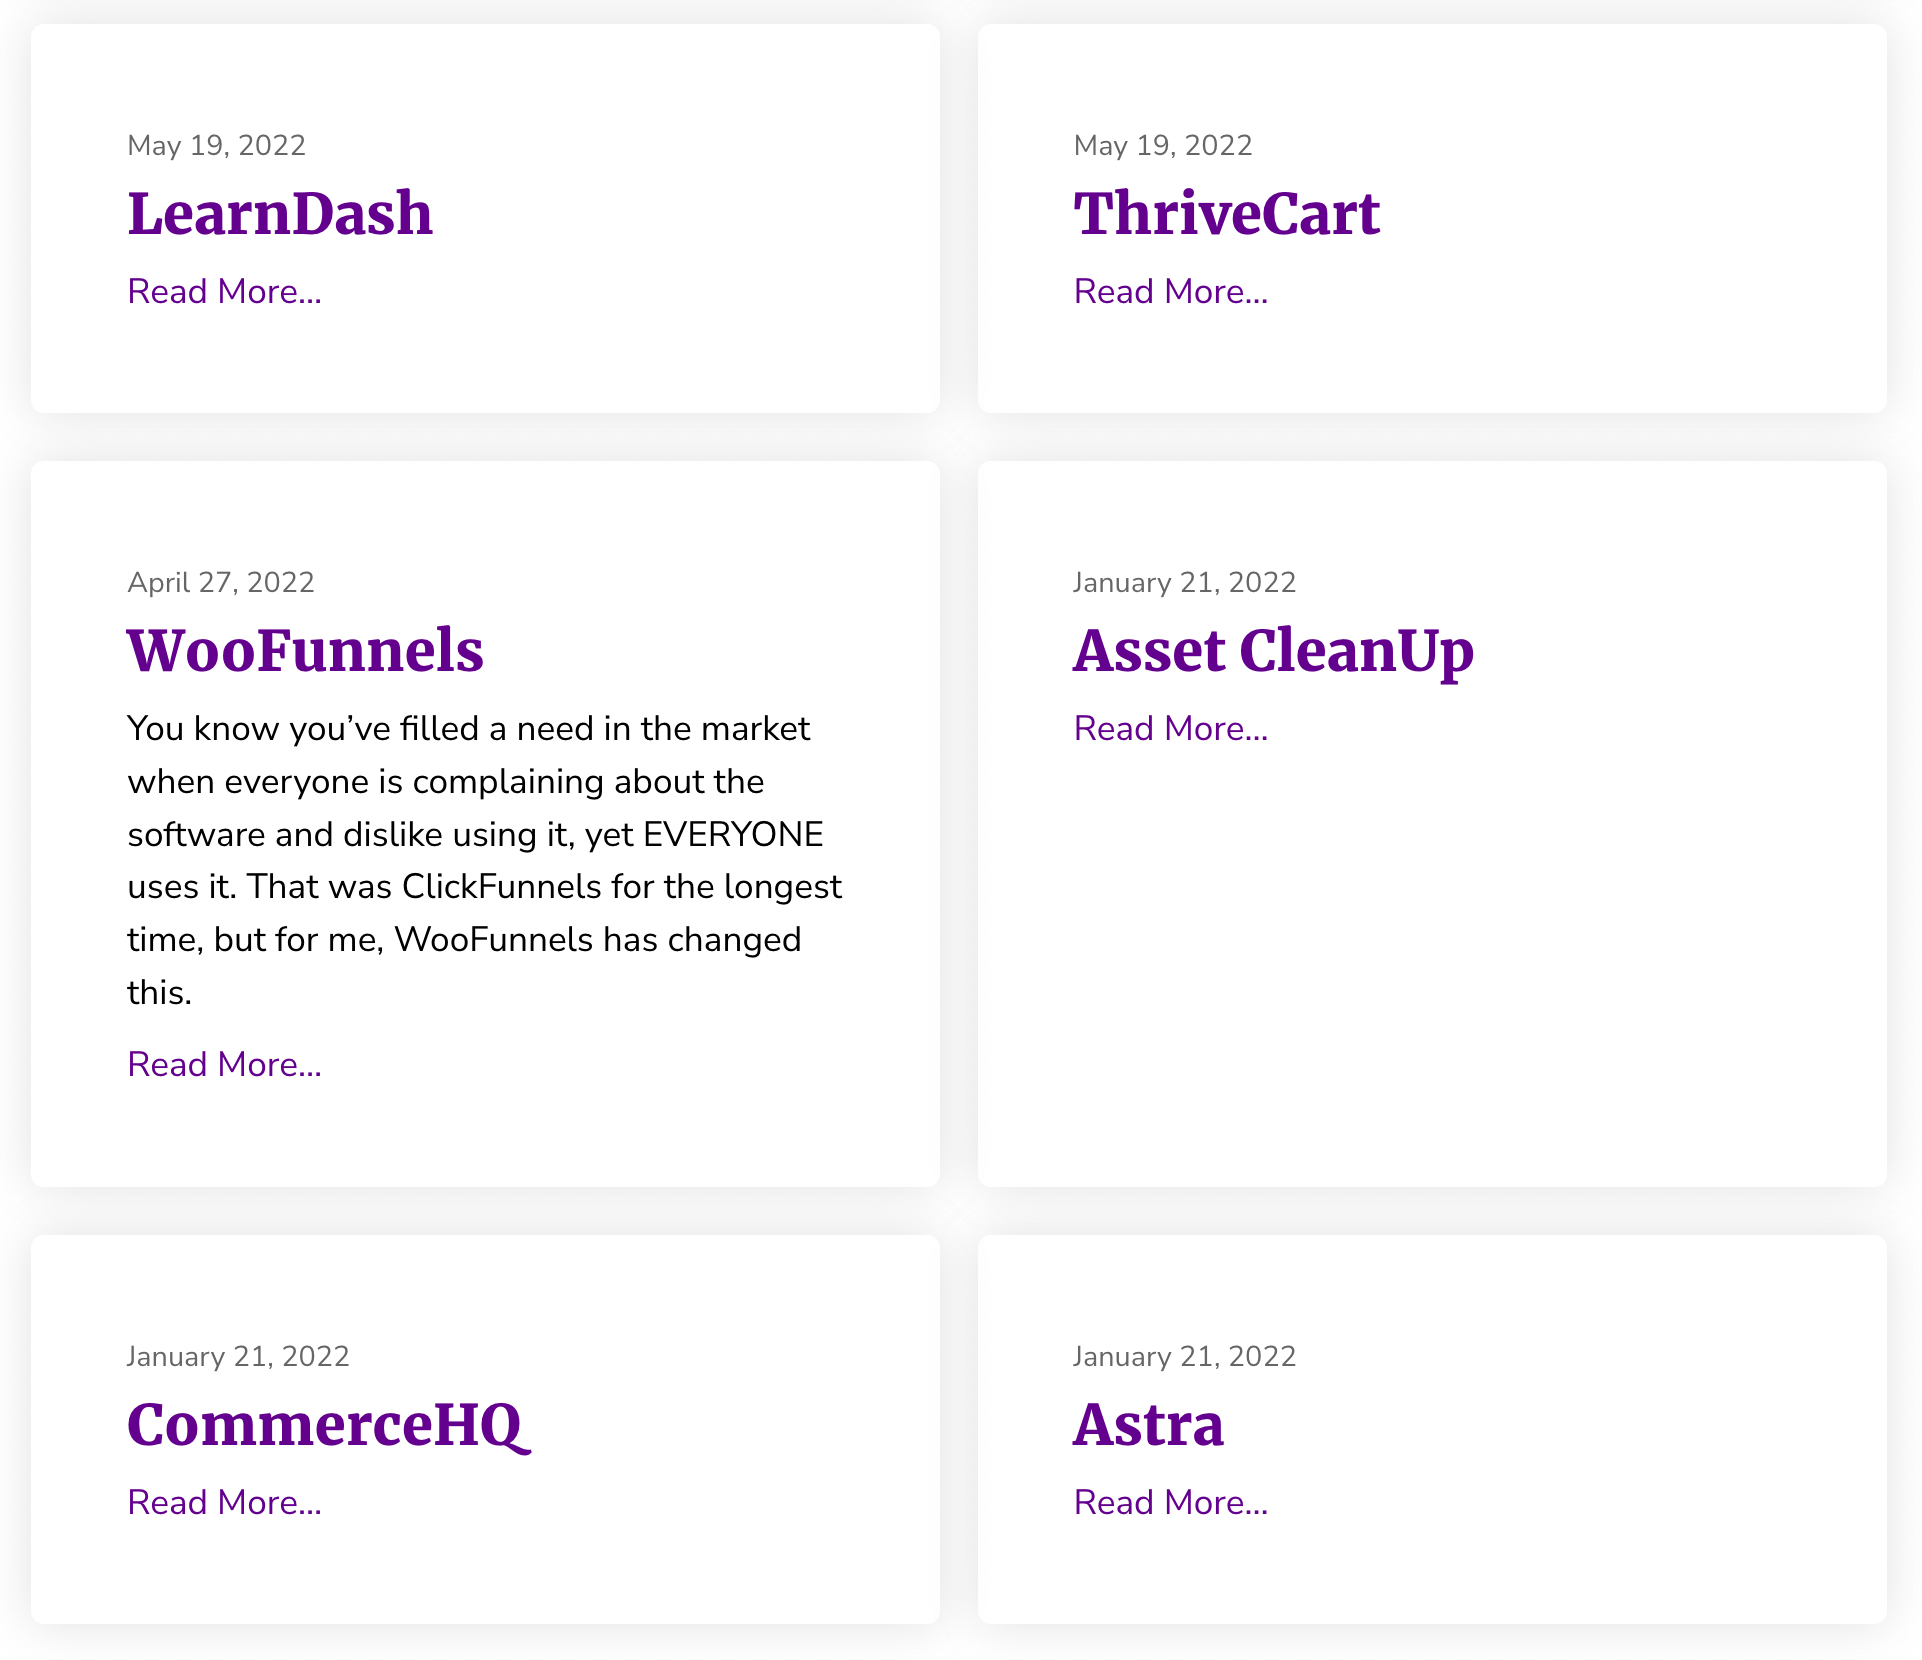
And my Online Courses page…
Coming from a web design background myself, I wouldn’t be able to go to sleep knowing that these white boxes weren’t EXACTLY the same.
The same padding, same shadow etc.
Obviously, a very easy way to do this is to style the CSS class with this styling and then add the CSS class to each of these elements.
and that’s exactly what you can do using Bricks Builder very easily.
Here is how you set up a Global CSS Class inside of Bricks Builder to keep your styling consistent across your pages.
Let’s recreate my white box CSS class that I just explained above.
We’ll add a white background, box-shadow, round the corners and add padding.
Firstly, I have gone ahead and built my page.
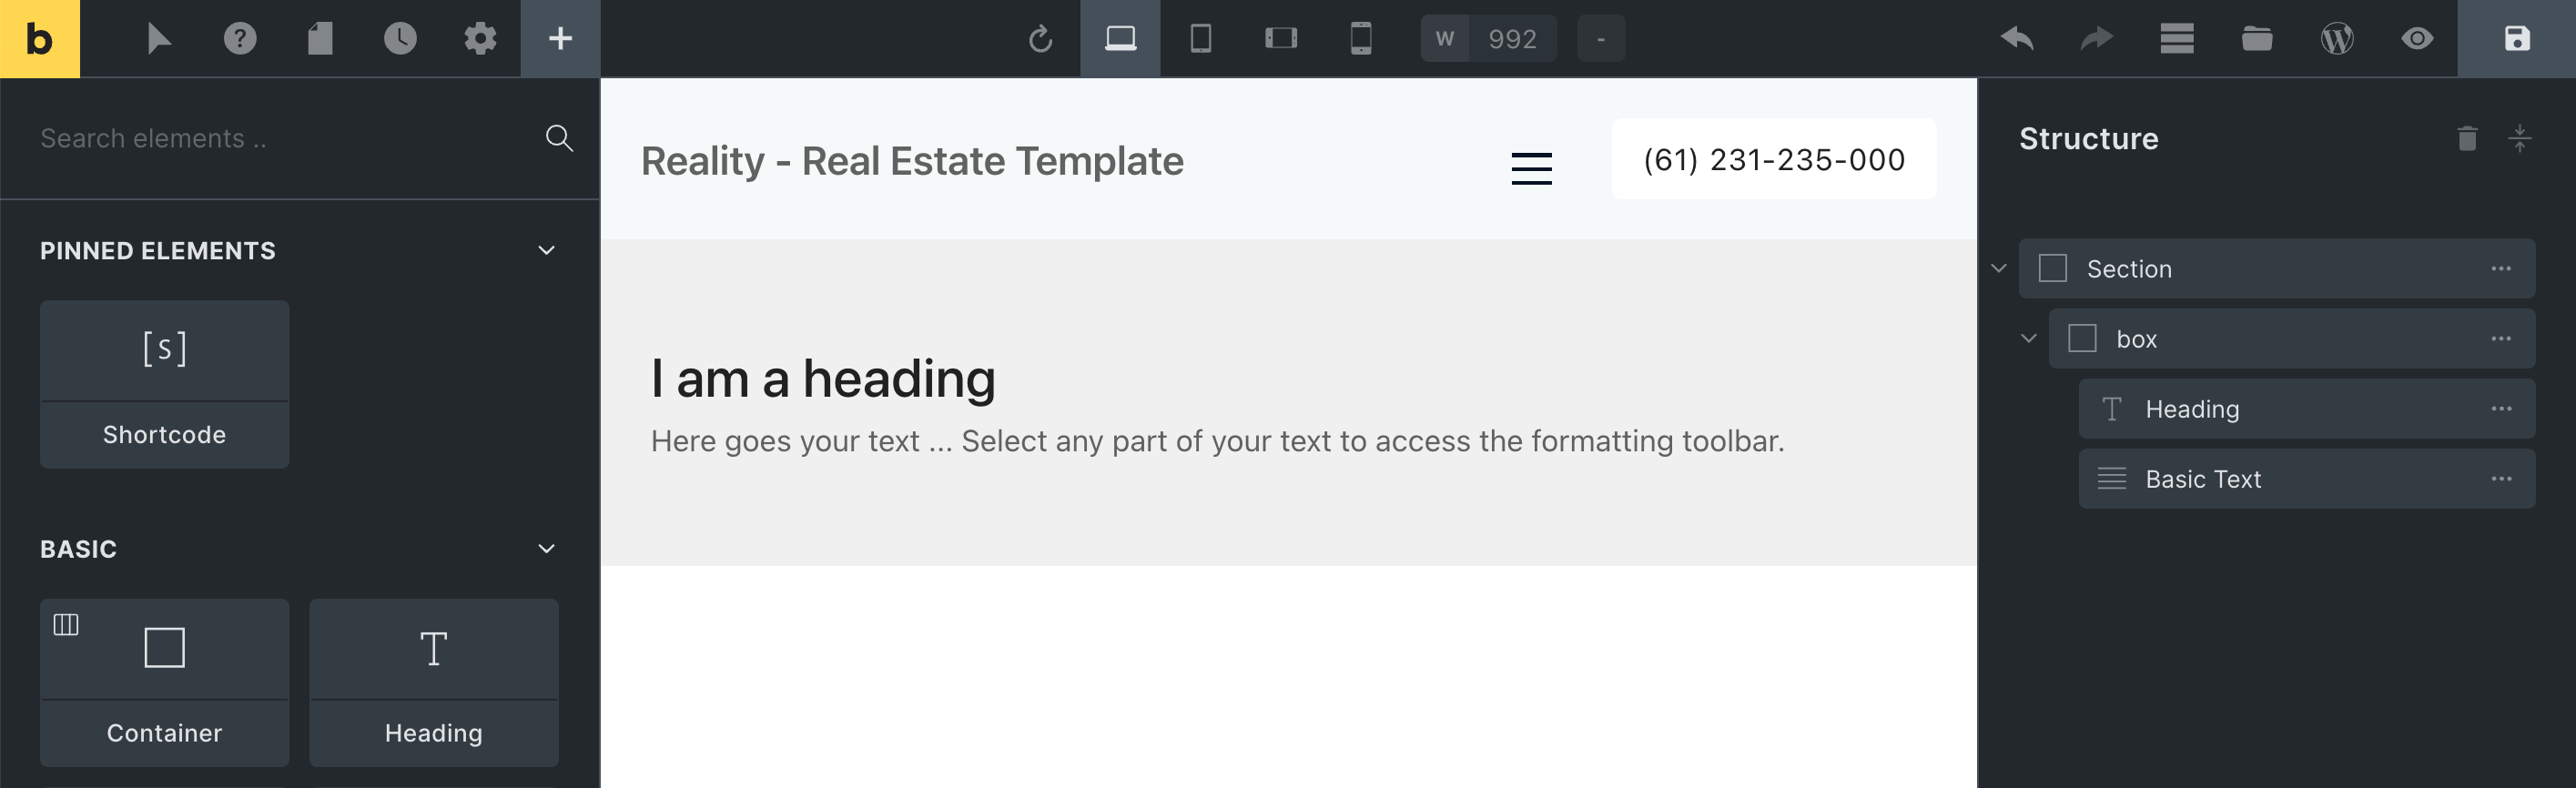
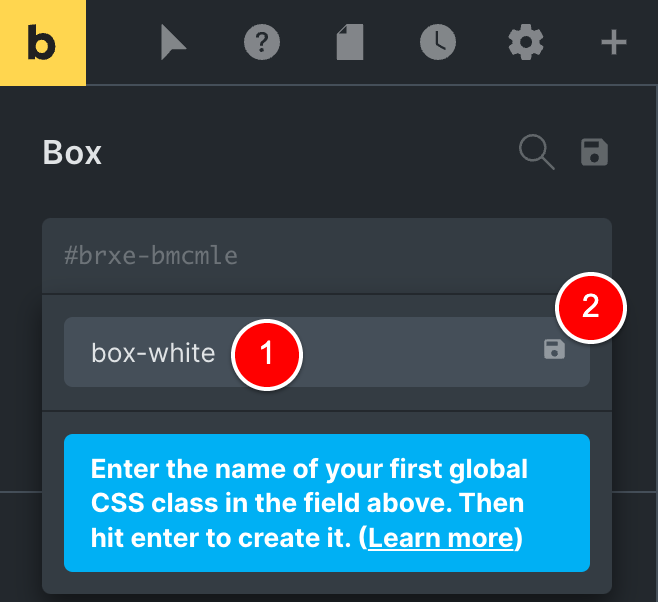
I want to style the container that says box, so I’ll click on it at (1) to select it and then I’ll click at (2) to begin creating my Global CSS Class.

Next, I’ll name this global CSS class box-white and then I’ll click the Save icon at (2) to create the new CSS class.
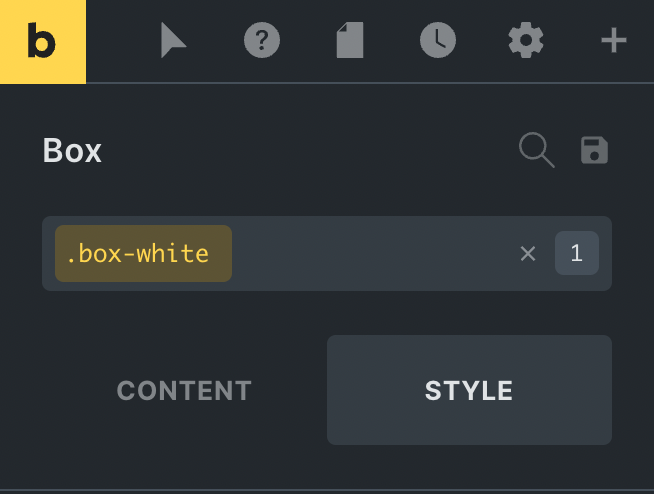
Bricks will then create this new Global CSS class and select it, ready for us to edit.
This is shown in the below image, where our new CSS class is in yellow
Now, any changes we make through styling are saved to this global CSS class.
While editing the Global CSS class box-white shown at (1), I will set the background-color for this box-white CSS class to be white, as shown at (2).
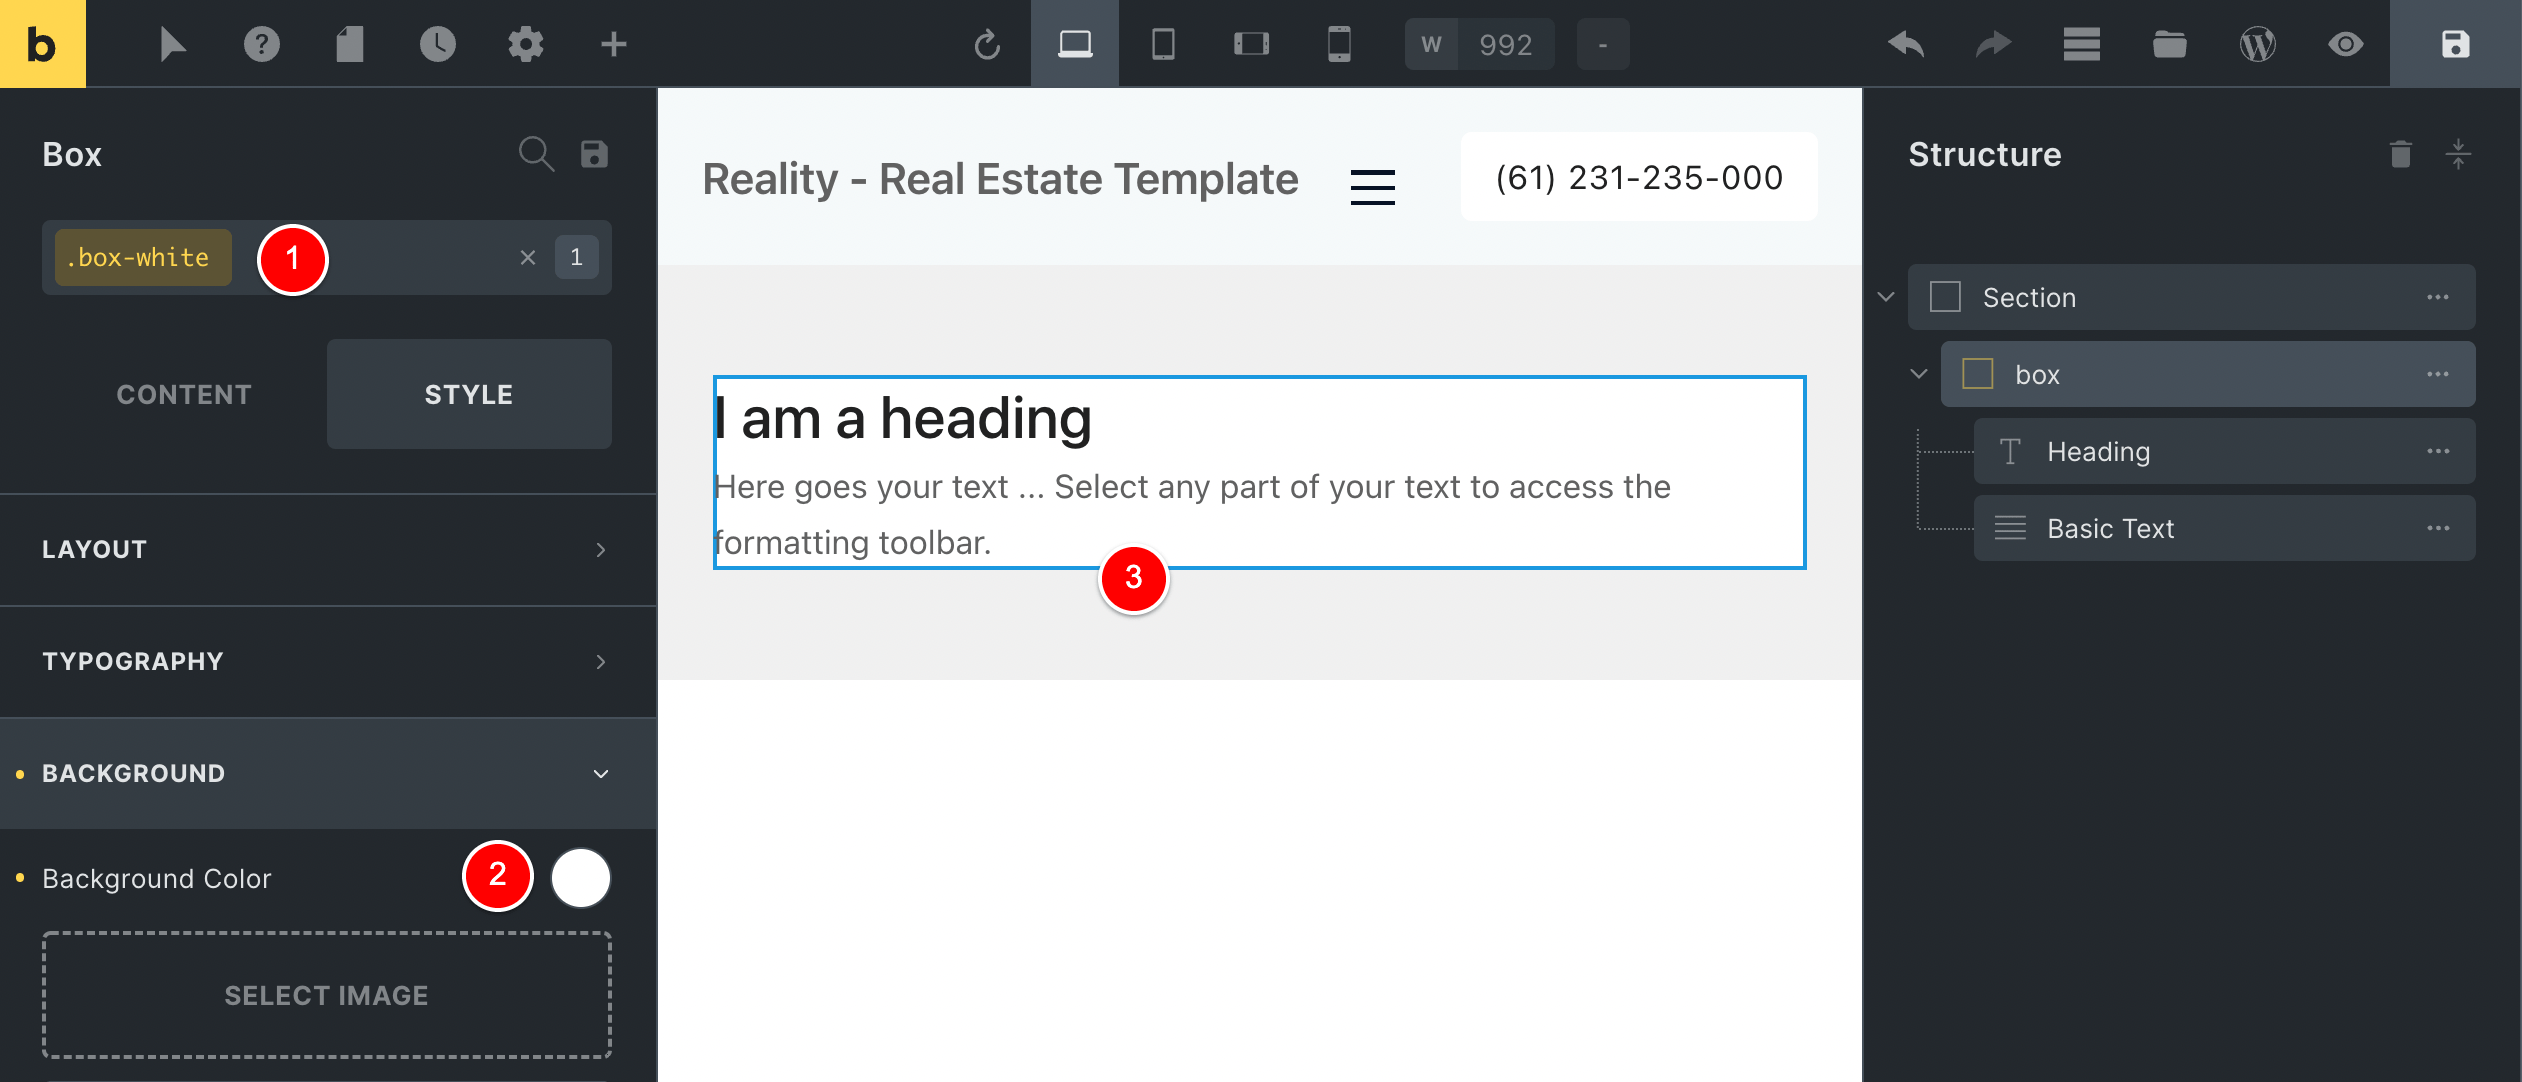
You will notice that at (3) above, the container named box updates also in our editor because we have applied this global CSS class box-white to this container.
I’ll go ahead and add some padding to this box-white global CSS class.
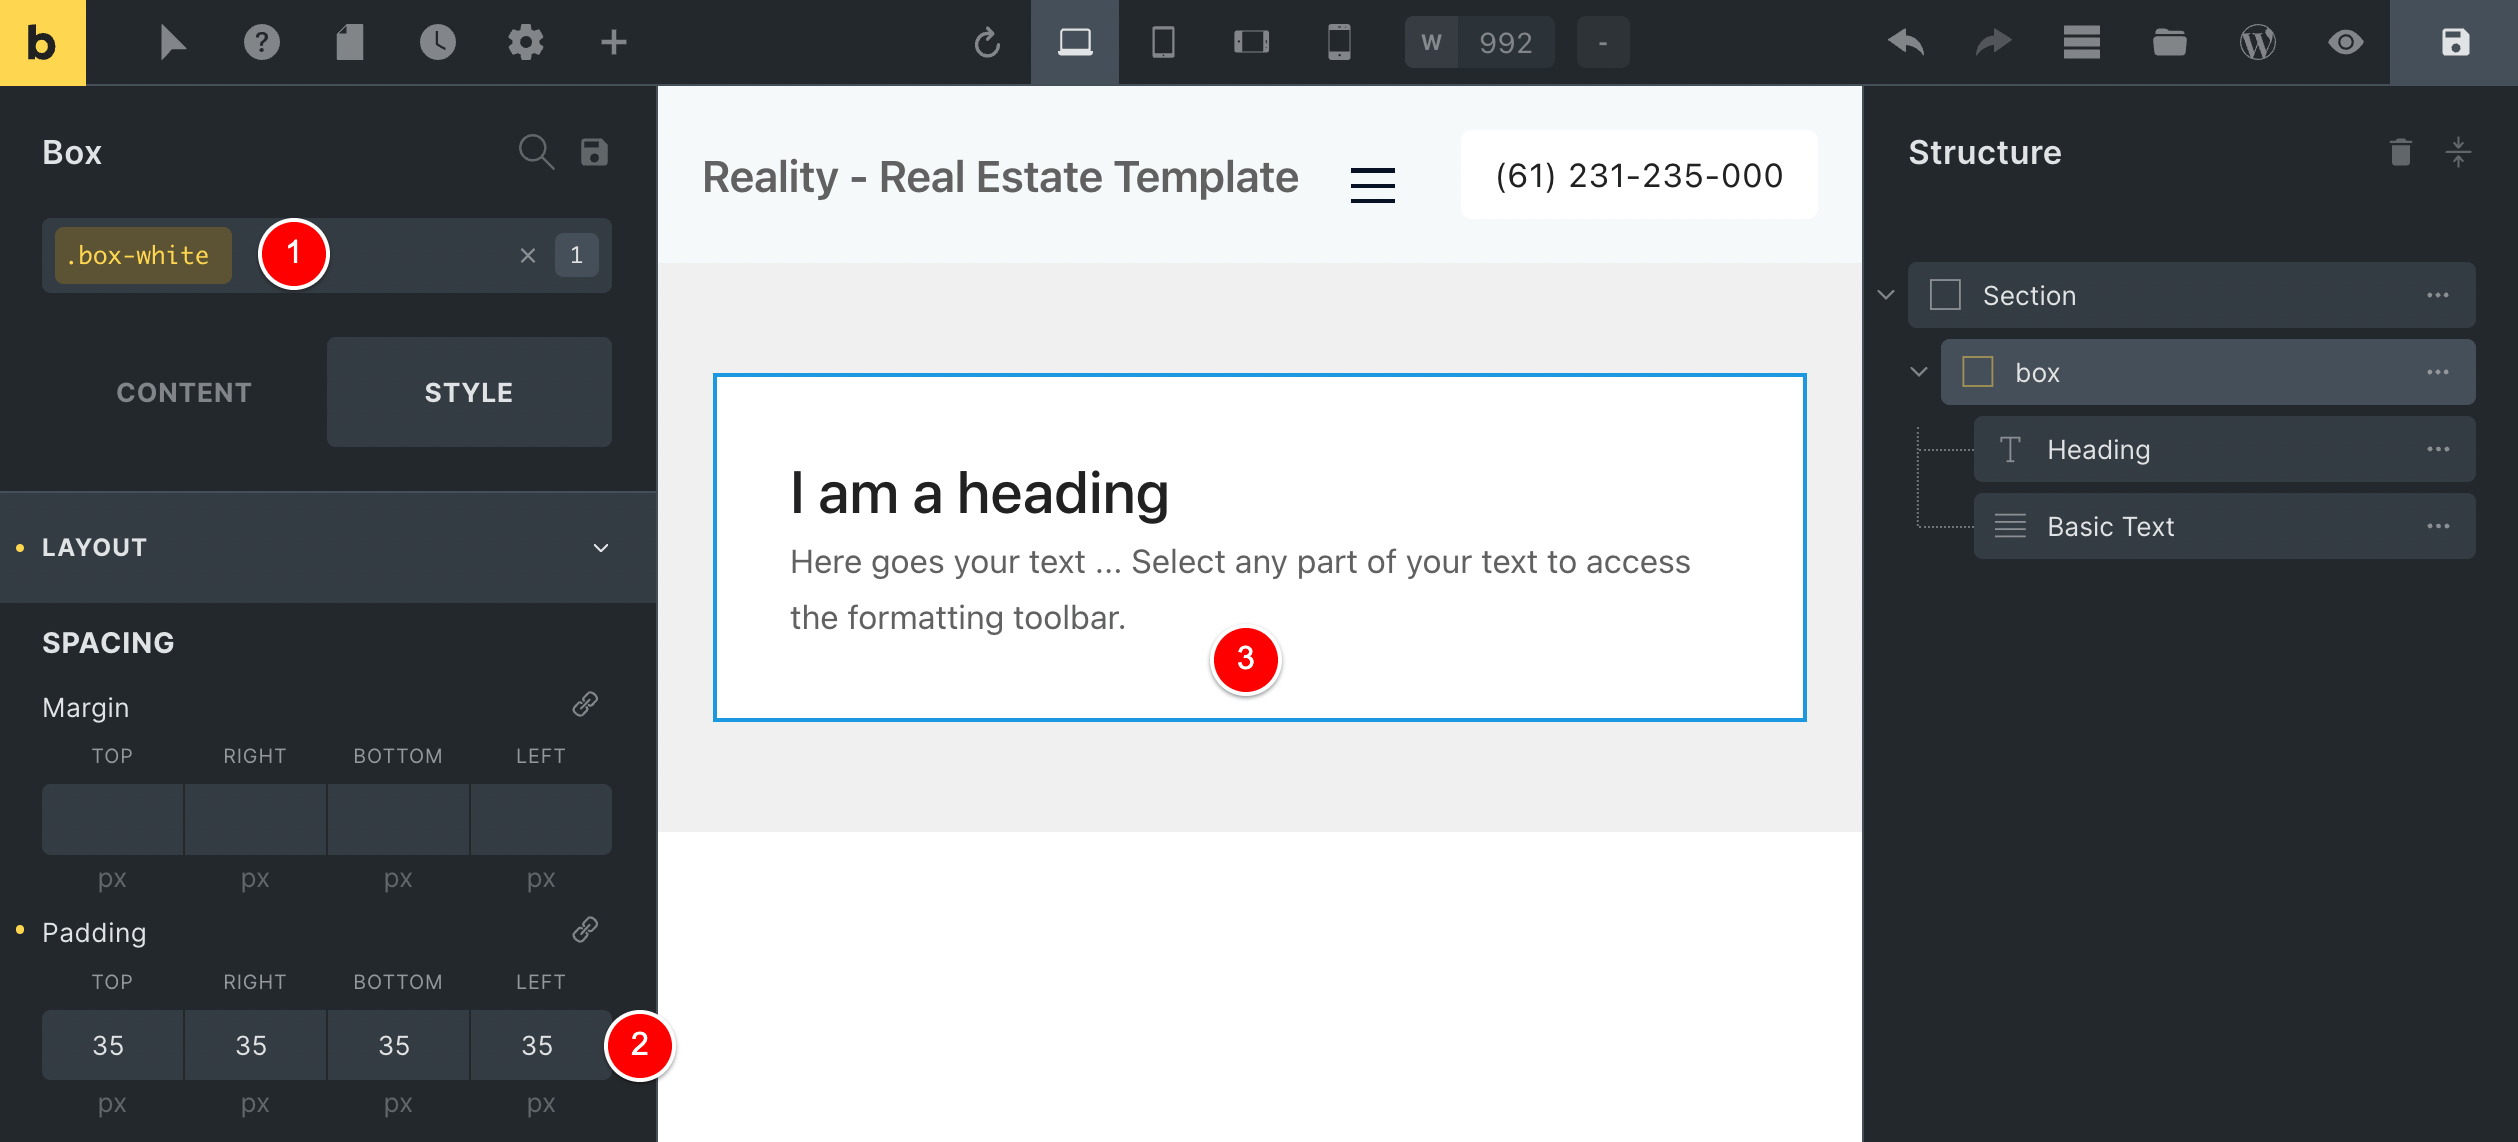
Lastly, while still editing this CSS class (1), I added the rounded corners and box-shadow.
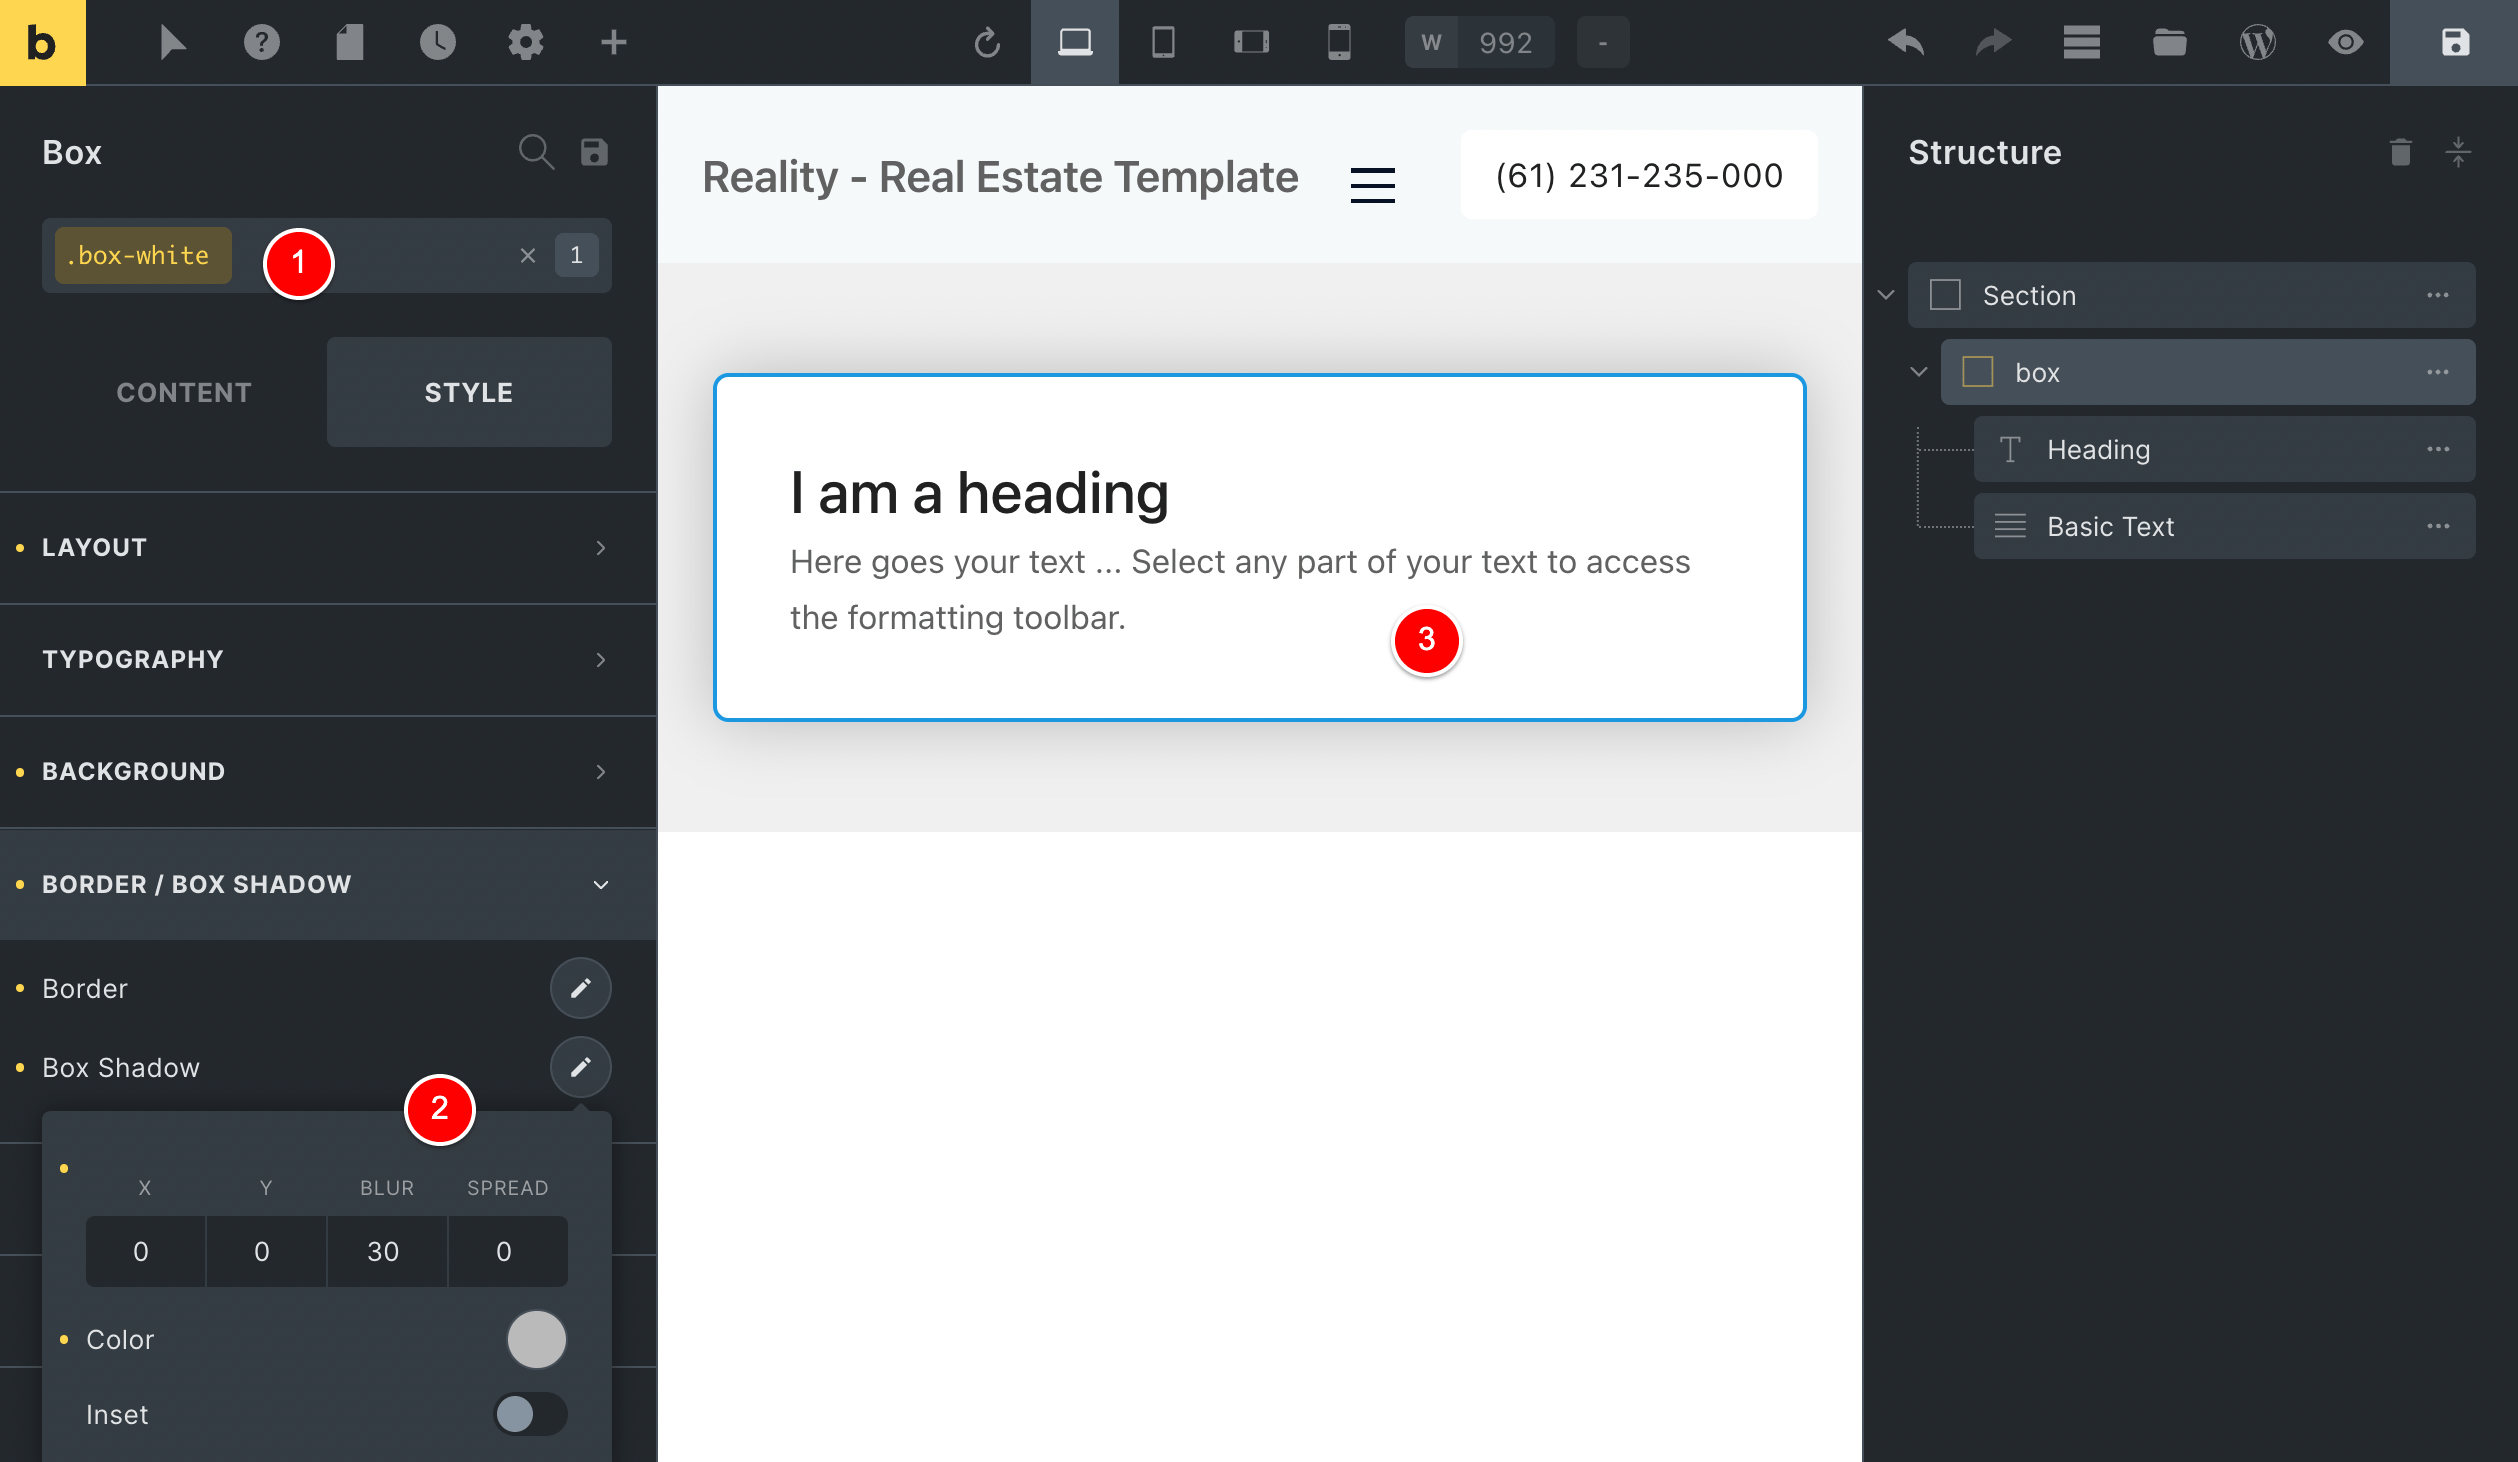
Now that we’ve defined the styling for this global CSS class named box-white, we can apply this CSS class to any elements on our Bricks pages and it will take on this styling.
So, if I create a second section (shown with a yellow background below), I can click on the element I want to apply this new global CSS class box-white to at (1), then click at (2) and select the global CSS class at (3).
Once I do that, box 2 now takes on our styling, as shown below.
If I ever want to do something like make the drop shadow less noticeable, all I need to do is edit this global CSS class and it would update everywhere on my website.
All without having to write my own CSS code.
Trust me – you’ll use this feature ALL THE TIME and love doing so.
You can reorder items on Mobile devices using Flexbox
This section carries on from the section where I discussed why it’s great that Bricks uses the Flexbox system to layout content.
In that section, we focused mainly on how Flexbox creates less HTML code on the page and requires less CSS to lay items out, thus your website will load faster.
BUT – In this section about Flexbox, we’re all about design.
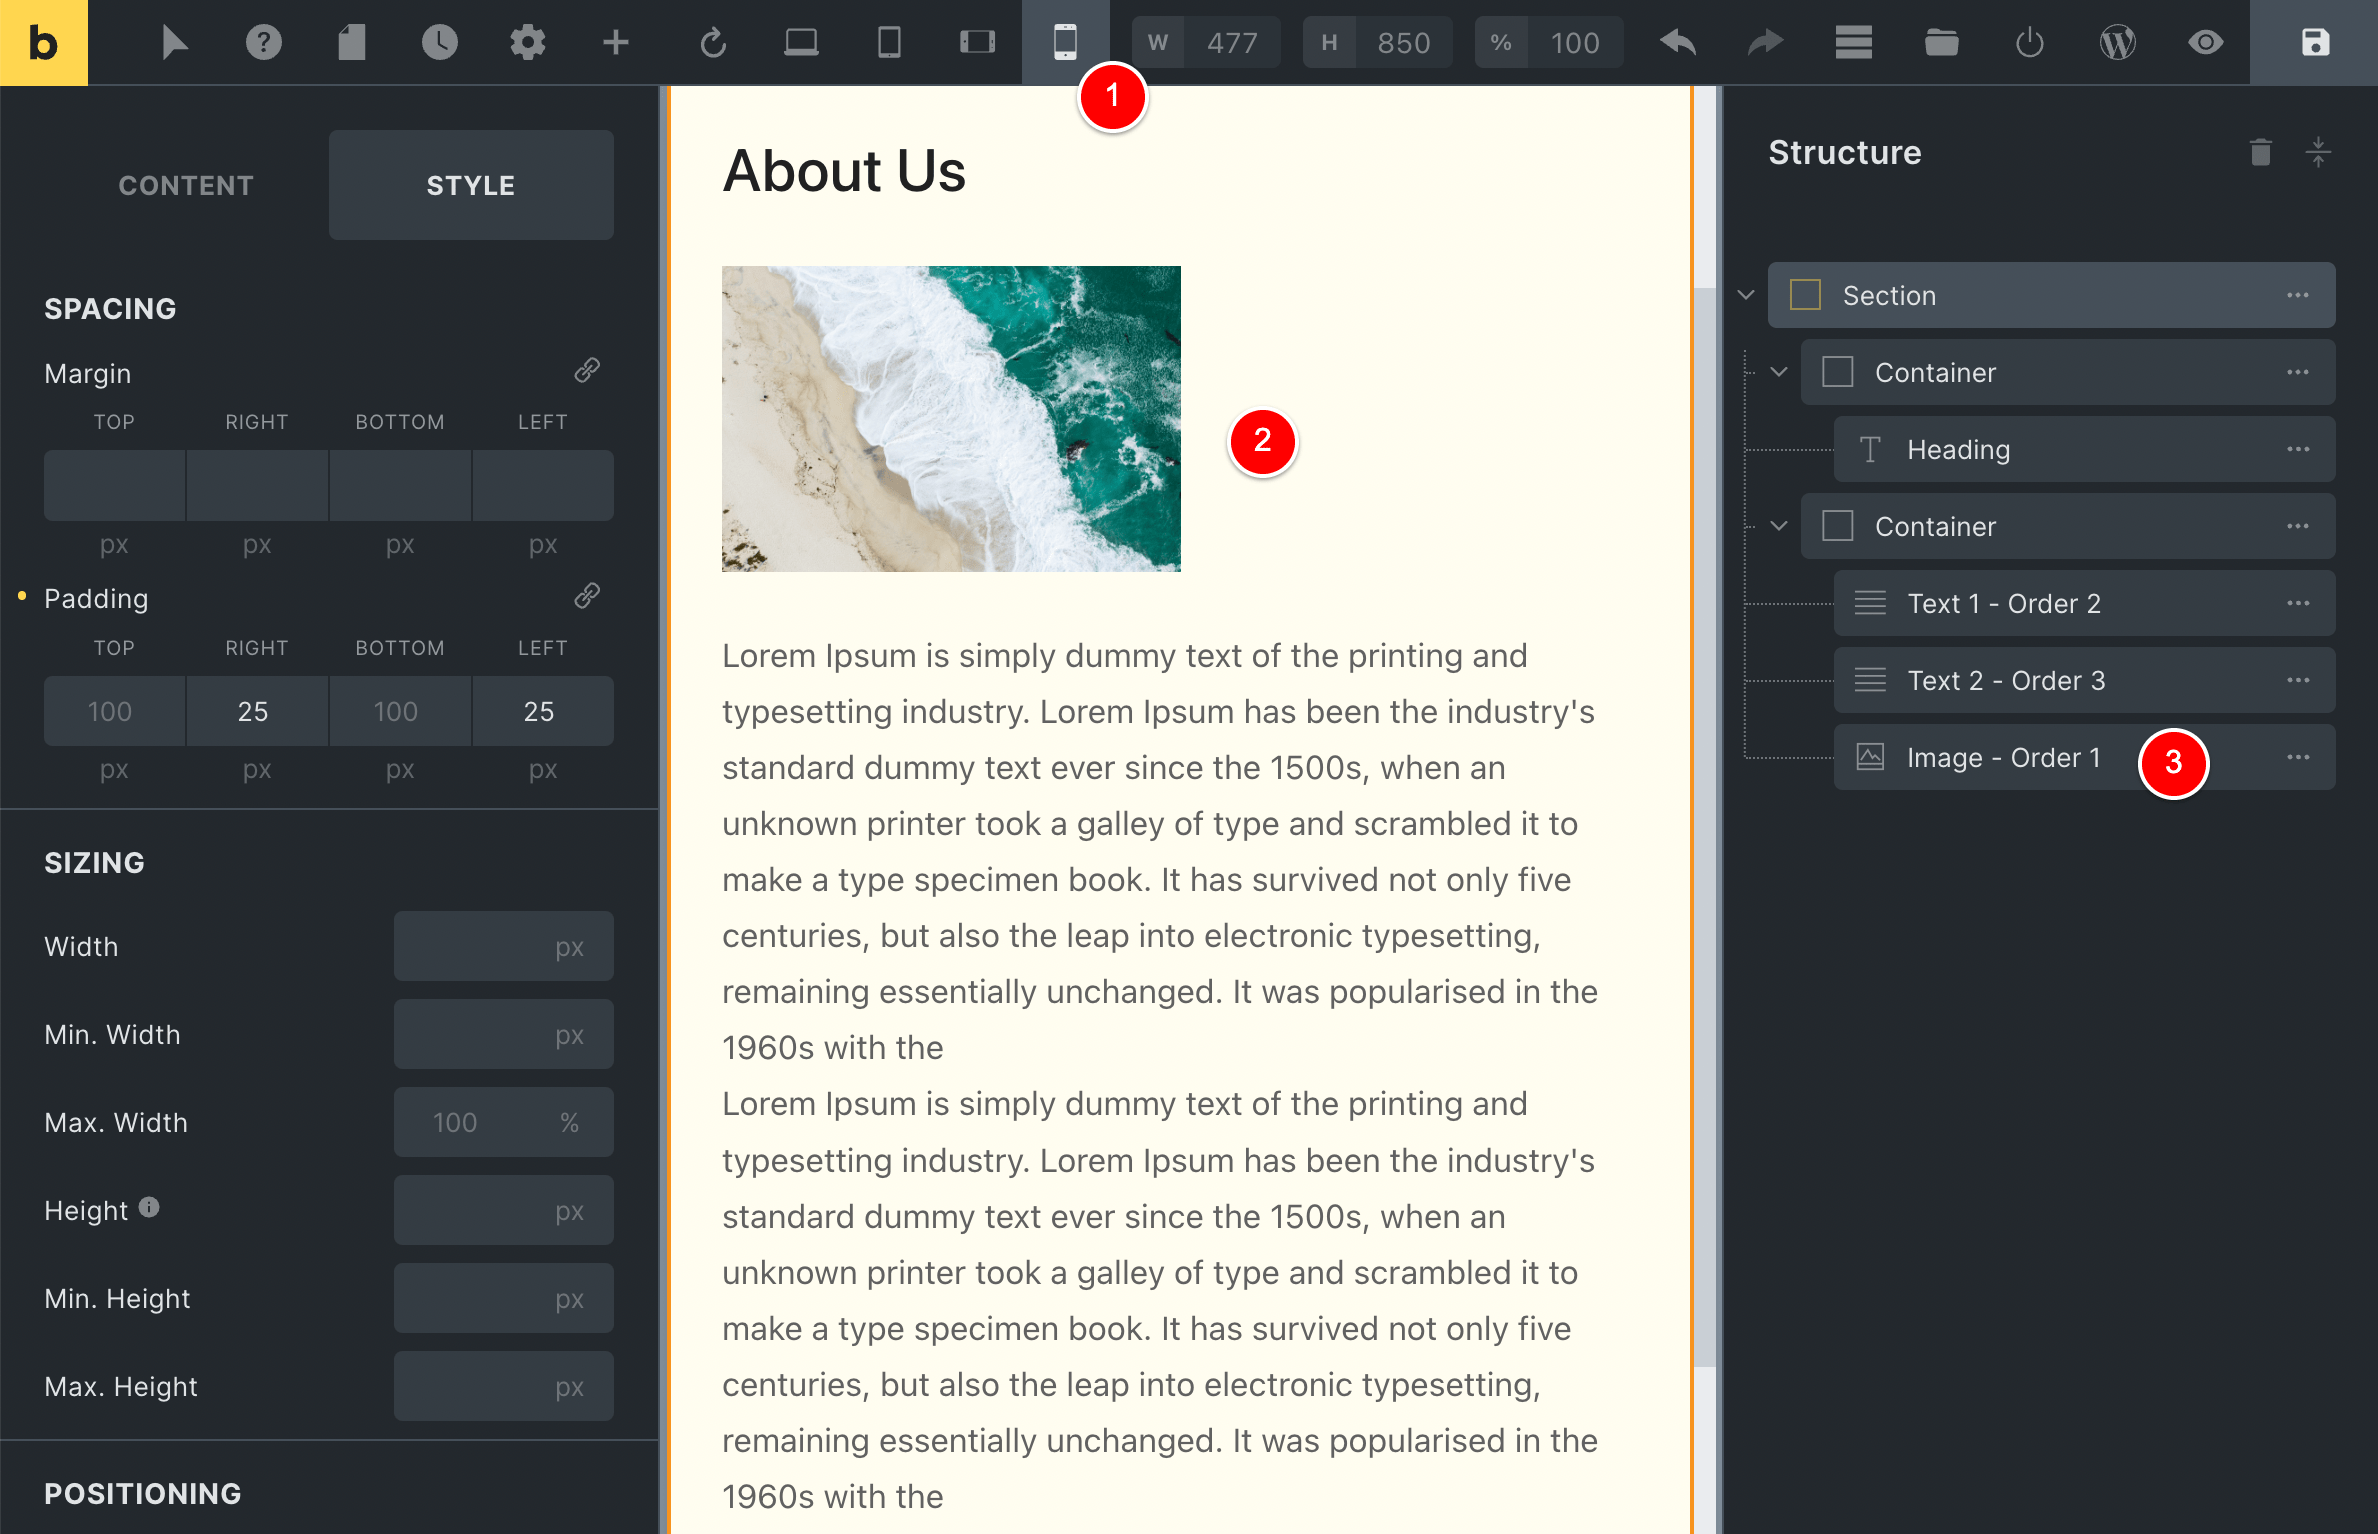
In the below image, I have my page that I’ve designed using Bricks.
I have selected the Image element selected at (1) and its default value for Order is set to 0 as I haven’t specified that I want to change the order of these items.
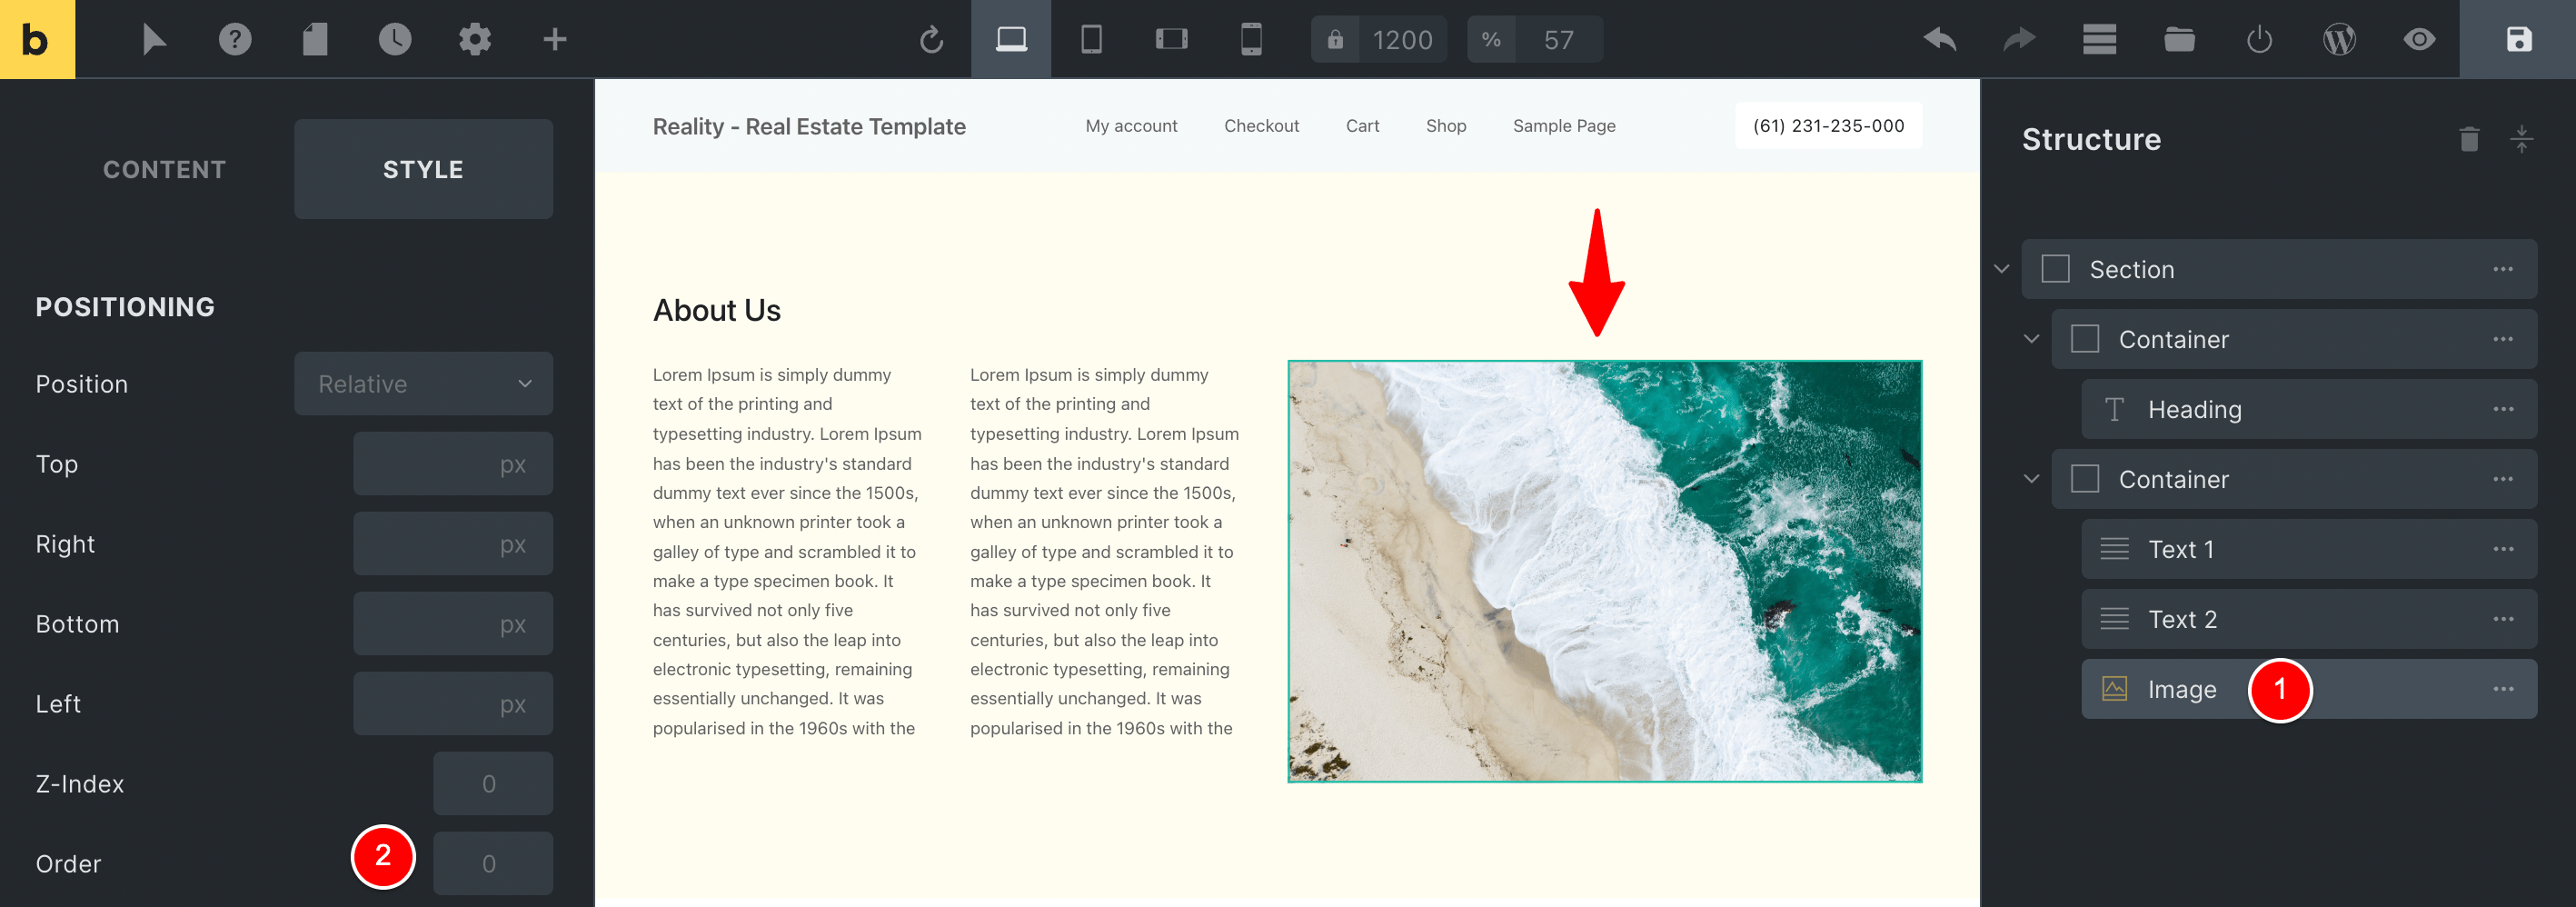
Now, if I go ahead and set the Order for each of the 2 paragraphs and the image element, I can do something like the below where I move the image to the first spot on the left, and then swap the paragraphs around.
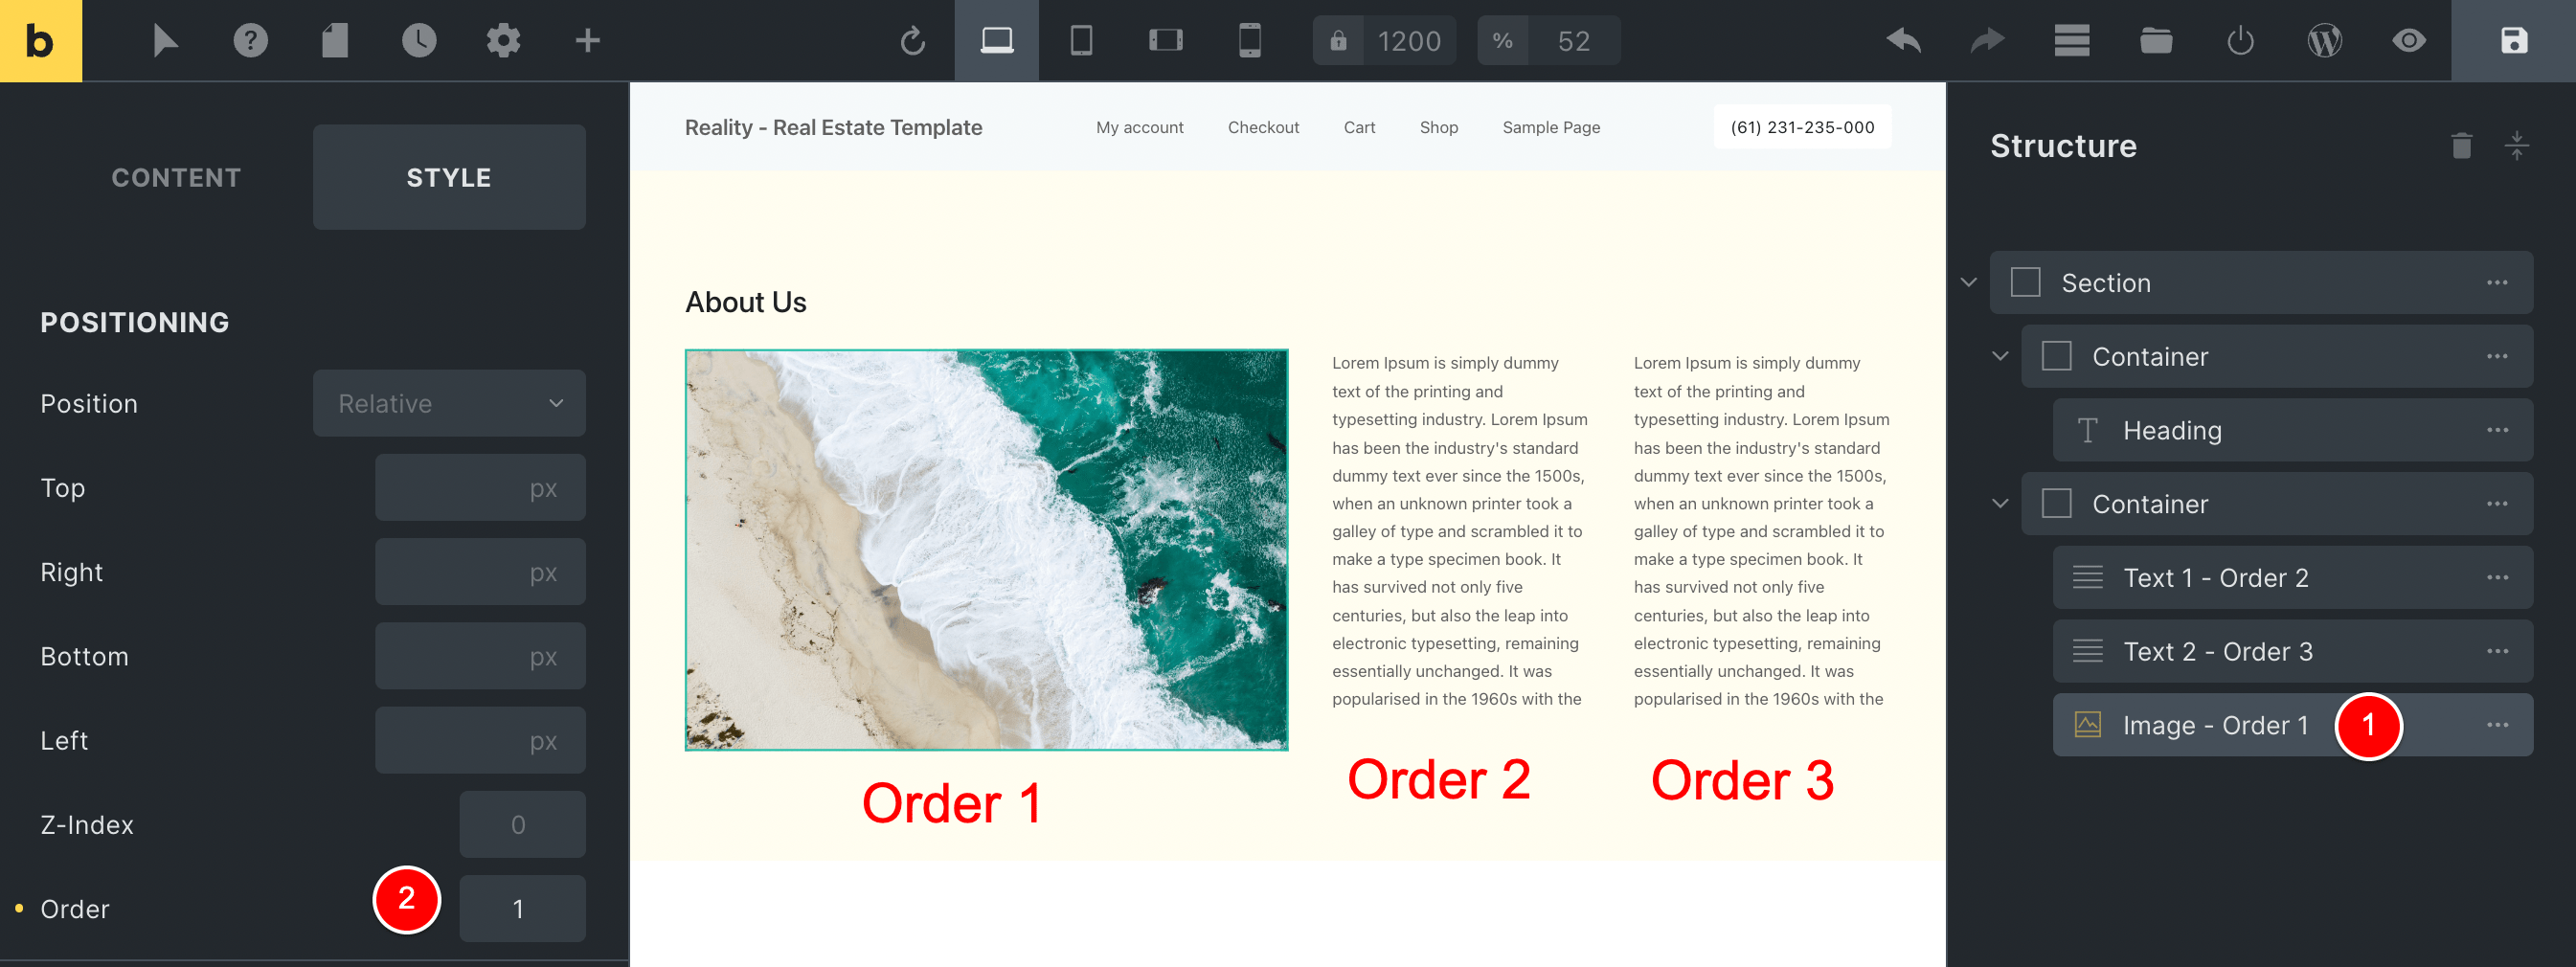
What I mean is – notice in the above image that in terms of HTML, the image is actually still in the last position here (third) as shown on the right at (1)…
But by changing its order to 1 and then the paragraphs to order 2 and order 3, I am able to rearrange how these elements are displayed on the page.
It’s extremely easy and I find that I use this quite often for mobile devices.
For example, maybe I want the desktop to look like this…
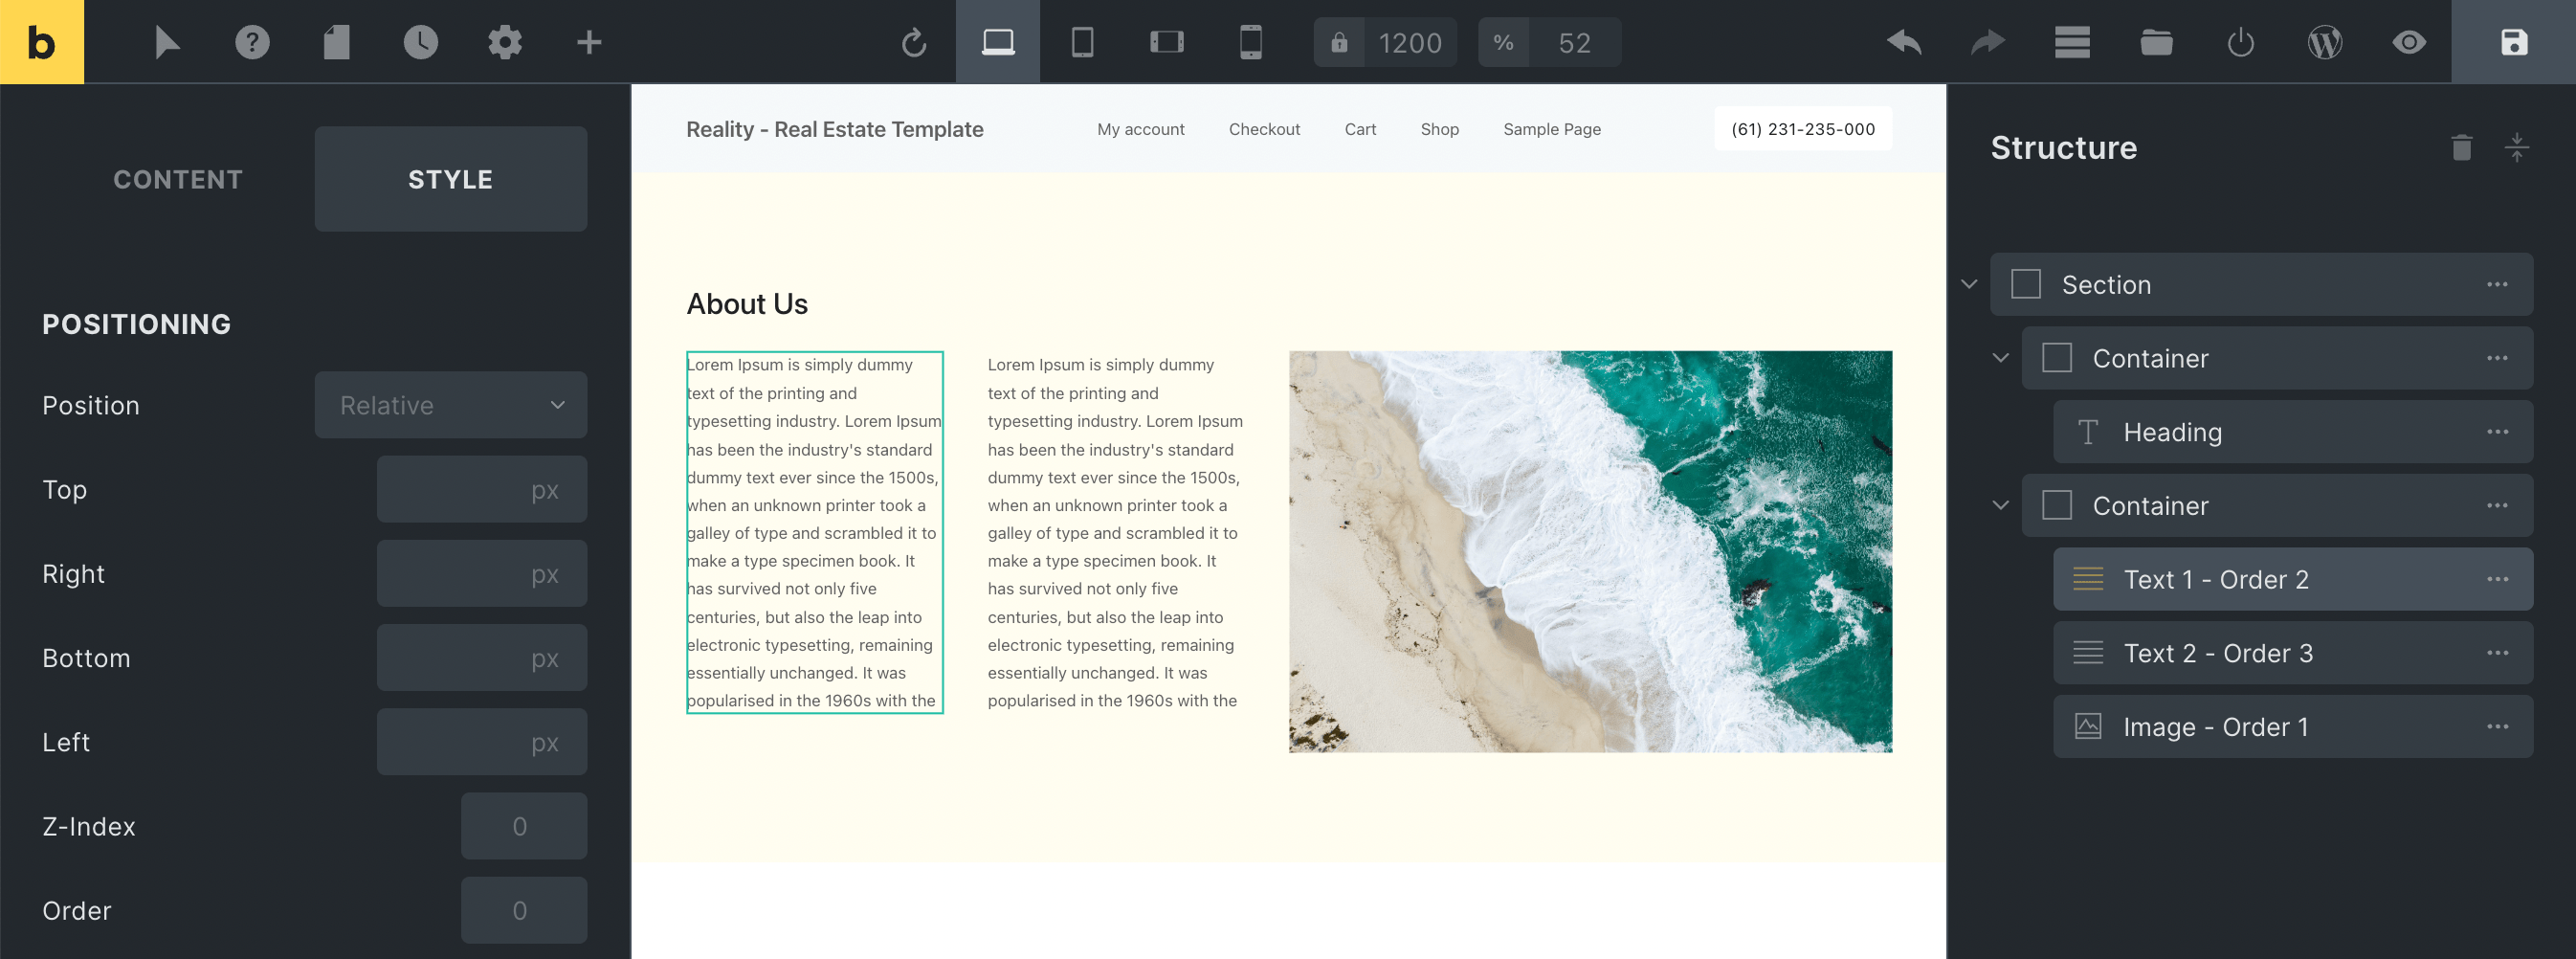
But on mobile phones, I want to put the image first under the About us heading like below…
As you can see in the above image, I was easily able to do this using Bricks for WordPress.
At (1) you can see am previewing the mobile mode and the image is showing under the heading at (2), even though it is still in the HTML after Text 1 and Text 2.
All I did was change the Order value for these and put the image’s Order value to 1, and the Text 1 to Order 2, and Text 2 to order 3 (so it showed last).
The FASTEST Page Builder for WordPress that I have ever used.
Web Developers will love the advanced features of Bricks
Bricks Builder has some really cool features for those who want to write custom loops and take more control over their website and how it functions. Here are some of my favourite things I found while converting my website from Beaver Builder to Bricks…
How to define Secondary Queries
Let’s say there are two categories of people
- Web Designers who would love to convert their designs to a WordPress website so they can sell websites at a higher margin, but they don’t know how to code in PHP/CSS/JS. But they can use a UI to create a loop if the ability is there.
- Web Developers who know how to write PHP and custom query loops, so their main goal is to be able to write loops faster and design the output quicker.
Whether you fall into camp 1 or 2, Bricks Builder’s Query Loop builder is going to help you.
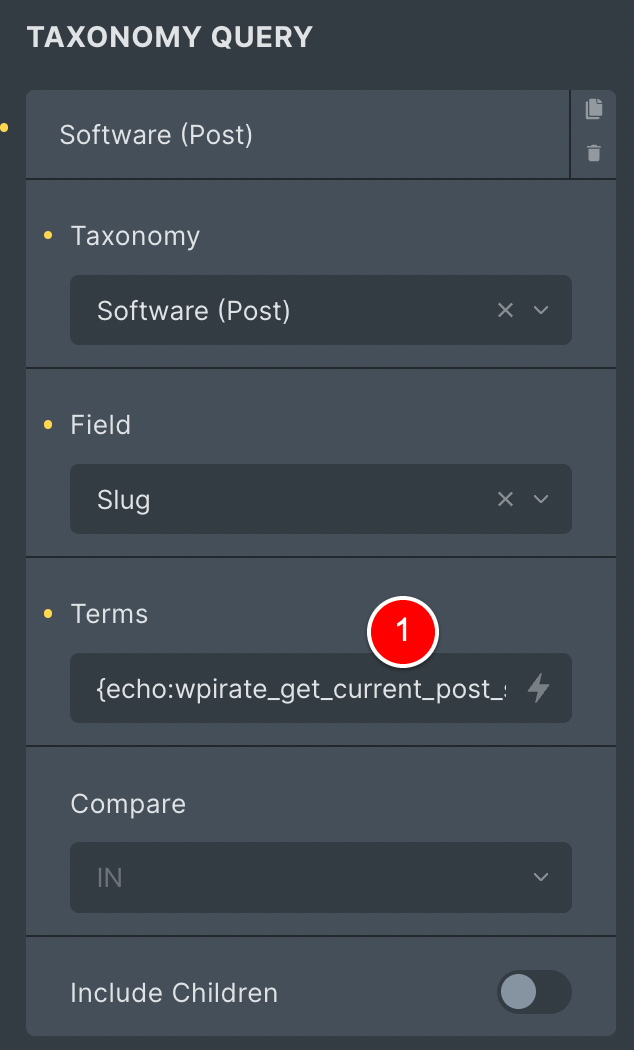
On my blog website wagepirate.com, I wanted to output a list of WordPress posts that were from a specific taxonomy.
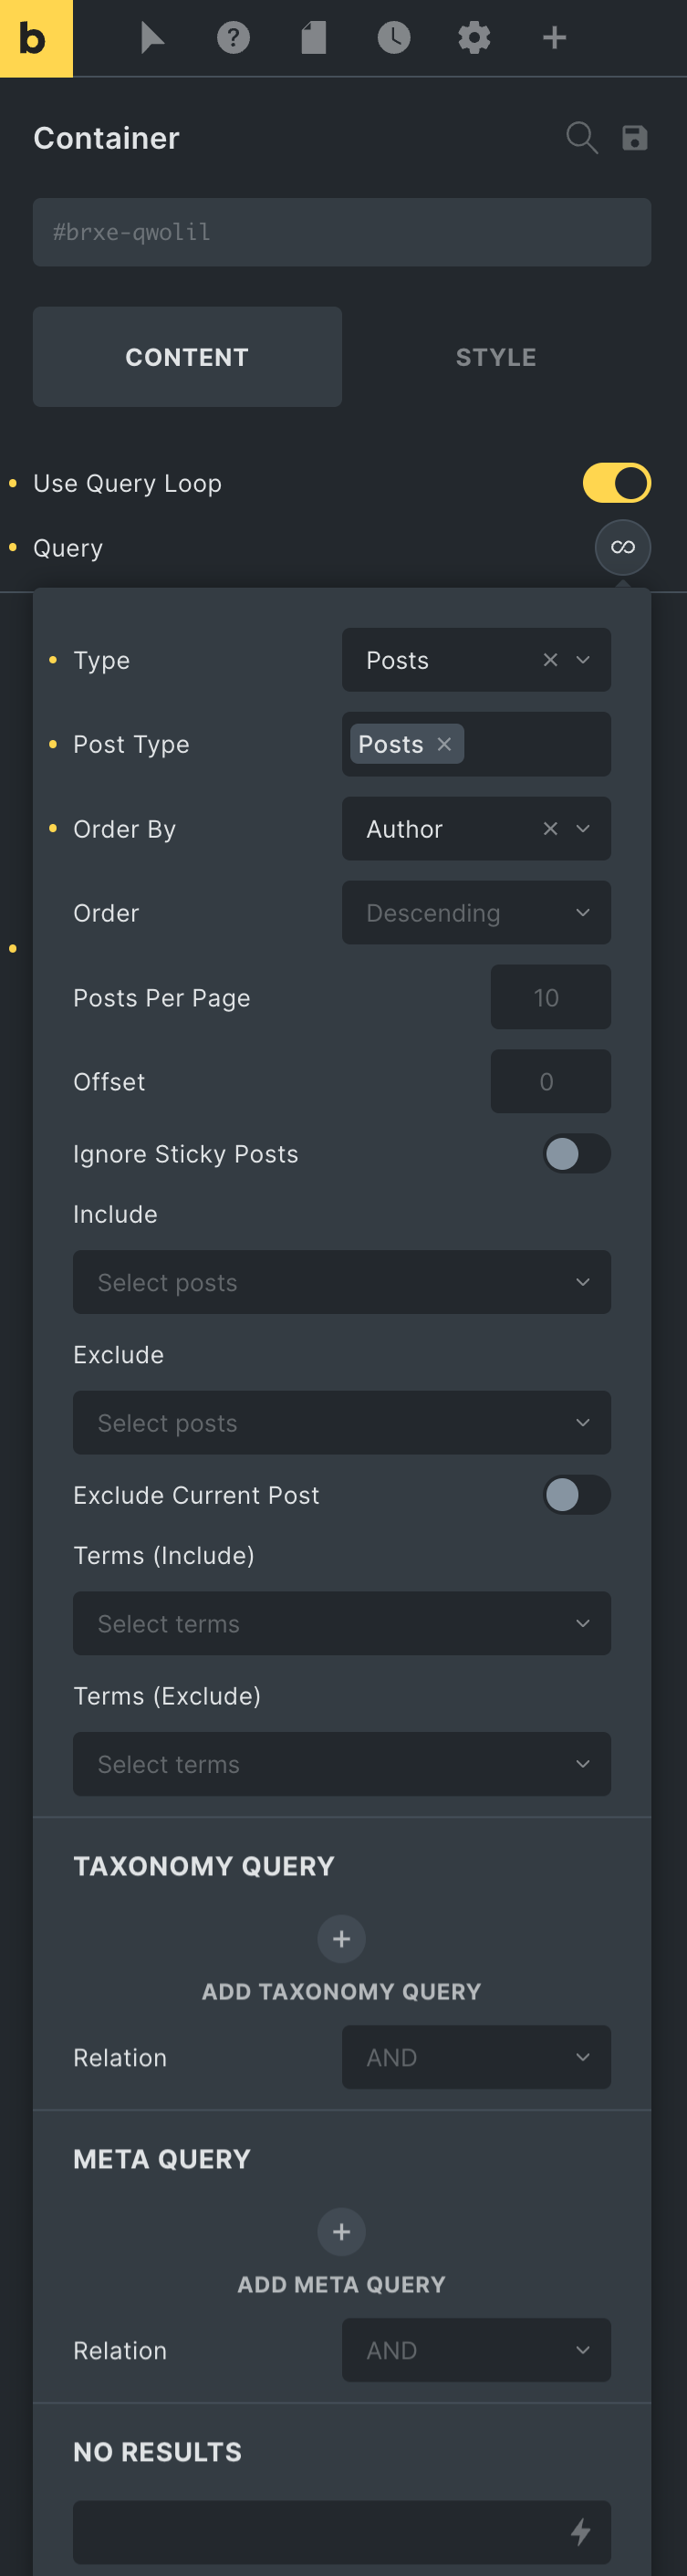
To create my custom query in Bricks Builder, I select my Container element named post item, shown below at (1).
This item is your loop item, so this Container is what is repeated in our loop.
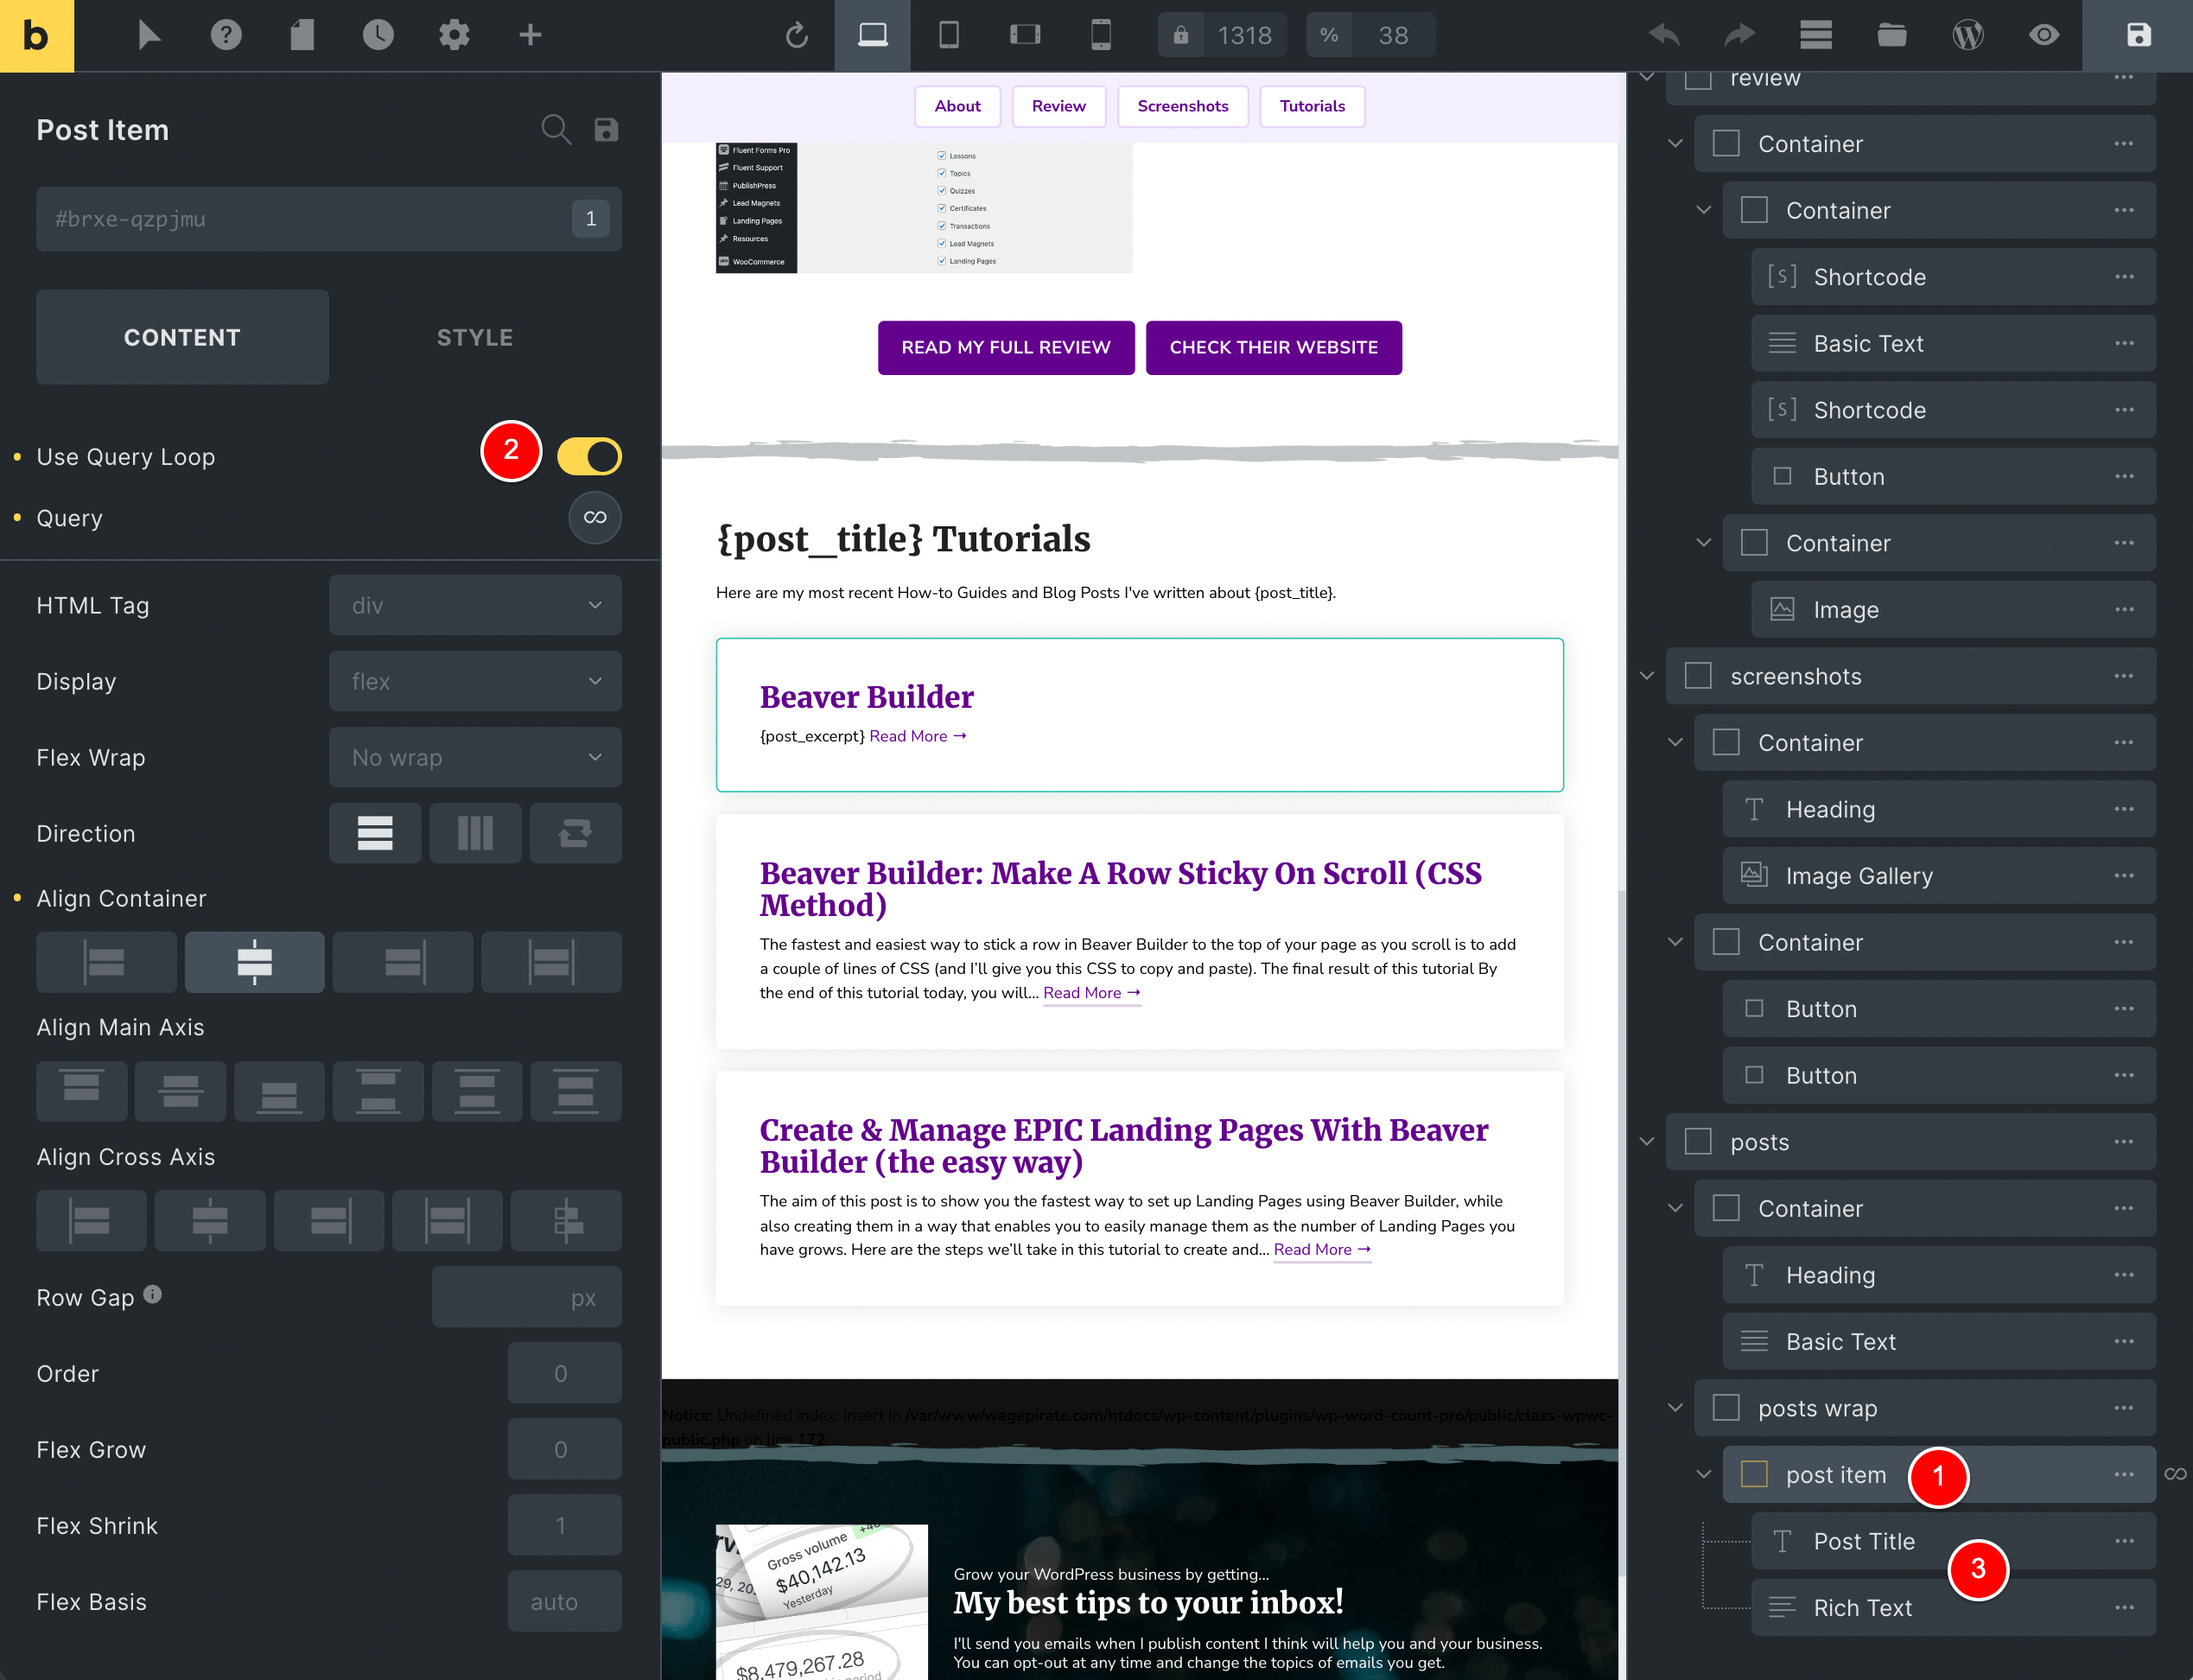
In this post item container, I added in a Post Title element and a Rich Text element.
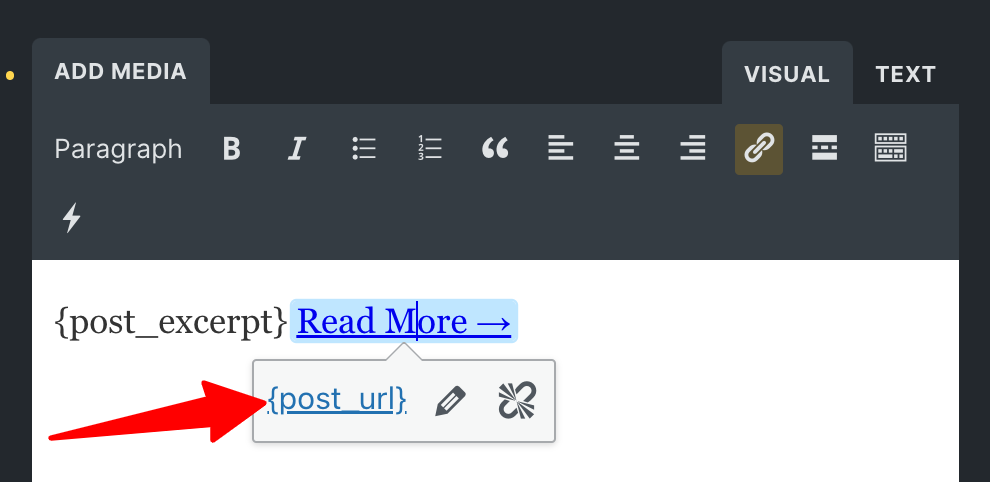
If I click to select this Rich Text element at (1) below, you can see that I have added { post_excerpt } and then Read More (2).
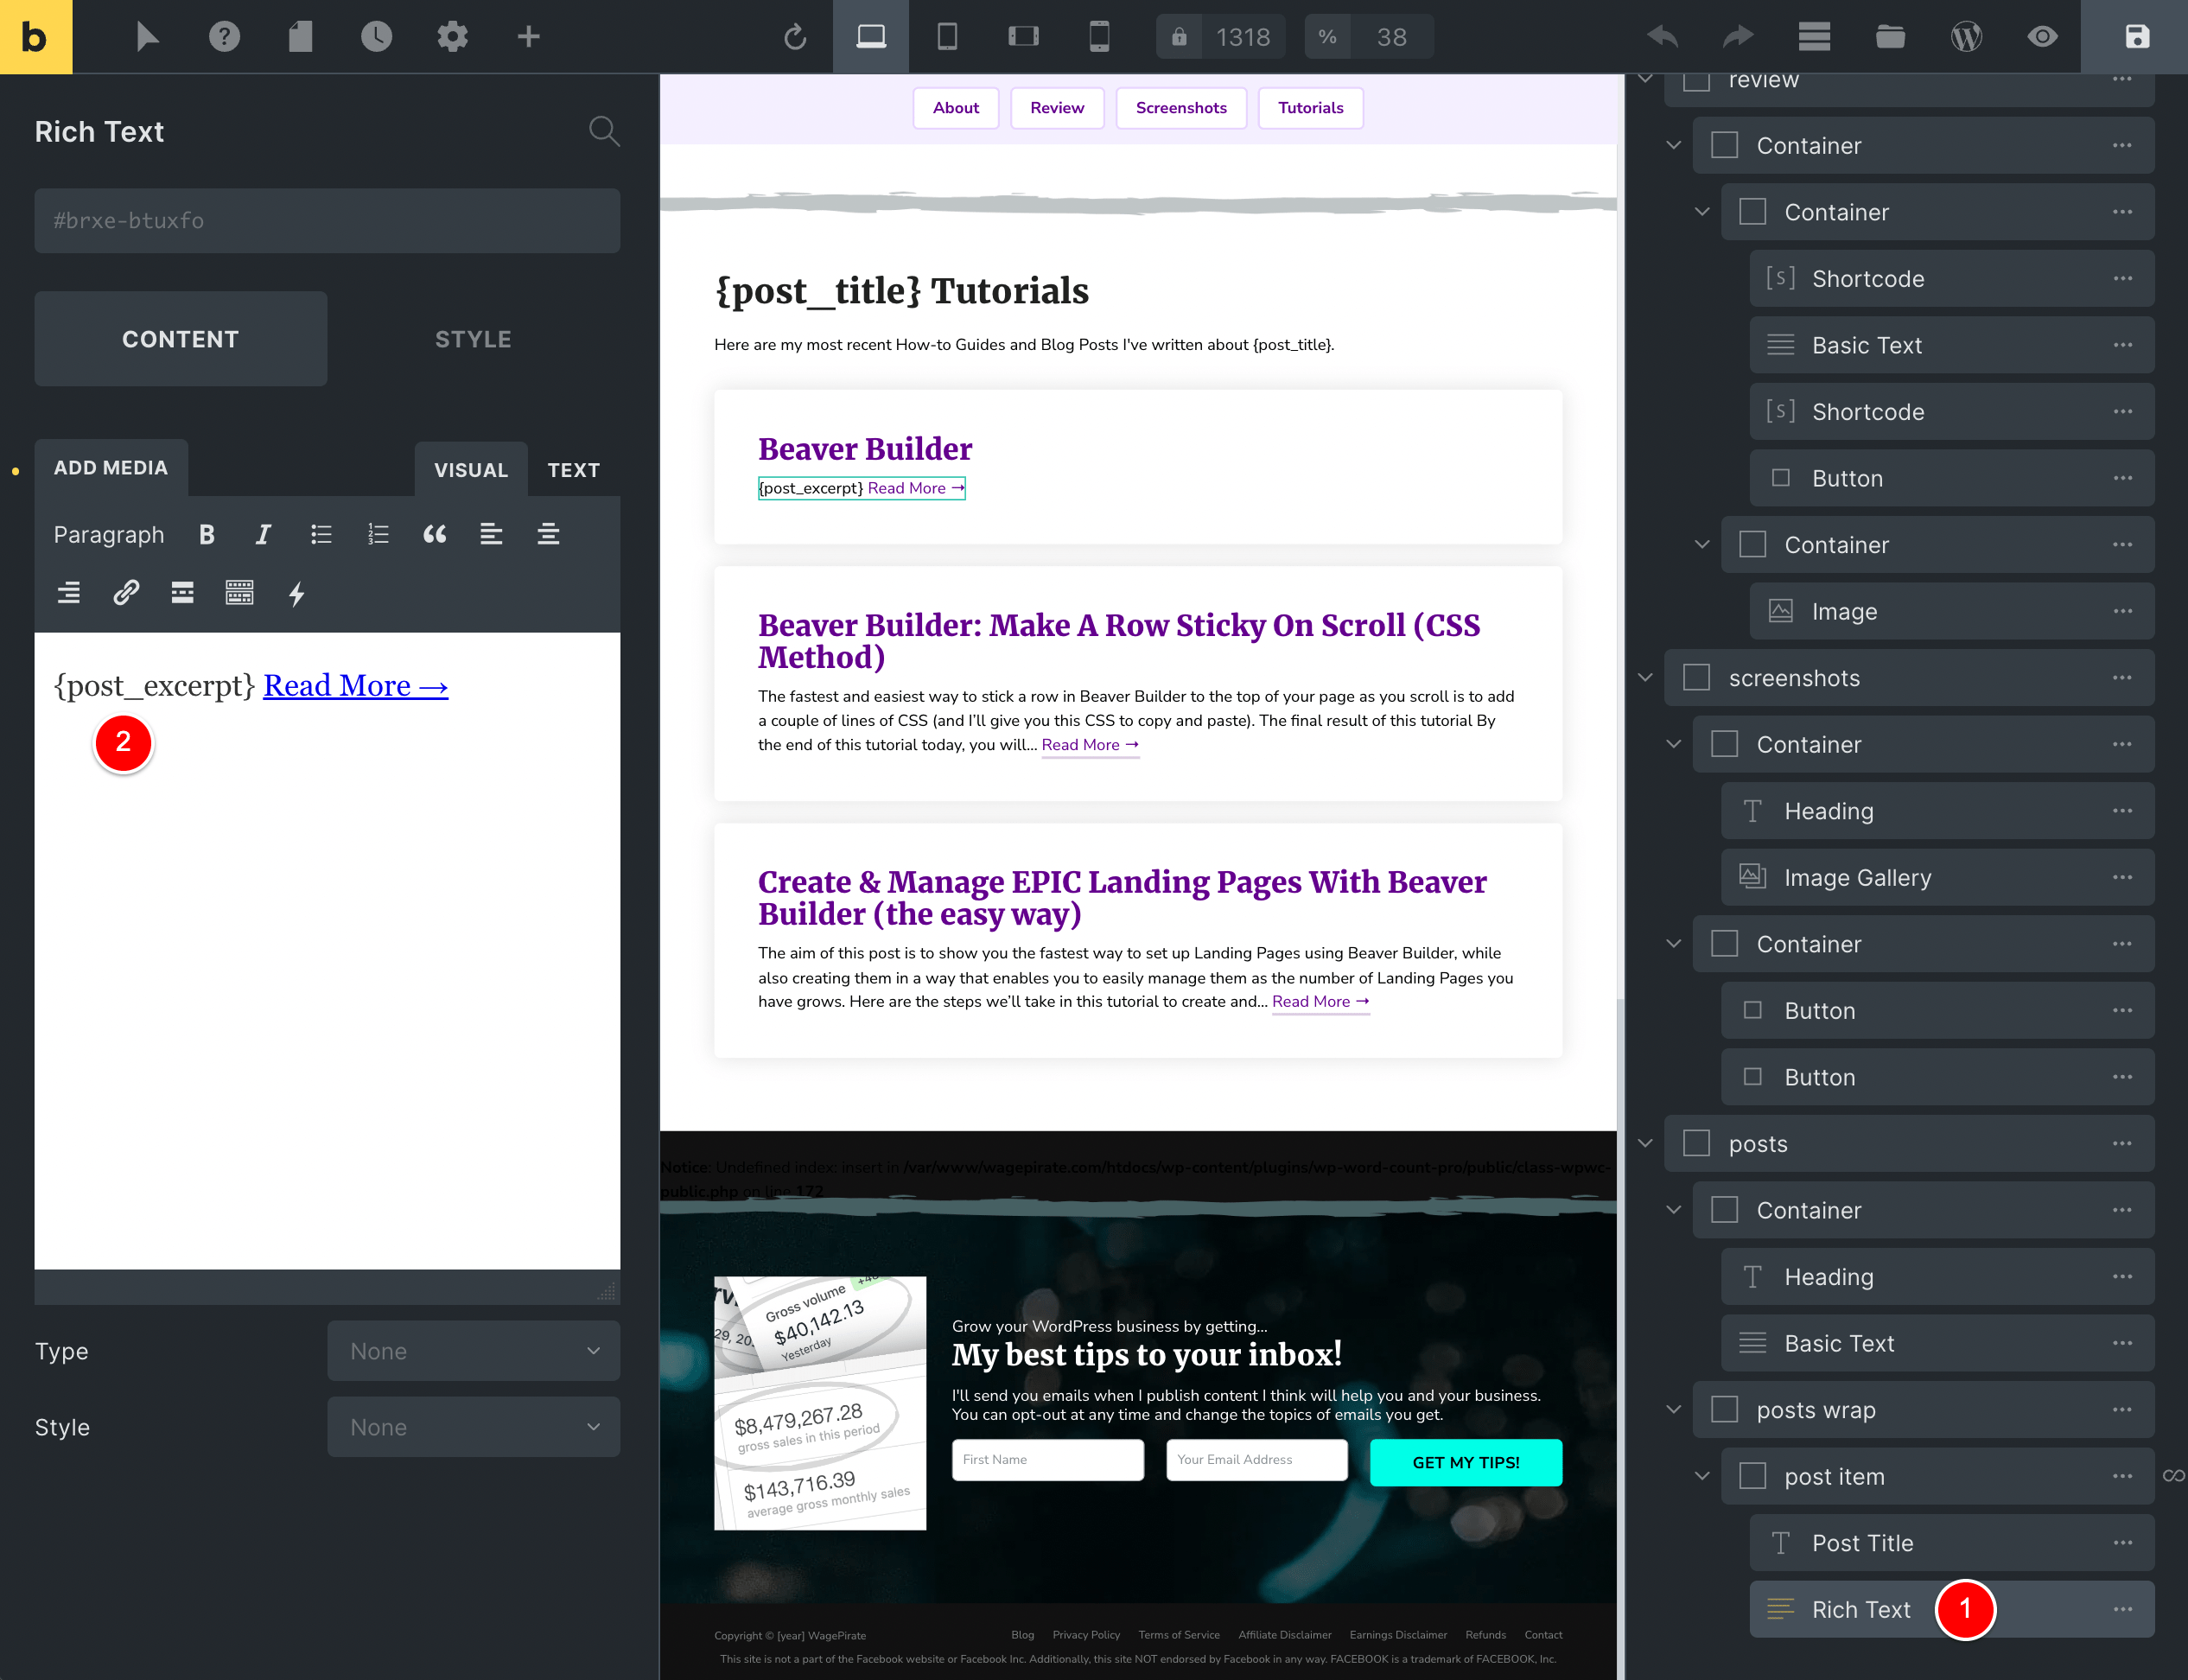
This { post_excerpt } is an example of what Bricks refers to in its ecosystem as Dynamic Data.
You can put Dynamic Data in most fields inside the page building Elements you drag into your page to design them with Bricks.
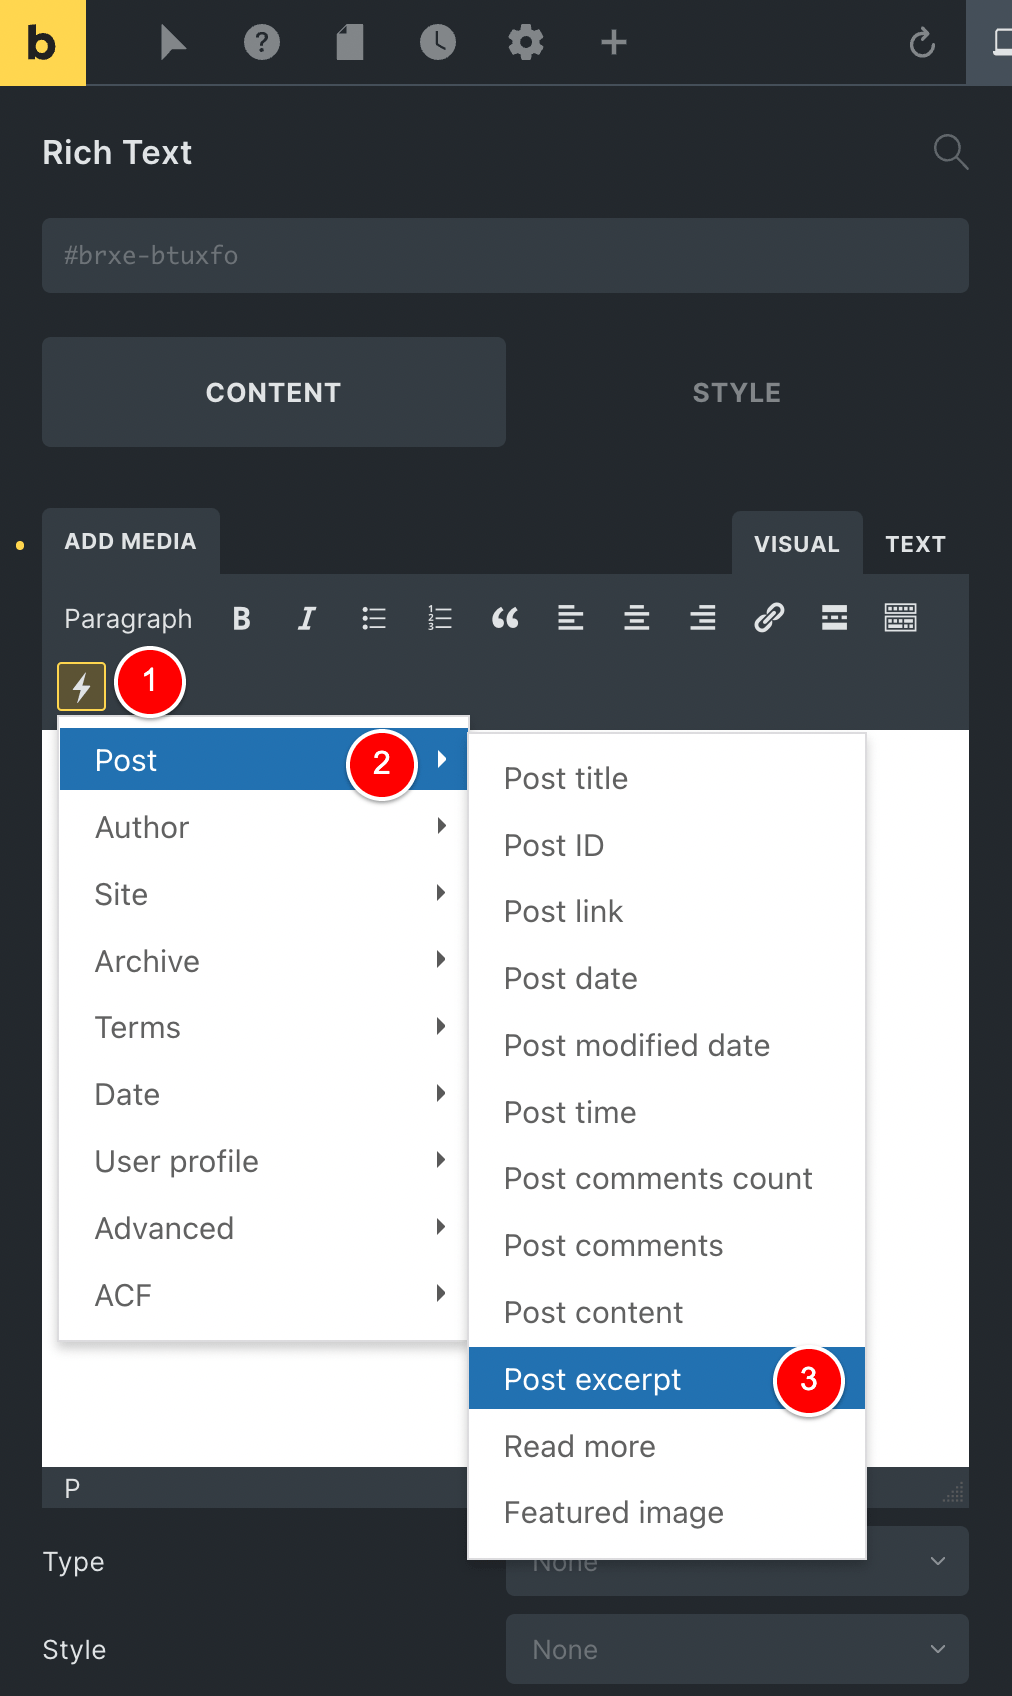
To access Dynamic Data, you click on the Lightning Bolt icon (1) and then navigate to the option you want and then click to insert that Dynamic Data tag into the field you’re editing in the Element on your page.
You can see below that I also used Dynamic Data to get the URL to the current loop item {post_url} and output it for the Read More hyperlink.
It’s very intuitive to use and worth noting is that it integrates with ACF out-of-the-box.
What you’ll want to do is get your query loop item all set up and get all the content outputting on the page, as I have done below.
And then begin to style everything.
For my specific case, I wanted my Loop items to each be in their own white box with a drop shadow, rounded corners and quite a bit of padding.
Previously in this article, under the heading about Global CSS Classes, I went ahead and created a Global CSS Class called box-white inside Bricks.
On my live website, I have a CSS Class called wpirate-white-box that has pretty much the exact styling we’ve set up in this review previously for box-white.
If I click on my post item loop item (1) you can see that there is one active Global CSS class applied to it.
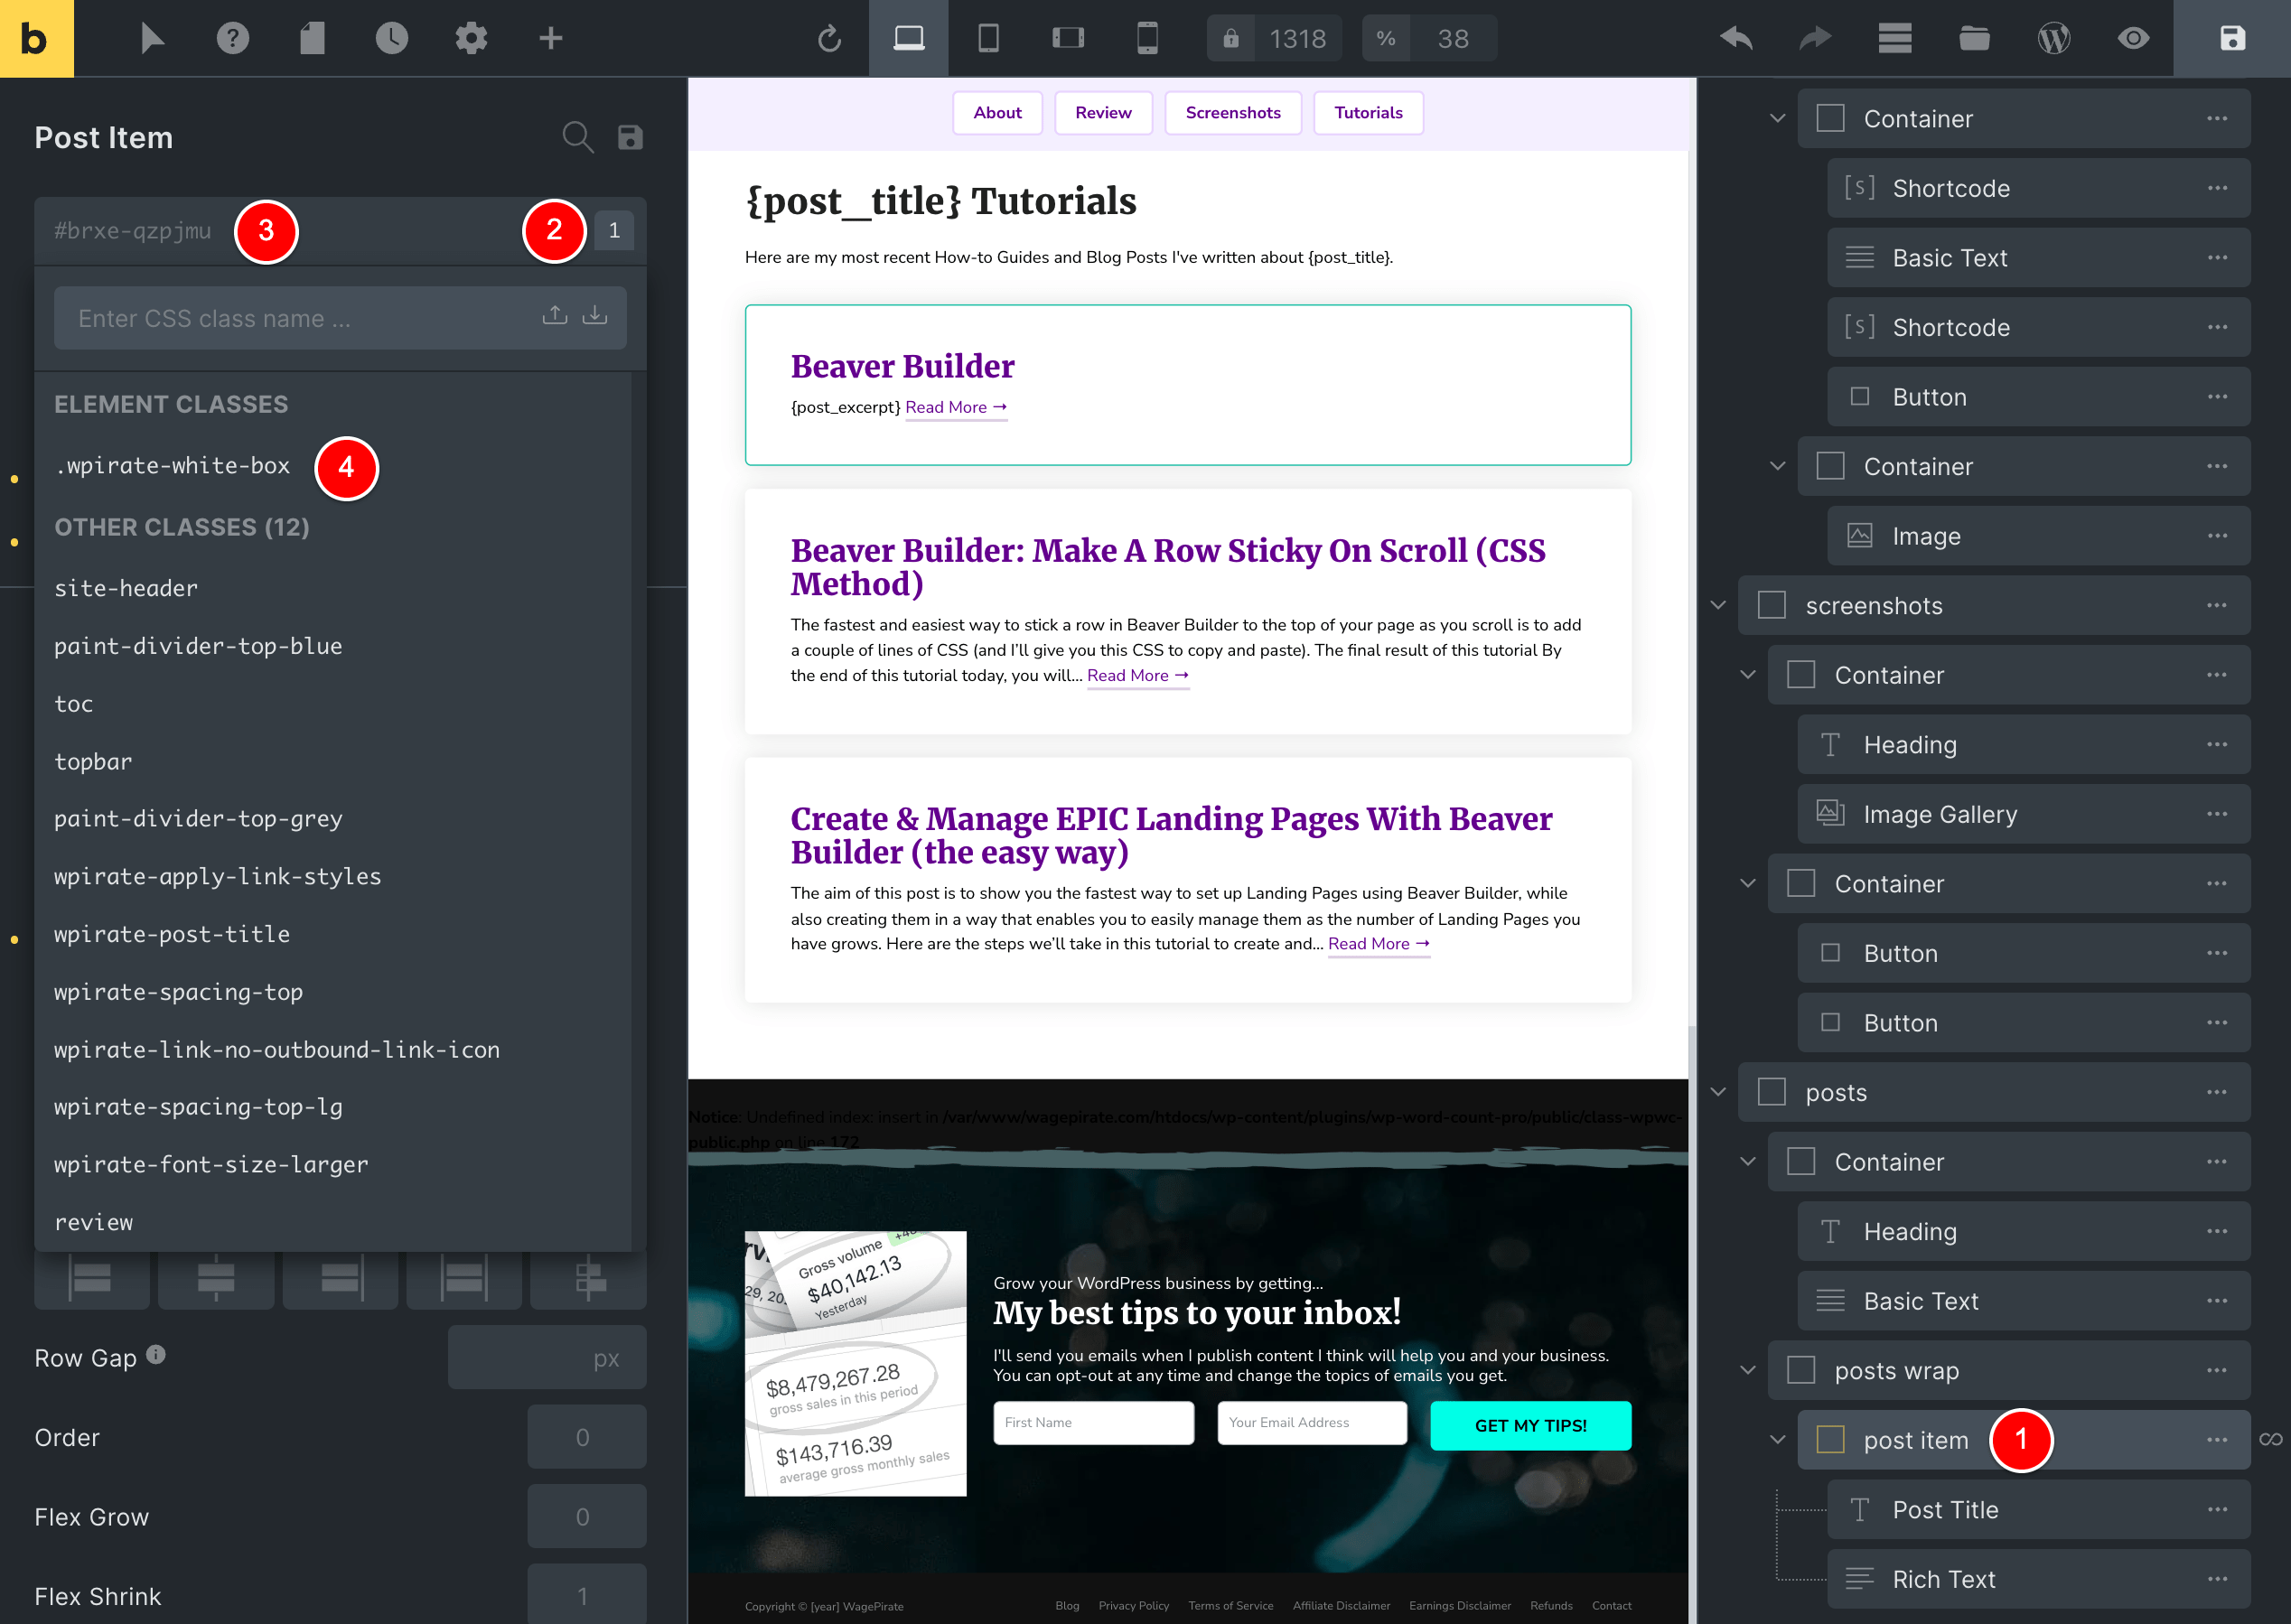
If I click at (3) above, it lets me know that the active Global CSS Class applied to my loop item is called wpirate-white-box and that is why the styling on all my loop items looks the same – each loop item gets this CSS class applied.
RELATED: If you want to see this query loop builder in Bricks in action, watch my full Bricks Builder video review that is on this page you’re currently reading.
If I want to make a grid with 2 columns of posts, I could change the width of the loop item to something like 48%
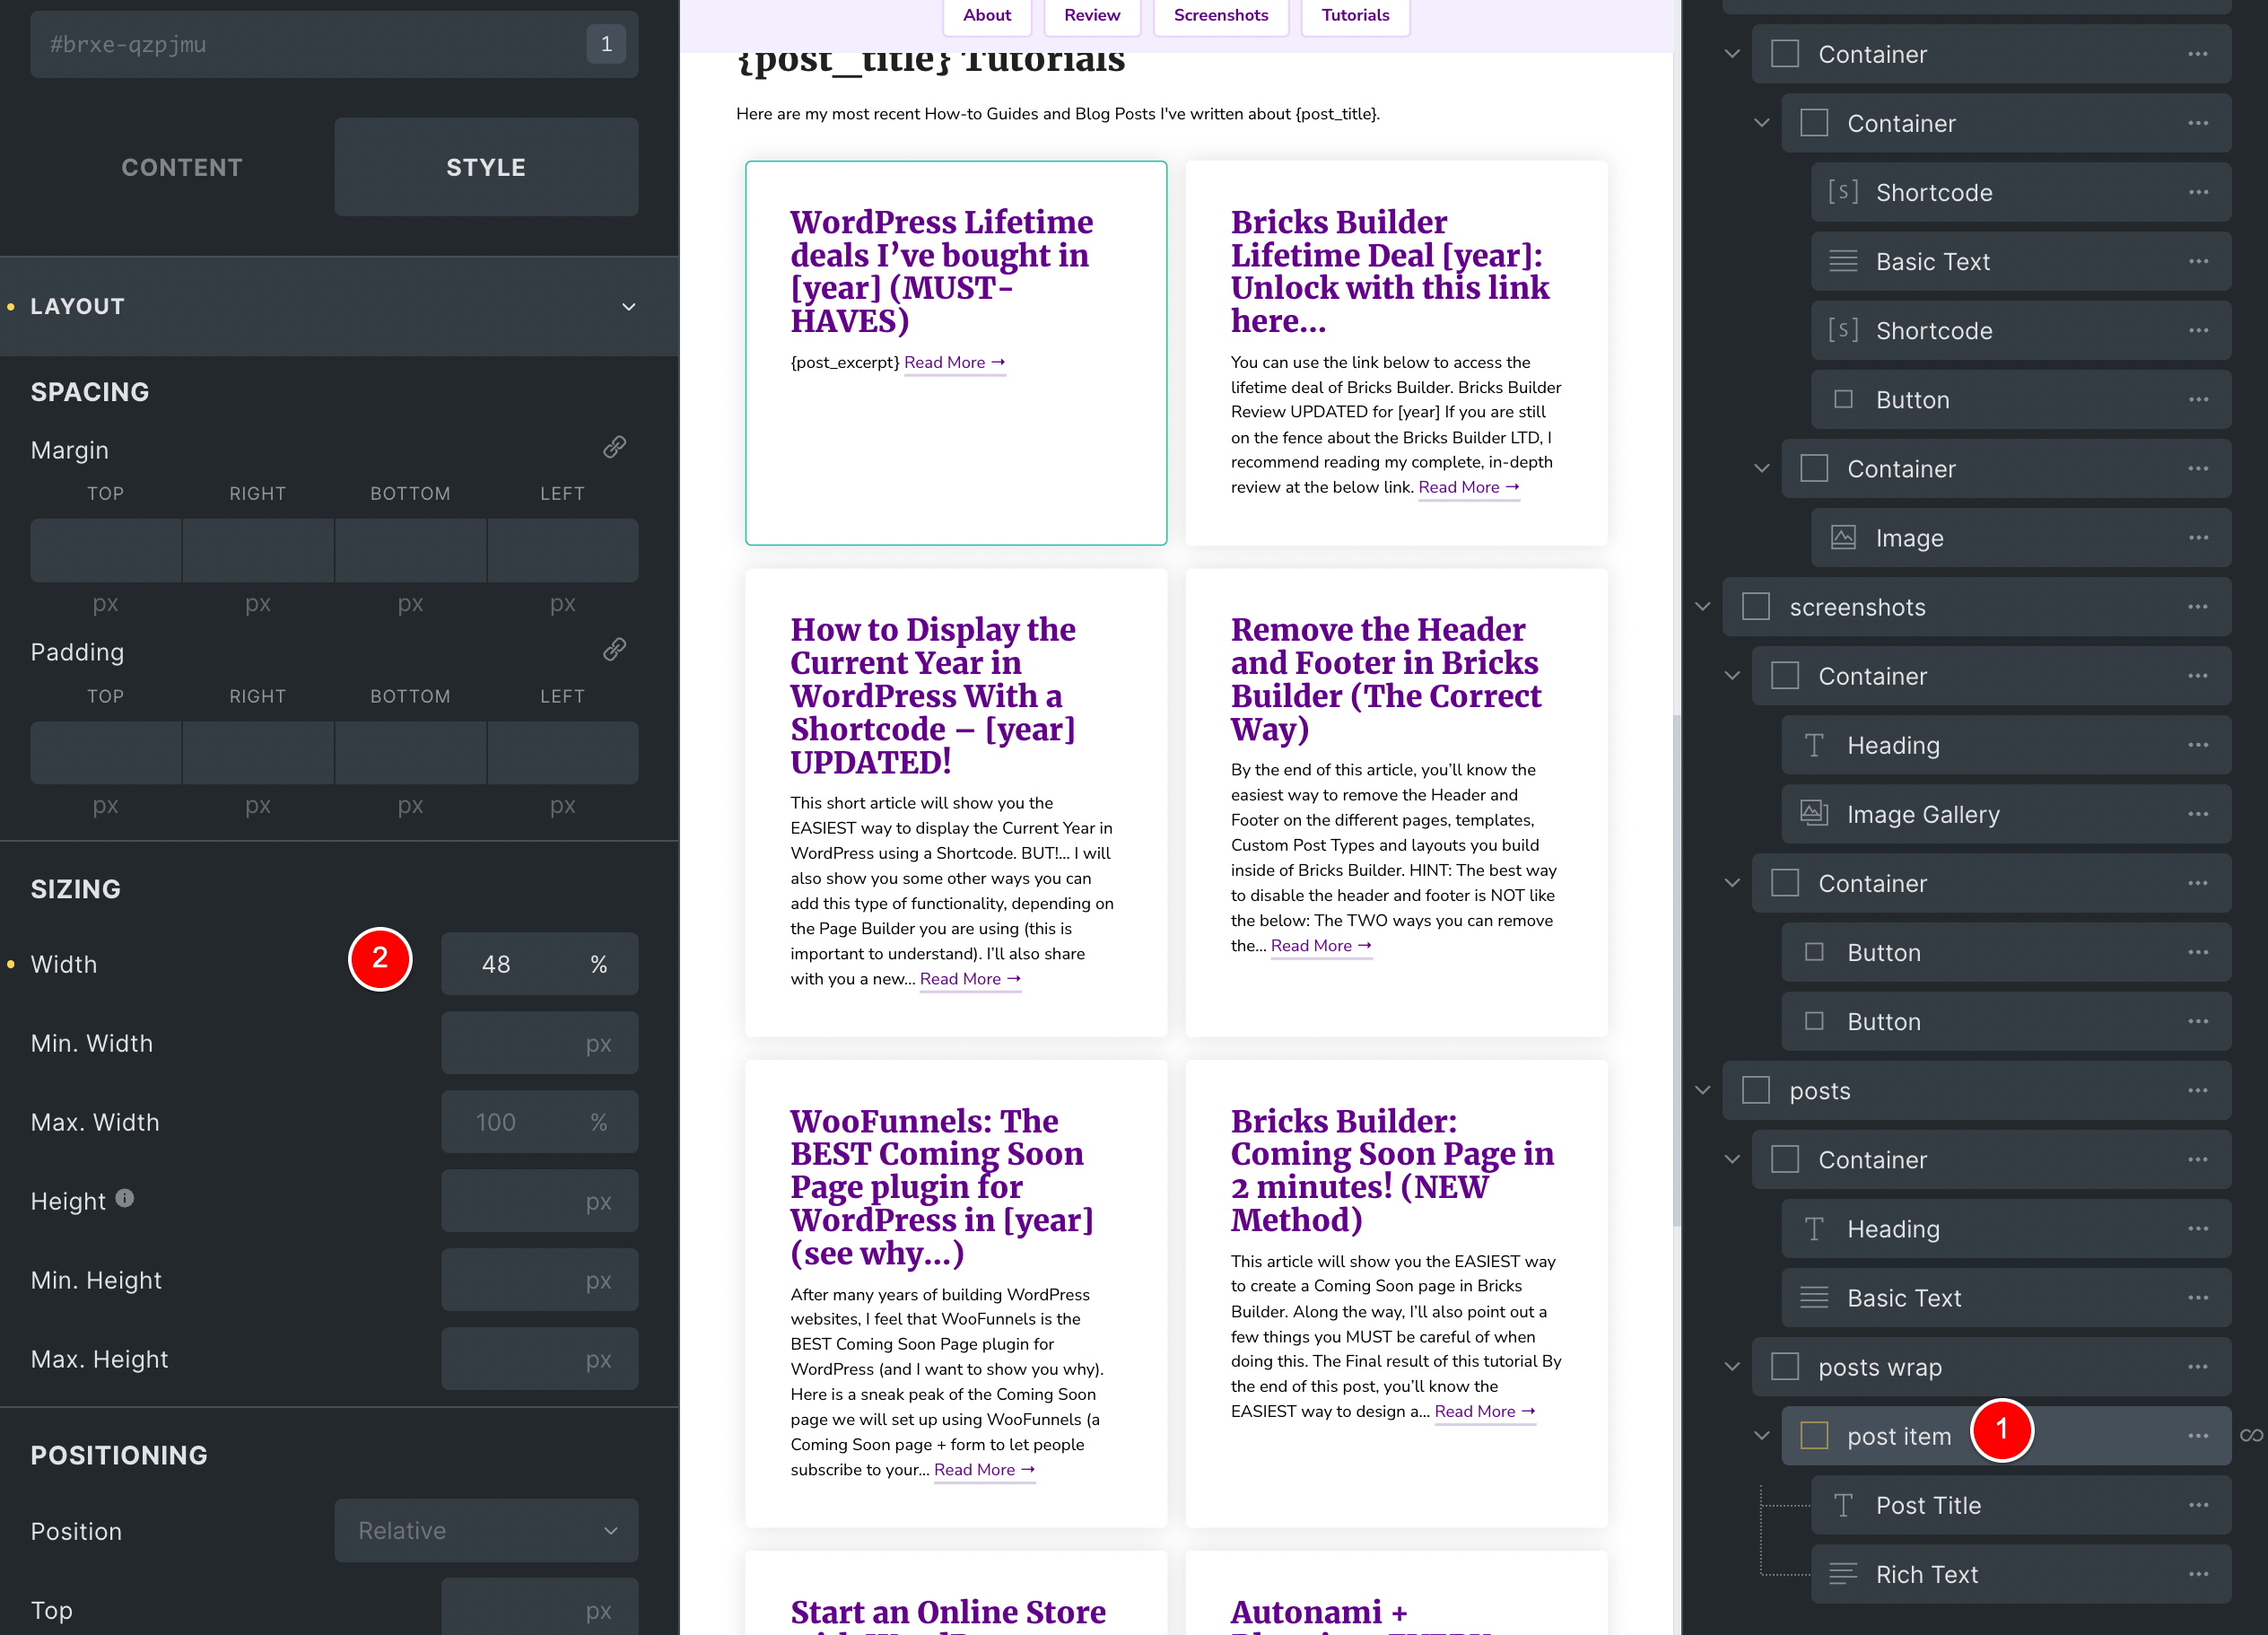
And then set the parent container that wraps the loop items (1) to wrap (2) as a row (3) and space evenly (4) – all shown in the image below.
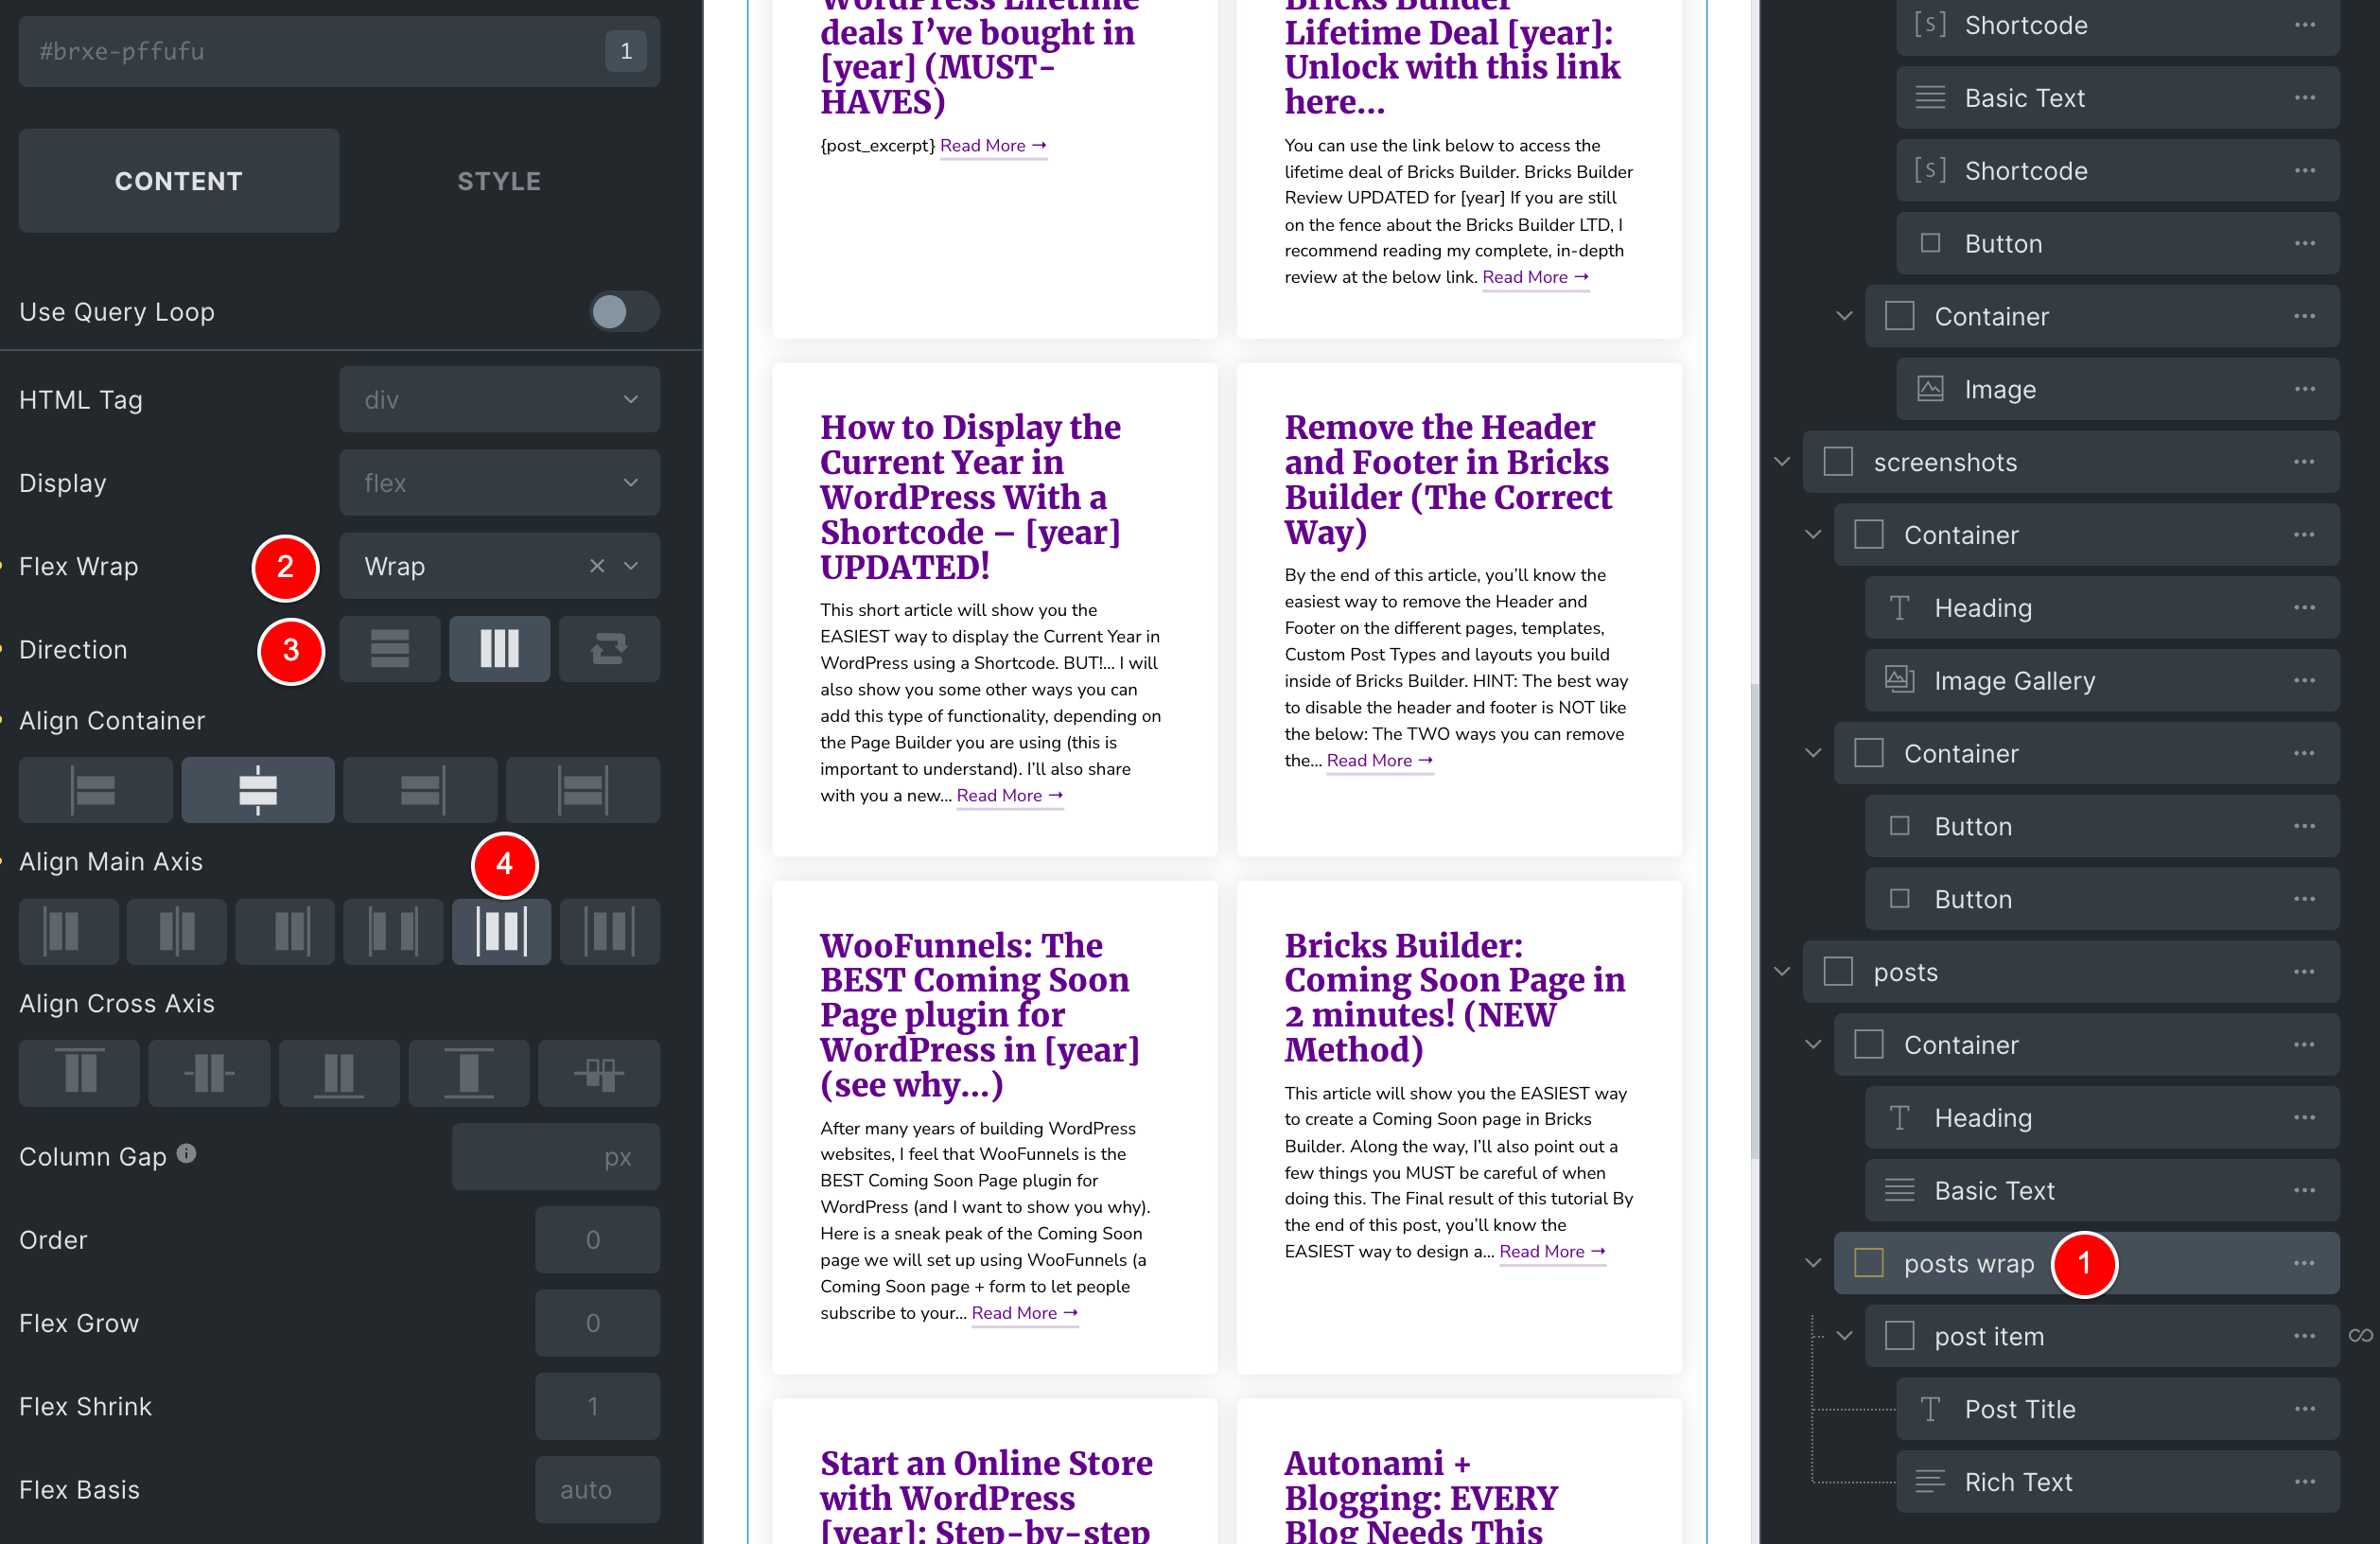
Again, we are doing this as Bricks Builder uses Flexbox (which is good and makes a faster website for you and generates less HTML for your page – as I discussed under the section on SPEED in this article today).
Custom Query loop: Set Arguments for your Query
So you’re probably wondering – where do you set the arguments for your query?
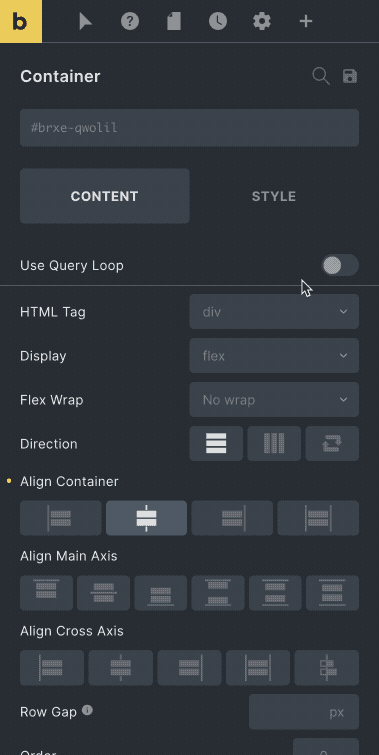
To create a Custom Loop in Bricks Builder, you can select any Container element and then click this icon below at (1) and that will reveal this setting at (2).
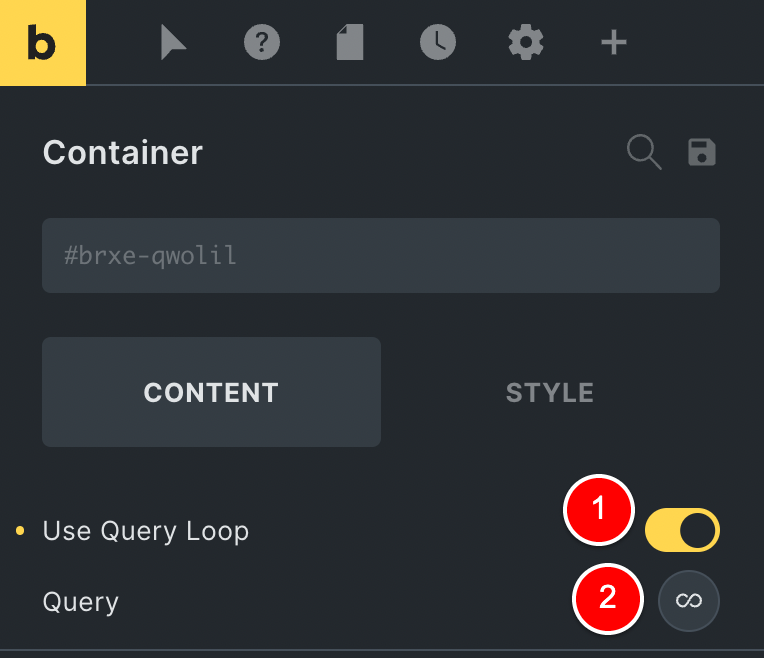
So in our example, if I click on the container named post item that has my loop set on, you can see it is switched on.
If I click at (2) you can see all my query arguments I’ve set at (3).

Here is an animation to give you a better idea of how you enable a Query loop builder on a Container element.
Here are the options you have available for your query.
As you can see, you can create quite complex queries.
Custom Query loop: Using the echo feature
Bricks Builder also has a feature where you can write your own PHP function in your functions.php or wherever you’d like and then return a value from your function back into Bricks as Dynamic Data.
So that we don’t get lost in the weeds, I’ll leave a few screenshots of how I am using this feature in Bricks and the developers out there should get what I mean from the below screenshots.
I have this function…
function wpirate_get_current_post_slug(){
    global $post;
    $page_slug = $post->post_name;
    return $page_slug;
}
Code language: PHP (php)
And it is called here using this {echo:my_function_name} syntax that Bricks works with and its value is used here.
I wanted to point out some of the more advanced features that Bricks has for developers so that you can see how you might also use this for yourself / your clients.
BONUS: How to find your Query Loops in Bricks
In Bricks, wherever we have an active Query Loop, we see this infinity icon / loop icon to the right of the Container, as shown by the arrow below.
The FASTEST Page Builder for WordPress that I have ever used.
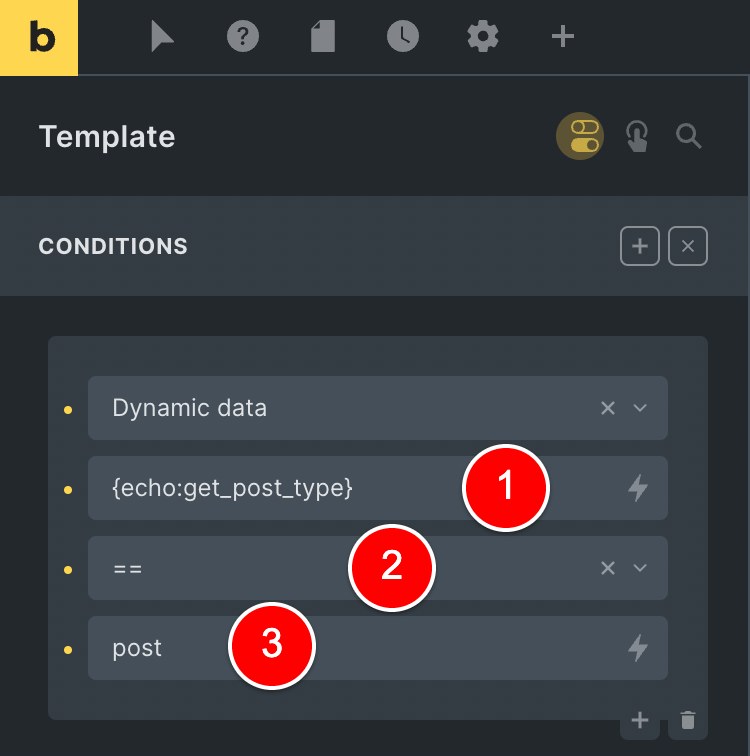
Conditional Logic: Bricks now has Conditional Logic!
When I first started using Bricks Builder, they didn’t have the ability to show and hide elements on the page based on conditions.
Thankfully, that has changed and since Bricks version 1.5 we now have a variety of ways to add our conditions.
You can set your conditions by clicking on an Element inside of the Bricks Builder UI by clicking a few options.
In the below example, I am specifying that I only want this element to show if the post type is “post” i.e. my Blog Posts.
Now, if you want more flexibility and you’re OK with a bit of PHP…
Bricks has introduced a PHP Filter that is very easy to understand once you jump in and give it a go.
Here is an example of how I am using this PHP Filter on my website to NOT output 2 elements on my page for specific post types on my webisite…
<?php

// show / hide elements based on Post Type
add_filter( 'bricks/element/render', function( $render, $element ) {

  if ( !is_singular( array('wffn_optin', 'wffn_oty', 'wffn_landing') ) ) {
    return $render;
  }

  $html_id = false;
  if( isset( $element->settings['_cssId'] ) ){
      $html_id = $element->settings['_cssId'];
  }

  $elements_to_hide = array('top-bar', 'cta-footer');
  if ( $html_id && in_array($html_id, $elements_to_hide, true) ) {
    return false; // i.e. do NOT output this element on the page
  }

  return $render;
}, 10, 2 );
Code language: PHP (php)
Choose your poison here as to which you use.
The Bricks UI is faster because you’re in there already creating your pages BUT the PHP Filter allows you to do anything you can imagine.
To help you learn more about this PHP Filter you can use to apply conditional logic in Bricks Builder, I wrote an entire Tutorial dedicated to showing you all the important things you need to get started (with example code)…
RELATED: Bricks Builder: Conditional Logic (show / hide elements on the page) PHP METHOD
This unlocks a whole lot more flexibility inside of Bricks and you will be able to set up whatever conditional logic you need using this Bricks filter.
AGAIN – you must be using Bricks version 1.5 or above to have access to this PHP Filter.
Bricks Builder uses new Tech
So Bricks Builder is what I would consider one of the “new” page builders and while that might mean it doesn’t have the scale that the other page builders have, it’s not necessarily a bad thing.
I always think about MySpace with something like this.
MySpace was the king of social media and it eventually grew to have shareholders, a board and so on.
When something like this happens, the priorities change i.e. focus goes to making money for the shareholders and not always on what is best for the users.
It also meant that MySpace had to run their ideas through a lot more people and things just took too long to implement and they fell behind the agile competition.
With new products, they don’t have this problem where they’re trying to implement the new technologies while keeping expenses down while also supporting the old system along the way.
So Bricks, while it’s somewhat new – it is built with all the new technologies that load fast and just work…better.
There’s no catch-up, or delaying adding features.
So the Bricks team are full-steam ahead with adding new features as per their Roadmap, adding more pre-build designs to their template library (more on this in a second) and everything you want to see a software doing.
Elementor has over a million users, so it’s very reasonable to think that they can’t add new features too fast otherwise they’ll be flooded with support questions.
That’s why their development seems so slow, whereas the Bricks facebook group constantly has posts about how impressed people are with how fast the Bricks team are releasing updates and new features.
However, that’s not to say they being quite new isn’t all roses and sunshine…
Bricks Builder Template Library
Bricks is a newish Page Builder and thus their template library does not contain as many pre-made designs that something like Elementor has.
I would put Bricks more in the ballpark of Beaver Builder if you consider the amount of templates it includes out-of-the-box.
How to access pre-designed Templates in Bricks
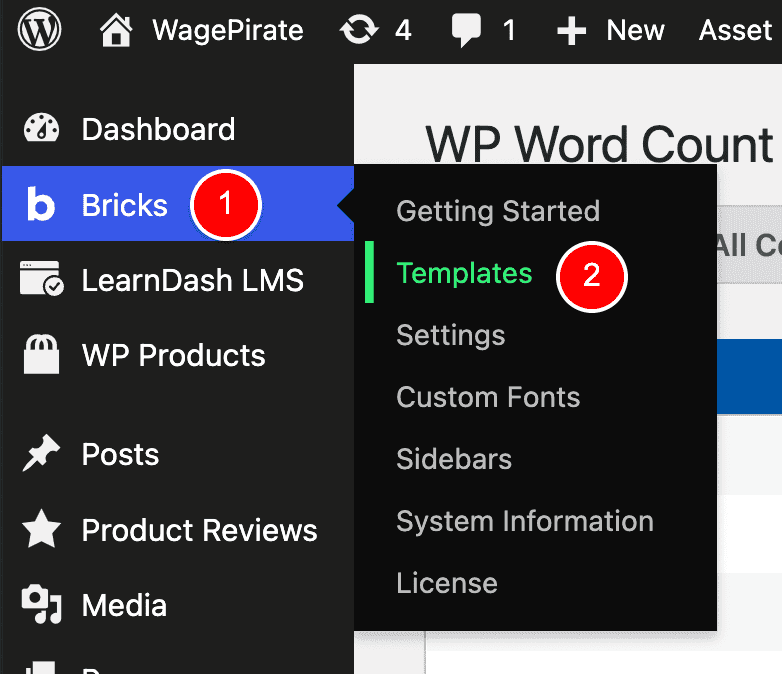
When you’re editing content using Bricks Builder, click this folder icon.
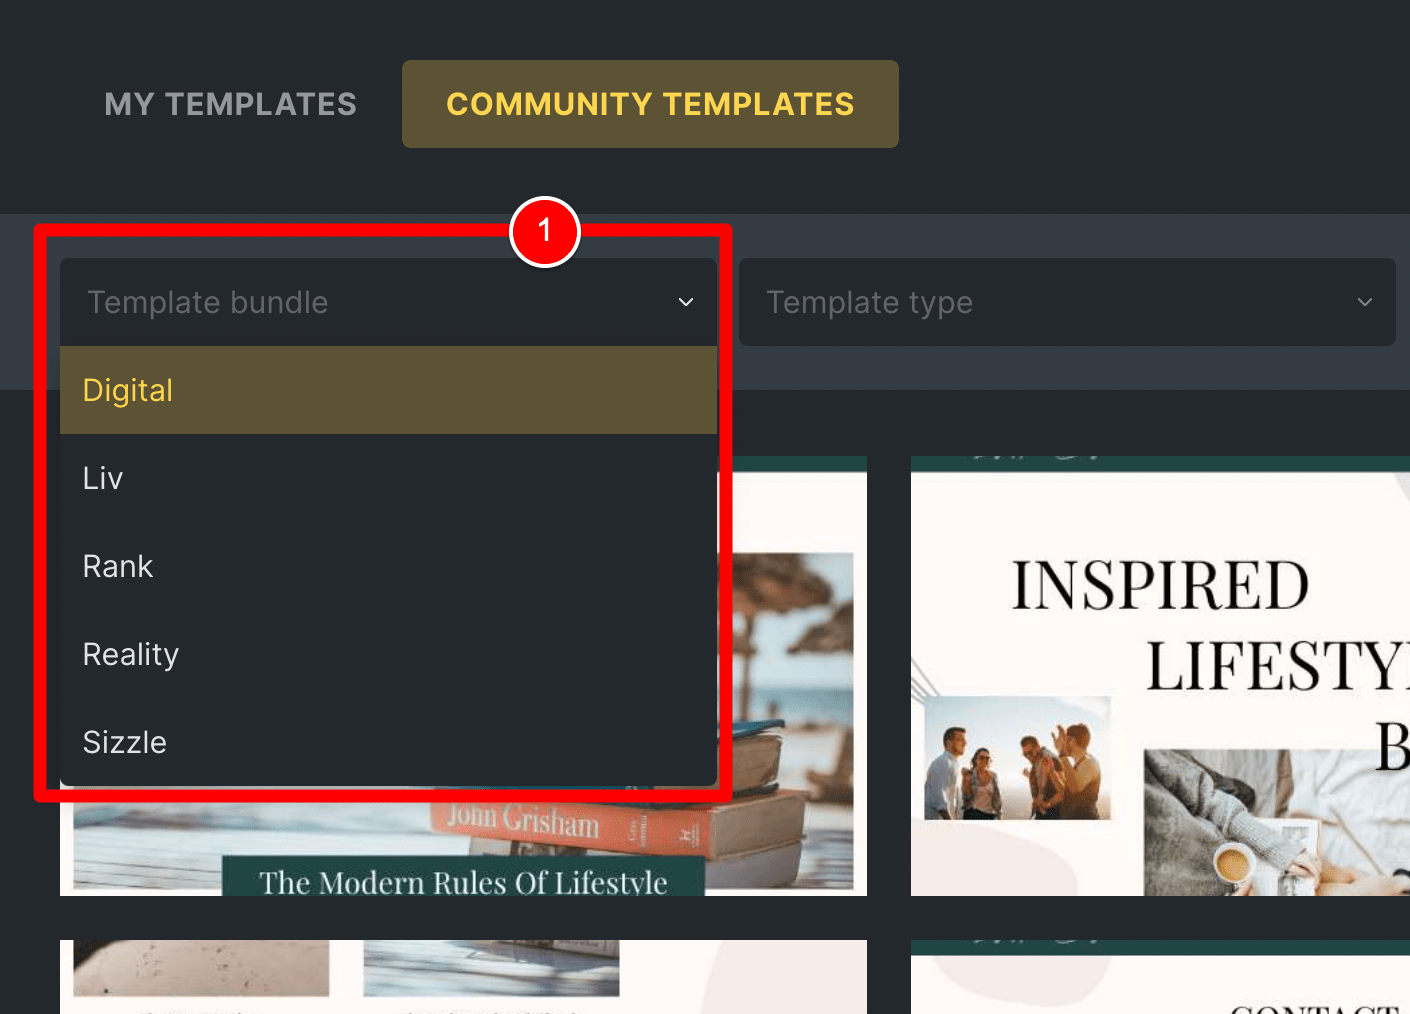
Then click on Community Templates (1) and then you’ll see all the templates you can import from the template cloud.
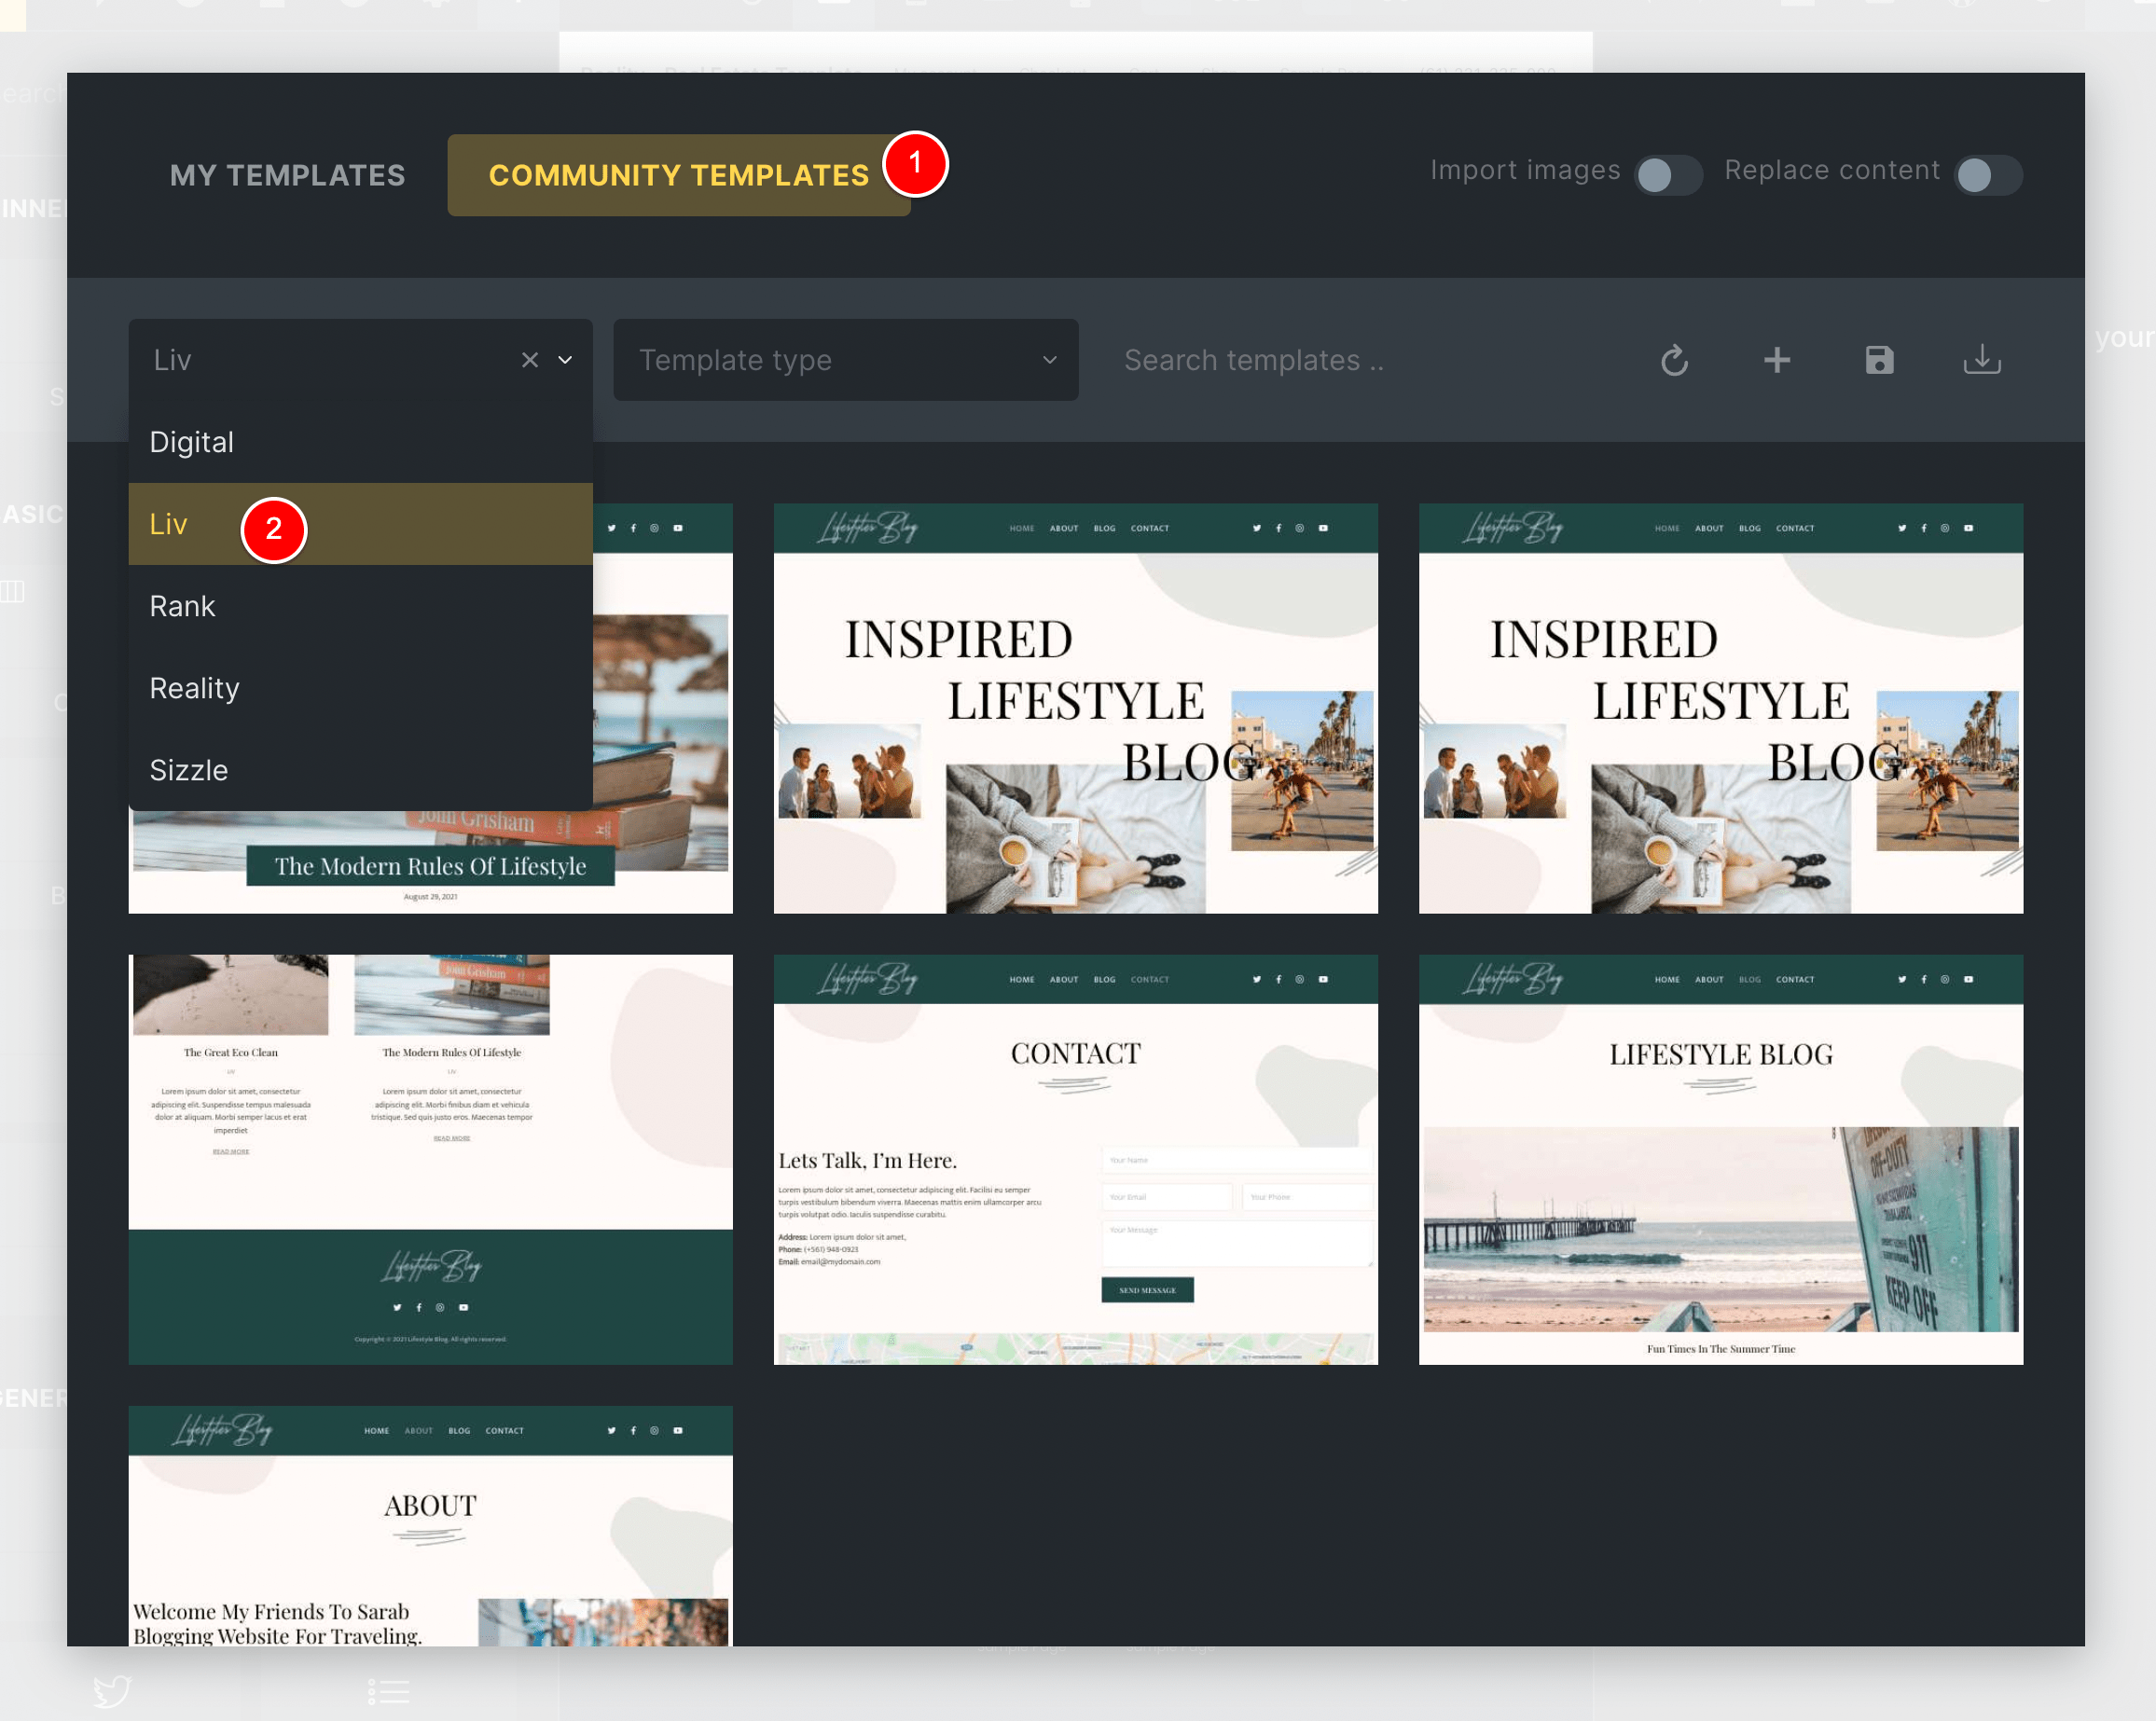
Currently, the pre-designed templates are more like pre-designed websites, where each page is broken out into its own template BUT it is categorized using the dropdown.
For example, in the above image, I selected “Liv” in the dropdown and that filters all the templates to only show me templates that are from the “Liv” Template bundle.
So you can see that once I selected Liv, I got templates for the Blog Page, Contact Page, Home Page, About us page etc – but they all match each other…
If I select the Realty Template Bundle, I get the below designs, including a matching Home page, different top sections, a Contact Us page, etc.
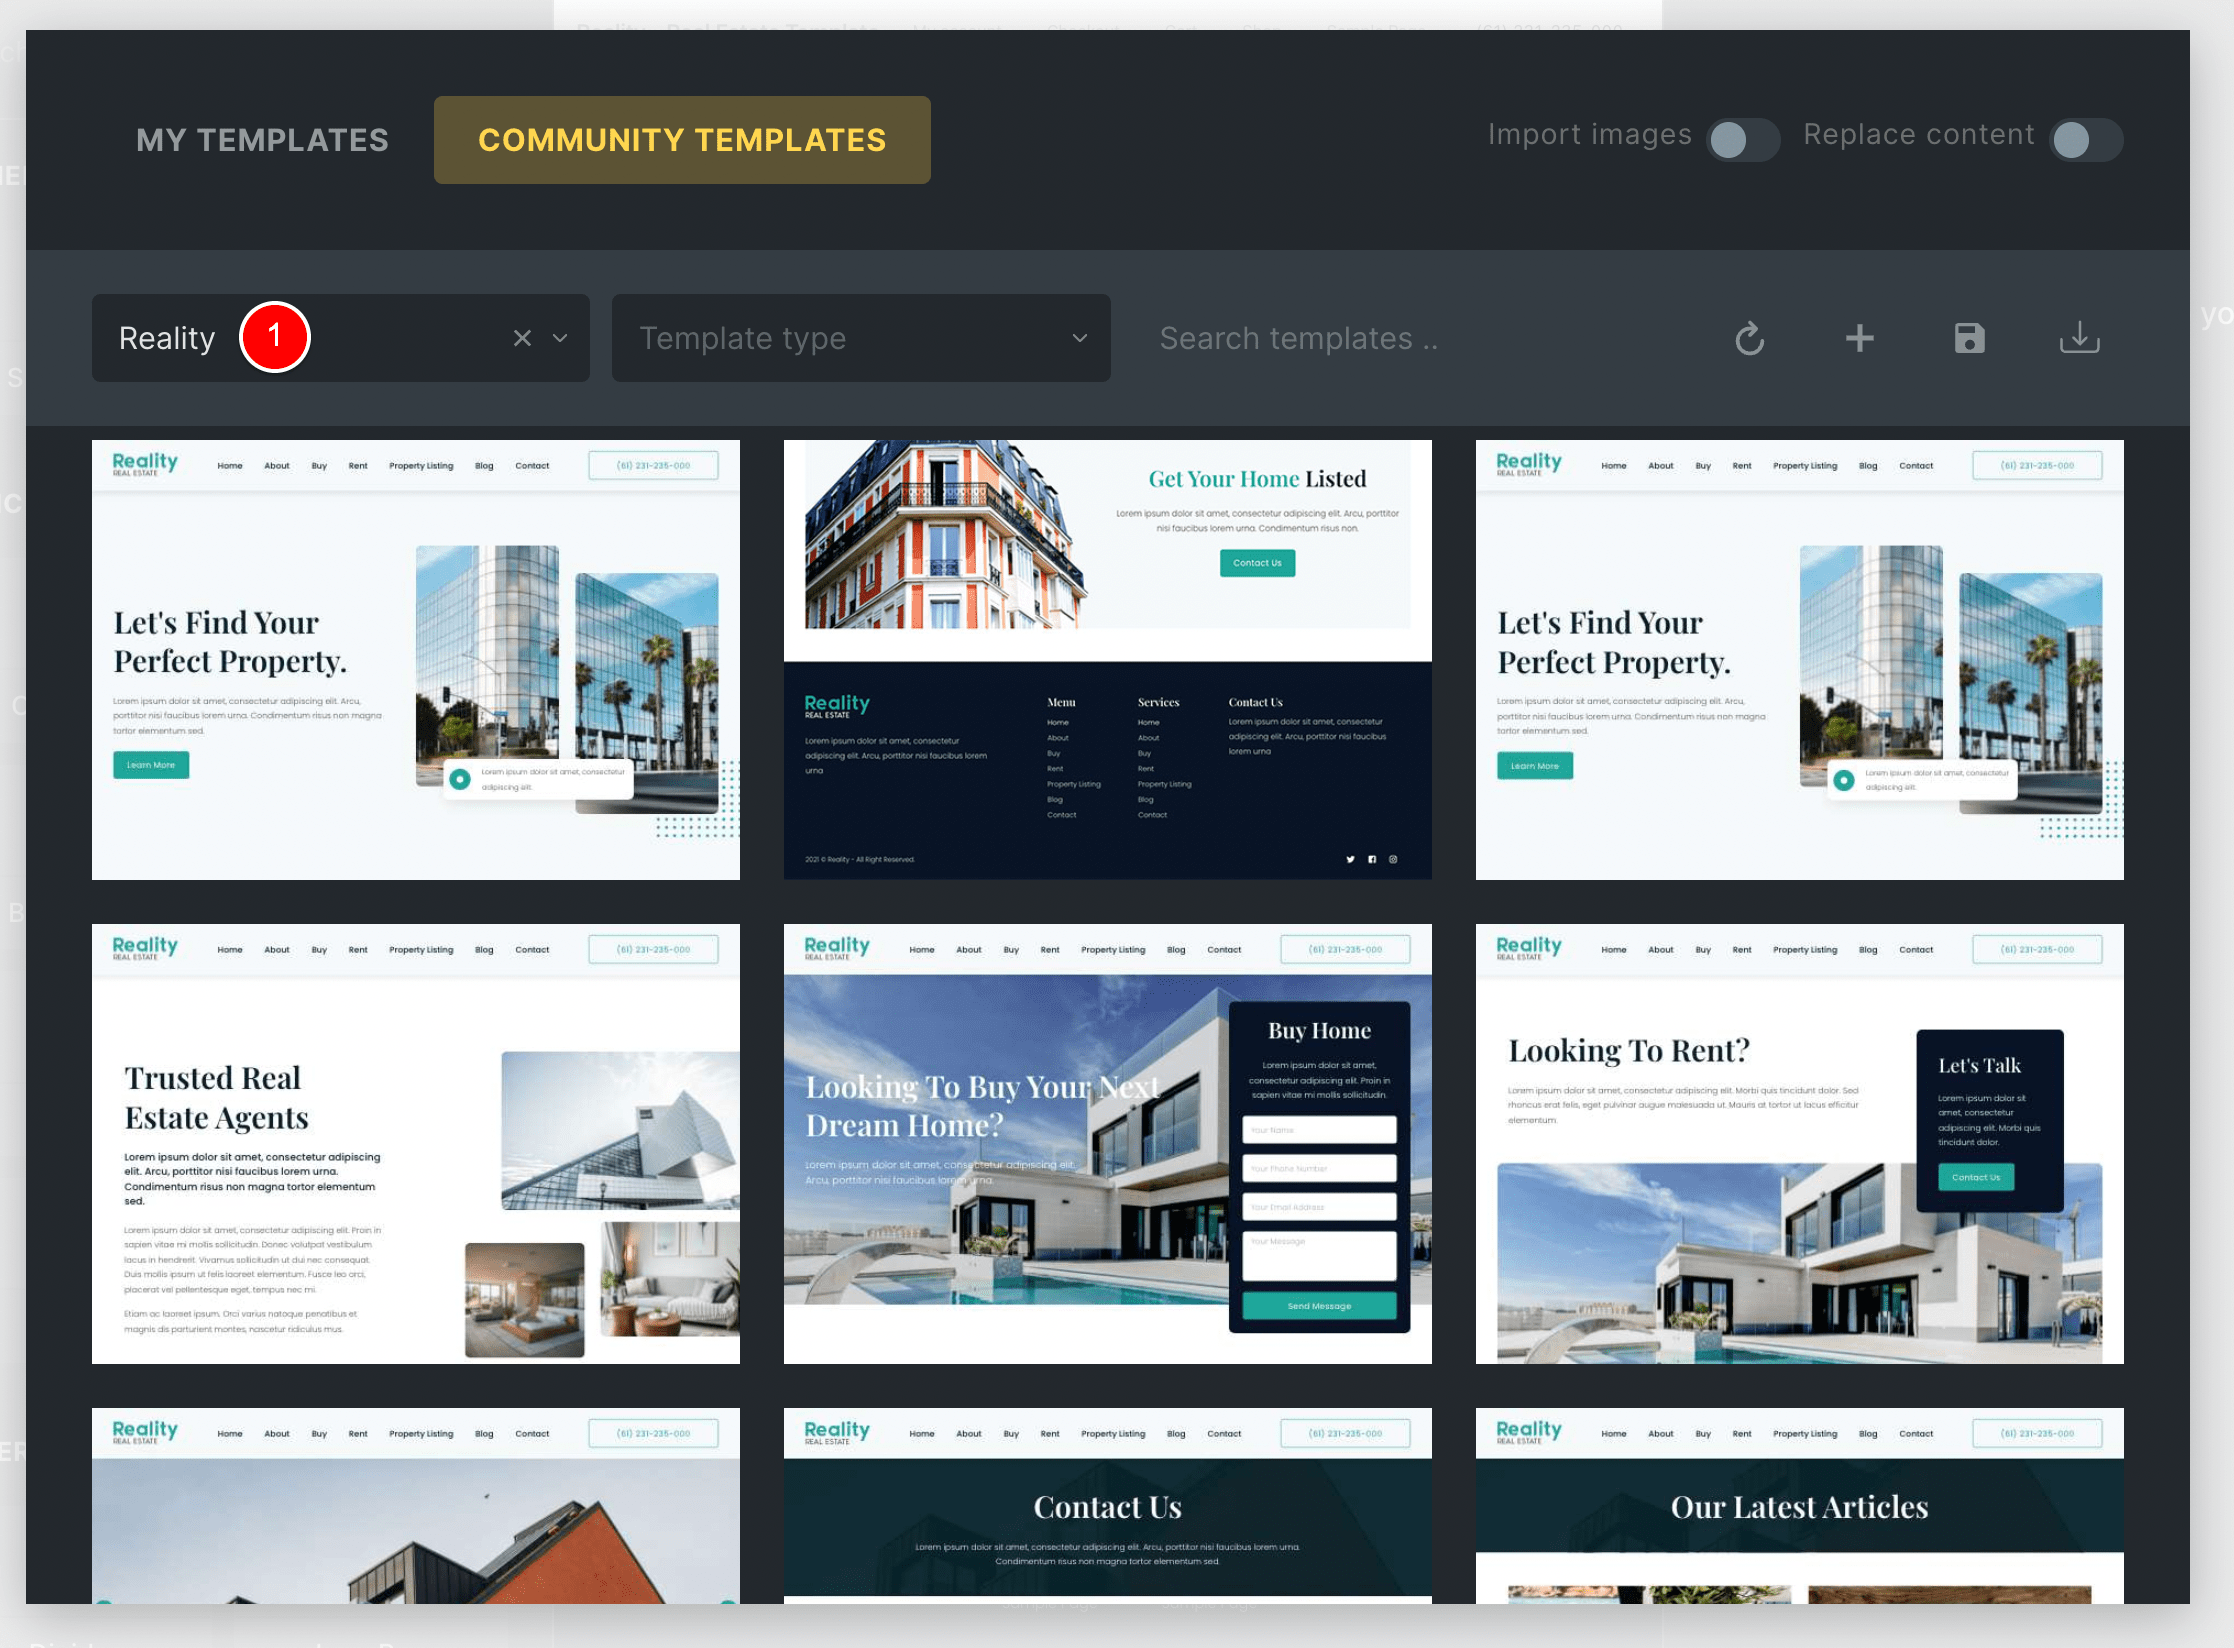
I think the designs are very professional and the idea is correct, but I just think there aren’t enough designs currently for it to be a standout feature.
From looking at the Roadmap, the Bricks team are focusing on adding more technical features to the Page Builder vs the pretty design stuff and, really… I agree – that’s the correct decision.
I mean – how often do you use pre-made designs in a Page Builder?
I know I don’t…
Except, in one specific case…
Astra Starter Sites
I have NEVER found myself using pre-made sections, pre-made page templates or anything else pre-designed that comes with other Page Builder’s I have used.
I just never found them time-saving and it feels clunky using them because you’re adding different sections and elements to your page and they don’t all have a cohesive feel.
BUT…
When I was using the Astra WordPress theme, I DID use the Starter Sites feature.
In Astra, Starter Sites are COMPLETE websites that you can one-click import into your WordPress install.
RELATED: Click here to go to the Astra Site to preview their collection of Starter Sites.
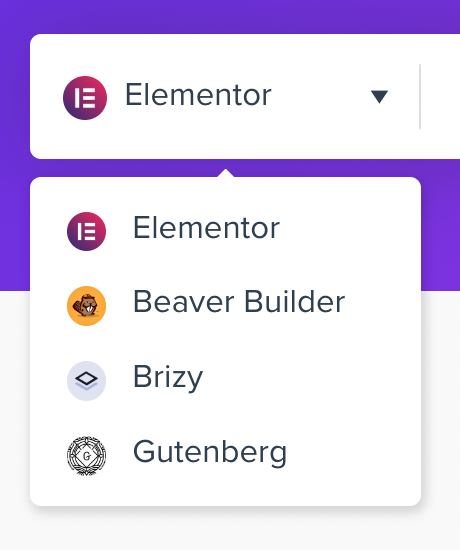
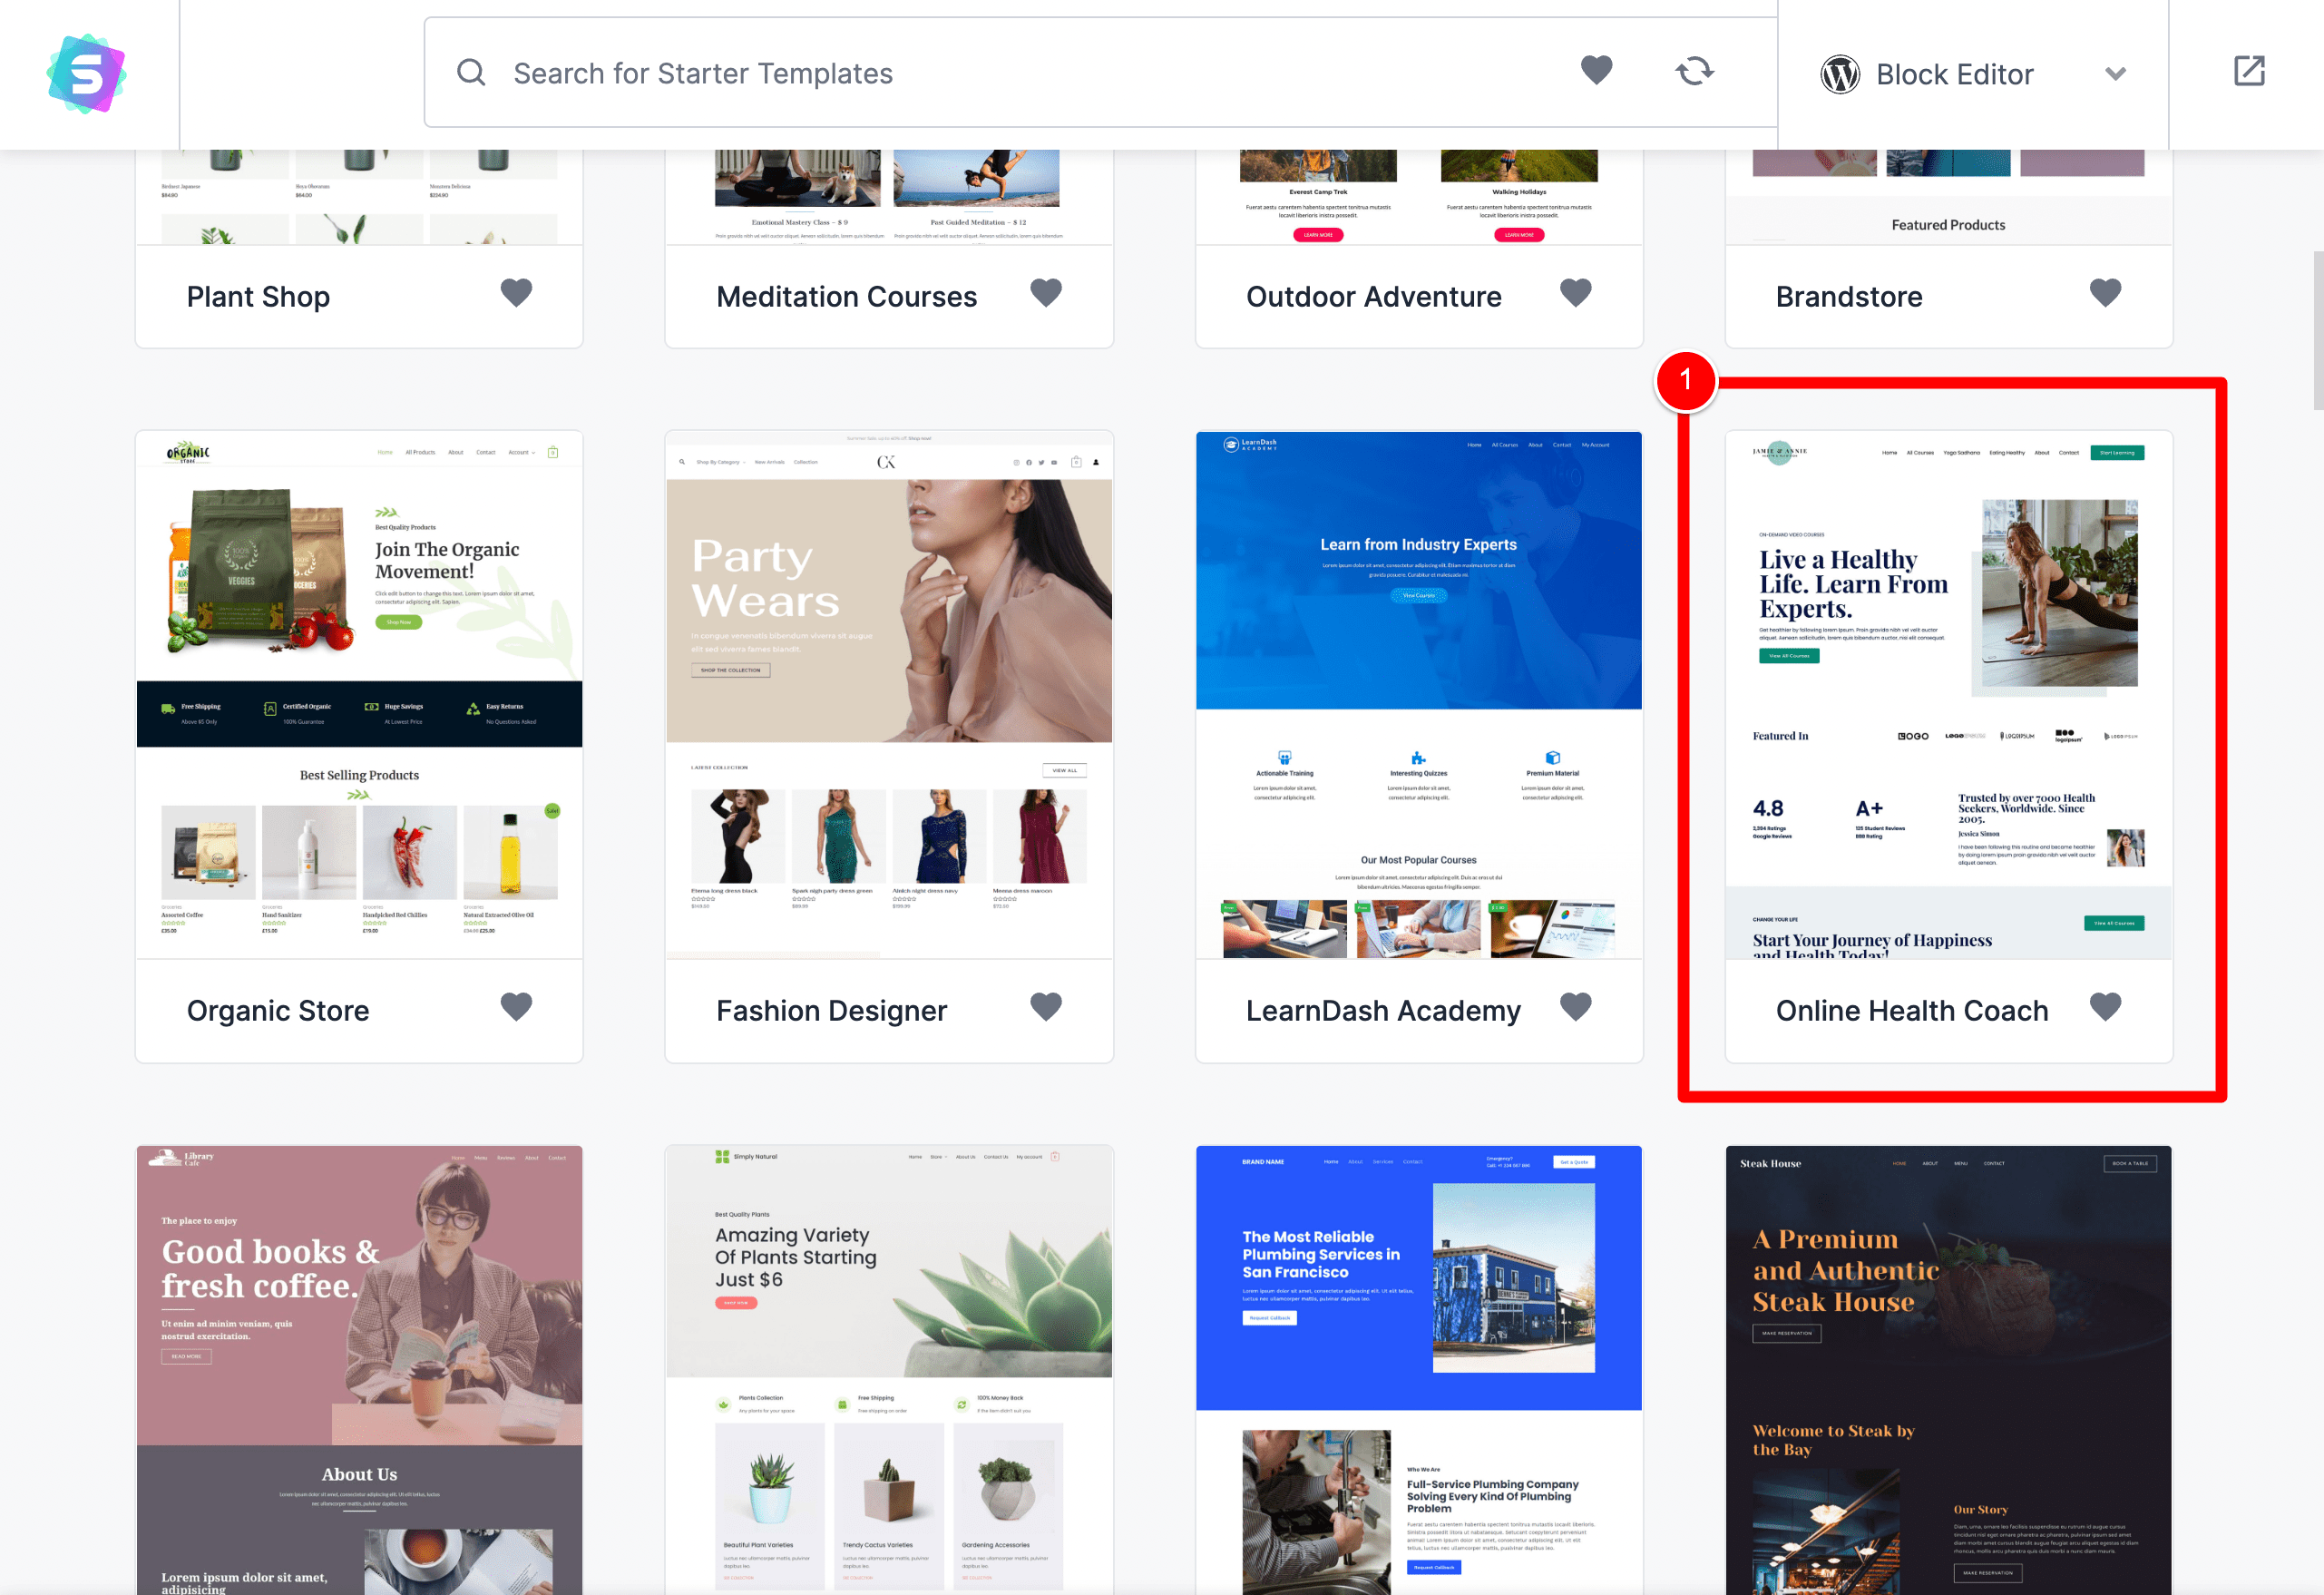
Below is an example of some of the Starter Sites I could import if I select Beaver Builder as my page builder at (1).
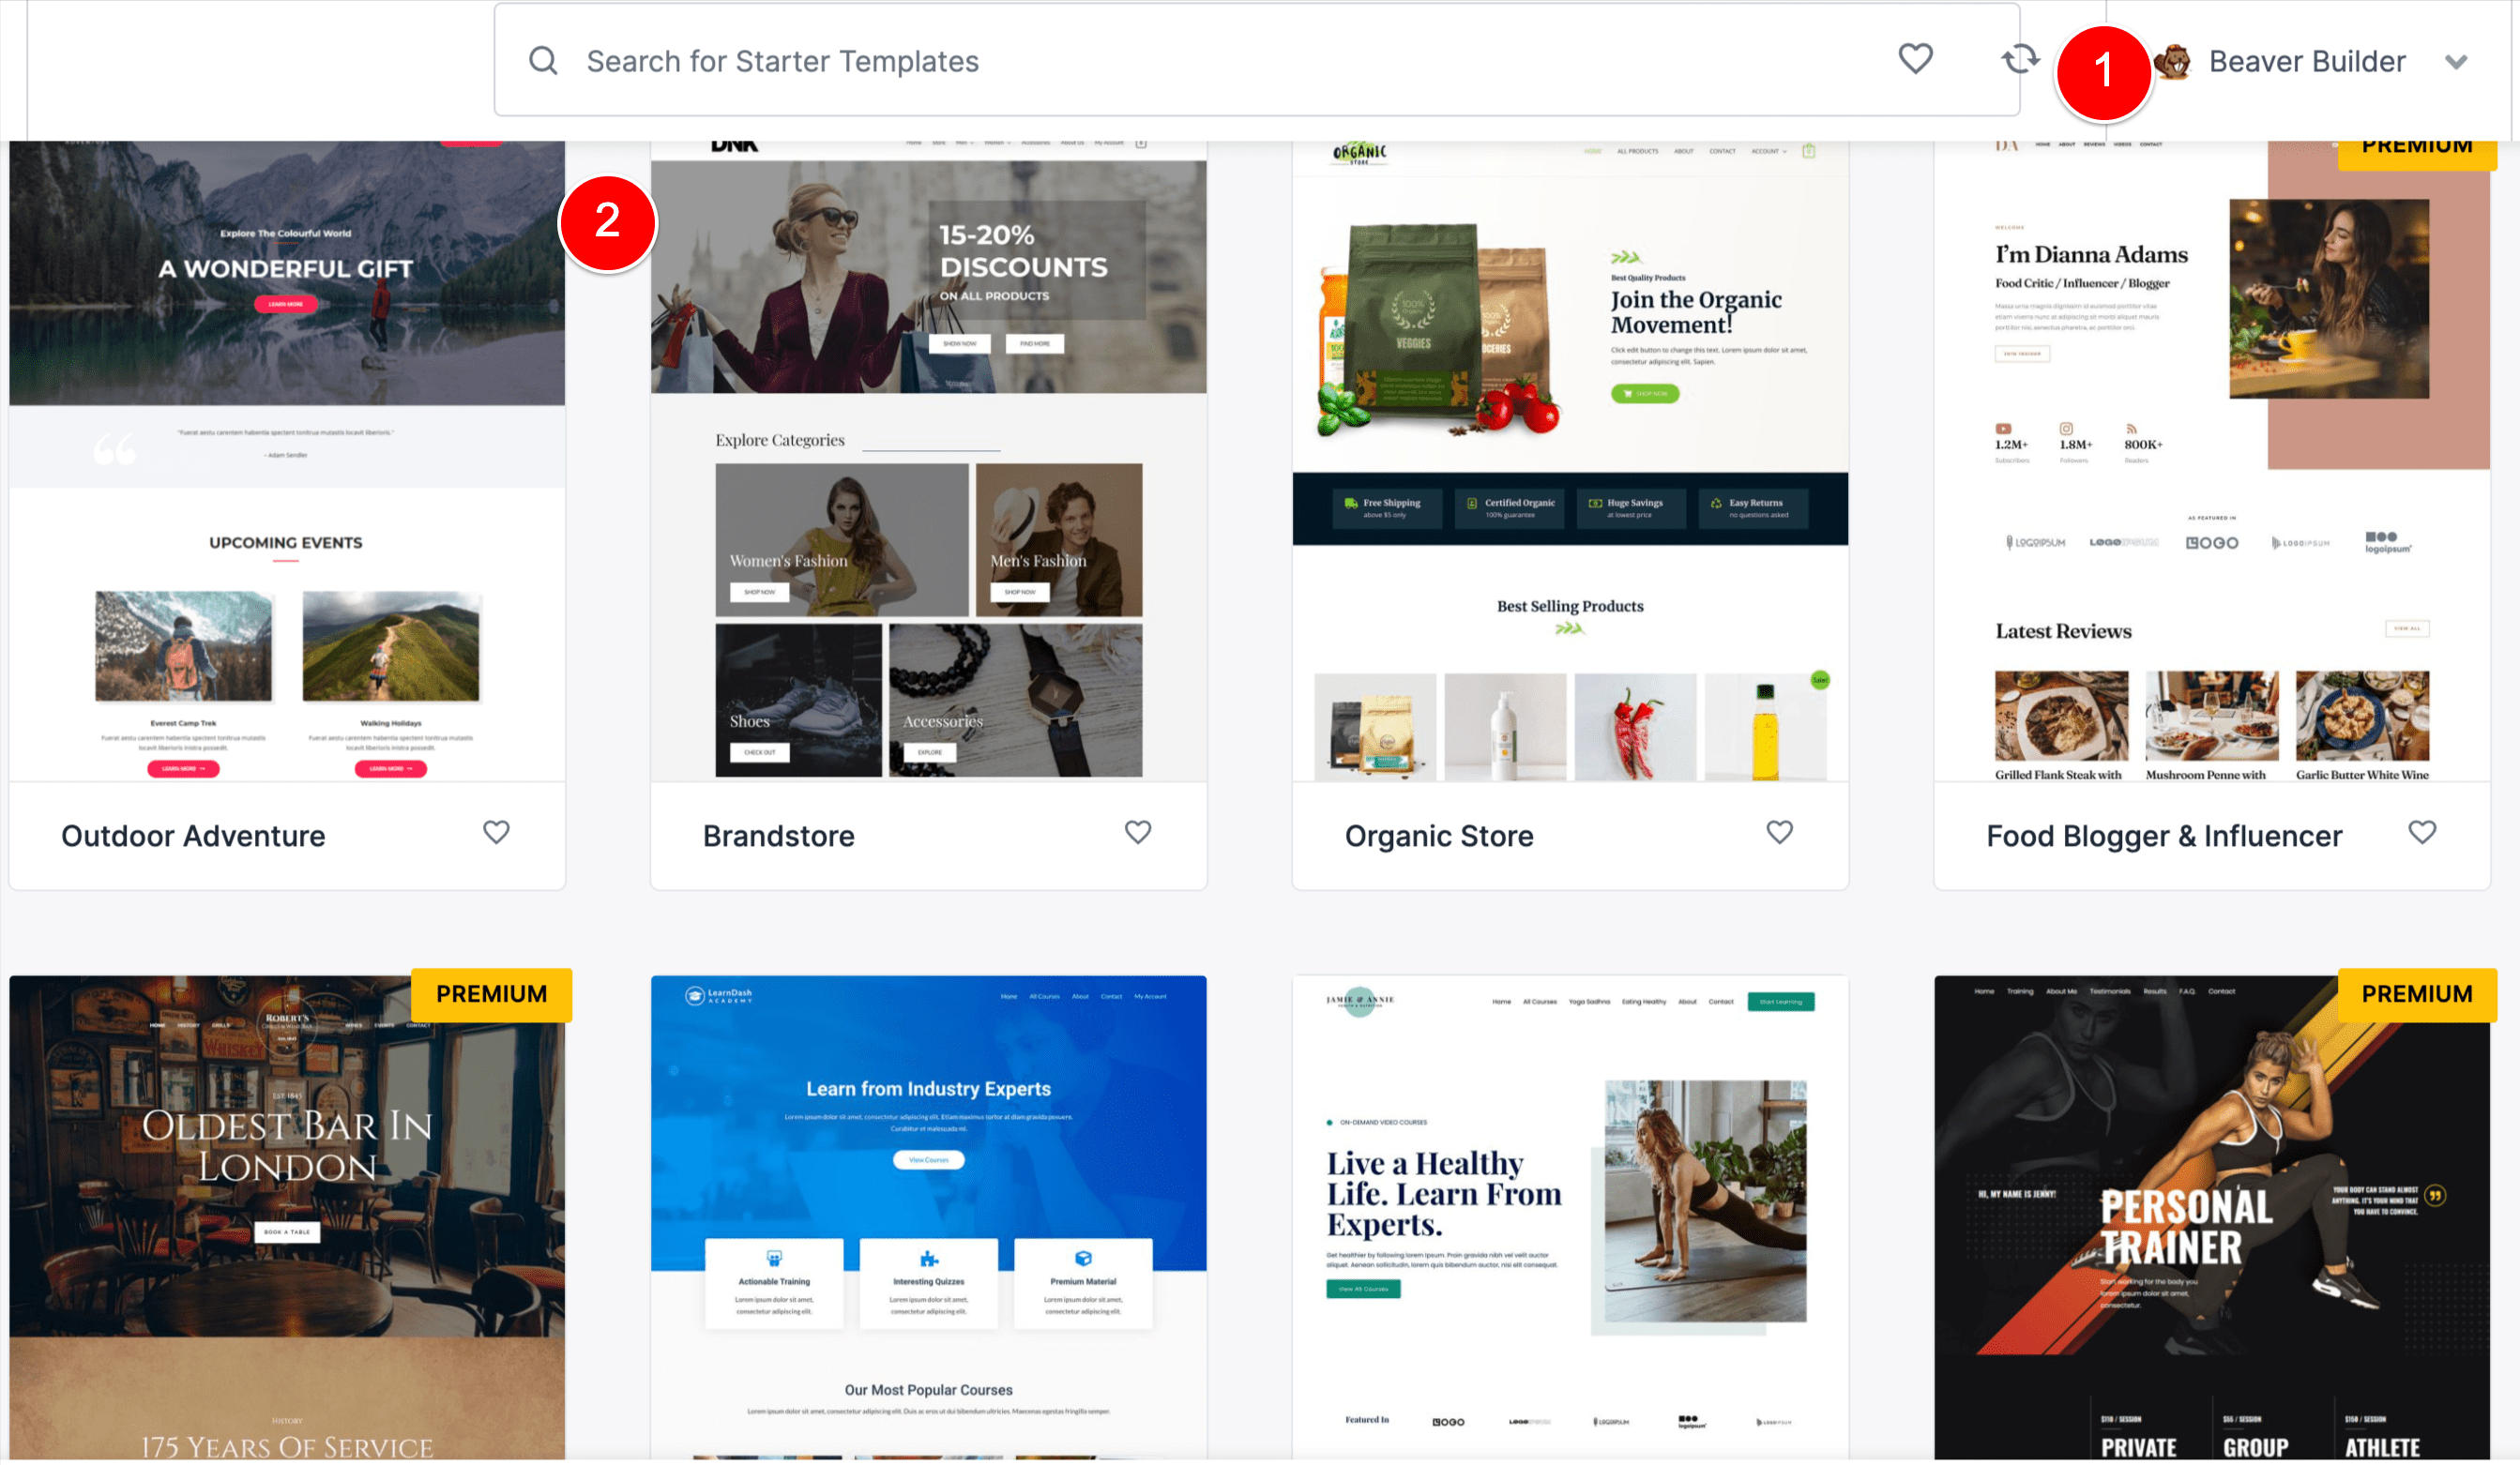
And there are Starter Site templates for the below Page Builders.
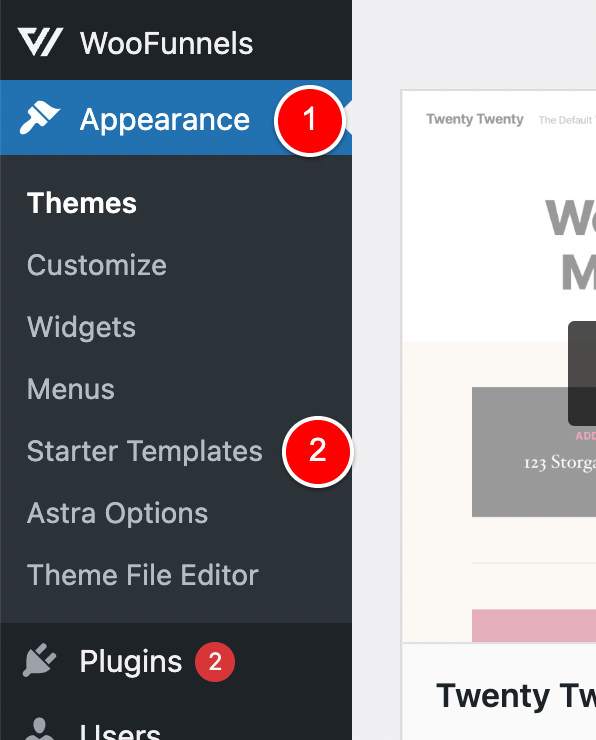
To import a Starter Site to your website, you go to Appearance > Starter Sites…
Then you choose a Starter Site you’d like to import.
For this demo, I’ll click to import this Online Health Coach template.
Then I click to import…
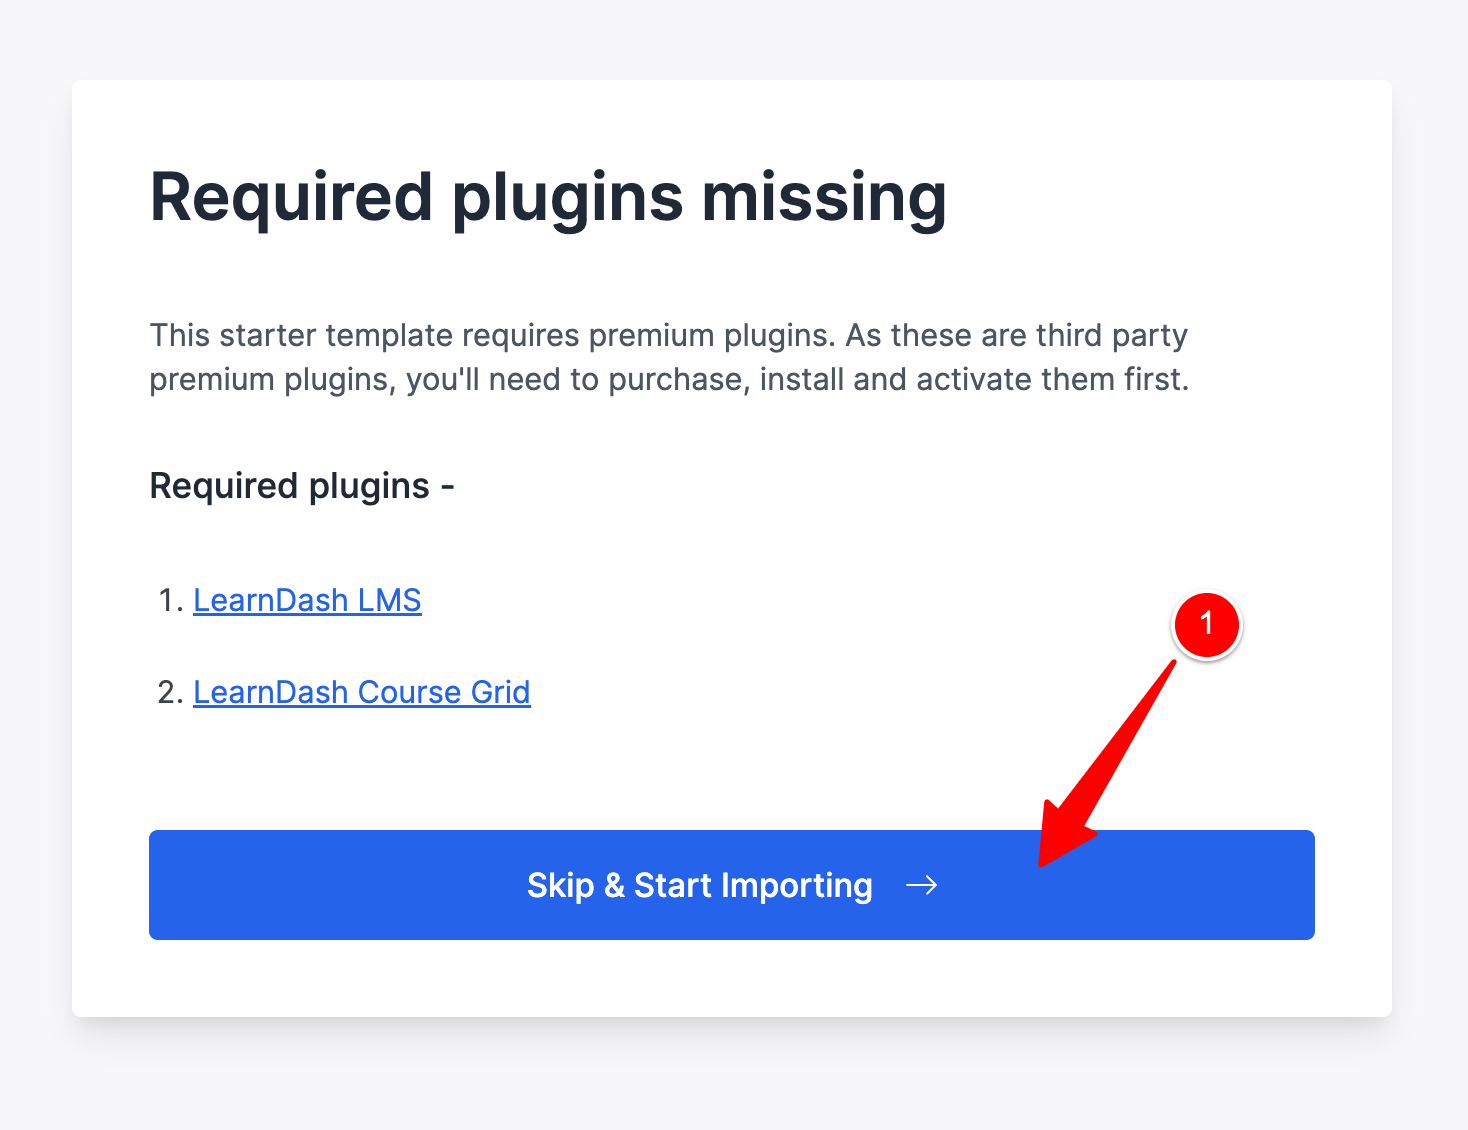
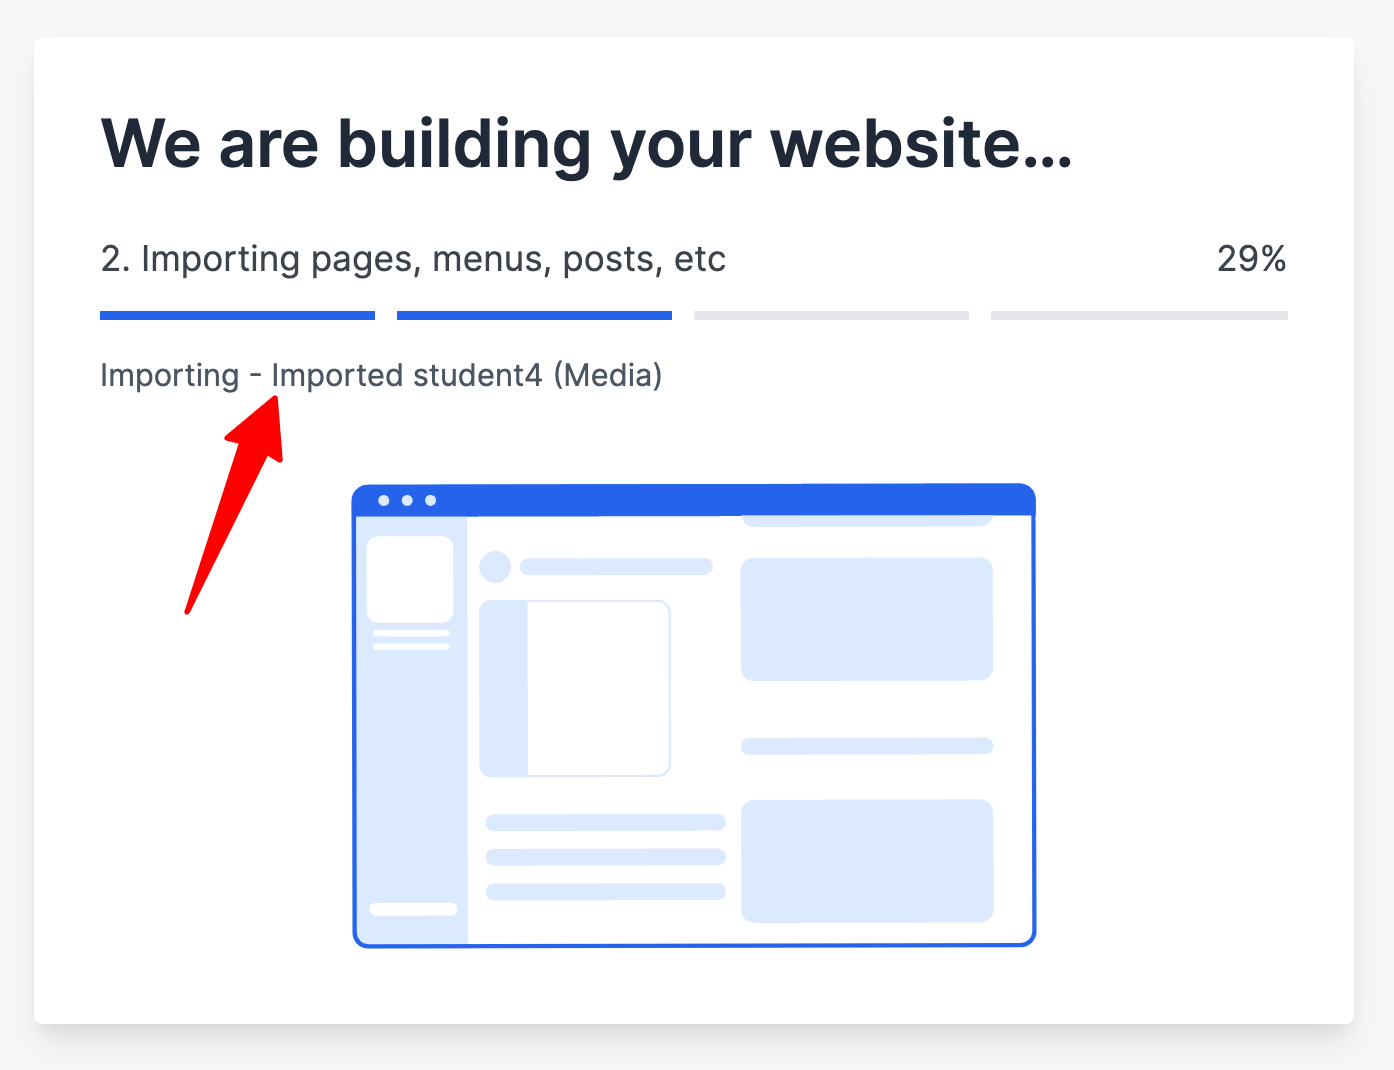
Then the wizard begins importing the Starter Site template into my WordPress install, including importing any dummy content it needs along the way.
Once the import is completed, I click this button to view my website…
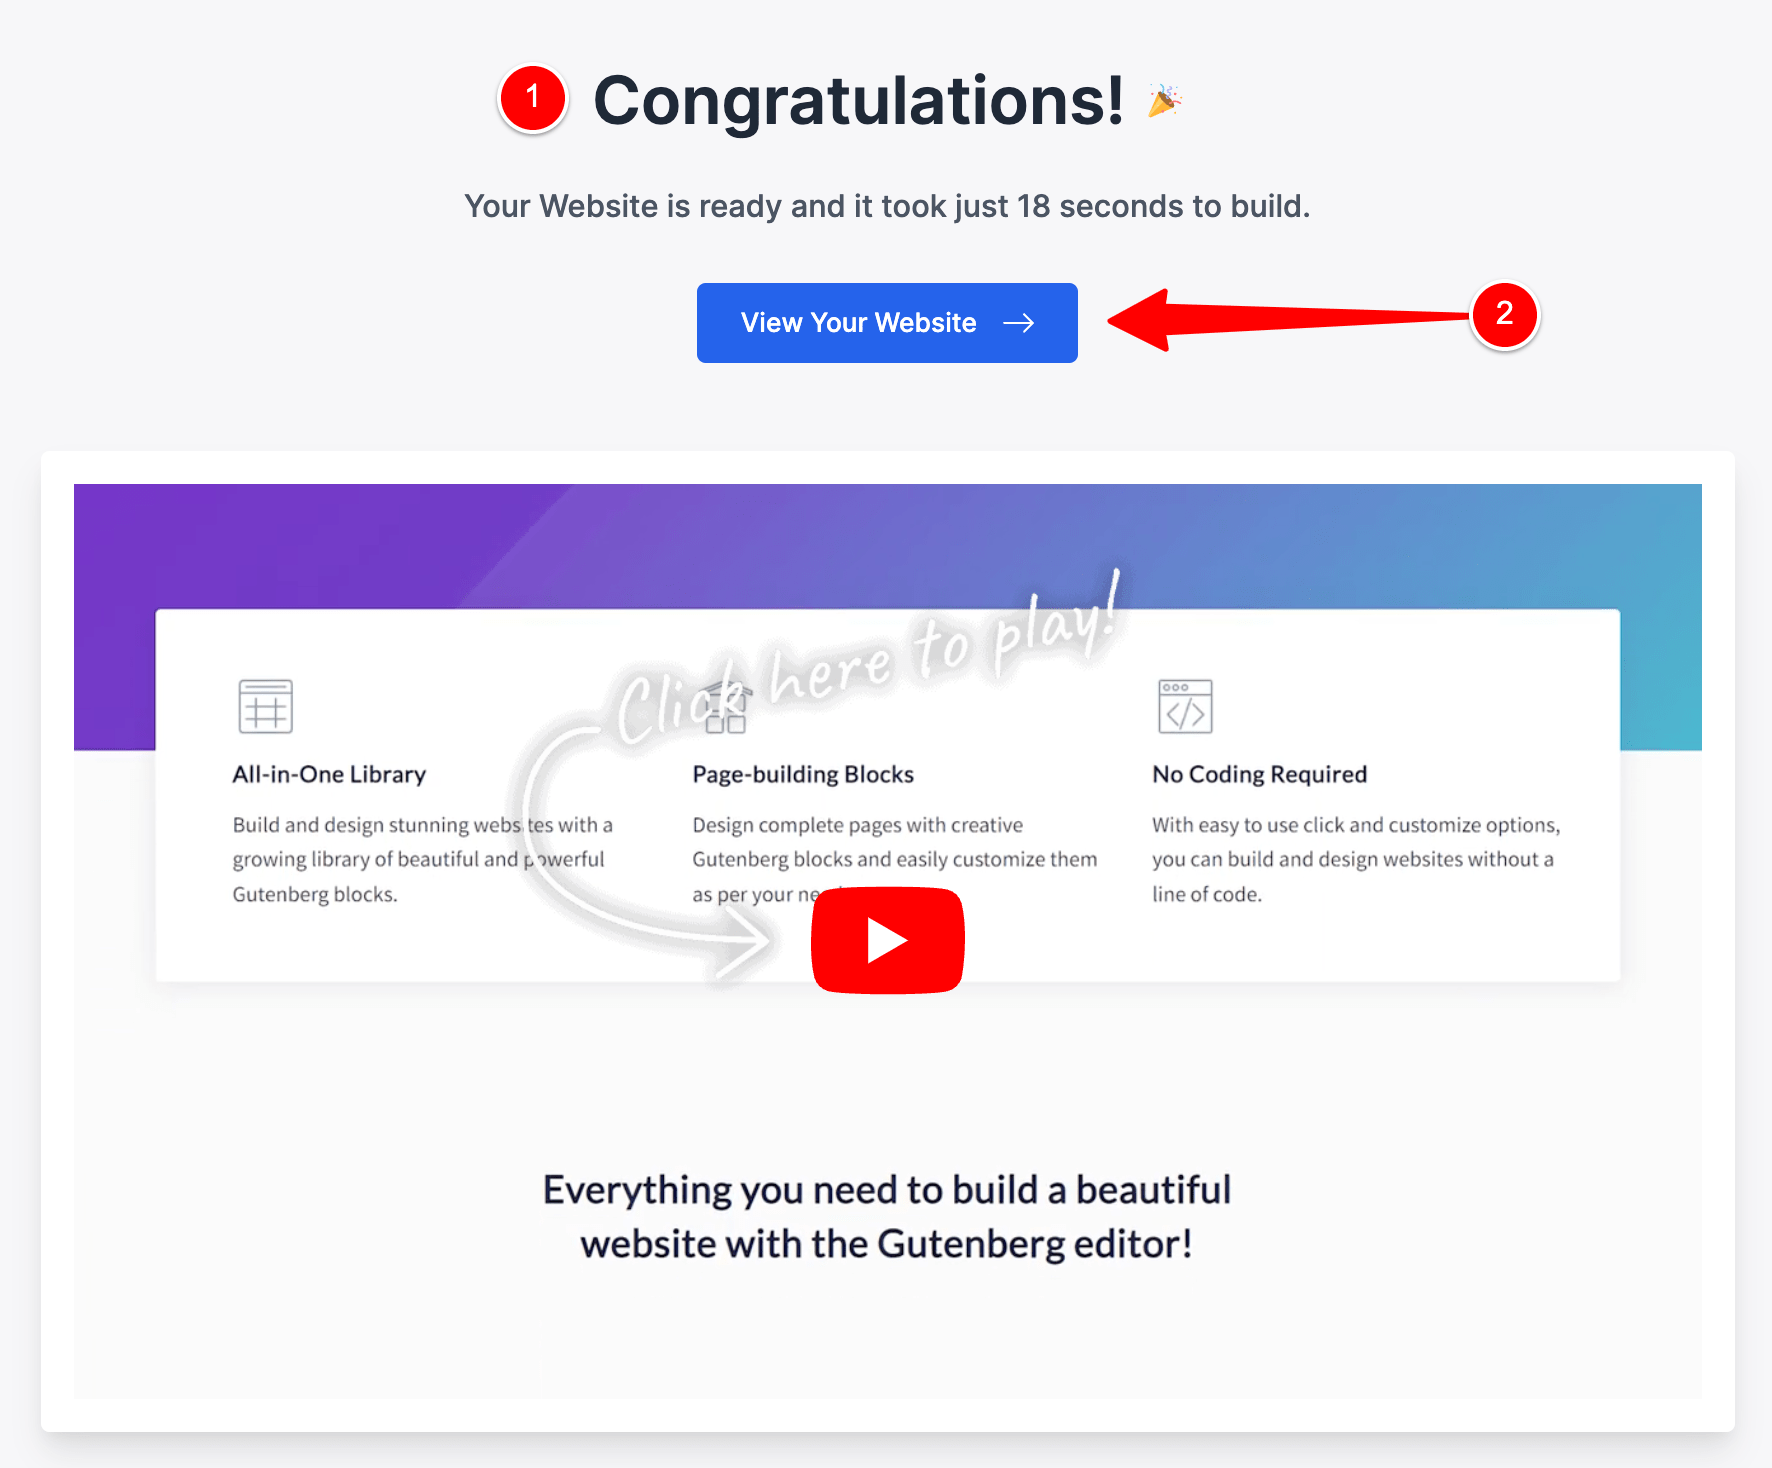
And my entire website has been built.
All Pages have been created in WordPress automatically for me and all content is imported into these pages.
Here is what my homepage looks like after doing that quick one-click import.

When I was dropshipping and needed to set up websites fast for different niche ecommerce stores, I would often select a Starter Site to get get started, then add some products, run ads and if the products started selling well, then I would put a bit more effort into branding the Starter Site to make it a bit more custom.
So, you might be wondering – how do Bricks Builder’s templates compare to Astra’s Starter Sites feature?…
Astra Starter Sites VS Bricks Builder
Bricks Builder allows you to achieve the same result as Starter Sites in Astra, but it just takes a bit more manual work (for now).
For example, Astra Sites are a collection of Home / About / Contact / Shop etc… pages that all match in design and import into your website with one click.
With Bricks Builder, you still have designs for these pages that match their aesthetic, but you just need to first manually create the pages and then add the templates to each.
To be honest, it doesn’t take much extra work.
So, to summarise my thoughts on Astra VS Bricks for templates…
The systems are as good as each other, but Bricks just needs more time to add more templates.
I would love to see this list at (1) below increase as I would definitely be using it for websites I build myself.
The FASTEST Page Builder for WordPress that I have ever used.
The Templating System is extremely flexible
Let me show you how you would use Bricks to build custom page templates, your single.php template / archive templates etc – as this is something I wasn’t sure about before I bought Bricks Builder.
When I used Beaver Builder, I needed to purchase the Beaver Themer template to be able to design my archive.php / single.php etc templates across my website. Bricks Builder does not need extra plugins like this – the 1 Bricks Theme allows you to do all of it (for a one-time payment, which is an incredible value – considering Beaver Themer alone was $149 per year for me).
How Bricks handles templates (and why I LOVE it)
Ok, so I will start here by saying… I don’t even know if this is the right way to use Bricks to set templates for your posts / pages etc – but it works well for me and I really like how I’ve got it working so I wanted to share it with you.
When I was using the Astra WordPress theme, like all other themes I would set the template for a Post / Page in the Template meta box, as shown below.
Some other common templates that would show here for some themes is your ability to set your sidebar on the left or right, or have no sidebar at all.
This method works but you are setting the template on a per post basis.
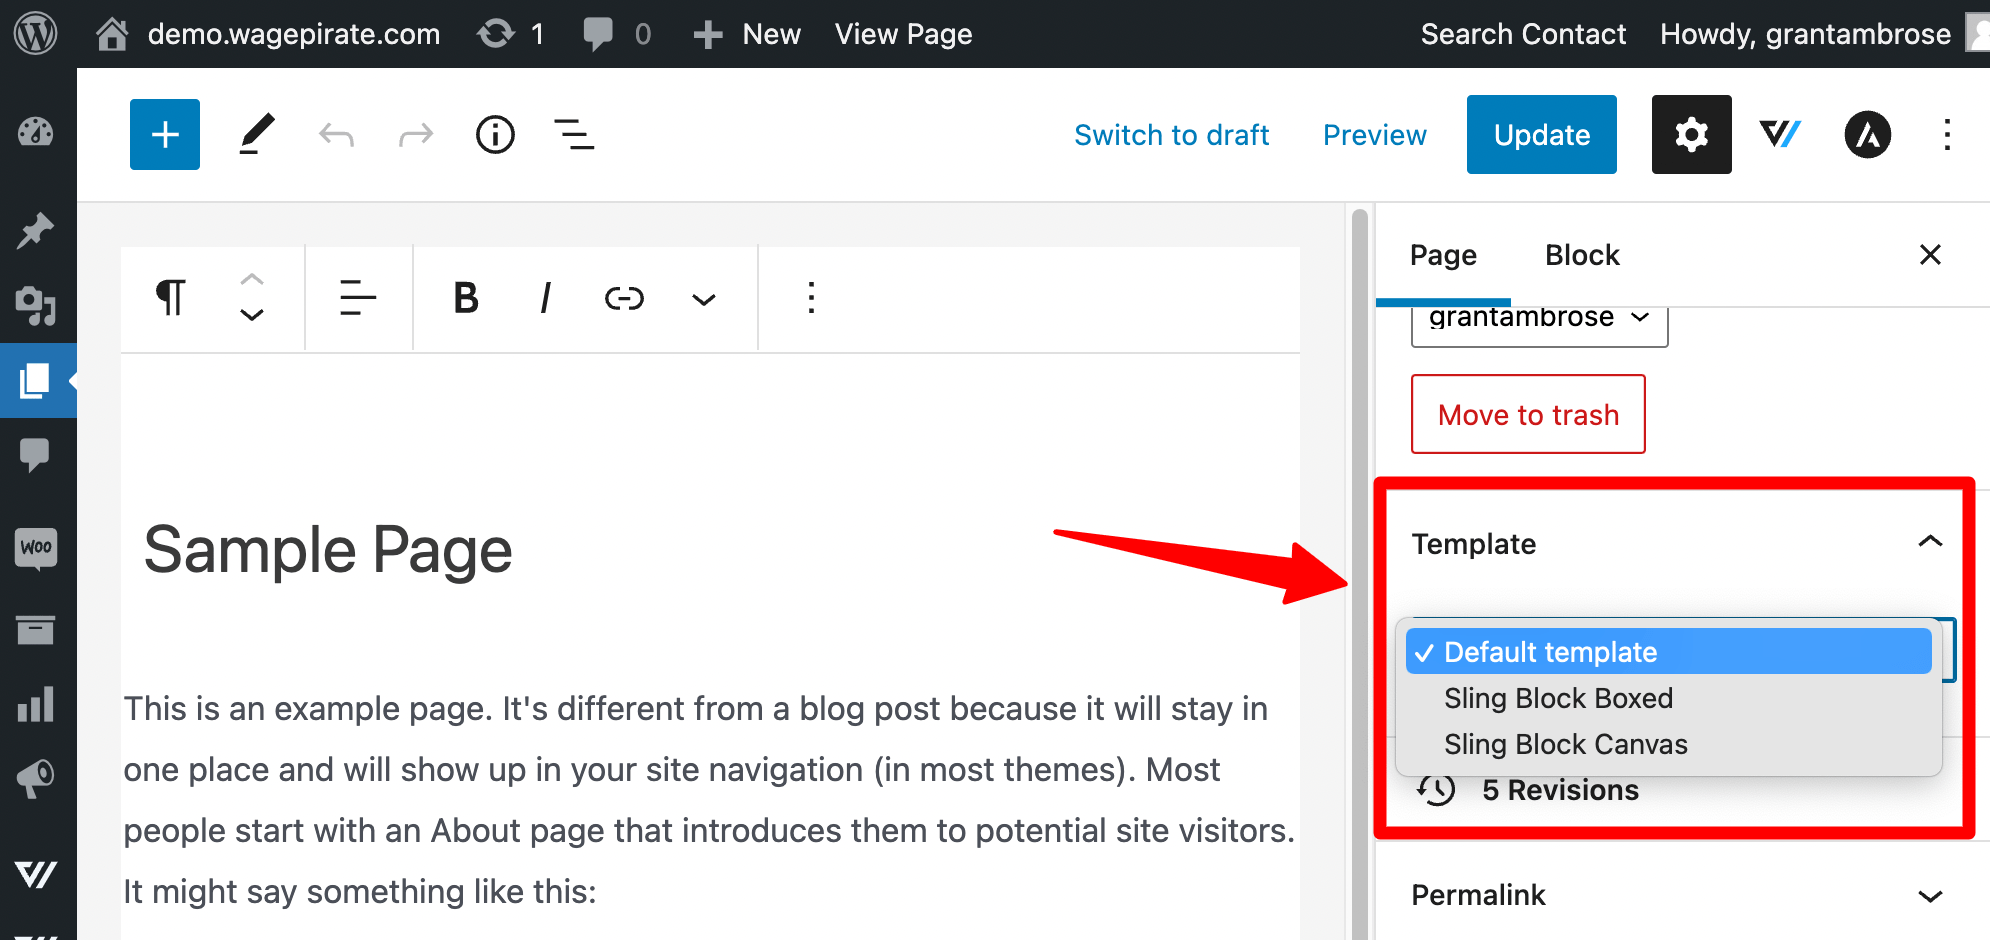
In Bricks, I don’t use this meta box to set my templates, but rather I do the following…
On this website WagePirate.com, I go to Bricks > Templates.
And I have these templates (1) and (2) which each show under their respective conditions shown at (3).
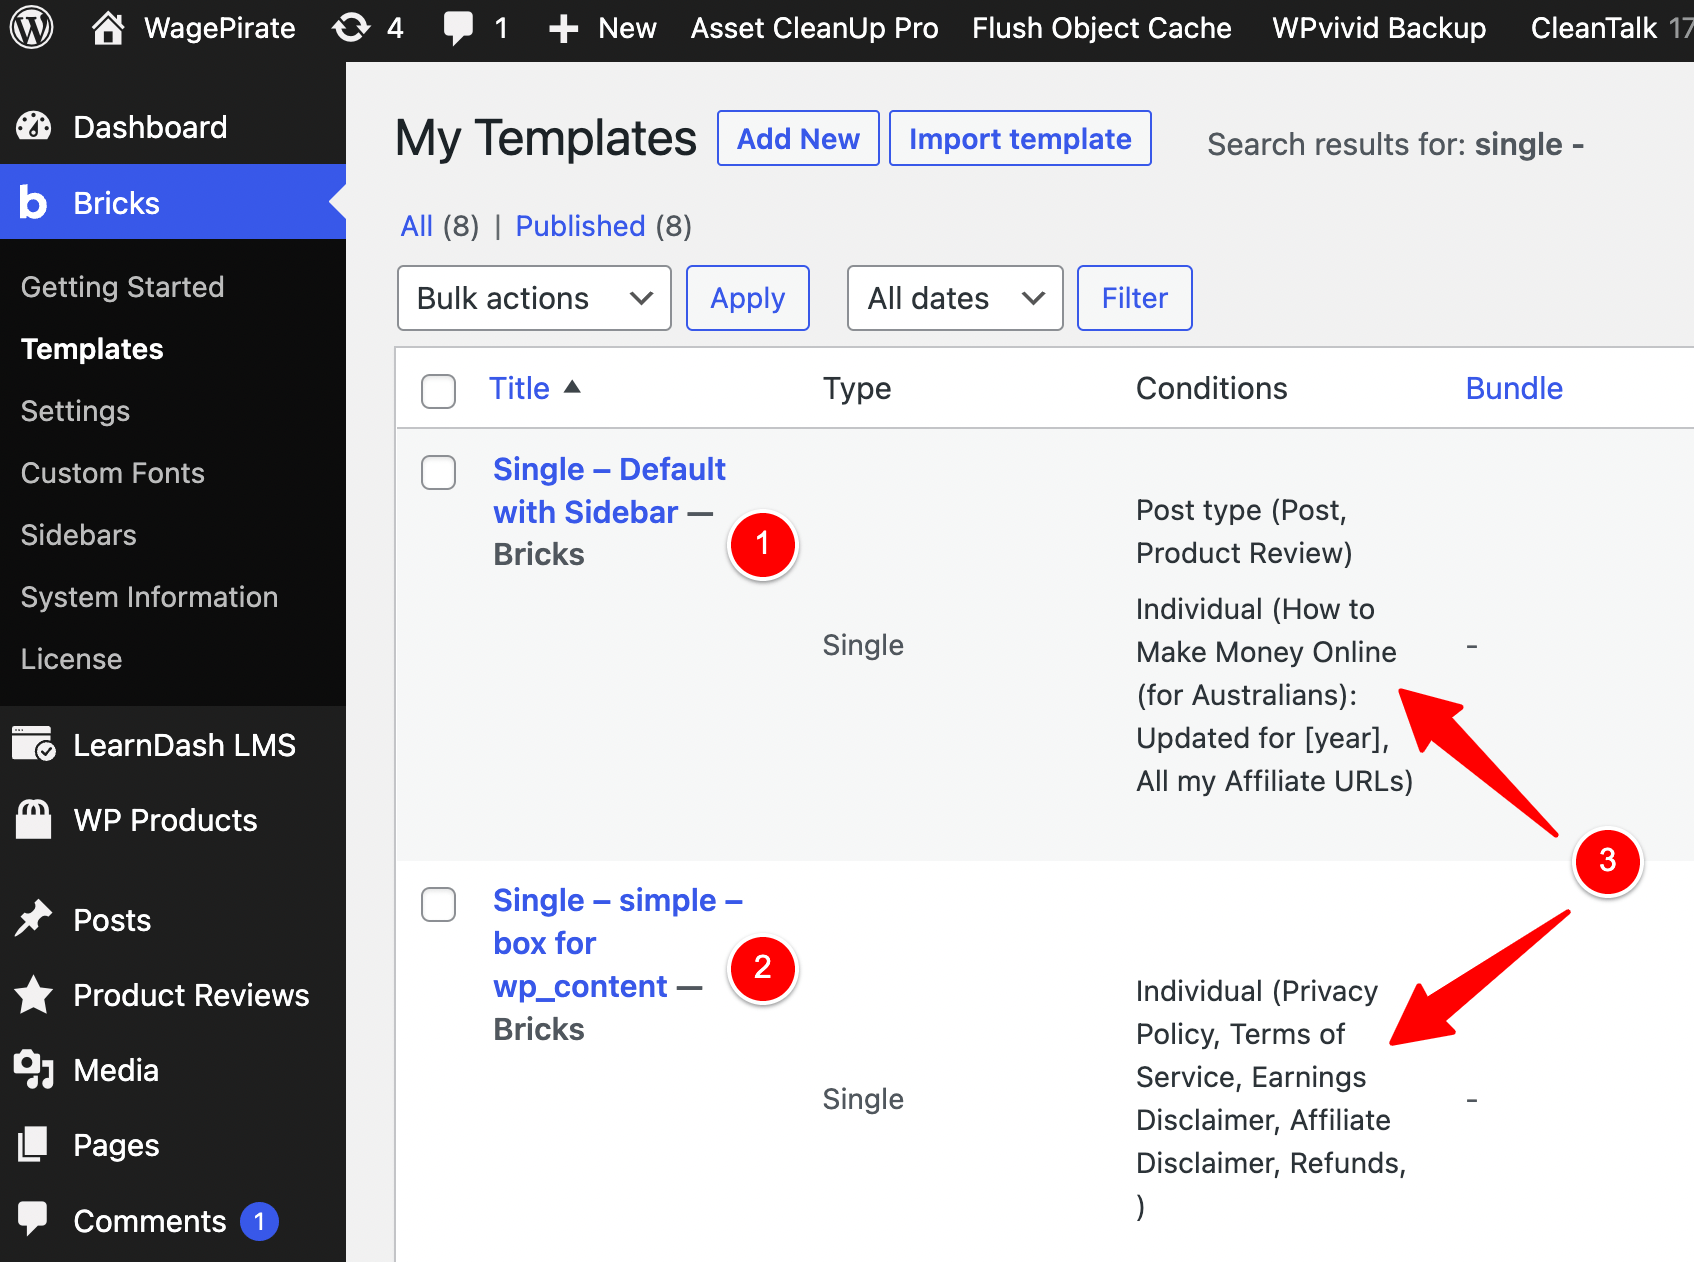
Now, notice here where the type of template for these two is set to Single.
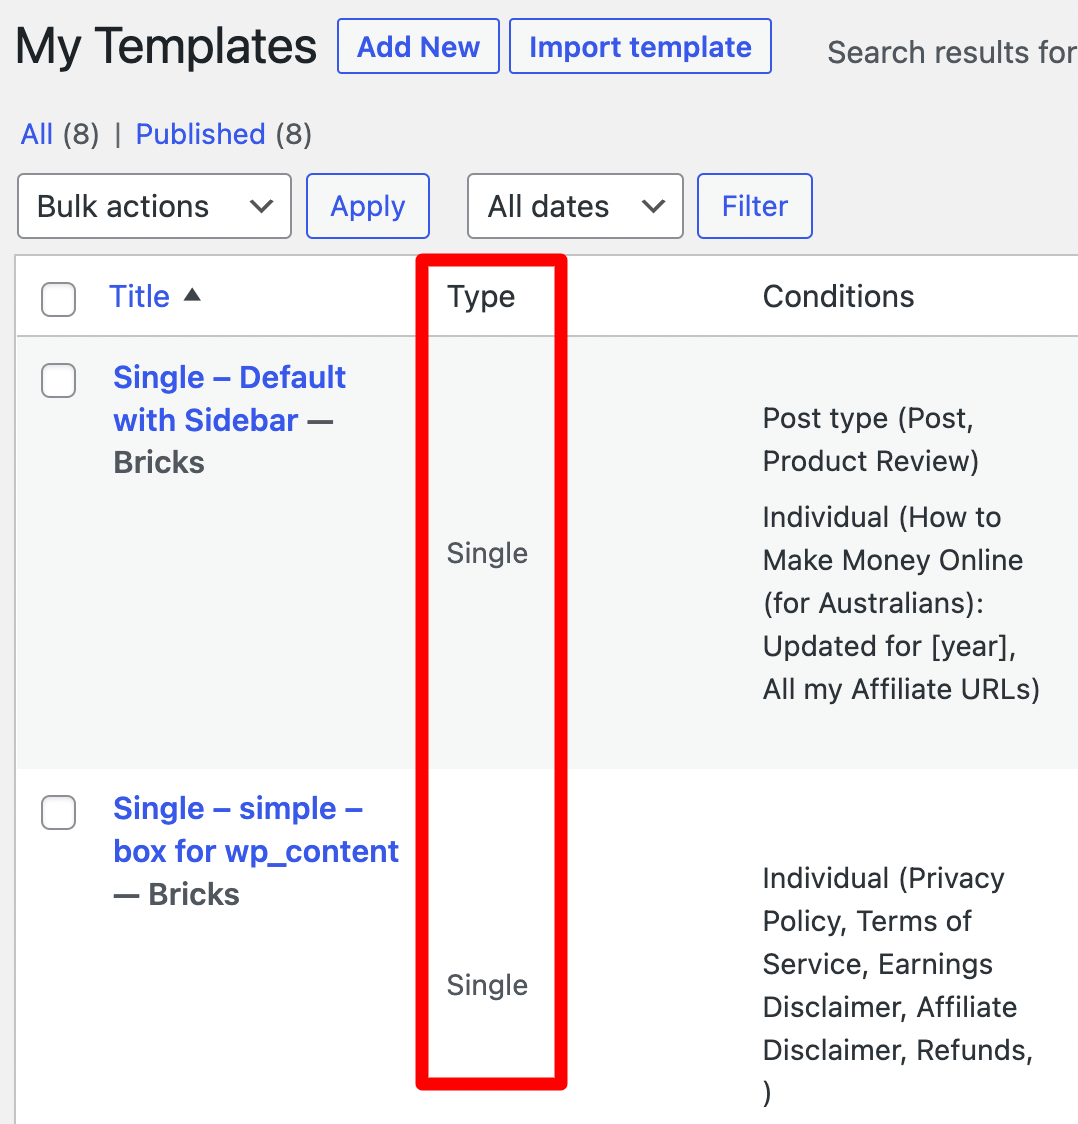
When you are creating a new template in Bricks Builder, you can set the type of template you want to create.
Below are the types of templates you can choose from…
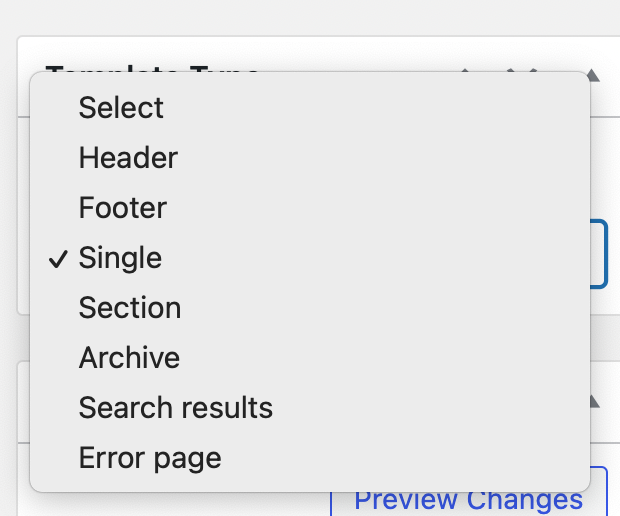
So for these two templates we are looking at, I have selected Single for both, as shown below.
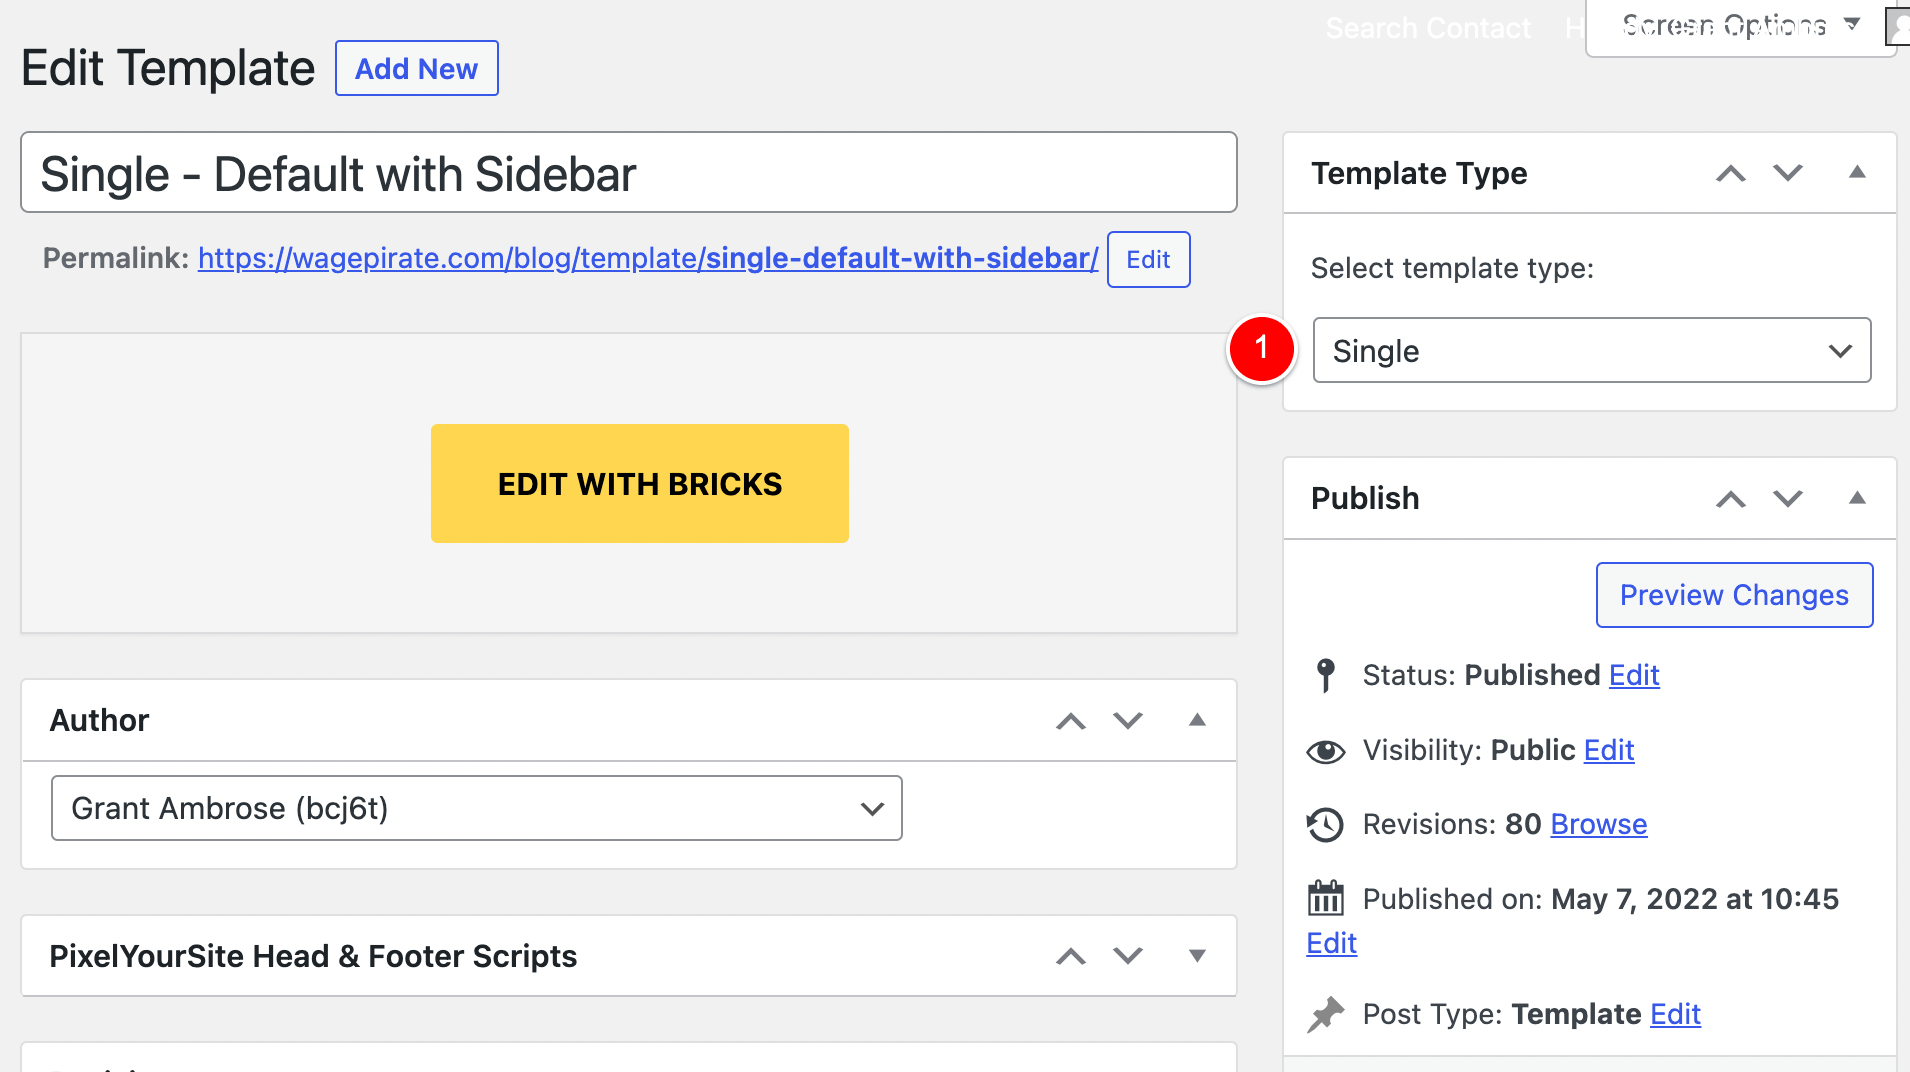
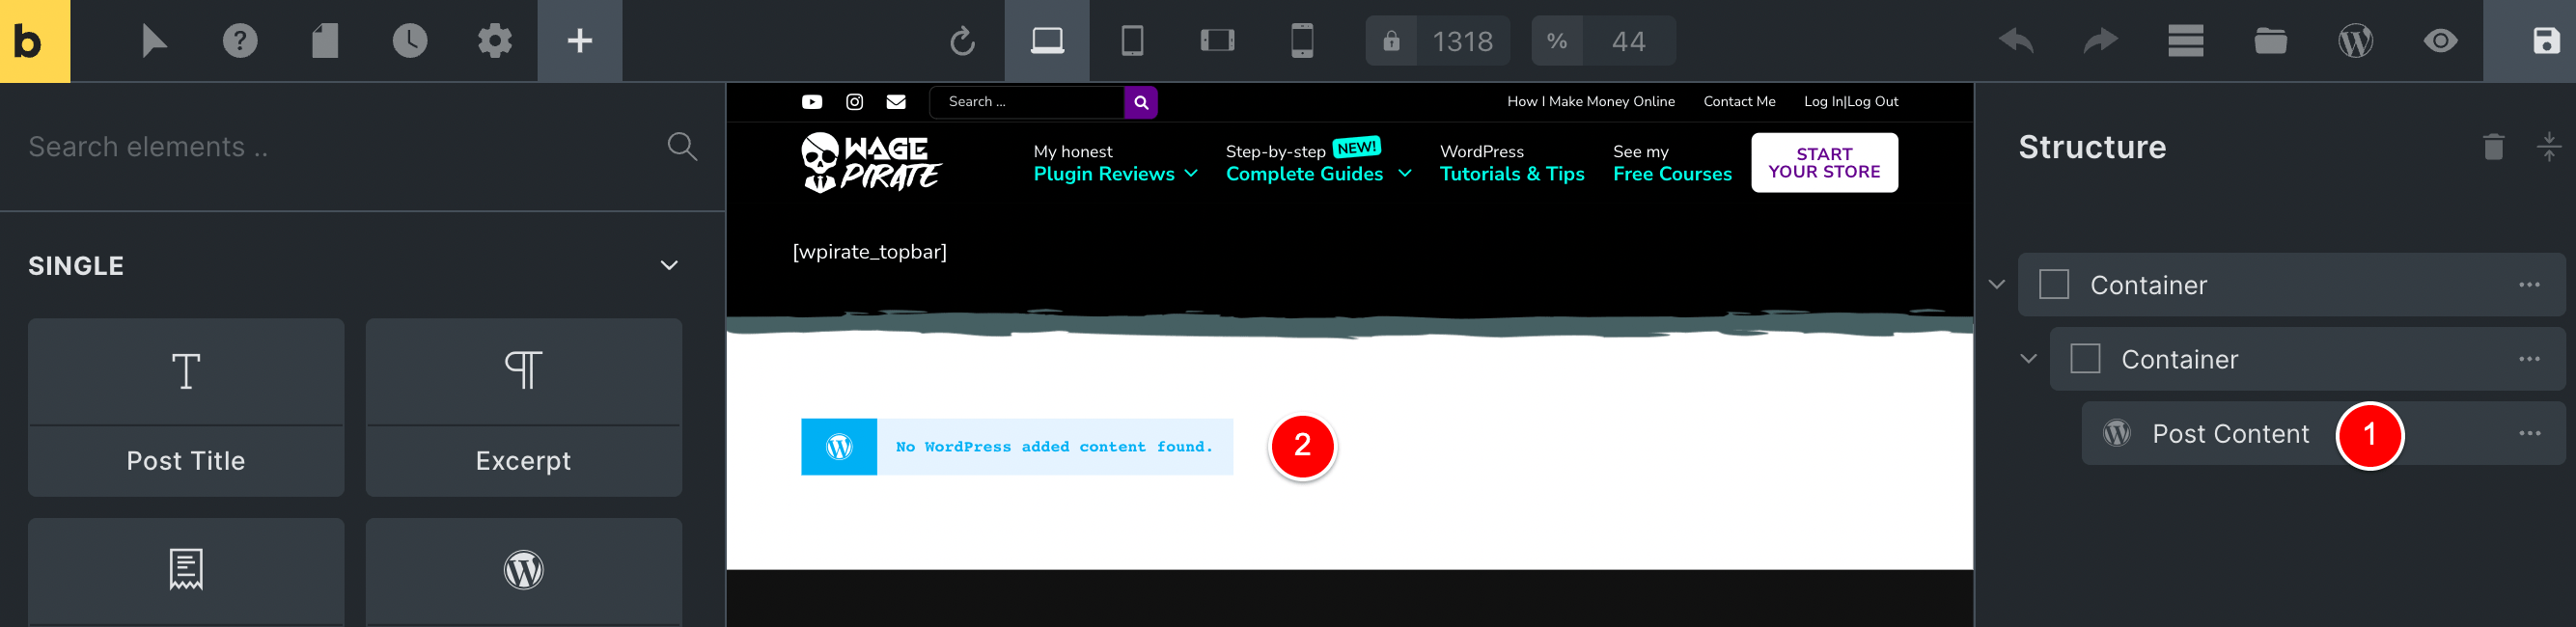
So – starting with my template named Single – Default with Sidebar (1), this is what that template looks like when I click to edit it in Bricks Builder.
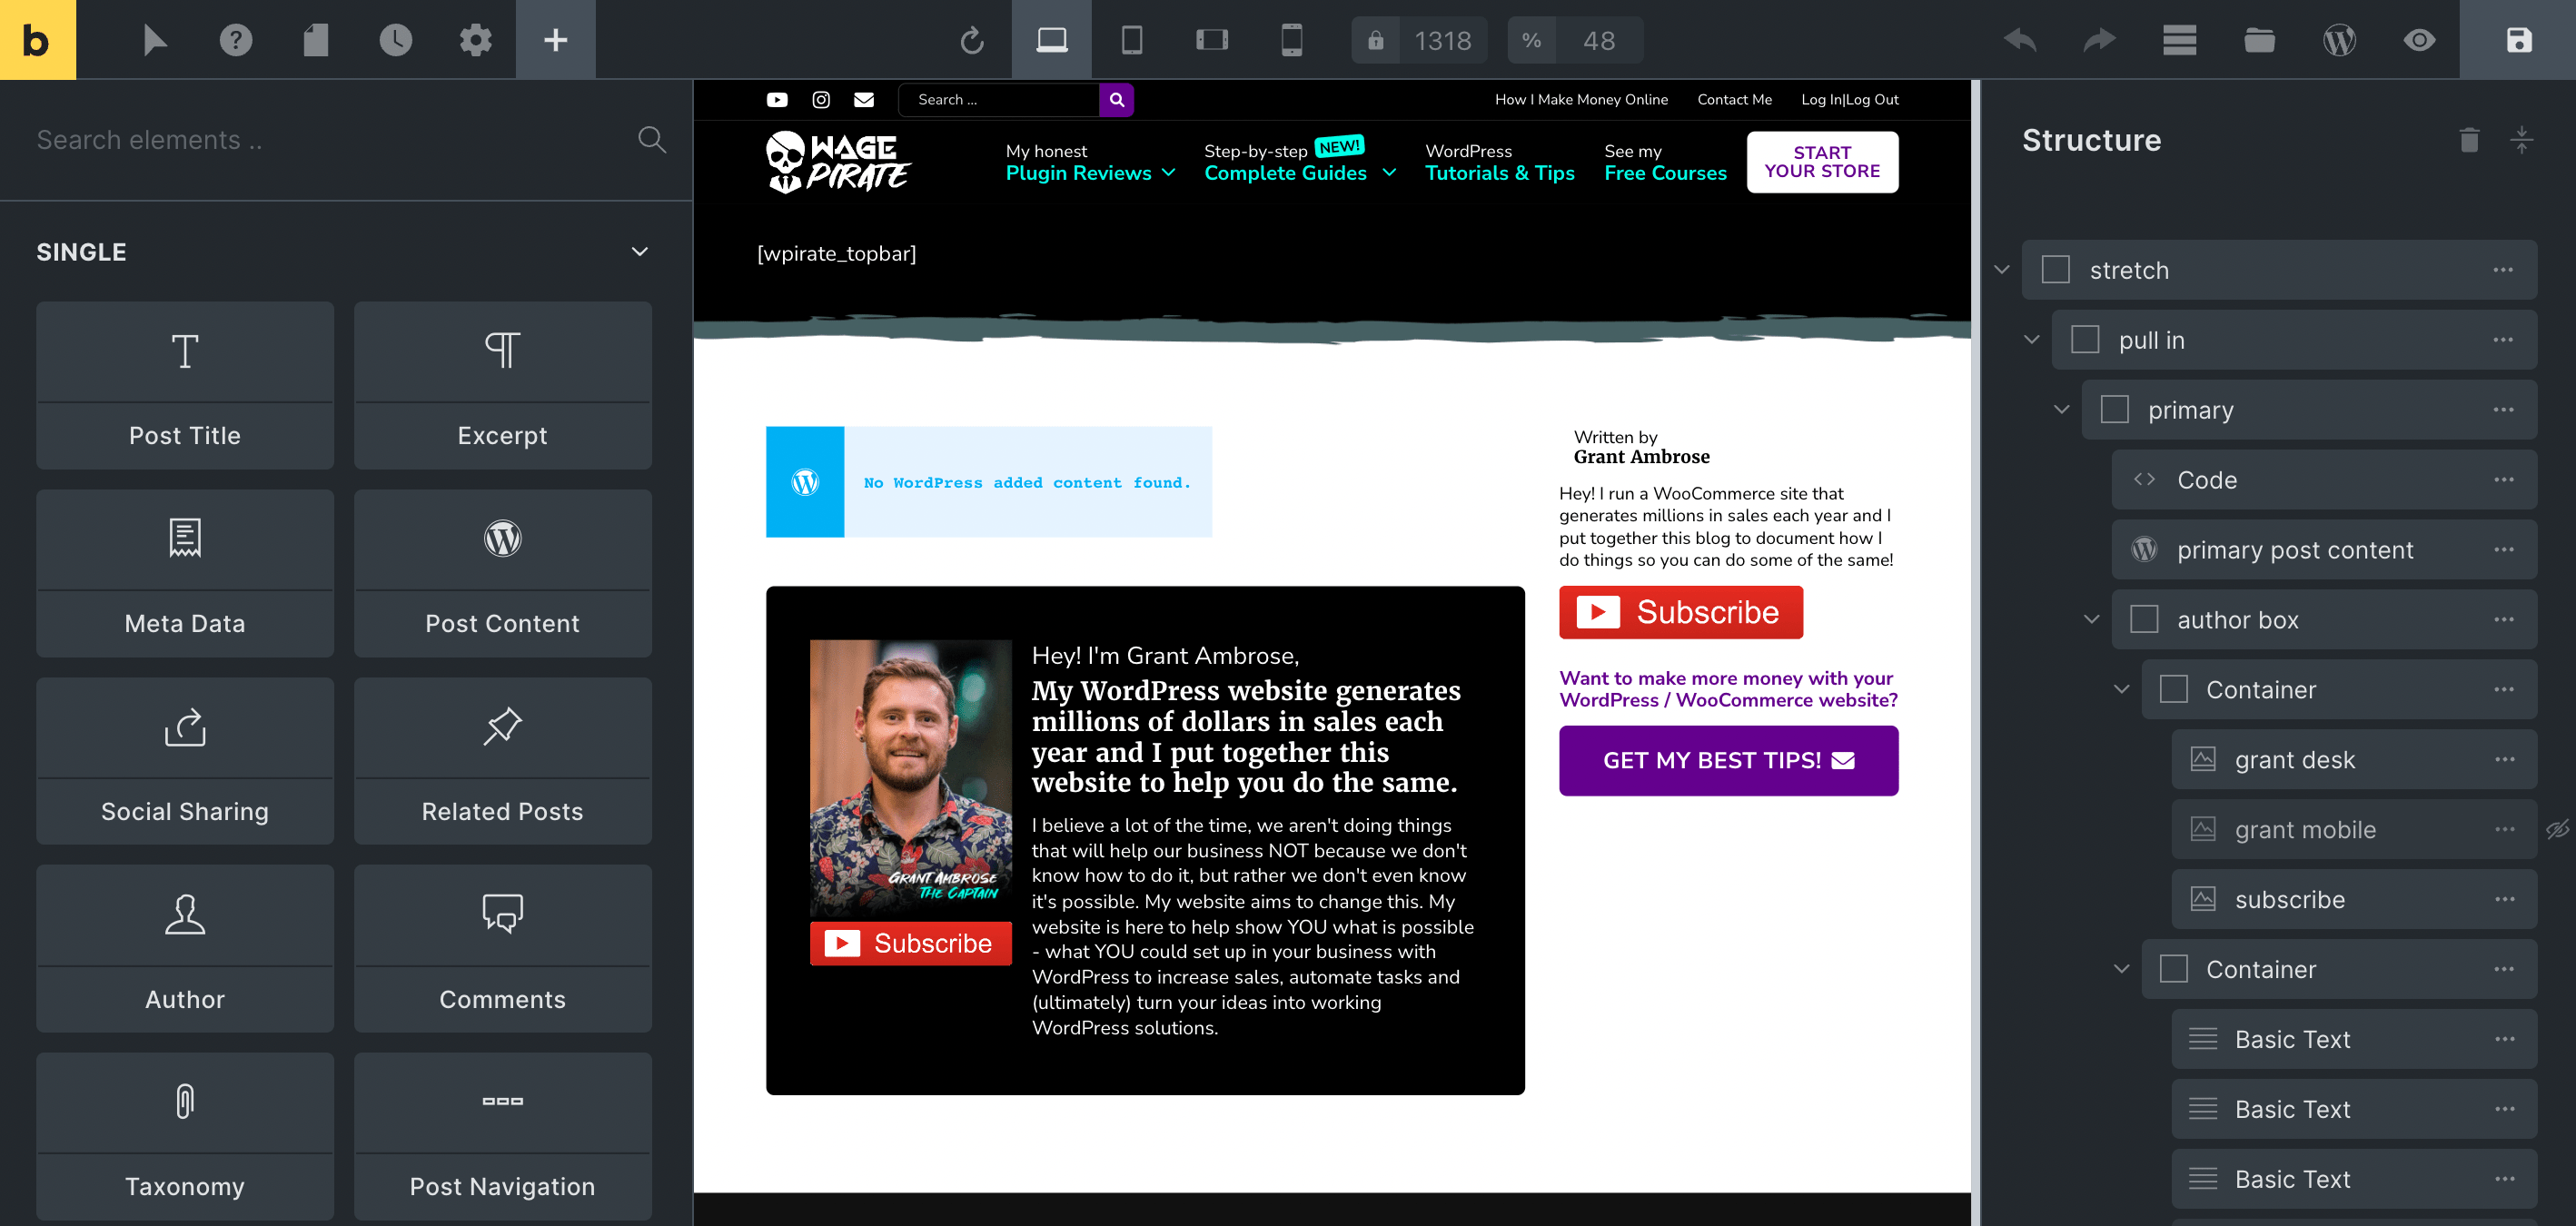
So what I have done here is designed my single.php how I want it to look, with a sidebar on the right and a primary content area on the left and I have added my Author meta box to the bottom (the black box with my photo) which I designed here in Bricks.
Now, because I selected “Single” for this template type, Bricks Builder unlocks a few elements we can use to build our design that are specific to the Single template type, which are shown below.
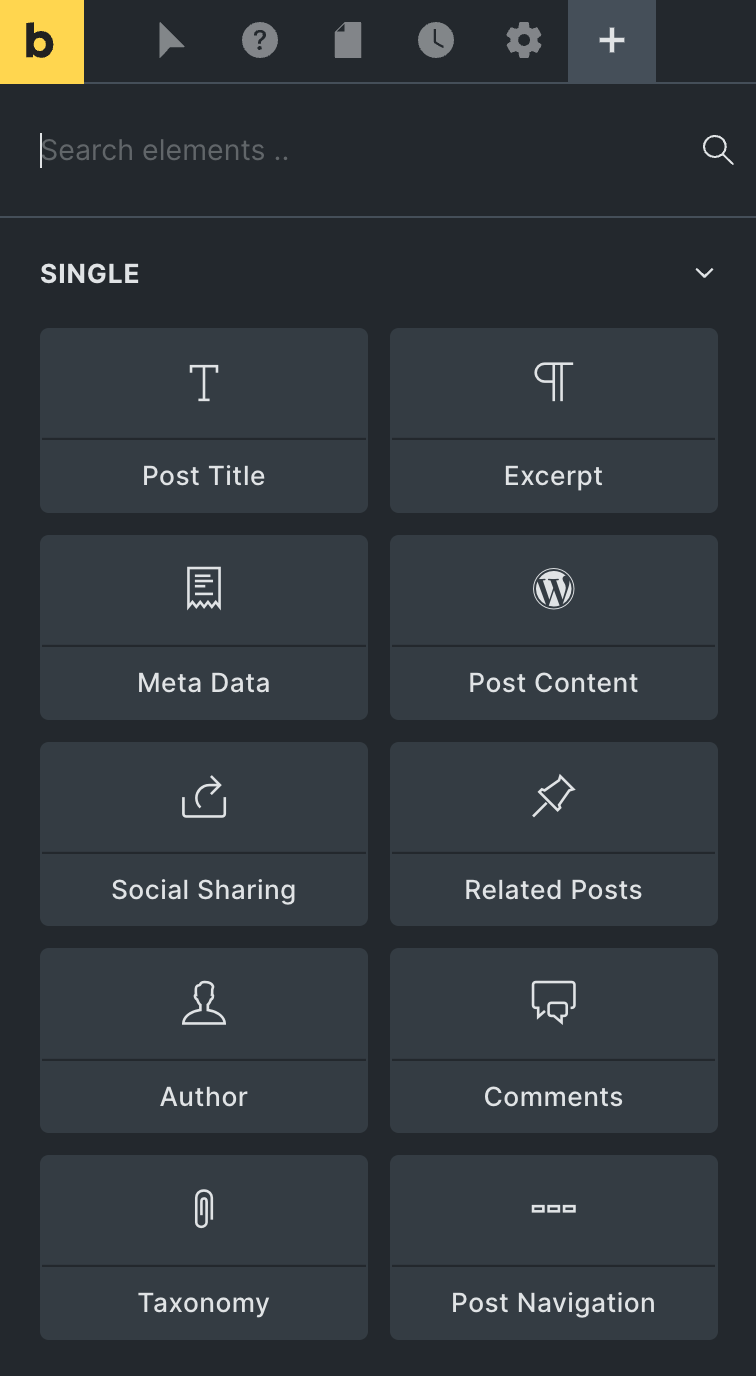
As you can see above, one of these elements is for the Post Content, so I have simply added that element to the page as shown at (3) below.
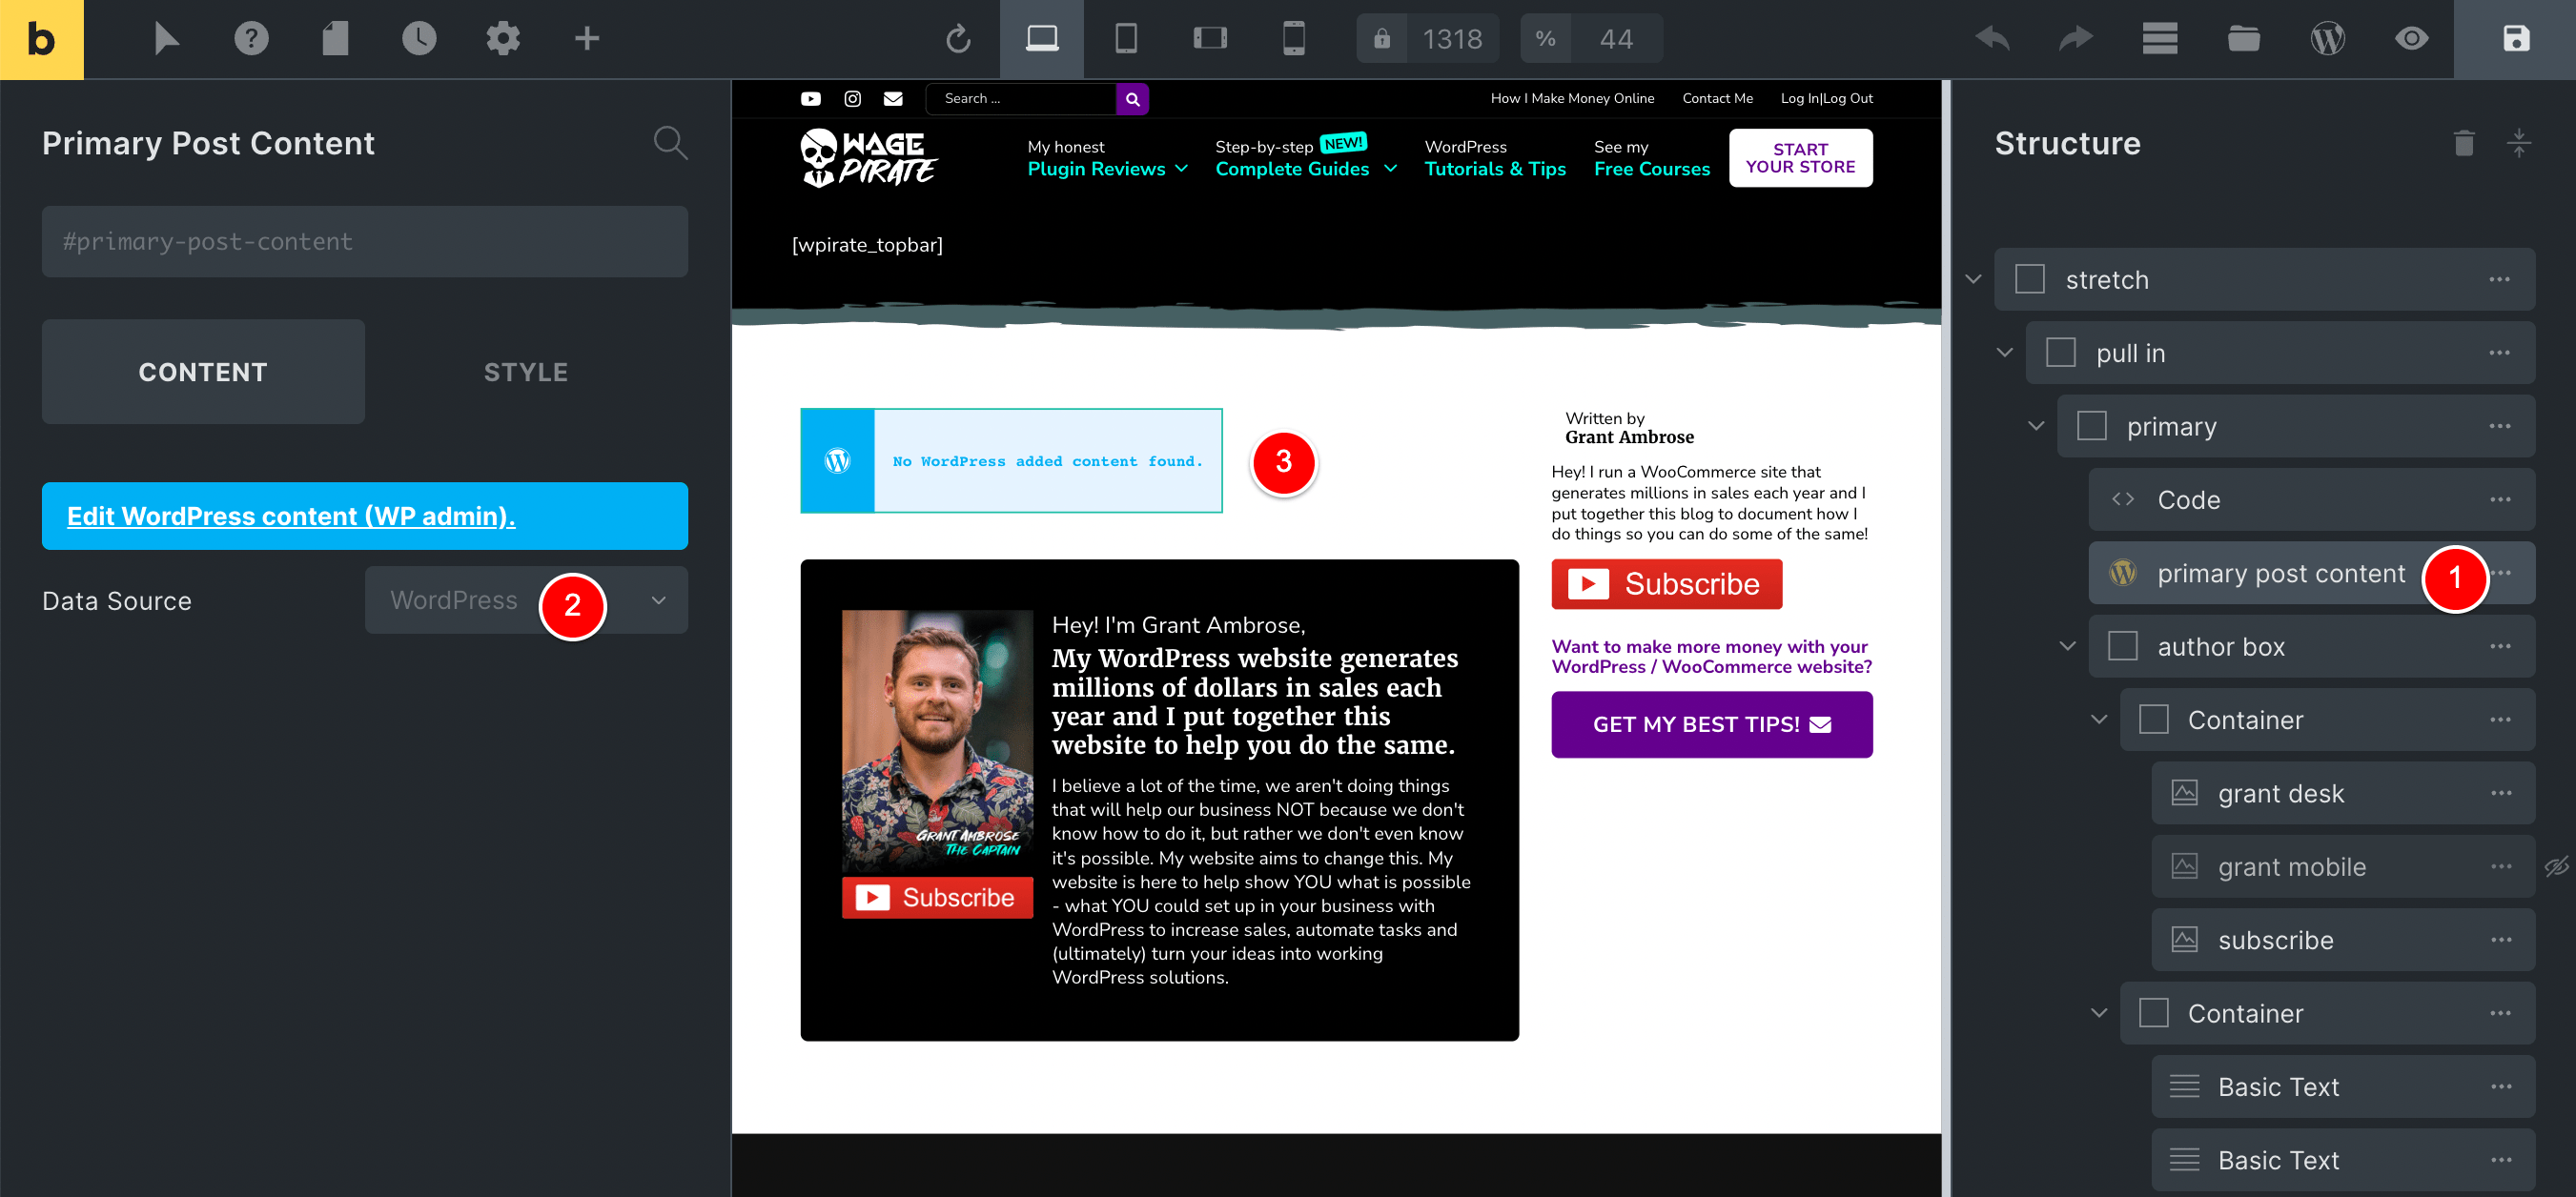
At runtime, this Post Content element outputs all the content for that post in that area.
This allows me to design my single.php template using Bricks and then my Gutenberg content is output wherever I put that Post Content element.
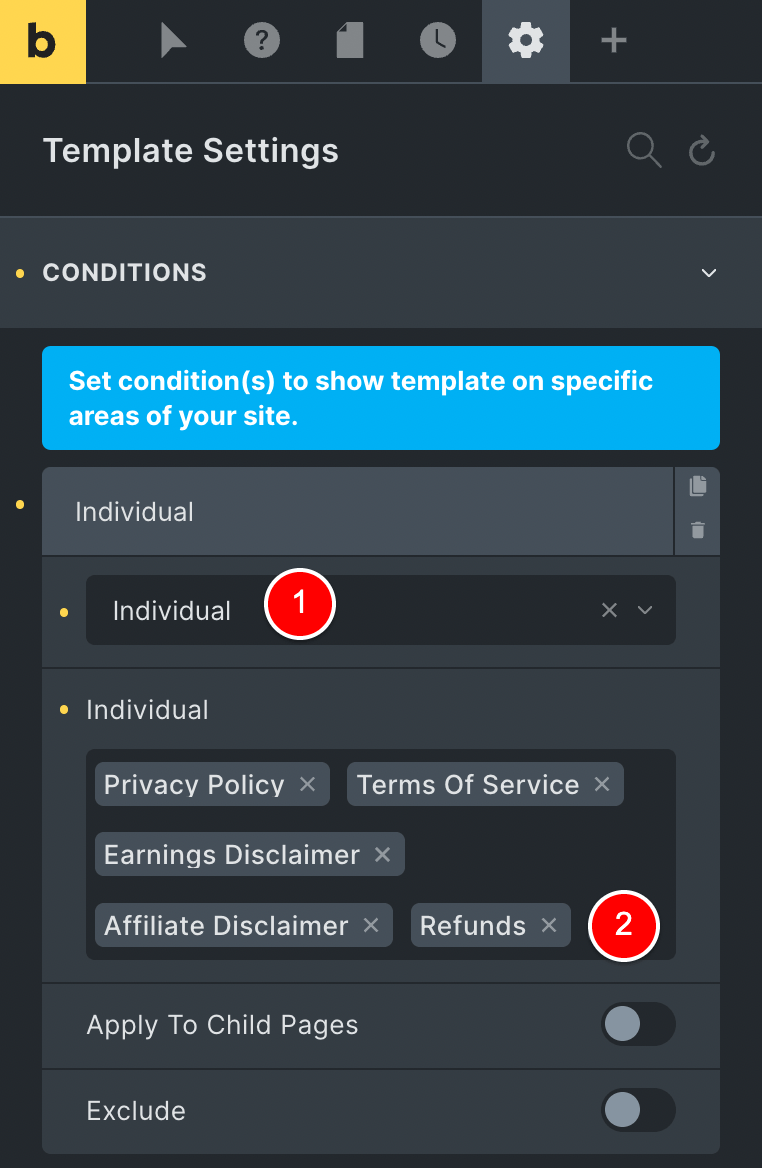
Now, the last thing you need to do once you design your single.php template is to specify under what conditions you want your new template to be used.
When you are editing your template, you can click on Settings (1) and then under Conditions (2) you specify things like which post types you want to use this template for.
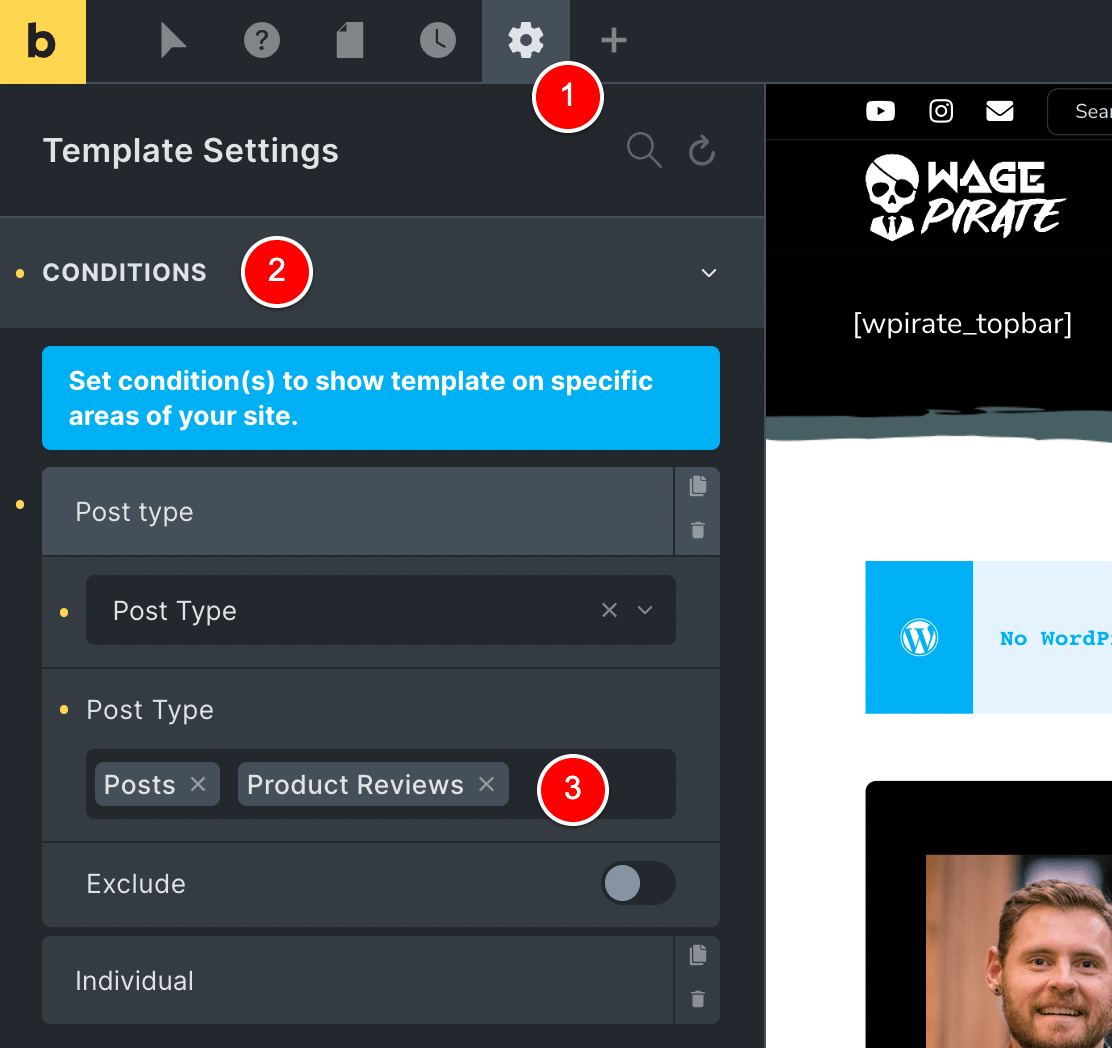
As you can see, I have this sidebar template applying currently to my Blog Posts and Product Reviews.
I basically apply this template to any content on my website that is usually long-form content i.e. content where I use Gutenberg to write a lot of content.
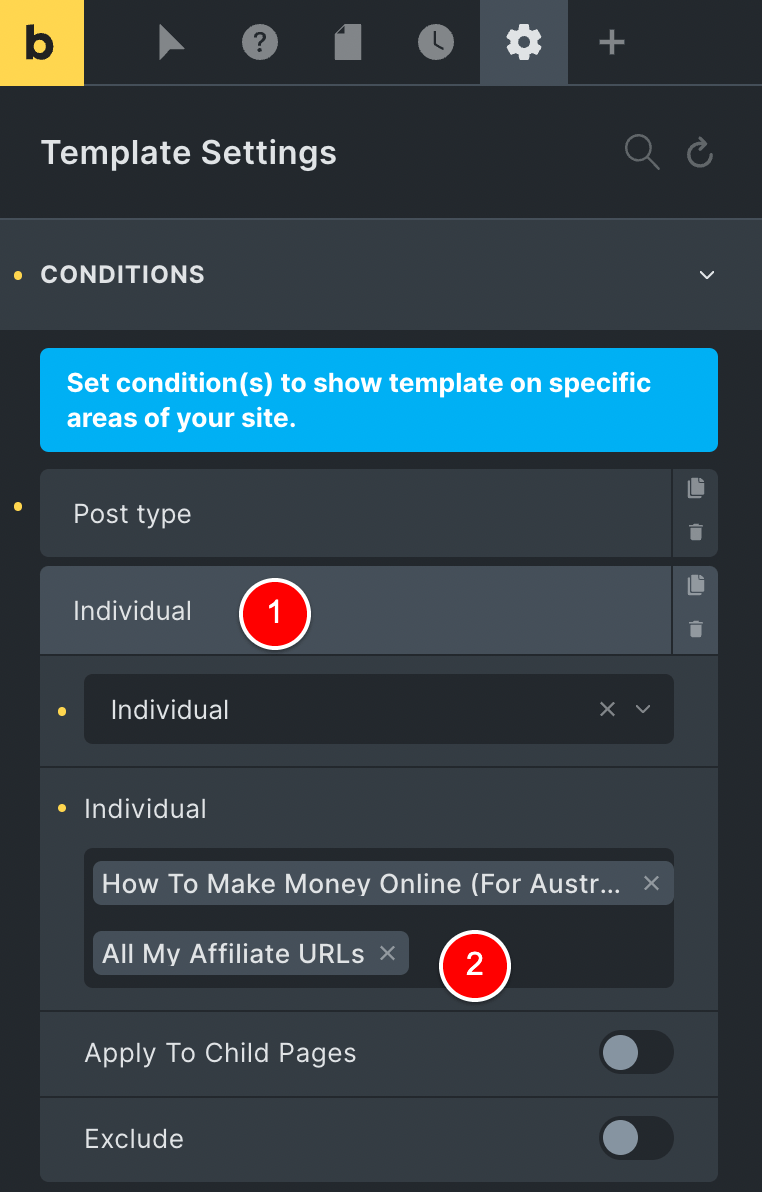
Outside of my Blog Posts and Product Reviews, there are sometimes certain Pages on my website where I want to write a lot of content.
Two examples of this are:
So, to apply this sidebar template to individual pages, I can just add a new condition here while editing the template and specify that I want it to ALSO apply to Individual (1) pages… and I put those pages at (2) below.
It’s a different way of thinking, but now that we’ve been through all of that – my point is this…
The normal way of applying templates to posts in WordPress is to edit the Post and then apply a template from there…
But with Bricks, you sort of do it in reverse.
You edit the template and then choose what posts the template should apply to.
And I MUCH prefer this method – it just makes a lot more sense to me.
Also, as a bonus – using Bricks, you can go back to Bricks > Templates at any time and see at a glance what template is applying to what content… all in the one view (something I have grown to love).
Take, for example, my Header template.
With Bricks, I can easily see where I have chosen to not output the Header on my website (i.e. on Sales Pages, Optin Pages etc).
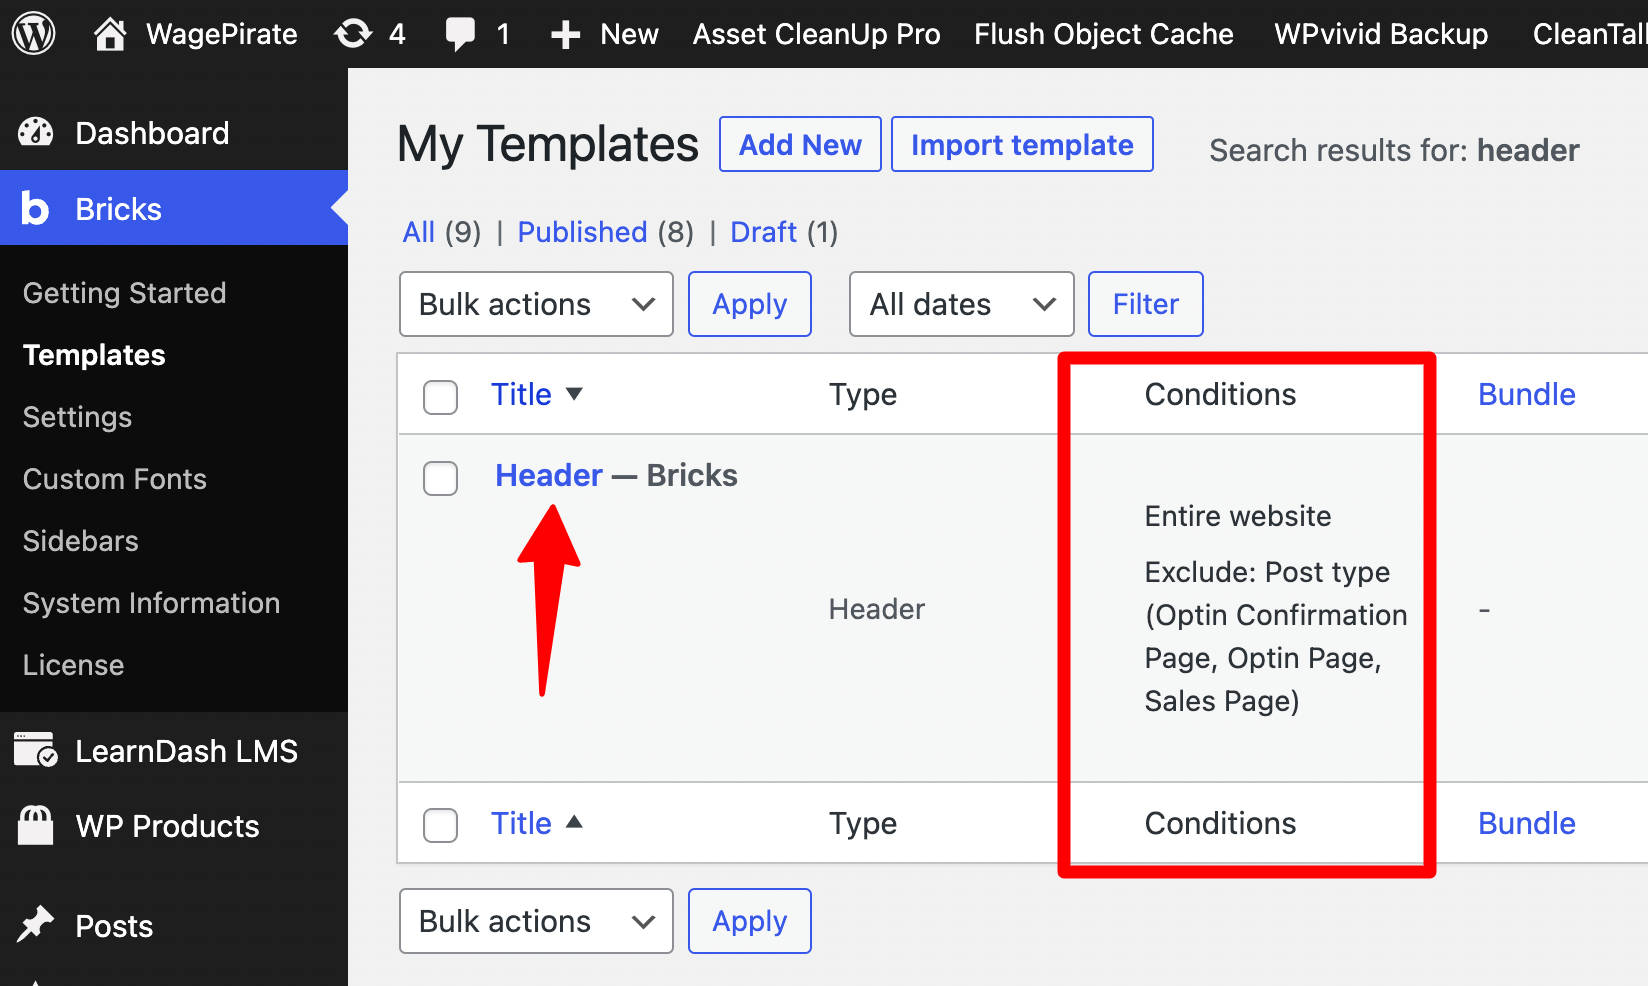
It just works so well and I love that I am applying the template to different areas of my website while editing the template VS the normal way of editing posts and choosing the template per post and never really knowing what posts have which template.
My setup for Page Templates
To round off this section on Templates in Bricks, I want to show you a couple of other things you might find useful.
In the above section in this review, we had these two templates and we looked at (1) named Single – Default with Sidebar.
The second template here (2) named Single – simple – box for wp_content looks like the below in the Bricks editor…
As you can see, it’s a very simple design and it’s just a couple of containers with the Post Content being output inside.
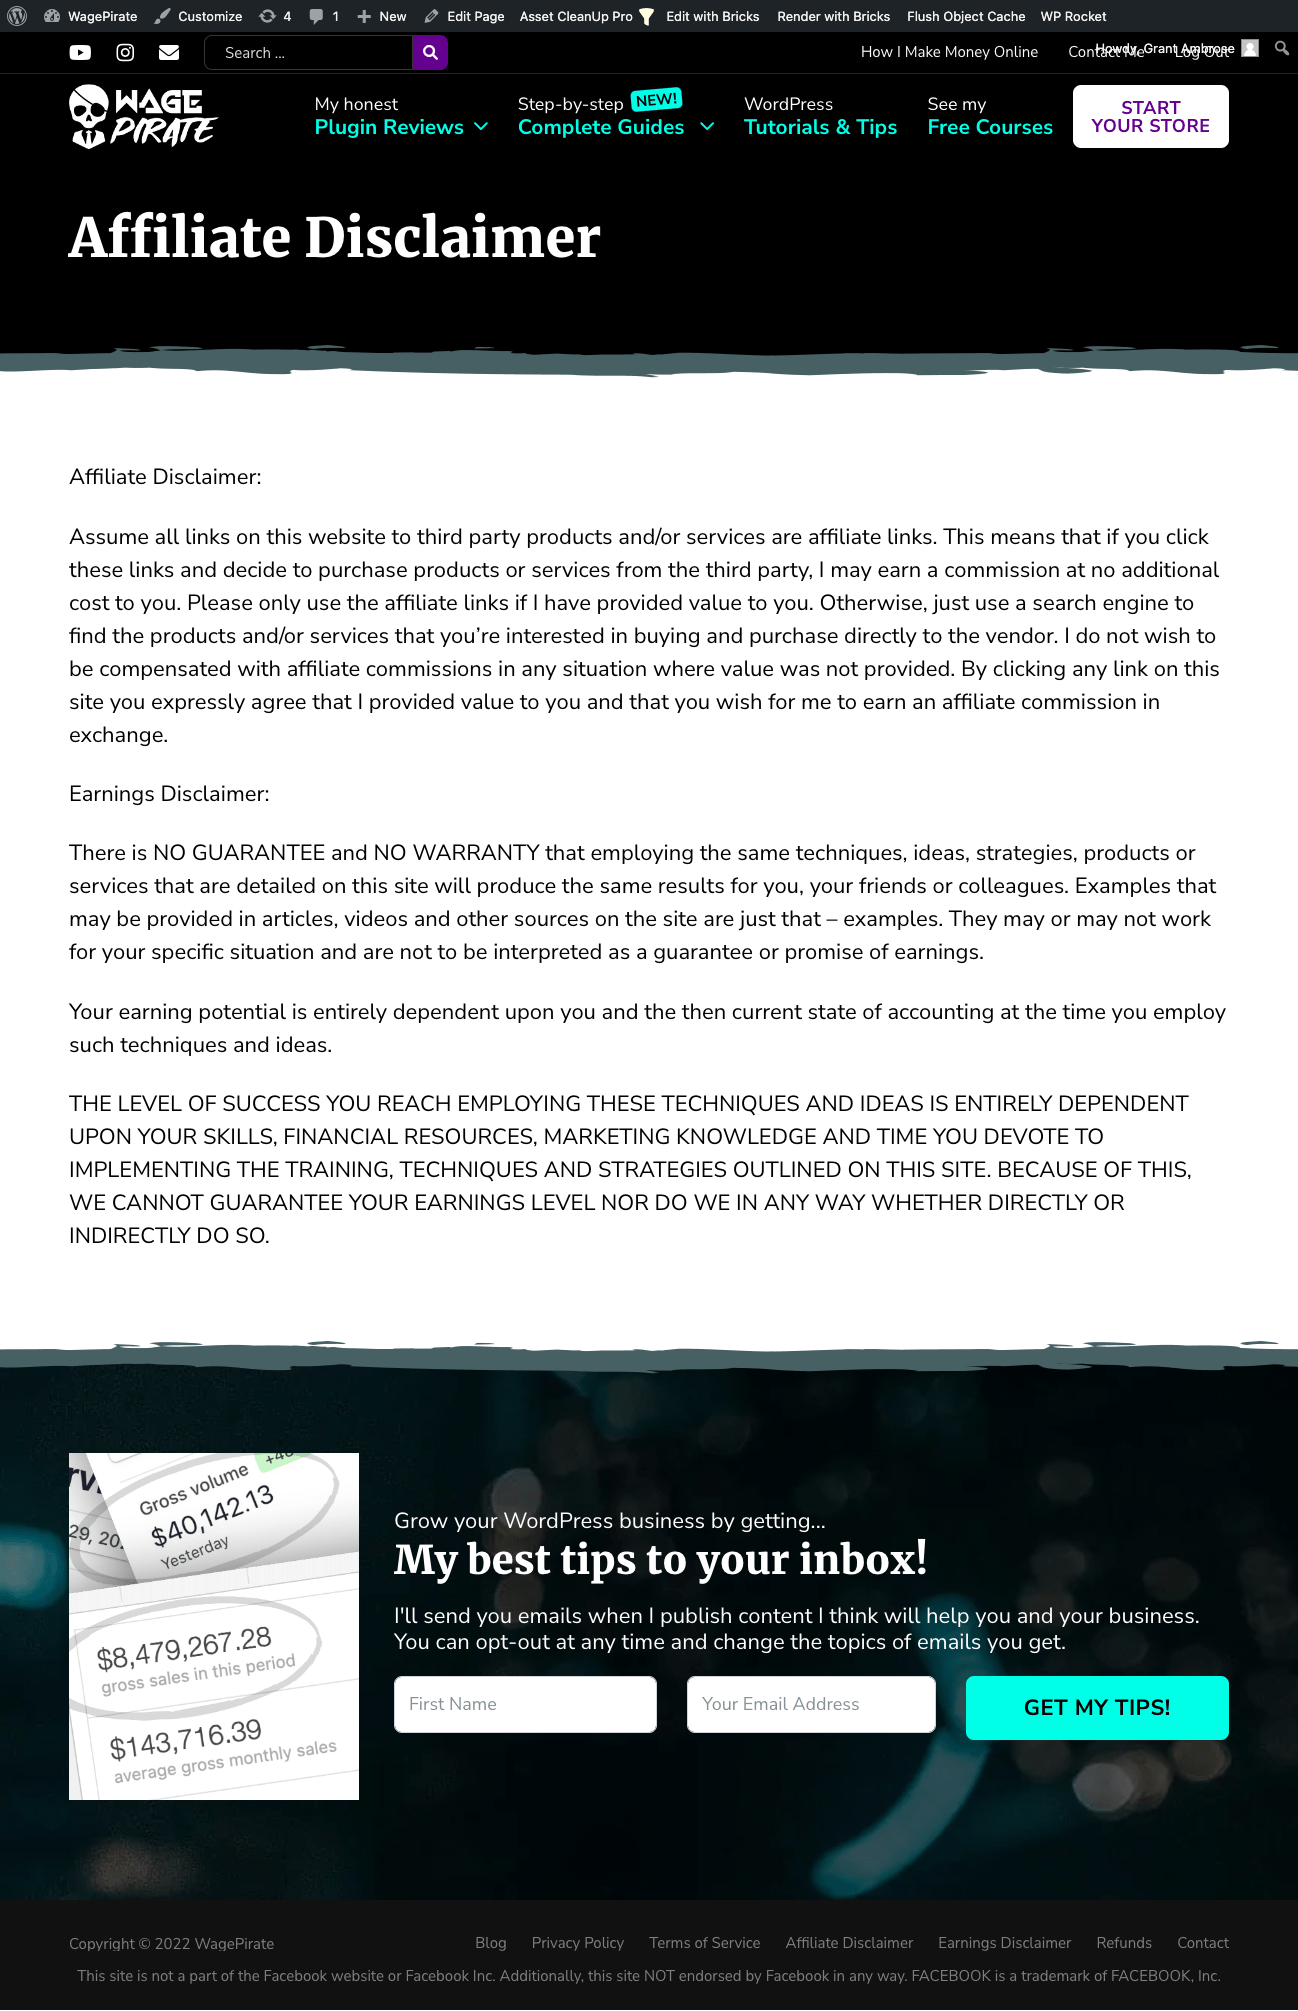
The conditions under which I apply this template to my website are listed below and you’ll see that I am only applying this very simple template to individual pages on my website…
These pages are the “boring” pages (lol) on my website, like Terms and Conditions etc and they look like the below…
Sure – I could have applied the sidebar layout to all of these, but I also am having a lot of fun playing with Bricks and getting to know it more.
The FASTEST Page Builder for WordPress that I have ever used.
Is Bricks Builder the best Page Builder 2025?
To finish off what has become a mega review of Bricks Builder, I want to say the following…
Bricks Builder is a lifetime deal / one-time payment and after purchasing the 1-site license for myself, I quickly upgraded to the unlimited site license because of how much I loved using it.
For a one-time fee and a flexible refund policy…
I would definitely recommend grabbing Bricks Builder now, setting up a new WordPress install and playing around with it.
I had been happily using Beaver Builder for the last 6 years and I only tried Bricks because as I increasingly saw more and more people commenting in Facebook groups I’m in raving about it.
And once I tried it, I started migrating my website from Beaver Builder over to Bricks less than a week later.
But don’t worry – if you do fall in love with Bricks as much as I did – converting your current website over to Bricks shouldn’t take that long.
I had mine converted over in a couple of days and I had a lot of fun learning Bricks along the way.
Best of all – I cancelled my Beaver Builder and Beaver Themer subscriptions which cost $248 per year and now I have one less plugin to pay for annually.
If you do give Bricks a go, I would LOVE to know what you thought of it in the comments below.
Also, to learn more about Bricks and how it works – head over and subscribe to my YouTube channel.
I post YouTube videos every week and I will be focusing a lot of my content around Bricks Builder in the upcoming future.
The FASTEST Page Builder for WordPress that I have ever used.
Leave a Reply