Bricks Builder Form data to FunnelKit Automations
This step-by-step guide shows you how to connect your Bricks Builder Forms to FunnelKit Automations.
By doing what I show you in this article today, I was able to convert all my FluentForms to Bricks Forms, uninstall FluentForms and now my website loads faster (more on this later).
The quick-and-short of how you send your Bricks Form data into FunnelKit Automations is by using a little bit of PHP and hooking into a Bricks PHP Action hook that they have provided to us.
To give you an idea of what we’ll be setting up today, we do need to write a bit of PHP code but I promise it’s actually not that complicated.
Here is the final code:
// This code sends data from a Bricks Form to FunnelKit Automations
add_action('bricks/form/custom_action', 'c_bricks_form_action_email_course', 10, 1);
function c_bricks_form_action_email_course($form){

    $form_id = $form_fields['formId']; // get the ID of the form

    // if the form is NOT the form we want to run a custom action on...
    if ($form_id !== 'aajrhq') return; // do nothing and return

    // add your webhook URL from FunnelKit Automations below
    $url = site_url("/wp-json/autonami/v1/webhook/?bwfan_autonami_webhook_id=35&bwfan_autonami_webhook_key=b5d24fab89ad2754cd925f67d126fc42");

    // here we get the form fields and send their values to the FunnelKit Automations webhook URL
    $args['body'] = json_encode($form->get_fields());
    $response = wp_remote_post($webhook_url, $args);

}Code language: PHP (php)
In our PHP code, we’ll get the data from a Bricks Form and send it as a Webhook Event into FunnelKit to trigger our Automation and add a user to our Contact list.
Here is what we’ll cover in more detail…
The Video Tutorial
Here is a very in-depth video that covers how to go and set up when I discuss in this Blog Post.
Let’s start with the first step – creating a Form in Bricks Builder.
Creating a Bricks Template with our Form element inside
I am assuming you know how to add a Form element to the page in Bricks Builder, but I want to share something here that might save you a few headaches.
If you’re setting up Bricks Forms to send the data into FunnelKit Automations, I am going to assume that you’ll have quite a few forms on your website.
You might also have the same form appear across many pages on your site.
If you’re in this boat of managing many forms, I highly recommend that you do the following…
Set up each of your Bricks Forms in their own separate Bricks Template.
I have two Blog Posts I recently finished writing which will show in greater detail how to do this and some of the benefits doing this will offer you in managing your website.
But here’s the quick to-the-point version that explains what I mean…
To create your Bricks Form, go to Bricks > Templates (1) > Add New (2).
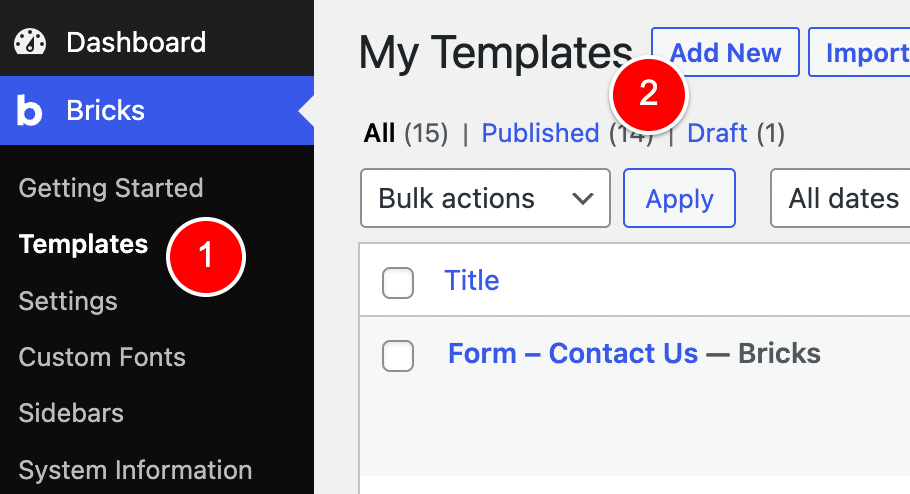
Give this Template a meaningful name – I recommend using the word “Form” at the start of the template name.
I’ve found that adopting this naming convention in my own website has made managing my Bricks Forms for FunnelKit Automations easier.
In the above image, you can see that I have a Form on my website for my Contact Us page, so I named the Bricks Template “Form – Contact Us”.
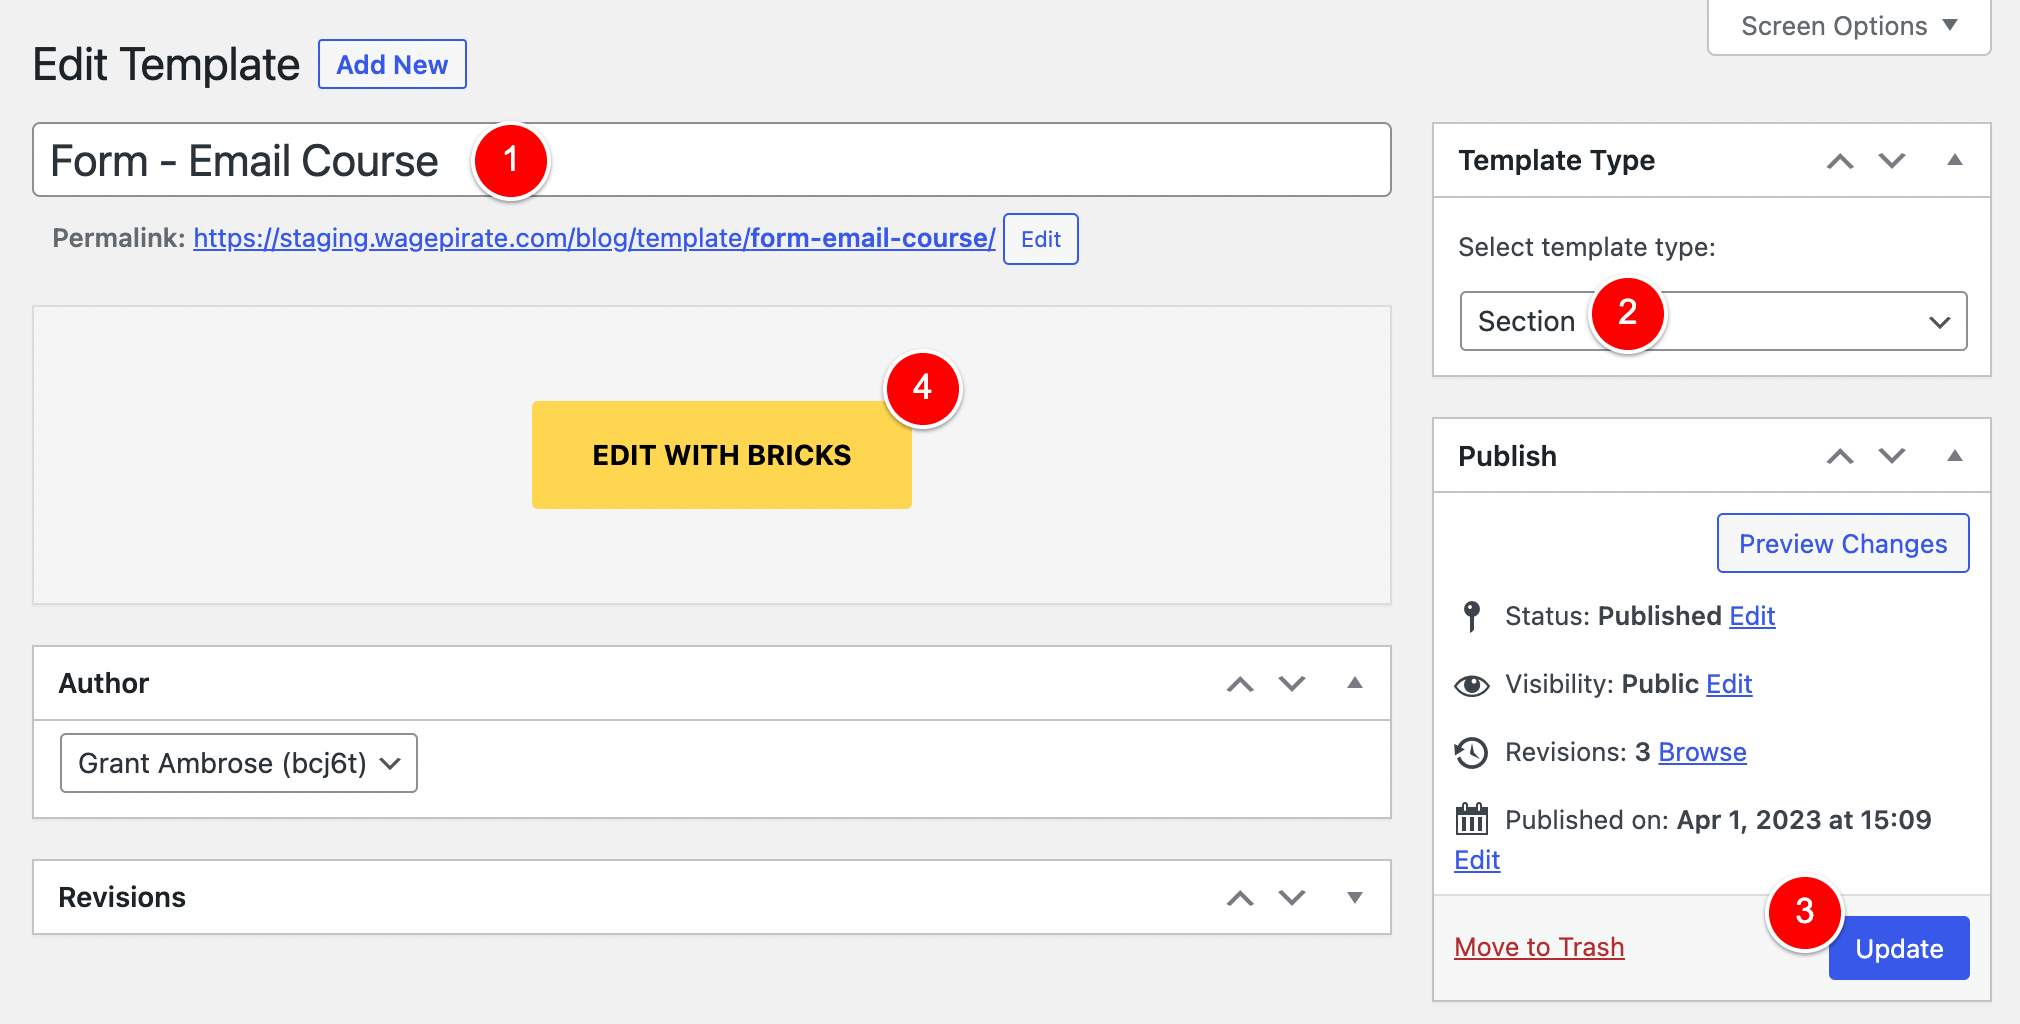
For this tutorial today, I will go ahead and create my Bricks Template with the name “Form – Email Course” (1). This is a real form from my website and we’ll recreate this as we go through the tutorial.
Make sure you also choose the Template Type “Section” (2).
Once done, click Publish / Update (3) and then Edit with Bricks (4).
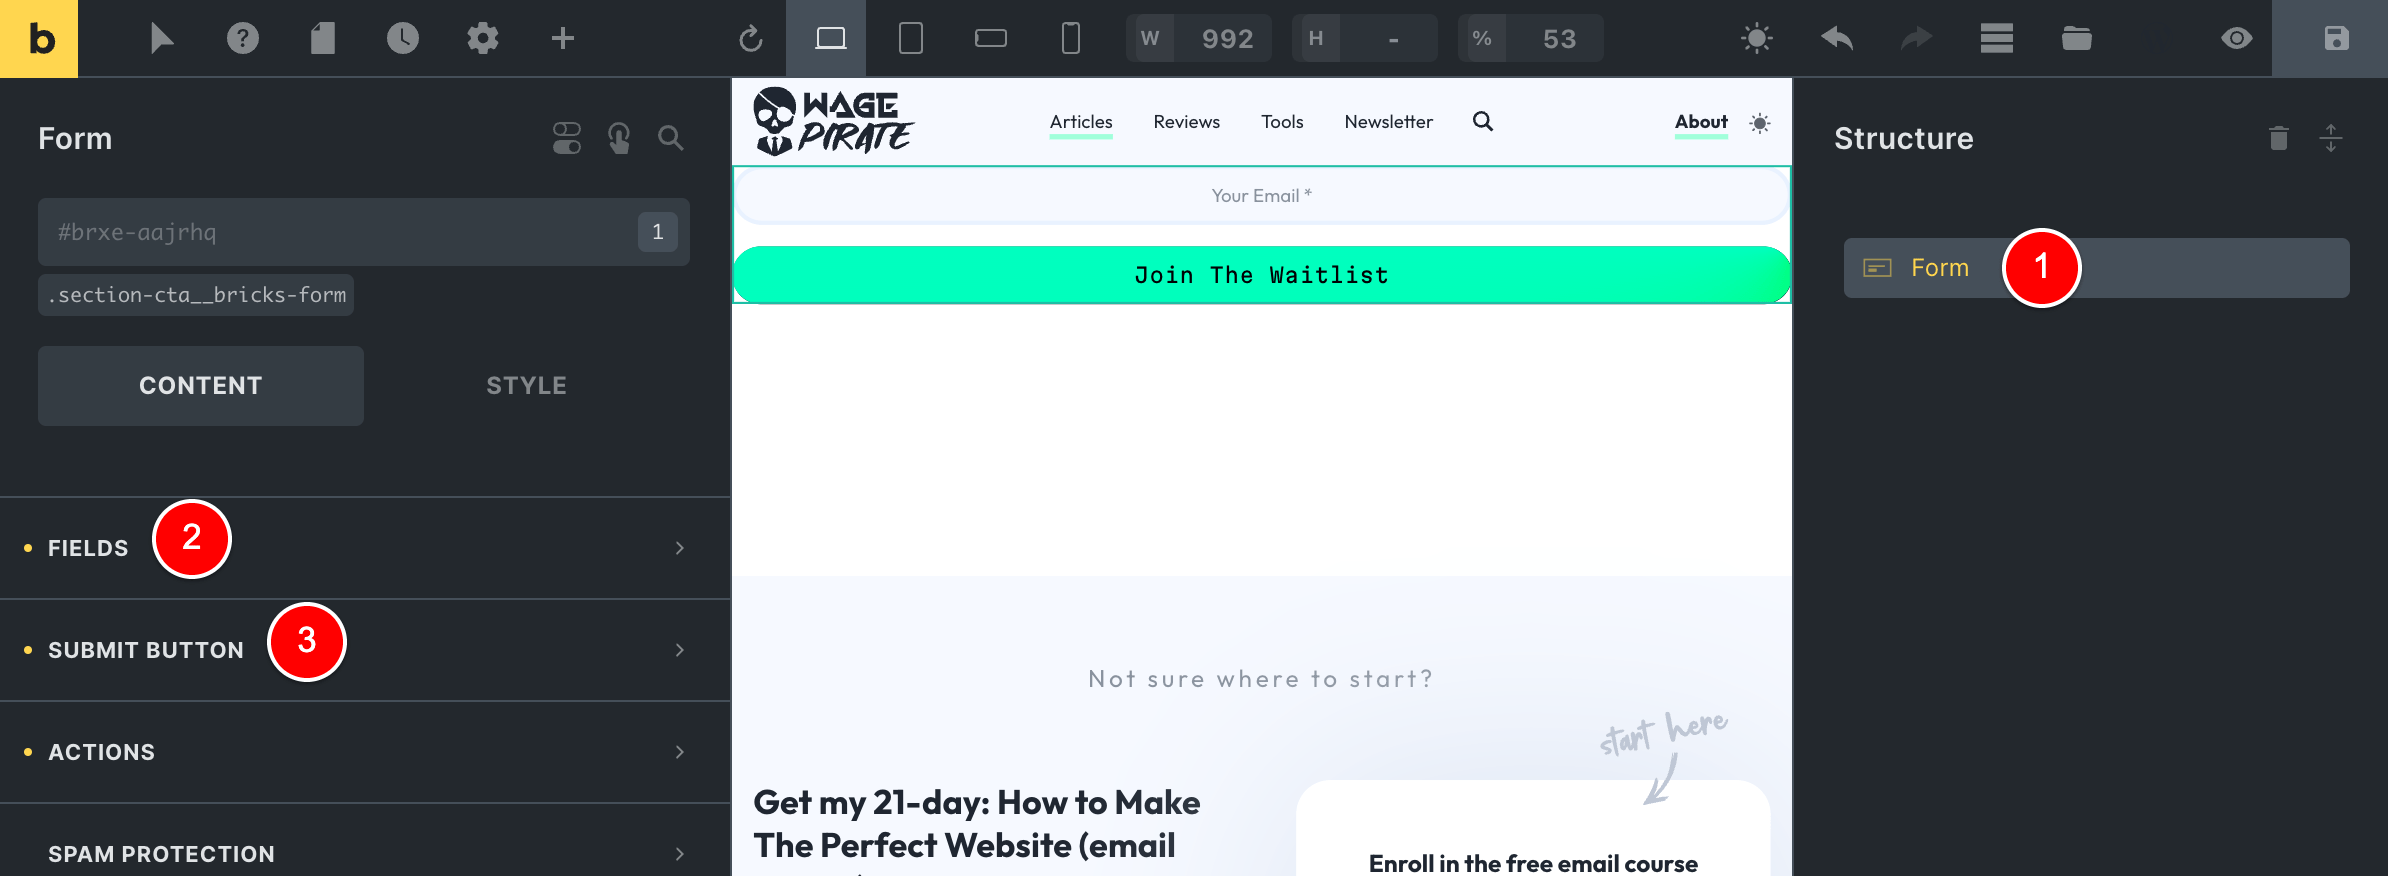
Add a Form element to your Template (1) and make sure you DO NOT wrap this Form Element in a Section or a Container.
The reason to have no section or containers around your Form element here that you’ll add this Template INTO Sections and Containers that are on the page you’re adding this form to.
Go ahead and set your Form Fields (2) and customize the Submit Button (3) like you normally would.
With that done, the last thing you need to do here is as follows…
Adding a Custom Action to our Bricks Form
With your Form element selected, click to edit the Actions setting and choose Custom as the option (1).
You can also write a success message (2)…
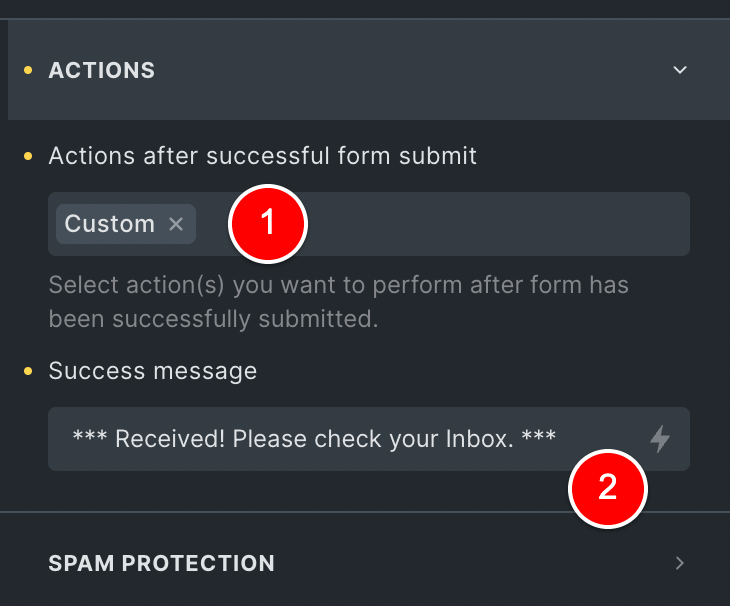
But the most important thing for this tutorial today is this Custom Action setting.
This is the magic!
When you select Custom Action here, you are now able to trigger some custom PHP Code once the form submits and do something…custom…
Like, send this Form’s data into FunnelKit Automations!
Getting ready to add our custom PHP code
So let’s go and write our PHP Code that’ll trigger once this form Submits…
There are many places you could add the next bit of PHP Code to your website.
You could use a Code Snippets plugin like WPCodeBox…
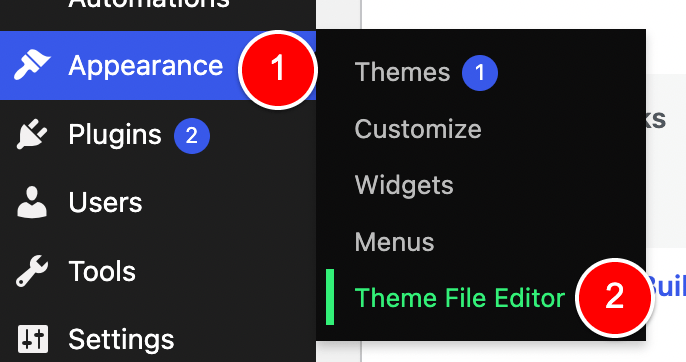
Or you could go to Appearance > Theme File Editor (2)…
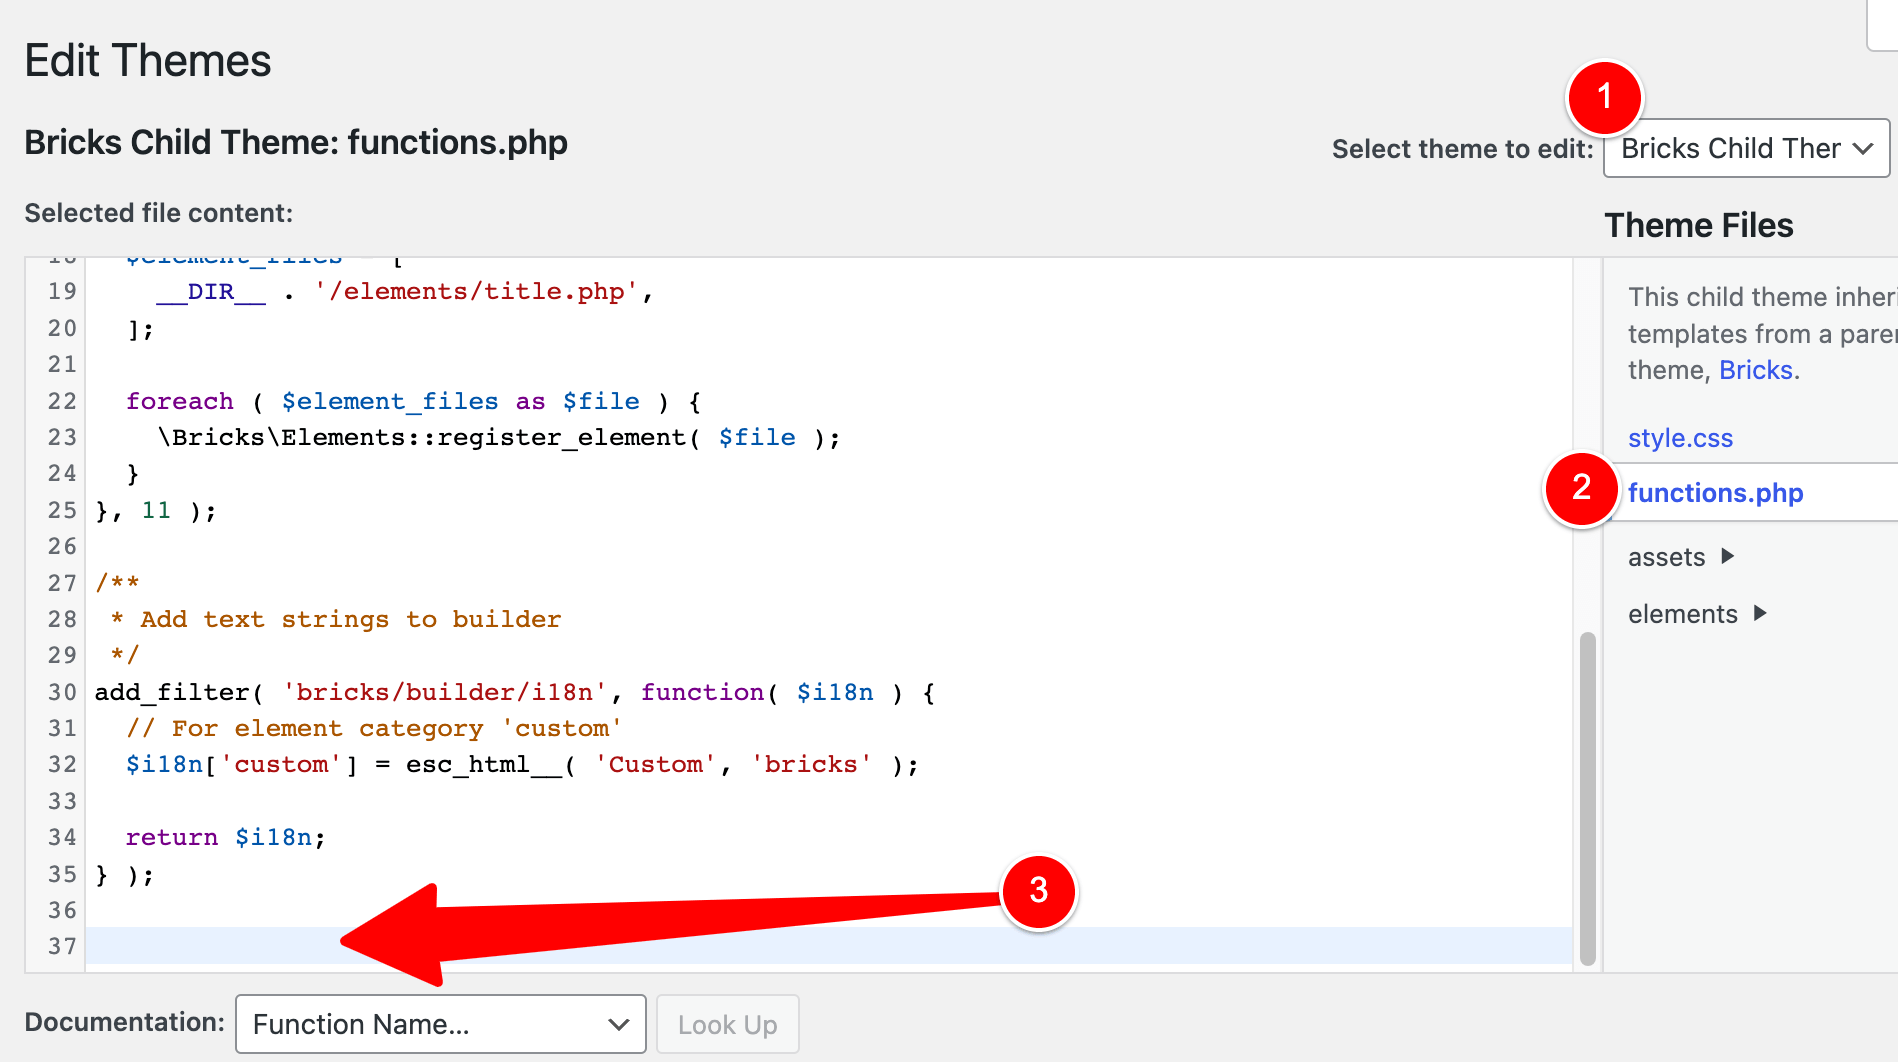
…select your Child Theme (1), edit functions.php (2) and add your PHP Code to the end of the file (3).
There are so many places where you might be adding your custom PHP Code snippets these days…
But wherever it is that you add your PHP code – open that up – because we’re about to get our hands dirty with a bit of code.
For this next part, I’ll be setting up a Form on my website and you should just replace the details that are specific to my website with your own.
Adding our code to the bricks/form/custom_action Action hook
Here is the first part of the PHP Code.
// This code sends data from a Bricks Form to FunnelKit Automations
add_action('bricks/form/custom_action', 'c_bricks_form_action_email_course', 10, 1);
function c_bricks_form_action_email_course($form){
   // we will write our code here...
}
Code language: PHP (php)
On line (2) above, you will notice that our code is hooking onto an Action named bricks/form/custom_action
You can read about this action on the Bricks website by clicking here.
Back in a previous step – we set our Action on the form to be “Custom”.
Doing this allows us to execute code on this bricks/form/custom_action Action Hook once our form submits.
Also worth noting here is that our callback function c_bricks_form_action_email_course on this action is passed $form which is a variable that contains all the information that your user entered into your form (more on this in a second).
Let’s continue to write our code by adding the next lines of code:
// This code sends data from a Bricks Form to FunnelKit Automations
add_action('bricks/form/custom_action', 'c_bricks_form_action_email_course', 10, 1);
function c_bricks_form_action_email_course($form){

    $form_id = $form_fields['formId']; // get the ID of the form

}
Code language: PHP (php)
Here’s what the new lines of code are doing:
- Line 5 – We are getting the ID of the form and saving it to the variable $form_id
With that done, I need to point out something here before we go on to the next step.
How Custom Actions in Bricks Forms work
While we are using this Action: Custom setting on this Bricks form to send our data to FunnelKit Automations, you can do a lot of other stuff using this Custom Action setting.
At its core, Custom Action allows you to use PHP to do anything you want after a Bricks Form is submitted.
So while today we are using a Custom Action to send our data to FunnelKit Automations, in the future you might need to do other stuff.
One example of how else you might like to use this Custom Action feature is to save your Bricks Form data to a Custom Post Type so you can view all the form entries in your admin area.
To achieve this, you’d use this same bricks/form/custom_action action.
It was important to point that out because this is why we really need to check the ID of the form before we go ahead and send its data to FunnelKit Automations.
Because you could have a few different Custom Actions set up in your website that do different things… but which all trigger off of this same bricks/form/custom_action action.
Finding the ID of our Bricks Form
So – let’s go and get our Form’s ID and ensure we only send data from the Form we want to into FunnelKit.
Let’s head back into the Bricks Template and click on our Form element.
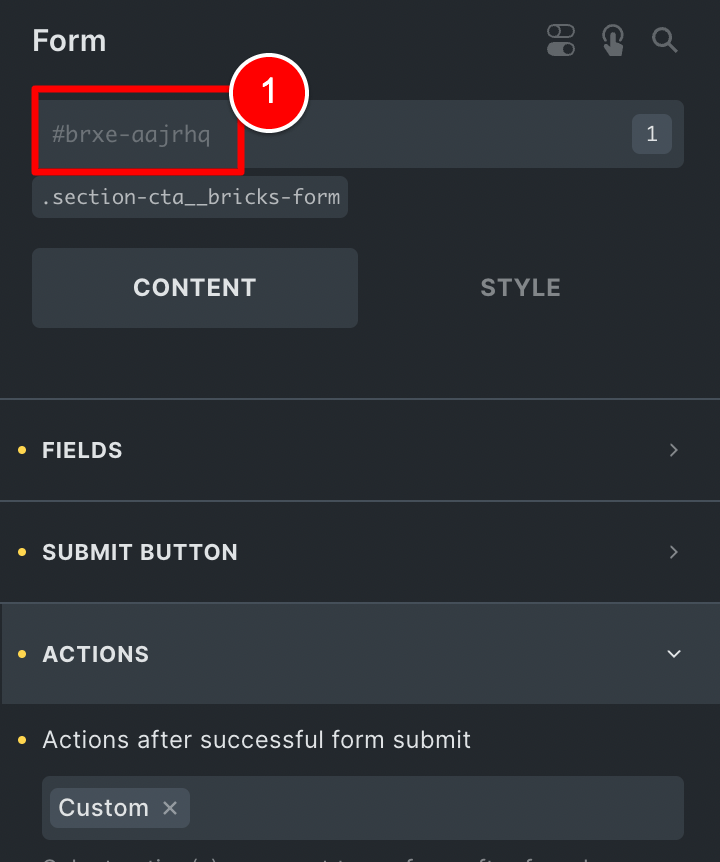
If we look on the left at (1) we can find the ID of our Form.
Be careful! – At (1) it says #brxe-aajrhq but the ID of our Form is everything AFTER the hyphen.
So in this case, the ID of this Form is aarhq.
Triggering our Custom Action only for our specific Form
Now that we have the ID of this form, we can add the next bit of PHP Code that checks for this ID.
You just need to replace aajrhq with your Form’s ID.
// This code sends data from a Bricks Form to FunnelKit Automations
add_action('bricks/form/custom_action', 'c_bricks_form_action_email_course', 10, 1);
function c_bricks_form_action_email_course($form){

    $form_id = $form_fields['formId']; // get the ID of the form

    // if the form is NOT the form we want to run a custom action on...
    if ($form_id !== 'aajrhq') return; // do nothing and return

}
Code language: PHP (php)
With that added, here’s what happens:
- A user on our website submits a Bricks Form.
- Bricks checks to see if Action: Custom is set for the form.
- If Action: Custom is set for the form just submitted, PHP executes all functions attached to the
bricks/form/custom_actionaction. - When it gets to our function above, it will check the ID of the form submitted.
- If the form just submitted by a user DOES NOT match aajrhq (i.e. it’s not the form we want to send data to FunnelKit for) then it returns (i.e. it exits the function and does nothing).
BUT…if the ID DOES match aajrhq, then it will proceed to the next bit of code we’re about to add where we get the data and send it to FunnelKit.
So let’s go ahead and do this next part (we’re nearly at the end!).
Creating a new Automation in FunnelKit
To send data to FunnelKit Automations, we will use a webhook URL that we’ll send data to.
Let’s go and get that URL.
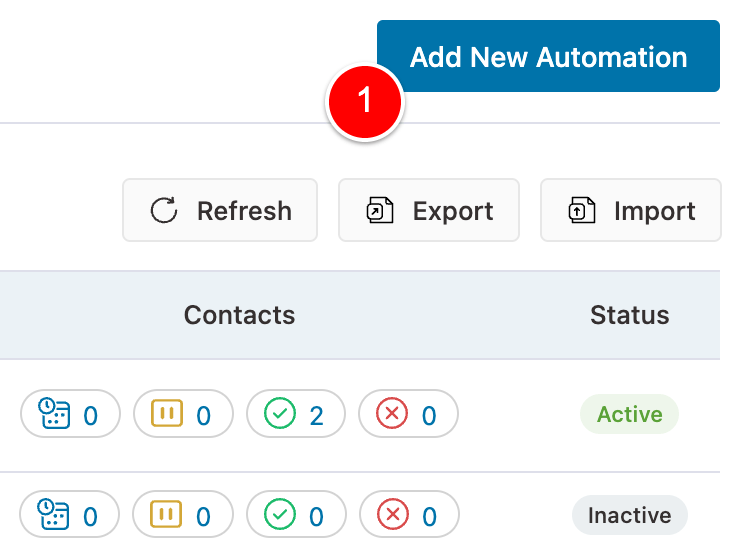
Under FunnelKit Automations > Automations…
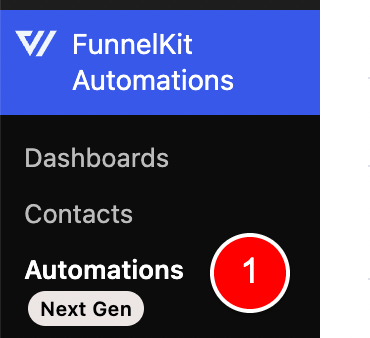
We will click Add New Automation (1).
Choose to Start from Scratch.
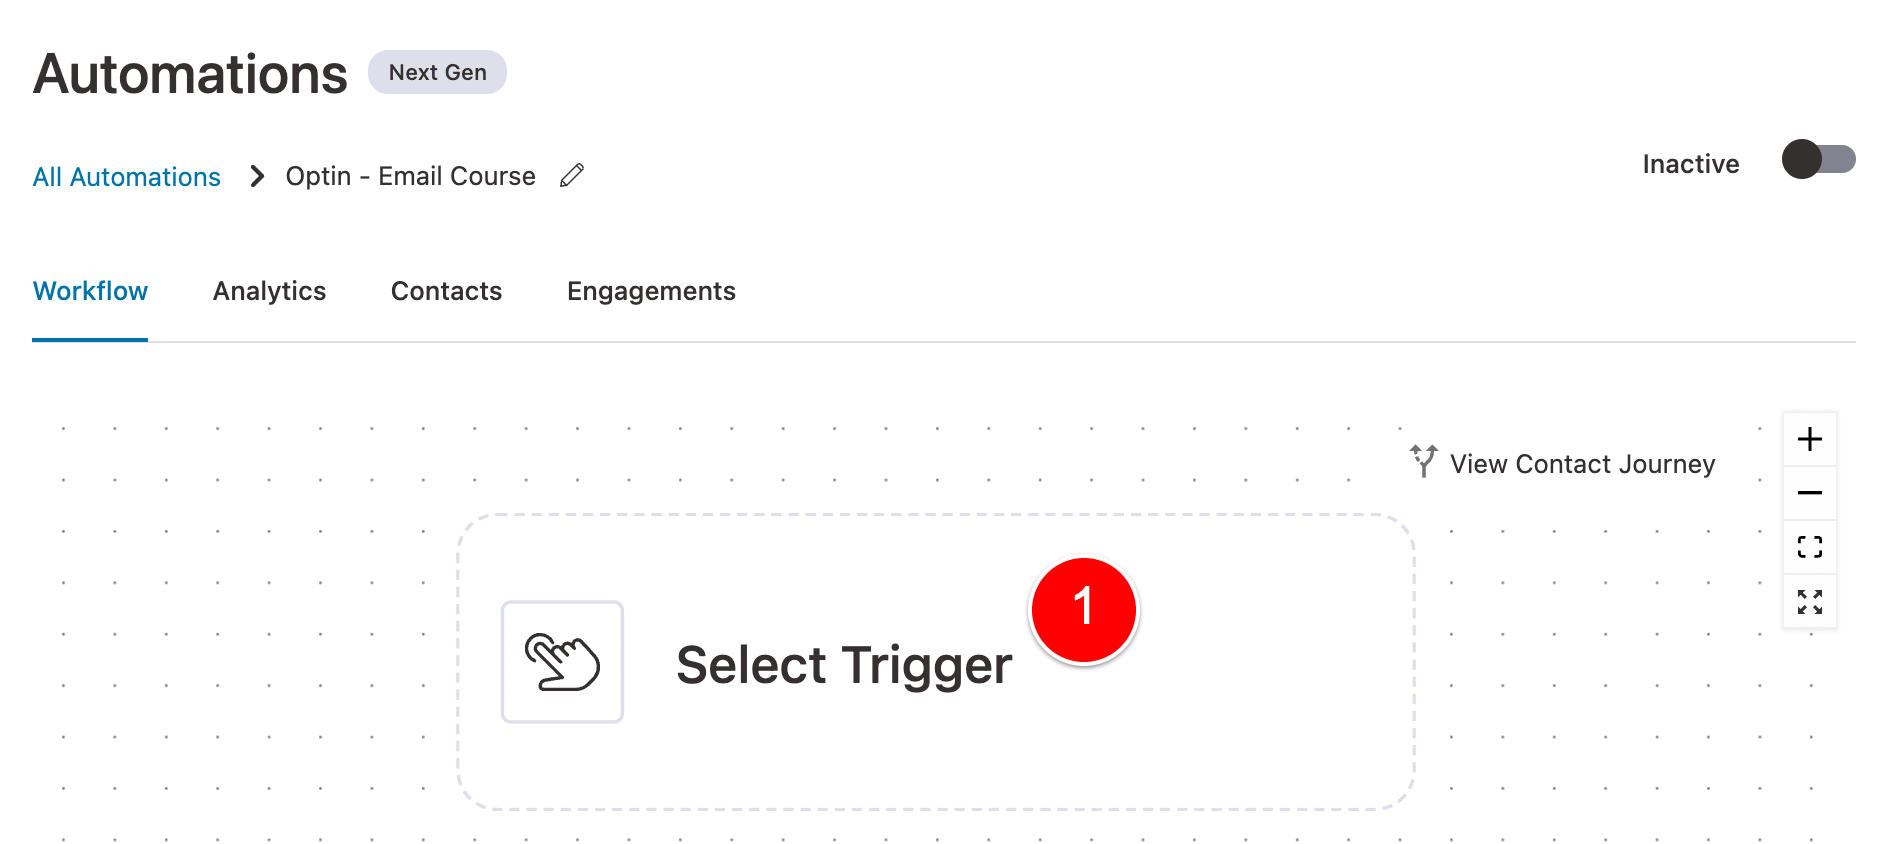
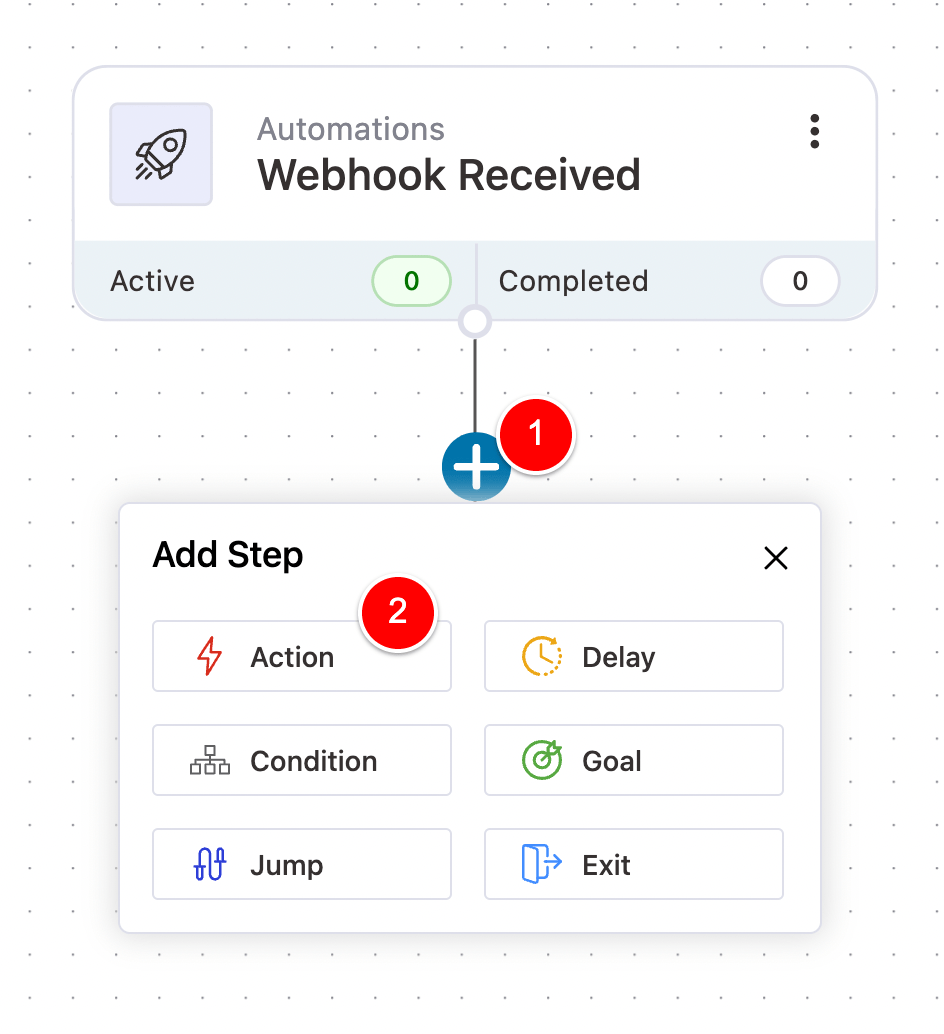
Then, click Select Trigger (1).
Click Automations (1), then Webhook Received (2) and click Done (3).

Adding our Webhook URL
Now we have set this Automation to trigger whenever data is sent to our Webhook URL.
But wait – where is our Webhook URL?
Click on (1) below…

And wa-lah!
This is the URL (1) that we will use in our custom PHP Code to send our Bricks Form data too.
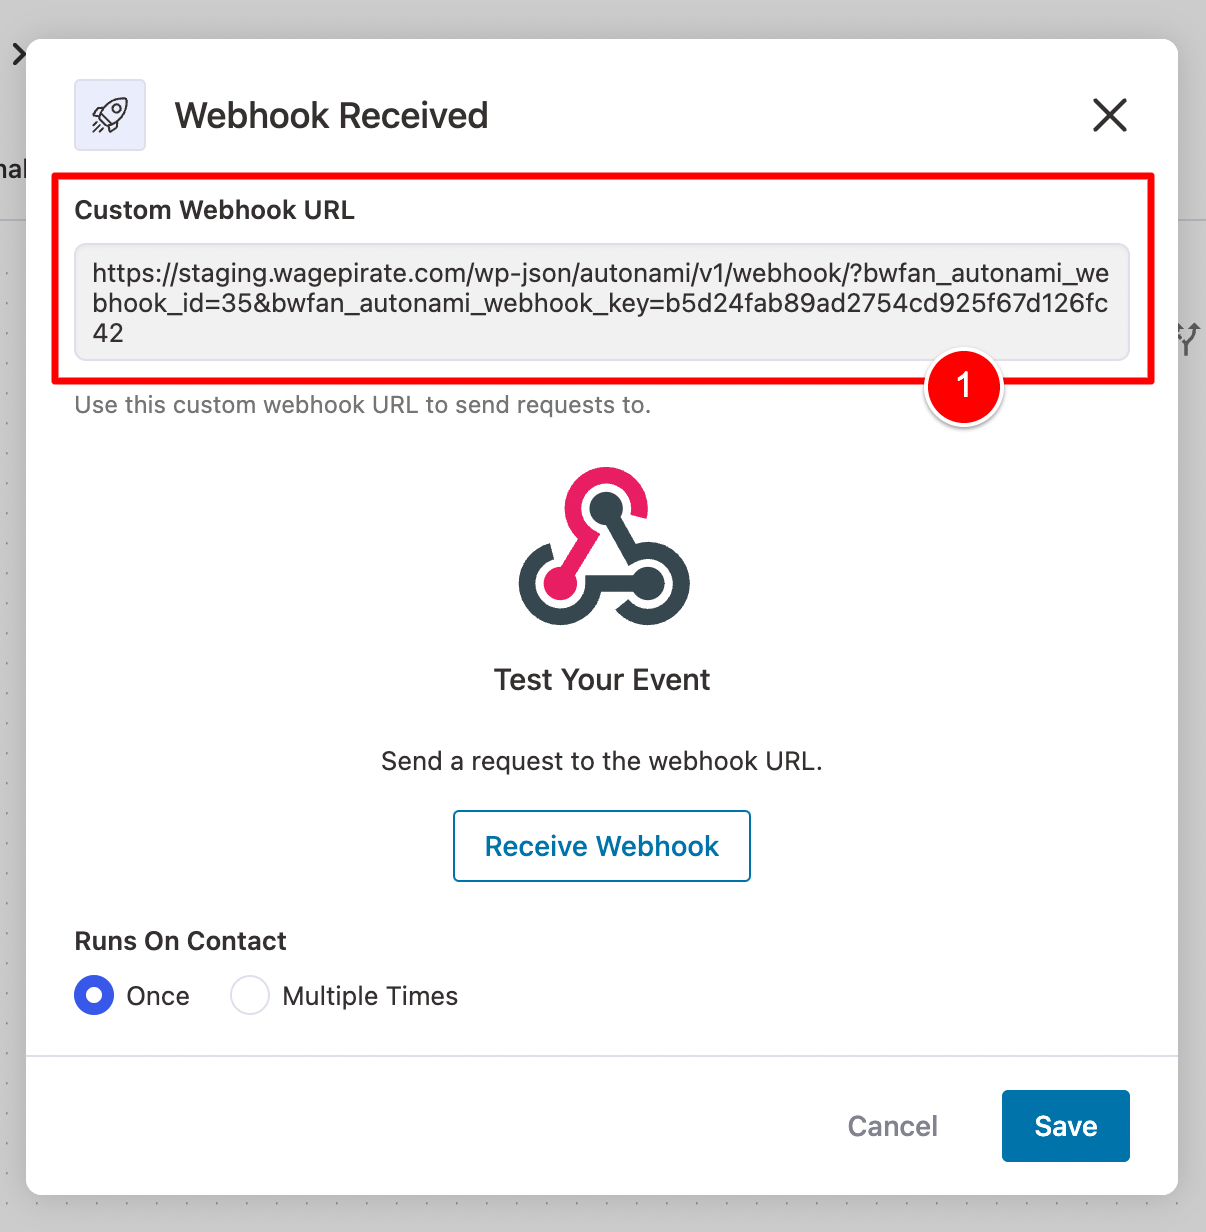
Now that we have our Webhook URL, I will add lines 10-11 below and paste in my Webhook URL on line 11.
// This code sends data from a Bricks Form to FunnelKit Automations
add_action('bricks/form/custom_action', 'c_bricks_form_action_email_course', 10, 1);
function c_bricks_form_action_email_course($form){

    $form_id = $form_fields['formId']; // get the ID of the form

    // if the form is NOT the form we want to run a custom action on...
    if ($form_id !== 'aajrhq') return; // do nothing and return

    // add your webhook URL from FunnelKit Automations below
    $url = site_url("/wp-json/autonami/v1/webhook/?bwfan_autonami_webhook_id=35&bwfan_autonami_webhook_key=b5d24fab89ad2754cd925f67d126fc42");

    // here we get the form fields and send their values to the FunnelKit Automations webhook URL
    $args['body'] = json_encode($form->get_fields());
    $response = wp_remote_post($webhook_url, $args);

}
Code language: PHP (php)
You should replace line 11 with your Webhook URL – don’t forget that part.
Converting our Bricks form data to JSON & using cURL
Line 14 above gets the data from our Bricks Form and converts it into JSON using the json_encode PHP Function.
You don’t really need to understand what this is doing behind the scenes but the important thing to know here is that the FunnelKit Automations Webhook URL requires us to send our data in JSON format and this line of code converts our Bricks data into JSON so that FunnelKit accepts the form data.
Now that we have our Bricks Form data converted to JSON for FunnelKit, we are ready to send this data to the webhook URL.
Here’s the code that does that:
// This code sends data from a Bricks Form to FunnelKit Automations
add_action('bricks/form/custom_action', 'c_bricks_form_action_email_course', 10, 1);
function c_bricks_form_action_email_course($form){

    $form_id = $form_fields['formId']; // get the ID of the form

    // if the form is NOT the form we want to run a custom action on...
    if ($form_id !== 'aajrhq') return; // do nothing and return

    // add your webhook URL from FunnelKit Automations below
    $url = site_url("/wp-json/autonami/v1/webhook/?bwfan_autonami_webhook_id=35&bwfan_autonami_webhook_key=b5d24fab89ad2754cd925f67d126fc42");

    // here we get the form fields and send their values to the FunnelKit Automations webhook URL
    $args['body'] = json_encode($form->get_fields());
    $response = wp_remote_post($webhook_url, $args);

}
Code language: PHP (php)
The code I just added is a bit harder to explain what it’s doing but the best thing here is that you don’t need to do anything yourself.
Just copy and paste that final bit of code without making any changes and it should work on your website.
If you are curious what to know what the lines of code starting with curl… are doing, I would recommend going to YouTube and watching a few videos. Just search for “cURL” and you should get quite a few good results – that’s how I learnt.
In summary, cURL is a tool used to send data from one server to another.
Simply, it’s a way to send data from A to B and it’s a very common thing in programming to use.
And that’s the final bit of code!
First test: Testing our Bricks Form data is sent to our Automation
Now let’s go ahead and test our setup to make sure it’s all working.
Back on the front-end of the site, I will put in my email address and submit the Bricks form with the Form ID aajrhq that triggers our custom PHP Function we wrote today.
To test this worked, let’s go back into our Automation in FunnelKit and open up the Webhook Received action.
As you can see… our test worked!
Mapping our Email Form Field to a field in FunnelKit CRM
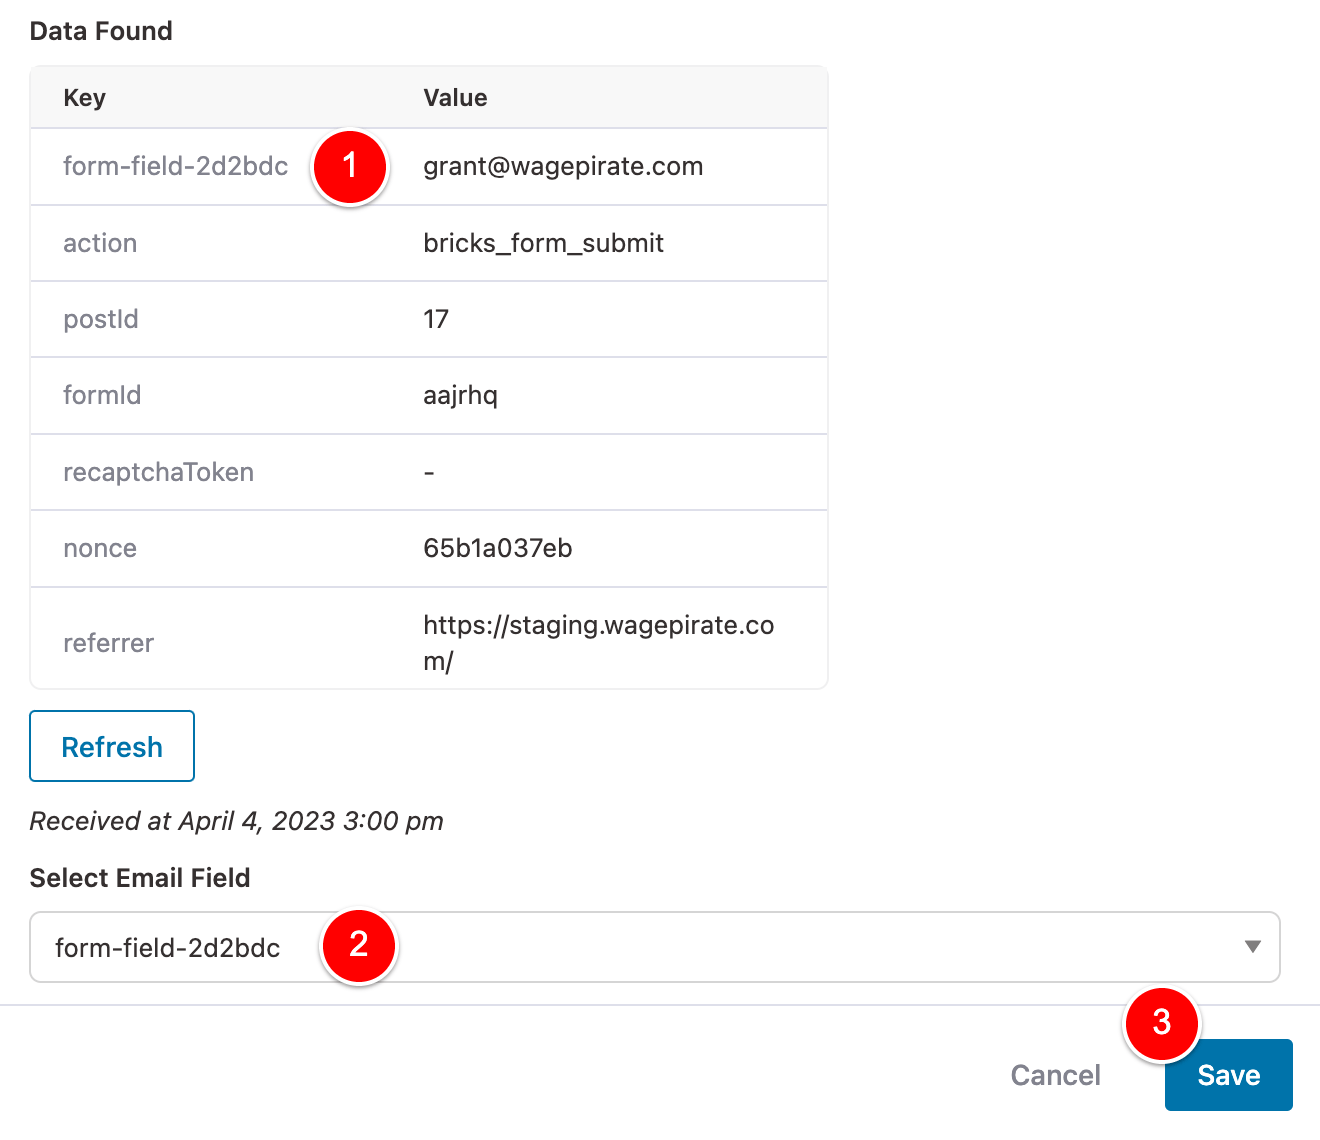
Now that our Form is sending data to our Automation, we now need to map each Form Field to a Contact Field in FunnelKit.
In my case, the Email Field in my Bricks form has the key form-field-2d2bdc (1) which I will map to the Email field in FunnelKit at (2) and click Save (3).
Map a second form field that does not exist in FunnelKit
While we are here, there is a good chance that you’ll eventually set up a Bricks Form with a form field that does not exist in FunnelKit.
Here’s how you’d go ahead and get that working.
Plus – as a bonus – let’s go and create a Select field to try a different form field type and see if that changes the process at all VS doing this with normal text fields.
In our Bricks Form, I have added a second field where people can let us know what Page Builder they use most.
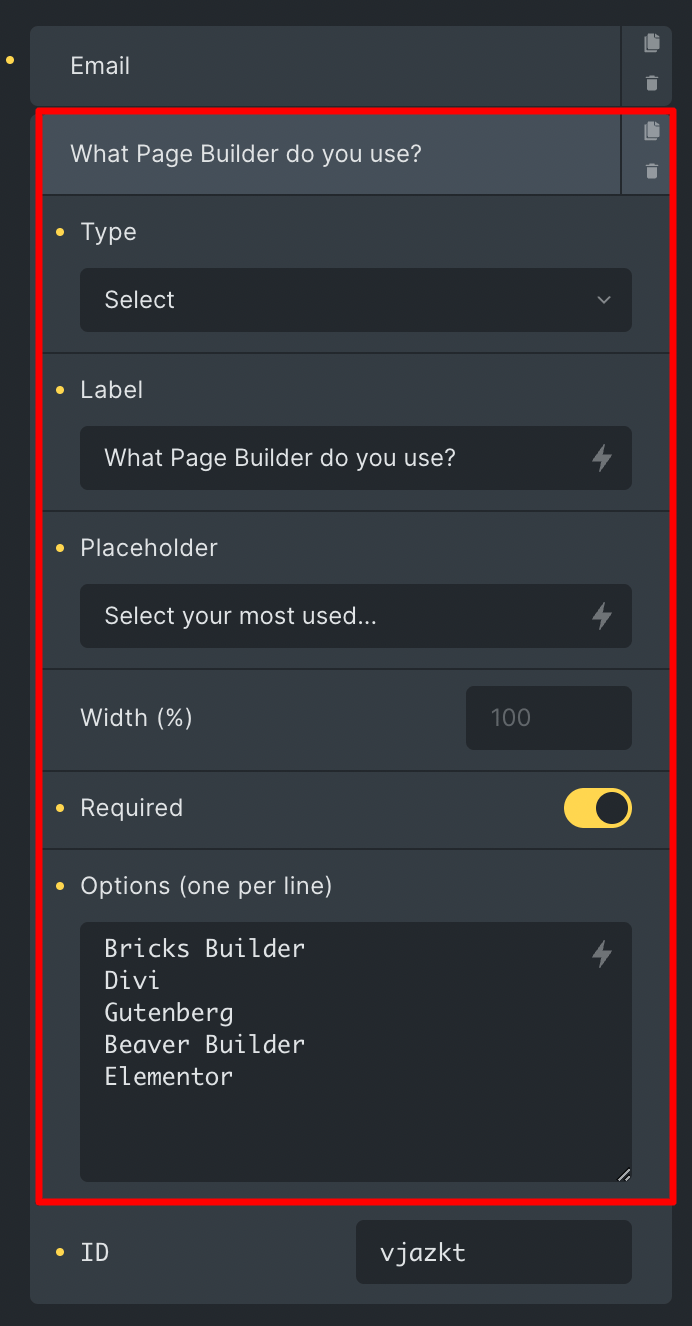
The only correct answer here would be Bricks Builder 😉 …
But let’s run with it.
On the front-end, let’s submit the form…
In our Automation, I’ll click back into our Webhook Received event and click Refresh (1).
Now we can see the new page builder field come in (2)!
But notice how at (3) there is still only the Email field…

You might be wondering if this is an error, a bug, or a glitch…
Nope!
If you think of FunnelKit as a database, the unique identifier for a Contact is their Email Address.
And that’s why FunnelKit only needs that at this stage to create a Contact.
Once the Contact is created here, we need to map the Page Builder form field to a field in FunnelKit.
The first step in this process is to go into the CRM in FunnelKit and create this Custom Field.
To do that, let’s go back to FunnelKit Automations > Contacts, click on the Fields tab (2) and then click Add New Field (3).
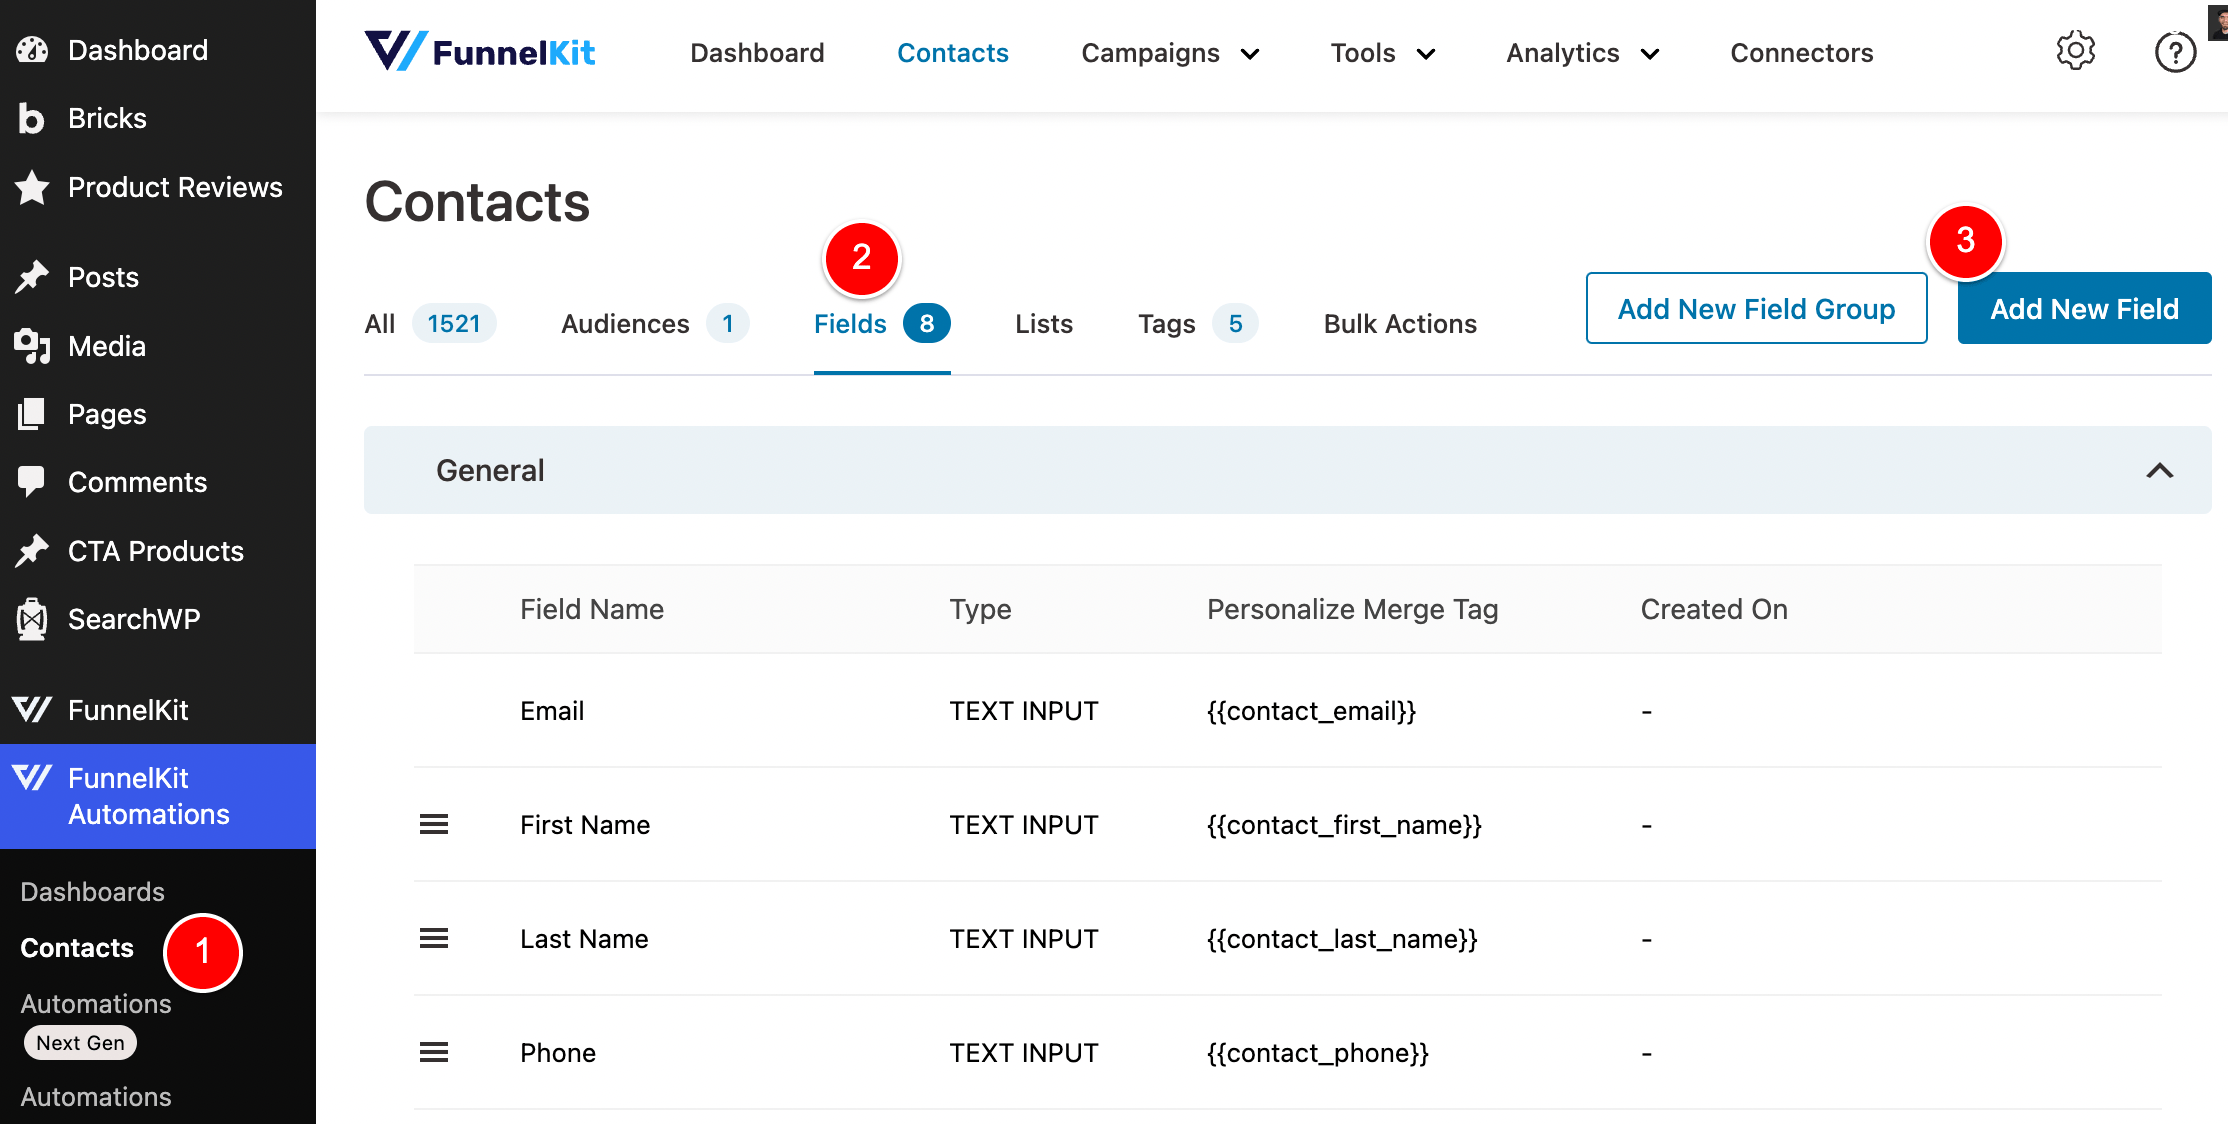
I’ll make this new field a Dropdown field with the name Page Builder most used (1)(2), then add the same options we had for this field in our Bricks Form and click Add (4).

With that completed, we now have a field to make our Form field too!
Let’s go ahead and do that now.
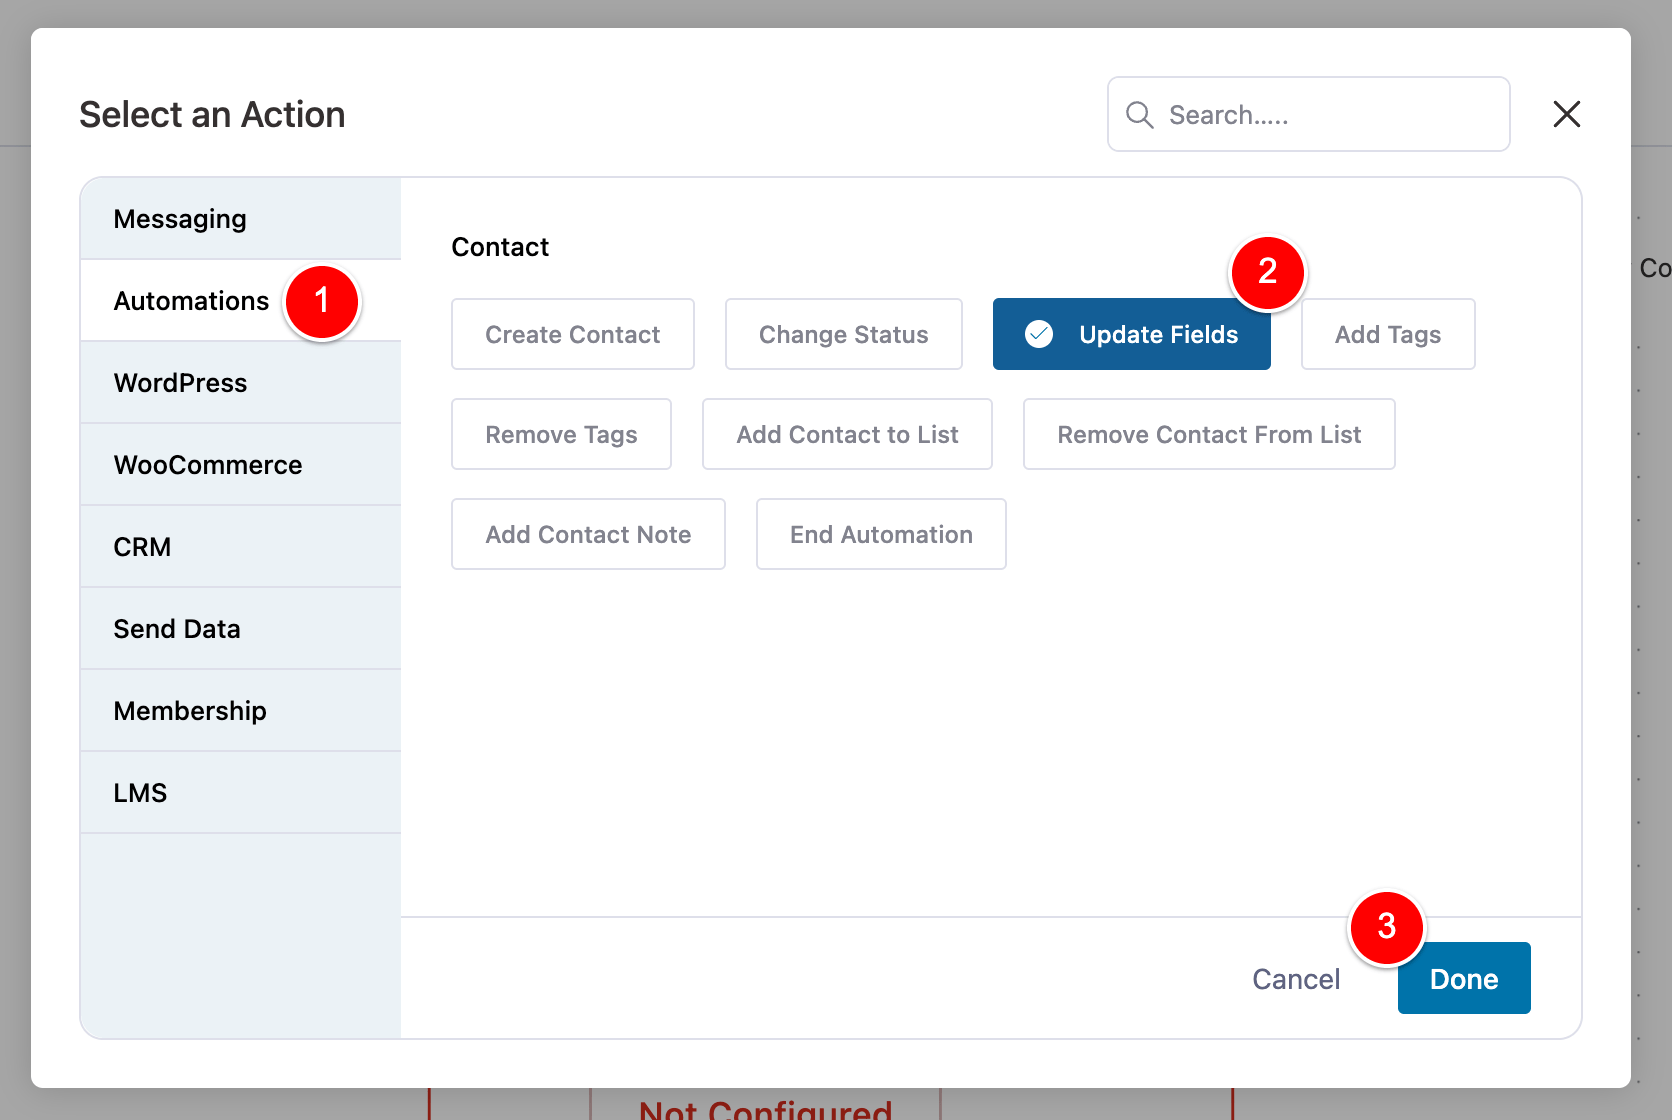
Back in our Automation, we click the plus sign (1) to add a new Action to the Automation (2).
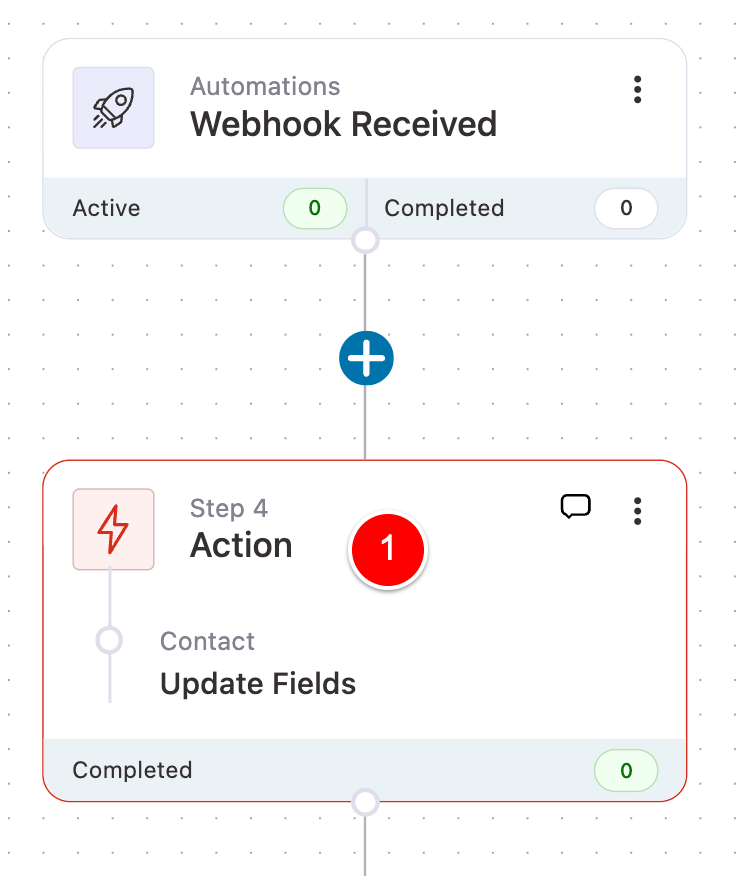
Then we will go to Automations, add an Update Field action (2) and then click Done (3).
Click to edit the Update Fields step (1).
And now we should see the new Page Builder field we created in our FunnelKit CRM in the drop-down on the left.
Next, we click on this icon…
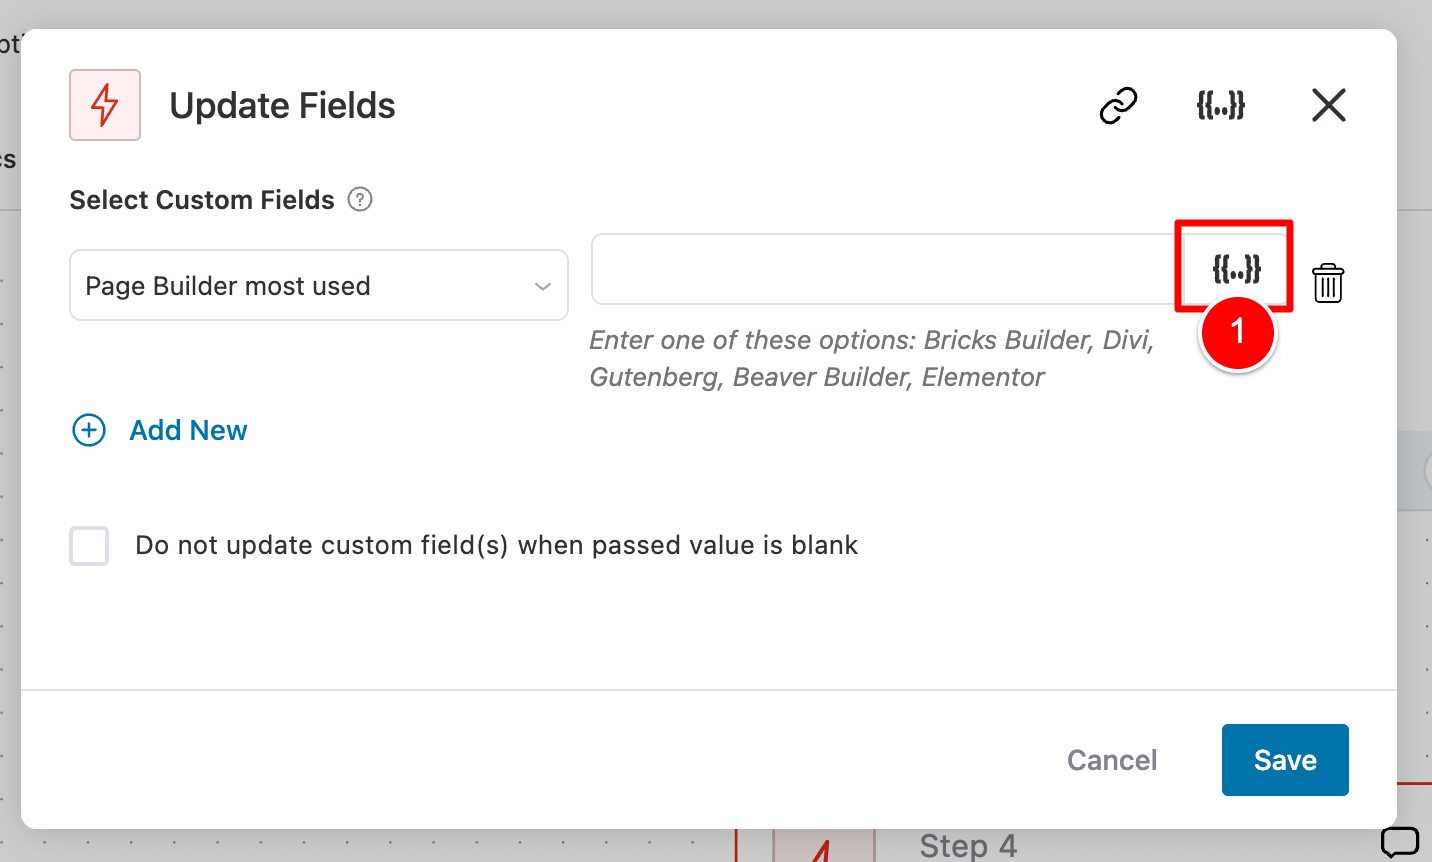
And then we can click on the Gear icon below to access the data in our Webhook event.
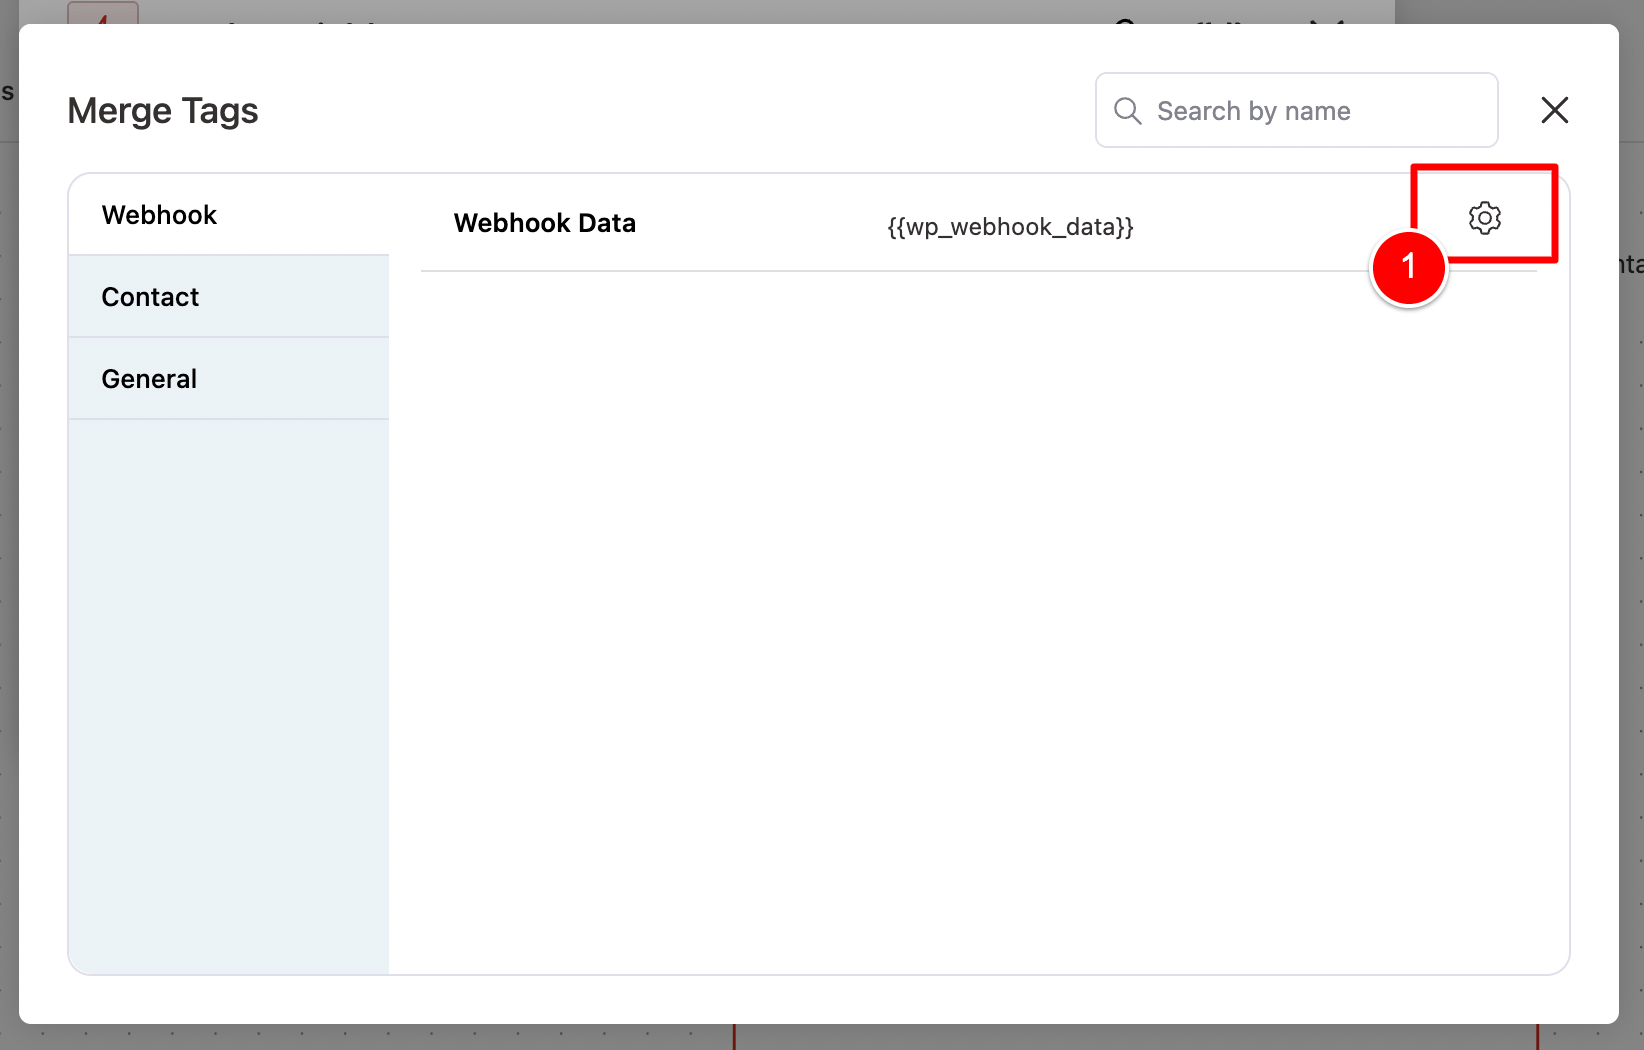
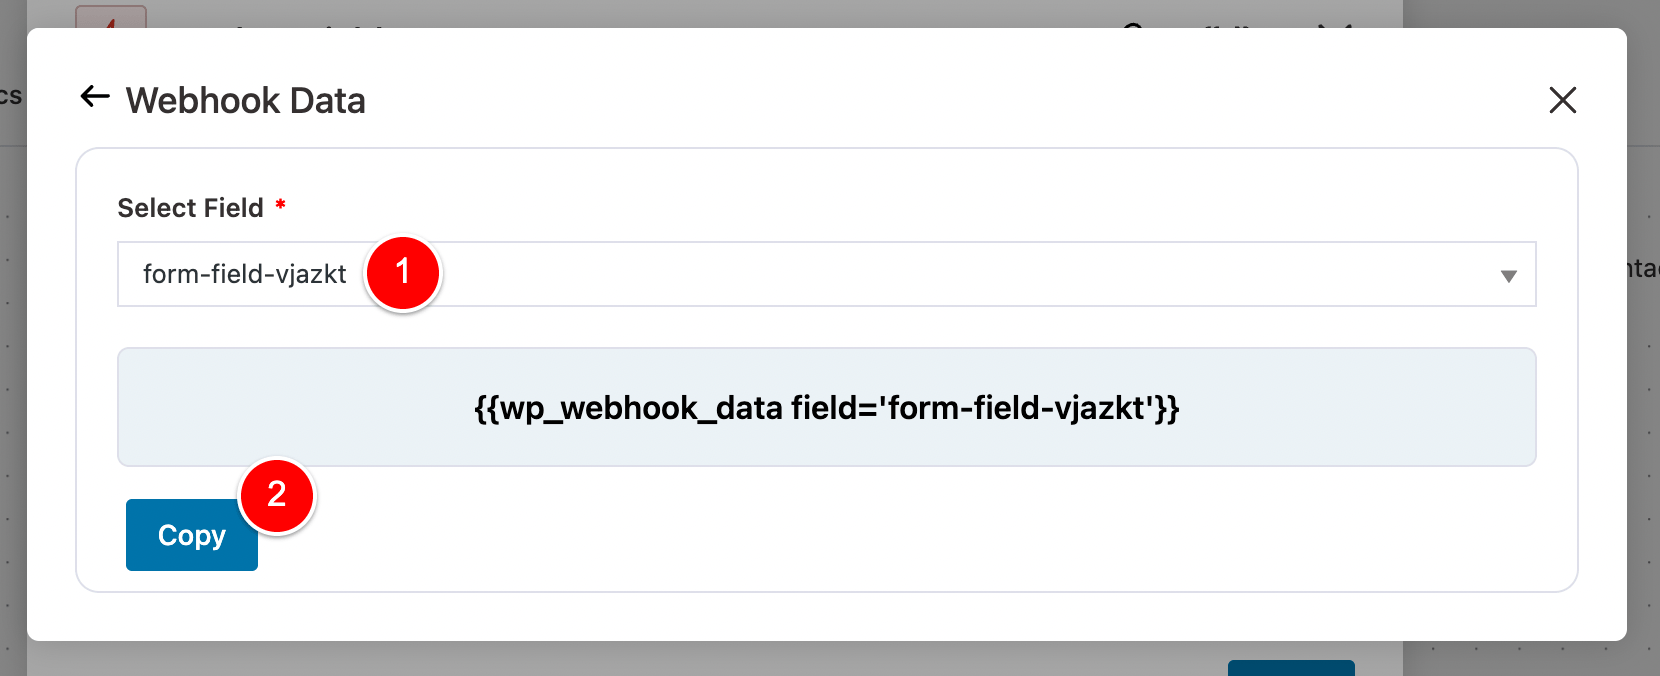
I’ll select this form field shown below which I know contains our Page Builder form data.
I know – it’s not the prettiest thing, but it’s not all that annoying.
If you’re ever unsure which field is which, you can go back into Bricks Builder, find your form field and the ID will be there for you to match up as per below.

Now – you might be wondering… why don’t we just add a meaningful name to our Form fields in Bricks?
You can’t edit them. I tried lol.
Coming back to the tutorial…
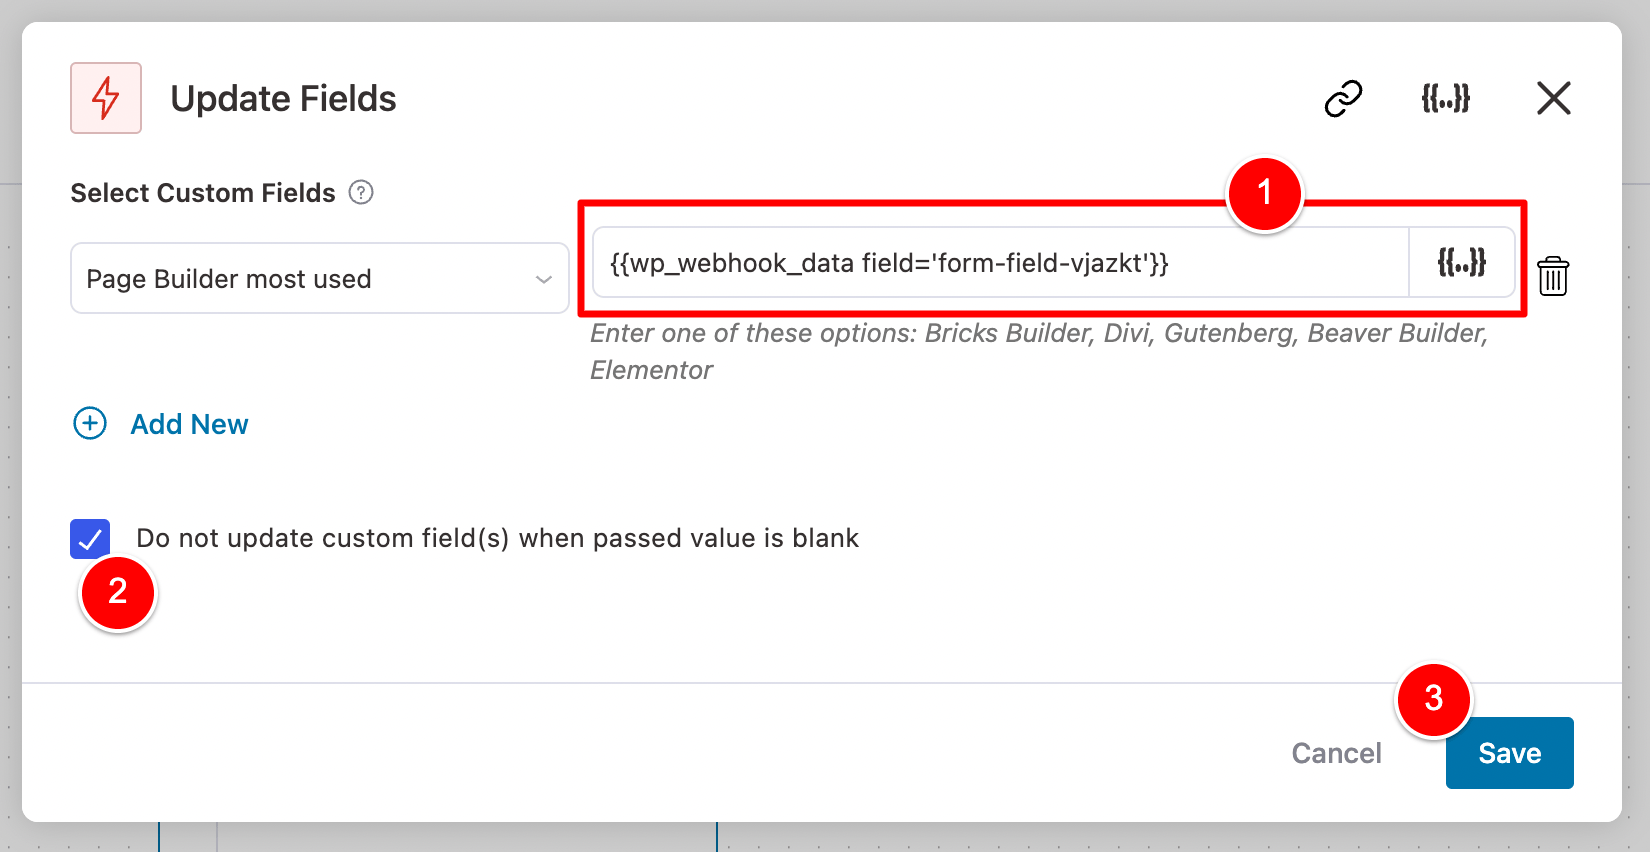
Once we’ve selected our Page Builder form field from the webhook data (1), I’ll click Copy (2)…
On the next screen, you’ll see that add some code for you automatically at (1).
That has now mapped our Page Builder form from the FunnelKit CRM to the Page Builder form field in Bricks.
Cool, huh?
All that’s left to do now is enable the setting at (2) if it makes sense in your case and click Save (3).
Video: Final Testing walkthrough
Let’s turn this Automation’s status to ACTIVE!
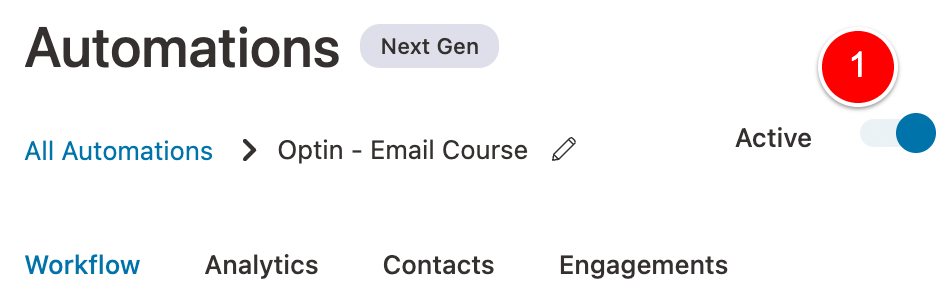
And that should be all setup.
Here is one final walkthrough of everything we set up today to ensure it’s all working and review it from A->Z
I put it into a very short video with my voice explaining how everything works.
I thought this would be much faster to do and better for you to understand vs taking a whole heap of screenshots that would be similar to what is already in this blog post.
Final Thoughts
This week I finally replaced all forms on my websites with Bricks Builder forms and I noticed my website loaded much faster.
This whole week has been about Speed Opimization.
The best caching plugin, the best CDN, where to store my images etc.
As part of that process, I wanted to get rid of some plugins and in turn, reduce the number of JavaScript and CSS Files that were loading on my website.
One of the bigger revamps to my website involved my forms.
I was using FluentForms for all my forms and it depended on jQuery.
After learning what I have shown you in today’s tutorial, I was able to remove FluentForms from my website, build all my forms with Bricks Builder and FINALLY my website does not use jQuery at all.
Not that jQuery was the bottleneck to my website’s speed…
But this is just an example of where doing more with Bricks Builder has allowed me to remove other plugins from my website and have a faster-loading website.
I’m excited to explore more of what Bricks can do for my website and I think there’s still a lot to cover.
Maybe after reading this article today, you can even do the same.
Go and remove that other form plugin from your website and convert all your forms to Bricks forms.
At least now you know how to send the Bricks data into your FunnelKit CRM.